RSS
 

Posts Tagged ‘Important’

Why is Monitor Calibration Important and How to do it

14 Feb

Why you need to calibrate your monitor

If there one thing that’s certain about photos on the internet, it’s that nobody is seeing exactly the same thing as you. In general, most screens are too bright, and have whatever default color the monitor happens to ship with. Some are great, others not so much. As the monitor gets older, these colors change too. It’s more of an issue with older bulb light monitors, and less so with LED, but still these colors change over time.

There’s also the matter of print matching. If you’ve ever printed (you’re missing out if you haven’t), and been dissatisfied with the print, it could be that your screen is fooling you when you’re editing.

There is a way to get your screen to a known standard, and doing this means that you know you have good representative color and brightness on your screen, and that you’ve made a step toward better prints. This is screen or monitor calibration.
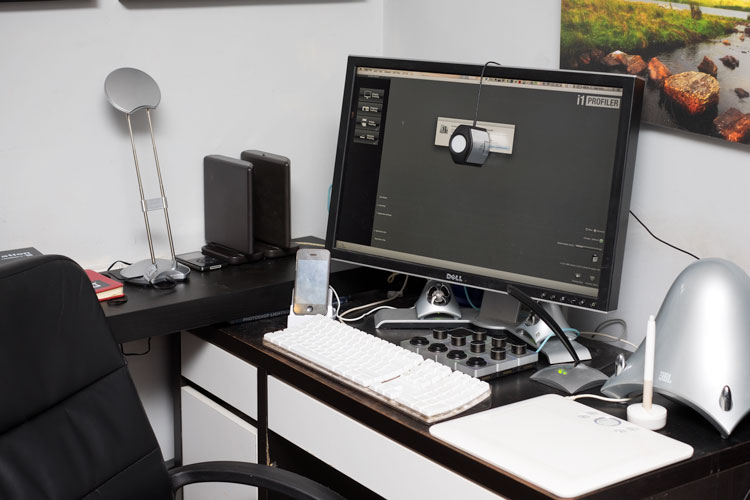
Calibrating your screen 01

What is monitor calibration?

To calibrate your screen, you need a puck-like device that sits on your screen, and measures the color being displayed. This is called a spectrophotometer. It’s just a name for what it does: photo = light, spectro = from spectrum meaning a range of colors, and meter = to measure. So it measures the light color. Don’t worry, you don’t need to buy one of these specifically, and match software to it, they come as kits, with the required software bundled with it.

What do you need to do it?

Some examples of the screen calibration kits include the X-Rite i1 Display Pro (which is what I have), the Spyder Pro, and the Color Munki. The process for each is similar and pretty straightforward. First you install the software, and run it. Next you attach the device. Initially you have to decide the settings, but the correct ones are usually suggested. Usually these are 120cd/m2 or less in brightness, D65 or Native for Illuminant and 2.2 for Gamma. At the start you may need to set the monitor brightness and contrast via the monitors own menu. Finally you just let the software run and it will create a profile automatically at the end. One thing that’s critical is that you need to have your monitor on for a while before starting the calibration. It takes up to 30 minutes for the monitor to settle.

How do you do monitor calibration?

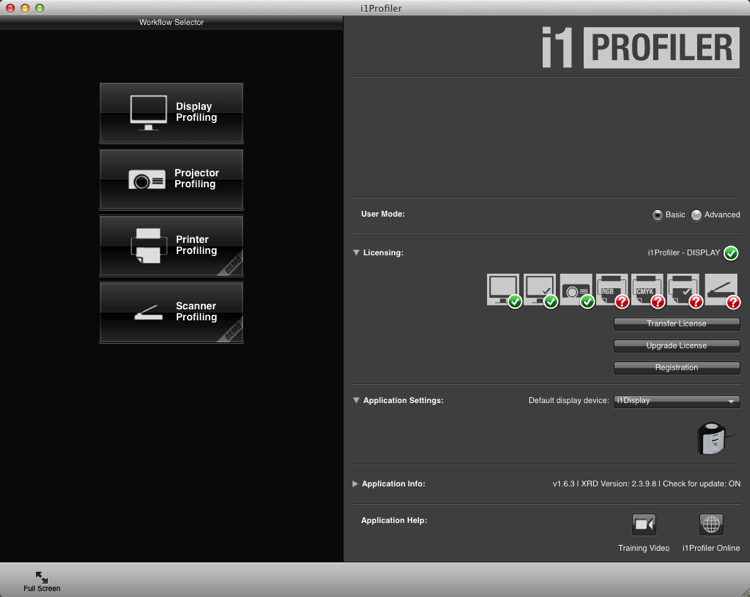
Let’s look at this using the software supplied with the i1DisplayPro, i1 Profiler. Here’s the screen you see at the start (after registering the product).
Calibrating your screen 02

Click on Display Profiling to begin. The software detects your screen type automatically and applies recommended defaults for the screen. Press Next (below).
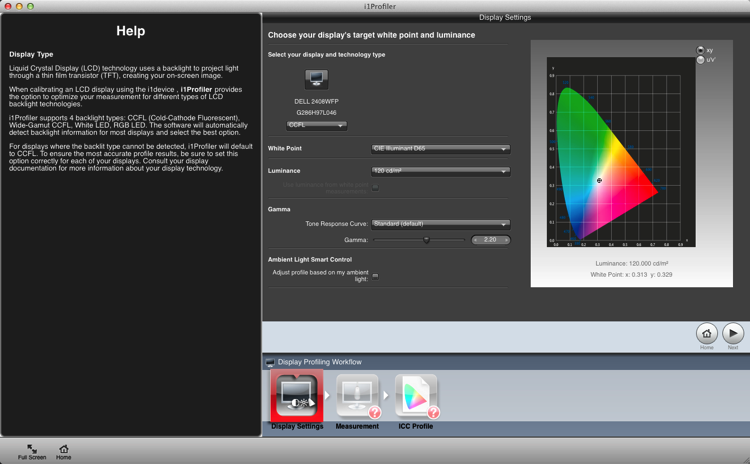
Calibrating your screen 03

You’re on to the Measurement screen now (below). Choose the manual option for the screen brightness and contrast. The color tiles you see on the right are the colors that will flash on the screen as the calibration runs. Click the Next button to begin.

Calibrating your screen 04

The next figure below, is a cropped version of the screen you will see. Place the device on the screen as instructed. Press ‘Ok’ to continue.
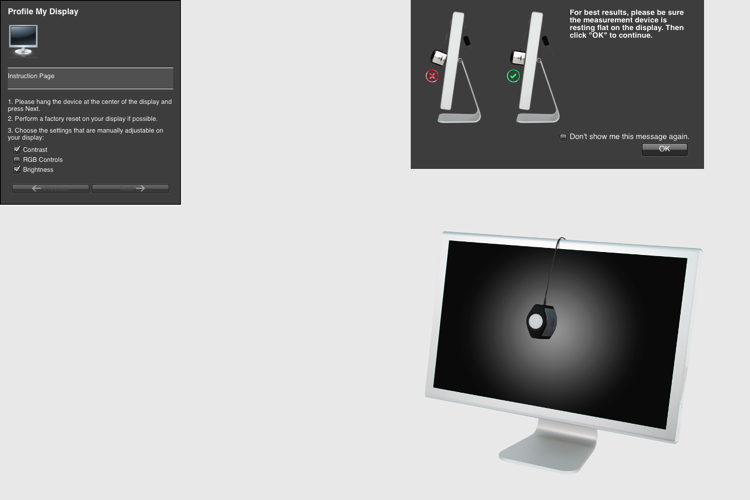
Calibrating your screen puck position

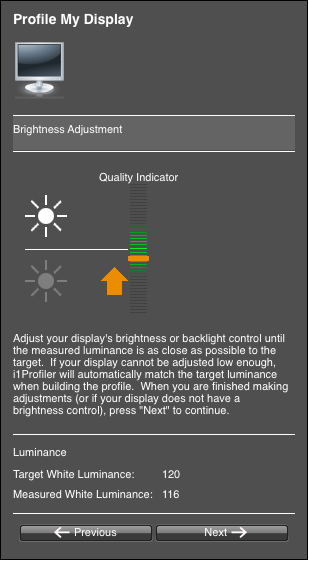
Use the controls on you monitor to get the correct brightness settings (see below) for the profile. Click Next when it’s correct. The screen will cycle through the series of colors seen as tiles back further. As each tile displays, the entire screen changes to that color. This takes about two minutes.
Calibrating your screen 06

Take the device off and set it for ambient light, even if you don’t use this function.
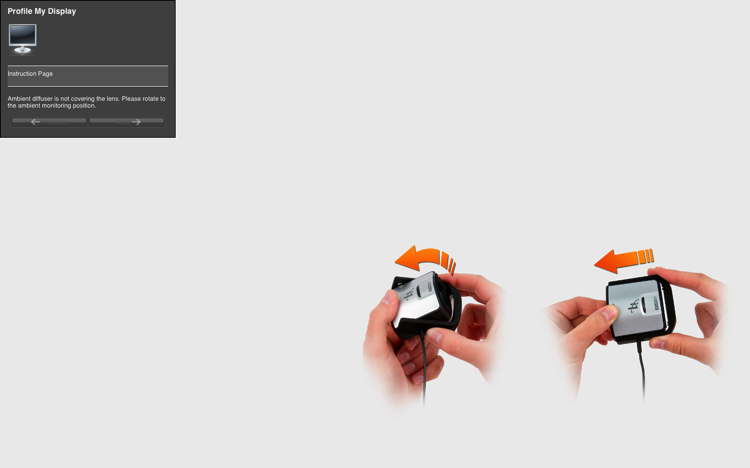
Calibrating your screen 07

The tiles now show a before and after view of the color changes from the profile. Click next.

Calibrating your screen 08

Click Create and Save Profile to make a new monitor profile.

Calibrating your screen 09

Once the profile is made, you can do a comparison using the test charts in the screen.
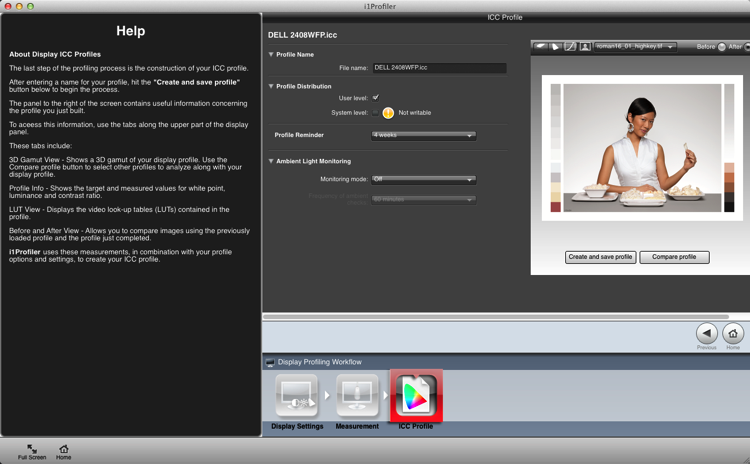
Calibrating your screen 10

Summary and questions

That’s it. You’re done. Lightroom, Photoshop and color managed browsers like Safari will use this profile when you view images, allowing you to edit and process images with the best color rendition. Ideally you should do this calibration no less than once a month for best color. You’ve also taken your first steps into color management without knowing it; probably the most important.

Do you have any questions about this process? Have you tried it? Had any difficulties? If you use a similar device which one, and have you had good success with it? Please share in the comments below.

googletag.cmd.push(function() {
tablet_slots.push( googletag.defineSlot( “/1005424/_dPSv4_tab-all-article-bottom_(300×250)”, [300, 250], “pb-ad-78623” ).addService( googletag.pubads() ) ); } );

googletag.cmd.push(function() {
mobile_slots.push( googletag.defineSlot( “/1005424/_dPSv4_mob-all-article-bottom_(300×250)”, [300, 250], “pb-ad-78158” ).addService( googletag.pubads() ) ); } );

The post Why is Monitor Calibration Important and How to do it by Sean McCormack appeared first on Digital Photography School.

Digital Photography School

 
Comments Off on Why is Monitor Calibration Important and How to do it

Posted in Photography


Interview: Kimio Maki of Sony – ‘the customer’s voice is the most important data for me’

22 Jun

Sony shook up the camera industry recently with the launch of three new cameras – the Alpha a7R II, Cyber-shot RX100 IV and RX10 II. At the launch event we sat down with Kimio Maki, Sr. General Manager of Sony’s Digital Imaging Business Group to speak about the process of designing the a7R II, and what he has learned from customers invested in the a7-series. Click through to read our interview

Articles: Digital Photography Review (dpreview.com)

 
Comments Off on Interview: Kimio Maki of Sony – ‘the customer’s voice is the most important data for me’

Posted in Uncategorized


Atomos releases important firmware update for Shogun recorder

20 Mar

Atomos has released a major firmware update to the Atomos Shogun 4K external video recorder. The Shogun, already popular among filmmakers and professional videographers thanks to its 4K 10-bit ProRes recording capabilities, gains several important features that should appeal to motion picture shooters. The update, dubbed AtomOS6.2, adds important features such as 3D LUTs and Avid DNxHR/DNxHD recording formats. Read more

Articles: Digital Photography Review (dpreview.com)

 
Comments Off on Atomos releases important firmware update for Shogun recorder

Posted in Uncategorized


How To Ensure You Don’t Lose Any Of Your Important Images

07 Nov

In my opinion, having to tell your clients that you “accidentally lost their images“ is one of the worst things that could possibly happen. Whether the data loss was your fault or not, your clients won’t care because it is your job to deliver images, regardless of hard drive failure or a corrupt SD-card. As a photographer, you should be Continue Reading

The post How To Ensure You Don’t Lose Any Of Your Important Images appeared first on Photodoto.


Photodoto

 
Comments Off on How To Ensure You Don’t Lose Any Of Your Important Images

Posted in Photography


Updating your Camera’s Firmware – What is it and Why it’s Important

28 Apr

Canon 2 firmware page

Does your camera have the latest firmware?

This topic is one that I often find myself explaining in more detail, and one that many people aren’t even aware that they can update their camera’s firmware, and how this may affect their digital camera. An analogy is to updating the version of software on your smart phone.

What is firmware and why is it important?

Inside your camera is a microprocessor (small computer), that uses software stored on non-removable flash memory inside your camera. This is called firmware and is the operating system of your camera which allows you to control the features and functions, with the camera’s menus and buttons. Firmware also controls autofocus, exposure, image processing, noise reduction and other important functions within your camera. Without firmware your camera would not be able to operate.

Why check for firmware updates?

Updates generally contain fixes or feature enhancements. Firmware updates aren’t always necessary – some cameras never have updates.

When a new camera is assembled the manufacturer loads the firmware that was designed at that time. After the camera has been released to the public, people may find that there are bugs or problems with the way the camera operates. The manufacturer investigates these problems and produces fixes for them in the form of firmware updates. Some of these fixes can be minor, but some of them fix more serious issues such as autofocus problems, battery-draining issues, or the camera unexpectedly locking up.

Other reasons why firmware updates are released is to include new camera features such as added languages, or to have manually adjustable settings that were once solely automatic. Some updates are to support new optional accessories for your camera (e.g. wireless functions or GPS modules, etc.). I like to think of them as free upgrades to your camera.

When to check for firmware updates?

I recommend checking for updates on a semi-regular basis, every few months or so, and after you purchase a new camera is also a good time to check. There will likely be fewer firmware updates for older cameras but still worthwhile checking, perhaps on an annual basis. If you have never checked your camera for a firmware update then now is a good a time to do so.

Does your camera have the latest firmware?

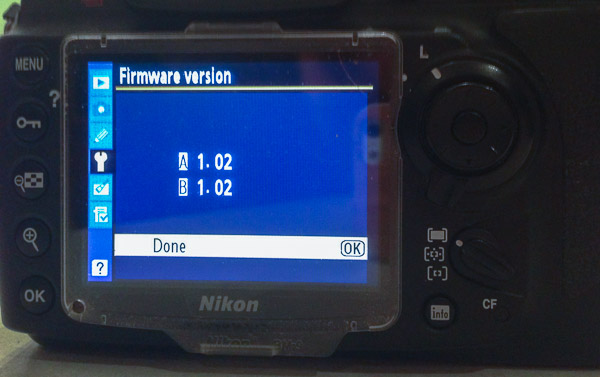
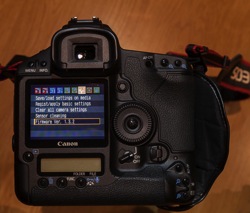
First check what version of firmware your camera is running. This information is found within one of your camera’s menu options. Finding it is different on every camera and not always obvious. Your instruction manual will help you find where to look in the menus.

Canon 1 firmware page

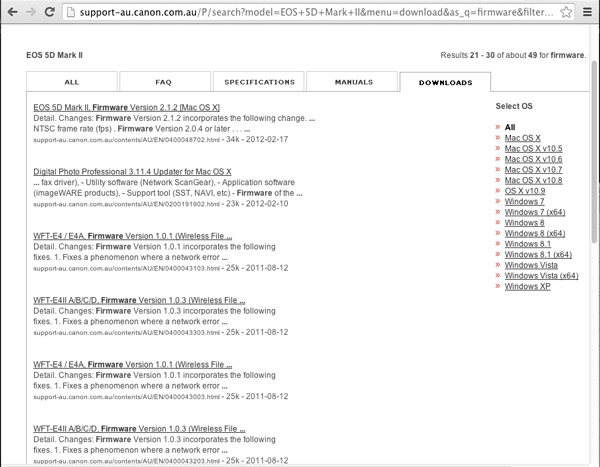
You can check for the latest firmware by looking at the manufactures support and downloads section of their website for your brand and model of camera. Look for higher version numbers than the one found on your camera. If the version numbers are the same, there is no need to perform an update. Please note that some camera models never had new or updated firmware released and therefore new firmware updates may not be listed at all.

Important: You need to know the model of your camera and only use the firmware that is specific to your model.

Nikon firmware image

The following links were recently current for the major camera manufacturers and may be of help when checking for releases of newer versions of firmware for your camera.

  • Canon
  • Nikon
  • Olympus
  • Sony
  • Pentax
  • Panasonic
  • Fujifilm
  • Leica

Canon firmware page

Why read the instructions carefully before updating your cameras firmware?

Read the instructions very carefully before updating the firmware on your camera – you don’t want to end up having a dead camera! If the battery fails during the firmware update or the update is interrupted in some manner, the risk is having a camera without usable software. Meaning you have a dead camera that you have to take to the manufacturer to fix!

How to find out what has been fixed or updated with the new firmware?

Check the release notes that come with the firmware updates. Usually you will find included a list of the fixes or updates in earlier versions of the firmware too.

Typical steps to update your cameras firmware*

* Sample only – Please read your own firmware update instructions for your camera model

  1. Check the firmware version on your camera – it will be shown on one of the menu options
  2. Check to see what the latest version of firmware is available for your camera on the manufacturers web site
  3. Read the instructions carefully
  4. Download the firmware
  5. Install a fully charged battery into your camera
  6. Format a memory card in your camera (read your manual if you aren’t sure how to do this)
  7. Place that memory card into a card reader connected to your computer (do not connect via a cord from the camera)
  8. Copy the firmware update file into the top-level (root) folder of the cameras memory card
  9. Safely eject the card on the computer
  10. Place the memory card back into the camera (remember to power off the camera any time you remove a card or open the slot door)
  11. Follow the instructions to update the cameras firmware
  12. Unless instructed to do so, don’t touch any buttons, or switch the camera off during the process
  13. Check to see that the camera is running the newly installed firmware version – as per the first step

If you have a Nikon

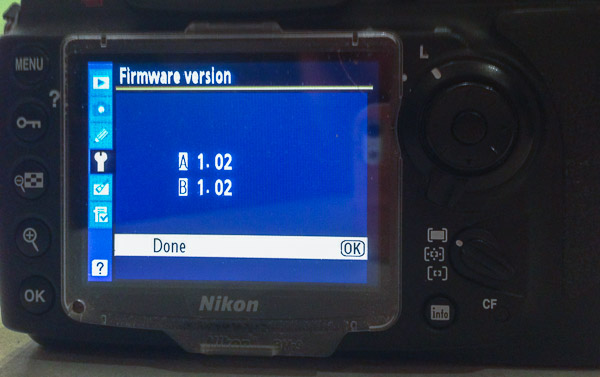
Nikon firmware image

Some Nikon DSLR cameras may have A, B and L firmware – what are these? Nikon A-firmware is for the I/O (Input/Output) processor, B-firmware is for the Control (“Expeed”) integrated micro-controllers and L-firmware is for lens specific updates such as correction for lens distortion. You need not know why they have this scheme, just know what version is the latest for your camera model and use that to keep your camera up to date. Other camera manufacturers generally have just one firmware version to install.

Nikon firmware page

Want more features on your camera – try Magic Lantern! (Canon EOS only)

Believe it or not some people wanted more from their cameras and the only option was to team up with other smart people and write their own firmware! This started back in 2009 after Canon first released the 5D mark II, a full-frame (35mm) sensor body that was also capable of recording full HD video. The users (film makers) wanted to be able to have more control over the 5D mark II for video functions. The camera was much cheaper than buying a $ 25,000 commercial video camera to do the same thing.

Since then, there have been various updates to this firmware that include support for other Canon EOS cameras while also including useful still photography features such as: an intervalometer, custom bulb timer for long exposures, motion detection, voice tags for photos, etc. This firmware runs from your CF or SD card, instead of the factory firmware inside your camera. The Magic Lantern software is only available for certain Canon EOS camera models. For a full list of supported cameras, to find out what it can do and how it works, you may like to visit Magic Lantern’s website.

Please note: running third party firmware is not supported by the manufacturer and may void your warranty. So unless you are very comfortable with what you are doing, using this firmware may not be a good idea, especially if you are new to photography or just bought a brand new camera.

What to do if something goes wrong?

Check the manufacturers instructions again, have you missed a step or misunderstood what is required?

If something is still not quite right after you have done all the troubleshooting you may like to contact an authorized service centre for your brand of camera and ask for their advice and support.

I hope that you are now much better informed about firmware for your camera. Let me know if you have enjoyed reading this article and leave any comments below.

The post Updating your Camera’s Firmware – What is it and Why it’s Important by Roy Vieth appeared first on Digital Photography School.

Digital Photography School

 
Comments Off on Updating your Camera’s Firmware – What is it and Why it’s Important

Posted in Photography


18 April, 2014 – Why Photography Projects Are Important

19 Apr


When leading workshops I have a topic I like to cover called “Now That You Got It What Do You Do With It”.  This refers to coming home from a workshops with a lot of good images and not really doing anything in particular with them.  On a workshop recently to Tuscany with Art Wolfe he and I were talking and he said you should have a topic or something you concentrate on while shooting and he referred to it as a project.  On that trip I focused on door knockers and the hanging laundry of Sienna.   Today we have come full circle and Alain Briot as part of his continuing series of essays focuses on the topic of projects. Alain’s Why Photography Projects Are Important is a great read and will be a benefit when going out on your next shoot.  I am now going to go back through some of my past work and look for a theme to develop as a few new projects.


The Luminous Landscape – What’s New

 
Comments Off on 18 April, 2014 – Why Photography Projects Are Important

Posted in News


The Most Important Do’s and Don’ts of Portrait Posing You’ll Ever Read

03 Feb

Have you ever seen those photographers whose portfolios have so so many amazing portraits? You look at all of their pictures, wondering how they do their magic. They must have “great subjects” or work with people that aren’t camera-shy like your friend. The truth is that great portraits aren’t about the models or how photogenic or “picture-perfect” they are, but Continue Reading

The post The Most Important Do’s and Don’ts of Portrait Posing You’ll Ever Read appeared first on Photodoto.


Photodoto

 
Comments Off on The Most Important Do’s and Don’ts of Portrait Posing You’ll Ever Read

Posted in Photography


Why Blocking is Important for a Social Network

14 Dec

Why Blocking is Important for a Social Network

Earlier today Twitter reversed their decision to change how user blocks are handled after a backlash reaction on their network.

From the Twitter blog:

“Earlier today, we made a change to the way the “block” function of Twitter works. We have decided to revert the change after receiving feedback from many users – we never want to introduce features at the cost of users feeling less safe. Any blocks you had previously instituted are still in effect.”

In a way, the current block at Twitter is sort of ineffective. If I block someone, the only thing it really does is prevent them from seeing my tweets when they are logged in (which also serves as notification to them that I’ve blocked them). They can still open up an unlogged-in version of Twitter (as easy as cmd-shift-N in Chrome, or cmd-shift-P in Firefox) and see everything I’ve tweeted publicly. Still, Twitter’s reversal shows that users really do care about blocking functionality and want more control and powerful blocking tools, not less.

I would argue that there are three key benefits that come from strong blocking tools on a social network.

1. Users feel empowered when they are more forcefully able to deal with harassment on a network. If someone is saying something offensive, why shouldn’t I personally be able to take control over that situation? If someone is making me uncomfortable, why shouldn’t I be empowered to deal with that for my own personal experience?

2. More effective blocking tools encourage more civil interaction. The thing that most trolls, haters, griefers, offensive jerks, etc. want on a social network is attention. By making it super easy to mute them or diminish them (especially by an intended target) it provides a disincentive for anti-social behavior in general.

3. Empowering users with blocking tools provides immediate relief for a user. Since oftentimes harassment is happening in real time, this can be more effective than waiting for customer service / community management reps at a social network to respond to reports of community violations. It is frustrating for a user to have to suffer even an additional 12 hours of harassment while a complaint works its way through to a community manager.

As far as best practices go, I’d hold up Google+ and Facebook as the networks that provide users the best blocking protection on the internet today.

Like Twitter, on Google+ and Facebook when you block someone they cannot see your public posts.

Google+ and Facebook take it one important step further though. Not only do they prevent someone you’ve blocked from seeing your public posts, they *also* filter the blocked user entirely out of your G+ or Facebook experience.

On G+ and Facebook when you block someone they become completely invisible to you everywhere on the network. It’s like they no longer exist in your social utopia.

That second block function is even more important than the first.

Flickr by contrast has some of the weakest blocking tools on the internet. When you block someone on Flickr, all it does is prevent them from private messaging you or commenting/faving your photos. Because of Flickr’s weak blocking tools, I’ve seen many of the most active, social accounts on Flickr leave due to harassment. This is bad design.

What makes harassment even worse on Flickr, is that (unlike G+ and Facebook) they allow anonymous troll accounts. So if a Troll1022 is harassing you anonymously on Flickr, and you report them, and three days later that account is deleted, all they need to do is set up Troll1023 and continue with the practice. Flickr’s weak blocking function allows virtually unlimited harassment on their network by anonymous trolls.

Protecting users and providing more control over your experience on a social network is important. It’s your most social and active users who will most likely sooner or latter run into friction. These are the users that any social network should be striving to empower.

I’m glad Twitter reversed their block policy after user reaction, and hope all networks realize how important the block feature is.


Thomas Hawk Digital Connection

 
Comments Off on Why Blocking is Important for a Social Network

Posted in Photography


5 Important Components of a Powerful Image

27 Jul

A Contribution by Mitchell Kanashkevich – author of Powerful Imagery.

Quite often people have asked me: “What are the components of a powerful image?” I gave the question a lot of thought and decided that there’s so much in it that a whole eBook could be written on the topic, which is exactly what I did, with lots of practical examples to illustrate the points. This post is something of a sneak peak and an overview of some of the most important components that make up a powerful image.

1. Subject

Most would agree that a powerful photograph needs a subject that resonates with us for some reason. The kind of thing that makes us say “Wow!” or “I want to know more!” or “Isn’t that beautiful!”.

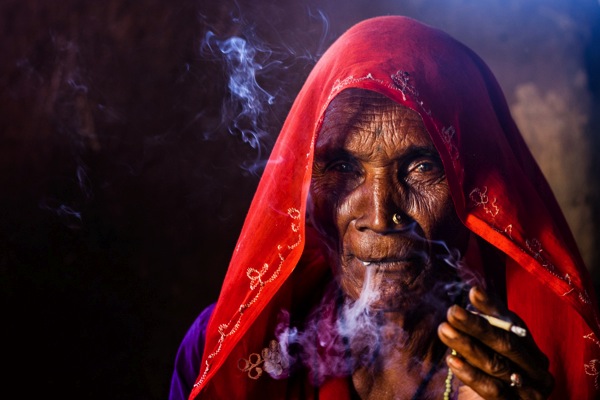
Woman smoker

This woman’s wrinkled face, full of character and stories is one example of a strong or special subject that resonates with the viewer.

Segovia Aquaduct

The beautiful aqueduct in Segovia, Spain is a completely different, yet also powerful example.

I’m not saying that an obviously special subject is an absolute must to make a powerful photograph. We can photograph more subtle things that might not usually stand out in everyday life and make them look amazing in photographs. It’s also true that a special subject alone doesn’t make a powerful image. I am however going to put things in perspective. A special, captivating subject is definitely a good start. Ultimately, even a badly executed photograph of that special subject will, to at least some extent interest the viewer, while a masterfully executed image of something that nobody finds interesting might not do the same.

2. Strong Composition

What makes a strong composition? It’s not necessarily a framing which strictly follows the rule of thirds, or any other of the usual rules for that matter. The rules help, but they’re a means to a bigger aim, which is to make it clear what the image is about–what you are trying to communicate. Before anything else it is important that everything that does’t matter to what you’re trying to communicate is framed out, then we can think about how to position all that does matter within the frame for maximum impact. This is where the rule of thirds, use of geometry and all the other compositional theories come in.

Pilgrim Feet

The image above is a good example of framing out everything that doesn’t add to the story. The story is about a pilgrim’s physical sacrifice to make the journey to the sacred town of Lalibela, Ethiopia.These are feet that have walked a lot of miles. To communicate effectively, a minimalist approach was the best one, I got in very close to the feet with a long zoom lens and framed absolutely everything else out. Imagine if I had something else in the image, we’d be distracted from the main story and as a result the impact wouldn’t be the same.

Desert Geometry

This image is about the beauty of the geometry in the landscape. Again, to make it abundantly clear that this is what I’m trying to communicate, I composed the photograph in such a way that the curves and triangles dominate the frame. Everything that doesn’t say geometry or that breaks up the rhythm is excluded. The curvy lines lead the eye around and through the photograph and that’s what makes the composition work.

And so, all in all a strong composition is one that makes it clear what it is you, the photographer are trying to communicate. No matter whether the subject is a pilgrim’s worn out feet, or curvy sand dunes.

3. Moment

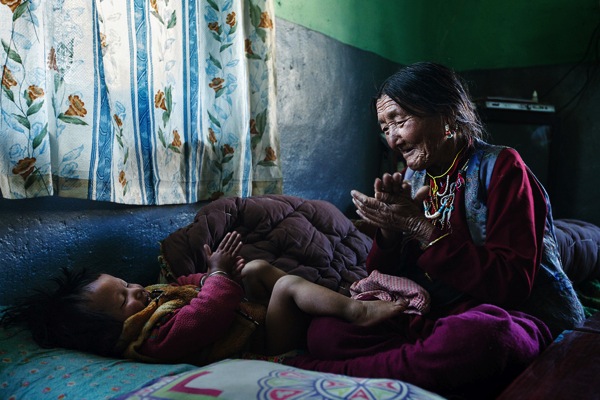
Granma and Child

Capturing a moment can mean a few things – capturing an expression (a smile for example), or the wind blowing and moving the trees, or it can be a tender moment, like the one between the grandmother and her grandaughter in in the photo above.

Stork Building a Nest

A moment can be that of an action frozen in time, like this stork bringing a twig to build a nest.

Beautiful Seaside

Of course a moment can also be an instance during the day, for example an instance during the golden hour, when the light from the setting or rising sun makes everything look warm, vivid and generally more beautiful. What makes the photograph above powerful is the fact that I captured it at that moment. The landscape looks beautiful and lively. The same photo at a different moment could produce a much lesser result.

To conclude on this point, capturing a moment which is somehow special or different from what most of us consider mundane definitely contributes to the creation of a powerful image.

4. Light

Light needs a further, more detailed mention in this post. It can be crucial to creating a powerful image. Light is capable of creating a strong sense of mood, it can add to the story and, it can even become a subject in its own right, which often leads to dramatic, powerful images.

Ethiopian Kitchen

This image of Ethiopian women cooking in a traditional kitchen is a good example of light adding a strong sense of mood to the photograph. It also adds to the story by accentuating the smoky conditions in the kitchen. The image would be decent without the light beam, but with it, the photograph goes to another level, where we not only see, but feel what we see to an extent.

Moroccan Landscape

In this landscape from Morocco you could say that the trees and the hills in the background are the subject, but, the light and its’ effect is equally prominent, hence, this is an example of light actually becoming a subject in its own right. An image of the trees and the hills in a different lighting scenario would not have nearly the same impact as it does when the light is so distinct and prominent that it becomes a subject itself.

Editors Note: for a comprehensive exploration of the topic of light check out Mitchell’s best selling eBook on Natural Light.

5. Emotional Impact

Emotional impact is probably the main factor that makes an image powerful, but, it isn’t something that’s always obviously tangible. It’s sometimes hard to pin-point exactly what causes the emotional impact. It can be that the subject captures you, or that the light really sets a strong mood, or, that the moment captured is fascinating, maybe even rare. Of course, it can be a combination of all the factors I’ve mentioned here and this makes for truly powerful imagery.

You can learn more about making Powerful photographs with Mitchell’s new eBook “Powerful Imagery” released through Eyevoyage, currently on sale with our sister site SnapnDeals.

Mitchell is a travel/documentary photographer. He has an online project called Eyevoyage – a site for anyone interested in travel photography and improving their travel photos. You can learn more about making Powerful photographs with Mitchell’s new eBook “Powerful Imagery” released through Eyevoyage, currently on sale with our sister site SnapnDeals. To further your learning visit Eyevoyage Facebook page.

Post originally from: Digital Photography Tips.

Check out our more Photography Tips at Photography Tips for Beginners, Portrait Photography Tips and Wedding Photography Tips.

5 Important Components of a Powerful Image


Digital Photography School

 
Comments Off on 5 Important Components of a Powerful Image

Posted in Photography


3 Small But Important Lightroom 5 Beta Changes You Might Have Missed

17 Apr

Adobe announced the availability of Lightroom 5 Beta at Adobe Labs today and by all means, go grab a free copy and play. I’ve been using Lightroom since version 1 and have been impressed with every upgrading to the program, gladly plopping down my money for a new version as I have found the enhancements in subsequent revisions well worth the funds. And Lightroom 5 seems to be on the same track, based on my findings while playing with the beta this last week.

Adobe has a number of fine new features in this revision and they are sure not to be missed. They include

  • A Smart Preview feature which mobile photographers will love as it creates a smaller, editable version of their monstrously sized RAW image that is easily portable on a laptop and can be synced when the originals, possibly stored on an external drive or NAS back at home, become available.
  • Radial Gradient which allows for selecting oval or circular shaped areas for specific effects.
  • Upright, which attempts to correct crocked images or fine tune vertical lines. (My experience with this tool has been less than stellar on simple horizon shots at sea. More on this in a minute.)
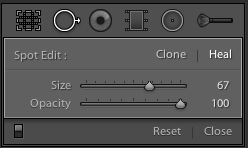
  • Advanced Healing Brush. This one, I like a lot and it is very helpful. Now your “Spot Removal Tool” can be used as a brush to wipe out items that are not in the shape of a circle. This helps a lot and means I spend even less time in Photoshop CS6.

That’s the obvious stuff that Abode packs into their press kit and you probably have seen those items demonstrated on other sites. What I want to show you are three things I found to be helpful in little, but repetitive ways for how I use Lightroom.

(Click any image for a larger version)

Invert Mask

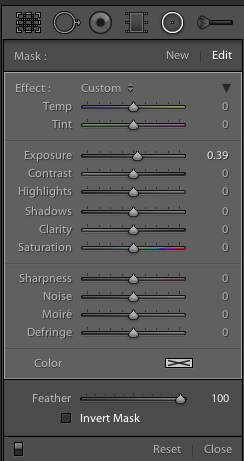
Shot4Thank you! I’ve been wanting this feature for the longest time to save time. But it’s not quite right.
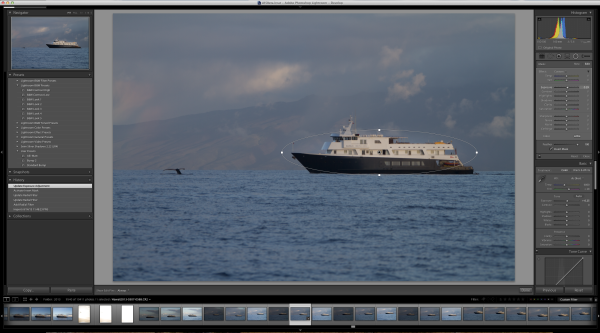
Invert Mask is currently only available with the new Radial Gradient feature. See it at the right? It works well and I’d like to see if appear in the Gradient Tool (especially when creating a new gradient…it would be great to great one just the opposite of the one I am using at the moment) and in the Adjustment Brush.

Here’s a simple rundown of how the tool works.

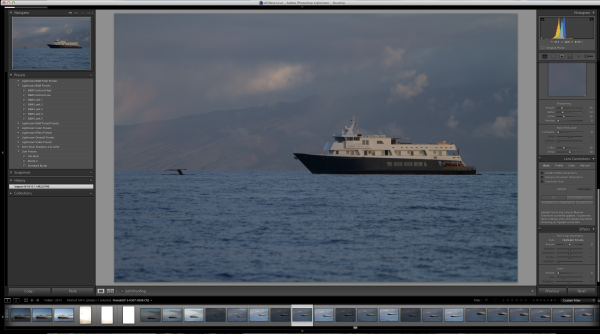
Starting with this image of one of my client’s boats, the Un-Cruise Adventures Safari Explorer off the shore of Maui, Hawaii, I want to see which direction works best: highlight the boat and darken the surrounding seas or slightly darken the boat and bring up the seas, in order to add contrast to the main subject.

Shot1

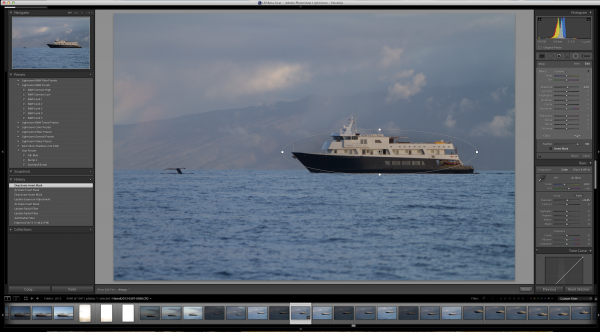
I select the new Radial Gradient tool and draw an oval over the boat (Dear Adobe, please make this tool work like the Ellipse Tool in Photoshop for consistency. Specifically, please allow me to grab a “corner” of the ellipse and drag it down instead of starting with the middle of the ellipse. Consistency would really help. Thanks.).

Shot2

Because I have chosen only to increase the exposure by .39, Lightroom masked the boat and increased the exposure for the rest of the image. But if I want to swap that and mask the entire picture except for the boat, it’s just a simple click of the “Invert Mask” check box.

Shot3

Subtle, but useful to me.

Now please, Adobe, add that ability to the Gradient Tool and to the Adjustment Brush especially.

Visualize Spot Healing

I’d like to think my sensor was perfectly clean before leading a recent tour to Bhutan. As a matter of fact, it was extremely clean before I left. But, as life goes, things don’t stay clean.

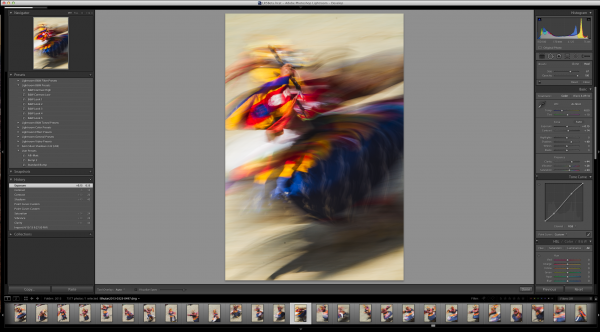
Take this image of a masked dancer at the Paro Tsechu.

Viz1

I wanted some blur (obviously) and used a small aperture to achieve a slow shutter speed. In this case, f/25 and 1/6th of a second. Closing down that aperture makes dust on the sensor more obvious, but this image has a lot going on making it hard to find all the dust.

Viz1-2


Viz2


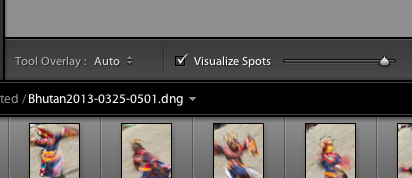
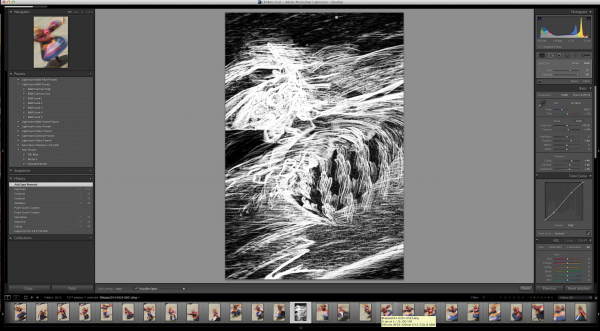
If I click on the “Visualize Spots” check box after clicking the Spot Removal Tool, the slider to the right of it comes alive and I can now more easily see spots. This is a technique used in Photoshop for a while and it works best where edge contrast can be spotted, so in areas without a lot going on.

Viz11

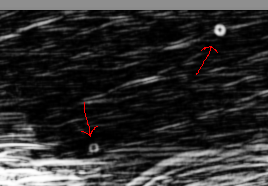
In this image, I found three additional spots, two of which would have been easy to miss without the tool.

Viz4

Remove Chromatic Aberration Check Box

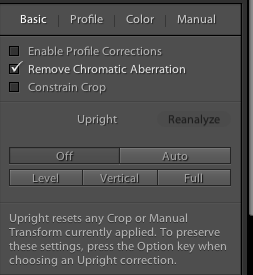
This one is really small, but helpful. With the addition of the “Upright” feature to the Lens Correction panel, Adobe made it easier to get to the Chromatic Aberration removal check box.

Rem1

It’s a small thing, but I often use the check box for “Enable Profile Corrections” for my lens and then want to remove chromatic aberration on only select images, but many. The placement of the box here, as well as on the “Color” tab, helps.

Upright Is Not That Functional For Me

Maybe I’m doing something wrong, but I doubt it. This is one of Adobe’s touted JDI (Just Do It) features and it seems to work well on the demos, but not in real life. If it did, it would be cool. I can get the feature to work part of the time, but no where near even 25% of the time reliably.

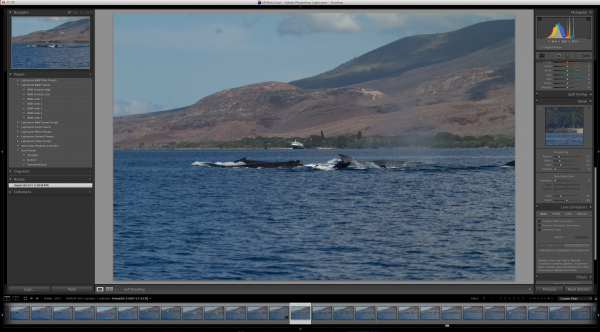
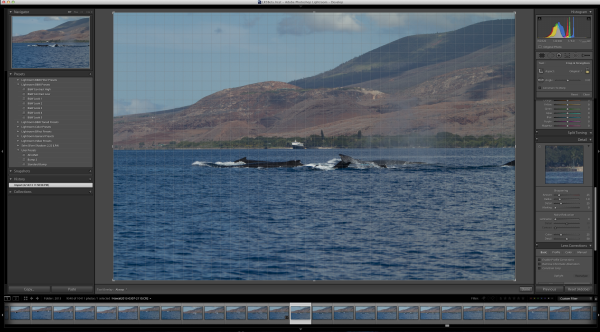
The feature is supposed to level a scene and make diverging or converging vertical lines straight. It can be helpful when it works. But something as simple as a horizon, an obvious one, in this example is not being leveled.  Here’s the initial image out of the camera.

Level1

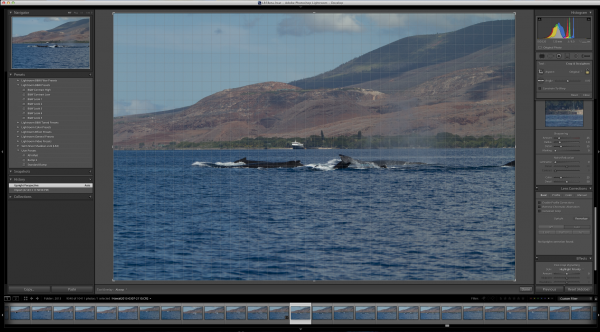
Now to show that the horizon is not level using the Crop Overlay.

Level2

And now using the tool in Auto mode.

Level3

I tried in Level and Full modes to no avail. The program clearly states “No Upright Correction Found”. This is supposed to be a boon for landscape photographers, but even with a clear horizon like this, it failed.

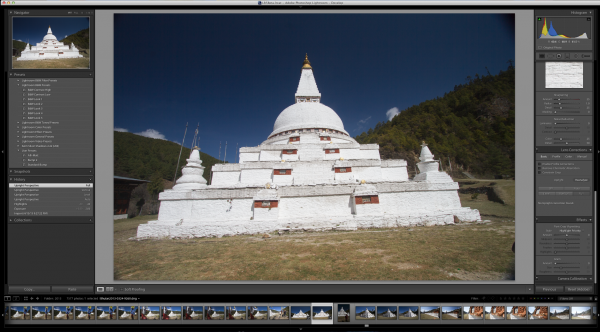
I tried another obvious shot from Bhutan.

Level4

Now how can it say, in all four modes (Auto, Level, Vertical and Full) that no data can be found?

I’m not saying it doesn’t work, I’m saying it’s wonky and not yet reliable.

But this is beta software and that is why they put it out, to find the kinks that mean the most for their users.

Give it a try, Lightroom 5 Beta is quite useful with all the upgrades instituted.


Post originally from: Digital Photography Tips.

Check out our more Photography Tips at Photography Tips for Beginners, Portrait Photography Tips and Wedding Photography Tips.

3 Small But Important Lightroom 5 Beta Changes You Might Have Missed


Digital Photography School

 
Comments Off on 3 Small But Important Lightroom 5 Beta Changes You Might Have Missed

Posted in Photography