RSS
 

Posts Tagged ‘Important’

Why Lightroom Keywords and Star Ratings are Important for Your Photography Workflow

23 Nov

Lightroom has long been the “go-to” program for organizing images and has come into its own as an editing powerhouse as well. If you haven’t been using Lightroom for organizing your images, you are missing a big part of the digital photography pie. The secret to your organization success in Lightroom is using keywords and star ratings effectively.

Why Lightroom KeyWords and Star Ratings are Important for Your Photography Workflow

That doesn’t mean that you need to keyword every last image you import into Lightroom. But you can label batches of images and then eventually cull down the keywords to easily find your best images. With over 30,000 images in my Lightroom catalog, I’m pretty happy about being able to find an image in a matter of seconds with the use of this simple system. It’s well-suited for beginners and combines keywords and star ratings.

Set up a consistent naming system for your folders and images

For example, a file name could be; “Iceland_2015_03”.

Many people name their folders by date or location. I prefer location, then date, as it’s much easier for me to remember that way. Whatever naming system you use, just be sure that it’s consistent, and makes sense to you. If you decide “Location_Year_Month” is the best way for you to set it up, make sure that every folder is done the same way.

For example, these folder titles could fall into the Iceland_2015_03 category. Don’t make the mistake of creating random titles like this: Winter 2015, Iceland 2015, Iceland March 2015, Reykjavik 03_2015.

When you first import your images into Lightroom, you can rename the whole set of images, or rename them after import. It is much faster and easier to rename them upon import. Follow the import prompts and enter as much information as you can when you first are bringing images into Lightroom. It will save you loads of time later on.

keywords upon Lightroom Import - Why Lightroom Keywords and Star Ratings are Important for Your Photography Workflow

I usually keep the original file number of the image assigned in-camera and then add the location or another identifying label to the front end of the name. You can batch rename and keyword a series of images in the import module. You don’t have to keyword each image individually, but keyword in batches to make it easier.

My other secret tool is the star rating tool. When the images are first imported, I cull through the images quickly and add a one-star rating to the images that I would like to come back and edit. At this point, I don’t try and add any more stars than just a simple one-star.

Use the Paint Can Tool in Develop

Another easy way to add ratings to an image after import is to use the “Paint Can tool”. With this tool, you can set a parameter (like a star rating, keyword, or set of keywords) to “spray” on to an image or a collection of images. If you would like to “spray” a star to your favorite images, this is a fast way to do it.

The Paint Can tool is located on the bottom left of the grid view and it looks like a spray can. Click on it and you will see a selective panel, choose “rating”. After you select “rating”, on the right side of that panel is a series of dots. Click on one of those dots, and it will turn into a star.

Why Lightroom KeyWords and Star Ratings are Important for Your Photography Workflow

Paint Can Tool

Then you can quickly go through your images in the grid view and “spray” a one-star rating on all of the images that you like. At this point, don’t apply any more than a rating.

If something really merits a better star rating, go back and review the images again. Once you do your second pass of the images, set the spray can to a 2-star rating. Then repeat the same method for those images that you might like to go in and apply Lightroom adjustments.

Paint-Tool-Label

You can also use it to paint in a color label, flat, metadata or any of these things.

Reserve the 3-star ratings for those images that you might use for an article or blog post and the 4-star ratings are only reserved for the best of the best which you would put in your portfolio. Keep your star ratings consistent, so you know that if an image has a 4-star rating, that it reflects your best work.

Now that you have set up the keywords and star ratings to your images, you have the ability to search or filter images in your catalog. In the Filter Bar in the Grid View, choose the Text option and the drop down box to select keywords, and start entering specific keywords.

Using the Spray Can tool to add metadata

The Spray Can tool can be used for a variety of options to add information to your images. You can “spray” not only star ratings but keywords, metadata information, labels, presets, or assign target collection images.

The next option is to add a series of keywords to your images. We already know that the files you are importing will be from Iceland. Use that as the keyword that applies to all of these images. Then consider where you were on your trip to Iceland. Are your images from the North Coast or the South Coast? Do you have pictures from Reykjavik? Do you have images from Vik? Who is in the images?

The idea here is to start out broad and then narrow your focus. Perhaps your whole shoot is from Iceland. Perhaps another broad category would be winter, ice, or arctic.

Select the Spray Can tool and go to the drop-down menu to the right of the icon. Select “keyword” and enter the word or words you would like to apply. “Spray” your series of images that are from the North Coast and apply that keyword. Change your keyword, and then spray your series of images that are from the South Coast. Continue to narrow down your focus. Then spray just those images from the South Coast that were taken in Vik and so on.

What Keywords Should You Use?

The keywords you should apply will depend on what you would like to use your images for in the future. Are you submitting to a stock agency? Are these images for personal use only? When will you use the images?

The best plan for creating keywords would be to apply basic information that will remind you about the subject, in order to help with locating images later. Start your keywording upon import and use the broadest subject that will apply to all of the images, and then narrow down your keyword focus.

Once you have started to create keywords, Lightroom will suggest keywords that might work with the current set of images in the Keywording panel. The suggested keywords help you to create cohesive words that can be used on multiple sets of images.

Notice at the bottom of the Keywording panel, there is an area with keyword sets. Lightroom automatically gives you some presets to use in this module. Click on the keyword set for “outdoor photography” and see the keywords that are suggested. If there are keywords you would rather use, right-click on the down arrow of the keyword set and you will see the option to “edit set” where you can add and remove words from that set.

The list of keywords from the preset will come up and you can add or subtract those keywords that apply to your images. Then, when you are keywording a certain genre of photography, you can select your keyword set of “outdoor photography” or “portrait photography” and rapidly choose from those sets of keywords. This will also prevent you from creating multiple keywords that mean the same thing. This is useful when you are using specific keywords to search for an image.

Use the Filter Bar to find images

Why Lightroom KeyWords and Star Ratings are Important for Your Photography Workflow

Then you will see Lightroom begin to sort images based on the keywords you entered. You can then add another dimension to the search, and a star rating.

This is when you can go back into your Lightroom catalog of 30,000 pictures to find the 4-star rated image in “Iceland” that has a keyword “Eagle Rock”, and find it in a second. Then you’ll see how great this system works. You can also limit your search to specific folders or collections when those are selected in the left-hand column of the Library Module.

Have you tried to organize your images in Lightroom? What kind of naming system works for you? What kind of challenges are you experiencing? Feel free to share your comments below.

The post Why Lightroom Keywords and Star Ratings are Important for Your Photography Workflow by Holly Higbee-Jansen appeared first on Digital Photography School.


Digital Photography School

 
Comments Off on Why Lightroom Keywords and Star Ratings are Important for Your Photography Workflow

Posted in Photography


Why it’s Important to Have a Good Relationship With Your Camera

12 Nov

I don’t like upgrading my camera; I’m rather content with the old one I have. I’m not one to worry so much now about the changes in technology. These days it seems there’s nothing really new under the sun. My trusty Nikon D800 is like a close friend, we have a good relationship.

The Importance of Having a Good Relationship With Your Camera

The advancements in camera technology have now slowed down and we already have more than enough megapixels to overflow our hard drives. So in my opinion, being content with a (slightly) older camera can help improve your photography more than if you are continually hankering for an upgrade.

Is your camera good enough?

Recently we had a customer on one of our photography workshops tell us they’d bought a few new lenses and were happy with them and next they wanted to upgrade their camera. I pointed out the camera they already have is way more advanced and can produce higher resolution photographs than most of the cameras I have ever used, (over the last 35 years I have used quite a few).

The Importance of Having a Good Relationship With Your Camera

My wife also loves her Nikon D800.

Having a close relationship with my camera is important to me. We need to know each other. The feeling I have for my camera enables me to obtain more interesting, dynamic, and relational photographs than I could make if I was using a brand new camera, (especially if was a brand of equipment with which I am not familiar). Having such a close and good relationship with your camera will make you a better photographer.

Use your camera with ease

If you can get to know your camera so well that you don’t have to consciously think every time you want to change a setting, you will have more energy to focus on your subject and the creative aspects of picture making. Being able to enjoy photography without your camera being the main focus of your attention is far more conducive to making great photos than having a brand new camera that you are unfamiliar with.

The keys to any good relationship are:

  • Compatibility
  • Frequent connection
  • Meaningful communication
  • Positive feelings

The Importance of Having a Good Relationship With Your Camera

Working with a camera you are just not comfortable with will not result in a good relationship. If you have small hands and your camera is large, you will struggle to operate it easily and it will be uncomfortable for you to hold. Likewise, if you have large hands and a small camera you will not find the experience of making photos as pleasurable as when you have a camera that suits you better.

If you find the controls awkward to manage, the image resolution disappointing, etc., you might want to consider a camera that’s more compatible. However, most cameras these days are well designed and crammed full of technology that produces incredible quality images. So you are probably better off committing more time to getting to know your current camera better.

Use your camera often

Frequent connection with your camera, as with your friends, will produce a richer relationship, especially when it’s a meaningful connection. Finding a subject, a location, or style of photography you really enjoy will ensure you want to spend more time with your camera in your hands.

This can take time, and can change over time, but when you have a passion for something or someone you naturally want to dedicate more of your time to that relationship.

The Importance of Having a Good Relationship With Your Camera

When you are so familiar with your camera that your attention is more focused on your subject, the timing, composition, and lighting, you will find a far greater enjoyment in photography. You will also likely see a big improvement in the photos you are producing.

Know your craft

In our modern consumer societies you are constantly reminded by advertisers there’s something else you must buy. I believe if you constantly upgrade you are potentially missing out on the depth of artistry that can be achieved by being intimate with your camera and your craft.

The Importance of Having a Good Relationship With Your Camera

A while ago I had a wonderful experience photographing two men putting finishing touches to some beautiful artworks. I was in the Grand Bazaar in Istanbul looking for the copper workers quarter which I had read about. I spent quite some time searching for it and literally walked around in circles and ended up back at the same place more than once. But I was determined to find this place as I really love making photos of craftspeople working.

Eventually, I heard a “tink tink tink” sound and followed my ears down an ancient arched alleyway. I went up a staircase, and into a courtyard surrounded by two-story buildings with hundreds of pots, pans, lamps and other items all crafted in copper.

The Importance of Having a Good Relationship With Your Camera

I continued farther to the source of the sound and was welcomed into a small workshop. With no common language, I gestured to my camera and received a thumbs up for me to take photographs there. The two men working on the art pieces were being watched by an older man, (I learned he was the father of one and uncle of the other.)

Another man arrived after a while and some discussion took place. That man was a customer coming to buy their art and he spoke some English. I asked him to help me because I had a question. How long, how many generations, had this family been working with copper and creating such art?

The lost art of generations

My question was translated and a long discussion ensued. Then all three family members looked at me and shrugged. They did not know. Their families have been copper craftsmen for so long and been passing on the skills of this lifestyle so long that nobody knew the answer to my question.

I was not surprised. Looking at what they were producing and at the pride on the older man’s face, it was evident they were not novices. They know their craft and their tools so well they made it look like what they were doing was somewhat effortless. But this is the result of a generations-long relationship with their materials and tools, (some of which may be generations old) frequent use of them, and an obvious passion for what they do.

The Importance of Having a Good Relationship With Your Camera

Conclusion

For more on loving your camera, watch the video below:

As you are pushed to spend money, rather than time, on your creative photographic expression, I believe you are in danger of losing touch with the depth and meaning that can be obtained by a more conscious connection with the camera you already own.

So if you are tempted to upgrade your camera let me encourage you to consider holding on to the one you already have for a while. Learn to love it and you will see the results in an improvement in your picture making.

The post Why it’s Important to Have a Good Relationship With Your Camera by Kevin Landwer-Johan appeared first on Digital Photography School.


Digital Photography School

 
Comments Off on Why it’s Important to Have a Good Relationship With Your Camera

Posted in Photography


Six Important Aspects of Monitor Calibration You Need to Know

27 Sep

Monitor calibration might seem complex. Perhaps it is, but you’ll soon be comfy with it if you can grasp some of the basic principles. It’s just a question of breaking the subject down. In this article, we’ll look at six aspects of a seemingly dark art, and how to calibrate your monitor.

Six Aspects of Monitor Calibration You Need to Know

1) Luminance / Brightness Level

One thing to know about monitor luminance (or brightness, in simple terms) is that it’s typically the only genuine hardware adjustment you can make to an LCD monitor. You are basically altering the backlighting with a dimmer switch.

The above is only untrue if you select a luminance setting that is lower than your monitor can naturally reach, in which case a software adjustment comes into play. Ideally, you don’t want this, since it eats into the monitor’s gamut (the range of colors it produces) and leaves it open to problems such as banding.

Always use software that tells you how bright the monitor is and lets you adjust it interactively.

Software versus hardware

Software adjustments are the ones that go through the graphics processor, while hardware adjustments are those that bypass the GPU and address the monitor directly. The former may cause problems in some cases, which is useful to bear in mind. Expensive monitors tend to allow more in the way of hardware calibration, enabling a higher image quality.

What setting to use?

Monitor luminance is measured in candelas per square meter (cd/m2), sometimes referred to as “nits”. A new LCD monitor is usually far too bright (e.g. over 200 cd/m2). Aside from making screen-to-print matching hard, this reduces the monitor lifespan.

You need a calibration device to measure the luminance of your monitor and always return it to the same level, as the backlighting slowly degrades. The trouble with using onscreen monitor settings to do this (e.g. 50% brightness) is that their meaning changes over time.

Six Aspects of Monitor Calibration You Need to Know

X-rite i1Display Pro

The arbitrary setting

Although arbitrary, the 120 cd/m2 setting that most software defaults to is a fair place to start. Most monitors can reach that level using the OSD brightness control alone, without resorting to reducing RGB levels and gamut. The setting you use is not critical unless you are explicitly trying to match the screen to a print or print-viewing area.

Dictated by ambient light

Ideally, you should control the ambient lighting in your editing area so you’re free to set the luminance you want. The monitor should be the brightest object in your line of vision. If you’re forced to edit in a bright setting, luminance must be raised so that your eyes are able to see shadow detail in your images. Some calibrators will read ambient light and set parameters accordingly. In controlled situations, this feature is needless and even unhelpful.

The paper-matching method

Many printers set their monitor luminance very low. By this, I mean between 80-100 cd/m2. The idea is to hold a blank piece of printing paper up next to your screen and lower the luminance until it matches the paper, or just set a low level so that this is more likely.

Potential downsides include a degraded monitor image since not all monitors can achieve this low luminance level without ill effect. Still, you could try it. This is about finding what works for you and your gear.

Matching the print-viewing area

Another way printers set monitor luminance is to match it to the lighting of a dedicated print-viewing booth or area. Although the light in this area may differ to that of the final print destination, it’s useful to note that monitor calibration is never quite an exact science. As well, print display lighting is always adjustable in its intensity. Using this method, the monitor luminance might be as high as 140-150 cd/m2. This setting should be natively achievable by any monitor.

2) Color Temperature / White Point

Most calibration programs will default to a 6500K white point setting, which is a cool “daylight” white light. This is usually close to the native white point of the monitor, so it’s not a bad setting, but you needn’t accept the software defaults.

By Bhutajata (Own work) [CC BY-SA 4.0], via Wikimedia Commons

Gentle calibration – native white point

If you own a cheap consumer-level monitor or a laptop with low-bit color (that’s most laptops), it’s a good idea to choose a “native white point” setting. This is only typically available with more advanced calibration programs, including the open source program DisplayCAL.

When you choose a native white point or anything “native” in calibration, you are leaving the monitor untouched. Because this means there are no software adjustments being made, the display is less likely to suffer from issues such as banding.

Correlated color temperature

In Physics, a Kelvin color temperature is an exact color of light that is determined by the physical temperature of the black body light source. As you probably know, the greater the heat, the cooler or bluer the light becomes.

Monitors don’t work like this since their light source—LED or fluorescent—doesn’t come from heat. They use a “correlated color temperature” (CCT). One thing to know about correlated color temperature is that it’s not an exact color. It’s a range of colors. This ambiguity is not ideal when trying to match two or more screens.

Six Aspects of Monitor Calibration You Need to Know - color temperature Planckian locus

By en:User:PAR (en:User:PAR) [Public domain], via Wikimedia Commons

This illustration, above, of the CIE 1931 color space plots Kelvin color temperatures along a curved path known as the “Planckian locus”. Correlated color temperatures are shown as the lines that cross the locus, so for instance, a 6000K CCT may sit anywhere along a green to a magenta axis. A genuine 6000K color temperature would rest directly on the Planckian locus at the point where the line crosses, so its color is always the same.

Though color temperatures might not mean the same thing from one monitor to the next, calibration software should be more precise. It’ll use x and y chromaticity coordinates (seen in the graph above) to precisely plot any color temperature. Thus, theoretically, you should be able to match the white point of two different monitors during calibration.

Even if you manage that, gamut differences are still likely to complicate things. It’s often easier to forget about matching screens and just use the better of them for editing.

Matching print output

Your chosen white point won’t always match the light under which you display or judge prints. For that reason, you might want to experiment with settings. Remember you’ll harm image quality if you bend the white point far from its native setting. In calibration, you’re often seeking a compromise and/or testing the boundaries of your monitor’s performance. Once you know these changes may cause problems, you can reverse them easily.

3) Gamma / Tonal Response Curve (TRC)

Digital images are always gamma-encoded after capture. In other words, they’re encoded in a way that corresponds to human eyesight and its non-linear perception of light. Our vision is sensitive to changes in dark tones and less so with bright tones. Although digital images are stored thus, they are too bright at this point to represent what we saw. They must be decoded or “corrected” by the monitor.

Six Aspects of Monitor Calibration You Need to Know

By I, the copyright holder of this work, hereby publish it under the following license: (Own work) [Public domain], via Wikimedia Commons

A digital camera has a linear perception of light, whereby twice as much light is twice as bright. Gamma encoding and correction alters the tonal range in line with the human vision, which is more sensitive to changes in shaded light than in highlights. By the way, the gradients in the above image are smooth. Any color or banding you see is caused by your monitor, and harsh calibration will make it worse.

This is where the monitor’s gamma setting (or tonal response curve) comes in. It corrects the gamma-encoded image so that it looks normal. The gamma setting needed to achieve this is 2.2, which is also the default gamma setting in calibration programs. However, this is another setting that you may stray from if your software allows it.

Gentle calibration – native gamma setting

Like the white point setting, the gamma setting is a software adjustment that might degrade the monitor image. If you calibrate with a native gamma setting, you are less likely to harm monitor performance. The only trade-off is that images outside of color-managed programs might look lighter or darker. However, inside color-managed programs, images will display normally.

4) The Look-Up Table (LUT)

Once you’ve dialed your settings into the calibration software, what happens to them next? They’re attached to the ICC profile (created after calibration) in the form of a “vcgt tag”. This then loads into the video card LUT (look-up table) on startup, at which point the screen changes in appearance.

Having said the above, if you’ve chosen only native calibration settings, you’ll see no change to your screen at startup. The Windows desktop may look different under a native gamma setting since it is not color aware. A Mac desktop will remain unchanged.

With expensive monitors, the LUT is often stored in the monitor itself (known as a hardware LUT), bypassing the GPU. One benefit of this is that you can create many calibration profiles and switch easily between them. This is not possible with most lower-end monitors.

5) Third-party calibration programs

High-end monitors come with software that allows all sorts of tricks, but most monitors and programs are less flexible. It’s worth noting, though, that some calibrators work with third-party programs, no matter what software they came with. Conversely, some tie you down to proprietary software, so this is worth checking when you buy a calibrator.

Ironically, one of the things more advanced programs let you do is nothing. In other words, they let you choose “native” calibration settings. Look at DisplayCAL or basICColor programs if you want more flexibility, but check for compatibility with your device first.

Six Aspects of Monitor Calibration You Need to Know

6) Calibration versus Profiling

The word “calibration” is an umbrella term that often refers to the process of calibrating and profiling a monitor. However, it’s useful to note that these are two separate actions. You calibrate a monitor to return it to a known state. Once it’s in that state, you then create a profile for the monitor that describes its current output. This allows it to communicate with other programs and devices and enables a color-managed workflow.

Six Aspects of Monitor Calibration You Need to Know

DisplayCAL info at the end of calibration and profiling. Gamut coverage is the proportion of a color space the monitor covers. Gamut volume includes coverage beyond that color space.

If you can’t afford a calibration device, it’s better to calibrate it using online tools than to do nothing at all. You’ll still need to get the luminance down from its factory level. Check things like black and white level on a website such as this.

You can’t create a proper profile for your monitor using software alone. Any software that claims to do this is using either a generic profile or the sRGB color space.

Finally

I hope this article has helped your understanding of monitor calibration. Ask any questions you like in the comments below and I’ll try to answer them.

The post Six Important Aspects of Monitor Calibration You Need to Know by Glenn Harper appeared first on Digital Photography School.


Digital Photography School

 
Comments Off on Six Important Aspects of Monitor Calibration You Need to Know

Posted in Photography


Sony: ‘Our company has a vision which is more important than profit alone’

12 Sep

Recently, DPReview was invited to Japan to visit both the Sony headquarters in Tokyo and Sony’s image sensor factory in Kumamoto. The trip was an opportunity to gain some insight into both the philosophy and the technology that underpins the company.

We spoke to both Sony Semiconductor Solutions, the company making the imaging sensors in your cameras and smartphones, and Sony Digital Imaging (DI), the division of Sony Imaging Products and Solutions (SIPS) that makes everything from interchangeable lens cameras (ILCs) to action-cams and camcorders, and lenses. Sony Corporation itself, the umbrella above all these groups, has its hands in a number of sectors – from consumer electronics to smartphones to professional services and motion pictures. Sony Semiconductor, as we previously reported, is its own company, which has some interesting implications we learned about through the course of our conversations.

Be the guinea pig

“The electronics industry is constantly searching for new ideas and there are still many products for us to make. If the guinea pig spirit means developing innovative ideas and embodying them in new products, then I think this is an admirable spirit.” These are the words of Sony co-founder Masaru Ibuka.

At the Kumamoto sensor factory hangs an image of co-founders Ibuka and Akio Morita arm-wrestling in good spirit.

At the Kumamoto sensor factory hangs an image of a golden guinea pig right below a candid of co-founders Ibuka and Akio Morita arm-wrestling in good spirit. On it these words appear, along with one of the principles set out in the Founding Prospectus: “To establish an ideal factory that stresses a spirit of freedom and open-mindedness, and where engineers with sincere motivation can exercise their technological skills to the highest level.”

“If the guinea pig spirit means developing innovative ideas and embodying them in new products, then I think this is an admirable spirit”

More than 70 years later, the ethos of the co-founders still persists in the mindsets of Sony employees. It’s evident in everything from the philosophy of Sony Semiconductor and its relationship with other manufacturers to Sony’s new flagship: the a9.

Planning innovation: Sony a9

Our testing has shown the Sony a9 to be a formidable camera, not just for stills but also video. At Sony, a new camera like the a9 takes two to three years to develop, we were told. Therefore, the photographic technologies the a9 offers had to be planned for years in advance, not long after Sony introduced the world’s first full-frame mirrorless cameras a mere 3.5 years ago. And as we learned during our visit, most of the advancements in the a9 stem from new sensor technologies.

Two to three years ago, how would it have been possible to predict sensor readout speeds that offer autofocus calculations at 60 fps and a fully electronic shutter that is only a stop behind the speed of mechanical shutters? The answer lies in the constant communication between Sony Semiconductor Solutions and Sony DI. And since Sony’s sensor foundry is one of the best in world, providing sensors for everything from cameras and smartphones to security and medical devices, this in-house knowledge and communication is a key advantage.

It takes 2 to 3 years to develop a camera like the Sony a9. Koji Hisamatsu, Mechanical Engineer of the a9, showed us its magnesium alloy body. It offers improved ergonomics and weather resistance over previous models.

Yasufumi Machitani, project leader on the a9, talked to us about the development of the camera. A number of its features, like blackout-free shooting and fast AF/AE calculation, require sensor readout speeds conventionally thought impossible. A stacked BSI-CMOS sensor with integral memory was necessary for these technologies, and the camera division’s awareness of such coming sensor technology years in advance allowed it to plan the a9.

Daisuke Miyakoshi, in charge of the image sensor portion of the product design division, elaborated on this cross-communication: his team is a bridge between Sony Semiconductor Solutions and SIPS (Sony Imaging Products and Solutions), the latter in charge of both product and system design and Sony DI’s parent company. The system design department sends new imager proposals to the product design teams making cameras, and together the teams evaluate success and pain points of actual sensor designs.

This information is then used to send new specification formulations to the image sensor development department at Sony Semiconductor. The communication between these three groups allows fine tuning of both sensor and camera.

Product strategy

Sony’s product strategy is simple. Imagine a pyramid with three customer types: at the top pros, in the middle high amateurs (‘enthusiasts’), and below that consumers. Products are intended to fall within one or span two of these segments.

Rice fields at dusk. Miyama Sansou, Kurokawa Onsen. Photo: Rishi Sanyal
Sony a7R II | 12-24 F4G @12mm | 1/30s, F4, ISO 5000.

Sony believes there is a growing market of pros and enthusiasts, with shrinking demand at the entry level (it’s hard to argue with that, given the death of the compacts and the rise of the smartphone). This brings a higher demand for better performing products, be it in terms of autofocus, speed, resolution or sensitivity. Therefore, Sony says its product strategy is to pack as much available technology into each product as possible, barring hardware limitations, to meet a certain price point. Machitani-san explicitly told us “there is no intention to limit functions of cameras to certain groups”. In fact, Sony claims it includes many of these functions – where others might remove them in an effort to segment products – just to see what creatives do with them.

It’s a strategy not always taken by other camera manufacturers, but one that makes sense in a post-smartphone era: target customers who want a dramatic step in quality and features from what smartphone imaging offers. It’s not entirely without its issues though. For one, some may find the user interfaces of some Sony cameras overwhelming due to the number of features. Sony is aware of this and constantly iterating – the a9 for example offers an encouraging ergonomic and usability refresh.

Of course, Sony’s own crowded camera lineup can sometimes be at odds with its intended strategy, since Sony is less afraid of cannibalizing itself than other camera companies. Take for instance the short product replacement cycles. Or the almost inevitable focus – since Sony believes in a growing pro and enthusiast market – on full-frame E-mount, which has left the impression among some that Sony is abandoning A-mount1 and APS-C.2 Or the appearance of advanced new technologies in more niche products before they find their way into other product lines. Many of these ‘issues’ stem from the pace of iteration and innovation at which Sony is moving, if not due simply to its relatively newcomer status. But Sony is actively learning, and recent market data suggest its strategy is working.

Vision over profit

You might think that Sony Corporation would like to keep the in-house knowledge of Sony Semiconductor Solutions for its own camera division, but that’s not the case. For one thing, the sales of the semiconductor division to third-parties is a large source of income for the corporation at large, but it goes beyond that.

Although Sony tends to hold its proprietary sensor technology for its own cameras for roughly two years,3 it publicly discloses sensors that are available for sale and their underlying technologies. This allows other manufacturers to integrate Sony sensors into their own products. And this is where it gets interesting: any manufacturer can approach Sony Semiconductor and ask for their own design requirements, often building on Sony’s own sensor advancements that are made public (take full-frame BSI-CMOS or dual-gain for example, two technologies found in the Nikon D850). But if an OEM does so, Sony Semiconductor is not allowed to communicate any intellectual property it gains to Sony’s camera division.

Having this wall (or more accurately, perhaps this two-way mirror) in place makes a lot of sense. After all, OEMs wouldn’t approach Sony about new designs if the sensor division leaked proprietary information to its own camera engineers. So, no folks, Sony’s camera team has not been aware of the Nikon D850’s sensor all along, prepping a response to it years in advance…

There are interesting implications of this wall between Sony Semiconductor and Sony DI: it means that newer, better technologies than those available in Sony’s own cameras may appear in any other manufacturer’s camera, despite using a ‘Sony’ sensor. Indeed, we’ve actually seen multiple examples of this: ISO 64 on the D810 and 16-bit analog-to-digital conversion on the Hasselblad X1D to name just two.

Could this threaten the growth of Sony’s own camera division?

Sony executive round-table. From left to right: Takashi Kondo, Chief Marketing Manager, Hiroshi Sakamoto, Senior General Manager of Marketing, Kenji Tanaka, Global Head of ILCs, and Masanori Kishi, Deputy General Manager of ILC lenses.

When we asked this question, the message from DI executives was clear: “Our focus is to increase the overall market”. Paraphrasing slightly, global head of ILCs Kenji Tanaka said: “Please think about vision. Our company has a vision, which is much more important than profit alone. Of course, if we cut our supply of sensors to other OEMs our camera market share might increase. But this is not our vision. Our vision is to grow the entire imaging market, and Sony alone cannot make every [imaging] product.”

While every manufacturer wants to be number one, no single company can make every product – even within a single sector. It is clear that Sony believes that competition is healthy, and that if Sony sensors help make better products, be it in a Sony device or other OEM device, the consumer wins. And ultimately, that is the purpose of the company.

“Our company has a vision, which is more important than profit alone”

It’s possible that the worst of the camera market collapse is over, but we do wonder whether Sony’s strategy might change if the market continues to shrink. Would the huge current investment in ILCs still pay off? Would sales of class-leading sensors to other OEMs still make sense? The answer from executives was “yes”.

Growing the market

Like every camera manufacturer, Sony wants to grow its market share. But it sees the gain of market share as a secondary effect, almost a byproduct, of growing the market overall. In fact, Sony admitted it doesn’t expect to continue to gain market share simply by getting users to switch systems. Tak Kondo, General Manager at Sony DI, remarked that “the industry is stagnated partly because of a lack of interesting products from camera manufacturers. It’s our obligation to increase the market size.”

We probed Sony about its strategy to move users away from smartphones, arguably the very cause for the declining camera industry. “We want to expand the photo-shooting culture” Tanaka-san told us. “By growing this culture, we hope to stimulate the desire for something [much] better than a smartphone”. Furthermore, Sony chooses to place its focus on mid- to high-end products, which show increased demand. The global decline in the industry is due to a drop in demand for low-end products – both DSLR and mirrorless – thanks to the smartphone.

By making versatile cameras that offer vast benefits over smartphones and more computational photography-oriented devices that widen its user-base, Sony hopes to reverse this trend. That is, grow the market through innovation, a message we’ve heard before.

Why Sony?

Sony believes that it is in a unique position to grow the imaging market. The communication between its image sensor development engineers at Sony Semiconductor and the camera teams at Sony DI give the company a unique advantage: an understanding of important sensor technologies to come two, five, or ten years down the line. The two-way communication between a cutting-edge sensor foundry and camera engineers that need sensor technologies to solve photographic problems is a unique advantage for Sony’s camera division. And Sony’s sensor design and fab group must stay cutting edge simply due to the number of sectors it has its hands in: from smartphones to the medical industry.

Shiraito Falls near Mount Fuji in Fujinomiya, Shizuoka Prefecture. It’s often said that Mt. Fuji is shy, rarely revealing herself. This day was no exception: the entire region was covered in thick mist and rainfall, and the spray from the waterfalls themselves was intense. Photo: Rishi Sanyal

Sony a7R II | 24-70 F2.8GM @46mm | 0.5s, F11, ISO 100

Mirrorless cameras are still in their infancy. However, Tanaka-san stressed that when you compare the development speed of mechanical products vs. semiconductor technology, the latter is far faster. Since much of the capability of mirrorless cameras is derived from the image sensor itself, its development speed is much faster than DSLR. So while mirrorless camera technology is a relative newcomer to the field, Sony’s insight into semiconductor advances puts its camera division in a unique position to innovate and iterate quickly, bringing greater speed and functionality to consumer products across shorter refresh cycles.

Will Sony’s ‘guinea pig’ approach pay off? The latest U.S. dollar-based statistics from NPD are certainly encouraging: the first 6 months of 2017 showed a 36% growth in mirrorless camera sales compared to an 11% decline in DSLR sales. In the same period, Sony’s sales of full-frame ILCs grew 42% compared to a decline of 5% for all other manufacturers. It also maintained a #2 position in sales of full-frame ILCs (likely helped by the release of a flagship camera), while growing 26% in mirrorless ILC sales year-on-year. Sony is now at the top in mirrorless ILC sales in the U.S.

While these sales figures are all dollar-based, with many Sony products retailing at relatively high prices, they’re significant – especially when you consider the impact the Kumamoto earthquake must have had on the company.

Challenges

Despite these encouraging figures, Sony’s path will not be a smooth one. Canon and Nikon have been making cameras for a long time and are widely viewed as photography companies, as opposed to consumer electronics companies. Part of the reason the a9 is being targeted so aggressively at pros, and why Sony is working so hard on expanding pro support, is to overcome the perception of the company as a manufacturer of TVs, Walkmans and PlayStations.

At the opposite end of the pyramid, smartphone cameras offer something that most, if not all, standalone cameras to-date lack: convenience of image ingestion, curation and sharing. While Sony PlayMemories apps offer some solutions,4 they leave much to be desired. Thankfully, Sony is well aware of the importance of integrating with cloud services and smartphones.

The hillsides near the Kuju Mountain Range in Kumamoto prefecture provide endless vistas. I shot this through a window of a moving bus on the way to Kurokawa Onsen. The volcanic region offers many hot springs and resorts within Kurokawa’s ‘enchanted’ forest. Photo: Rishi Sanyal

Sony a9 | 24-70 F2.8GM @35mm | 1/1000s, F2.8, ISO 1250

And then there’s video. Increasingly, cameras that do both stills and video well are more attractive than those that can’t. Sony is on the right track here, offering cameras that are highly capable at both, but there’s still work to be done. The Sony a9 offers some of the sharpest video around thanks to the fact it oversamples a full-frame sensor, yet it lacks a Log profile or an intuitive autofocus interface in video.5

Meanwhile of course, competitors aren’t standing still. Canon’s Dual Pixel AF in video offers a clear user benefit in combining performance and UI/UX. Four Thirds cameras offer 4K video with compelling (mechanical + digital) stabilization. The Panasonic GH5 offers 6K Photo, pre-capture, and effectively simultaneous video and stills capture in its high-resolution anamorphic mode. RED Cinema cameras – albeit in a very different price bracket – can capture at 120 fps for stills extraction or for 24p video.6

But theoretically, these are all challenges that Sony is well placed to face. Sony’s executives see the relationship between Sony Semiconductor and Sony DI as being key to planning for the future, and they assure us that the founders’ spirit of innovation will continue to bring compelling products to the market.


Footnotes:

1 Tanaka-san assured us that ‘the A-mount customer base is small, but loyal, and we need to serve them.’ While Sony does not intend A-mount users to transition to E-mount, it does see the a9 as a potential body for A-mount lenses, via adaption. To that end Sony assures us the disadvantages associated with adapters – like the lack of proper subject tracking – are addressable, though it won’t officially support or offer a solution for Canon lenses natively.

2 Expressing very frank surprise at the idea that some of our readers feel Sony is less committed to APS-C, Sony DI executives assured us that, on the contrary, they are fully committed to APS-C. They pointed in particular to its potential to increase business by its adoption as a second camera for pros (a6300/6500) or a first-time camera for casual users (a5100/6000).

3 While we weren’t explicitly told this, one might surmise it from the fact that the sensor in the a7R II has not appeared in any other manufacturer’s camera since its launch over 2 years ago.

4 For example, ‘Sync to Smartphone’ ensures all my JPEGs from my a7R II end up on Google Photos via my Google Pixel in full resolution original quality without me moving a finger.

5 We asked Sony about the omission of S-Log2 and PlayMemories on the a9. We suggested it ostensibly appeared like forced product segmentation, uncharacteristic of Sony’s product strategy. While it still appears that may indeed have been the case, we were assured that Sony takes our negative feedback about these omissions seriously.

6 Some RED cinema cameras are capable of assembling 24p footage from 120p capture by frame averaging, which removes the stutter that would otherwise result from the higher shutter speeds you’d likely shoot 120p footage at. It’s quite clever.

Articles: Digital Photography Review (dpreview.com)

 
Comments Off on Sony: ‘Our company has a vision which is more important than profit alone’

Posted in Uncategorized


The 10 Most Important Marketing Strategies to Grow Your Photography Business

31 Aug

No photographer wants to get into the photography business with the aim of becoming a marketing expert. But the reality is that if you don’t focus on the marketing and business end of photography, your business will not be able to survive long enough to do the fun stuff. It stinks, but this is the truth.

The 10 Most Important Marketing Strategies to Grow Your Photography Business

Luckily, the learning curve at the beginning is the toughest part, and as you get used to the business side, everything will come much more naturally to you. Eventually, you might even learn to enjoy it, or at least appreciate the work, after you see how powerful it can be in getting you where you want to go.

So here are 10 of the most important strategies you can start right away to make sure your photography business succeeds.

1. Use Your Personal Network

The 10 Most Important Marketing Strategies to Grow Your Photography Business

Nobody wants to be that annoying marketer that always pushes their business on their friends and acquaintances. However, this fear can push photographers way too far in the opposite direction, never working with the people that have grown to trust them the most. Your personal network is your strongest asset and even more so at the beginning of your photography business. These are the people who will give you your first jobs and introduce you to your first clients.

Photography is unique in that no matter what genre you are involved in, people in your network will most likely need your services at some point, whether it’s wedding or event photography, business portraiture, family portraiture, or print selling. So let your network know what you do and how you can help them.

Create a mailing list and send out an announcement to your network. Show your best work, talk about your photography business, and make sure to explain how you can help people. How can your business benefit them? They will not know unless you tell them. In addition, make sure to ask for referrals.

2. Take Advantage of Local Marketing

The 10 Most Important Marketing Strategies to Grow Your Photography Business

Whenever you say the word marketing these days, for some reason everyone immediately starts talking about social media. That is funny, because as important as social media is, it should be one of the last steps to think about for any marketing plan.

Your first step should be working within your local community. Similar to the last point, these are people who know you. You are just down the street from them. There are businesses of all types in your community that can probably use your work, so create a plan for how to get in front of them.

Make a good impression

Keep in mind that you only get one first impression, so be smart about how you reach out. First and foremost, figure out how you can benefit them. If you are going to reach out to someone, you need to know how their business or life will be better with your services and explain how you can help. Always be kind and courteous with their time, and if possible see if you can get an introduction before contacting someone cold. Does anyone in your personal network know the person you want to contact? That’s always a great first step, but if not, just reach out yourself.

The more you are seen, the more people in your community will notice you and start to think about working with you. Whether it’s local events, business events, fundraisers, you name it, you should make the point to be there, particularly at first. This is the way to create new relationships and to spread your reach.

Similarly, reach out to the other photographers in your area. Many photographers will assist others when they need help and vice versus, and this will help strengthen everyone as a whole. It can be easy for photographers to feel competitive with each other but avoid this. The ones that work together and refer each other will do much better in the long-run than the ones who try to do it all on their own.

3. Create a Mailing List

The 10 Most Important Marketing Strategies to Grow Your Photography Business

Use a mailing list provider such as MailChimp or Aweber to keep up with your clients, personal network, and fans. Email lists have the highest engagement of any form of marketing, and it is the way for you to stay on people’s minds.

Ask people if you can add them to your list, and always have them opt into the subscription. Put signup forms or popups on your website that encourage people to join. Consider giving away something to encourage them to do so, such as free computer wallpapers of your photography.

When sending out emails, create content that your list will enjoy. Do not sell too often with it. The more benefit and interest that you provide for the people on your list, the more they will enjoy it and the more they will like you. Then when you sell, they will be primed to purchase your services or product. When it’s time to sell, sell.

4. Create a Personal Project

The 10 Most Important Marketing Strategies to Grow Your Photography Business

This image is part of a personal project I’ve been working on involving talking to and making portraits of people in my community.

Personal projects will not bring new clients to you right away, and they will take away time from building your business and making a living. This is the tougher side of doing projects, but they are immensely important for the long term growth of your business and for growing your voice as a photographer. A project can be done slowly over a long period of time, so you can build it into your weekly schedule.

Think of an idea that will resonate with both you and your community. This is a way of keeping your passion for photography alive. It will also help to set you apart from the other photographers in your community. It will show people that you are an interesting person. They will be more interested in working with you, even if the paid work you do is a completely different genre. It will be a way for you to gain press coverage and something for you to talk about to engage people. All in all, a personal project will make marketing yourself so much easier, and it will feel much more natural.

5. Respond Quickly

There is no point in building your photography business or marketing your work if you are not going to respond quickly to inquiries. Respond quickly at every step of the process throughout a job as well. Responding quickly does not have to mean within the hour, although sometimes that can help when getting a new inquiry. It can mean responding within 12 hours or a day, as long as you are consistent and prompt.

Fortunately for you, a lot of photographers are terrible at this, so this will quickly set you apart. It will show people that you are a responsible person, and it will make them more comfortable working with you.

6. Build Your Connections (Both Local and Online)

The 10 Most Important Marketing Strategies to Grow Your Photography Business

Building your network is a lifetime process. As you go further and further in your career, you will begin to create connections with people who can do more and more for you (and who are tougher to get in contact with).

Whichever point in your career you are at, and whatever level your skill level as a photographer, start at that point and build connections there. Then over time, work your way up the ladder. Be patient, be smart, and don’t try to push too hard at first, particularly with people who don’t know you. First impressions are impossible to get back. Grow your network carefully and consistently.

7. Keep Your Existing Clients Coming Back

It can help to create a client management system. You can start off with an excel document at first and eventually grow to a more robust system, such as Sprout Studio. Keep in contact with your best clients, and even consider sending them holiday cards or a small gift to stay on their minds. A small gesture can go a long way, and it is much easier to get an existing client to come back than it is to reach a new one.

8. Makes Sure Your Website Sells

The 10 Most Important Marketing Strategies to Grow Your Photography Business

Think about your website as your number one selling tool. Whatever your primary service is, your site should be developed for the specific purpose of leading people to hire you for that service or for purchasing one of your products.

Study the basics of copywriting, create specific sales pages for your offerings, and even consider creating sales funnels that lead people to an end goal. These can be very powerful ways of priming people to want to work with you.

9. Take Advantage of SEO

SEO, or ranking highly in search engines, is a long term strategy that takes some studying to understand how to do (beyond what we will be able to cover completely here). My belief is that you should always focus on local networking first, as that has the ability to get you very quick gains, whereas an SEO campaign can take years to truly get you where you want to be.

But that being said, SEO should not be ignored, because most people will use Google to find the right photographer for them. Always remember, the goal of Google is to serve up the most relevant websites for the query topic. If you want to rank for a specific term, make sure to create the best possible page that will answer that query. Without this, an SEO strategy will not work.

The 10 Most Important Marketing Strategies to Grow Your Photography Business

Listen to Google

Google runs on links, so you need to figure out how to get other related websites to link to yours. It’s interesting because while it may seem annoying to gain these links, Google is actually forcing you to do things you should be doing in the first place.

Network with websites that you would like to be featured on, and figure out how you can provide that site with some value before you contact them. You will get nowhere if you just ask for something, but if you contact them willing to help them out, it will help immensely. As you grow with your abilities and your marketing, your opportunities for getting covered will grow as well. Internet marketing gets much easier over time.

This is another area where a personal project can help grow your business. People want to share interesting topics, so even if you are not generating income from the project directly, you can use the project to get covered on websites and to make people more aware of you, which will ultimately help improve SEO and grow your network and mailing list.

10. Create a Daily Plan

The 10 Most Important Marketing Strategies to Grow Your Photography Business

All of this is way too much to do in a feverish month of working. Similarly, your marketing skills will grow gradually, so take your time and be strategic about how you work through your marketing plan. You do not want to spend a whole month contacting everyone you can only to burn out soon after.

Set aside a daily block of time to build your business. Contact a few people every day or every few days. Use the feedback from those to tweak your next pitch. Over time, you will figure out what works and what does not work. A small amount of work each day will eventually snowball into much bigger things.

Conclusion

The main theme throughout this article is that you need to put yourself out there. The work will not just come to you. Create an organized plan, stick to it, and go for it. Be both careful and relentless. That is what is needed.

It may seem like there is a huge wall in front of you that is impossible to cross. But if you chip away at it a little bit each day, within a few years you will find that you have opened up many paths through it.


For even more business help – join the Focus Summit 2017 Online Business and Marketing Conference for Photographers on Sept 26-28th 2017. We will cover marketing, business development, law, SEO, branding, blogging, and much more. Use the code “DPS” for a $ 50 discount.

The post The 10 Most Important Marketing Strategies to Grow Your Photography Business by James Maher appeared first on Digital Photography School.


Digital Photography School

 
Comments Off on The 10 Most Important Marketing Strategies to Grow Your Photography Business

Posted in Photography


Ten important differences between Panasonic’s GH5 and GH4 (and one key similarity)

16 Jan

In-body IS

Panasonic’s new GH5 flagship will be hitting the streets soon, joining the GH4 in the company’s line of video-centric cameras. With our eye on video features, we take a look at the ten biggest differences between these two cameras.

Although this article is mainly looking at video shooting, the biggest physical change between the GH5 and its predecessor promises benefits both for stills and video shooters.

The addition of five-axis image stabilization is a major step forwards for the GH series. Using Panasonic’s latest version of its I.S. system, the camera will combine internal stabilization with in-lens stabilization when shooting with own-brand lenses. For video shooters, this includes a digital stabilization element for dealing with larger or faster translational movements than physical stabilization can correct for.

Although most serious film makers won’t consider in-body stabilization to be an effective replacement for stabilization hardware, it will significantly extend the GH5’s appeal for run-and-gun video, where a little camera shake just adds a little vérité atmosphere.

Full width 4K video

Using the full width of the sensor has three hugely significant benefits. First, it means that all the lenses designed for the Four Thirds format provide the angle of view that they were designed to give (putting to one side the slight crop as you move from the 4:3 aspect ratio down to 16:9). This makes it easier to find lenses that will give a wide-angle view of the world. This use of the full sensor width also means that focal length reducers (such as Speed Boosters) with Super 35 lenses will give the same field of view as they were designed to give.

Second, using the full width of the sensor means using a larger area of the sensor, which means more light capture and better noise performance. Using this larger region should mean up to a 1/2EV improvement over the cropped region the GH4 used for UHD 4K. Add to this improved noise reduction algorithms (that seem particularly effective for combating temporal noise, based on what we’ve seen), and the GH5 should be a significantly better performer as light falls.

Finally, there’s the resolution benefit that comes from oversampling. Capturing the sensor’s full resolution and then downsampling allows the capture of finer detail than is possible with just using a 4096 or 3840 x 2160 region of the sensor.

Internal 10-bit recording

The addition of ten bit internal video capture is a big deal. To really understand why, we’ve gone into a bit more depth in our First Impressions Review, but at its most basic, the move to 10-bit recording means 4x the number of ‘steps’ available in each channel: 64x as much data in total. This means much more subtle gradation can be captured, meaning more tolerance for subsequent grading and processing. On top of this, the GH5 can capture with 4:2:2 chroma sub-sampling, effectively meaning twice the color resolution of the GH4.

The GH4 was one of the few cameras we’ve encountered to allow 10-bit output to an external recorder, so it’s a big deal that 10-bit 4:2:2 footage can be recorded internally on the GH5 (though you’ll still need an external recorder if you want to use the camera’s highest frame rates).

The increased grading flexibility should be especially useful for any users who buy the optional V-Log upgrade, since it gives more bit-depth to compress the camera’s dynamic range into: decreasing the risk of banding and posterization when the footage is pulled back into a end-use color space.

60p 4K capture

The GH5 is only the second camera we’ve yet encountered that can shoot 4K footage at above 30 frames per second. The GH5 gains the ability to shoot UHD 4K video at 48, 50 and 59.94p.

60p (and 50p if you’re shooting for PAL output) is great for capturing fast movement, rather than giving the blurred impression of movement that 24p brings. Several shooters in the office have become big fans of the look. Alternatively, of course, It can be slowed back down to 24p, giving UHD footage at 1/2.5th speed. Either way, it’s another creative option in your toolbox to use (or not) as suits your style.

Pro video tools

Dig a little deeper into the GH5 and its videographer-focused features and you’ll find it moves beyond the already impressive array offered by the GH4. In addition to existing features such as time code, SMPTE bars and the option to limit output to broadcast-safe data values, the GH5 add a series of features and capabilities.

For instance, the GH5 can present Waveform and Vectorscope representations of the scene being shot. This ability to visualize your shot using video-industry standard tools is a welcome step forward, and the first time we’ve seen them in a hybrid stills/video camera.

And, while the GH4 could already be upgraded to shoot with a Log profile (another first for a camera coming through our office), the GH5 VLog upgrade adds the ability to load Look Up Tables (LUTs) onto the camera, so that the camera can show a ‘faux-graded’ preview while shooting in the harder-to-interpret Log gamma and color mode.

The other video-friendly feature that stood out to us was the ability to pre-define a series of up to three focus distances before you start shooting, meaning that the camera can rack focus between these points in a controlled manner. It means it’s possible to refocus smoothly without a dedicated focus puller or any of the uncertainty of autofocus.

User interface (Menus and My Menu)

The GH5’s user interface has received a significant overhaul. Enough of it remains the same that existing users will be able to start shooting straight away but the menus have been revamped to make them easier to navigate and remember.

In addition to the better menu categorization and improved location indication, Panasonic has also added a ‘My Menu’ tab, meaning that users can get fast access their most-used settings. These settings can then be saved onto an SD card, meaning this customization doesn’t need to be repeated every time you switch cameras.

On top of these menu changes, Panasonic has made a host of small tweaks that make a big difference to everyday operation. One such example is that the camera now remembers different focus settings for its stills and video modes, meaning that you don’t have to constantly reconfigure the camera to the differing demands of still and video work.

Secure, full-size HDMI socket

Another seemingly small change to the camera’s body is the move to using a full sized HDMI socket, acknowledging the likelihood that the camera will be connected to an external monitor or recorder.

On top of this, Panasonic has included a cable retainer that screws into the camera body, in the box. This greatly decreases not only the risk of a cable coming loose, mid shoot but also significantly decreases the risk of breaking the HDMI socket, which is not unheard-of on hard-working video cameras.

XLR accessory

One challenge when shooting video on still cameras is how to record high quality sound. Most still cameras include a simple audio-in mini jack, meaning that if you want to record using proper XLR-connected microphones you need to use an third party adapter or record sound off camera and sync in post.

On the GH4, Panasonic solved this with its optional YAGH unit, which included XLR inputs as well as four SDI outputs. A good solution to be sure, but it cost $ 2000!

On the GH5 Panasonic is offering what appears to be a reasonable compromise: the DMW-XLR1 microphone accessory. The XLR1 mounts to the camera’s hot shoe, includes two XLR inputs, physical switches and dials similar to what you would find on a pro video camera, and records 96kHz/24-bit sound. It even has a dummy shoe mount on top in case you need to mount another accessory, such as a wireless receiver, above. It doesn’t include SDI connectors, but we’re guessing that most GH5 users will be satisfied with HDMI-out.

We don’t have pricing information yet, but we’d like to think it will cost less than $ 2000.

Auto ISO in M movie shooting

It’s a little thing, but one we very much welcome: with the GH5, Panasonic has added the ability to shoot with Auto ISO in Manual video mode.

Allowing the camera control settings in a ‘manual’ mode may seem like a head-scratcher at first but, particularly for run-and-gun shooting, it can be a really useful combination. It means that the camera operator can set their aperture and shutter speed to maintain the depth-of-field and sense of movement that they want to convey, while trusting the camera to maintain the correct exposure even if the lighting changes.

Offering exposure compensation means that the user retains control over what ‘correct’ exposure is.

Viewfinder

The GH5’s rear screen has been updated but it’s the viewfinder that’s most immediately striking. Its step up to 3.68m dots means it is able to offer 1280 x 960 pixel resolution: a 25% increase in linear resolution compared with the GH4. This may not sound like a major benefit for video shooters but a to-the-eye shooting stance gives a much steadier grip for hand-held shooting than holding the camera at waist level.

The excellent, detailed viewfinder, along with built-in stabilization is only likely to encourage shooting this way, even if only for a shot here and there.

The rear screen moves from 1.04m dots (720 x 480 pixels) to 1.62m dots (900 x 600 pixels). The GH5’s panel should also be more efficient or brighter as it uses an RGB pattern with white pixels interspersed into the array, rather than the conventional RGB pattern used on the GH4.

Battery and media

For all the things that have changed, Panasonic has done a good job keeping as much as possible the same. [REC] button aside, the new camera’s ergonomics are broadly unchanged, compared with its predecessor. But it’s the decision to use the same batteries and media type that’s likely to please existing GH4 users.

The GH5’s promised 400Mbps capture (due in a summer 2017 firmware update) will be too much for most current SD cards, which could have prompted a move to a different capture media. Instead, Panasonic has stayed true to the SD format and added a second slot, compatible with the forthcoming V60 class cards that will guarantee to support the appropriate data rates.

Sticking to the same DMW-BLF19 battery as the GH3 and 4 means any money invested in spare batteries won’t be wasted. The new camera is rated at 410 shots per charge, down from 530 on the GH4 but it’s unlikely many users would have welcomed the larger body and need for a whole set of extra batteries that a change in power supply would have necessitated.

Articles: Digital Photography Review (dpreview.com)

 
Comments Off on Ten important differences between Panasonic’s GH5 and GH4 (and one key similarity)

Posted in Uncategorized


4 of the Most Important Elements of the Lightroom Library Module

11 Oct

When I read through photography forums or talk to other photographers the topic of image editors often comes up. People give various opinions and thoughts about which one they prefer. Photoshop, Lightroom, Apple Photos, Capture One, GIMP, and a host of other options from companies like ON1 and MacPhun are all capable of doing various types of small and large edits to your images.

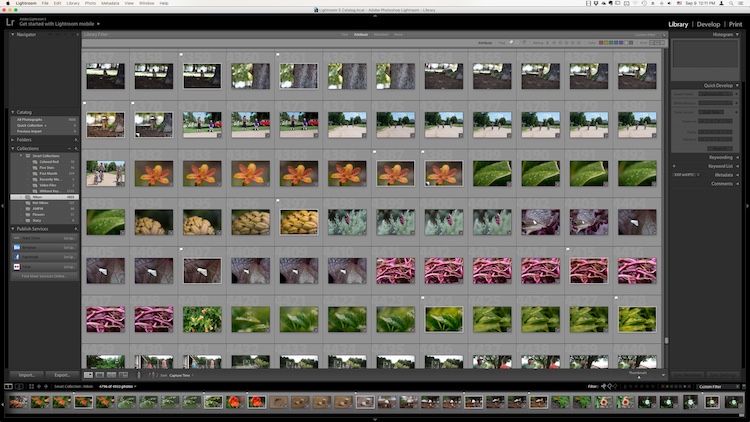
However, one advantage Lightroom has over some other programs is that it not only lets you edit your pictures but categorize them, sort them, tag them, even compare different pictures to see which one you prefer. All this happens in the Library module which is a key part of Lightroom’s workflow. It is essential to understand the Lightroom Library module if you want to get the most out of this program.

The Library module. No late fees here, just lots of ways to manage your images.

The Library module. No late fees here (library pun), just lots of ways to manage your images.

While the Library module does many different things, to get an understanding of the basics it’s good to narrow your focus down a bit. There are a few key areas of the photographer’s workflow that are served by this part of Lightroom; organizing, sorting and viewing…with a dash of editing thrown in just for fun. Let’s look at each one by one.

Organization of images in Lightroom

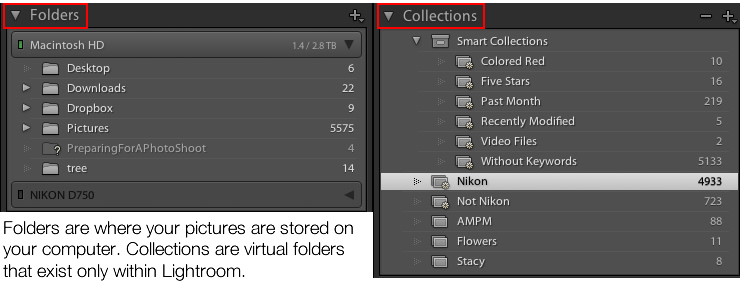
One aspect of Lightroom that is often misunderstood is how it handles your actual picture files, whether JPG, RAW, DNG, or any other format. Contrary to what some people think, it doesn’t actually do anything with your files whether you are categorizing them, sorting them, or editing them. Wherever your pictures are stored on your computer, that is precisely where they will remain when you import them into Lightroom. What you can do, however, is use the Library module to organize and manage your pictures within the program itself. The best way to do this is to put your pictures into what’s known as Collections, or virtual folders that contain sets of images.

Collections are a powerful and efficient method of sorting and organizing your pictures in Lightroom, while leaving them fully intact and untouched on your hard drive.

Collections are a powerful and efficient method of sorting and organizing your pictures in Lightroom while leaving them fully intact and untouched on your hard drive.

How Lightroom sees your pictures

When you import your pictures into Lightroom you are essentially just telling Lightroom where to look for the images that are sitting on your hard drive. Remember back in the days of using the card catalog in a public library? The books weren’t stored in the massive grids of tiny filing cabinet drawers. But those thousands of little cards did tell you where to locate each book as well as a bit of information about each one. That’s sort of how the Collections feature works in the Library module. You can use it to create virtual filing cabinets to organize the images on your hard drive without actually moving, renaming, or otherwise altering your original images.

For example, let’s say you shoot a wedding for your friends Jim and Pam Halpert and come back to your computer with over a thousand images to edit. You can copy all their images to your computer into one folder, and then use Collections in Lightroom to organize them in a way that makes sense to you. Then you can create a Collection Set called “Halpert Wedding” and then within that create additional collections such as “Ceremony,” “Reception,” and “Candids.” Because you are not actually moving the images into different folders on your computer or duplicating the actual picture files, you can put the same picture into multiple collections. You could have the same shot of Jim’s buddy Dwight in both the Reception and Candids folder.

This picture of a periwinkle flower could go into a collection called "Flowers," another one called "Nature," and another one with only pictures of periwinkles. All at the same time.

This picture of a periwinkle flower could go into a collection called “Flowers,” another one called “Nature,” and another one with only pictures of periwinkles. All at the same time.

Smart Collections

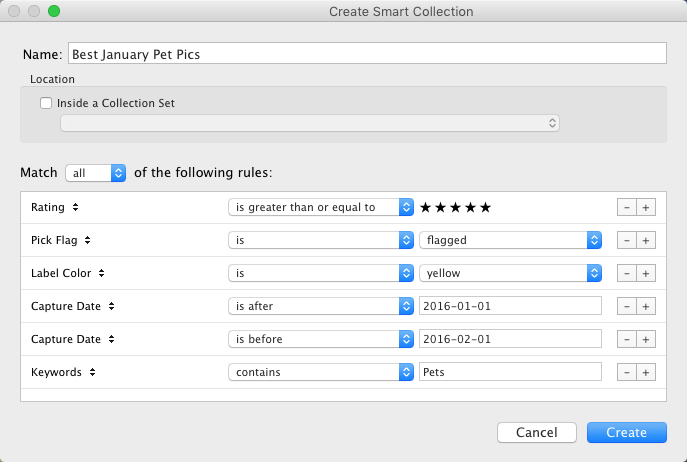
While Collections themselves are quite flexible, you can go a step further by utilizing Smart Collections which is a way of automatically putting pictures in various collections based on criteria that you specify. There are a staggering number of criteria at your disposal, and you can choose whether the Smart Collection should meet any, all, or none of them. These collections are updated dynamically so as soon as a picture in your Library meets the specifications for a given Smart Collection it is automatically inserted into that Collection.

lightroom-library-module-smart-collection


Collections remain one of the hallmark features of the Library module and serve to make Lightroom far more versatile than other programs that simply let you edit your pictures. They work hand-in-hand with the many sorting options as well to give you even greater control over your images.

Sorting images in Lightroom

Have you ever gone through your closet and wished that you could snap your fingers and instantly see all your red shirts, tan pants, or gym shorts that still fit? Better yet, what about immediately seeing only the red shirts you actually like? The Library module allows you to do just that. With the click of a button or press of a keystroke, you can hone and filter your images to see precisely the ones you want, then easily reset everything back the way it was. Pressing the “\” key (while in the Library module), or going to “View > Show Filter Bar” brings up a bar at the top of your screen that allows you to dynamically sort your images based on criteria you specify at will.

lightroom-library-module-filter-bar

Using the filter bar tools

The Filter Bar lets you sort by criteria such as whether photos are marked as Picks or Rejects, have a color or star rating, or are associated with specific keywords. Click any of the icons in the Filter Bar to see the results in real-time, and your images will be immediately pared down to reflect the criteria you want.

To remove any of the filtering criteria just click the button again and Lightroom turns it off. You can also change the type of filtering by clicking the “Text/Attribute/Metadata” options in the middle of the top of your screen which will give you additional parameters. If you don’t want to constantly turn the Filter Bar on and off there is also a persistent mini Filter Bar at the bottom of your screen with many of the options as the full-featured one. I use these filters constantly to sort through my images and find the ones I need for any given project.

Using Keywords to sort your images

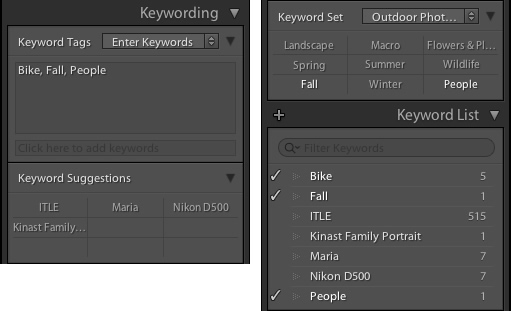
lightroom-library-module-keywords

Keywords are a handy way to add sorting criteria to your photos.

The Keywords feature is another aspect of Lightroom that allows you to sort through your images. On the right side of the Library module is a panel that you can use to assign keywords to images such as “Birthday,” “Nature”, “Summer”, “Uncle Mike”, or any other words you want. To assign a keyword, or multiple keywords, to a picture, just start typing them in the Keyword box or select them from the Keyword Suggestions or Keyword Bank frames. To assign keywords to multiple images at the same time, select them first and then enter your keywords in the box.

Whether you have dozens, hundreds, or thousands of pictures to sort, the options in the Library module can help.

Whether you have dozens, hundreds, or thousands of pictures to sort, the options in the Library module can help.

Viewing images in the Library module

As your photo collection grows larger it’s essential that you have a way to actually view and manage all of the images. Thankfully Lightroom has a robust system in place to let you do exactly that. Of course, you can use collections and sorting criteria, but you also have some useful tools at your disposal to actually view the pictures too. The icons at the bottom-left of your screen let you change between four different views; Grid, Loupe, Compare, and Survey.

View modes

Click Grid to see a bird’s-eye view of all the pictures in the Collection you are currently viewing. Use the Thumbnail slider in the bottom-right (if it’s not visible tap the T key to hide/show the tools bar) to change the size of the thumbnails depending on your preference.

Grid, Loupe, Compare, and Survey let you view your pictures in useful and creative ways.

Grid, Loupe, Compare, and Survey let you view your pictures in useful and creative ways.

Loupe is a term borrowed from the days of developing pictures in a darkroom. It refers to the small glass viewer, sort of like a magnifying glass without a handle, that a technician would use to see a given image in greater detail. Click the Loupe view to see one image at a time and then click anywhere on the image with your cursor (which has now turned into a magnifying glass with a + inside) to zoom in closer. Hold [alt] or [option] on a Mac to click and zoom out, and use the zoom level options in the top-left corner of your screen to change the magnification level. This is particularly useful if you want to check if a given picture is sharp and in focus.

Compare and Survey view modes are related in that they let you see two or more pictures at a time in order to choose the one you prefer. These modes are especially handy if you have multiple similar images, such as after a portrait session, and are trying to pick the best one out of a bunch.

I had about two dozen nearly identical shots, but Lightroom's view and sorting options helped me find just the photographic needle in the memory card haystack.

I had about two dozen nearly identical shots, but Lightroom’s view and sorting options helped me find just the photographic needle in the memory card haystack.

Quick Develop in the Library module

I like to think of the Library’s Quick Develop options as extra credit for a class assignment. They are an added touch that lets you do a bit of editing with your pictures without going to the full-fledged Develop module, and will often give you just the right amount of editing that a picture needs. Nestled on the right-hand side of the Library module is a little toolbar called Quick Develop which does exactly what you might think. It allows you to quickly and easily adjust a few essential parameters such as White Balance, Exposure, Highlights, Shadows, and a few other settings.

lightroom-library-module-quick-develop

Clicking on the single arrow for any given parameter adjusts things just a little bit. While clicking the double arrow adjusts things a lot. For example, the single right-facing arrow for Exposure will increase the value by 1/3 stop, whereas the double arrows will increase the value by a full stop. You don’t get anywhere near the fine-grain control that you do in the actual Develop module, but if you need to quickly make some basic edits to an image you might find Quick Develop to be quite handy.

lightroom-library-module-rainbow

Conclusion

These four elements aren’t all that the Library module has to offer, but learning them will give you plenty to work with as you begin to expand your knowledge of this powerful program. Do you have any favorite tips you’d like to share? Are there features you think I missed that others should know about? Please leave your thoughts in the comments below.

googletag.cmd.push(function() {
tablet_slots.push( googletag.defineSlot( “/1005424/_dPSv4_tab-all-article-bottom_(300×250)”, [300, 250], “pb-ad-78623” ).addService( googletag.pubads() ) ); } );

googletag.cmd.push(function() {
mobile_slots.push( googletag.defineSlot( “/1005424/_dPSv4_mob-all-article-bottom_(300×250)”, [300, 250], “pb-ad-78158” ).addService( googletag.pubads() ) ); } );

The post 4 of the Most Important Elements of the Lightroom Library Module by Simon Ringsmuth appeared first on Digital Photography School.


Digital Photography School

 
Comments Off on 4 of the Most Important Elements of the Lightroom Library Module

Posted in Photography


The 6 Most Important Things You Need to Know about Lightroom’s Develop Module

15 May

Lightroom is powerful, but it’s also complex and has a steep learning curve. If you feel overwhelmed by all the options, there’s great value in taking a simple approach and learning to use the tools that are most useful first. Leave the more advanced features until you have more experience.

With that in mind, I’ve put together this list of the six most important things you need to know about Lightroom’s Develop module. Learn these and you will be well on the way to Lightroom mastery.

1. Backup your catalog regularly

This is the most crucial thing to set up, as everything you do to your photos in the Develop module (not to mention metadata changes like Collections, flags and keywords) is stored in the catalog. It would be a disaster to lose your catalog (and consequently all your hard work) to hard drive failure, so you need to make sure that Lightroom is backing it up regularly to an external hard drive.

To do so, go to:

  • For Windows users: Edit > Catalog Settings > Back up catalog
  • For Mac users: Lightroom > Catalog Settings > Back up catalog

I have mine set to: Every time Lightroom exits – some photographers find that Once a week, when exiting Lightroom is enough.

When you exit Lightroom, a dialog window appears that shows you where Lightroom is going to save the backup Catalog. Click Choose to change the location if you need to. Note: this is the only time you can select the destination where the backup will be saved.

Make sure the Test integrity before backing up and Optimize catalog after backing up boxes are both ticked. This slows down the back up process, but it’s worth it because it helps ensure that your catalog remains free from corruption, and is optimized for speed.

Lightroom Develop module

Please note: The Catalog doesn’t contain any of your photos. Backing up your Catalog doesn’t back up your photos, only the information that Lightroom contains about them. Photo backups need to be managed separately.

2. Profile is the most important setting in the Develop module

The Profile menu is tucked away in the Camera Calibration panel, at the bottom of the right-hand panels in the Develop module. The default profile setting is Adobe Standard (circled below). This profile was created specifically for your camera by Adobe. Pick that one for accurate colors.

You will also find the color profile settings specific to your camera (Landscape, Portrait, and so on). You can pick one of these if you prefer the look to Adobe Standard.

Lightroom Develop module

The profile affects both color and contrast, so from a practical point of view it’s important to select the right one, before you start adjusting contrast and white balance in the Basic panel. Get the profile right, and it makes all subsequent processing steps much easier. Get it wrong, and it makes them more difficult.

For example, if you apply a profile intended for landscape photos to a portrait, then you could end up with over-saturated colors and unnatural skin tones. Then you might try and fix that by playing with the Basic panel sliders or other color controls. This approach rarely works, it’s far better to select the most appropriate profile from the start.

These two photos show the difference between the Adobe Standard and Velvia profiles on a Fujifilm X-T1 camera. The Velvia profile saturates colors, the Adobe Standard profile looks more natural.

Lightroom Develop module

3. Use Lens Corrections to correct distortion and eliminate chromatic aberrations

No lens is perfect, and most have at least a little distortion and chromatic aberration. One of the benefits of digital photography is that you can eliminate these in the processing stage, so they are not the problem they once were. Go to the Basic tab in the Lens Correction panel, select Enable Profile Corrections and Remove Chromatic Aberration in order to do so.

Lightroom Develop module

This comparison shows the result on a photo taken with a zoom lens producing barrel distortion.

Lightroom Develop module

Lightroom Develop module

4. You can carry out 80% of your processing in the Basic panel

Once you have selected a Profile, and applied Lens Corrections, you can go to the Basic panel to start making any adjustments required to the photo’s brightness, contrast, and color.

The sliders in the Basic panel are extremely powerful. Take the time to get to know what each one does, and how the settings affect your images. Once you get the hang of these sliders it’s quite possible that you can do all of your global adjustments (those that affect the entire image) here, and not have to touch the Tone Curve or HSL / Color / B&W panels at all.

This photo is a good example. Virtually all the processing was done in the Basic panel, made possible by selecting the most appropriate profile first. The only additional thing I did was add a vignette using the Effects panel.

Lightroom Develop module

My article Steps for Getting Started in the Lightroom Develop Module goes into this in more detail.

5. Learn to use local adjustments wisely

It wasn’t so long ago that many professional photographers would send their negatives to master printers who used dodging, burning, and other fancy darkroom techniques, to create a far better print than the photographer ever could. These local adjustments – those applied to only part of the image, rather than all of it – are often vital for bringing the best out of your Raw files in Lightroom.

Lightroom has three tools for making local adjustments – the Adjustment Brush, Radial Filter and Graduated Filter. They allow you to selectively adjust brightness, contrast, and other tone and color settings. Each tool has its own idiosyncrasies, so take the time to get to know each one in turn.

This example shows the difference that local adjustments make. I used a combination of all three of Lightroom’s tools to turn the image on the left, into the one on the right.

Lightroom Develop module

6. Don’t overlook the Clarity slider

The Clarity slider is extremely useful as both a local, and global adjustment. It’s primary use is to enhance texture, and it does so by increasing edge contrast (the spots where dark and light areas meet). You do have to be careful not to overuse it, but judicious applications of texture enhancement can help bring the best out of any photo. Clarity is also an ideal tool for enhancing black and white images, which often rely on texture to add impact.

The following photos show the effect of adding Clarity. I used the Radial filter to apply Clarity to the Buddha heads to bring out the texture.

Lightroom Develop module

Lightroom Develop module

These six items are not a comprehensive list of what you can do in Lightroom’s Develop module, but they will certainly get you started, and simplify the process of learning to use it.

What do you think are the most important tools to master in the Develop module? Do you agree with my selection? Please let me know in the comments below. And if you want to learn more about Lightroom then please check out my Mastering Lightroom ebooks.

googletag.cmd.push(function() {
tablet_slots.push( googletag.defineSlot( “/1005424/_dPSv4_tab-all-article-bottom_(300×250)”, [300, 250], “pb-ad-78623” ).addService( googletag.pubads() ) ); } );

googletag.cmd.push(function() {
mobile_slots.push( googletag.defineSlot( “/1005424/_dPSv4_mob-all-article-bottom_(300×250)”, [300, 250], “pb-ad-78158” ).addService( googletag.pubads() ) ); } );

The post The 6 Most Important Things You Need to Know about Lightroom’s Develop Module by Andrew S. Gibson appeared first on Digital Photography School.


Digital Photography School

 
Comments Off on The 6 Most Important Things You Need to Know about Lightroom’s Develop Module

Posted in Photography


5 Important Focal Lengths to Know and the Benefits of Each

05 Apr

5 Focal Lengths and Why You Should Use Them 1

Please note: all focal lengths mentioned in this article are in reference to 35mm full frame sensors.

There are photographers that favor the convenience and flexibility of zoom lenses, and those that favor their sharper, lighter and cheaper counterpart, the prime lens. Note: some modern zooms do have prime-like optics. Often, it’s your line of work that will make that decision for you. Whichever variant you favor, you owe it to yourself to experiment with different focal lengths to learn where they each excel, and which ones mesh best with your style. You can achieve this with primes, or zooms if you can commit yourself to not touching that handy zoom barrel. Among the many options, five focal lengths you want to use are the: 24mm, 35mm, 50mm, 85mm, and 135mm.

Let’s look at each one at a time.

#1 – 24mm wide angle

Areas it excels in: landscapes, astrophotography, group portraits, and event photography.

This one is easy to experiment with because not only are there many affordable prime options available, but you’ll find this focal length at the wide end of many full frame zoom lenses. The 24mm prime lens is sufficiently wide and remarkably sharp, making it an ideal candidate for landscape photography. Zooms are wonderful for landscape photography too, but the locked-in field of view (or a prime lens) will force you to think carefully about your compositions.

5 Focal Lengths and Why You Should Use Them 2

The 24mm focal length also excels in situations that don’t offer a lot of light. That includes astrophotography, where 24mm lenses with wide apertures (f/.8 or wider) will facilitate shots of the milky way, and in event photography, where you’ll have an ample field-of-view to shoot indoors and add context to your photographs. Additionally, the 24mm focal length is sufficiently wide to capture group portraits with minimal perspective distortion. Just don’t get too close, and watch the edges of your frame.

5 Focal Lengths and Why You Should Use Them 3

#3 – 35mm focal length

Areas it excels in: street photography, events, environmental portraits, and shooting-across-the-dinner-table photography.

35mm is a classic focal length for many photojournalists. Part of that reason is that the field-of-view requires you to be close to the action, but still maintains enough of the environment surrounding your subject to give an image context. This same philosophy applies well to wedding or event photography, and makes the 35mm focal length a great fit.

5 Focal Lengths and Why You Should Use Them 4

Another great thing about the 35mm prime lens is that it just so happens to be the perfect focal length for shooting a portrait from across the dinner table. Any wider and your subjects face will suffer from perspective distortion (exaggerating their facial features) and any narrower and you’d have to get out of your seat for the shot.

5 Focal Lengths and Why You Should Use Them 5

#3 – 50mm (normal) lens

Areas it excels in: street photography, full-body portraits, walk-around shooting.

There are so many reasons to try shooting with a 50mm prime lens. Perhaps the best one is that they’re cheap. You can purchase a brand new 50mm lens for most DSLR systems for a little over $ 100. Also, they produce an image that is normal, or most-like the image that we see with our own eyes. There is a common misconception about this concept. The normal perspective that a 50mm lens offers refers to the perspective distortion (or lack thereof), not the field-of-view. For this reason, the 50mm lens is great for full-body portraits and walk-around or street photography.

5 Focal Lengths and Why You Should Use Them 6

5 Focal Lengths and Why You Should Use Them 7

The 50mm lens is another classic, and a large part of that reason is that often, the area in frame is just right. It’s narrow enough to create balanced compositions with ease, but still wide enough to create interest beyond your subject. That is why you will find a 50mm lens in the bags of most street photographers.

#4 – 85mm slight telephoto lens

Areas it excels in: portrait, events, and sports photography.

The 85mm focal length is one that you will find in the bag of many wedding and portrait photographers. It creates beautiful portraits with the ability to flatten one’s features, which is generally flattering, and brilliant background separation. The field of view is not so tight that you’ll feel like you need to be outdoors to use one, but it gives you a nice working distance that allows this focal length to sneakily capture candids at a wedding or family gathering.

5 Focal Lengths and Why You Should Use Them 8

That working distance is great for full body shots when you’re on the sidelines of a sporting event, too. The 85mm prime is also a great working distance for photographing your kids or pets.

5 Focal Lengths and Why You Should Use Them 9

#5 – 135mm telephoto

Areas it excels in: head-shots, portraits, and wedding photography.

When you need to get in close, or if you just love bokeh, the 135mm lens is a great pick. For details and head-shots that bring your subject to life, grab this focal length. The background separation is fantastic, due to the increased compression of the image. The flattering flattening effect (say that five times) from the compression, makes this lens great for shoulder shots, senior portraits, candids, and more. You’ll have fun shooting wide open to create magical separation between your subject(s) and their surroundings.

5 Focal Lengths and Why You Should Use Them 10

5 Focal Lengths and Why You Should Use Them 11

The drawback to this focal length is that you do need a lot of working room, and a lot of light. Remember the 1/focal length rule for shutter speed? In other words, you wouldn’t want to shoot a 135mm lens any slower than 1/135th of a second, without a very steady hand or a tripod. When light or space become a problem, it’s nice to have an 85mm lens to fall back on.

5 Focal Lengths and Why You Should Use Them 12

Chances are you will love some of these focal lengths and dislike others, but you’ll never know until you give them all a shot. Modern zoom lenses are remarkable in their optical-quality, but you do lose the connection you feel when you are truly in sync with your focal length. The more you shoot with a 50mm lens, the more you will start to see with a 50mm perspective. Good luck and happy shooting!

googletag.cmd.push(function() {
tablet_slots.push( googletag.defineSlot( “/1005424/_dPSv4_tab-all-article-bottom_(300×250)”, [300, 250], “pb-ad-78623” ).addService( googletag.pubads() ) ); } );

googletag.cmd.push(function() {
mobile_slots.push( googletag.defineSlot( “/1005424/_dPSv4_mob-all-article-bottom_(300×250)”, [300, 250], “pb-ad-78158” ).addService( googletag.pubads() ) ); } );

The post 5 Important Focal Lengths to Know and the Benefits of Each by Jason Checkla appeared first on Digital Photography School.


Digital Photography School

 
Comments Off on 5 Important Focal Lengths to Know and the Benefits of Each

Posted in Photography


CP+ Canon interview: ‘important to increase development speed’

02 Mar
Mr. Go Tokura, Group Executive ICP Group 2, Image Communications Products Operations, Canon Inc. Pictured at the CP+ show in Yokohama Japan, 2016. 

As well as reporting on the newest gear, we use the opportunity of visiting the CP+ show in Japan to sit down and talk to senior executives from the major camera and lens manufacturers. This year, we were fortunate enough to spend some time with Mr Go Tokura of Canon. 


Canon has had a big year with the launch of the enthusiast-focused EOS 80D and the professional EOS-1D X Mark II. Can you summarize your strategies for catering to these two different market segments?

With regard to the 1D X Mark II, this is an Olympics year.  In years when the Olympic Games are held, one of our objectives is to launch a flagship model within our DSLR lineup to try to capture the professional user market. So this is a big objective in terms of strategy.

As for the 80D, we have entry-level DSLR models under the Rebel brand and the 80D is the level just above – designed to ensure that users can maximize its features in the best way possible. That’s in terms of price, operability, usability and that sort of thing. In recent years the entry-level market segment has been weakening, but the level above that, where we’re targeting advanced amateur users, is becoming an increased focus. The 70D is doing well and is quite popular among our users, and for that reason we expect a lot of interest in the 80D.

Some of our readers were disappointed that the 80D does not include 4K video. Why did you decide not to include this feature?

As you know, in our DSLR lineup we incorporate both video functions and traditional stills DSLR functions. Among our DSLR users we’re still seeing a strong emphasis on the stills photography function. 

We’re promoting our DSLRs as providing both stills and video features – the best of both worlds, you might say. However with regard to the 80D, the main emphasis was to maximise the stills side of the camera. Then, with the aim of increasing the user base, we add movie features to this established stills shooting feature set.

The EOS 80D offers an easy-to-use video feature set, and its new 18-135mm kit lens is compatible with Canon’s new inexpensive Power Zoom unit for convenient handling in video mode. But it’s not 4K-capable, and as yet, no camera in Canon’s sub-pro DSLR lineup is, either.

Do you think there is space in the enthusiast DSLR market for a more capable video camera? Which maybe does offer 4K?

We are considering this and we recognize that this is a feature which might be in demand in the future.

Do you think that Dual Pixel AF will ever be equal to conventional phase-detection DSLR focus, and if so, when will this happen?

It’s very difficult to predict timing, of course, but we want to make Dual Pixel AF surpass conventional phase-detection in terms of performance. 

Dual Pixel AF is a technology which has huge potential for mirrorless cameras. A lot of our readers are still very hopeful for future Canon enthusiast mirrorless models. Is there anything that you would like to say to them?

Obviously I can’t be particularly concrete when talking about our future product planning, but this is something that we are looking at. Something that is under consideration. There are some features, such as AF, which have not yet caught up with DSLRs, so given the current state of affairs it would be a little unrealistic to say that we will suddenly start offering a professional mirrorless camera. There’s still a performance gap that needs to be addressed. 

If we assume that at some point in the future Canon will create an enthusiast or professional mirrorless camera, what are your benchmarks?

This is just my personal opinion. In my view there are two key features that have to be addressed. The first is autofocus, particularly tracking of moving subjects. The other is the viewfinder. The electronic viewfinder would have to offer a certain standard. If those two functions were to match the performance of EOS DSLR camera performance, we might make the switch.

Tremendous progress has been made in electronic systems.  However in terms of AF, pro-level AF functions, and the range of shooting situations that professional photographers can respond to, there’s still a gap between DSLRs and mirrorless systems.

The Canon EOS M3 is Canon’s most convincing mirrorless camera to date, but it isn’t the model that a lot of Canon users have been hoping for. According to Mr Takura, autofocus and electronic viewfinder performance has to improve before Canon will consider launching an enthusiast-focused mirrorless product. 

When I spoke to Mr Maeda last year he told me that he was focused on increasing the speed of product development at Canon. Have you seen a change?

I can’t give any concrete details here but this is a goal that we’re working to achieve. 

The reason I ask is that it seems that compared to the past, the entry-level ILC market seems to be moving rather slowly right now, whereas in terms of development speed, the enthusiast and semi-pro ILC market is moving quite quickly. 

Yes, I agree. For this reason, it’s becoming increasingly important that we do increase development speed.  That’s why it’s considered a very important objective that we’re continuing to address.

What is your strategy for growth in this changed market? What do you need to do to differentiate?

One of the differences between us and our competition is the EF lens lineup. We have a very broad base of EF lens users and we don’t want to do anything that would sacrifice their loyalty, so it’s a very high priority for us to satisfy their needs and meet their demands. 

With regard to the overall market, maybe there’s a lack of vigor and it could be viewed as shrinking. Looking at the compact camera market, the bottom end is dropping considerably and the competition is smartphones. Smartphones offer a very easy, convenient way of taking photos. However in the high-end compact segment, at the high end there are cameras that offer functions and performance that smartphones cannot compete with and here we’re seeing growth. So in the compact market, offering features that smartphones cannot compete with is a way of differentiating and invigorating the market. 

You mentioned loyalty. How important is it to you to continue to update older models via firmware even perhaps after end of life?

Of course we’d like to provide every level of support we can, even to users of older models. Should an opportunity arise we’ll obviously offer firmware updates so that they can get the most out of the models that they have purchased. However a lot of the performance depends on the hardware itself. There is only so much you can get out of older or out of date hardware. There are new devices incorporated in newer models which make possible improved performance, so there’s a kind of tradeoff. Unless newer hardware is introduced, sometimes it’s not possible to get the performance.

One of the areas where we’ve been pleased to see improvement from Canon is in sensors. What are your priorities in terms of sensor development in the future?

Increasing resolution and increasing sensitivity are ongoing objectives and that’s not going to change, but on top of that, as I’ve mentioned there’s an emphasis on merging stills and movie functions. So two priorities for future sensors are lower power consumption and increasing processing speed. 

The Canon EOS-1D X Mark II is a significant, albeit iterative upgrade to the 1D X. We should expect new flagship models in Olympic years, says Mr Tokura. 

As you develop semi-professional lines like the EOS 5D and 1D-series, where are you most focused in terms of improvement?

When we look at a model that we want to upgrade, we don’t take a single item of specification and choose to work on that and not other aspects. We try to improve all features to the same degree. The EOS 5DS however was an exception. Resolution was increased markedly, off the charts compared to anything we had done before. But that’s the exception. Usually we won’t try to boost any one feature over and above the rest of the feature set.

Our approach when it becomes time to launch the next generation of the EOS-1D X or the 5D, is that we try to raise performance across the board as best we can.

Editor’s note:

I last spoke to Mr Tokura in 2014, and although Canon has been pretty busy in the two years since then, when it comes to the big picture it might appear that not much seems to have really changed. The company still lacks a convincing mirrorless camera, as competitors like Sony continue to set a faster and faster pace of technological development at the semi-pro end of the ILC market.

But at least we have a clear sense of what it would take for Canon to make a ‘switch’ to mirrorless. Although Mr Takura acknowledges that the technology has advanced a lot, he still sees autofocus and the experience of using an electronic viewfinder as being the two key areas where mirrorless cameras lag behind DSLRs. Whether you agree with him or not, the implicit promise that Canon intends to improve Dual Pixel AF to the point where it rivals the best professional DSLR autofocus systems should be very exciting. 

Canon is big enough that it doesn’t need to worry too much about being left behind quite yet (Mr Takura’s point about Canon EF users is a good one – there are more than 100 million EF lenses out there, something that Sony certainly cannot boast) but I do sense a shift, of sorts, in my conversations with Canon representatives in recent months. Mr Maeda, who in conversations with us has stressed the importance of speeding up product development, is moving up inside the company. More than ever, his influence is, I think, being felt quite keenly by the managers that report to him. When I asked Mr Takura whether increasing development speed was still a priority, he answered with a knowing smile. It’s very clear that yes – it most definitely is. 

Articles: Digital Photography Review (dpreview.com)

 
Comments Off on CP+ Canon interview: ‘important to increase development speed’

Posted in Uncategorized