RSS
 

Posts Tagged ‘Files’

Byte sized: JPEGmini claims no loss of perceptual quality, up to 80% smaller files

03 Dec

Most of us think of image compression as a necessary evil. It makes our files more manageable in terms of size, but reduces the quality of our images and can undo the incremental benefits of buying more pixels and better lenses. If offered the choice between more or less image compression, I suspect that most photographers would always go for less. Hence, the idea of buying a piece of software that aims to reduce the size of JPEG files by up to 80% might seem a little crazy. But that is exactly what Beamr, the company behind the JPEGmini application, is offering.

Introduced in 2011, JPEGmini acts as a standalone product or as a plug-in for Lightroom and is a compression optimizer that takes in existing JPEG files and makes them smaller – without reducing the quality of the image, the company claims. The idea is to save space on hard drives, external storage devices, make websites run more quickly, deliver more manageable file sizes to clients and help reduce spending on cloud storage. We’ve read up on it and written about its desktop and mobile applications briefly, but Senior DPReview Contributor Damien Demolder recently had the chance to sit down with the company’s Chief Technology Officer to find out more about how it works.

How it works

Dror Gill, CTO and VP of Beamr, the company behind JPEGmini

In an interview, Beamr’s CTO Dror Gill explains how JPEGmini works and how the company measures its claimed ‘no change’ in image quality.

‘JPEGmini works with standard JPEGs. The input is a standard JPEG and the output is a standard JPEG. We recompress that standard JPEG photo by up to 80%, and the resolution remains the same and the perceptual quality of the image remains the same. When we talk about ‘perceptual image quality’ we mean that if you took this photo and viewed it on your screen at Actual Pixels, or 100% magnification, and compared it to the original you wouldn’t be able to determine which was the original and which one was the optimized. That’s what we call ‘perceptually identical’ to the original.’

I wanted to know who the ‘you’ was in that qualification – as the opinions of a general consumer, a photographer and a scientist will all be significantly different. Gill said that ‘99% of the population’ wouldn’t be able to tell the difference, including most photographers. 

‘Any JPEG compression introduces artefacts, but the question is,
are these artefacts visible by humans or not?’

‘Most of our customers are professional photographers, and they have realised that the photos that they get out of JPEGmini are as good as the originals and that they can use them in the same situations and for the same uses. Of course, the JPEG process introduces artefacts that you don’t find in the RAW file, so any JPEG produced by Photoshop or Lightroom will have artefacts, but our claim is that our processed image will look the same as the original JPEG and the compression will not introduce further artefacts. Any JPEG compression introduces artefacts, but the question is, are these artefacts visible by humans or not? We have developed a quality measure that gives us that answer with very high accuracy. This quality measure has much better correlation with human results than other scientific quality measures.’

The software works by analyzing the content of each image, and determining how much compression can be applied to each individual area. Images are broken down into tiles of a set number of pixels, and the degree of compression acceptable is assessed according to the level of information recorded in the tile. Gill wouldn’t say how the tiles interact with each other, but we worked on the presumption that the tiles were about 150 pixels square.

If there isn’t much data recorded the content can be compressed more than if a tile contains a lot of data, so the savings are made via a more flexible process than the usual global compression ratios that most software applications and cameras work with. The software produces compression level ‘candidates’ for each tile, which basically means it tries different levels and determines the maximum that can be achieved without loss of the information in the tile – and then that amount is applied.

$ (document).ready(function() { SampleGalleryV2({“targetContainerClass”:”sampleGalleryImageViewerContainer”,”galleryId”:”6536787672″,”isEmbeddedWidget”:true,”selectedImageIndex”:0,”startInCommentsView”:false,”isMobile”:false}) });

Gill says camera manufacturers don’t like to use a lot of compression because too many reviewers and customers think that image quality and the amount of detail in an image can be determined by the size of the file created, and that people associate smaller file sizes with lower levels of picture information. Camera brands, he says, don’t want to produce files that are smaller than their competitors as some reviewers will immediately mark them down for it without studying the comparison images.

‘what we do is take that image and determine
what is the exact optimal level of compression for that particular picture’

Cameras don’t have any mechanism for evaluating the content of the image either, he says, so the compression has to be global and to err on the safe side. ‘This results in a relatively large JPEG,’ says Gill, ‘but what we do is take that image and determine what is the exact optimal level of compression for that particular picture. Some images are more easily compressed than others – some have very delicate textures and smoothly varying color gradients, and for those you need to use high quality settings. If the content is mainly smooth surfaces and busy backgrounds, that you can’t tell if they are degraded or not, you can use a higher compression ratio.’

Gill says that out-of-focus backgrounds can be compressed more than focused areas, as the software analysis works by detecting the amount of detail and information present. This brings up the question of whether a poor lens will be made to look worse by the compression compared to the same area captured by a sharp lens, but Gill maintains that the difference wouldn’t show. Tests, I suppose, will give us the sure answer to that.

If you view the optimized images at 800% Gill admits that you would see the differences, but at normal viewing and for normal use you won’t. ‘These optimised files are designed to be viewed at 100% and to be printed. In print it is even harder to see the differences than on screen.’

‘the inefficiency of normal JPEG compression pollutes the environment’

The whole idea of JPEGmini, Gill explains, is to save space on laptops, hard disks, online and in external storage. ‘There are a lot of terabytes wasted by files that are larger than they need to be. There is no point using bytes and bits that are not visible to humans. The industry is doing it all the time. Maybe we should calculate how many exabytes are being wasted every day – the inefficiency of normal JPEG compression pollutes the environment’ he only half-jokes.

Gill’s father is Aaron Gill, who was one of the chief scientists who worked on the original JPEG standard in the 1980s. I ask how he feels about his son tampering with the way JPEGs are created. ‘At first he was sceptical and asked me what I was doing getting mixed up with this company that wants to reduce file sizes, but after he tried it I think he was proud of me.’

Trying it out

JPEGmini supports JPEG files up to 28MP, while its JPEGmini pro and JPEGmini Server siblings support up to 60MP images. To give an idea of what JPEGmini does, I ran a 25.45MB Raw file through Lightroom and exported a ‘best quality’ JPEG of 10.12MB. After being exported again via the JPEGmini plug-in the file was compressed to 2.66MB, and still measured the same 4608×3456 (16MP) pixels it did originally – so the JPEGmini file is a quarter of the size of the normal JPEG.

The software still makes considerable savings even if you don’t usually convert your images using the best quality settings. For comparison, that Raw file exported as a JPEG at 80% quality in Lightroom (not using JPEGmini) resulted in a 4.8MB file. The 2.6MB JPEGmini file is just over half the size.

Although photographers might like the idea of saving space most are not interested in doing so at the cost of quality, and frankly I think most of us struggle to believe that such a dramatic file size reduction can be achieved without any detrimental effect on the content of the picture.

Normal JPEG exported from Lightroom at best quality JPEG exported from Lightroom via the JPEGmini plug-in

In my very brief tests I have been able to see slight differences in levels of micro contrast and the amount of very fine texture that is resolved when the images I used were viewed at 100% on screen. More tests will be required to see exactly what is lost and what is at stake, and I’m compelled to make those tests by the carrot of saving a massive amount of space in storage and by the prospect of having a website with large images that runs quickly. At this stage I can say that in the image I tested the plug-in with tiny differences could be seen when the images were compared at 100%, but at print size (33%) the differences were certainly not apparent.

Normal JPEG converted from Raw at quality 11 – 2.2MB JPEG further compressed via JPEGmini app – 980KB

If you can’t wait for the results of my testing you can download the $ 19.99 standard standalone version of JPEGmini for a free trial. JPEGmini Pro costs $ 149 but can work with images of up to 60MP, is up to 8x quicker and comes with the Lightroom plug-in option as well as the standalone application. At the moment however, JPEGmini only accepts JPEG files. That means even using the Lightroom plug-in, a Raw file must first be converted to JPEG to then be re-saved as a smaller JPEG by the application. 

For more information visit the JPEGmini website.

Articles: Digital Photography Review (dpreview.com)
 
Comments Off on Byte sized: JPEGmini claims no loss of perceptual quality, up to 80% smaller files

Posted in Uncategorized


Reuters will no longer accept edited Raw files from freelance photographers

19 Nov

In an email to freelance photojournalists this week, Reuters has confirmed a change in its photo submission policy requesting that photographers submit JPEGs rather than edited Raw files to the news agency. The message also states that original JPEGs with ‘minimal processing’ are acceptable, for example, level corrections and cropping. Read more

Articles: Digital Photography Review (dpreview.com)

 
Comments Off on Reuters will no longer accept edited Raw files from freelance photographers

Posted in Uncategorized


Leica’s Red Dot Forum warns of crash risk with Monochrom Raw files in Apple’s Photos App

15 May

Users of the new Leica Monochrom (typ 246) risk wiping out their Apple Photos library if they try to use it to store the DNG Raw files created by the camera, according to a statement from Leica’s Red Dot Forum. Mac computer owners running OS X Yosemite will find the files cause the library to crash, which Leica says could lead to all images saved in the library being destroyed. Read more

Articles: Digital Photography Review (dpreview.com)

 
Comments Off on Leica’s Red Dot Forum warns of crash risk with Monochrom Raw files in Apple’s Photos App

Posted in Uncategorized


Post-processing RAW Files – ACR Compared to Some Free Software Options

07 Mar

What is RAW?

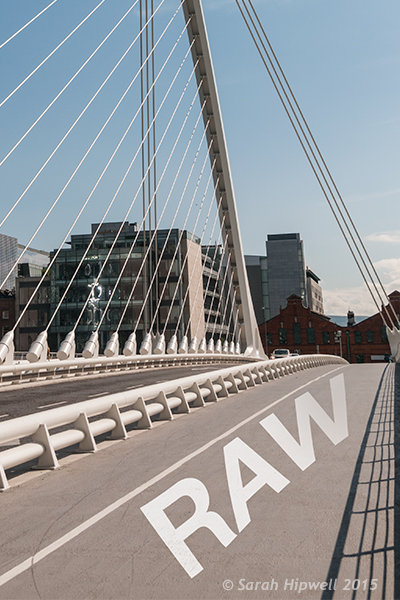
Title-imageA RAW file is really the digital negative, which means that all the data is stored waiting to be unleashed via a RAW Editor. Unlike a jpeg file which has been edited in-camera (or in post-processing) and is a compressed 8-bit file.
Why shoot RAW?

The main benefit to shooting RAW is simply to have as much information as possible in the file. When you upload a RAW file onto your computer the white balance, and tonal corrections have to be set manually. More detail can be retrieved from the highlights and shadows. It is then saved as a jpeg or some other format. The RAW file always remains in its original state.

Shooting RAW has become more commonplace as cameras have the option, built-in and RAW editing software is more widely available on both Mac and PC. In this article, I will be testing out two RAW editors which are free to download. Yes, no purchase necessary. The main RAW editor that I will go into more detail on is Adobe Camera Raw (ACR), which comes with Photoshop and is my primary go-to RAW editing software.

As a side note, this article is by no means a complete in-depth review of the pros and cons of each of the the three RAW editors. I merely wanted to test Photoshop’s ACR against some of the RAW editors that are available to download for free, such as GIMP and RawTherapee.

A few years back, I was using ViewNX (now ViewNX2), which is Nikon’s RAW free editing software. Canon (DPP) and other major camera manufacturers have their own RAW proprietary software. But I found ACR just got better with each new release. I usually bring my images into Photoshop when I’ve done the initial edits in ACR. It means my workflow is quite efficient as I’m using ACR and Photoshop side-by-side.

The Basics

When you open ACR or any RAW editor, the user interface can be a bit daunting for the uninitiated. The range of adjustments and all the features of ACR would require several articles alone.

So, let’s look at the basic adjustments where I begin the editing process of my RAW files. These adjustments are fundamental to any RAW editor. Similar adjustments can also be found in the Develop module of Lightroom and in Photoshop Elements 12 and 13. Let’s begin with Adobe Camera Raw, otherwise known as ACR.

Adobe Camera Raw (ACR)

ACR-UI

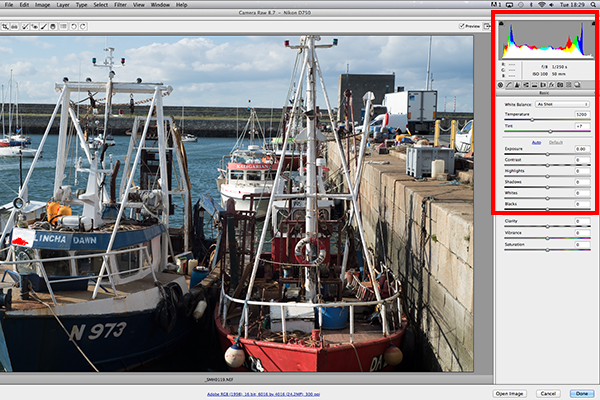
The interface when a RAW file is opened in ACR

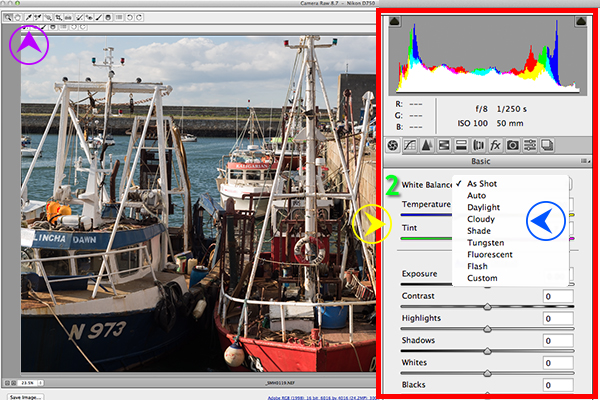
When I open a RAW file in ACR, White Balance is my first port of call. This is about the color temperature of the image depending on the light source. If the white balance is incorrect, then a color cast will occur on your image. It may look slightly blue, orange or green.

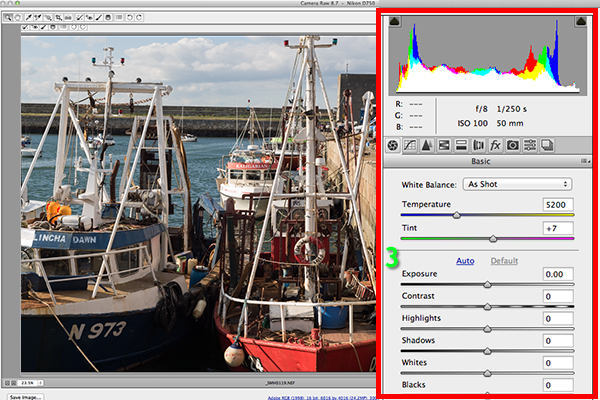
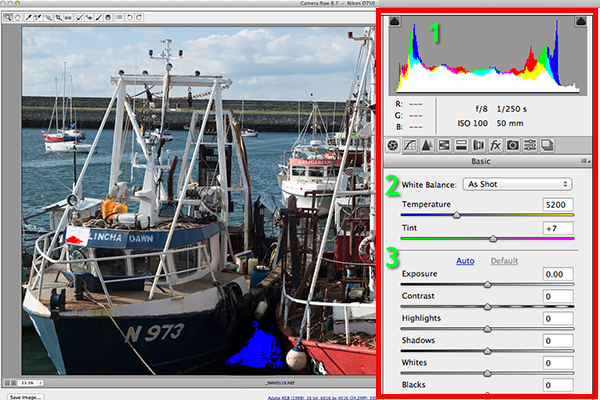
The 3 important focus points in the Basic panel in ACR

The three important focus points in the Basic panel in ACR

In ACR, there are three ways to adjust White Balance.

3-ways-to-edit-WB

Three ways to edit White Balance in ACR:
1. White Balance Tool
2. Presets
3. Temperature and Tint Sliders

  1. The White Balance Tool is my least favourite. The idea being that you click anywhere on the image that is suppose to be gray. I find this tool hit and miss.
  2. There are number of presets that are worth experimenting with, if you are new to RAW editing. Try Auto which is a good place to start.
  3. You can then adjust the Temperature and Tint sliders for finer tweaking and control. I favour these two sliders the most in my workflow.

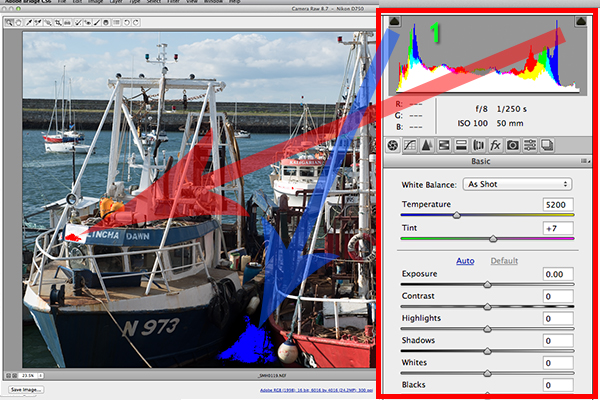
Just above the Temperature and Tint sliders, you have the histogram panel. Click on the the two black triangles. These indicate the highlight (left) and shadow (right) areas that have been clipped (see photo below). As you can see in this image, the areas highlighted in red indicate where the clipping has taken place in the whites. Similar to the shadows, blue indicates where the shadow areas have been clipped.

Highlights-shadows-clipping

Highlights-shadows-clipping in the Histogram.

When adjusting the White and Black sliders keep an eye on the black triangles in the Histogram chart. These triangles turn green when clipping occurs. Alternatively, you can hold down the Alt key while dragging the Blacks slider across to the left until the darkest area of the image starts to appear. Similar for the Whites slider, hold down the Alt key and drag the slider to the right until the brightest part of the image begins to show.

I tend to leave the Exposure slider until after I have adjusted the Highlights and Shadow sliders.

Exposure-contrast

Exposure and Contrast sliders.

The Contrast slider gives your image that final punch but go lightly.

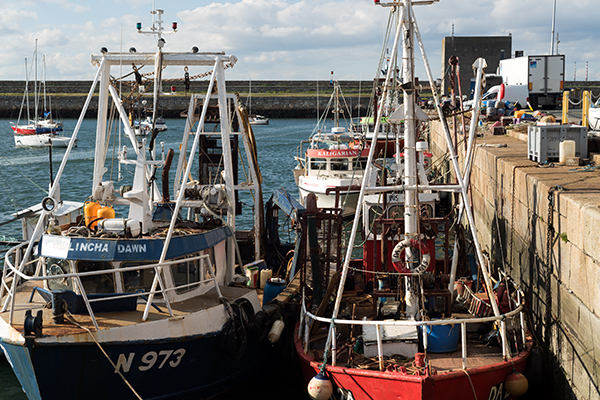
edited-image

Final edited image from the basic adjustments in ACR

All edits done in ACR are non-destructive. Editing RAW files can be easily done in one pass, especially if you have captured the image that you want in-camera. However, there are no layers in ACR or Lightroom, so if you need further editing where layers are required you will need to use Photoshop or GIMP.

GIMP

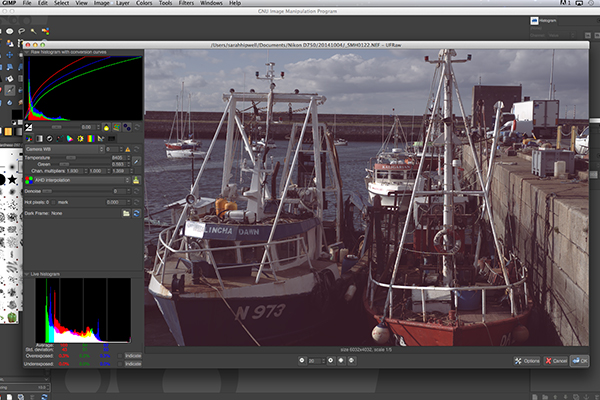
So this brings us to the next RAW editor, UFRaw. This comes pre-installed in GIMP, version 2.8. I’ve never used GIMP before now and I was really curious and enthusiastic to try it out. It has the reputation of being as powerful as Photoshop for editing – and the fact that it is free, is a bonus.

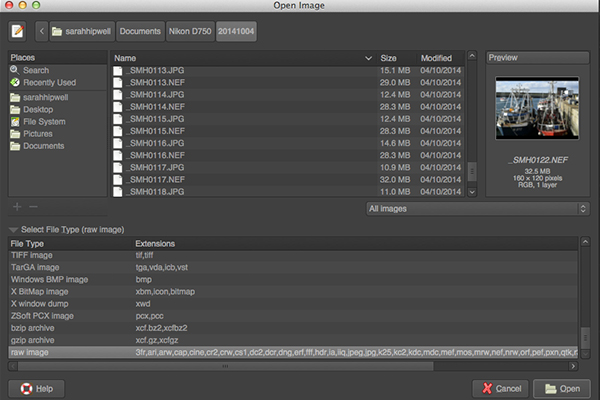
I presumed that by opening a RAW file that the UFRaw editor would launch automatically. It didn’t. After a quick research online. I found a solution. I had to go to File>Open>Select file. I then had to Select File Type and scroll down to the bottom of a list and click on ‘raw image’. Once I opened the image in question. It did not resemble anything like the image I had taken on the day. Normally when I launch a RAW file in ACR, it would be similar to the jpeg version.

Opening-RAW-file-in-GIMP

The UFRaw editor does not launch automatically. A few clicks gets you there.

The interface was completely alien to me, and I didn’t find it particularly user friendly. I played around with the sliders for awhile but I couldn’t get the image to look right at all. I tried adjusting the White Balance but I couldn’t get rid of a green/grey color cast on the image. By not having the familiar sliders in ACR, I was a bit lost to be honest. I really wanted to like UFRaw, as it is a free software for Mac and PC. To be fair, this was my first attempt at using the software, so I’ll put the mea culpa (blame) on me as opposed to the software.

RAW-file-opened-in-GIMP

The UFRaw editor UI in GIMP

RawTherapee

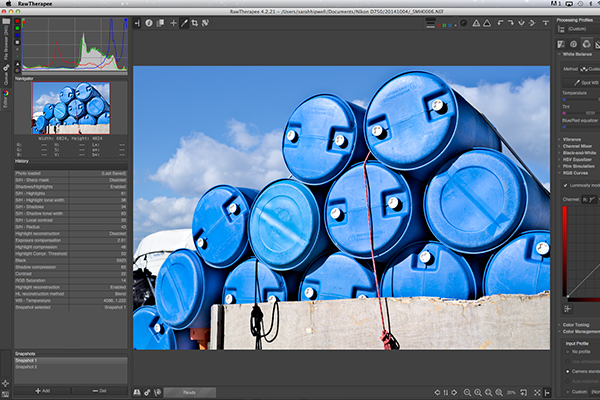
Now onto RawTherapee. I love the name. I wasn’t expecting much after trying out GIMP’s UFRaw but I was completely surprised and impressed. RawTherapee is available in 64 and 32 bit forms for Mac OS X and Windows. It also supports a huge range of supported cameras and manufacturer filetypes.

RawTherapee-UI

RawTherapee interface

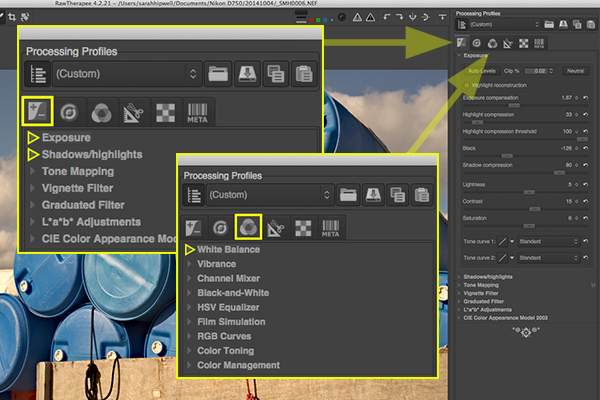
This RAW editor is quite rich in features. Even so I found the user interface very intuitive, and after a few minutes I felt right at home. I quickly adapted to the menu system and found it very easy to navigate around. The editing panels are on the right.

RawTherapee-adjustment-sliders

Highlighted adjustment sliders that are similar to the ones in ACR.

Summary

If you haven’t edited a RAW file before, I would highly recommend that you try it out. The options are varied whether you decide to purchase Lightroom, or choose to pick from the many RAW editors that are free to download. The choice is really up to you. Another free RAW editor that has just been launched is Affinity Photo and it looks really promising (currently in beta for Mac only).

googletag.cmd.push(function() {
tablet_slots.push( googletag.defineSlot( “/1005424/_dPSv4_tab-all-article-bottom_(300×250)”, [300, 250], “pb-ad-78623” ).addService( googletag.pubads() ) ); } );

googletag.cmd.push(function() {
mobile_slots.push( googletag.defineSlot( “/1005424/_dPSv4_mob-all-article-bottom_(300×250)”, [300, 250], “pb-ad-78158” ).addService( googletag.pubads() ) ); } );

The post Post-processing RAW Files – ACR Compared to Some Free Software Options by Sarah Hipwell appeared first on Digital Photography School.


Digital Photography School

 
Comments Off on Post-processing RAW Files – ACR Compared to Some Free Software Options

Posted in Photography


How to Recover Lost Files from a Memory Card

17 Feb

Whether you’re a novice or veteran photographer, chances are you’ve experienced a moment of dread when you thought all of your precious photos were lost forever. Maybe you damaged a SD or CF card, or accidentally formatted a card before offloading your images. As long as your memory card can still be plugged in to, and recognized by your computer, there’s a good chance you’ll be able to salvage your photos, even if you did an accidental deletion. Sometimes you can achieve this all by yourself, and recover your lost files.

There are many programs and apps that can help you recover data from a memory card, but the one I’m going to introduce you to is SanDisk RescuePRO. Created by the same folks who produce trusty SanDisk memory cards, RescuePRO has in my experienced maintained the same reliability and quality that one can expect from SanDisk products. Their recovery program is straightforward, easy to use, and does a great job at recovering lost photos. So before you make an appointment with an IT professional, give this memory card recovery method a try.

SanDisk Recovery PRO memory card recovery

About SanDisk RescuePRO

RescuePRO is a downloadable, data recovery program available for Mac or Windows. Using proprietary media recovery algorithms, RescuePro will scan your memory card and display previews of any recoverable data such as photos (JPG and most RAW formats), video, and audio. The software will work with most brands of digital cameras and memory card types including; SD, SDHC, CompactFlash, Memory Stick, CDs, and DVDs.

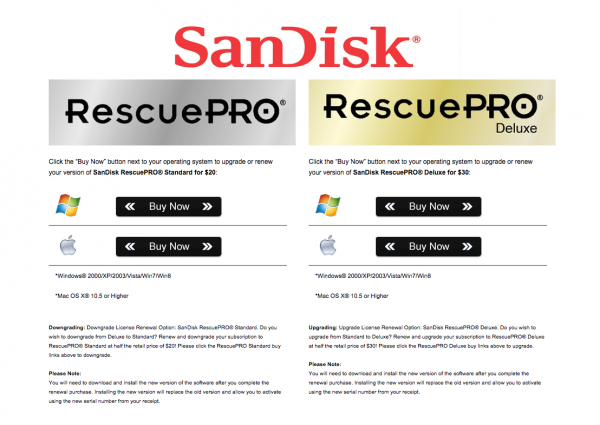
There are two versions of RescuePRO, regular and deluxe, with the main difference other than price being in the extra formats of photos and video/audio that deluxe promises to recover. RescuePRO has a fee of $ 39.99 for the regular version and $ 59.99 for deluxe, but they do offer a free evaluation so you can verify if the program will work with your memory card before you purchase. Payment buys you a one year subscription, which must be renewed annually to continue using the service. But on the bright side, this is a small price to pay if you stand to recover important photos or videos.

How RescuePRO Works

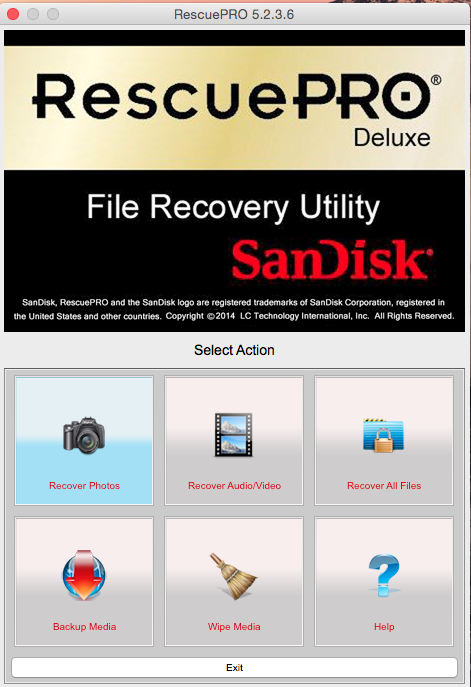
1. After you buy a subscription, download the RescuePRO program to your desktop computer. Insert your memory card into your computer and launch RescuePRO. The below menu will pop up on your screen, and you’ll want to select the option that’s relevant to your needs: either Recover Photos, Recover Video/Audio, or Recover All Files.

SanDisk Recovery PRO memory card recovery

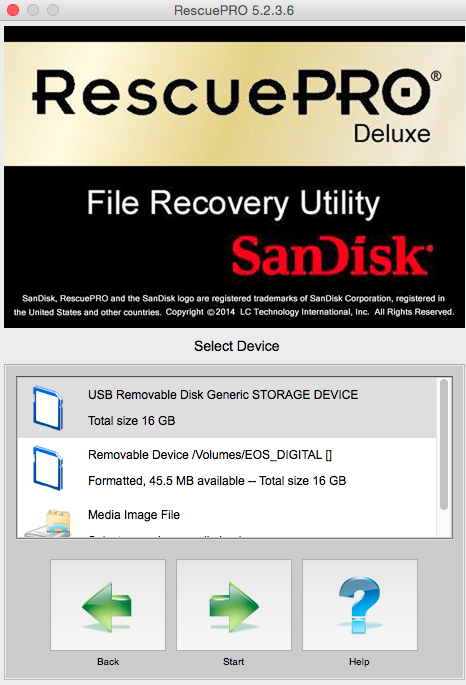
2. After you select your desired outcome, the below screen will prompt you to select the memory card in question. Be sure you have your memory card connected to the computer. Select your card and hit the green Start button.

SanDisk Recovery PRO memory card recovery

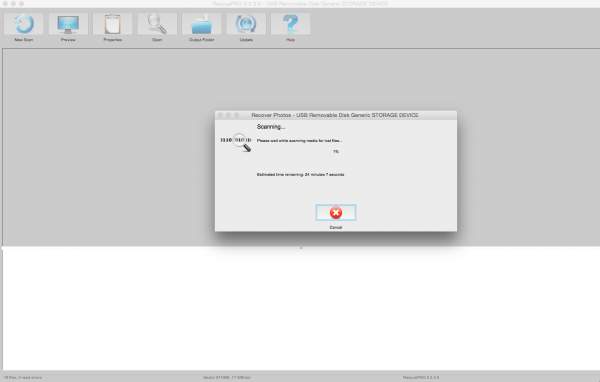
3. Now it’s time to sit tight and let the program do its thing. Feel free to pull up an Internet browser or Photoshop and multitask as you wait. Data recovery from your memory card can take a bit of time depending on how many files there are to be retrieved. In this particular instance, I had 927 files to recover from my CF card and it took about 30 minutes.

SanDisk Recovery PRO memory card recovery

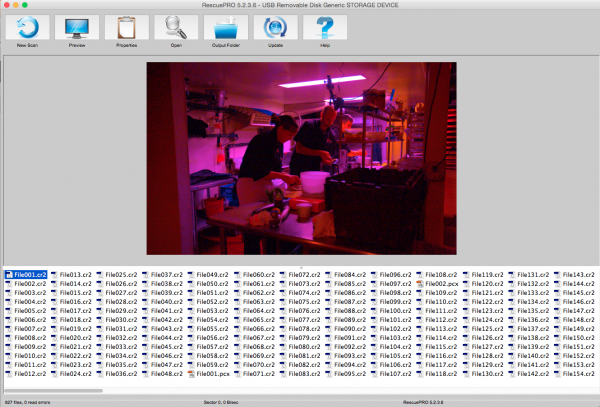
4. When the program is done recovering data, it unfortunately doesn’t do a great job at alerting you. There’s no fanfare, but you’ll know the recovery process is done when you see the bottom portion of the screen filled with recovered files. To verify what content the program has recovered, click on each individual file name and a preview will appear. In this particular instance, the previewed images were showing up tinted in pink, but the actual recovered images were just fine without any distortions.

SanDisk Recovery PRO memory card recovery

5. Once you verify that your files have indeed been saved, it’s time to locate them on your computer. The great part about RescuePRO’s long recovery process is that it includes saving the files on your device automatically. As a result, all you have to do to find the desktop folder full of your recovered images is click on the giant Output Folder button. The program should then pull up a desktop window like the one below, showing you a folder full of recovered data. Also, notice in the preview below that the recovered image does indeed, not carry over the extra coloring that RescuePRO’s software assigned to it in the preview.

SanDisk Recovery PRO memory card recovery

There you have it; a relatively simple, low cost way, to potentially get back precious photos that you thought were lost. Either way, do yourself a favor and remember to always format your memory card in your camera (not your computer) after every use; doing this will keep your memory card up to speed, and lessen the chance of it becoming corrupt over time.

Since this is one of many options, let me know in the comments below if you have a preferred method or program for recovering lost images.

googletag.cmd.push(function() {
tablet_slots.push( googletag.defineSlot( “/1005424/_dPSv4_tab-all-article-bottom_(300×250)”, [300, 250], “pb-ad-78623” ).addService( googletag.pubads() ) ); } );

googletag.cmd.push(function() {
mobile_slots.push( googletag.defineSlot( “/1005424/_dPSv4_mob-all-article-bottom_(300×250)”, [300, 250], “pb-ad-78158” ).addService( googletag.pubads() ) ); } );

The post How to Recover Lost Files from a Memory Card by Suzi Pratt appeared first on Digital Photography School.


Digital Photography School

 
Comments Off on How to Recover Lost Files from a Memory Card

Posted in Photography


Lighting equipment manufacturer Metz files for insolvency

21 Nov

German television and photographic equipment maker Metz has filed for insolvency according to German media. Metz is known for producing high-end lighting equipment including flash units, studio flashes, and video lights. Approximately 600 jobs will be affected by the company’s financial situation. Read more

Articles: Digital Photography Review (dpreview.com)

 
Comments Off on Lighting equipment manufacturer Metz files for insolvency

Posted in Uncategorized


Apple files patent application for artificial muscle camera lens actuator

21 Jun

applepat1b.jpg

After filing one last month, Apple has applied for another camera-related patent. The document an artificial muscle structure being used to replace traditional motors to control focus and aperture in a camera module. The design is interesting because it can carry relatively large and heavy optics and consumes very little power. Read more

News: Digital Photography Review (dpreview.com)

 
Comments Off on Apple files patent application for artificial muscle camera lens actuator

Posted in Uncategorized


GoPro files for $100 million IPO

21 May

Go-Pro-Hero-3_-2.jpg

The GoPro camera is nearly ubiquitous in the adventure sports field. Now, that company is looking to capitalize on its success by preparing to go public. The San Mateo, California-based company is looking to raise about $ 100M in an Initial Public Offering, a recently disclosed prospectus shows. GoPro says it plans to use funds from an IPO for working capital, repaying debt, and new business and technology investments. Learn more

News: Digital Photography Review (dpreview.com)

 
Comments Off on GoPro files for $100 million IPO

Posted in Uncategorized


[MODIFIED] IrfanView – Disable Most Recently Used Files and Folders for Privacy

17 Apr

Increase your privacy by making IrfanView forget the most recently accessed files and folders.

For convenience, IrfanView offers an “Open Recent files” option in its “File” menu, providing you quick access to files you have opened lately. Also, when opening and saving files, IrfanView shows the most recently-access folders as well as commonly-accessed areas such as your Desktop, My Pictures, Favorites, etc.

While these features may be useful if you frequently modify the same files, or images in a particular file location, having this information readily available may violate your privacy if multiple people share the same machine. Thus, you can stop IrfanView from showing this information if desired:…

Read more at MalekTips.
New Computer and Technology Help and Tips – MalekTips.Com

 
Comments Off on [MODIFIED] IrfanView – Disable Most Recently Used Files and Folders for Privacy

Posted in Technology


Samsung files patent for camera with transparent display

21 Mar

samsungpatent.jpg

The Wall Street Journal has discovered a patent filing with the Korean Intellectual Property Rights Information Service that seems to indicate Samsung is experimenting with transparent displays for digital cameras. The idea behind the concept is that the photographer and their subject can maintain eye-contact while the image is being framed. Learn more 

News: Digital Photography Review (dpreview.com)

 
Comments Off on Samsung files patent for camera with transparent display

Posted in Uncategorized