RSS
 

Posts Tagged ‘exposures’

3 Ways to Guarantee Good Exposures

16 Sep

There is no excuse for coming home from a photo shoot to discover that your images are over or under exposed.

Your camera’s light meter will guide you to choose the right aperture and shutter speed settings to get a good exposure, or it will choose them automatically if you are using the automatic or semi-automatic modes.

The problem is that your camera can be fooled by tricky lighting situations and that’s why your image may not come out exactly the way you want it, despite all the advanced technology in your camera.

Below are 3 techniques you can use to make sure you get a good exposure. Choose the technique that works best for the type of photo shoot you are on and how much time you have while making images.

1. Automatic Exposure Bracketing (AEB)

One way to make sure you get at least one image that has a good exposure is to use bracketing, which means that you take one exposure at the setting your camera’s light meter thinks is correct (0 on the light meter) and you take at least two more exposures, one at -1 stop and one at +1 stop.

That might sound like a bit of a hassle, but most cameras have a setting for automatic exposure bracketing which makes it quick and easy. Check your camera manual to see whether your camera has this feature and, if so, how to turn it on.
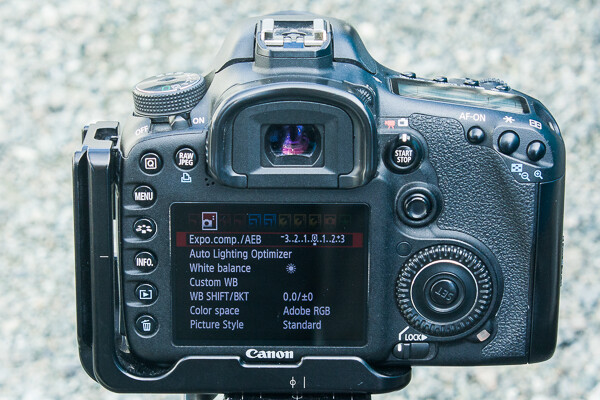
AEB in Camera Menu
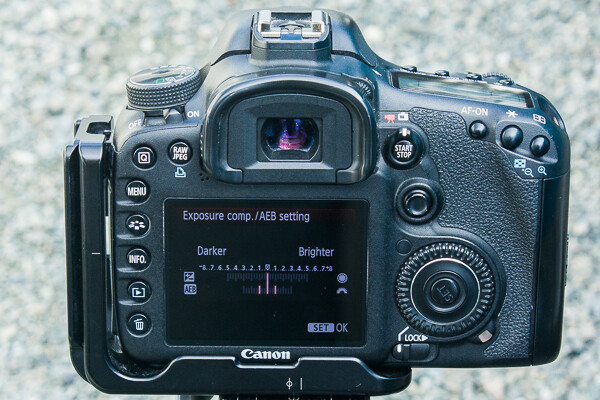
AEB in Camera Menu

AEB showing +1, 0, -1 brackets

AEB showing +1, 0, -1 brackets

With automatic exposure bracketing on, you simply hold down the shutter until your camera takes 3 exposures and voilà. This is even faster if you set your shutter drive mode to continuous high speed.

AEB will work on Aperture Priority and Shutter Priority exposure modes and on some cameras it will even work in Manual mode.

I usually use AEB on Aperture Priority mode because I like to have control over my depth of field for landscape photography. On this setting the camera will take the photo at three different shutter speeds to give you the three different exposures. It is important to use this setting if you think you might want to combine the exposures in post-processing.
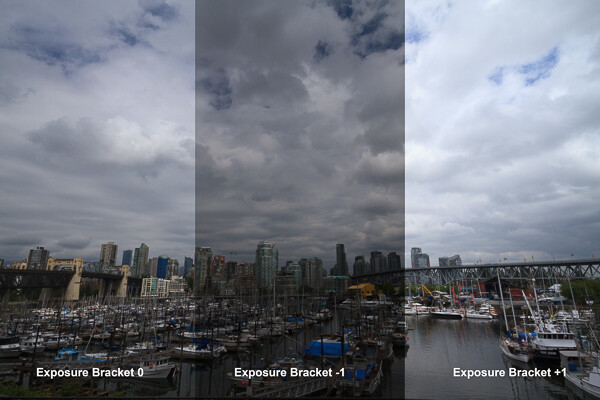
Exposure bracketing example

In this scene, the white sky caused the camera’s light meter to choose a darker exposure than was necessary. I decided that the +1 exposure was the best option.
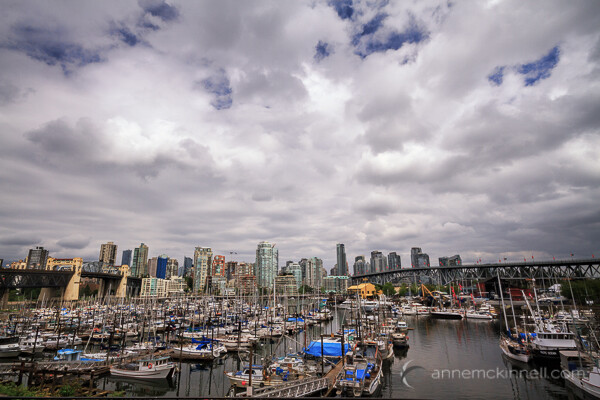
Vancouver, British Columbia, Canada by Anne McKinnell

After processing the +1 exposure, this is the final version of the Vancouver City Skyline image.

If you use AEB on Shutter Priority mode, the camera will take the photo at three different apertures to give you the three different exposures. This is the best option to choose if you need to freeze motion at a fast shutter speed and depth of field is less of a concern.

Using AEB is the best method to use when things are happening quickly and you don’t want to spend any time looking at your LCD (known as “chimping”) after you make an image. When things are happening fast, chimping can cause you to miss a shot.

2. Exposure Compensation

Chimping is not necessarily a bad thing and unless there is a possibility of missing a shot, reviewing your images after you take them is a good practice to double check the exposure, focus and composition.

To use exposure compensation, just take the shot and then evaluate the image using the histogram. It is important to use the histogram for this and not just the picture as it appears on the back of your camera. The LCD is not all that accurate when it comes to exposure. Remember that if you shoot in RAW, what you are seeing on the back of your camera is a compressed version of the image and not an accurate representation of the RAW file. Also, your LCD’s brightness can be adjusted, so if you turn the brightness down when you are photographing at night all your images will appear darker during the day.

Using the histogram is easy. The blacks are on the left, the whites are on the right, all the mid-tones are in between. All you really need to know is that a spike on either edge of the graph is bad.

Under exposed image.

Under exposed image.

Good exposure.

Good exposure.

Over exposed image.

Over exposed image.

If there is a spike on the left edge, it means part of your image is completely black. You may want to use your exposure compensation to adjust the exposure to the right to make it brighter. But remember that having part of your image completely black, especially for a night shot, is okay.

If there is a spike on the right edge, it means part of your image is completely white and contains no data. Never let any substantial part of your image go completely white. Because it contains no data at all, it will always remain a white spot no matter what you try to do in post-processing. It’s better to keep the graph off the right edge. You only need to worry about this if the spike is right on the very edge of the histogram – if it spikes before the edge it is not a problem.

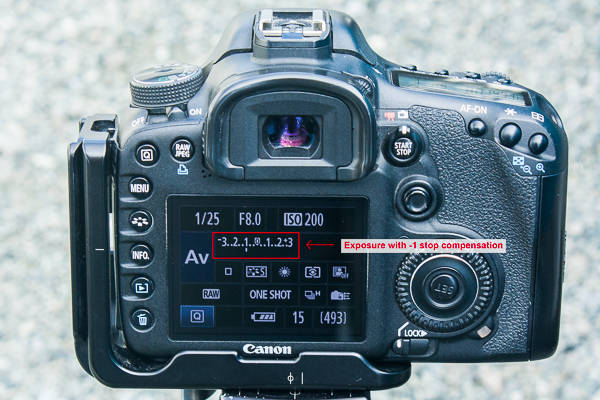
Once you evaluate your image using the histogram, you can use your exposure compensation to make the image darker or lighter without having to worry about changing the aperture, shutter speed, or ISO. If you just want it a little darker, turn the exposure compensation down a little. Or turn it up a little if your image is too dark. You’ll have to check your camera manual again to see how to do this. On my camera, I hold the shutter half way down and move the wheel on the back of my camera to change the exposure compensation.
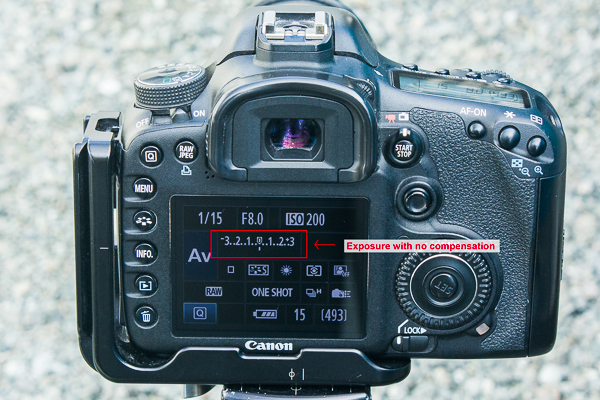
Exposure with no compensation

Exposure with -1 compensation

This is the quickest method to use when you have time to chimp. While bracketing will ensure one of the three exposures is useable, this method is more precise and deliberate.

3. Exposure Lock

Exposure lock is my favourite method to use when I have lots of time. It actually doesn’t require that much time to do, especially when you get in the habit.

If you have a subject that isn’t moving, such as a landscape scene, and you have time to be purposeful about what you are doing, this is the ultimate method for getting the perfect exposure.

I like to use exposure lock in combination with the “spot metering” exposure mode so that the camera will only take into account the light level at the exact spot in the frame that I tell it to. I decide what part of the image is most important for the exposure. For example, if I am making a silhouette image at twilight, I will point the camera at the sky and use the exposure lock button to exposure for the sky, then I recompose the image, focus, and take the shot.
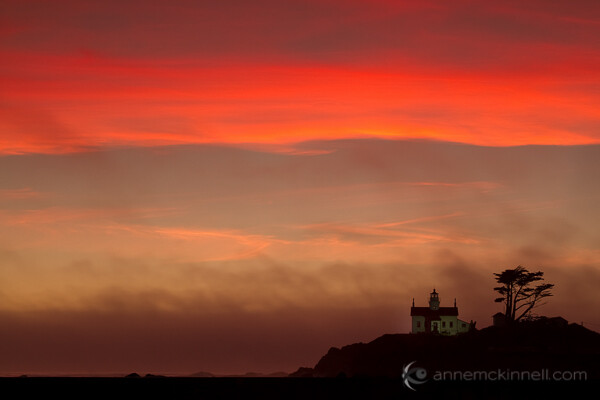
Battery Point Lighthouse, Crescent City, California, by Anne McKinnell

To make this image of Battery Point Lighthouse in Crescent City, California, I pointed my camera at the bright red band of clouds in the sky, used my exposure lock, and then recomposed the image and pressed the shutter.

Check your camera manual to see how to use exposure lock. On my camera, I press a button with a * on the back of my camera.
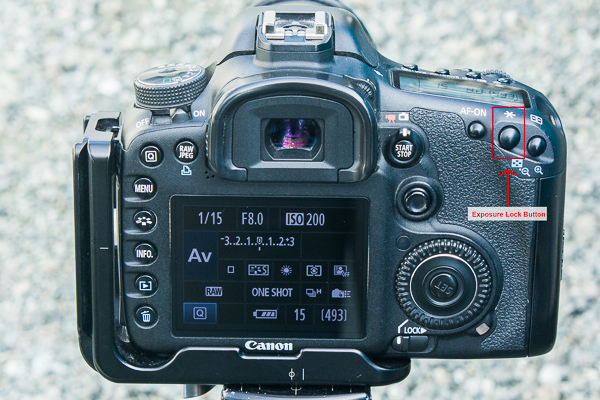
Exposure Lock Button

Depending on the type of subject you are photographing and whether things in your scene are changing quickly or slowly, one of these methods will ensure you always get a good exposure.

Post originally from: Digital Photography Tips.

Check out our more Photography Tips at Photography Tips for Beginners, Portrait Photography Tips and Wedding Photography Tips.

3 Ways to Guarantee Good Exposures

Digital Photography School

 
Comments Off on 3 Ways to Guarantee Good Exposures
Posted in Photography


How to Blend Exposures to Enhance Your Composition

07 Jun

Exposure blending is a popular technique often used to create high dynamic range photography.

This article is about using the same technique but for the purposes of creating an image that contains all of the elements of a scene that you might not have been able to capture in one exposure.

Of course, we would all like to capture what is in our mind’s eye in one exposure and we strive to do so to reduce the amount of time we spend post-processing. But that doesn’t always work out and blending exposures can be a quick and easy way of creating the image you want.

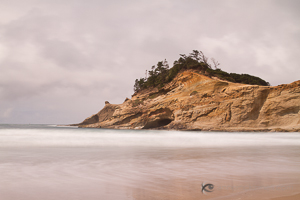
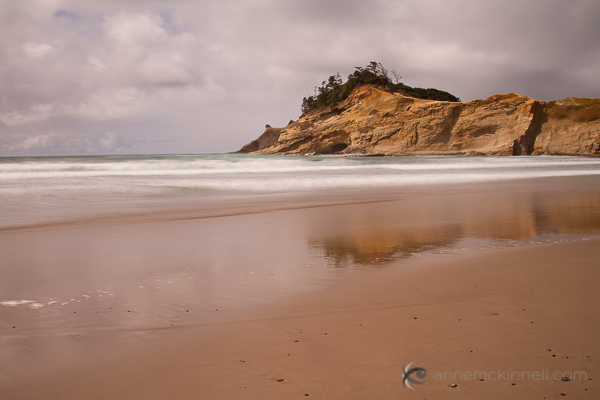
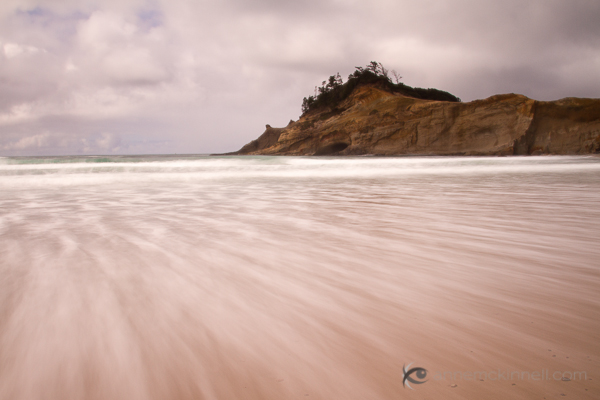
Here’s an example. I was recently visiting Cape Kiwanda on the Oregon coast and I wanted to make a long exposure image that would show the motion of the water rushing back out into the sea before each incoming wave.

Cape Kiwanda, Oregon, by Anne McKinnell
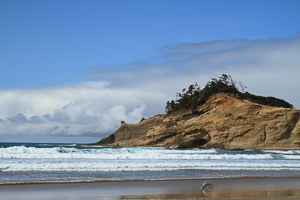
I started out by taking some fast exposures to discover the composition I would ultimately use. This is what the scene looked like when I first got to the location — in fact, this is my first frame.

I quickly decided on the long exposure technique so I put on my 10 stop neutral density filter which would allow me to make a 4 second exposure in the middle of a sunny afternoon.

The difficulty was that the wave had to be just right and I had to open the shutter at exactly the right moment to get the effect I was after.

Cape Kiwanda, Oregon, by Anne McKinnell
This attempt turned out okay but it wasn’t as dramatic as what I hoped for.

After making this image, I decided that I wanted more foreground in my composition so I used a wider focal length and tilted my camera down a bit.

I made a number of images that were close to what I wanted but the foreground was not exactly as I had hoped.

Then, I finally got the big wave I was waiting for!

Unfortunately the wave was too big and even though I had pushed my tripod down in the sand the amount of water caused my tripod to sink a little while the shutter was open. That wasn’t a problem for the foreground, since it was blurred anyway, but the background was blurred in that image as well.

I spent half an hour making images at this location trying to get exactly what I wanted in camera. That is not a particularly long period of time — often I spend much longer in one location. But since I had the components I needed to make my final image, I decided to move on to other subjects.

These are the two images I ended up combining for the final product.

Cape Kiwanda, Oregon, by Anne McKinnell

Cape Kiwanda, Oregon, by Anne McKinnell

You can see how the rock in the image above is out of focus due to my tripod sinking in the sand.

In post processing, I took both of the above images and opened them in Photoshop Elements. I selected the one with the foreground I wanted, copied it, and pasted it on top of the other image so each image was on it’s own layer. Then I created a layer mask and used the gradient tool to blend the two images together.

Watch this video to see me blend these two images together in Photoshop Elements.

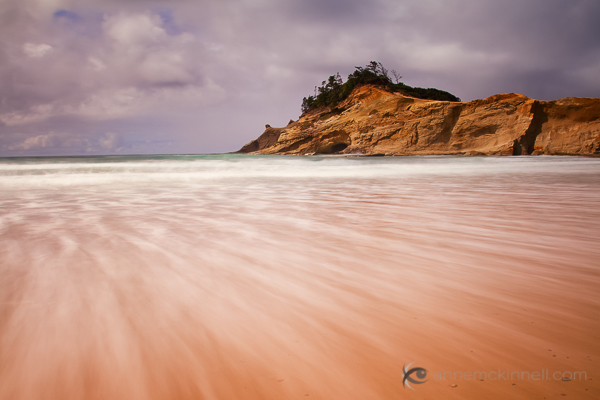
After blending the exposures, I made some final adjustments to contrast and colour to create the final image:

Cape Kiwanda, Oregon, by Anne McKinnell

Remember, photography is an art and you have the artistic license to do whatever you want whether that is documenting a scene exactly as you see it in front of you, or creating something that is different than what you saw with your own eyes using any technique you see fit.

Post originally from: Digital Photography Tips.

Check out our more Photography Tips at Photography Tips for Beginners, Portrait Photography Tips and Wedding Photography Tips.

How to Blend Exposures to Enhance Your Composition


Digital Photography School

 
Comments Off on How to Blend Exposures to Enhance Your Composition

Posted in Photography


Fine Tune Your Exposures With Spot Metering

09 Apr

The metering systems of today’s digital cameras are light years beyond cameras of just 10 to 15 years ago. What this means is that in many situations, the camera’s meter, left to its own devices, is going to do an excellent job at getting a good exposure. While evaluative (or matrix) metering and center-weighted average metering take into account the entire scene, albeit in different ways, spot metering mode provides a tool for metering only the part of the scene you as the photographer consider most important.

I used spot metering on this image  due to the sun setting over her shoulder, making the sun and sand exceptionally bright behind her. By metering on the model's shoulder, I was able to maintain detail in the shadow areas, without hurting the drama of the lighting.

I used spot metering on this image due to the sun setting over her shoulder, making the sun and sand exceptionally bright behind her. By metering on the model’s shoulder, I was able to maintain detail in the shadow areas, without hurting the drama of the lighting.

Spot metering is especially helpful when the subject is much brighter or darker than the background, and the subject does not make up a majority of the image.   Most cameras, when set to spot metering, are set to measure an area of the image as small as 1.5% of the total image area.  This varies from camera to camera, so check your manual for the exact specification.  In addition, while most consumer cameras use the center of the image for spot metering, usually defined by a circle in the viewfinder, others allow for tying spot metering to the active AF point, which then ties your choice of focus point to the meter.

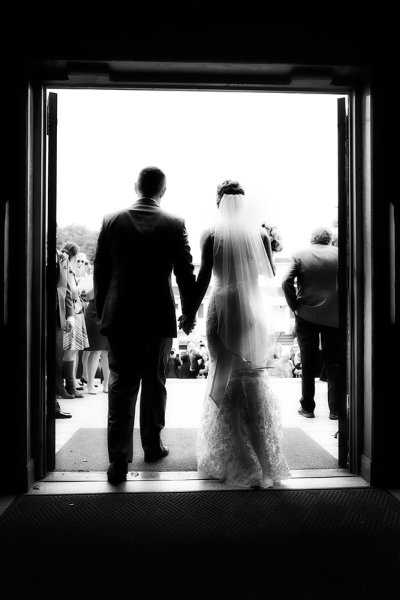
When I saw this shot I immediately knew what I wanted.  I did not want to completely lose the detail in the dress, but I did want a near-silhouette effect to add to the mood of the image.  Using the spot meter, I metered off the sky, and then dialed in +1/3 of exposure compensation to bring back some dress detail.

When I saw this shot I immediately knew what I wanted. I did not want to completely lose the detail in the dress, but I did want a near-silhouette effect to add to the mood of the image. Using the spot meter, I metered off the sky, and then dialed in +1/3 of exposure compensation to bring back some dress detail.

Generally, if you’re spot metering, and your camera’s spot meter is at the center of the image area, you will have to use Exposure Lock as well. This is because if the meter only works at the center of the image, and the area you’re metering is NOT the center of the image, you will need to recompose after metering.  Exposure Lock ensures that your exposure is locked in once you have metered the scene, before you recompose the shot. Exposure lock is generally activated by pressing a button on your camera while metering.  It will then hold the exposure you locked in, at least until you release the shutter button.  Some cameras will hold the metered reading until you deactivate Exposure Lock. On Canon cameras, Exposure Lock is achieved by pressing the (*) button.  On Nikons, exposure can be locked by pressing AE-L.

When you’re dealing with a high contrast situation, such as a bright background with a dimly lit subject, or a dark background with a brightly lit subject, switching your metering mode to Spot Metering can be an easy way of ensuring that your exposure is exactly where you want it.

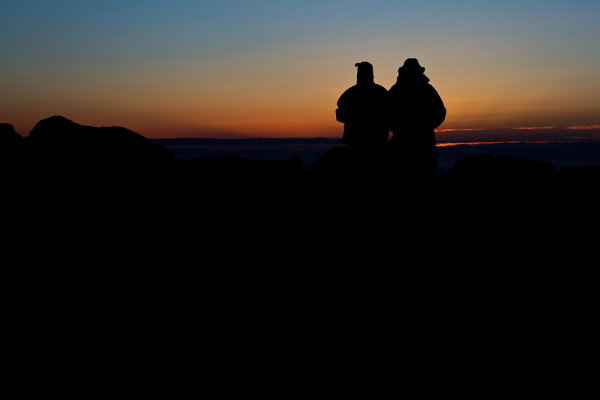
I was shooting the sunrise on Cadillac Mountain in Acadia National Park when I spied this couple sitting on a rock.  I moved around behind them, and spot-metered on the sky. Because the meter tries to make the metered area a mid-tone, I knew it would silhouette my subjects perfectly.

I was shooting the sunrise on Cadillac Mountain in Acadia National Park when I spied this couple sitting on a rock. I moved around behind them, and spot-metered on the sky. Because the meter tries to make the metered area a mid-tone, I knew it would silhouette my subjects perfectly.

Post originally from: Digital Photography Tips.

Check out our more Photography Tips at Photography Tips for Beginners, Portrait Photography Tips and Wedding Photography Tips.

Fine Tune Your Exposures With Spot Metering


Digital Photography School

 
Comments Off on Fine Tune Your Exposures With Spot Metering

Posted in Photography


How to Match Exposures when Stitching Panoramas in Photoshop

03 Feb

Since the introduction of Photoshop CS2, Adobe’s image editing software has shipped with the ability to easily merge a series of photographs into a panorama.  Often, it is incredibly simple: once you have the images you want to stitch together, it only takes a few clicks to produce the blended panorama.  However, whilst Photoshop may be able to seamlessly merge your images 90% of the time, on occasion it may struggle to perfectly match the exposures across the input images resulting in a final panorama with obvious joins between the individual photographs.

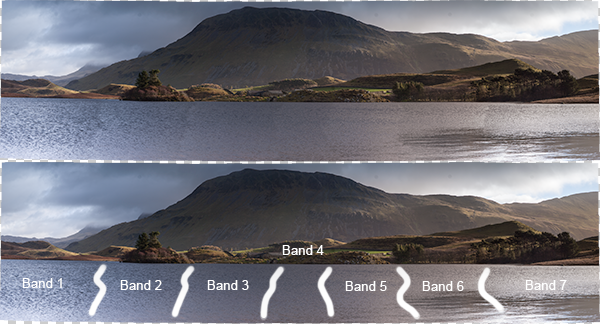
To see what I mean, have a look at the image below.  This is a 7 shot panorama, straight out of Photomerge, and you can see obvious banding in the water of the lake, as the exposure/colour tone subtly change between images.

panorama_exposure_match_image-3

Top: The panorama fresh out of Photomerge. Bottom: I've highlighted the joins between the individual input images where the blending of exposures was not sufficient

This article walks through a series of fairly simple steps to edit the above panorama to remove the obvious joins and give a perfectly blended panoramic image  (note: I am only going to discuss processing the panorama once it has been stitched by Photomerge.  For tips on how to take the images, prepare them for stitching and on use of Photoshop to stitch them, see this recent article by Jason Weddington).

It is worth mentioning that the images I started with were a challenge to shoot for a panorama as the exposure differed greatly between the far left of the image, where I was shooting away from the sun, and to the far right, where I was shooting towards the sun.  Therefore, before blending the images into the panorama, the individual images were processed in Adobe Lightroom to try and match the exposures as closely as possible first.  Once complete, the selected images were exported to Photoshop to ‘merge as a panorama’, using the ‘auto’ setting.

On to the steps…

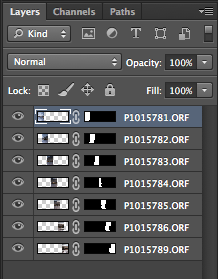
1.  Once the images have been merged, the output image will consist of several layers (one for each input image, in this case 7) with a mask applied to each layer.  In many cases, these layers can be flattened at this point to give the final panorama, however, we’re going to make a few edits first.

panorama_exposure_match_image-2

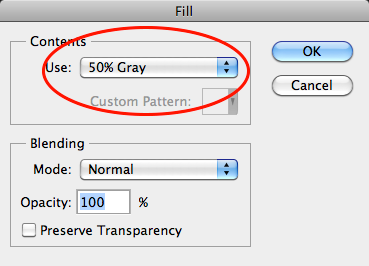
2.  Create a new layer, on top of all other layers.  Fill the layer (Edit > Fill) with 50% grey:

panorama_exposure_match_image-4

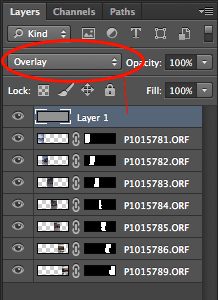
3.  Set the blending mode of the ‘grey layer’ to ‘overlay’.  When set to overlay, a 50% grey layer will appear transparent, so initially this layer will make no difference:

panorama_exposure_match_image-5

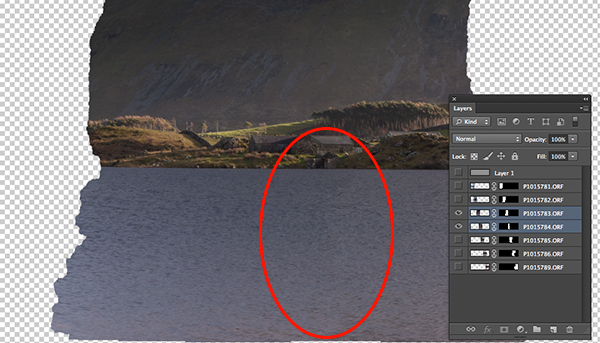
4.  Find one of the joins where the exposure needs to be tweaked, for example, below, there is an obvious join between the two images.  The left hand image needs to be a little lighter and the right hand image needs to be a little darker.  Let’s address the left hand image first.

panorama_exposure_match_image-6

Only the two layers of interest are selected here. The left hand image needs to be lightened, whilst the right hand image needs to be darkened

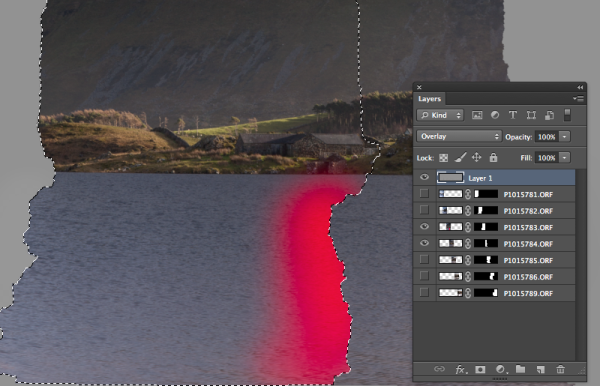
5.  If we ctrl+click/cmd+click the mask of the appropriate layer (i.e. click on the black/white rectangle in the layer bar), we will bring the portion of the image to be edited into an active selection (we only want to edit inside of that selection for the time being).

6.  Ensure the ‘grey layer’ is highlighted

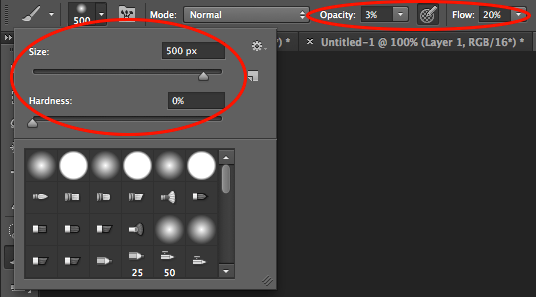
7.  Select the brush tool.  You will want a large, soft brush so set the size to be a few hundred pixels (I used 500 px in this instance, but the size is relative to the size of your panorama) and set the hardness to 0%.  Set the opacity to 3% and the flow to 20%:

panorama_exposure_match_image-7

8.  To lighten the layer we want to select the colour white (if we wanted to darken the layer, we would select black).

9.  Using the brush, liberally brush over the join and back towards the centre of the image.  This will paint white onto the grey layer, but only within the current selection.  As the brush is very soft the edits should be subtle, but as you brush you should be able to see the area under where you have painted white gradually begin to get lighter.

panorama_exposure_match_image-8

An active selection of the mask of the left hand image is required so that any edits are only applied within that selection. The idea is to paint white onto the 'grey layer' in the region highlighted by red in the above image.

10.  In order to get seamless joins, I find that is is a compromise between lightening one image and darkening the other in order to maintain a smooth transition of tone/exposure across each image.  Therefore to edit the right hand image, you repeat steps 5 to 9, but ensure that the right hand image is within your active selection, and that the colour black has been selected for your brush.

Initially it is a slow process that involves carefully modifying each image at the join in order to match the exposure, however once you get a feeling for the brush it can become quite quick.

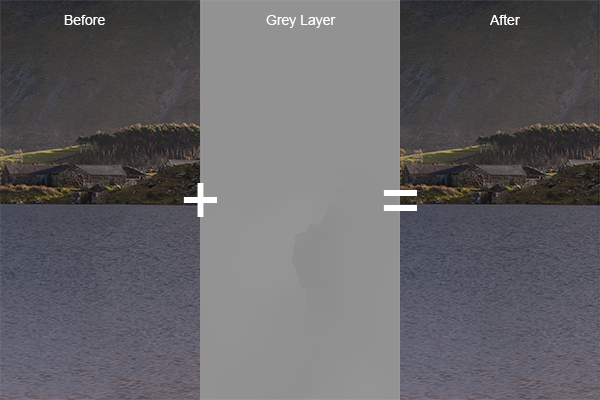
If we change the blend mode of our ‘grey layer’ back to ‘normal’ you will be left with something similar to the middle image below, where you can see the result of the white/black brush strokes on the grey layer and the difference it makes to the actual join.

panorama_exposure_blending_9

A composite showing the starting image, the modified 'grey layer' and the final image, when the 'grey layer' is set to 'overlay'.

If you repeat that for each join across the panorama, you will end up with grey layer that looks like the image below (with the blend mode set to ‘normal’).

panorama_exposure_match_image-10

The 'grey layer' for the entire panorama showing the white/black brush strokes around each join

Once you set the blending mode back to ‘overlay’, all of the joins should disappear, and you should be left with a perfectly blended panorama with no tell tale signs of the joins:

panorama_exposure_match_image-11

The entire panorama when the 'grey layer' is set to 'overlay'. The joins between the images are no longer visible in the water of the lake

As the edits have been made to the ‘grey layer’ no permanent edits have yet been made to the actual images, so any mistakes are easily rectified or any further modifications can easily be made.  Once you are happy with the blending of the individual images, you can flatten the layers to produce your final panorama and make any further finishing touches:

panorama_exposure_match_image-12

The final panorama: Llyn Cregennen, North Wales, UK

I hope those steps were easy enough to follow.  Ultimately, this is just one application of a the use of a 50% grey layer, set to ‘overlay’, in order to modify the exposure of an image in a non-destructive manner (until the layers are flattened, that is).  So if you try to blend a panorama in Photoshop but didn’t quite get the results you were after, you dont have to jump for the clone brush straight away or send the image to the trash.  Give these steps a try and see if you can manually match your exposures where Photoshop can’t.

Please let me know if you have any feedback, I welcome any comments and, as always, I’ll try to respond when I can.


Post originally from: Digital Photography Tips.

Check out our more Photography Tips at Photography Tips for Beginners, Portrait Photography Tips and Wedding Photography Tips.

How to Match Exposures when Stitching Panoramas in Photoshop


Digital Photography School

 
Comments Off on How to Match Exposures when Stitching Panoramas in Photoshop

Posted in Photography


Urban Long Exposures by Marc Koegel

20 Jan

This video features new photography work by black and white photographer Marc Koegel. Using long exposures of over an hour, Marc’s photographs cityscapes in black and white, using large format film cameras and full frame digital capture. Marc teaches his techniques in a workshop called the “Fine Art B+W Long Exposure Workshop. It is hosted by his company, Vancouver Photo Workshops. More of Marc’s work can be seen at www.MarcKoegel.com and also www.bulbexposures.com. More information about the workshop can be found by visiting www.VancouverPhotoWorkshops.com.

Bambi Cantrell describes her approach to real life photography in the wedding and family portrait space. She gives some insight into her shooting style and how her equipment helps her achieve her vision
Video Rating: 4 / 5


Blending Exposures in Photoshop

07 Jan

Landscape photographer and instructor Robert Rodriguez Jr explains the process of blending exposures in Photoshop and Lightroom for greater dynamic range. Part of the Beyond the Lens Video Podcast.
Video Rating: 4 / 5

A few great tips on how to photograph infants by an expert photographer. photogaps.com has more stuff.
Video Rating: 4 / 5


Perfect TTL Exposures, Simplified

18 Dec

Gary Fong gives tips on how to achieve more consistent TTL exposures with your dedicated Canon, Nikon or Sony flash units.

The very first run of my latest project Movie filmed with Nikon D3s and edited with iMovie on a Mac.
Video Rating: 4 / 5


Photographic Tutorial # 2 – Bulb & Long Exposures

15 Dec

Video #2 – Sorry it is a bit dark, one of my globes blew just before I started,whoops. Hi again guys, I had some really great feed back from my 1st video so I will continue to share these. This week I had a questions from Daniel Donnelly asking: How does Denis Smith create his Ball-Of-Light images? ( In some parts of this vid I misplace Daniel & Denis’s names oops haha) In this video I go over the methods Denis would use to create his unique images. Please see Denis Smith Photography to understand a bit more about the Ball-Of-Light project! www.denissmith.com.au Leave me any feedback & questions. Thanks so much guys! Phil Lagettie www.palmedia.com.au phil.lagettie@palmedia.com.au
Video Rating: 4 / 5


Real Exposures: Ryan Brenizer

27 Nov

This episode of Real Exposures brings in professional photographer Ryan Brenizer to B&H for a discussion about his method for creating a shallow depth of field, favorite gear, mentors and influences and what’s next for future projects. The Brenizer Method youtu.be Ryan Brenzier’s Website www.ryanbrenizer.com Nikon D3S bhpho.to Nikon Nikkor 35mm f/1.4 bhpho.to Sigma 85mm f/1.4 bhpho.to
Video Rating: 5 / 5

 
Comments Off on Real Exposures: Ryan Brenizer

Posted in Nikon Videos