RSS
 

Posts Tagged ‘Chromatic’

Chromatic Aberration: What It Is and How You Can Avoid It

13 May

The post Chromatic Aberration: What It Is and How You Can Avoid It appeared first on Digital Photography School. It was authored by Joshua Burke.

chromatic aberration what is it and how you can avoid it

Chromatic aberration is a huge image-quality killer – but many photographers don’t know what it is and how it can be prevented.

In this article, I’m going to share everything you need to know about chromatic aberration, including:

  • Why it happens
  • How to identify it
  • Four simple strategies to minimize its effects

So without further ado, let’s discuss how to deal with that pesky chromatic aberration once and for all.

What is chromatic aberration?

Chromatic aberration (also known as color fringing or dispersion) is a common problem in lenses that occurs when colors are incorrectly refracted (bent) by the lens; this results in a mismatch at the focal point where the colors do not combine as they should.

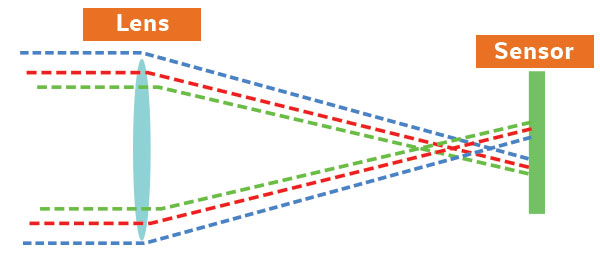
Confused? Don’t be. To help understand this a bit better, remember that the focal plane is your sensor’s point of focus, where all the light from your lens should join together to be correctly captured and recorded. But depending on the construction of your lens, your chosen focal length, and even the aperture that you’ve used, certain wavelengths (colors) may arrive at points in front of or behind the focal plane.

Take a look at the diagram below. Do you see how the red, green, and blue light hits the sensor in different spots? That’s chromatic aberration at work.

What is chromatic aberration and why it happens.

When CA occurs, you end up with telltale color fringing around the edges of your photograph. Check out the photo below. The left-hand side shows red and green fringes along the sharp edges of the subject. As you can see, it doesn’t look so great.

Chromatic Aberration example

But although you can edit out low levels of chromatic aberration in Photoshop and Lightroom, the reality is that it’s annoying to remove CA from each and every photo, plus every moment you spent touching up a photo is one moment less that you have for photography.

Cheetah Chromatic Aberration Comparison

Why does chromatic aberration occur?

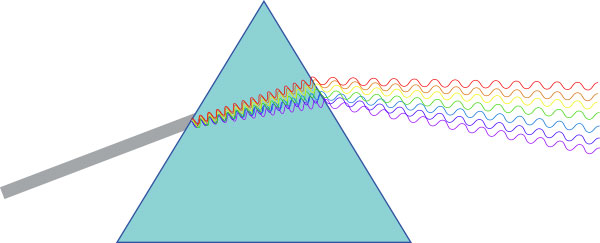
Chromatic aberration happens because your lens acts as a prism. It bends light, and much like the triangle-shaped prism made famous by Pink Floyd, colors passing through the lens are split at different angles.

Why does chromatic aberration occur

Here, it’s important to remember that light is actually made up of several different wavelengths (colors). So for your camera’s sensor to detect the combined color of light, your lens needs to make all wavelengths of that particular ray hit the exact same point on your sensor.

It may sound simple, but various wavelengths (and thus various colors) strike your lens all at once, and each of these wavelengths will behave slightly differently depending on the lens glass that it is passing through.

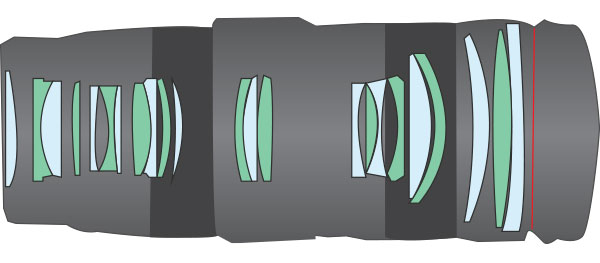
The feat of engineering required to correctly align all of these different light rays is usually achieved by the manufacturer’s use of a lens array. In fact, if you were to pull your lens apart, you’d probably find upward of 16 lens elements – all designed to correct for various things along the light’s journey between your lens and your sensor.

Lens elements

Unfortunately, this is also where chromatic aberration tends to rear its ugly head. Hidden within the design of these lens elements are defects – either in the glass or the design of the lens itself – which, under specific conditions, may cause your photos to exhibit CA.

Now, I’m not saying you need a pro-level lens. In fact, a key point is that all lenses suffer from chromatic aberration in one form or another, no matter the cost. What matters is whether or not your lens exhibits visible chromatic aberration, and whether the amount of visible CA is a dealbreaker for your particular needs.

Also, even if you’re stuck with a CA-prone lens, you can still take steps to prevent image-quality issues, as I discuss in the next section.

How to avoid chromatic aberration defects: 4 strategies

Chromatic aberration is a major problem, especially on cheap lenses. But the good news is that, if you are stuck working with a lens that exhibits some form of visible chromatic aberration, there are several easy-to-understand strategies to remove or minimize its effect on your photos.

1. Avoid high-contrast scenes

CA Cheetah High Contrast

Chromatic aberration tends to flare up when shooting high-contrast scenes. Particularly problematic are darker subjects surrounded by white backdrops, landscapes against a bright sunrise, or – as in the example of the cheetah above – heavily backlit subjects.

There’s no easy in-camera method of avoiding contrast. So there’s often nothing you can do here except adjust your composition. Swap your backdrop out to something that more closely matches your subject’s tones, or simply wait for more favorable lighting conditions.

If you absolutely must capture an image as-is, then shoot in RAW and prepare for a touch-up in post-production.

2. Adjust your focal length

Chromatic Aberration Focal Length

Although it’s nice to have access to a wide range of focal lengths, the fact is that most zoom lenses exhibit chromatic aberration at their focal length extremes. So setting the focal length toward the middle of your lens’s range will usually help remove the offending CA.

Note that using a zoom lens at its widest will usually introduce various other defects in your image. So if you’re set on a wide-angle perspective, choose a prime wide-angle lens to handle the job, or make a panorama at a longer focal length, then join the photos in post-processing.

3. Stop down your aperture

CA Aperture

Although the result will depend on the type of lens you are using, stopping down your aperture helps minimize most lens defects, including chromatic aberration.

(You’ll need to consider reducing the shutter speed or boosting the ISO to compensate for the light loss.)

So instead of using an f/2.8 or f/4 aperture, try going to f/8 or f/11 – then take a few test shots to see if the chromatic aberration has disappeared.

4. Reframe with your subject at the center of the image

chromatic aberration rhino reframe

Chromatic aberration is often more noticeable toward the edges of the frame, not the center.

(This is generally due to the curvature of the lens elements.)

Therefore, if you reframe your shot but put your main subject closer to the middle, you’ll often end up with little-to-no chromatic aberration on your subject.

Of course, you may still have noticeable CA around the edges of the frame, but you do have the option to crop this away. It’s not ideal if you need to retain every pixel in your photo (e.g., for large prints), in which case you should consider one of the other preventative measures discussed above. But if you’re creating small prints or you plan to distribute your photo online, cropping shouldn’t be a big issue.

Chromatic aberration: final words

Well, that’s it:

Everything you need to know about chromatic aberration, including what it is and how to avoid it.

Now you know how to keep your images free of CA. And you can capture stunning photos – even with cheaper lenses.

Over to you:

Are you struggling with chromatic aberration in your photos? Have you tried any of the measures discussed above? Share your thoughts (and images) in the comments below.

The post Chromatic Aberration: What It Is and How You Can Avoid It appeared first on Digital Photography School. It was authored by Joshua Burke.

Digital Photography School

 
Comments Off on Chromatic Aberration: What It Is and How You Can Avoid It

Posted in Photography


Canon EF 35mm F1.4L II USM boasts new Blue Spectrum Refractive Optics for improved chromatic aberration control

27 Aug

Canon has announced the EF 35mm F1.4L II USM, the second generation of its popular wide-angle prime. It uses newly designed Blue Spectrum Refractive Optics, which claim to reduce chromatic aberration better than any other existing technology. Read more

Articles: Digital Photography Review (dpreview.com)

 
Comments Off on Canon EF 35mm F1.4L II USM boasts new Blue Spectrum Refractive Optics for improved chromatic aberration control

Posted in Uncategorized


Chromatic Aberration – What is it and How to Avoid it

19 Apr

OziRig Cheetah Chromatic Aberration

In the photo above, you may notice that the colors on the left-hand side appear to be showing fringes of green and red along the sharp edges of the subject; this is what is called chromatic aberration.

What is chromatic aberration?

Chromatic aberration (also known as color fringing or dispersion) is a common problem in lenses which occurs when colors are incorrectly refracted (bent) by the lens, resulting in a mismatch at the focal point where the colors do not combine as they should.

To help understand this a bit better, remember that the focal plane is your sensor’s point of focus; where all the light from your lens should rejoin together to be correctly detected by your sensor. The thing is, depending on the construction of your lens, your chosen focal length, and even the aperture that you’ve used, certain wavelengths (colors) may arrive at points before or after where the focal plane sits.

Ozirig ca dlsr illustration

When this occurs, you end up with the telltale color fringing around edges in your photograph; and although you can remove low levels of chromatic aberration in Photoshop and Lightroom, the reality is that each extra moment you spend on touching up a photograph is one moment less you have to get something else done!

OziRig Cheetah Chromatic Aberration Comparison

Why does chromatic aberration occur?

Chromatic aberration happens because your lens acts as a prism; bending light depending on the various properties of the glass, and much like the triangle-shaped one made famous by Pink Floyd, colors passing through it are split at different angles.

Ozirig ca prism diagram

Remember that light is actually made up of several different wavelengths (colors). So, for your camera’s sensor to detect the combined color of light, your lens needs to make all wavelengths of that particular ray hit the exact same point on your sensor.

This sounds simple, but you need to take into account the fact that various wavelengths (and thus various colors) will be striking your lens all at once and that each of these rays will behave slightly differently depending on the glass that it is passing through.

The feat of engineering required to correctly align all of these different light rays is usually achieved by the manufacturer’s use of a lens array. In fact, if you were to pull your lens apart, it wouldn’t be surprising if you found upwards of 16 lens elements all designed to correct for various things along the light’s journey between your lens and your sensor.

OziRig Lens Elements

Unfortunately, this is also where chromatic aberration tends to rear its ugly head. Hidden within the design of these lens elements are defects – either in the glass or the design of the lens itself – which under specific conditions may cause your photos to exhibit this type of aberration.

I’m not trying to say that you need to have a pro-level lens, in fact, the key point to keep in mind here is that all lenses suffer from chromatic aberration in one form or the other. What matters is whether or not your lens exhibits visible chromatic aberration, and whether in your particular case this is a deal-breaker or not.

Avoiding chromatic aberration defects

Chromatic aberration can actually be effectively removed in post-processing if you are shooting in RAW. However, good practice states that you should try and remove issues in-camera first, rather than creating more work down the line.

The good news is that if you are stuck working with a lens that exhibits some form of visible chromatic aberration there are several easy-to-understand strategies which can help you to remove or minimize the visible effect of it in your photos.

Avoid high contrast scenes

OziRig CA Cheetah High Contrast

Chromatic aberrations tend to flare up in high contrast scenes. Particularly guilty are shots against white backdrops, landscape shots against a bright sunrise, or, as in the example of this Cheetah, where the light source is behind the subject.

This means that sometimes there’s nothing to do except try and reframe your shot. Swap your backdrop out to something which better matches your subject’s primary color, or wait for more favorable lighting conditions. If you absolutely must capture this shot as-is, then swap over to RAW and get your fingers ready for the possibility that you may need to do some touch-ups in post-production.

Check your focal lengths

OziRig Chromatic Aberration Focal Length

Although it’s nice to have access to a wide range of focal lengths, the fact is that most zoom lenses will exhibit various aberrations at the shorter and longest extremes of their focal range. So being able to choose a different focal length will usually help to remove the issue of visible chromatic aberration.

Likewise, using a zoom lens at a wide angle will usually introduce not just chromatic aberrations but various other defects in your image. Instead, consider choosing a prime wide angle lens to handle the job, or, perhaps more practical for your case, make a panorama at a focal length that does not exhibit the chromatic aberration issue and then join the photos in post-production for a flawless result.

Stop down your aperture

OziRig CA Aperture

Although this will depend on the exact type of lens you are using, stopping down your aperture will usually help to play down the noticeable effects of most lens defects, including chromatic aberrations. Remember that you may need to consider dropping the shutter speed or boosting the ISO to compensate for the light loss if working in a non-studio setting.

If you have access to lighting or flashes, then be sure to experiment with the effect of boosting and adding in extra light.

Reframe your subject to the center of the image

OziRig Rhino CA Recrop

Chromatic aberrations tend to occur more frequently as you move further away from the center of the frame. This is generally as a result of the curvature of the lenses within the barrel. Therefore, being able to reframe your subject closer to the middle may help to reduce, or even completely eliminate, issues with chromatic aberration and other lens-based defects.

This means that you may need to crop your image after shooting to achieve the desired frame, which may be an issue if you absolutely have to maintain every pixel in your photo. If, on the other hand, you are working with small prints, or digital distribution, then the differences between resolutions are not as noticeable until you step down significantly.

So understanding chromatic aberration, how to avoid it, and what you can do about it will help you improve the final quality of your images. If you have any other tips or comments please share them below.

googletag.cmd.push(function() {
tablet_slots.push( googletag.defineSlot( “/1005424/_dPSv4_tab-all-article-bottom_(300×250)”, [300, 250], “pb-ad-78623” ).addService( googletag.pubads() ) ); } );

googletag.cmd.push(function() {
mobile_slots.push( googletag.defineSlot( “/1005424/_dPSv4_mob-all-article-bottom_(300×250)”, [300, 250], “pb-ad-78158” ).addService( googletag.pubads() ) ); } );

The post Chromatic Aberration – What is it and How to Avoid it by Joshua Burke appeared first on Digital Photography School.


Digital Photography School

 
Comments Off on Chromatic Aberration – What is it and How to Avoid it

Posted in Photography


How to Fix Chromatic Aberration in Lightroom 5

21 Aug

Chromatic aberration is a phenomenon caused by distortion of the lens. Basically, it is a failure of the lens to focus all the colors to the same convergence point.

The effect can be generally seen in dark edges adjacent to bright areas of an image; it looks like an out-of-focus ghost of magenta or purple color. In photography this is also called “purple fringing”.

100 Crop Before

The quality of the optic plays an important role here, as not all lenses will produce the same effect. This problem tends to manifest much more in zoom lenses with variable aperture. However, no lens is exempt from having some distortion of this type, but we are not going to enter into that right now. I just want to share with you an easy solution with Lightroom 5. Your photos will look much better on the screen and, of course, in print once you easily correct this.

First off, let me share the example above, where you can see a 100 percent crop of a photo where you can see the distortion. If you look around the edges of the building against the sky, you can clearly see the magenta lines and out-of-focus effect.

Now, depending on the type of camera you are shooting with, if you shoot in JPG, chances are you’ll probably notice it less. The camera will apply some automatic correction when converting or processing the JPG in-camera. So please note that this will work much better when you are shooting in Raw.

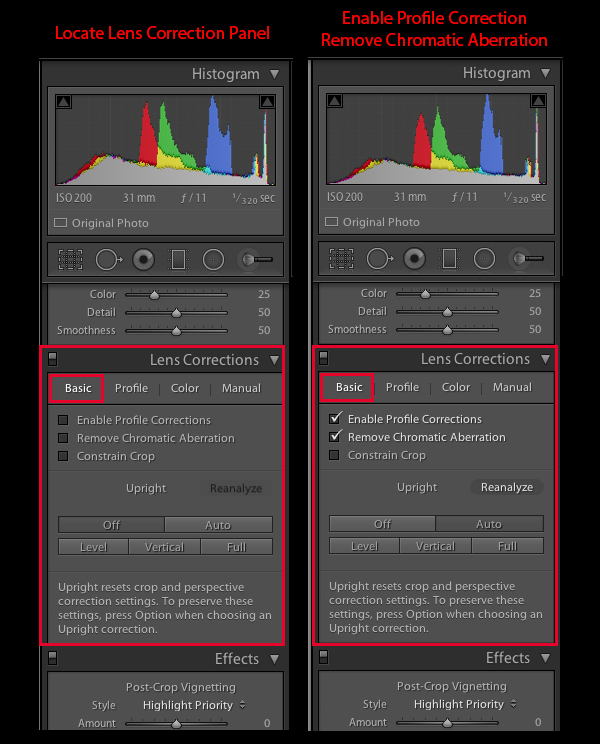
We are going to be working in the Lens Corrections panel in Lightroom. Correcting chromatic aberration is fairly easy and can be done really quickly in Lightroom 5. All you need is a few clicks in the appropriate boxes and Lightroom will work its magic. Please note that this panel is also used to correct other type of lens distortions as well, including barrel distortion, vignetting, etc.

Step 1 Go to the Lens Correction Panel

Locate the Lens Corrections panel in the Develop Module. You’ll probably have to scroll down. The Lens Corrections panel is located between the Detail and Effects panels.

Step 2 Do the Basic tab options first

The Lens Corrections panel is divided into four sections: Basic, Profile, Color, and Manual. Be sure to start from left to right and select the Basic section. Select the options Enable Profile Corrections and Remove Chromatic Aberration. The software comes preloaded with profiles from all major camera manufacturers and lenses. So as soon as you enable these options, you’ll notice that the image will change and any distortion will be automatically corrected. It will also correct and reduce the chromatic aberration or purple fringing.

Lens Correction Panel 1

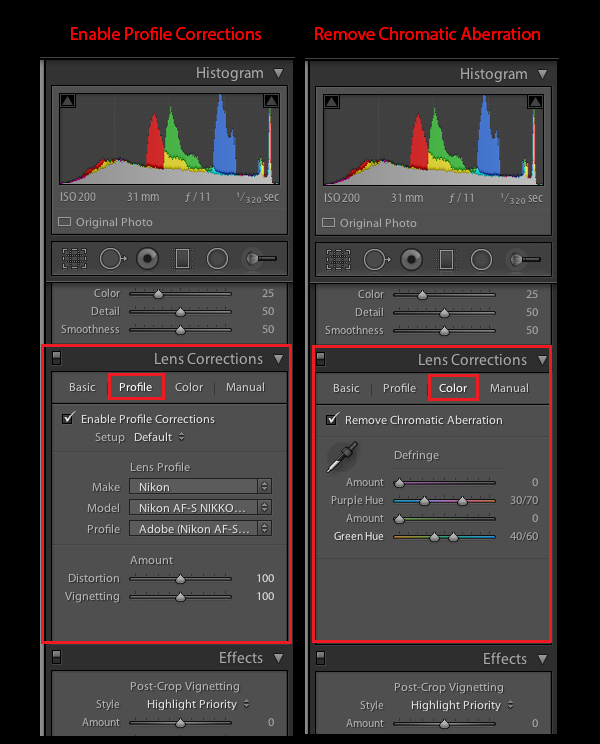
Step 3 Go to the Profile tab next

Now, go to the second section of the panel, Profile. Be sure that the checkbox Enable Profile Corrections is selected. Right below you’ll notice that Lightroom already recognized your lens make and model. If for any reason it is not, you can browse and select it manually. If your lens is not available you can switch the Setup option to Custom and correct distortion yourself by moving the sliders Distortion and Vignetting manually.

Step 4 The Color tab

Move to the Color section. Again, be sure that the Remove Chromatic Aberration checkbox is selected. In the majority of situations this is all you need to do. But for some particular images, you may need to do some extra work to completely remove the distortion. For that you can move the sliders until underneath until you notice the fringes disappear. A more precise method is to use the eyedropper to select the purple or green fringes for correction in a more accurate way.

Lens Corrections Panel 2

As you can see, this is a very simple process. Like stated before, in most cases you’ll be just clicking a few checkboxes and the program will do the rest. There are really very few occasions where you need to do any manual work – especially if the lens is already profiled in Lightroom, which applies to a very wide selection.

Here are the final results. In both, the same 100 percent crop as before and the entire image. As you can observe, the chromatic aberration no longer exists and the photo looks much better.

100 Crop After

Miami River Condos

For more Lightroom articles click here.

The post How to Fix Chromatic Aberration in Lightroom 5 by Daniel Korzeniewski appeared first on Digital Photography School.


Digital Photography School

 
Comments Off on How to Fix Chromatic Aberration in Lightroom 5

Posted in Photography


Chromatic Vortex: 3D Art from 4,416 Sheets of Photo Paper

23 Sep

[ By WebUrbanist in Art & Installation & Sound. ]

chromatic storefront installation art

A site-specific installation in a New York City storefront, this twisting multi-colored tunnel was suspended in mid-air and held together with no less than 17,000 standard office bind clips.

chromatic reflective photo paper

chromatic hanging tunnel inerior

chromatic binder clip assembly

Composed of over 4,000 panels of high-gloss photographic paper, CHROMAtex from SOFTlab (photos by Alan Tansey) was designed to suck passers by right in (proverbially not literally, fortunately for pedestrians).

chromatic art intersection interior

Situated in the Lower East Side of Manhattan, this sculptural work was built from the outside in. As illustrated in the video above, it slowly took shape as it moved from the front of the empty shop toward the back, breaking out into various subsidiary tunnels along the way.

chromatic suspended art sculpture

chromatic art entryp oint

These twists in turn split and curve, morphing from circular tubes into square ports and providing other internal perspectives for those curious enough to enter the interior space in order to see more of the suspended sculpture.

chromatic tunnel installation entrance

SOFTlab itself is composed of “artists, believers, listeners, directors, geeks, architects, sketchers, dreamers, programmers” and above all: designers. It was created by Michael Szivos who has a degree from the “Graduate School of Architecture, Planning and Preservation at Columbia University. The studio has since been involved in the design and production of projects across almost every medium, from digitally fabricated large-scale sculpture, to interactive design, to immersive digital video installations. As the studio adjusted to a wide range of projects, we began to focus less on the medium and style and more on ideas [and] we are able to approach every project from a fresh perspective to create rich spatial, graphic, interactive and visual experiences.”

Share on Facebook


[ By WebUrbanist in Art & Installation & Sound. ]

[ WebUrbanist | Archives | Galleries | Privacy | TOS ]


WebUrbanist

 
Comments Off on Chromatic Vortex: 3D Art from 4,416 Sheets of Photo Paper

Posted in Creativity


Hunt, Peck & Paint: Chromatic Typewriter Prints Landscapes

11 Mar

[ By WebUrbanist in Technology & Vintage & Retro. ]

chromatic typewriter

Many works of amazing literary art have been printed on typewriters in times past, but this re-purposing takes an old machine beyond words and into the realm of colorful painting.

chromatic upcycled landscape printer

Tyree Callahan has recycled (or upcycled, perhaps) a classic 1937 Underwood typewriter by replacing letters with sponges soaked across the spectrum with bright yellows, reds, blues and combinations thereof.

chromatic abstract art prints

Based in the Seattle area of Washington, the artist writes of his environs: “I’m constantly amazed at the play of light through our moist air and over the varied landscape of the Pacific Northwest. I especially enjoy early morning light–that short interval of time just before the last of the fog burns off–and evening light, especially on humid evenings, when the atmosphere itself is aglow with evening’s hues. We live in an environment that can produce both vivid and somber landscapes, often both within an hour’s time.”

chromatic landscape printing machine

There is something so satisfying about the click-clack sounds of a traditional typewriter, translating the mechanical motions of your fingers into physical results on the page in front of you – but imagine making those impressions in vivid colors instead of black on white. Sounds relaxing, hopefully literally.

Share on Facebook


[ By WebUrbanist in Technology & Vintage & Retro. ]

[ WebUrbanist | Archives | Galleries | Privacy | TOS ]


WebUrbanist

 
Comments Off on Hunt, Peck & Paint: Chromatic Typewriter Prints Landscapes

Posted in Creativity