Chromatic aberration is a phenomenon caused by distortion of the lens. Basically, it is a failure of the lens to focus all the colors to the same convergence point.
The effect can be generally seen in dark edges adjacent to bright areas of an image; it looks like an out-of-focus ghost of magenta or purple color. In photography this is also called “purple fringing”.

The quality of the optic plays an important role here, as not all lenses will produce the same effect. This problem tends to manifest much more in zoom lenses with variable aperture. However, no lens is exempt from having some distortion of this type, but we are not going to enter into that right now. I just want to share with you an easy solution with Lightroom 5. Your photos will look much better on the screen and, of course, in print once you easily correct this.
First off, let me share the example above, where you can see a 100 percent crop of a photo where you can see the distortion. If you look around the edges of the building against the sky, you can clearly see the magenta lines and out-of-focus effect.
Now, depending on the type of camera you are shooting with, if you shoot in JPG, chances are you’ll probably notice it less. The camera will apply some automatic correction when converting or processing the JPG in-camera. So please note that this will work much better when you are shooting in Raw.
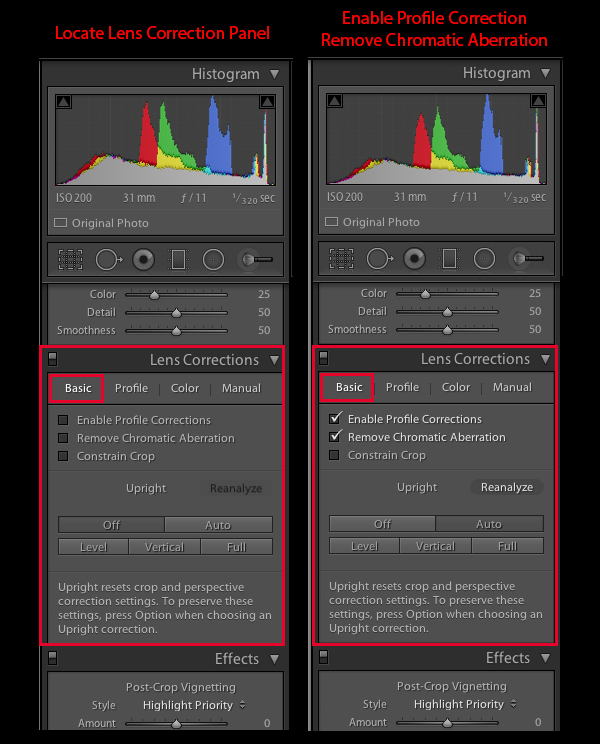
We are going to be working in the Lens Corrections panel in Lightroom. Correcting chromatic aberration is fairly easy and can be done really quickly in Lightroom 5. All you need is a few clicks in the appropriate boxes and Lightroom will work its magic. Please note that this panel is also used to correct other type of lens distortions as well, including barrel distortion, vignetting, etc.
Step 1 Go to the Lens Correction Panel
Locate the Lens Corrections panel in the Develop Module. You’ll probably have to scroll down. The Lens Corrections panel is located between the Detail and Effects panels.
Step 2 Do the Basic tab options first
The Lens Corrections panel is divided into four sections: Basic, Profile, Color, and Manual. Be sure to start from left to right and select the Basic section. Select the options Enable Profile Corrections and Remove Chromatic Aberration. The software comes preloaded with profiles from all major camera manufacturers and lenses. So as soon as you enable these options, you’ll notice that the image will change and any distortion will be automatically corrected. It will also correct and reduce the chromatic aberration or purple fringing.

Step 3 Go to the Profile tab next
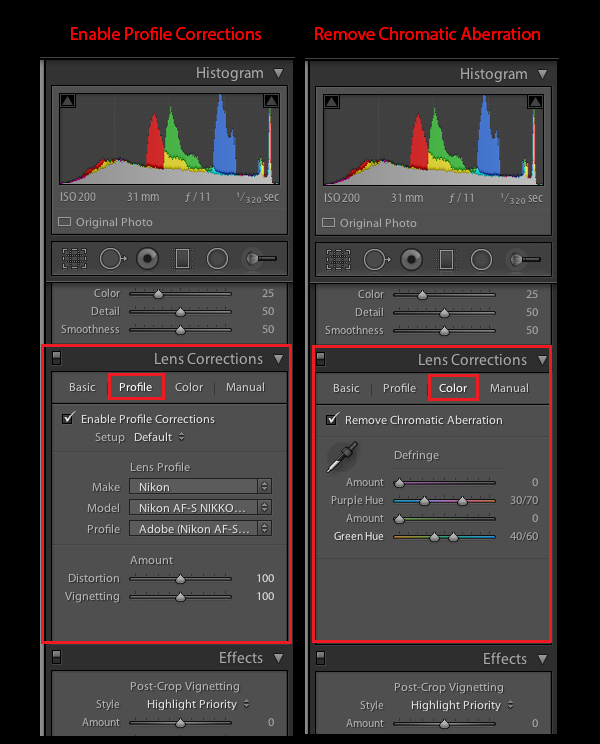
Now, go to the second section of the panel, Profile. Be sure that the checkbox Enable Profile Corrections is selected. Right below you’ll notice that Lightroom already recognized your lens make and model. If for any reason it is not, you can browse and select it manually. If your lens is not available you can switch the Setup option to Custom and correct distortion yourself by moving the sliders Distortion and Vignetting manually.
Step 4 The Color tab
Move to the Color section. Again, be sure that the Remove Chromatic Aberration checkbox is selected. In the majority of situations this is all you need to do. But for some particular images, you may need to do some extra work to completely remove the distortion. For that you can move the sliders until underneath until you notice the fringes disappear. A more precise method is to use the eyedropper to select the purple or green fringes for correction in a more accurate way.

As you can see, this is a very simple process. Like stated before, in most cases you’ll be just clicking a few checkboxes and the program will do the rest. There are really very few occasions where you need to do any manual work – especially if the lens is already profiled in Lightroom, which applies to a very wide selection.
Here are the final results. In both, the same 100 percent crop as before and the entire image. As you can observe, the chromatic aberration no longer exists and the photo looks much better.


For more Lightroom articles click here.
The post How to Fix Chromatic Aberration in Lightroom 5 by Daniel Korzeniewski appeared first on Digital Photography School.