RSS
 

Posts Tagged ‘Capturing’

4 Tips for Capturing Beautiful Seascapes

22 May

Seascape photography can be both incredibly rewarding and incredibly frustrating at the same time. The entire process of photographing seascapes is slightly different than regular landscape photography and there are a few extra factors you need to keep in mind.

4 Things to Know Before Capturing Beautiful Seascapes

Coming from inland Norway it wasn’t until I moved to Northern Spain that I really got a taste of photographing seascapes. It took a while for me to adapt and feel comfortable with waves crashing around me (I know those who come from coastal towns might be laughing now!) However, after living along that coast for nearly a year, and revisiting several times since, I’ve picked up several tips and tricks that can make a huge difference in your seascape photography.

#1 – Know the Tides

Understanding how the tides will impact the location you’re photographing is most likely the most important factor of capturing beautiful seascapes.

I remember the first time I visited Playa de Barrika, a stunning beach outside of Bilbao in Spain, I didn’t take one single image. It was a warm and beautiful day but the beach looked nothing like what I had expected. In fact, there wasn’t much of a beach at all. Since the tide was high, the waves went almost up to the cliffs, leaving only a thin strip of beach left. In my defence, the main purpose of this trip wasn’t photography but I had hoped to at least see what all the fuss about this place was about.

Tips for Seascape Photography

Playa de Barrika during low tide.

A few weeks later, I revisited the beach and this time I made sure that the sunset was during medium to low tide, which is ideal for this location. What met me was a completely different beach which was nothing but spectacular.

Anyway, what I’m saying is that you need to familiarize yourself with the beach you’re visiting and learn what tide is optimal to photograph that spot. Some places are interesting during high tide only while others offer opportunities regardless of the tide. Just make sure that you’re aware of this so you don’t miss out on a potentially great image.

Rising tide at Los Urros, Spain

How to Research the Tides

There are several methods to research and learn about the tides but I prefer to do this via a website such as Tides4Fishing or Tide Forecast. What I like about these pages is that you’re able to see the tides for a long period into the future, making it possible to plan trips that are months ahead.

Even though I prefer to research the tides from my computer or on a web browser, smartphone applications such as My Tide Time will also do a great job.

#2 – Accessories for Seascape Photography

We can’t avoid talking a little about accessories, can we?

Quite honestly, the accessories I recommend for seascape photography is more or less the same as the ones I recommend for landscape photography in general. The requirements are pretty similar even though the conditions by the coast might require a heavier use of cleaning products!

Lens Wipes

If you don’t already have a couple lens cloths and pre-moisturized wipes in your camera bag I strongly recommend you get some right away. These cheap and small tools are essential in keeping your lens clean and free for unnecessary dust spots.

4 Things to Know Before Capturing Beautiful Seascapes

Zeiss lens cleaning wipes.

Pre-moisturized wipes are even more important for seascape photography. If there’s a little wind, or you’re standing close to the waves, it’s quite likely that salt will gather on the front of your lens or filters. By having a pre-moisturized wipe and a microfibre cloth nearby you can easily remove this dirt from the lens and continue to take smudge-free images. This will also save a lot of time in post-processing.

Filters

Filters aren’t an essential part of seascape photography but they do have an even greater impact than they do when photographing motionless landscapes. A slight increase in the shutter speed can benefit the image a lot, but we’ll come back to this in a few minutes.

4 Things to Know Before Capturing Beautiful Seascapes

There are many filters to choose between but if you are just getting started with photography I recommend starting with a Circular Polarizer, a medium strength ND Filter, and a Soft Graduated ND Filter. This combination is all you’ll need in most scenarios and will be a great start to capturing beautiful seascapes.

Keep in mind that the use of a slow shutter speed also requires the use of a tripod!

A Remote Shutter

When you’re working with shutter speeds of approximately 0.5 seconds you’ll want to use a remote shutter to avoid camera shake. This doesn’t need to be an expensive accessory; a cheap remote shutter from Best Buy will do the job.

A remote shutter can also be useful when your tripod is placed close to the water and you don’t want to get wet. You can stand on a rock next to the camera and take pictures exactly when the waves look the best. Just take care of your camera and watch out for big waves. You don’t want the tripod to fall over!

#3 – Choosing the Perspective

The perspective often plays a great role in an image’s composition regardless of what you’re photographing. But when working with seascapes and the water’s motion, I’ve found it to be even more impactful.

Changing from a high to low perspective can make a great difference to the image, especially the depth. When photographing with a low perspective you’ll get the sensation that the waves are actually surrounding you. In addition, you can benefit from the leading lines that the waves create, which also will greatly benefit your composition.

4 Things to Know Before Capturing Beautiful Seascapes

On the other hand, using a higher perspective, or even an overview of the beach, can impact the image in a completely different way. You might not feel like your standing in the water but you get a better look at the beach and its surroundings. Some of my favorite images of beaches are taken from above rather than at sea level.

#4 – Choosing the Right Shutter Speed

The last factor you should keep in mind when photographing seascapes is the choice of shutter speed. Since I first began photographing with filters I’ve been fascinated by how great an impact a slight adjustment can have.

4 Things to Know Before Capturing Beautiful Seascapes

There are no right or wrong choices for shutter speed. It depends on your preference and what you wish to convey through that specific image. However, I’ll share some of my thoughts about this topic:

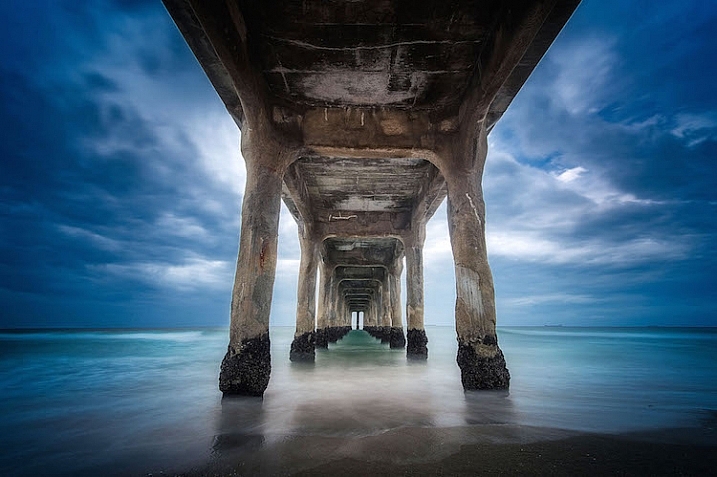
When photographing close to the water, with waves rolling in and leaving trails as they go back out, I prefer to use a shutter speed of approximately 1/2 second. I’ve found this to be the spot where I capture both the textures of the waves but still get the nice lines as the waves recede.

As I adjust to a higher perspective I tend to slow down the shutter speed more (longer exposures). Exactly how much depends on the specific scene, but normally I use an exposure between 5-30 seconds.

Again, that’s just my preferences and even I don’t follow them strictly. The best way of finding what you enjoy is to explore with different shutter speeds. If you want to learn more about the use of slow shutter speeds I’ve shared everything I know about the topic in The Ultimate Guide to Long Exposure Photography.

The post 4 Tips for Capturing Beautiful Seascapes by Christian Hoiberg appeared first on Digital Photography School.


Digital Photography School

 
Comments Off on 4 Tips for Capturing Beautiful Seascapes

Posted in Photography


Capturing the unseen: Sam Forencich’s Invisible Oregon

10 Mar

$ (document).ready(function() { SampleGalleryV2({“containerId”:”embeddedSampleGallery_6130176634″,”galleryId”:”6130176634″,”isEmbeddedWidget”:true,”standalone”:false,”selectedImageIndex”:0,”startInCommentsView”:false,”isMobile”:false}) });

There’s no denying it: Oregon is an incredibly beautiful place. So Portland resident Sam Forencich’s challenge isn’t finding amazing scenes to photograph – it’s finding a fresh way to do it. Experimenting with new approaches and different techniques led the veteran photojournalist and landscape photographer to infrared. He tells Resource Travel: 

‘The exciting thing about infrared is that there is no standard for what it’s supposed to look like. This grants you a wide latitude to interpret the look, and there are many directions you can go in.’

And that’s how a time-lapse was born: his recent work, Invisible Oregon, was recorded entirely with converted infrared cameras. It brings an otherworldly and eerie quality to some of the state’s familiar scenery. Check out the video below and head to Resource Travel for a full interview with Forencich, which includes a discussion of his well-known image of Dennis Rodman, named by Sports Illustrated one of the 100 best photos of all time.

Read Resource Travel’s interview with
Sam Forencich

Articles: Digital Photography Review (dpreview.com)

 
Comments Off on Capturing the unseen: Sam Forencich’s Invisible Oregon

Posted in Uncategorized


5 Tips for Capturing Everyday Moments in Your Family’s Life

21 Jan

Lifestyle photography and the art of everyday photography is about documenting your daily life. This could include capturing your baby’s toothless smile, his/her first steps, the way they hold their hair or twirl their dress, first time they start to read or write, or anything that you would normally run to grab your cell phone to capture.

While smartphone cameras have gotten to be more powerful and expensive over the years; nothing beats the quality and the depth of field you can achieve with wide apertures using your DSLR. The ability to capture raw files and process them, lens interchangeability, and being able to obtain superior images under even low light conditions, are just a few of the benefits. To add, over the decade the price for an entry level DSLR has also come down significantly. So if you own a DSLR (or a mirrorless or high-end compact camera) already, why not use it to capture everyday moments in your daily life?

how to capture everyday moments

Here are some tips for you to capture your everyday moments with your camera.

#1 – Capture the details

how to capture everyday moments

how to capture everyday moments

Capturing the details is about focusing on what the subject is actually doing versus photographing the entire subject which can take away from the story the image is trying to tell or convey. It could be something as simple as a kid holding a flower, or the way she touches her hair or smiles, or anything for that matter.

how to capture everyday moments details

Another key to creating extraordinary images out of the ordinary is to think about composition while considering the detail you are trying to capture. You may be focused on documenting and creating that memory that you can reflect upon. So compose your image such that the subject, in this case, the boy writing, creates stronger and meaningful image while helping you remember the story that occurred.

Another example is the image below.

how to capture everyday moments

This was a very simple image where he wanted to show a tiny flower he got from the garden. Again, having my camera right next to me, I quickly adjusted the settings to get the shot. I also tweaked the image a bit during post-processing to accentuate the details.

how to capture everyday moments

Children grow up fast and the memories in images and videos of them doing little fun things, their innocence is sometimes all we have to remember and treasure of their childhood.

#2 – Think perspective

how to capture everyday moments perspective

This was an ordinary everyday moment for us. Having breakfast at the table, eating his favorite snack and just enjoying his moment. I happened to think about a different angle and took this image while he stared up at me. Straight on would have been a perfectly fine image as well, but him looking up gives the viewers something different from the usual.

Here is another image where perspective was a little different.

how to capture everyday moments

In this image, I found my little one sitting on the stairs and coloring away. He found that to be his comfortable spot. Using the stair rods as framing I placed my camera in between the pillars and clicked for a unique perspective. This was a very ordinary moment of a 4-year-old coloring. But having my camera on hand and using a different perspective makes this image more unique and extra special.

Perspective can be anything. Utilizing your stairs for shooting through, or having your kid looking up at you while you click to emphasize scale are some commonly used techniques that can give an added boost to your images.

how to capture everyday moments

3 – Open your windows and blinds and use natural light

When that fails, use alternate light sources.

The biggest challenge with indoor photography is the availability of light and being able to use your camera under different lighting conditions. The quantity and quality of light change dramatically with different sky conditions. Regardless of the sky, however, try to shoot in the available natural light while keeping your subject close to the window.

how to capture everyday moments

how to capture everyday moments

Also, consider the time of day while photographing your subjects. In the first image above, I had to increase my ISO to 400 while also trying to keep only certain parts of the image in focus. Something to remember is while a high ISO can help you with many scenarios, it can also produce a certain amount of grain in the images which may or may not be desirable, depending on the look you want.

The bigger challenge with natural light is what do you do at night when there is only artificial light available? One solution is to use a flash and bounce it off the ceiling or wall depending on how much you wish to have in your image. Another way is to actually decrease the available light in your image, use interesting available light sources as a backdrop and accentuate your subject under low lighting conditions for some extra creativity.

how to capture everyday moments

In the image above, all the artificial lights in the room were turned off. While he was browsing his iPad, it was the only light source illuminating his face.

In examples below, I used the lighting from the Christmas tree as my light source. I turned all the room lights off and adjusted the exposure a bit during post-processing. Another creative way to use the artificial light is to use backlighting which causes a silhouette.

how to capture everyday moments

how to capture everyday moments

In other words, use natural light as much as possible. However, when artificial lighting is all you have, use it in the best possible creative way.

#4 – Make your moments happen, don’t wait for them

how to capture everyday moments

how to capture everyday moments

how to capture everyday moments

Somedays, you just have to wait for a cute moment to happen. While other days, you have to create a scenario to make those adorable moments with your kids occur. In the images above, he just wanted to hang out in his room. I used that as an opportunity to let him jump on the bed, which he loved a lot, and I clicked away to capture the action and movement shots with a high shutter speed.

In the image below, I really wanted a laughing happy image of my kid without him knowing I was shooting. Hence acting natural, while he really didn’t care to do either while being engrossed with his iPad. I kept repeating certain jokes he likes until I got that laughter out of him.

how to capture everyday moments

In other words, it is nice to have your camera nearby when a certain moment happens for you to be able to capture it right away. However, you sometimes have to create that moment or place your subject in a place or a scene in order to achieve something you want.

#5 – Last, but not the least, carry your camera everywhere

how to capture everyday moments

how to capture everyday moments

Carrying your camera everywhere you go will ensure that you do not miss out on documenting key moments in your kids’ lives. Can you imagine carrying only your cell phone to your son’s soccer game and ending up with a blurry image?

Documenting and creating a memory book or printing out a family album with images you created that are clean, crisp and not blurry is a special feeling of its own. Having your DSLR with you while learning the basics will help you to document key events in your own life and ensure they remain for generations to come.

Conclusion

In conclusion, just a few simple techniques in understanding composition, lighting, while also applying the above tips will help you create stronger images. Lifestyle photography and the art of capturing the everyday moments using your DSLR instead of your cell phone gives you an extra layer of that creative edge while still documenting moments that you usually would either way.

googletag.cmd.push(function() {
tablet_slots.push( googletag.defineSlot( “/1005424/_dPSv4_tab-all-article-bottom_(300×250)”, [300, 250], “pb-ad-78623” ).addService( googletag.pubads() ) ); } );

googletag.cmd.push(function() {
mobile_slots.push( googletag.defineSlot( “/1005424/_dPSv4_mob-all-article-bottom_(300×250)”, [300, 250], “pb-ad-78158” ).addService( googletag.pubads() ) ); } );

The post 5 Tips for Capturing Everyday Moments in Your Family’s Life by Jyotsna Bhamidipati appeared first on Digital Photography School.


Digital Photography School

 
Comments Off on 5 Tips for Capturing Everyday Moments in Your Family’s Life

Posted in Photography


6 Tips for Capturing Action in Your Wildlife Photos

29 Nov

Even with the fastest lenses and top-end DSLR cameras, catching fast movement in your wildlife photos can be tricky. The physical speed of your autofocus may not be able to keep up with and track a moving subject. Away from the limitations of your equipment, you may find that you miss a flutter of wings or fight between two animals.

action-wildlife-photos-6

Luckily, there are some things you can do to overcome both problems. Here are my top tips for successfully capturing action in your wildlife photos.

#1 Pay Attention to Behavioural Cues

Animals are great at giving away information about what they are going to do next. If you pay real attention to the subjects you a photographing, then chances are you’ll be able to predict the future and have a better chance at capturing something awesome on camera. You can often apply a general rule to a class of animals, rather than having to learn hundreds of different cues from all sorts of different species. For example, when a bird is about to fly off, most will first lean forwards and appear “twitchy” before taking flight.

When photographing this greenshank, I saw it bathing in a puddle in a field. From my experience, I know that birds will fluff their  feathers or shake off water after bathing and preening. I composed the image properly then sat in wait with the subject in focus and my finger on the trigger. Eventually, probably after about 20 minutes of waiting, the bird stretched out its wings and I clicked the shutter.

wildlife photos

Being able to anticipate this behaviour made catching this moment possible. If I had tried to jump into action having seen the stretch, the action would have been over before I could even focus the camera. The same principle applied to the following image. I saw a black-headed gull dipping its head underwater washing itself. Soon after it finished, it threw droplets up into the air. Waiting in position made it possible.

action-wildlife-photos-7

#2 Don’t Use Live View

The live view mode on your DSLR camera shouldn’t be touched with wildlife photos. It makes tracking very difficult, and whenever you engage autofocus the live view goes off as the mirror flips down. Because of the way you end up holding the camera, things become unstable too. Instead, stick to using your viewfinder. It is so much easier to react quickly and track your subject that way.

Two hooded crows engaged in a scrap.

Two hooded crows engaged in a scrap.

#3 Use a Sufficient Shutter Speed

It goes without saying that if you have enough available light, then you should use a fast shutter speed to freeze movement. A general rule to avoid camera shake is 1 over the focal length of your camera. For example, a 400mm lens should have a shutter speed of at least 1/400th second to avoid camera blur.

However, this rule may not give you a shutter speed fast enough to freeze the subject. Animals often move quickly, so adjust it as required. 1/1000th second or more is a good bet for fast running or flying creatures. It’ll depend on what you are photographing, and how exactly you are shooting it, as to what shutter speed you should go for.

action-wildlife-photos-5

1/2000th, f/4, ISO 320

A good tip is to review your images, when possible, to check that your shutter speed is fast enough. Zoom in on the LCD and look for motion blur. If you spot any, then just increase your shutter speed.

#4 Don’t Stick to Your Tripod

If you are comfortable with handholding, then maybe you can ditch your tripod. Some tripod heads, like ball heads, can make things restrictive when you’re trying to follow a moving subject that stops and starts. Having to undo knobs to be able to move the camera slows you down.

Releasing your camera from the grips of your tripod will allow you to move freely. If you have it, then engage vibration reduction on your lens. This will help to get rid of camera shake, but you should be using a fast shutter speed so that shouldn’t prove a problem at all.

A lesser black-backed gull pins down an Atlantic puffin and steals its catch of sandeels.

A lesser black-backed gull pins down an Atlantic puffin and steals its catch of sand eels.

#5 Use Continuous Focus

Switch your camera to continuous focus mode so that you can track focus with a moving subject. If you continually have to refocus manually because your camera locks onto a spot once it achieves focus, then you’ll probably find you’re always one step behind the animal. Continuous focus mode will keep the plane of focus shifting.

Be sure to dive into your camera’s menu and find the setting which chooses whether achieving focus or pressing the shutter gets priority. Set it to the shutter, and then you can ensure you are able to fire off frames at the opportune moments.

#6 Lay in Wait

If you find that your equipment’s focusing motors are too slow and you can’t keep up with a moving animal, then you should change your approach. Look for patterns of behaviour, such as a route an animal may take regularly. Chances are there will be places where they pause. Focus there, and point your camera straight at it. Lay in wait, and once the animal moves into view, fire the shutter.

An Atlantic puffin (Fratercula arctica) coming into land at its burrow on the Farne Islands, Northumberland.

An Atlantic puffin (Fratercula arctica) coming in to land at its burrow on the Farne Islands, Northumberland.

If you’re following a bird in flight, try setting your focus to a plane the bird will pass through. Pan along with the animal (you’ll need to be in manual focus by this point), and hold down the shutter to utilise burst mode as it passes you. Hopefully, one of the shots will be in focus if you’ve timed it right. You’ll need to do this a number of times to adjust the focal plane to the optimum distance, and then have a bit of luck on your side!

googletag.cmd.push(function() {
tablet_slots.push( googletag.defineSlot( “/1005424/_dPSv4_tab-all-article-bottom_(300×250)”, [300, 250], “pb-ad-78623” ).addService( googletag.pubads() ) ); } );

googletag.cmd.push(function() {
mobile_slots.push( googletag.defineSlot( “/1005424/_dPSv4_mob-all-article-bottom_(300×250)”, [300, 250], “pb-ad-78158” ).addService( googletag.pubads() ) ); } );

The post 6 Tips for Capturing Action in Your Wildlife Photos by Will Nicholls appeared first on Digital Photography School.


Digital Photography School

 
Comments Off on 6 Tips for Capturing Action in Your Wildlife Photos

Posted in Photography


7 Steps to Capturing Truth in Your Portraiture

05 Sep

A stunning portrait, one that stops you in your tracks and demands attention, is a beautiful thing. There’s something magical when a portrait intrigues and connects with us. It’s not about celebrity or beauty; it’s about humanity. For my money, the moment you capture truth and humanity in your portraiture, is when photography and art collide.

DPS7

From the moment you raise a camera to take a photograph of someone, there are many variables to keep under control. It is easy to get lost and allow your focus to drift. This is the one time in photography when you need to be incredibly present.

Following this mini guide of seven steps, can help you to improve your portrait photography, and connect better with your subjects.

Step One: Photograph within your technical capabilities

The last thing you need to be worried about when you start a shoot is the technical side of things. Practice ahead of time and nail your technique. Get to know all of your equipment, and iron out any technical kinks before the day of the shoot. Your subject is bound to become nervous if you seem uneasy with your kit, or project any uncertainty. Things can still go wrong on the day, but the more relaxed you are overall, the more you will be able to handle it without panicking.

DPS2

Step Two: See images of your subject beforehand

It can be handy to see images of your subject ahead of shoot day. I like to ask clients to send me a picture of themselves which they really like. This is useful in several ways.

You can get a good idea of their skin tone and the planes of their face, which helps you to consider your lighting set up and any adjustments you will need to make. You also get a good idea of how the client wants to be perceived, and what they want an image to say about themselves.

This will not always balance with what you see in them, but herein lies the magic. As a photographer, you are seeing the subject in a new light. When you add that into the process, alongside trying to capture what they like about themselves, you make a unique portrait.

DPS1

Step Three: Have a plan

You absolutely must have a plan ahead of time. Use the what you’ve learned by having seen an image of your subject ahead of time, to help you plan your lighting and background choices. Obviously consider the weather if you are planning any natural light or outdoor shots.

It’s worth mentioning at this point that natural light doesn’t always mean you actually have to be outside. Being close to large windows or open doors can provide a beautiful light, but it absolutely depends on the weather. You should also plan what framing you might use. The goal is not to end up with a contrived shoot, it’s still important to stay in the moment. But, if session is slowing down, and you at least have some ideas in mind, you can refer back to your mental plan and get things going again by changing it up.

Author photo

Step Four: Take charge

When you lift that camera, you must take charge of your set. This is a collaborative process, but you are definitely in the driver’s seat. It’s up to you to be vocal with your subject, to keep their energy levels up, and to make sure they feel good about themselves. It’s no good just shouting out stage directions, “left a bit, chin down,”. You must encourage them, and keep them having fun, because tension is not your friend! No matter how many times your subject has been in front of a camera, each one is a new performance and needs to be directed as such.

Wherever your shoot is taking place, you are in charge of that space. Define the space in your mind, and remove as many distractions as possible. Obviously if you are shooting in a public place, a park for example, you can’t remove everything. But if you can choose an area away from the main pathways, that will make life easier.

DPS3

If you are indoors music is a must. It’s a great leveller, and helps everyone to relax. You can create a playlist specially for your shoots, include some cheesy music to put a smile on people’s faces. It’s a good idea to choose different genres/decades depending on your client’s age, style, etc.

Step Five: Learn to read people

Learning to read people is a skill you absolutely must acquire in order to progress as a people photographer. Try to connect with your subject and chat to them, tell stories – humanizing the experience is vital. The more they relax, the more you will get out of them, and the more authentic the photograph will be.

DPS5

You must learn to pick up on signs and signals: Are they losing focus? Change up the setting. Are they uncomfortable? Try standing or sitting instead. You don’t want to waste shots on unusable images, where the subject is not present or is clearly not in the zone.

Another way in which you can learn to read people has to do with their personality. Determining early on that they are nervous, might mean you tell some jokes, or explain the setup to put them at ease. A giggly, happy person definitely needs to be represented as such, but there is always room for a more serious look, which will be up to you to direct them towards.

DPS6

Step Six: Set the tone

So once you have gained control and confirmed that you are in charge, you must set the tone for the whole shoot. When you look at a portrait which you love, consider what you like about it and how you too can take this sort of image. Keeping in mind that any picture you take will have your own voice, and that develops over time. The connection or level of engagement in that photograph is entirely dictated by you, the photographer.

Your subject feeds off your energy and pace, so you must keep this in mind at all times. If they seem to be wilting, it’s your job to bring them back up to speed. Make sure to check your own performance so that you are giving out the right vibes.

DPS9

Step Seven: take your time

This last step has to be one of the most important – take your time! Please trust me on this one, slow down and keep your head in the game. A shoot can run away from you in no time, and the last thing you want is to look at back at your shots and discover you haven’t captured what you wanted. You may find that you have spent too long on one look or background, and not captured another enough. Just as you want your subject to take mini breaks to refocus themselves, you must take the opportunity too.

Personally, I know that if at the end of a shoot I don’t feel a bond with my client, I haven’t nailed it – I’ll have some great images of them but it won’t be what I set out to capture.

DPS4

Your turn

Do you do portraits? How do you inject some truth into your portraiture? Please share your tips and tricks in the comments below. If you have any questions I’ll try and answer them as well.

googletag.cmd.push(function() {
tablet_slots.push( googletag.defineSlot( “/1005424/_dPSv4_tab-all-article-bottom_(300×250)”, [300, 250], “pb-ad-78623” ).addService( googletag.pubads() ) ); } );

googletag.cmd.push(function() {
mobile_slots.push( googletag.defineSlot( “/1005424/_dPSv4_mob-all-article-bottom_(300×250)”, [300, 250], “pb-ad-78158” ).addService( googletag.pubads() ) ); } );

The post 7 Steps to Capturing Truth in Your Portraiture by Alex Lagarejos appeared first on Digital Photography School.


Digital Photography School

 
Comments Off on 7 Steps to Capturing Truth in Your Portraiture

Posted in Photography


6 Tips for Capturing Character and Personality in Wildlife Photography

18 Jul

If you want to take your wildlife photography to the next level, then you need to look at capturing the character and personality of an animal. This makes for a much more appealing image, rather than simply a bird on a stick. A photo always needs to tell a story, but I think many photographers don’t realize that this applies to wildlife photography too.

Even though we can’t directly relate to most wild animals, it is still possible to document a story through a single image, or a sequence of images.

Tufted Capuchin

Tufted Capuchin

Without anthropomorphising animals, many do have their own personalities. I am doubtful this applies to something like an ant, but mammals in particular can be observed to have particular traits and habits. Some may be bold and investigate new things, whereas others may retreat and shy away from disturbances. This can be seen as the animal’s personality, and it is up to us as wildlife photographers to capture this on camera.

It’s definitely not easy though, as stills photography captures one moment in time and freezes it forever. Working with video makes it far easier to convey character, but it’s not impossible to do it in a single frame. Here are some tips to help you get character in your wildlife photography.

#1 – Behaviour

As a zoologist, I am fascinated by animal behaviour. Some behaviours we see as normal and predictable, whereas others shock and surprise us. Did you know that fish swallow small stones to aid digestion?

It’s capturing these interesting behaviours on camera that properly conveys the essence of a particular species. When you’re behind the camera, it’s easy to stare through the viewfinder and get tunnel vision. But if you step back and study an animal, reading up about it beforehand, you’ll learn what you need to look out for. Many animals have giveaway moves that warn you of an impending display – which is the case with great skuas, a seabird found in the northern hemisphere.

great skua

Great Skua, photographed in Scotland (Stercorarius skua)

In this particular case, the skua was preening its feathers continuously. This is a typical thing for birds to do before flapping their wings or displaying. It’s almost like a big stretch and yawn. I waited patiently for 15 minutes while the bird preened, knowing that I would probably be rewarded with such a display afterwards (image above).

Confrontations between two animals are commonplace. If you see one animal, even if it’s of a different species, approaching another, then chances are you’ll see some sort of interaction. Take these white-tailed eagles, for example. I was pretty sure that they’d both have a disagreement over who had rights to the tasty fish laying on the ice. With my focus nailed, I kept the shutter half-pressed and fired as soon as they lifted their wings.

white tailed eagles

White-tailed Eagles, photographed in Hungary.

#2 – Humour

While animals won’t inherently try to be funny, they often do things that make us chuckle. These are usually opportunistic photos that you can’t prepare for, but being poised and ready at all moments is key to capturing them.

When I lead workshops, one of the main things I try to get my clients to realize is that as soon as you drop your camera down, you’re risking missing the shot. If your subject is in front of you, then you’ve done the hard bit of waiting for an appearance – keep your eye to the viewfinder and remain at the ready, almost like a sniper training his eye on a target.

red squirrel

Eurasian red squirrel (Sciurus vulgaris), photographed in England.

A quick scratch from a squirrel lasting just a couple of seconds was possible to catch on camera, because I was already following its progress along the branch through the viewfinder.

Red deer

A red deer stag in the Scottish Highlands.

I had been looking to capture a stag peering through the trees, and while this wasn’t my intended outcome, I couldn’t help but click away when this stag stuck its tongue out round the tree. It’s little things like this that bring a smile to the viewer, and bring in personality and character to your wildlife photos. Although they make some chuckle more than others…

atlantic seals

#3 – Tight in the Frame

All the images I’ve shared so far in this article are fairly tight in the frame. This is a particularly useful composition technique you can use to bring the focus solely to the animal. The bokeh also helps, isolating the subject against the background – this is done using a wide aperture (and subsequently a shallow depth of field), most often successfully with a telephoto lens.

red squirrel

Eurasian red squirrel (Sciurus vulgaris).

When the attention of the viewer is trained on the animal alone, without distracting background elements to tear the eye away, then they feel more interacted with the animal in the image. It perhaps sounds a little cliché, but it is true. In this image of a squirrel, you can see that eye contact, along with a catchlight in the eye, really makes the photo pop.

When doing tight compositions like this, be careful not to chop limbs off half way down their length. It’s all or nothing, I always say!

#4 – Family Ties

If there’s anything humans can relate to with animals, it’s the bond between parents and offspring. Not all animals care for their young, of course, but those that do can be seen to care and work endlessly to raise their young. Take these two gannets – a male and a female – courting to reaffirm their bond each time the other returns to the nest from gathering fish.

gannet

Northern gannets (Morris bassanus).

If you can capture the parents feeding their young, even better. It doesn’t have to be a feeding behaviour though, and in particular playful shots between a family will give your shots the aww factor. Obviously, you have to be in the right place at the right time, and these particular kinds of shots require a lot of dedication and time to achieve, due to their rare nature.

barn swallow

Barn swallows feeding fledglings in British countryside.

#5 Try Something Different

Experimenting is something you’ve probably been told to do again and again – but it works. I am a particular fan of the high-key style of photography for wildlife, isolating the subject against the background by blowing out the highlights in an image. This mountain hare was grooming its fur, but as it bowed its head it looked rather solemn. The white background makes it almost look like a painting, and personally I think this is a rather intimate portrait.

Mountain Hare

Be prepared to step outside your comfort zone. That is where the photos are, that set you apart from the endless bird on a stick shots we see day to day. At first it’ll probably all go wrong, but that’s okay! You know all those rules you’ve been told? Rule of thirds, golden triangle, etc., break them, and see what happens.

#6 – Light

Ooh, it’s that scary unknown again. Light. It’s a maker or breaker for photography, and that doesn’t change when you step into nature photography either. Backlighting is particularly effective for conveying mystery and magic in an image. I used this to my advantage when photographing Peruvian spider monkeys – a primate that is unfortunately on the endangered list. Even so, the backlighting breaking through the rainforest canopy makes this image appear magical.

A backlit Peruvian spider monkey in the Amazon Rainforest in Manu, Peru.

A backlit Peruvian spider monkey in the Amazon Rainforest in Manu, Peru.

If you see interesting light like this, then be careful about your exposure. It’s important not to blow the highlights rim-lighting the animal, while at the same time keeping the individual exposed properly too. But when it works, it really works.

I feel that to end an article about character and personality, it is only right to use primates as an example. We can really relate to them, more than any other animal, due to our close relations. They’re curious, intelligent, and a clear example of an animal capable of emotions.

A male and female black-faced spider monkey stick together in the Peruvian Amazon Rainforest. These two individuals are displaying courting behaviour.

A male and female black-faced spider monkey stick together in the Peruvian Amazon Rainforest. These two individuals are displaying courting behaviour.

So keep clicking the shutter each time something of interest happens. Don’t wait and savour space on your memory card, because you might just miss something amazing.

This week we are doing a series of articles to help you do better nature photography. See previous articles here:

  • 3 Habits Every Outdoor Photographer Should Develop to Avoid Missing Shots
  • 5 Tips for Better Nature Photography
  • 27 Serene Images of the Natural World
  • Weekly Photography Challenge – Nature
  • 10 Ideas for Photographing Nature in your Backyard

googletag.cmd.push(function() {
tablet_slots.push( googletag.defineSlot( “/1005424/_dPSv4_tab-all-article-bottom_(300×250)”, [300, 250], “pb-ad-78623” ).addService( googletag.pubads() ) ); } );

googletag.cmd.push(function() {
mobile_slots.push( googletag.defineSlot( “/1005424/_dPSv4_mob-all-article-bottom_(300×250)”, [300, 250], “pb-ad-78158” ).addService( googletag.pubads() ) ); } );

The post 6 Tips for Capturing Character and Personality in Wildlife Photography by Will Nicholls appeared first on Digital Photography School.


Digital Photography School

 
Comments Off on 6 Tips for Capturing Character and Personality in Wildlife Photography

Posted in Photography


‘I instinctively felt I had an extraordinary image’: Ansel Adams on capturing Moonrise over Hernandez

25 Jun

In newly released footage, legendary landscape photographer Ansel Adams recounts capturing one of his most popular images: Moonrise, Hernandez, New Mexico

Adams’ son Michael recently explained in an interview with Marc Silber of Advancing Your Photography how the events unfolded the day the photo was taken. Riding along with his father, he remembers how Ansel caught sight of the moon rising over the landscape and pulled the car over to take the photo. In the clip above, you’ll hear Michael and Ansel Adams himself explain how the image was created, thanks to some quick thinking when a light meter couldn’t be found. The resulting image is, of course, a classic.

Articles: Digital Photography Review (dpreview.com)

 
Comments Off on ‘I instinctively felt I had an extraordinary image’: Ansel Adams on capturing Moonrise over Hernandez

Posted in Uncategorized


Tips for Capturing the Holiday Festivities at Home so You Can Enjoy Them Too

21 Dec

If you are a busy parent, you likely rely on your smart phone or pocket camera to capture the events of your daily life, especially at holiday times. But sometimes you want a little bit more than just the usual snaps, without the hassle of your bulky DSLR.

Photo4b details

There are some days when you often wish you had the time and ability to take meaningful photos of your family and capture special, magical times. Not the phone snaps that mostly end up as blurry images, but the ones that evoke emotion and feeling, and make new memories. There may be times when you wish you had a handful of quality photos as opposed to a hundred unrecognizable snaps on your phone or pocket camera.

This article has nothing to do with awesome DSLRs, it is about using the camera that you have with you to document fleeting moments of your family life. But it’s different from just snapping away without a little artistic vision. Instead, it’s about about seeing differently – with a creative eye, and most importantly, having fun doing so.

Note: Of course if you wish these tips can also be applied using your regular DSLR. It’s about whatever works for you so that you can still have fun participating in the activity with your family

Remember preparation is key, even if a lot of it is mental preparation and you only devote a few minutes to it. It gets you thinking and creative juices flowing.

1 photo1a

Christmas is just around the corner so let’s start get started creatively capturing Christmas at home in 10 images using the humble point and shoot pocket camera.

Part one: Capture a mini Christmas story at home in five photographs

Think of a simple theme (decorating a Christmas tree, making a Christmas card or décor, decorating a cake, etc.).
Choose a subject – a person, little or large. Find a location or corner in your own home and de-clutter the area. Choose a spot with ample light, or a light source such as next to a big window, lamps lit up, tree lights, or better yet just outside the house.

Select the macro or close-up scene mode. Turn your camera flash OFF as direct flash flattens the image and removes contrast making your photograph looking very two-dimensional. You want a play of light and shadow going on in your image to make it more interesting. Set the scene up as a fun activity with your family.

Top tip: When taking the photo, tuck both arms in, stay steady or lean on to something if that helps, and hold your breath as you press the shutter (some say press the shutter as you exhale but holding my breath works better for me).

Get ready to take photos. Wait for your moments. Take your time. Don’t snap loads of photos, rather try looking at the scene with an artistic eye. Remember you are only after 5 photos that tell a mini-story.

Photo 1: Get close and cosy

1 photo1

Choose a Christmas decoration in your home. Get really close to it and shoot at an angle so you need to tilt your camera. Shooting very close or with a wide aperture can help achieve nice blur (bokeh) in the background. In macro mode, shooting a scene that has several focal planes helps in achieving some bokeh.

Photo 2: Blur it all

Include beautiful blur in the background, or use blur as the subject of your photo. Make sure your subject is at some distance, and in front of the light source. Press the shutter while your camera is still focusing. This way you get intentional blur even while using the automatic mode.

4 photo4

Photo 3: Capture it

Choose a very simple activity, for example, ask your child to put a decoration on the tree. Tilt your camera, and fill the frame focusing in on the action. Avoid empty spaces in the background. You will have a more dynamic photo if you go close and fill the frame.

5 photo5

Photo 4: Mirror it

Make sure there is ample available light, then photograph a reflection instead of the subject. Try to use a mirror, or any reflective object like a bauble, to frame your subject.

3 photo3

Photo 5: Look straight down

Ask your subject to lie down under the tree and play with the baubles. Crack some jokes or tickle tummy and toes to get some genuine expressions. Make sure that the light from the window is illuminating your subject’s face so there is light in their eyes.

2 photo2

Part two: Capture a Christmas activity and document the process

Set the scene, the photos below show a Christmas decorating activity. Get everything ready. Buy a Christmas cake if you haven’t had the time to bake one.

Choose the look (outfits and colour scheme), as you want some sort of coordination so that there is a focus. For example, if the cake is colourful, you may want to put plainer aprons or outfits on your kids, so that there is contrast and focus, and vice versa. Limit your colour scheme to three or four colors, so there is some sort of harmony and cohesion. Try not to go too matching though.

Make it a fun activity, but explain to the children that there is a process to follow to ensure a successful outcome, therefore they must allow time for each process. In your head, plan to document this process. Give them a sequence of stages so they look forward to the next step.

Set your camera to portrait or macro. The automatic settings for these in-camera include a wide aperture so lots of light enters the lens, and a slower shutter speed which allows in more ambient light. The danger here is blur, but you can use that creatively too. To counteract blur, try to be very still, and hold your breath as you press the shutter. You can also steady yourself against a table or wall.

Get ready to document.

Photo 1: Set the context

Photo1 context

In this case, it’s the bare, undecorated cake. One of the ways you can shoot editorially is to take the photo from a bird’s eye view. To make it interesting, rather than just photographing the cake on its own, get the kids to wave their hands on top of it for some energy and action. The blurry action creates an effective contrast to the still cake.

Photo 2: Introduce the characters

Take a photo of the kids kitted out in their aprons or outfits you planned for earlier, remember to try and capture expressions. You can introduce the kids by taking a more traditional front view image, or employing some creative cropping for a more interesting take.

Photo2 characters

Photo 3: Direct the spotlight on some details

Details are so important in telling a story, enhancing memory, and evoking emotions. Choose special, or key items in the process to focus on, and photograph them close-up. Avoid too many empty spaces in the background. A full frame engages the viewer more in this case.

Photo3 details

Photo3a details

Photo 4: Document some action

Movement and blur add so much dynamic and energy to a photograph. They strengthen a story and allows for fun moments too.

Photo4 action

Photo 5: Add fun

Talking about fun, allow some silliness in the process, such as painting their faces with a bit of flour, writing their names on flour, waving decorations around while singing Christmas tunes, etc. Make it an experience, not just a secret photoshoot!

Photo5 fun

So there you have it, 10 creative photos capturing some Christmas joy in your home.

Do you have any tips for photographing the Christmas spirit in your own home, or images to share? Share them in the comments below.

googletag.cmd.push(function() {
tablet_slots.push( googletag.defineSlot( “/1005424/_dPSv4_tab-all-article-bottom_(300×250)”, [300, 250], “pb-ad-78623” ).addService( googletag.pubads() ) ); } );

googletag.cmd.push(function() {
mobile_slots.push( googletag.defineSlot( “/1005424/_dPSv4_mob-all-article-bottom_(300×250)”, [300, 250], “pb-ad-78158” ).addService( googletag.pubads() ) ); } );

The post Tips for Capturing the Holiday Festivities at Home so You Can Enjoy Them Too by Lily Sawyer appeared first on Digital Photography School.


Digital Photography School

 
Comments Off on Tips for Capturing the Holiday Festivities at Home so You Can Enjoy Them Too

Posted in Photography


6 Tips for Capturing Dramatic Skies in your Landscape Photography

17 Dec

Don’t let the land in landscape photography fool you–a great landscape photo relies just as much on the sky. Boring gray skies make for boring landscape photos. But capturing a dramatic sky in camera is trickier than it seems. With the sky lighter than the land, the camera will typically overexpose the sky, turning a brilliant blue into a vague and unexciting gray.

But, with a little fine tuning, it is possible to capture a sky that is the cherry-on-top of a great scene on land. Here are six tips for capturing more dramatic skies in your landscape photography.

Desolation Wildernes Sunset Jkatzphoto

Photo Courtesy Justin Katz Photography.

1 – Time it right

Landscape photography may not require the split second timing that’s necessary for capturing a toddler’s smile, or a wide receiver’s catch, but timing is still a big part of the picture. The sky that’s gray one day, could be bright blue the next. When planning out a landscape photo, consider how the timing will impact the sky.

Watch for weather patterns that add could add interest to a shot, like a storm brewing just on the horizon. Weather plays a big role in the overall mood of the image–if you’re hoping to capture a dark and gloomy shot, head out when the sky is stormy. On the opposite end, if you’re hoping to capture a more relaxed or happy feeling, look for blue skies dotted with clouds.

Yosemite Tunnel View Jkatzphoto

Photo Courtesy Justin Katz Photography.

The time of day matters too. While the middle of the day will produce the most shadows on the land, the sky tends to be the bluest then. Just after sunset and just before sunrise is often a good time to capture wispy clouds and a warmer tint of light. Of course, sunrise and sunset makes for a dramatic sky as well.

2 – Try the wrong white balance

Photography rules are sometimes meant to be broken–sometimes, using the wrong white balance setting creates a more dramatic sky. This is especially true when shooting towards the beginning or end of the day–using a different preset will adjust the color in the sky. Auto, cloudy and shade presets will get you an orange-ish sunset with a light blue sky, with a slight variation between the settings. A florescent setting, on the other hand, will typically turn an orange sunset purple, with a brilliant blue sky. Tungsten offers a similar effect, but with even deeper colors.

Whitebalancepresets

Using Kelvin temperatures to adjust your white balance results in an even greater control over the colors in the sky. Around 5500K will usually capture a sunny sky with an accurate white balance–that is, where things that are white are still white in the picture, or neutral tones. A higher temperature, for example 6500K, will give the land an orange glow but also enhance the colors in a sunset. A cooler temperature, on the other hand (say 3000), will play up the blues and purples. By using the Kelvin scale, you have more options for picking a white balance setting that best captures those colors.

White Balance 16,000 K

Photo © Hillary Grigonis – White Balance edited to 160,000 K in post-processing to add orange

While it’s always best to get the shot right in camera, shooting in RAW allows you even more flexibility when it comes to adjusting the colors in the sky (and the rest of the image, for that matter). If you perhaps overdid it by making the shot too warm or too cool, you can easily adjust it to find the color temperature that fits the image the best. If you have a landscape photo that you already shot in RAW, open it and try different white balance presets, or the temperature slider, to see first hand how shooting with a different white balance would have impacted the shot.

3 – Compose for the sky

When the sky is more dramatic than the land, why not use that when determining your composition? Pay attention to where you place the horizon when you are composing your shot. Using the rule of thirds to imagine the image is dived into threes, place the horizon on one of those horizontal lines. If you are shooting a photo with an average looking sky, try placing the horizon on the upper third of the image, so more of the land is included in the photo. But if the sky is really dramatic, take advantage of that and include more of it in the frame by placing the horizon on the lower third.

Darlene Hildebrandt

By Darlene Hildebrandt – The sky is dramatic so the image was composed to show less ground and more sky by placing the horizon toward the bottom.

Ádám Tomkó

By Ádám Tomkó – as the sky is less dramatic, the horizon placed higher helps minimize the sky.


4 – Use a filter

There are two filters every landscape photographer should have in their camera bag in order to capture more dramatic skies. The first is a graduated neutral density filter. A regular neutral density filter is like putting sunglasses over your lens–it limits the light coming in for bright scenes or long exposures. But a graduated neutral density filter places that darkening effect only on a portion of the image. By placing the dark portion of the filter over the sky, you can properly expose the entire scene. Without the filter, the sky will either be overexposed and bland, or the land will be underexposed and dark. With the filter, you can achieve an exposure that works for both in one shot. The only downside is that graduated neutral density filters don’t work as well with an uneven horizon, like shooting a cityscape. Graduated neutral density filters come in both circular and square formats, but the square is often preferred because you can then place the horizon anywhere in the frame.

A graduated neutral density filter doesn’t work in every scenario–like a very uneven horizon, for example. A polarizing filter doesn’t have as much of an effect on the sky, but it can still be used with uneven horizons. Polarizing filters work by adjusting the reflected light rays coming through your camera lens. Since the sky is blue because of these reflecting rays, turning the front of the polarizing filter will adjust the intensity of the blues in the sky. Since it just affects reflected light rays, it can still be used when mountains or buildings make the horizon uneven. Polarizing filters are also great for enhancing reflections off water or other shiny surfaces too.

Lake Tahoe Sunset Nevada Jkatzphoto

Photo Courtesy Justin Katz Photography.

Experiment with motion blur and long exposures

Long exposures aren’t just for photographing waterfalls. If you use a long enough shutter speed, the clouds will blur too, creating a sky of wispy clouds and a slight feeling of motion. To capture motion blur in the clouds, you’ll need to use a long shutter speed. The best settings will depend a bit on the weather and how much motion blur you’d like, but you can try starting with a two minute exposure and adjust up or down from there.

Kris Williams

By Kris Williams (Exposure info: ISO 200, f/22 for 75 seconds)

If you are shooting during the day, you may not be able to balance out a two minute exposure with a narrow enough aperture or low enough ISO, ending up with a photo that’s way too bright. So how do photographers capture motion blur in the clouds when the photo obviously wasn’t taken at dusk or dawn? A neutral density filter helps block out some of that light so you can use a long exposure during the day (that’s the same thing as the graduated neutral density filter from the last tip, only the entire filter is dark instead of just half).

Image used with permission of Matt Kloskowski

Image used with permission of Matt Kloskowski (10 second exposure)


Use the Camera RAW graduated filter tool

While it’s always best to get the shot right in-camera, there are a few editing tools that can improve the sky in your landscape photos. One of those tools is the graduated filter inside Adobe Camera RAW (works the same in Photoshop and Lightroom). Using the tool, you can click over the sky on the image. Like an actual graduated filter, the effect will only cover that portion of the image and gradually fade away, making it possible to create natural looking edits.

The graduated filter tool can be used to adjust the exposure, creating an effect much like using the actual filter. But, the Camera RAW tool can also adjust brightness, contrast, saturation, clarity, sharpness and color. That opens up a lot of possibilities for applying edits just to the sky for more drama that sometimes can’t be done in-camera.

Original imag

Original image

Graduated filter added in post-processing stage

Graduated filter added in post-processing stage

The sky can make or break a landscape photo. From timing and composition to filters, when you consider the sky as you shoot, you’ll end up with more dramatic, frame-worthy shots.

Do you have any other tips for creating dramatic skies in landscape photography?

googletag.cmd.push(function() {
tablet_slots.push( googletag.defineSlot( “/1005424/_dPSv4_tab-all-article-bottom_(300×250)”, [300, 250], “pb-ad-78623” ).addService( googletag.pubads() ) ); } );

googletag.cmd.push(function() {
mobile_slots.push( googletag.defineSlot( “/1005424/_dPSv4_mob-all-article-bottom_(300×250)”, [300, 250], “pb-ad-78158” ).addService( googletag.pubads() ) ); } );

The post 6 Tips for Capturing Dramatic Skies in your Landscape Photography by Hillary Grigonis appeared first on Digital Photography School.


Digital Photography School

 
Comments Off on 6 Tips for Capturing Dramatic Skies in your Landscape Photography

Posted in Photography


PanoCatcher automates capturing panoramas and timelapses

30 Sep

A new device called the PanoCatcher is described as a ‘robotic photography platform,’ and is designed to automate the capture of time lapses, panoramas, and other similar photos. The device is made from CNC precision-machined aluminum, and is compatible with most mirrorless and DSLR cameras. Read more

Articles: Digital Photography Review (dpreview.com)

 
Comments Off on PanoCatcher automates capturing panoramas and timelapses

Posted in Uncategorized