RSS
 

Posts Tagged ‘Blurry’

How to Avoid Blurry Photos of Kids

29 Nov

One of the most frequent questions that I see on the Digital Photography School Facebook Group is some variety of this: “Help! Every photo of my kid is blurry! What am I doing wrong?!” If you’ve found yourself wondering the same thing, I’ll walk you through five things that you can do to help you avoid taking blurry photos of kids.

photographing-kids

1. Mind Your Aperture

When it comes to photographing children and experiencing blur, many issues can be solved by either stopping down or opening up your aperture. That said, if you’re relatively new to photography, it can be difficult to know which direction you need to go.

sharp-kid-photos

If you’re currently shooting with a large aperture and notice some issues. Like an aperture of f/1.4 or f/1.8 and only part of your child’s face is in focus, or only one of several children in the image is in focus even when they’re fairly close together. Then, you might want to try stopping down (making it smaller) your aperture (in other words, make the number larger like f/4 or f/5.6).

If you’re currently shooting with an aperture of f/5.6 or greater (like f/8 or f/11) and you notice a lot of camera shake or motion blur, you may want to try opening up your aperture (make the number smaller like f/4 or f/2.8) if you can. That will allow in more light, which can help create a better balance between the aperture and shutter speed.

2. Utilize Shutter Priority Mode

photograph-moving-kids

If you’re using one of your camera’s shooting modes and are currently photographing kids that are moving, you may want to try shooting in Shutter Priority Mode with your shutter speed set at 1/500th or even faster. By using Shutter Priority Mode, you’ll set the shutter speed, and your camera will select the other settings to balance out the shutter speed that you’ve selected.

Keep in mind that you can still select your ISO in Shutter Priority Mode. You will definitely want to watch your exposure make sure you’re making adjustments to your ISO (or set it to auto). Often, leaving your ISO at 100 in Shutter Priority Mode with a fast shutter speed can result in very dark, or even black images.

3.Use Burst Mode Selectively
photos-moving-kids

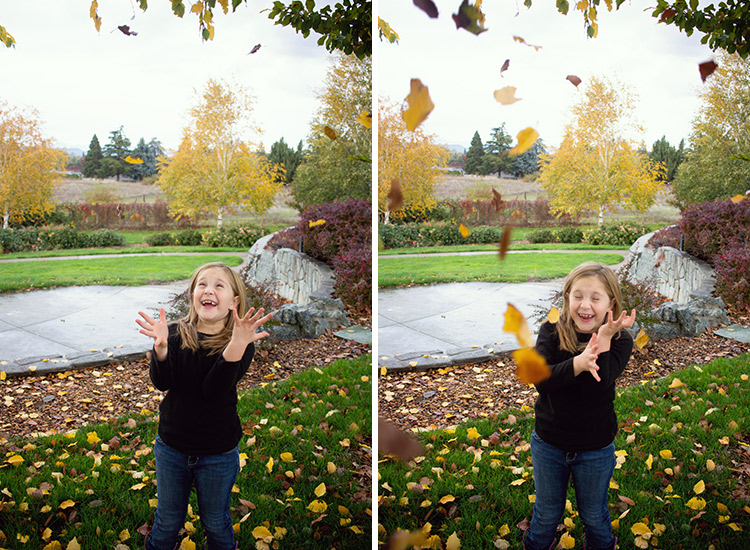
In the photography world, the practice of “spray and pray” where you take a series of images using burst mode and hope that one of them turns out, has received a lot of negative attention lately. Certainly, we shouldn’t use burst mode through the entirety of every session, but there are some instances when it comes in handy photographing kids.

The other day, we took my girls to the park. They were having a blast tossing piles of leaves into the air and letting them fall down onto their heads. In that instance, I chose to use burst mode because it allowed me to capture an event in which the action/movement changed very quickly, as did their expressions.

I sometimes use burst mode in a short series of images to capture kids twirling, running, or any time they’re moving very quickly for a limited period of time. It’s never a bad idea to practice capturing those same events without using burst mode. But when I know that my opportunity to capture a particular event is limited (a child attempting a goal in a soccer game for example), I choose to use burst mode to my advantage.

4. Don’t Be Afraid of Autofocus
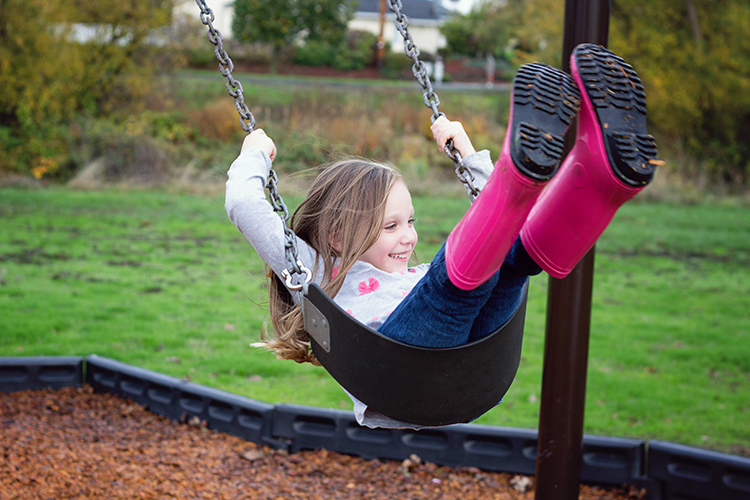
sharp-images-moving-kids

Somewhere along the way, a rumor was started that you’re not a “real” photographer unless you shoot in full Manual Mode all the time. I don’t know how that particular rumor got started or why it has taken such a hold on the photography world, but it’s garbage.

If you’re trying to photograph really active kids, please don’t be afraid to use autofocus! It will make life so much easier! If you’re already using autofocus but are still experiencing problems, there are two other things to try adjusting. First of all, it has been my experience that selecting a single focus point for my camera yields far more in-focus images than allowing the camera to auto-select one. If you have the ability to select a focus point for your camera, you may want to try selecting a single point (start with the center point if you’re unsure where to begin) for your camera, and see if the focus improves.
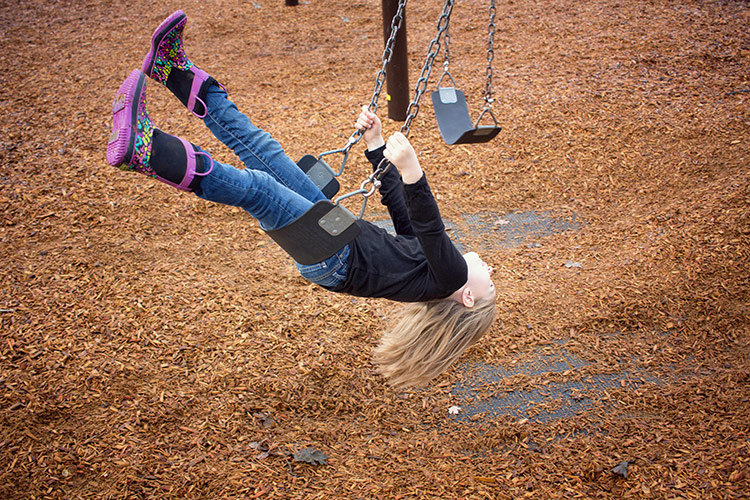
moving-kid-photo2

Focus modes

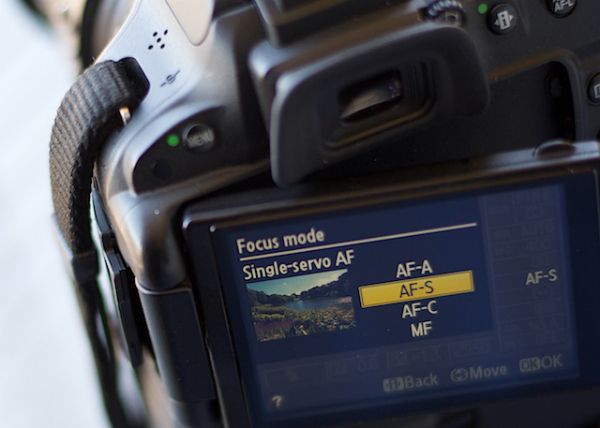
Another option when it comes to autofocus is to change the autofocus mode. If you’re trying to photograph moving children, and your autofocus mode is currently set to One Shot (Canon) or AF-S (Nikon), try switching to continuous autofocus mode – Al Servo (Canon) or AF-C (Nikon).  One Shot mode is designed to focus on objects that are largely inanimate, and consequently it’s not the best choice when you’re photographing quickly moving children.

When you switch to Al Servo, you’re selecting continuous autofocus. In continuous autofocus mode, you can push down the shutter halfway and let the camera focus, but the camera will continue to track that subject and recompose focus (even as the subject moves) until you depress the shutter button all the way.

moving-kid-photo-2

Some camera models also have a hybrid setting called AI Focus (AF-A for Nikon), which is designed to fluctuate between an object that starts out as stationary but then begins to move. I have been less satisfied with the images I’ve captured in AI Focus than other modes. But each camera model works a little differently, so it’s certainly worth experimenting with the hybrid autofocus mode if your camera has that option.

5. Use a Flash (Sparingly)
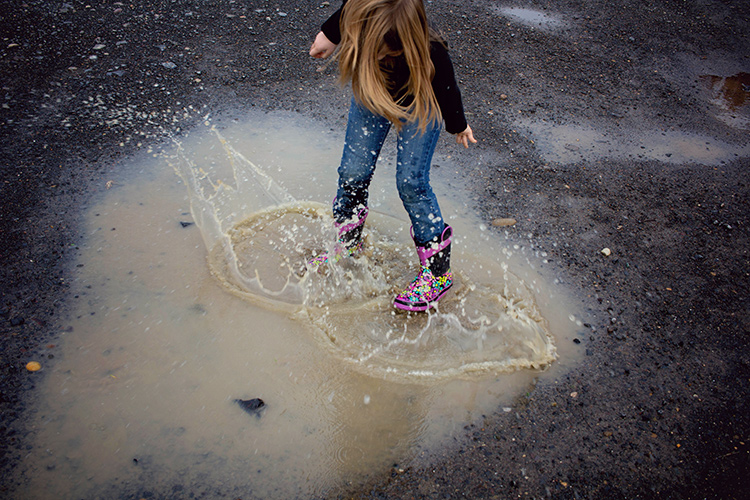
fix-blurry-photos

Though I prefer to shoot without a flash whenever possible, there are certainly instances in which using a flash can help to freeze the action, and help you avoid blurry images. When it comes to using a flash, my best advice is to use it sparingly.  Balance it with the available/ambient light (use only the strength of flash you absolutely need), and diffuse or bounce the flash whenever possible in order to create an image that looks crafted rather than like a snapshot.

Photographing children can certainly be a test of patience. These five tips will help you eliminate the blur, and begin to capture photographs of your children that you’ll treasure for years to come! Do you have any other tips? Please share them, and your images of kids in the comments below.

googletag.cmd.push(function() {
tablet_slots.push( googletag.defineSlot( “/1005424/_dPSv4_tab-all-article-bottom_(300×250)”, [300, 250], “pb-ad-78623” ).addService( googletag.pubads() ) ); } );

googletag.cmd.push(function() {
mobile_slots.push( googletag.defineSlot( “/1005424/_dPSv4_mob-all-article-bottom_(300×250)”, [300, 250], “pb-ad-78158” ).addService( googletag.pubads() ) ); } );

The post How to Avoid Blurry Photos of Kids by Meredith Clark appeared first on Digital Photography School.



Digital Photography School

 
Comments Off on How to Avoid Blurry Photos of Kids

Posted in Photography


How to Create a Delicious Blurry Bokeh Background in 4 Easy Steps

02 May

Blurry backgrounds are nothing new when it comes to photography. The technique of blurring the background to emphasize a subject in the foreground has been used by photographers for decades, and by painters and other visual artists for hundreds of years. Now thanks to the proliferation of digital cameras this phenomenon has exploded in recent times.

Many people like photos with a tack-sharp subject and a smooth blurry background, and even though some might say it’s more of an over-used trend, the truth is that bokeh is here to stay. The trick to using it effectively, is to learn how to use the physical properties of lenses and light to create the look you are going for. While some people turn to creative editing tricks like adding blurry filters or doing Photoshop gymnastics there really is no substitute for the genuine article. If this is something you have always wondered about or wanted to try for yourself, here are four easy steps to get you started.

50mm, f/4, 1/350 second, ISO 400

50mm, f/4, 1/350th of a second, ISO 400

The term bokeh is a Japanese word that doesn’t have a precise English translation, but refers to the type and quality of the out-of-focus areas of an image. In other words, when the blurry parts of a picture look nice, you might say the image has good bokeh. While a thorough discussion of what bokeh is, what causes it, and what affect your lenses and lens elements have on the type and quality of bokeh could go on for several pages, this article is going to be a bit more basic look at how to create visually pleasing blurry elements in your photos. If you don’t want things to get too complicated, and aren’t quite ready for a thorough breakdown of aspherical elements or the circle of confusion, then get out your camera and follow along with these few simple tips to help you get the look you have always wanted.

understanding-bokeh-golden-glow

50mm, f/1.8, 1/6000th, ISO 100

1 – Shoot with a wide aperture

Take a look at the front of your lens, you will probably see a few numbers that look like 1:3.5-5.6, or 1:2.8, or f/4 (read: What the Numbers on your Lens Mean for more on how to find this). These numbers refer to the size of the aperture in the lens itself, and how big the opening can get. Ironically smaller numbers are bigger, and a lens that says 1:2.8 will be able to let in much more light than a lens that says 1:4 or f/4. (Some manufacturers use different schemes to show the aperture size but it’s always the number after the colon, or on the second side of the / that you want to look for when determining the maximum size of the lens opening.)

The smaller the number, the wider your aperture will be, and the less light you will need to take a properly exposed photo. Wide apertures also mean your photos will have a shallower depth of field, and anything out of focus behind your subject will begin to take on a smoother, more visually pleasing blur. In other words, wide apertures help give you more bokeh.

understanding-bokeh-leaves

50mm, f/1.8, 1/4000 second, ISO 100

If you’re itching to get some pictures with the same kind of buttery-smooth background blur you have seen in nature magazines or fashion spreads, put your camera in Aperture Priority mode (on Nikon) or Av (Canon, Pentax, etc.) and turn the control dial until the aperture value number is as close to zero as it can go. It helps if you have a prime lens that doesn’t zoom in and out, since they usually have wider maximum apertures, but even a kit lens can give you decent results if you have enough light. Now go out and find something to photograph, even if it’s just a coffee mug on your office desk.

To put my money where my mouth is, I took my camera to work and literally snapped a picture of a coffee cup on my desk. No photoshopping or magic tricks here, just a wide f/1.8 aperture. 50mm, 1/100 second, ISO 160

To put my money where my mouth is, I took my camera to work and literally snapped a picture of a coffee cup on my desk. No photoshopping or magic tricks here, just a wide f/1.8 aperture. 50mm lens, 1/100 second, ISO 160

2 – Put your subject far away from the background

If you have been trying to get the kind of silky, blurry bokeh you seem to notice in everyone else’s photos you might try this one simple trick and you won’t believe what happens! Simply putting a great deal of distance between your subject and whatever is behind it, can go a long way towards creating the bokeh you have always dreamed about.

understanding-bokeh-flowers-sunrise

50mm, f/1.8, 1/1000 second, ISO 100

If you are shooting portraits, try moving your subjects to a location where there is a great deal of space behind them, or even just repositioning yourself so you are looking at your subjects from a different angle that puts more distance between them and the background. In the photo below, I specifically shot the scene so that there was about 50 meters between the couple and the fountain, which caused it to have a nice blurry out-of-focus appearance that complements the woman and her fiancée quite well. I could have used a bench that was much closer to the fountain, but it would have had a very different affect on the picture, and it would not have given me nearly the same amount of bokeh as you can see in the final image below.

understanding-bokeh-fountain

85mm, f/2.4, 1/2000 second, ISO 200

3 – Get close to your subject

As I mentioned in the opening paragraph there are many different optical elements that come into play when dealing with bokeh and background blur, and certainly shooting with wide apertures while putting a great deal of distance between your subject and the background are critical elements of the equation. Another thing you can do, is position your camera and lens physically close to the subject you are shooting. Combine this technique with the first two, and you’re virtually guaranteed to get good results.

understanding-bokeh-fence

This shot has all the techniques rolled into one: a wide f/1.8 aperture, a far-away street light in the top left corner, and a very short distance between my camera and the fence bar on the right side.

4 – Zoom in, waaay in

If you are trying to get bokeh-licious shots and not having much luck, there’s another technique that could mean the difference between frustration and celebration. Due to how lenses collect, and focus incoming light rays, it’s easier to get blurry backgrounds with longer focal lengths. This is why these types of shots are difficult to get on mobile phones, which generally have lenses with a much wider angle of view. Grab your nearest camera, whether it’s a DSLR or a humble little point-and-shoot, and zoom the lens as far in as it will go. Now use the other tips I have already mentioned: set the aperture to the widest setting, find a subject that’s relatively close to you, and make sure there is plenty of room between the subject and the background.

A golden eagle, taken with my 400mm f/4 lens on a Nikon D7200. A very expensive combination, but it produces outstanding results with silky-smooth bokeh.

A golden eagle, taken with my 300mm f/4 lens on a Nikon D7200. A very expensive combination, but it produces outstanding results with silky-smooth bokeh.

You might not get the photo of your dreams, but with a little bit of practice you should start to see some improvements, as you begin to understand how to use your camera to create sharp subjects with pleasing out-of-focus areas.

Just kidding! I took the first shot with a $  150 Panasonic ZS7 pocket camera. All I did was zoom in as far as it would go. This is the same scene with the same camera a few seconds later, shot at the camera zoomed all the way out.

Just kidding! I made that first image above with a cheap Panasonic ZS7 pocket camera, and all I did was zoom in as far as it would go. This is the same scene, with the same camera, a few seconds later – but zoomed all the way out.

Now with all this being said, I have a challenge for all of you dPS readers: What is your favorite picture you have taken that has nice pleasing bokeh? Is it a portrait, a wild animal, or more along the lines of abstract art? Share your picture in the comments section below along with a few tips of your own to help others take similarly beautiful bokeh photos.

googletag.cmd.push(function() {
tablet_slots.push( googletag.defineSlot( “/1005424/_dPSv4_tab-all-article-bottom_(300×250)”, [300, 250], “pb-ad-78623” ).addService( googletag.pubads() ) ); } );

googletag.cmd.push(function() {
mobile_slots.push( googletag.defineSlot( “/1005424/_dPSv4_mob-all-article-bottom_(300×250)”, [300, 250], “pb-ad-78158” ).addService( googletag.pubads() ) ); } );

The post How to Create a Delicious Blurry Bokeh Background in 4 Easy Steps by Simon Ringsmuth appeared first on Digital Photography School.


Digital Photography School

 
Comments Off on How to Create a Delicious Blurry Bokeh Background in 4 Easy Steps

Posted in Photography


How to Understand Depth of Field to Avoid Blurry Photos

21 Sep

Last week we released our brand new course – Photo Nuts and Shots which is all about teaching the tools, techniques and thought processes for creative photography. It’s by on of our most popular ebook authors, Neil Creek and features over two hours of video teaching.

We asked Neil to create this course as he has a natural knack of explaining technical concepts in a way that makes the intricacies of photography easy to understand.

We’re so convinced that this course will help you that we want to share a couple of minutes from one of the modules about avoiding blurry images with you here today.

Neil Creek runs through an additional 35 minutes of golden focus advice in this lesson – available in full when you purchase the course online today.

Keep in mind that this is just one of ten creative photography lessons included in Photo Nuts and Shots.

So you’ll not only discover practical tips and tricks for producing tack sharp photos, but get step-by-step guidance on:

  • Using light effectively
  • Avoiding and embracing lens flare
  • Composition techniques
  • Choosing creative exposure settings
  • Thinking flexibly on location
  • And much more!

With Neil’s comprehensive demonstrations and easy-to-understand teaching style, it’s like having your very own professional photography mentor.

All packaged in over two hours of streamable and downloadable video content for the terrific introductory price of USD $ 39. That’s 33% off!

Don’t miss out – take the full course today.

We’ve extended the 33% saving to our first course, Photo Nuts and Bolts, too (although you can certainly take one without the other). So both are USD $ 39 each, but for a limited time only. And you can rest assured that all of our video courses come with a 60-day money-back guarantee.   

googletag.cmd.push(function() {
tablet_slots.push( googletag.defineSlot( “/1005424/_dPSv4_tab-all-article-bottom_(300×250)”, [300, 250], “pb-ad-78623” ).addService( googletag.pubads() ) ); } );

googletag.cmd.push(function() {
mobile_slots.push( googletag.defineSlot( “/1005424/_dPSv4_mob-all-article-bottom_(300×250)”, [300, 250], “pb-ad-78158” ).addService( googletag.pubads() ) ); } );

The post How to Understand Depth of Field to Avoid Blurry Photos by Darren Rowse appeared first on Digital Photography School.


Digital Photography School

 
Comments Off on How to Understand Depth of Field to Avoid Blurry Photos

Posted in Photography


3 Tips for Avoiding Blurry Photos of Kids

09 Jun

One of the best things about kids is also one of the most frustrating when it comes to photographing them; they are so full of life and energy they rarely sit still, which can lead to an abundance of blurry pictures and heavy sighs when you go back to review your images. Instead of smiling faces and cute outfits, you often end up with a memory card full of photos where their cute little faces are a mishmash of fuzzy pixels, and any details in their hair or clothes are hopelessly lost. This is a chronic problem with photos of kids from smartphones, but it’s all too common in pictures taken with more expensive DSLRs too.

One solution is to simply use the flash on your camera, but this has the unfortunate side effect of creating harsh shadows, poorly-lit backgrounds, and ghostly red-eye effects that have to be fixed on your computer. To get the types of photos of kids you’ve always wanted it’s important to know a bit about shutter speed, and look at some of the ways you can harness the controls of your camera .

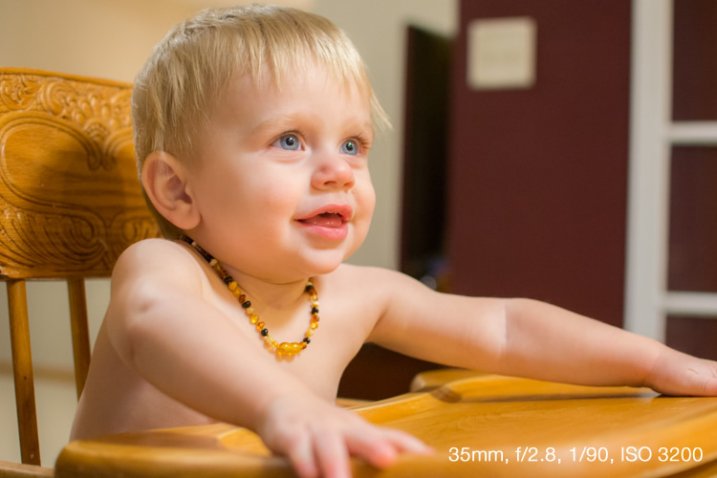
kid-dinner-table-eating

Understanding Shutter Speed

The underlying problem of blurry kid pictures usually stems from your camera’s shutter speed; kids move quickly so a fast shutter is usually required to snap clear pictures. This is fine if you have plenty of light, but as soon as the sun goes down, or you find yourself indoors, your camera’s shutter slows way down in order to let in enough light for exposing – too slow for non-blurry photos of fast-moving children.

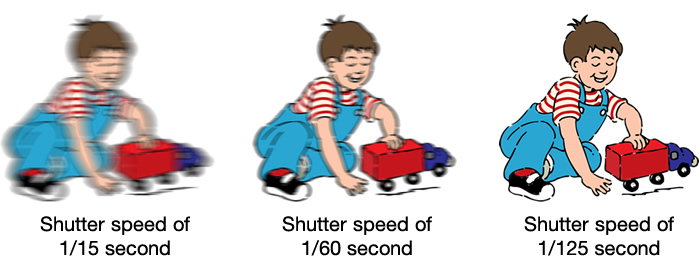
A faster shutter will result in sharper photos with less motion blur.

A faster shutter speed will result in sharper photos with less motion blur.

Unfortunately the solution is not always as easy as increasing your shutter speed, as this can lead to pictures that are underexposed if there is not enough light available. This is why your camera will often opt to use the flash if you are shooting in low-light situations on Automatic mode. Rather than decreasing the shutter speed your camera simply creates its own artificial light. If you’re using a kit lens with a focal length between 18-55mm a shutter speed of 1/90 is probably sufficient to capture blur-free images of little ones, though the exact value will change depending on the focal length of your specific lens and how fast the kids are moving. As a general rule I don’t use shutter speeds slower than 1/90 second when taking pictures of kids with my 35mm lens, but that usually means I have to compensate for low light in a few other ways. Here’s a few tips to help:

#1 Increase the ISO

There are three primary ways to control the amount of light that enters your camera:

  • Aperture: Increase size of the opening in your lens so more light can pass through it.
  • Shutter speed: Open the shutter for a longer period of time.
  • ISO: Make the piece of digital film (sensor) in your camera more sensitive to light.

The first method is limited by the physics of your lens. Most basic kit lenses simply don’t have large enough openings, or apertures, to let in much light (unless there is a great deal of light already available i.e. outside during the daytime or in a brightly lit room). The second method is easy if your subjects are not moving. You can leave the shutter open for many seconds at a time and get a non-blurry shot if everything is standing still, but that rarely happens with little kids. The third method, raising the ISO, was not a viable solution until recent years when camera technology advanced to the point that you could greatly increase the sensitivity of your sensor without a massive loss in overall image quality. Camera sensors are now so good that you can use faster shutter speeds to get blur-free shots of kids (even if your lens does not have a wide aperture) simply by raising the ISO.

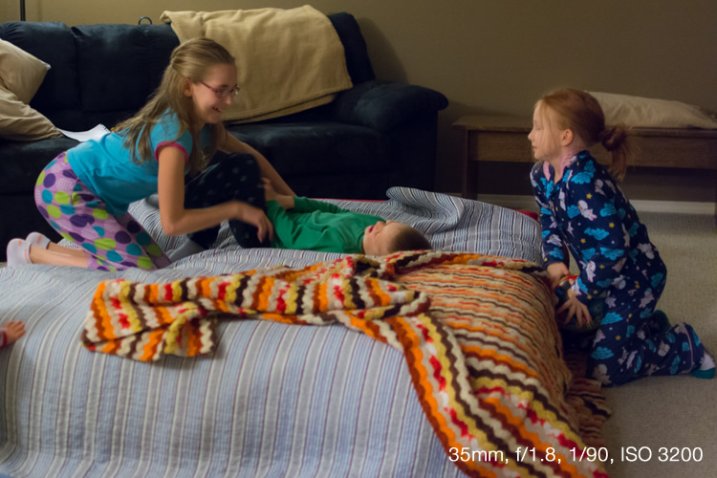
Shooting at ISO 3200 allowed me to get pictures of my nieces' pajama party without using the flash.

Shooting at ISO 3200 allowed me to get pictures of my nieces’ pajama party without using the flash.

Until a few years ago most DSLR cameras were fine at ISO settings of 400, 800, or even 1600. Beyond that, photos started getting quite noisy and grainy, almost as though they were coated with a fine layer of colored sand. Now even basic consumer cameras like the Canon Rebel T4i or Nikon D3300 can go all the way up to ISO 6400 without too much detriment to their overall picture quality. Granted an ISO 6400 picture is never going to be as clean and sharp as one taken at ISO 100 or 200, but ISO 6400 essentially allows your camera to capture 64 times more light than ISO 100 (equal to 6 stops more). This means an image that would normally require a shutter speed of 1/15 second at ISO 100 could be taken with a shutter speed of 1/1000 second at ISO 6400 – a massive benefit if your goal is to capture pictures that are not blurry.

Shooting at higher ISO values means your photos will have a bit more noise and grain, but you will be able to use much faster shutter speeds. It's up to you whether the tradeoff is worth it, but for me it usually is.

Shooting at higher ISO values means your photos will have a bit more noise and grain, but you will be able to use much faster shutter speeds. It’s up to you whether the trade-off is worth it, but for me it usually is.

One caveat to this technique is you simply cannot do it in Automatic mode. If you don’t feel quite confident to start shooting in Manual, try using the Program Automatic mode instead. Rotate your camera’s command dial to the P setting, then you are free to change the ISO while your camera figures out an appropriate shutter speed and aperture. The more you practice, the more you will get the hang of it, and start feeling comfortable with your particular camera’s capabilities at higher ISO values.

#2 Use a large aperture

I mentioned in the previous section that a wider aperture is one way to let in more light, and the best way to do this is with a prime lens. These lenses do not zoom in and out like the kit lens most cameras come with, but the trade-off is their extraordinarily large apertures – big enough to let in tons of light even at dusk, or in a dimly-lit room.

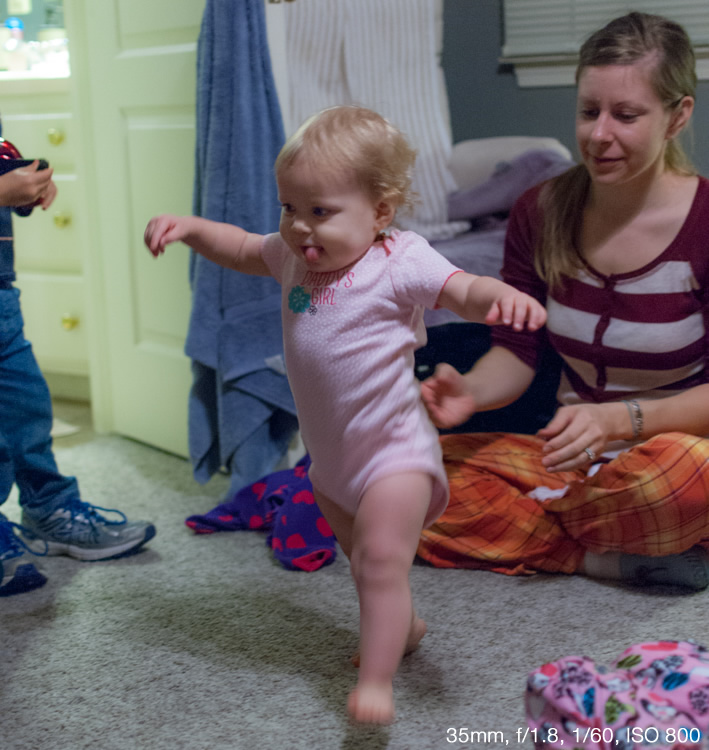
Shooting at an ultra-wide aperture of f/1.8 allowed me to get a picture of this girl taking her first steps. Using the flash would have resulted in washed-out colors and would have been quite a distraction for the little girl.

Shooting at an ultra-wide aperture of f/1.8 allowed me to get a picture of this girl taking her first steps. Using the flash would have resulted in washed-out colors and would have been quite a distraction for the little girl.

If you don’t have a prime lens you can still use wider apertures, but you will likely have to raise your ISO a bit more as well. Most kit lenses have apertures of roughly f/3.5 when zoomed out all the way and f/5.6 when zoomed in, which might not sound like much but it’s actually a massive difference (f/5.6 to f/2 is three stops or 8x less light so it is quite significant – in the example above it would mean shooting at 1/4 second or 6400 ISO instead). This just means you will have to move around a bit more to position yourself closer to the kids instead of standing across the room and using the telephoto end of your lens.

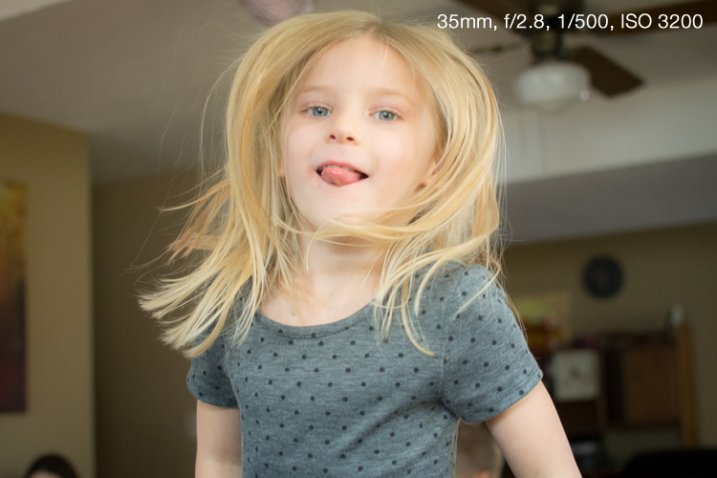
If you’re not entirely comfortable dealing with apertures and f-stops just yet, try using your camera in Shutter Priority (S or Tv) mode with auto-ISO. This lets you set the shutter speed while your camera figures out the best combination of aperture and ISO. As I said earlier, when taking pictures of kids with my 35mm prime lens I like to use a shutter speed of 1/90 second and faster, like 1/125 or 1/250, if they’re running around or jumping on furniture. The shutter speed you use will be different depending on your camera and the focal length you are using on your lens, but when you shoot in S/Tv mode with auto-ISO your camera will generally default to using the widest possible aperture and then start raising the ISO to get a good exposure. In other words, you are telling your camera “I want a fast shutter and no flash, so it’s up to you to figure out the biggest aperture and highest ISO to make this happen.” It doesn’t always work, but it’s certainly a good technique to try if you want clearer pictures of children.

The only way to get a non-blurry picture of this girl jumping on her trampoline was to use both a wide aperture and fast shutter.

The only way to get a non-blurry picture of this girl jumping on her trampoline was to use both a wide aperture and fast shutter.

This might sound a little counter-intuitive, but if you shoot in Aperture Priority (A or Av) mode, you can tell your camera to use a large aperture but in order to get a good exposure it will usually give you a slower shutter speed. By contrast, shooting in Shutter Priority will force your camera to use the widest possible aperture every single time in order to get a good exposure at the shutter speed you set. (Unless of course there is already plenty of light available in which case it might select a smaller aperture, but you would still get the non-blurry photo you want.)

#3 Make better use of light

One of the best sources of light is available for free all day long right in the sky above you. However, while the sun is certainly the brightest light, it is also the least controllable. This means you have to find ways of making use of the light it does provide, which usually is a simple matter of repositioning yourself or your subjects. When working with adults this is fairly easy, but kids are another matter; they rarely go right where you want, and if they do they are not likely to stay there for long. If you’re the kind of person who likes to take pictures while resting comfortably on a couch you might find yourself with plenty of blurry, or excessively dark or light photos, as a result. If you get up and start roaming about the room you can not only get a better vantage point from which to take your pictures, but find ways of making much better use of the sunlight that is likely to be streaming in through the windows.

Sunlight was pouring in through a window just to the right of this photo, so I quickly found a location that took advantage of such a large amount of available light.

Sunlight was pouring in through a window just to the right of this photo, so I quickly found a location that took advantage of such a large amount of available light.

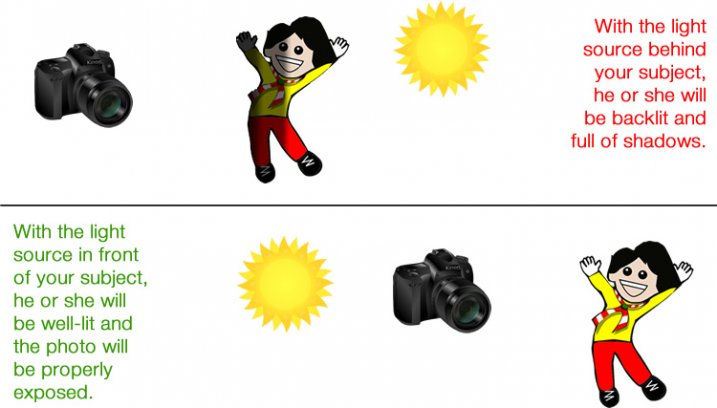
This technique works great even if you don’t have a fancy DSLR or other such expensive camera. I often see pictures of kids posted to social networks that are blurry because the shutter speed was too slow to capture the action, even though there is plenty of sun or other light available. The trick is to learn how to reposition yourself such that your subject is in front of you and the main source of light is behind you. This will help make sure your subjects (whether they are kids, adults, pets, plants, or anything else) are properly lit, while also giving you enough light to use faster shutter speeds.

light-sources


This takes a bit of time to adapt to because you may be used to staying relatively still while kids run around and play. Once you start getting up, moving around, and learning to harness the available light instead of using the flash, you will see a dramatic improvement and far fewer blurry photos, even if you are using an iPhone or an inexpensive point-and-shoot camera.

Do you like taking pics of children? What are some of your favorite techniques for getting photos that are sharp, in focus, and not blurry? Leave your thoughts in the comments below.

googletag.cmd.push(function() {
tablet_slots.push( googletag.defineSlot( “/1005424/_dPSv4_tab-all-article-bottom_(300×250)”, [300, 250], “pb-ad-78623” ).addService( googletag.pubads() ) ); } );

googletag.cmd.push(function() {
mobile_slots.push( googletag.defineSlot( “/1005424/_dPSv4_mob-all-article-bottom_(300×250)”, [300, 250], “pb-ad-78158” ).addService( googletag.pubads() ) ); } );

The post 3 Tips for Avoiding Blurry Photos of Kids by Simon Ringsmuth appeared first on Digital Photography School.


Digital Photography School

 
Comments Off on 3 Tips for Avoiding Blurry Photos of Kids

Posted in Photography


Top 10 Mistakes that Cause Blurry Photos

10 Nov

Cedar Key

If your photos are not sharp, you are not alone! The most common question I get asked by beginning photographers is “how do you get your images so sharp?”

Blurry photos is very common issue with a whole plethora of possible culprits, making it very difficult to pinpoint exactly what the problem is. But if you go through this list of the top 10 mistakes that cause blurry photos, you will probably find the answer that works for you.

1. Your shutter speed is too slow

This is the #1 culprit of blurry photos. You might think you can hold perfectly still for half a second, but I assure you there are very few people in the world who can. When hand-holding your camera, remember this rule of thumb to avoid blur caused by camera shake – your shutter speed should be the reciprocal of your lens’ focal length – that is, if you’re using a 60mm lens, your exposure should be 1/60th of a second or faster. With a 200mm lens, use at least 1/200th of a second, and so on. Camera shake is magnified the longer your telephoto length, so wider angle lenses will suffer its effects much less.

Using a 400mm lens, I selected a shutter speed of 1/400th of a second to reduce the possibility of camera shake.

Using a 400mm lens, I selected a shutter speed of 1/400th of a second to reduce the possibility of camera shake.

Some lenses and cameras have image stabilization technology built into them – particularly with longer focal lengths. Image stabilization usually allows you to slow your minimum shutter speed by around three stops, meaning that a 60mm lens can now handle shutter speeds as low as 1/8th of a second without camera shake.

What is YOUR minimum shutter speed?

In addition to this rule of thumb, it’s important to know your own personal minimum shutter speed. We all shake a little, some more than others, so it’s good to know at what point camera shake becomes an issue for you. Try an exercise to find out: put your camera in shutter priority mode and make the same photo at 1/500th of a second and keep going slower and slower. Back at your computer, look at your images and see when you start to notice the blur. Personally, I don’t usually go below 1/125th of a second if I’m hand-holding my camera.

2. Not using a tripod

Sunset Arches

If you’re experiencing camera shake and you can’t use a faster shutter speed (due to low light conditions) or you don’t want to use a fast shutter speed (because you’re purposefully trying to blur something in the frame) then you need to steady your camera another way such as using a tripod or monopod.

When you use a tripod, image stabilization is not necessary and may even be counter productive, so it’s a good idea to get in the habit of turning it off when you put your camera on a tripod and turning it back on when you take it off.

3. Bad camera holding technique

For the best stability, practice the official photographer position: stand with your feet slightly apart, one staggered forward, and firmly planted to stabilize your body right-to-left and back-to-front. Support the camera with your left hand by holding the lens from underneath, and use your right hand to grab the grip and gently press the shutter button. Tuck your elbows tight to your chest and use the viewfinder rather than the live view screen, as holding the camera to your face will also help hold it steady. Some photographers even go so far as to listen to their breathing and heartbeat, taking care to fire the shot in between breaths and beats for maximum stability.

Proper technique when hand-holding your camera.

Proper technique when hand-holding your camera.

4. Your aperture is too wide

The size of the aperture also has a direct effect on the sharpness of your photo in that it determines depth of field, which is how much of the image is in focus from front to back.

When a lens finds focus, it locks in on a specific distance known as the plane of focus. If your focus is at, say, 15 feet, everything 15 feet away from the camera will have maximum sharpness, and anything in front of or behind it will start to fall into blur. The amount of this effect depends on the aperture.

If you use a wide aperture, like f/2.8, the depth of field is very shallow. This effect is emphasized with longer focal length lenses. So if you are using a telephoto lens and the aperture is f/2.8, there may be only a razor thin sliver of the image that is in sharp focus. If you use a small aperture, like f/11 or f/18, the depth of field is larger so more of the image will be sharp.

Choosing the right aperture depends on the type of image you want to create. But if you are trying to get everything in the frame as sharp as possible, try using a small aperture (a larger f-number such as f/11 or f/22). However, by using a small aperture you will need to use a slower shutter speed to compensate for the loss of light. See problem #1.

5. Not using autofocus

How good is your eyesight? Not great? Wearing glasses? You should probably be using autofocus. These days cameras are sophisticated – let them do what they are good at. Another thing to keep in mind is that your viewfinder should have a diopter on it. It’s a little wheel next to your viewfinder that allows you to adjust how clearly things appear when you look through it. It is particularly useful for people who should be wearing glasses but are not.

Black Vulture in Flight

6. Not focusing in the correct place

Even if you have a sharp, clear prime lens on a bright day, using a small aperture and a fast shutter speed with a low ISO, it doesn’t count for much unless you can get the camera to focus on the right spot. This is even more crucial when using a wide aperture, which can create a razor thin depth of field. A slight miscalculation in the focus can throw the subject completely out of the focal plane, or give you a portrait with a perfectly sharp earlobe and blurry eyes.

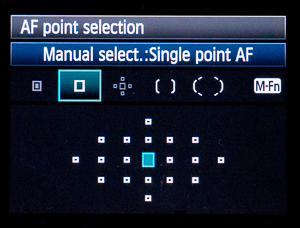
Often photographers leave their cameras set on auto-area AF mode, which tells the camera to use its best judgment to decide what part of the picture should be in focus. Most of the time modern cameras are pretty good at this, particularly if the subject is prominent in the frame. However, with more complex compositions the camera can get confused and try to focus on the wrong thing. To specify the focal point yourself, switch to single-point AF area mode.

f-spotWhen you look through your viewfinder, you should see an array of little dots or squares laid over the display. These are your focus points, and they show you where in the frame the camera is capable of finding focus. In single-point AF area mode, you can use the camera’s direction pad to select one of these dots, and the camera will always focus on that point and that point alone.

To tell the camera to focus, you would normally depress the shutter button halfway before pressing it the rest of the way to take the shot. This works pretty well, but can be sensitive – if you press too lightly, it may come unpressed and try to re-focus after you’ve already found your spot. If you press too hard, you might make the exposure before the focus is ready. If you take multiple pictures in succession, it will try to focus again before each shot. For these reasons, some photographers swear by the back focus button instead.

This is a button on the back of your camera, probably near your thumb. It might be labeled “AF-On” or simply “Fn”, and it might be set up by default or you might have to activate it in your camera’s menu settings, but it can be assigned to take over the autofocus function. When you press it, the camera focuses and won’t focus again until you press the button again. This way, you can re-compose and take shot after shot, and the camera won’t lose your focus every time you hit the shutter button.

7. Using the incorrect focus mode

There are three main autofocus modes that every camera should have. The first is single-shot focus, usually called AF-S or One-shot AF; it is meant to be used with still subjects. The second, continuous autofocus (AF-C or AI Servo) is specially designed to track movement through the frame, so is best to use when your subject is in motion. The third is an automatic mode, AF-A or AI Focus AF, and likely the default setting on your camera. It reads the scene and determines which of the first two modes it should use.

Cactus Flower

8. Not using manual focus

While I’m a big advocate of autofocus, there is one particular time when manual focus comes in very handy. When your camera is on a tripod and you are using a wide aperture to achieve a very shallow depth of field, and you want to make sure the most important thing in your frame is sharp, switch to manual focus and then use the LCD zoom function to magnify the display by 5x or 10x allowing you to make tiny adjustments to the focus to get it just right.

9. Junk on or in front of your lens

If you have a big smear on your lens, that is going to affect the clarity of your image. By the same token, if you put a cheap plastic filter in front of your lens, that is going to degrade image quality as well. If you always use a UV filter, you might want to try taking a few shots without it to see if the quality of your UV filter is negatively affecting your images.

Using an aperture of f/20, everything is sharp from foreground to background.

Using an aperture of f/20, everything is sharp from foreground to background.

10. Poor lens quality

This item is last on the list for good reason; it is the most common thing for beginners to blame their blurry images on, but it is rarely the real reason. Still, lens quality does make a difference.

Lens quality is determined by the materials and construction inside the lens itself, which is usually made up of several pieces of glass precisely aligned in order to focus, zoom, and correct for optical aberrations.

Some lenses are simply sharper than others or are better in different ways. Some lenses may be sharp in the center, but get blurry around the corners and edges of the image. Some are clear at certain apertures but slightly fuzzy at others. Some lenses cause colour fringing around points of contrast. Every lens has a unique character that may or may not be useful to the type of work you’re doing. It’s also worth noting that each lens has a “sweet spot” – a certain aperture at which it performs its best. This is usually in the middle of its aperture range, around f/8 or f/11.

For the sharpest image quality, fixed focal length lenses usually take the cake. It’s not always convenient to carry around two or three lenses rather than a single all-purpose zoom, but their simple construction makes even the cheapest prime lens crystal clear.

The post Top 10 Mistakes that Cause Blurry Photos by Anne McKinnell appeared first on Digital Photography School.


Digital Photography School

 
Comments Off on Top 10 Mistakes that Cause Blurry Photos

Posted in Photography


How to Avoid Blurry Photos by Choosing the Right Autofocus Mode

09 Apr

Sometimes the light is perfect, the moment is right, but when you get home you find out that your photo is blurry. Arrgh!

Why are your pictures blurry? One obvious reason might be that your camera isn’t focused properly. Today’s cameras and autofocus lenses can help you quickly take sharp images in a wide variety of situations, provided you choose the right autofocus mode.

Here are some questions to help you diagnose any situation and choose the correct auto focus setting

autofocus modes

Photo by Lynford Morton

Are you using the Auto-area autofocus or Single-point autofocus selection?

Who gets to decide your focus point? That’s the question you are deciding with this option. In an Auto-area autofocus, your camera decides what it should use as your focal point. It usually decides based on what looks most prominent in the viewfinder or closest to the camera. This might work when your subject is obvious and there are no potential distractions.

For more control, choose a Single-point autofocus setting. That mode allows you to choose your specific auto focus point (check your camera’s manual if you aren’t sure how to do this). After all, only you, not your camera, knows where you want to place your subject.

Is your subject moving?

Most DSLR cameras give you four basic options for autofocus settings: single, continuous, auto or manual. To help you choose the right option, ask yourself, “Is my subject moving?”

No, my subject is not moving

autofocus modes

Photo by Lynford Morton

If your subject is not moving, choose “AF-S” for Nikon or “One Shot” for Canon. This mode locks in your focus based on the distance to your subject. As long as your subject stays at that distance, your photo will be in focus. Your subject has to be stationary for this mode to work. In fact, your camera will not take the photo if your subject is moving (or it cannot lock focus).

This mode also allows you to recompose. Let’s say the autofocus point is in the center of the frame, but you want your subject on one side or the other. Keep depressing your shutter button slightly, and focus remains sharp on your subject. Then you can move the camera slightly left or right, recomposing with your subject out of the center of the frame.

Yes, my subject is moving

By Amsterdamized

If your subject is moving, use continuous autofocus (AF-C for Nikon or AI Servo for Canon). In this mode, you place your autofocus point over your subject, and focus continues to adjust while you hold down the shutter button, keeping your subject in focus as it moves.

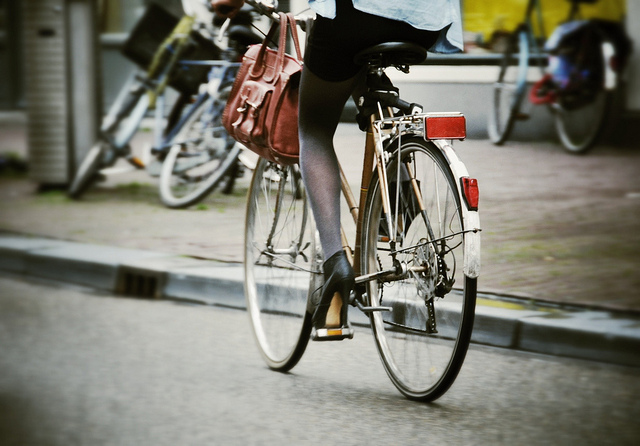
For example, if someone is riding a bicycle, place the AF point on your subject and slightly depress the shutter. As long as you are pressing the shutter, the autofocus will continually adjust to your subject, keeping them in focus as they move. When you are ready to take the photo, depress the shutter completely, and the camera will focus on your subject for a sharp image.

No, my subject isn’t moving, but it might

A third option merges the functionality of the single autofocus and continuous autofocus. This hybrid mode, (AF-A for Nikon or AI Focus for Canon), starts out as a single auto focus. Your camera won’t focus until you lock in on a stationary subject. Once you have your subject in focus, you can take the photo as you would in a traditional single auto focus mode.

If your subject starts moving, however, the autofocus releases and continues to track your moving subject. It gives you the best of both worlds. One note of caution, I have noticed at times, if you recompose a stationary object quickly in AF-A mode, the camera can be fooled into thinking the subject is moving and release the autofocus.

My autofocus just isn’t getting it right

You always have the option of turning off the autofocus function and choosing the Manual setting. If your camera is having trouble detecting your focus point, it might be more efficient to focus the camera yourself.

How about the opposite situation? You turned off your autofocus by accident? Every now and then, when your camera can’t seem to focus, and you don’t hear the motor searching back and forth, check to see if you selected Manual autofocus by accident. This can happen more frequently than you might think.

Other issues to consider

What if you set up your autofocus properly, and the lens still won’t focus? Try these considerations:

  • You might be too close. Try backing away. If you are too near the subject, it might prevent the camera from focusing properly.
  • Your subject might not have enough contrast. Your image needs to have some contrast for many autofocus systems to work. If you try to photograph a solid sheet of white or any single color, most autofocus systems will struggle. Why? The camera compares adjacent pixels and when one is different, it uses that point to determine its focus. If it can’t find any contrast, it can’t focus.
  • You might have an extremely shallow depth of field. In this case, your autofocus is working, but the depth of field is so shallow, it is hard to tell that your subject is in focus.
  • You have camera shake. When you depress the shutter, you move the camera. If the shutter speed is too slow, the camera picks up that movement, and it looks like a blurry photo. Make sure your shutter speed is faster than the equivalent of your focal length. For instance, if you are zoomed to 100mm, your shutter speed should be 1/100th of a second or faster to avoid camera shake.

Why is your picture blurry? If the answer is in your autofocus, your fix could be as simple as choosing the right setting.

Do you have any other autofocus tips or comments you’d like to share? Please do so below.

More tips on sharper images and focus modes:

  • 5 Tips for Getting Sharper Images
  • Understand Exposure in Under 10 Minutes
  • Making Sharper Wildlife Photographs – [Part 1 of 2]
  • Making Sharper Wildlife Photographs – [Part 2 of 2]

The post How to Avoid Blurry Photos by Choosing the Right Autofocus Mode by Lynford Morton appeared first on Digital Photography School.


Digital Photography School

 
Comments Off on How to Avoid Blurry Photos by Choosing the Right Autofocus Mode

Posted in Photography


10 Tips How to Avoid Blurry Pictures when Shooting from a Kayak

28 Mar

Pentax Optio WG3 waterproof camera Compact waterproof digital cameras like Pentax Optio W-series or Olympus Tough series are popular among paddlers. They may not offer the highest image quality among point-and-shoot cameras, but they still produce decent pictures. Most importantly, you can photograph in conditions where other cameras are better kept in a dry case or box.
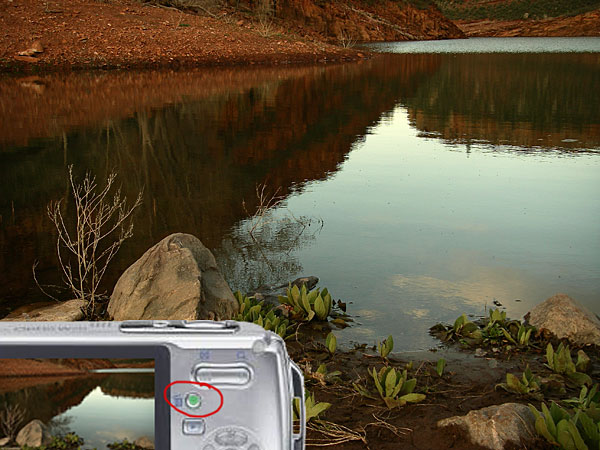
However, new camera owners are often getting pretty bad, blurry pictures and are really disappointed with a purchase. Shooting on water from a kayak or canoe requires some extra efforts and practice from a paddling photographer. Here are a few tips which may help. This is an update of my old post written 5 years ago. Cameras are getting better, but, I believe, the tips below are still valid. I have been using Pentax Optio waterproof cameras starting from the original model WP, then W10, W30, and, currently, WG2 is attached to my life jacket.

1. Use the automatic mode

I do not have any special settings for my camera. On water I use exclusively the P (program) mode. Of course, in addition to the P mode I use the movie mode and interval drive mode quite often.
You can program the green button to do useful adjustments without a need to go through a setup menu. I am using two functions assigned to the green button: exposure correction and, much less often, white balance setups. Typically, I underexpose my shots to avoid overexposed areas with wash out details. Coincidentally, it shortens the exposure time which helps to avoid blurry pictures, but this is not a main purpose of this adjustment.

2. Keep the camera steady

This is the most important tip. However, it is not so easy when paddling, especially, when water is not calm. Ideally, you should hold the camera in both hands. In addition, it is quite easy to shake the light and small camera just by pressing a shutter button.

3. Use a paddle shaft to stabilize the camera

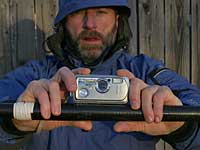
Here is a short video clip demonstrating how I am doing it.
This technique really helped me when I was starting to paddle a tippy Sisson Nucleus kayak. You can achieve two goals: to stabilize the camera and to stabilize your kayak. You have your paddle ready for bracing. This technique does not work with strong, gusty winds.

You can go further with this idea and attach or mount your the camera more permanently to your paddle – see a camera cradle by Mark Sanders.

4. Use a self timer

The 2 second selftimer available in Pentax Optio is very useful to avoid shaking the camera when pressing the shutter button. I recommend it, especially, when you are holding the camera with one hand (shooting on an extended arm or from some unusual angles).

5. Keep your lens clean of condensation, water drops, water residue

I keep my camera in a small neoprene pouch attached to my life jacket and usually do not have problems with water or dirt on my lens. The camera is always on a tether. Shooting with a camera mounted on a deck and exposed to splashes is another story.

6. Pay attention to light and sun position

Try to shade you camera lens from a direct sunlight to avoid a lens flare. Do not shoot against the sun.

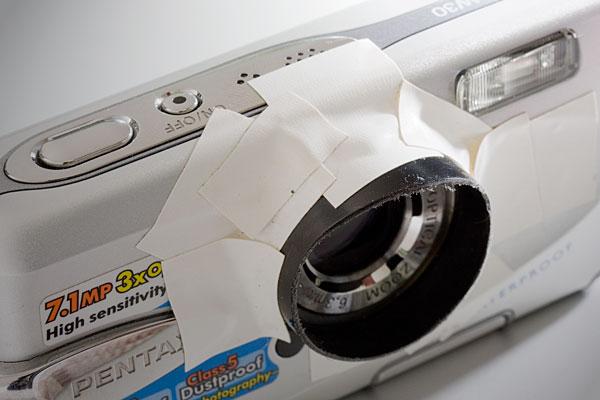
It is possible, at least for Pentax, to glue (epoxy) some step-up rings and to attach lens hood to your camera. I am using much simpler solution: an improvised lens hood attached with an electric tape to the camera.

You can expect the best “sweet” light for shooting when the sun is low, so after the sunrise and before sunset. Do not expect too much from this camera in low light conditions, but do not give up with shooting as soon as the sun is down. Consider shooting some silhouettes or water reflections then.

7. Use flash

Sometimes, I use flash to add light to objects in my fore plan. Usually, a soft flash option works better for a kayak deck. Be aware of any reflective tape on your kayak or gear.

8. Shoot multiple frames

Don’t limit yourself to a single shot for a given scene. Repeat the shot. Try different angles, horizontal and vertical format. You will increase your chances to get that great shot. Digital memory is cheap. You can always erase unsuccessful pictures later.

9. Photoshop …

Downloading pictures from the camera to your computer is not the end of your work as a photographer.
Use Photoshop or other image editing software to post process your pictures. Most often, I rotate my pictures to make horizon horizontal, adjust the exposure with levels, crop and resize them, and, finally, apply some sharpening. You cannot save completely blurred pictures in Photoshop, but you can improve most of them.

10. Practise

There are no reasons not to take and use the camera wherever you go. It is small and waterproof. Experiment and have fun.

Time to to time it is useful to browse through the camera manual. You may find something new and exciting in a jungle of all these options and settings.

More tips?

Could you share tips from your experience with a kayak or canoe photography? Are your on water pictures worse than these shot on land?

Some related articles where I am sharing my experience from paddling and shooting with Pentax Optio WP, W10 and W30 cameras:

  • Pentax Optio W20 Waterproof Camera Review, Tips, and Sample Photos
  • Kayak Photography: Using Your Paddle to Stabilize the Camera – Video Clip
  • 7 Tips on Kayak Photography: How Did You Shoot It?
  • No Viewfinder? 10 Tips on Shooting Pictures without Viewfinder
  • Is Pentax Optio W10/W20 the Paddler’s Camera? Many Boats, Many Cameras …
  • Kayak Photography Links – Tips and Hints for Paddling Photographers


paddling with a camera

 
Comments Off on 10 Tips How to Avoid Blurry Pictures when Shooting from a Kayak

Posted in Photography


What Causes Blurry Photos? Photography Lessons by Berger Bros Camera

02 Nov

www.berger-bros.com One of the biggest problems for people new to photography is taking blurry photos. There are many reasons why photos can come out blurry. Here are several frequent causes of blurry photos. 1. Improper Shutter Speed 2. Being Out of Focus 3. Failing to Keep the Camera Still While Taking a Photo Yvonne Berger, one of the photography instructors at Berger Bros Camera in Amityville and Syosset Long Island, explains how to solve the issues that can cause your photos to come out blurry.
Video Rating: 5 / 5

 
Comments Off on What Causes Blurry Photos? Photography Lessons by Berger Bros Camera

Posted in Nikon Videos


Learn Photoshop – How to Fix Blurry Photos

21 Oct

www.Free-Photoshop-Video-Tutorials.com Learn how to fix a blurry photo due to camera shake, movement of your subject, or incorrect auto focus. We cover the use of the high pass command to a duplicate layer and adjust its blend mode to bring back focus to the image.
Video Rating: 4 / 5

 
Comments Off on Learn Photoshop – How to Fix Blurry Photos

Posted in Retouching in Photoshop


[Photoshop Tutorial] Sharpen Blurry Images

20 Oct

Tutorial in Photoshop CS5 where i take a blurry image and improve the pixel quality to give a higher resolution or “Sharpened” result. Link to image: www.morguefile.com User: inatashko Image is FREE TO USE license.
Video Rating: 4 / 5

 
Comments Off on [Photoshop Tutorial] Sharpen Blurry Images

Posted in Retouching in Photoshop