RSS
 

Posts Tagged ‘Before’

Take an entertaining look back at the cameras that came before SD cards

13 Dec

Looks like we’re not alone in our love of cameras from the early days of digital photography: YouTuber The 8-Bit Guy has published a thoroughly entertaining look back at cameras that used floppy disks and other memory media that preceded the humble SD card. He revisits the Sony Mavica FD-7, Mavica FD-85, Panasonic SD4090 and the Mavica CD-350. Take a look at the video and see if it sparks any memories of cameras from your past, and then head over to our Throwback Thursday feature on the floppy-disk-using Mavica FD-91.

Articles: Digital Photography Review (dpreview.com)

 
Comments Off on Take an entertaining look back at the cameras that came before SD cards

Posted in Uncategorized


Modern Home Makeovers: 15 Dramatic Before & After Transformations

08 Nov

[ By SA Rogers in Architecture & Houses & Residential. ]

main

Not every radical home makeover turns an ugly duckling into a beautiful swan, but they sure can render the original structures completely unrecognizable, for better or worse. Sometimes no more than the bones of the home stay in place as an entirely new sort of residence rises in its place, while other renovations maintain a starkly visible division between the old and the new. These transformations certainly prove the value of looking past a building’s flaws to its potential, as no matter what a house may look like when it’s purchased, it can ultimately be anything the homeowners want it to be.

Kensington Residence, Sydney, Australia

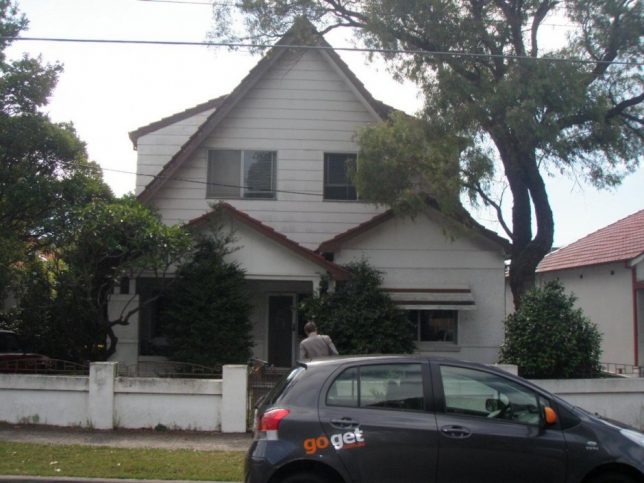
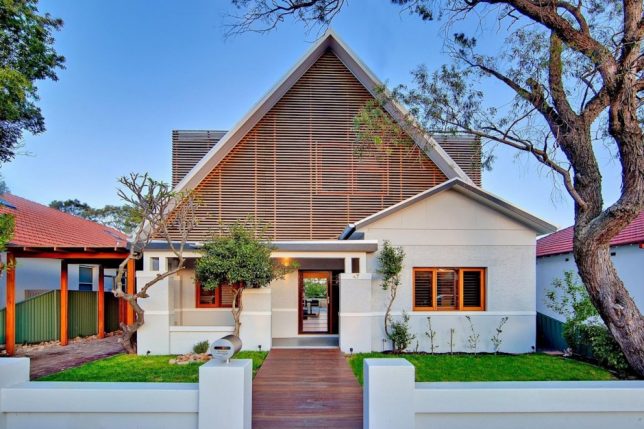
kensington-before

kensington-after

There was nothing particularly special about this two-story 1920s bungalow residence in Sydney, Australia, before CplusC Architects got ahold of it and transformed it into a sustainable home. An existing extension to the first floor is vastly improved by a timber screen that improves natural ventilation and gives it loads more curb appeal.

Brooklyn Row House by Office of Architecture

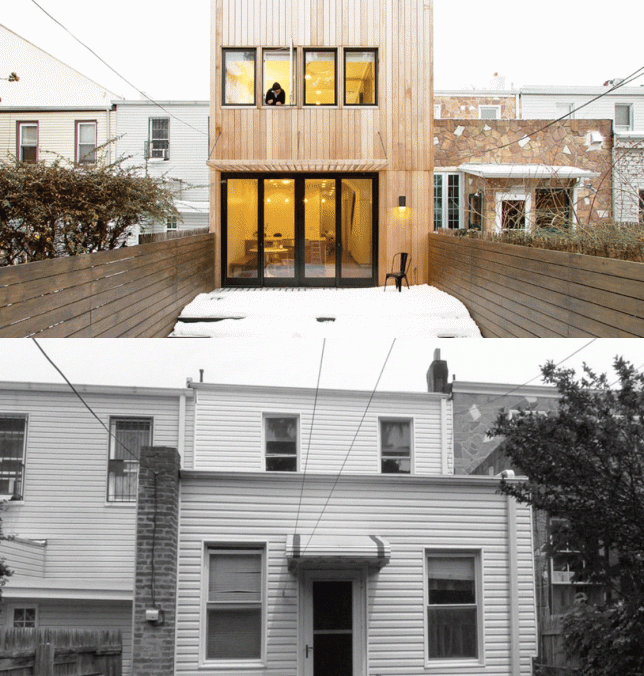
screen-shot-2016-11-06-at-6-48-28-pm

screen-shot-2016-11-06-at-6-48-38-pm

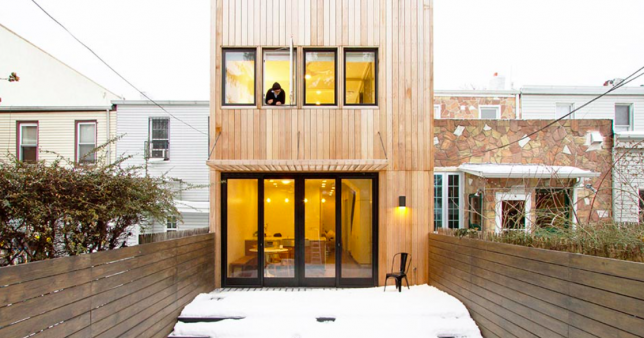
A 110-year-old Brooklyn row house looked very 1980s with its vinyl siding, boring sash windows and afterthought of an awning, not to mention missed opportunities for vertical expansion and a visual connection to the private outdoor space. Office of Architecture renovated the space inside and out, integrating a second-floor extension, lots of glass and a wooden facade.

Commercial Building to Modern Residence in Thailand

thailand-before-and-after

thailand-after-2

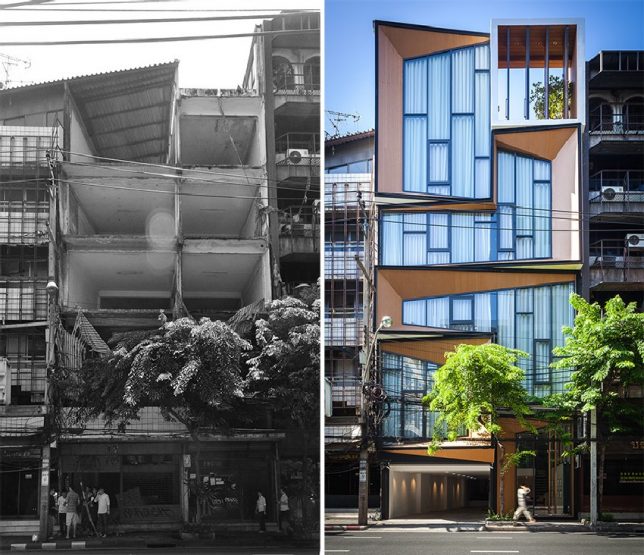
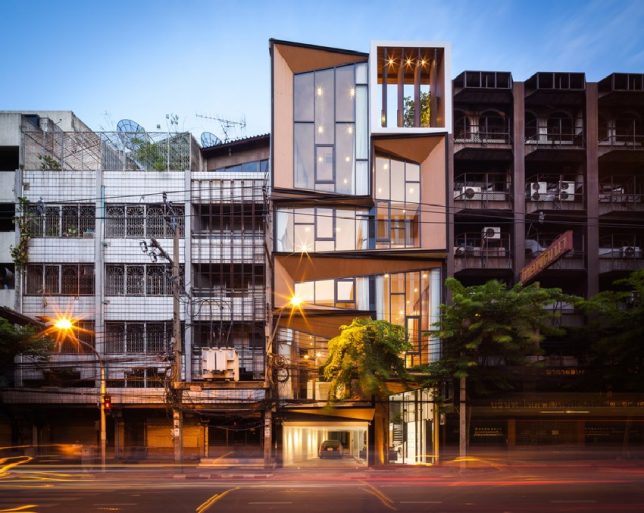
A gutted five-story commercial building becomes a spacious, luxurious home for an extended family of siblings, their spouses and children in this stunning Bangkok renovation project by IDIN Architects. The first level accommodates the family’s jewelry store, while the rest serves as their private home, full of atriums planted with live trees.

Texas Ranch House Transformation by MF Architecture

pugh-residence-before

pugh-residence-after

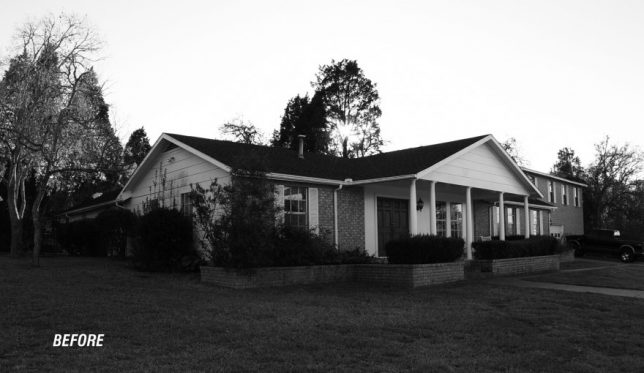
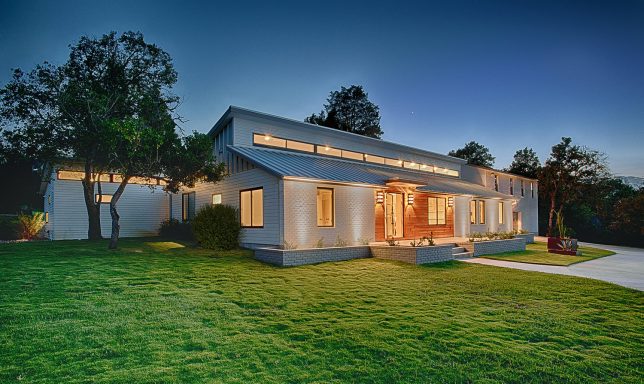
Who would ever think that a ranch house had so much potential? This residence east of Austin, Texas had already been expanded several times and was full of dark, disconnected interior spaces. MF Architecture conserved most of the exterior envelope while knocking out lots of the interior walls, but gave the facade a fresh look with white brick, timber cladding and a high row of narrow windows that bring light inside.

Modest Home in Salmon Arm, Canada

salmon-arm-before

salmon-arm-after

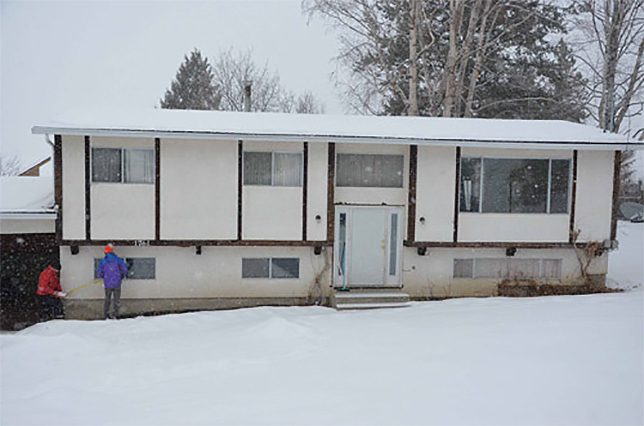
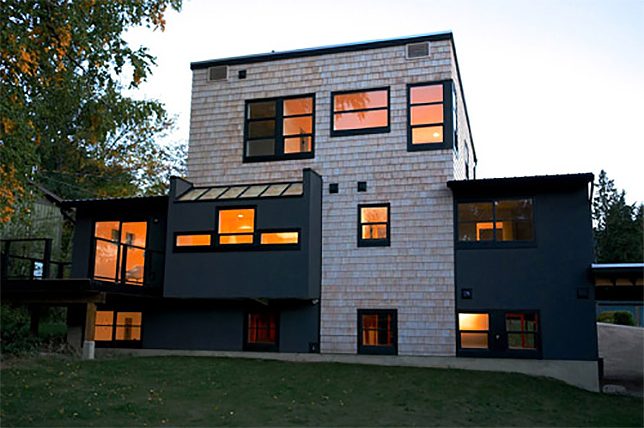
The couple who bought this property in Canada called it a “run-down, boring sausage-box cookie-cutter house built in ’73 on a large lot with ramshackle garbage-filled sheds.” But they knew it could be more, and took on the project of renovating it themselves, adding a third-floor volume that extends to the ground in the front and back, transforming the facades and tacking on two carports.

Next Page – Click Below to Read More:
Modern Home Makeovers 15 Dramatic Before After Transformations

Share on Facebook


[ By SA Rogers in Architecture & Houses & Residential. ]

[ WebUrbanist | Archives | Galleries | Privacy | TOS ]


WebUrbanist

 
Comments Off on Modern Home Makeovers: 15 Dramatic Before & After Transformations

Posted in Creativity


8 Things to Consider Before You Buy Your Next Lens

19 Jun
How to buy a camera lens

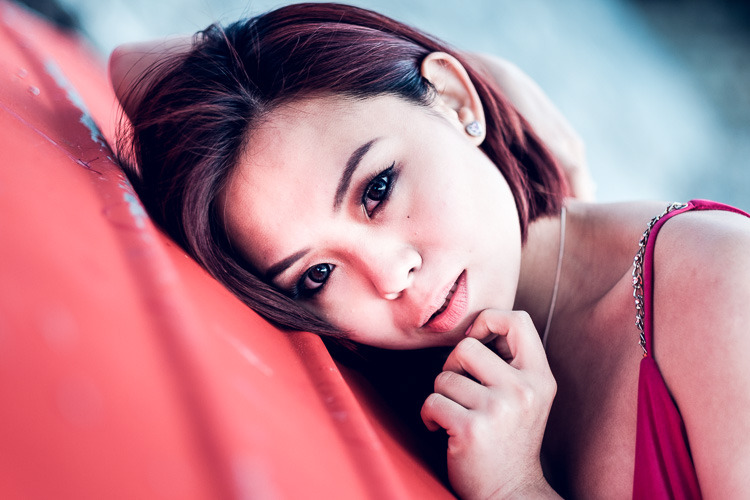
Prime lenses are best for creating portraits like this one, taken with the aperture set to f/1.2 to blur the background.

Are you thinking of buying a new lens for your camera? Stop, and read this article first.

One of the hardest things to achieve when buying new camera gear is clarity. Why do you need a new lens, how much should you spend, and where does it fit into the big picture of your gear acquisition? Once you are clear on these points, it makes the process of deciding which lens (or lenses) to buy next much easier.

Let’s look at eight things to consider before you buy that new lens:

1. Budget – how much do you have to spend?

Everybody’s budget is different, and the amount of money you have to spend determines which lenses come into consideration. But, no matter what your budget, hold that figure in mind while you read this article. You may see things in a different light afterward.

My approach is to own as few, good quality lenses as possible. In other words – don’t over buy. Keep the big picture in mind. What lenses would you eventually like to own for your camera? How does your next purchase fit into this plan? Ideally, you should have a good idea of which lenses you need, and then you can plan accordingly.

This type of thinking can lead to a big shift in what lenses you decide to buy. For example, a few years ago I became frustrated with the size and weight of my Canon system. I was also thinking ahead to some travel plans I had coming up, and realized it was important to keep my kit as lightweight as possible (hand luggage allowances are very low and strictly enforced in New Zealand airports). That led to the decision to switch to the Fujifilm X-Series system. I now have the lightweight kit required for traveling.

2. APS-C or Full-frame?

Most manufacturers offer both APS-C and full-frame cameras in their ranges. But this makes buying lenses even more confusing.

Let’s say you own an APS-C camera. But at the back of your mind you think you might one day buy a full-frame body. That raises the question – do you buy a lens that works on APS-C bodies only (the advantage being that it is probably smaller and lighter than a lens that would fit a full-frame camera) or one that fits a full-frame body as well (which will probably be larger and more expensive)?

Tricky question to answer, isn’t it? And that’s not even taking into account the difference that sensor makes to the lens’s angle of view.

Ideally, you should decide when you buy your first camera body whether it should be APS-C or full-frame, then stick to the same sensor size in the future. It greatly simplifies the lens buying process, and eliminates a lot of confusion.

How to buy a camera lens

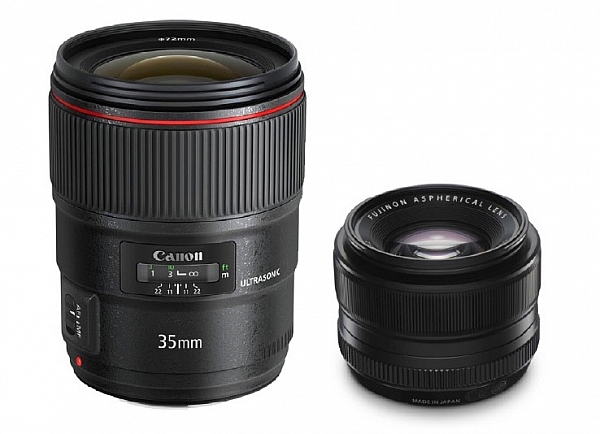
What do these two lenses have in common? They are both 35mm f/1.4 lenses. The Canon one (left) is much bigger than the Fujifilm lens (right) because it is made to fit a full-frame camera. This is a good example of how sensor size, affects lens size.

3. Don’t fall into the focal length trap

The focal length trap is the belief that you need zoom lenses that cover every conceivable focal length. For example, if you start off with an 18-55mm kit lens, then buy a telephoto zoom, you might feel that you need one that starts from 55mm so that you don’t miss out on any focal lengths in between.

This simply is not true. The next point explains the way you should be thinking about lenses.

4. What subjects are you going to photograph?

Continuing with the 18-55mm kit lens example, you may find yourself considering the following second lenses: a 50mm prime as a portrait lens (giving you the benefit of high quality imaging and wide apertures), or a macro lens for taking close-up photos of insects and flowers, or wide-angle zoom for landscape photography, or a super-telephoto for wildlife and sports photography.

The key point here is that lens choice is related to subject. The subject always comes first. Once you know what you are going to photograph, you can choose the best lens (or lenses) for the job. Focal length is a secondary consideration.

In other words, don’t buy a lens because you think you should own it, buy it because you actually need it.

How to buy a camera lens

5. Should you buy a zoom or a prime lens?

The benefit of zoom lenses is convenience. If you are a wedding photographer it is much easier to zoom from a wide-angle to a telephoto when you need to, than it is to change lenses. If you are a landscape photographer it is easier to use a wide-angle zoom to frame the scene precisely, than it is to change prime lenses (or it may not be possible to stand where you need to get the shot).

The benefits of prime lenses are image quality and wider apertures. Compare an 18-55mm kit lens (typical maximum aperture f/5.6) with a 50mm prime with maximum aperture of f/1.4. There’s a four stop difference 16 times more light) between f/1.4 and f5.6, which helps you take photos with blurred backgrounds, and also to shoot in low light conditions, without raising the ISO too much. That’s why a 50mm prime is a better portrait lens than the 18-55mm kit lens (taking us back to the point about lens choice being driven by subject, not focal length).

Some photographers prefer primes, others zooms – thinking about your priorities will help you decide which is best for you.

For example, if you are a landscape photographer who always shoots at f/8, f/11, or f/16 then the wider apertures that prime lenses have are of little use to you, and a zoom may be a better choice.

How to buy a camera lens

Action photos require a telephoto lens and a camera with a good autofocus system capable of tracking moving subjects. A zoom will help you frame the subject accurately.

6. Don’t forget about weight and size

Think about the weight and size of your lenses carefully. After all, you are the one who is going to be carrying them around.

But there is another thing you should also think about when it comes to size, and that is filters. You can save a lot of money on filters by buying smaller lenses. If you’re curious to see how much, do a search for circular polarizing filters and compare the prices of the same filter in 58mm and 77mm sizes. If you need to buy a lot of filters (landscape photographers take note) then you can potentially save hundreds of dollars by buying a smaller (the diameter of the lens or filter size is also smaller) lens.

How to buy a camera lens

Wide-angle zooms are ideal for landscape photos and will help you take photos like this. Bear in mind that smaller lenses also require smaller (and less expensive) filters.

7. Build quality, weather proofing and autofocus

Most manufacturers have inexpensive, middle range, and expensive or high end lenses. Inexpensive lenses may seem like a bargain at the time, but they won’t be built as well as more expensive ones, and they may also have inferior (i.e. slower and noisier) autofocus motors.

At the other end of the scale expensive lenses tend to be built well, use good quality autofocus lenses (i.e. faster and quicker) and may also be weatherproofed (important if you take photos in bad weather or dusty conditions).

Bear these points in mind when considering a lens. Don’t forget to ask how well the lens is built, whether it is weatherproofed, and the speed and quality of the autofocus motor.

How to buy a camera lens

Wide-angle lenses are also helpful for taking photos indoors, where you may not have space to move back to use a longer focal length.

8. Brand name or third party?

You can often save money by buying a third-party lens for your camera, but in my opinion it is best to buy a lens made by your camera’s manufacturer whenever possible. Unless you have a specific reason to buy a third-party lens (usually because the type of lens you need isn’t made by your camera’s manufacturer) then stick with OEM (Original Equipment Manufacturer) lenses. They hold their value better, and autofocus performance is usually superior.

Editor’s note: for a good discussion on that topic, head to: Brand Name Versus Third-Party Photography Gear: Which is better?

How to buy a camera lens

If street and candid photography is your thing, then consider buying smaller lenses to help you take photos like this, without being noticed.

9. Image Stabilization*

An Image Stabilizer is a motor inside the lens, that moves the elements in a way that compensates for the movement created by camera shake. It is given different names by different manufacturers (Nikon, for example, calls it Vibration Reduction). It helps you take photos in low light, using lower ISO settings or smaller apertures, than would otherwise be possible. Lenses with Image Stabilization cost more than their non-stabilized counterparts, so think carefully about whether or not you need it, before paying the extra money.

* Some manufacturers, like Sony and Pentax, build Image Stabilization into the camera body, not the lenses.

Hopefully these points will help you decide which lens to buy next for your camera. If you have any questions about lenses let us know in the comments and I will do my best to answer.


Mastering Lenses

If you want to know more about buying and using lenses then please check out my ebook Mastering Lenses: A Photographer’s Guide to Creating Beautiful Photos With Any Lens.

googletag.cmd.push(function() {
tablet_slots.push( googletag.defineSlot( “/1005424/_dPSv4_tab-all-article-bottom_(300×250)”, [300, 250], “pb-ad-78623” ).addService( googletag.pubads() ) ); } );

googletag.cmd.push(function() {
mobile_slots.push( googletag.defineSlot( “/1005424/_dPSv4_mob-all-article-bottom_(300×250)”, [300, 250], “pb-ad-78158” ).addService( googletag.pubads() ) ); } );

The post 8 Things to Consider Before You Buy Your Next Lens by Andrew S. Gibson appeared first on Digital Photography School.


Digital Photography School

 
Comments Off on 8 Things to Consider Before You Buy Your Next Lens

Posted in Photography


4 Tips for Pre-Visualizing – Look Before You Shoot

11 May

For a limited time only at Snapndeals, May 10-24th only get 33% OFF Timeless Portraits & Natural Light Black & White Portraiture, a 2-eBook Bundle by Wayne Radford.

Pre-visualizing is an art form, that I believe, is not taught enough these days. It is the foundation for an artist or photographer to establish lighting, background, foreground elements, composition, and harmony. You need to establish all this before lifting a camera to your eye. Let’s look at some techniques and tips for pre-visualizing.

1 – BACKGROUND

Are there any distracting elements behind the subject that draw your eye away, e.g., bright hotspots such as sun coming through trees, strong geometric shapes, or bright colours. If these are a problem, move the subject or camera position around to avoid or minimize their effect.

PHOTO 1

2 – FOREGROUND

Can you use any foreground elements to help create framing – examples would be rocks or foliage. Even getting down very low to blur the foreground will create a framing effect.

3 – COMPOSITION

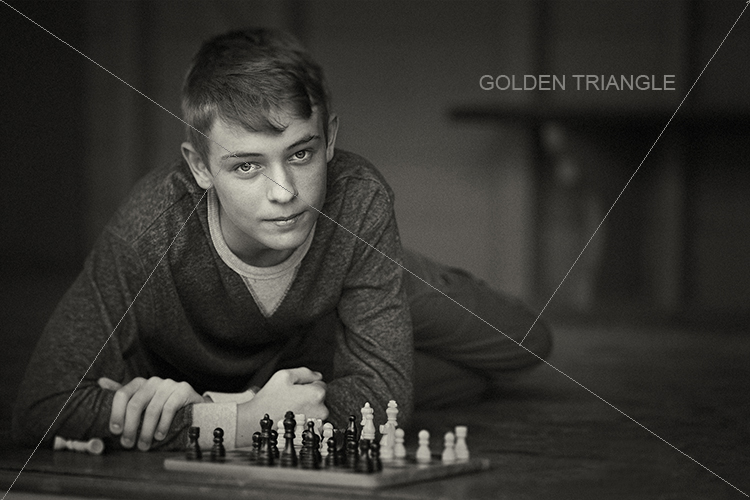
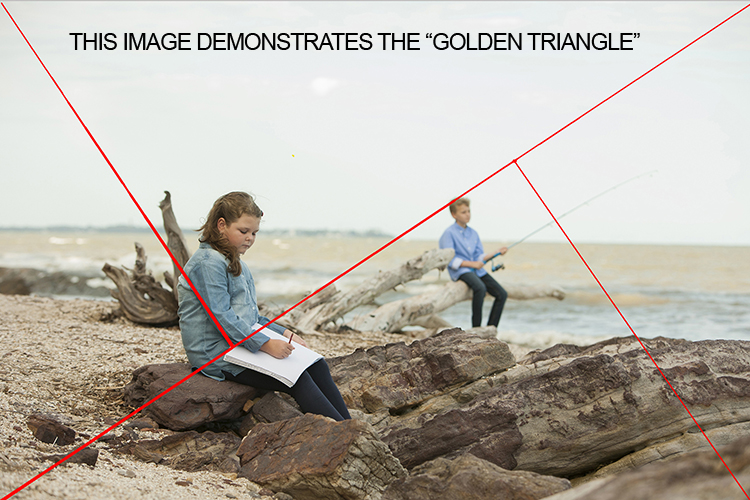
Look around for shapes and perspectives that create more interest and lead your viewer around the scene. Example: I like to use the Golden Triangle instead of the Rule of Thirds, so I’m looking for elements that balance with that in mind. There is a sample below and you can read: Divine Composition With Fibonacci’s Ratio (The Rule of Thirds on Steroids) for more comprehensive information. Of course, it’s built-in as part of the cropping tools of Photoshop CS6 (and LR) and later, but I suggest learning to see this way before post-production adjustments.

4 – HARMONY

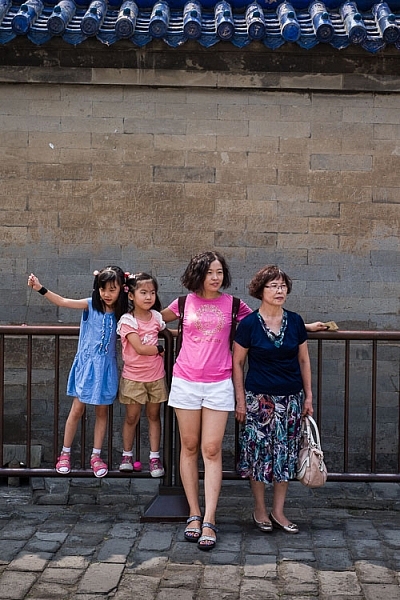
This one is the most overlooked aspects of composition. I want my subject’s face to stand out, so I generally choose backgrounds that are complimentary to their clothing for colour, and depth of tone for black and white. Also, try minimizing any additional colours in the background that clash with the subject. Yes it sounds complex, so I’ve added some study examples to make it easier. (clothing colour selection is also important, but that’s a subject of its own for another day). Next time you watch a movie, look at the colour coordination of clothing and scenes.

PHOTO 1

I chose an old painted door as the background for these two girls as it had the same hues (colour tones) as their clothing and skin. Look at your subject’s clothing colours, and then find a background tone that will compliment it. This will make them stand out from the background and not create a distracting colour contrast. An example would be if the background were green or blue.

The simpler, less cluttered backgrounds work best, especially when the colour tones harmonize. Keep the subject at least a meter or more away from the background, and use a wide aperture of f/1.2-2.8 to create a shallow depth of field.

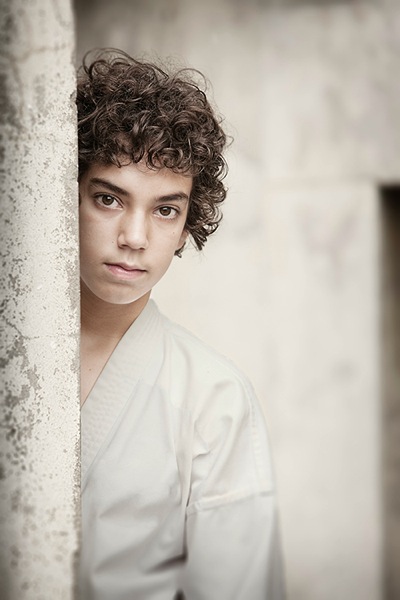
PHOTO 2

Be careful that the subject doesn’t blend into the background. In this study I first looked for the light direction, then looked at the background colour and tone. It was a yellow painted wall which normally would record brighter than his face, but as it was undercover in shade, it rendered quite dark. Looking at his clothing colours I knew that there would be separation that could be controlled in Photoshop without any problem, if necessary. Again distance from subject to background, combined with an f/2.8 aperture setting, creates a lot of background blur which allows the subject to pop. Note, there are no distracting background elements.

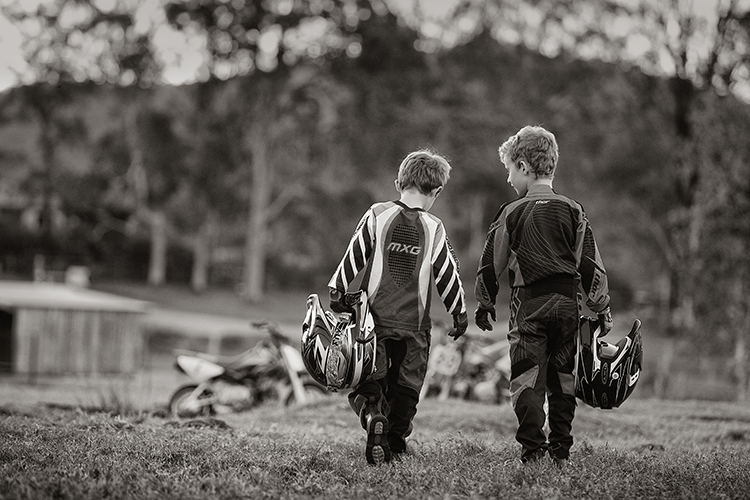
PHOTO 3

When searching for suitable locations, you may find lots of distracting objects and textures that will make your image busy. This is when pre-visualizing where the camera and subject should be placed, and what you want to be included in the background should be used.

In this image of the two boys, I noted that the trees and shed were too cluttered and distracting. By placing the boys a good distance from the shed and trees, and again setting the lens to create a shallow depth of field, (f/2.8 70-200mm lens) I was able to achieve good subject to background separation. The bikes were important to the story, so I placed them in the background to give the boys a direction to walk. Also, note the rim lighting on their hair gives extra separation.

PHOTO 4

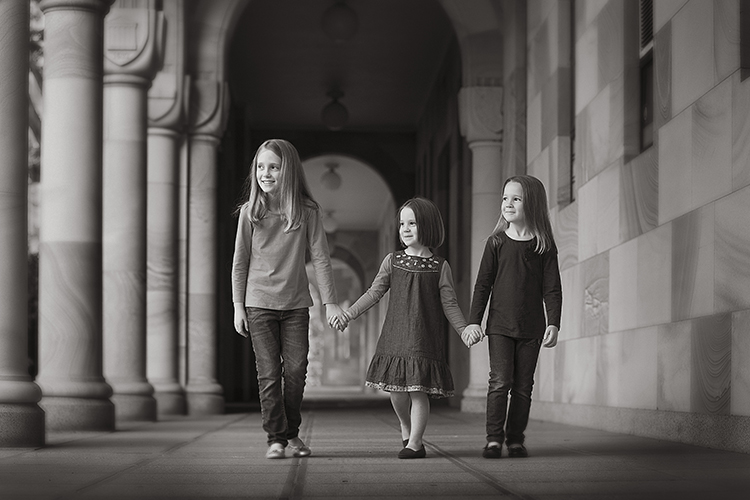
Pre- visualizing this scene is an easy one for a trained eye – find the light, look at the background. Here you can see the light wrapping around the columns, creating graduated shadows, and a diminishing background that gives depth to the overall image. In this study, the light is cross-lighting them at 90 degrees to their bodies, so turning their faces to the light creates modelling on their faces, which adds shape to their faces.

The background almost has a 3D look in the way it diminishes. Column over column, and arches layering over each other, creates great depth.

The following study is an example of how I try to pre-visualize a portrait session

When I found this beach location (below), I was overloaded with ideas on how I was going to use it. This is the opposite to writers block, where you become void of ideas. Instead, you can be over excited with creative ideas and forget the basics that make a portrait work.

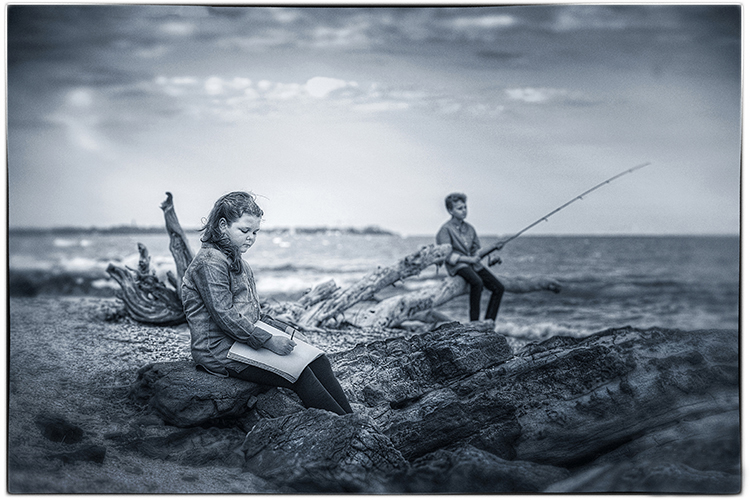
The first consideration was the direction and quality of light. In this study the open sky (right hand side of the photo, over the ocean) was the main light. Note the sun was setting over a hill behind the children, so I am using the soft light provided by the open sky. While it is a fairly flat light and very soft, it provides enough cross lighting to enhance texture and shape in the clothing and rocks. Notice the small specular light, rim lighting her legs, and the shadows in her clothing. These are helpful indicators to the direction of light when it is flat.

PHOTO 5

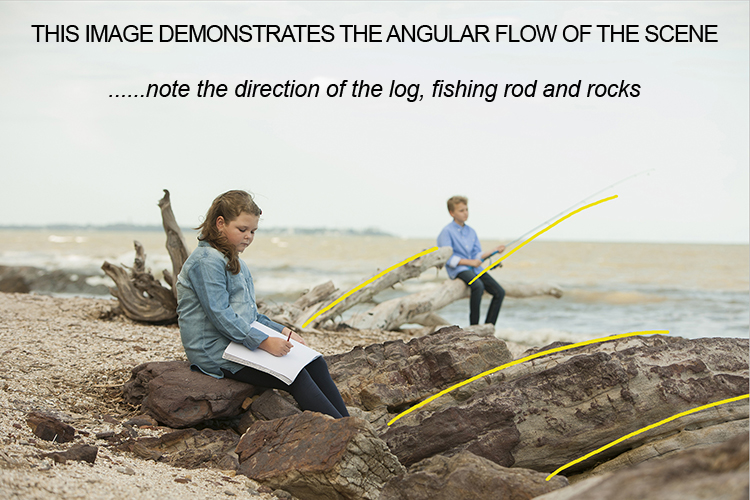
The next consideration is the placement of the subjects in relationship to the light, and the natural props such as the rocks and driftwood. Those props are the things that get photographers excited, the challenge is how to use them creatively. Remember this is all done before lifting the camera to your eye – the art of pre-visualizing. I also noticed the angular shape in the rocks curving towards the ocean, this matched the angle of the driftwood.

PHOTO 6

The girl was placed on the most distant rock (also the flattest one for comfort) so the light was coming from her front left-hand side, creating some modelling to her clothes and face. It also allowed the image to read from left to right.

The boy was placed on the driftwood, with his rod angled to match the driftwood branch beside him. It’s also a similar angle to the diagonal line running from top right to bottom left in the image. My only disappointment was the horizon line running through the girl’s head. It wasn’t possible to move the camera any lower, and raising the camera higher would have placed the boy’s head near the horizon line. Moving the girl wasn’t an option either due to the awkward shapes of the rocks. I was happy to leave it that way, as the shallow depth of field had created enough background blur to allow her to separate from the background.

PHOTO 7

Canon 5D + 70-200 f/2.8 IS lens – F4 @1/800th – ISO 400
Hand-held at ground level
Photoshop CS6 – Alien Skin Exposure 7

When you learn the art of pre-visualizing, you will look at your work with greater satisfaction. You will know that you alone created the image to the best of your ability, using all the artistry skills of light and composition before even raising the camera to your eye. Not everything is created in the computer, I believe pre-visualizing is another tool in the journey of craftsmanship.

For a limited time only at Snapndeals, May 10-24th only get 33% OFF Timeless Portraits & Natural Light Black & White Portraiture, a 2-eBook Bundle by Wayne Radford.

googletag.cmd.push(function() {
tablet_slots.push( googletag.defineSlot( “/1005424/_dPSv4_tab-all-article-bottom_(300×250)”, [300, 250], “pb-ad-78623” ).addService( googletag.pubads() ) ); } );

googletag.cmd.push(function() {
mobile_slots.push( googletag.defineSlot( “/1005424/_dPSv4_mob-all-article-bottom_(300×250)”, [300, 250], “pb-ad-78158” ).addService( googletag.pubads() ) ); } );

The post 4 Tips for Pre-Visualizing – Look Before You Shoot by Wayne Radford appeared first on Digital Photography School.


Digital Photography School

 
Comments Off on 4 Tips for Pre-Visualizing – Look Before You Shoot

Posted in Photography


4 Questions to Ask Yourself Before You Shoot to Help Improve Your Photography

09 May

One of the nice things about mobile phones is that virtually all of them have cameras built in, which means almost anyone can be a photographer and has at their disposal quite an advanced piece of technology, capable of creating stunning images with the tap of a button. Some people prefer dedicated cameras like a DSLR or mirrorless model, and others like to carry a small point-and-shoot or even use good old-fashioned film. However, good photography has much less to do with the gear and is more about the person taking the image.

With that in mind, here are four questions to ask yourself the next time you take out your camera and start snapping away. If you stop and think about these, it will help improve your photography and you will take better photos:

  1. What is the purpose of the picture?
  2. What do I want my viewers to see or feel?
  3. How can I use my surroundings to create the image I want?
  4. How can I control my camera to get the image I want?
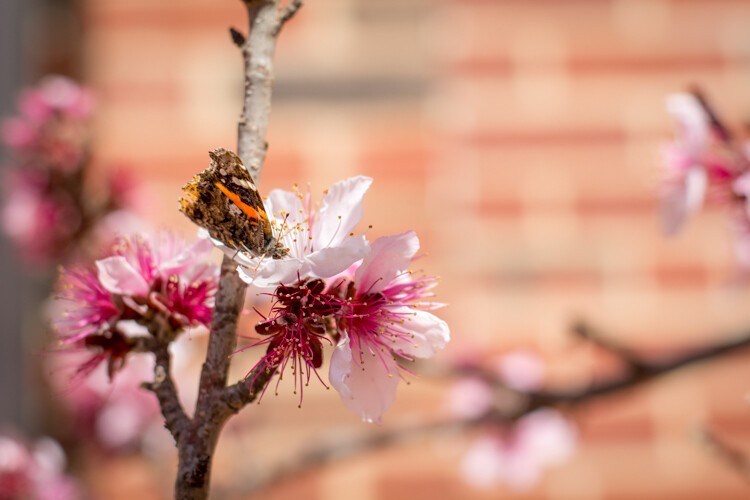
five-questions-before-photos-butterfly-flower

You could stop reading right now after seeing those questions and get to work on improving your photos, but I want to dig a little deeper into each one, to see how answering them can help you improve as a photographer and artist.

1 – What is the purpose of the picture?

Think back to the last time you sat scrolling through images on Instagram, Facebook, Flickr, or another image sharing site. Perhaps you just looked through some pictures at random, and maybe you even gave a precious few the much-coveted like, double-tap, or star rating. What was it about those photos that caught your eye and made you pause for a second or two? Recently a study carried out by Microsoft found that, thanks to smartphones and the rapid pace of our modern tech-infused lifestyles, people have an average attention span of only eight seconds. That’s shorter than a goldfish! A similar study carried out in the year 2000 found that attention spans then were roughly 12 seconds, which means things are only getting worse as we become more and more connected via technology.

You might very well have a shorter attention span than this infant. And it's a good bet your audience does too.

You might very well have a shorter attention span than this infant, and it’s a good bet your audience does too.

This has profound implications for photographers because it means that in the already-crowded landscape of digital pictures, your photos are not only vying for attention among thousands or millions of other images, but you have even less time to grab the viewer’s attention than ever before. To combat this, you need to make it abundantly clear to your viewers just what precisely is the point, of any given picture you take. In other words, your photos should have a clear subject – whether it’s a person or people, a flower, a kitten, a plane, a train, or even an automobile.

Look through your own pictures and ask yourself, “What’s the point?” If you can’t answer that question, then chances are that the photos won’t mean much to anyone else who sees them either. When I first got into photography I took all kinds of pictures of things that I thought might be interesting at the time, but looking back on them I honestly can’t tell you what is the purpose of many of those images. If I had taken the time to make sure the images had a clear purpose, instead of just pointing my camera at whatever I thought might look cool, I would have more important photos and much richer memories too.
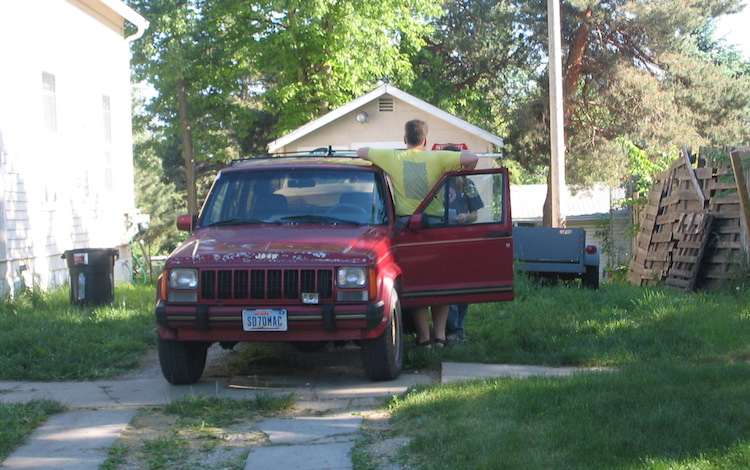
I shot this photo about 10 years ago, and while I'm sure I had some kind of purpose I honestly can't remember what the point of it was supposed to be.

I shot this photo about 10 years ago, and while I’m sure I had some kind of purpose, I honestly can’t remember what the point of it was supposed to be.

2 – What do I want my viewers to see or feel?

So now you have a clear subject in mind for your picture, and you’re all ready to snap the shutter on your DSLR, mirrorless, or even mobile phone. But wait, there’s more to consider before you start eating up that memory card, and flooding your favorite social networks with more photos. Now that you know what the purpose of your photo is, take the concept one step further and ask yourself what feelings, symbols, or other elements you want to impart on your viewers.

Do you want them to feel happy, sad, curious, introspective, or nostalgic? Do you want to stir them up so as to take action for a particular cause? Do you want them to notice things other than what might be the main subject of the image, and spend time digesting and interpreting your photos to gain a deeper understanding of the world around them?

five-questions-before-photos-bubbles

I didn’t just want those who saw this picture to think “Oh, some students playing with bubbles.” I wanted people to smile and feel the same sense of delight as the girl in the middle.

Humans are visual creatures, and as a photographer you are in the unique position of using a visual artistic medium to transmit thoughts and emotions. In this sense, photography is a form of one-way communication as you invite your viewers to engage with your images, and take something away from them. For example, here’s what might appear to be a rather mundane picture of a plastic duck:
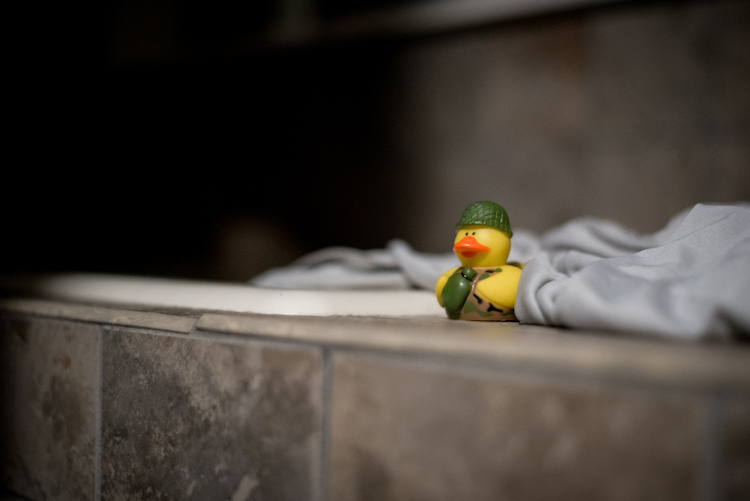
Is it a duck...or is it something more?

Is it a duck…or is it something more?

My goal in taking that picture was to have my viewers see more than just a basic rubber duckie. I specifically chose the time of day, angle of my camera, foreground and background elements, and exposure settings (i.e. f/1.8 aperture) to create this image, so that my viewers might see more than a kid’s bath toy. Perhaps they would think back to their own childhood, or maybe even invent a fantasy backstory for this duck standing guard at the edge of a precipice. It might seem like a simple image, but to me there was a lot more going on here, and by asking myself some deeper questions before I took the picture I got a better image as a result.

The same lesson applies to photography in general, and you have a powerful image-capturing tool at your disposal, to not just make snapshots, but tell stories and communicate with your audience. Going through some of these questions might seem like a lot of work when all you want to do is just pull out your camera and snap a few photos. But, as you work on doing this more and more, it will soon become second nature and you will see a noticeable increase in the quality of even your most mundane images.

This picture is just a quick snapshot that's not going to win any awards, but I shot it in such a way so as to provide context, invite the viewer to feel slightly squirmy, and hopefully see more than just the some kids in a room.

This picture is just a quick snapshot that’s not going to win any awards, but I specifically took it in such a way so as to provide context, invite the viewer to feel slightly squirmy, and hopefully see more than just some kids in a room.

3 – How can I use my surroundings to create a better photo?

One of the easiest ways to create a more compelling, interesting, and visually appealing photograph is to take a few seconds and examine the context in which the picture is being taken. Then try to position yourself, your subject, or even just your camera in such a way as to create maximum visual impact, and help you get precisely the photo you are trying to capture.

As an illustration of this take a look at the photo below. When I took it, I made several quick decisions with regard to my surrounds in order to get a better picture, than if I had just settled for a quick snapshot. As the child was walking down the street I followed from a short distance in order to get a photo of him, and adjusted my viewpoint so the sailboats would occupy the left side of the frame. I crouched down low to get a better angle, and positioned myself so that the boy’s head and shoulders were above the horizon and showing through a clear portion of sky instead of a tree or building. I also scooted over so the white paint line was leading towards the center of the picture, rather than off to the side. All this was done in a matter of seconds, since I knew this particular moment would be quite fleeting.
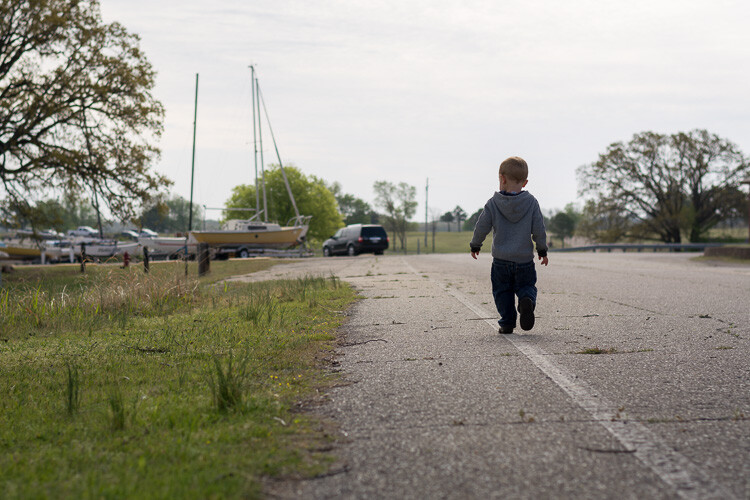
five-questions-before-photos-marina

The result is a picture that, in my opinion, is elevated several notches above what otherwise might be a quite ordinary picture of a kid walking down the street. It also provides clear answers to the two previous questions:

  1. What is the purpose of the picture? To show a child walking down the street.
  2. What do I want my viewers to see or feel? A bit of nostalgia, a connection to the boy, perhaps a bit of hopefulness for the future.

Recently I had the privilege of photographing four generations of one family, so I chose a location that would evoke feelings of a certain time period and place my subjects in a very specific context. What you see below is the direct result of me choosing to use the environment to elevate the impact of the photo. In order to create a sense that the couple had a long and rich history together, I placed them a few meters in front of a white fence, with an old farmhouse occupying the top-left portion of the frame. I could have taken the picture from many other angles, with very different scenery around them, but what you see here is the result of a very specific artistic choice on my part, in order to get precisely the photo I wanted.
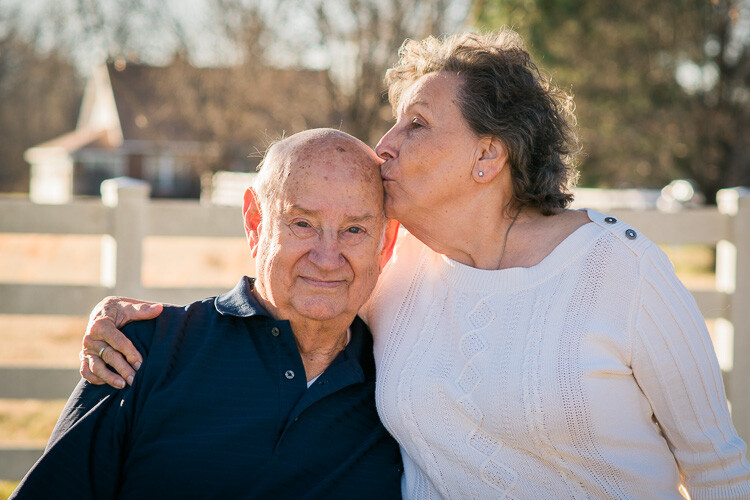
five-questions-before-photos-couple-barn

You can do the same thing, and it doesn’t require any special equipment or educational training. All you need is to keep your eyes open, examine the world around you when you take photographs, and use the environment to give your images a richer sense of time, place, and context.

4 – How can I control my camera to get the image I want?

Many people take great pictures without ever straying from the Auto option on their camera dial, and if you have a mobile phone or point-and-shoot you may not have any other options besides Auto. I know from personal experience how scary it can be to move away from Auto. For years I wondered why I would ever bother leaving that safe little green option when it did a pretty good job – especially since every time I ventured into another mode such as Aperture Priority, Shutter Priority, or (gasp!) full Manual, I never seemed to get the results I was looking for. What you may not realize if you stick with Auto, is that a whole new world of photography wonder is right in front of you, just waiting to be discovered if you can learn how to control your camera a bit more.
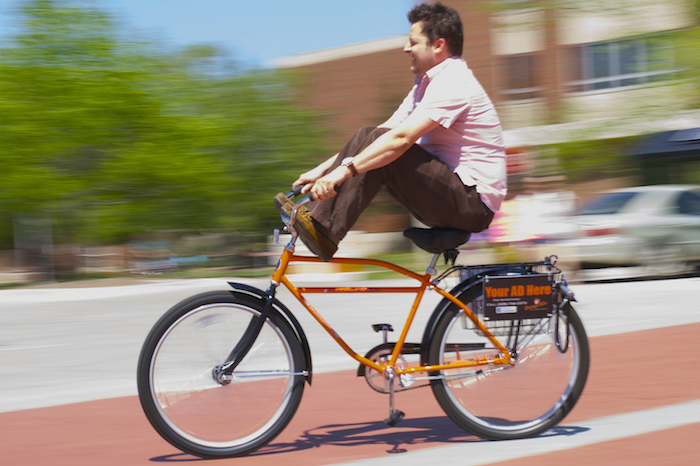
It's virtually impossible to get pictures like this using the Auto mode.

It’s virtually impossible to get pictures like this using the Auto mode.

Learning to control the aperture of your lens, the shutter speed of your camera, and the ISO sensitivity of your image sensor can make all the difference between a forgettable snapshot, and a wall-worthy masterpiece. It takes a little while to learn the fundamentals, but once you get the hang of it you will find yourself asking technical questions in order to solve artistic problems. I am constantly pressing buttons and flipping dials when I take pictures (even if it’s just my kids in the back yard) so I can get exactly the image that’s in my head, and not the picture that my camera thinks I want to take.

If this sounds hopelessly complicated, look down at the keyboard the next time you are at a computer. Remember when it took you agonizing minutes just to peck out a few words or sentences? Now you probably don’t look at the keyboard at all, and typing isn’t something you really think about anymore. You think of the words you want to appear onscreen, and your fingers naturally move to the right letters on the keys. The same thing happens with practice when you learn to use other modes on your camera, and your pictures will be much improved as a result. The bottom line is that if you, not your camera, decide which aperture, shutter speed, and ISO to use, you will get better pictures.
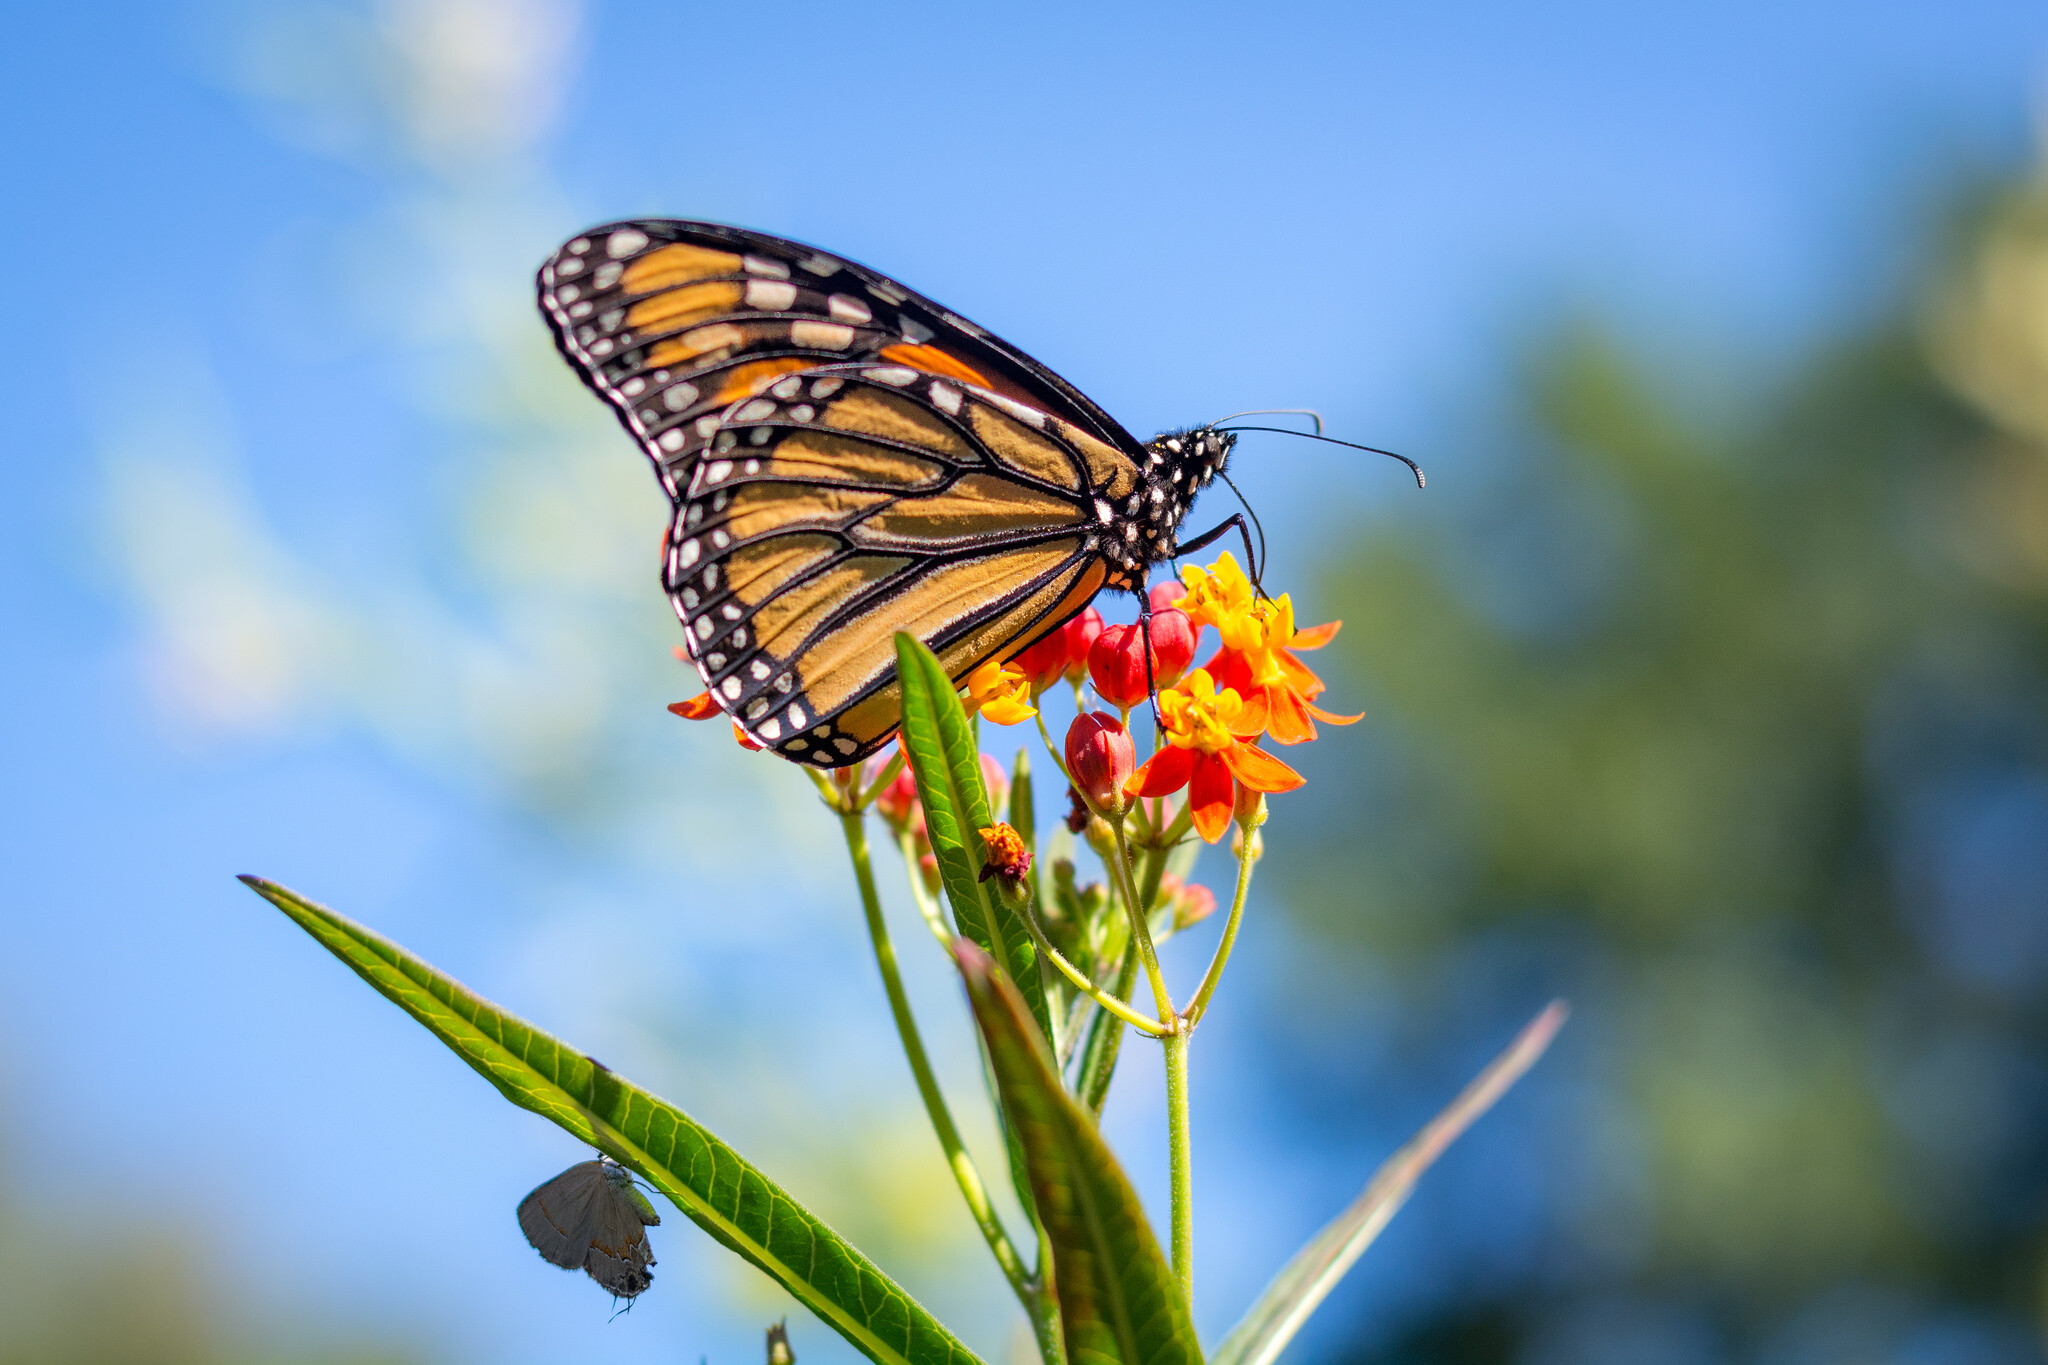
five-questions-before-photos-butterfly

Now that you have read my four questions, I’m curious to know your side of things too. Are there any tips you have found that work well for you to get better images? What are some of the best practices you have learned over the years? Share your thoughts in the comments below.

googletag.cmd.push(function() {
tablet_slots.push( googletag.defineSlot( “/1005424/_dPSv4_tab-all-article-bottom_(300×250)”, [300, 250], “pb-ad-78623” ).addService( googletag.pubads() ) ); } );

googletag.cmd.push(function() {
mobile_slots.push( googletag.defineSlot( “/1005424/_dPSv4_mob-all-article-bottom_(300×250)”, [300, 250], “pb-ad-78158” ).addService( googletag.pubads() ) ); } );

The post 4 Questions to Ask Yourself Before You Shoot to Help Improve Your Photography by Simon Ringsmuth appeared first on Digital Photography School.


Digital Photography School
 
Comments Off on 4 Questions to Ask Yourself Before You Shoot to Help Improve Your Photography

Posted in Photography


Something we’ve never seen before: LensRentals eviscerates the Fujifilm XF55-200mm F3.5-4.8R LM OIS

27 Feb

Into ‘the land of Fuji’

Roger and Aaron over at LensRentals have been tearing lenses down again. This week they’ve ‘eviscerated’ Fujifilm’s XF 55-200mm F3.5-4.8R LM OIS – the company’s mid-price tele zoom. The name may be redolent of a ‘$ 100 extra for a dual lens kit’ zoom but inside they found surprises at every turn. And not just with regards the number of screws holding the thing together.

The 55-200mm doesn’t have the fastest aperture range but it’s a fast-focusing, weather sealed telephoto zoom that we’ve always been impressed with. Fujifilm has often hinted that the X Series was partly an opportunity for its lens designers to show-off what they could do, so it’s probably to be expected that the designs are quite creative.

The system with the most screws

Having only broken a minor element of the lens in trying to open it up (something Roger didn’t want to embarrass Aaron by mentioning, so we shan’t dwell on it), they found the front section of the lens was held together with a lot more screws than usual. And, that many of these were screwed into metal inserts, rather than easily stripped or broken plastic columns. This turns out to be something of a recurrent feature of the 55-200, prompting Roger’s assertion that: ‘If you want the system with the most screws, you want Fuji, no question.’

Commenter helps Cicala find his orientation

Things got interesting when they dug a little deeper. Having removed the rear screws from their metal-inlaid holes, they discovered two sensors attached around the lens’s rear element. Since the element is static, Roger wasn’t clear what their role was and hoped that he’d be able to rely-on (and recognise) the wisdom of the crowd. He was right to, as pro photographer Trenton Talbot immediately guessed that they were gyroscopic sensors. A look at the way they’re orientated, relative to one another, along with a bit of Googling, suggests he’s right: they appear to be Epson gyro sensors, presumably feeding information to the lens’s stabilisation system.

The ‘R’ is for ‘by-wire’

Digging further into the lens revealed one of the few conventional parts of the 55-200mm’s design: the spring ball-bearings used to provide clicks as you turn the aperture ring. That ring being secured in place with screws, of course. It’s a similar approach to the one we saw in LensRentals’ tear-down of the Sony FE 35mm F1.4 a little while ago: the ring itself doesn’t directly drive anything, its movement is registered with a sensor, then sprung ball bearings are added to provide a stepped feel to the dial. Unlike the Sony, they can’t be disengaged.

Full metal barrel

A few loosened screws later, our intrepid duo found themselves facing a solid-looking metal zoom barrel, attached with three similarly solid ‘keys’ with which the zoom barrel transfers its motion to the mechanisms below. Cicala says he’s impressed with this level of construction on such a modestly-priced lens: another recurrent feature.

Fujifilm takes and eccentric path

Roger noted the ‘complex dance’ performed by the lens elements in Leica’s SL 24-90mm F2.8-4 when he tore that apart. That lens featured six helicoid paths that different elements trace as the lens is zoomed. That’s a $ 5000 lens. By comparison, the Fujifilm drives five groups in a similarly intricate optical shuffle, in a package you can pick up for one tenth of the cost.

Limited degrees of freedom

Down past the IS mechanism and carefully screwed-down aperture assembly, Aaron and Roger reached the focus element. There’s a sensor detecting the position of the focus group within the lens barrel then, on the group itself, what appears to be another one to detect the focus element’s position within the group’s housing.

But, wherever the focus element itself is, you can be fairly sure it’s not crooked: as Roger points out, the twin linear motors (10 o’clock and 2 o’clock in this image) and the rail along which the focus element moves (12 o’clock) are all broad, flat bars, rather than circular rods, meaning the element shouldn’t go askew as it races on its way.

Conclusion

Overall, Cicala says he’s impressed with the construction of the 55-200mm, especially given how much the lens sells for. He also seems pleased by the degree of optical adjustment that can be conducted on the lens, given the challenges of building lenses consistently. ‘This looks like a lens that was designed by people who know how to make reliable lenses,’ he concludes.

When ‘modern’ lens design is discussed, it’s often in terms of the use of Computer Aided Design to develop the optical formulae. But, just like the Sony FE 35mm, the Fujifilm shows an innovative approach to construction and focus drive. LenRentals ventured into the land of Fuji, ‘where things are done differently,’ with some trepidation but seem to have returned with a healthy respect for what goes on there, as well as a couple of screws that were probably supposed to stay there.

Articles: Digital Photography Review (dpreview.com)

 
Comments Off on Something we’ve never seen before: LensRentals eviscerates the Fujifilm XF55-200mm F3.5-4.8R LM OIS

Posted in Uncategorized


5 Things to Consider Before Deciding to Specialize or Not in Your Photography

25 Jan

There comes a point in every photographer’s career where they ask themselves the proverbial question, “Should I specialize in a specific genre of photography? Or should I just keep photographing anything and everything that comes my way?” There are several schools of thought on this dilemma, depending on who you ask, and what you read. Ultimately the answer is very personal, and specific to each photographer. The point of this article is not to convince you, the reader, of one way verses the other. The objective here is to simply state my personal reasons for how I would answer that question, and leave the final decision making up to you.

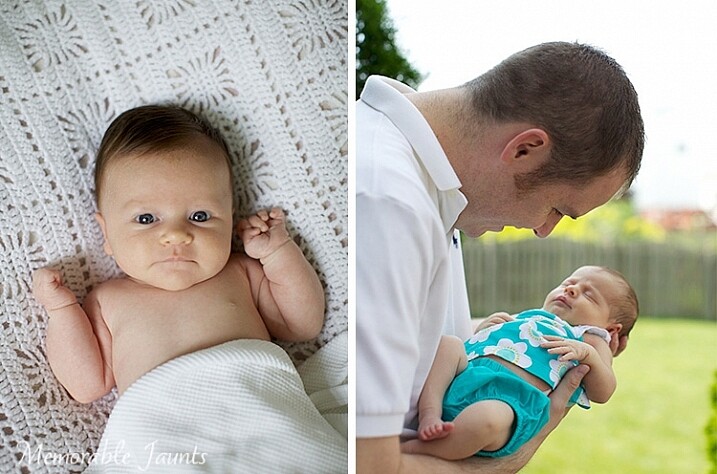
Memorable Jaunts DPS Article on Specializing in your photography

#1 Jack of all trades, master of none

I really believe in this age-old motto. I find that when you focus on multiple genres of photography, your photographic style and creative voice takes that much longer to develop. Different genres of photography require different strategies. What works well for family portraits, may not work well for still life. What works great for food photography, may not work for pet photos. Yes, the basic concepts of lighting rules, composition techniques, and technical camera knowledge, are mostly similar, but the style of photography varies depending on the subject. When you focus on multiple genres, there tends to be a mishmash of imagery in your portfolio, which may not be what you want in the long run.

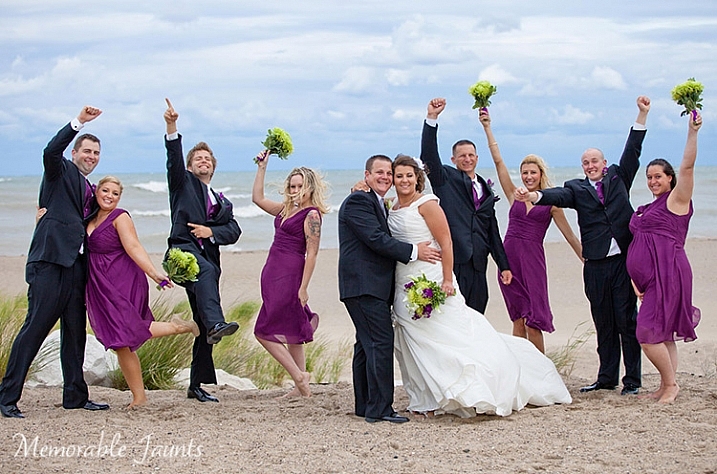
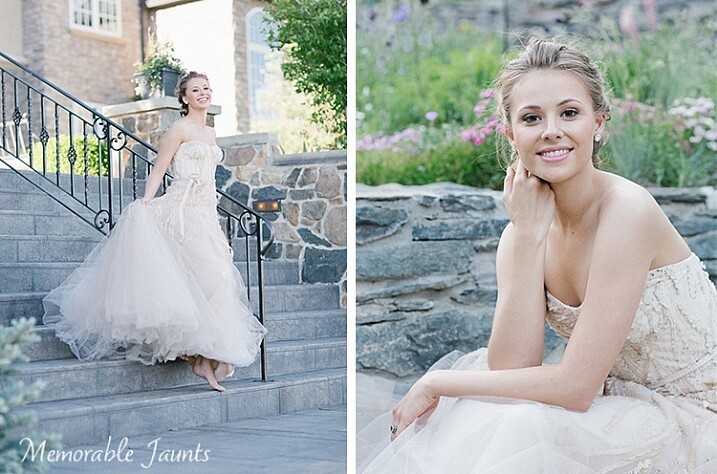
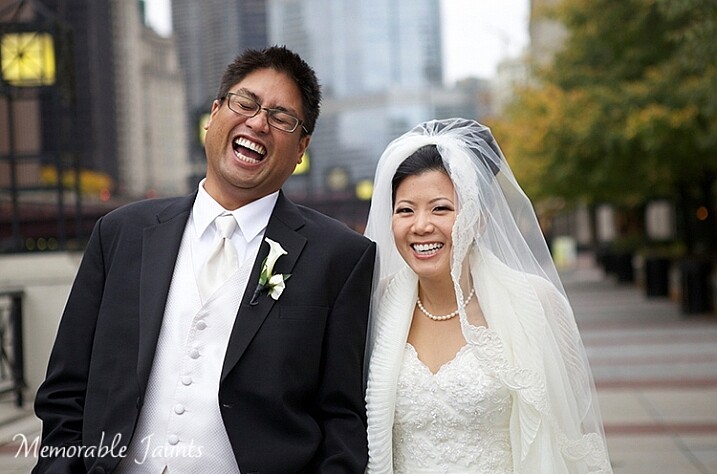
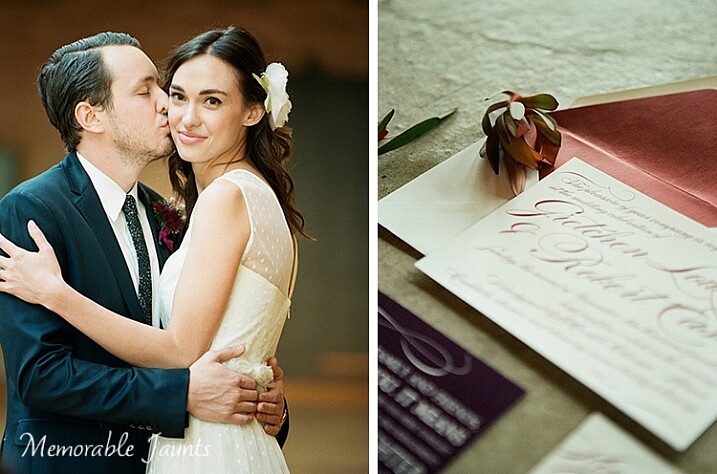
Memorable Jaunts DPS Article Specializing in your photography Wedding Images 01

I love capturing weddings and bridal portraits, some of my favorite genres of photography!

#2 Attracting your ideal client

In my mind, an ideal client is one who loves your work, and is willing to pay the right value for your services, no questions asked! Clients always demand and expect the best value for their money. When a client inquires for a particular job, they expect to find someone who is the best at what they are looking for.

For example, a family looking for beautiful, timeless, annual family photos, will expect the photographer they hire to know what he or she is doing, not just from a photography standpoint but also in terms of posing, lighting, post-processing, and delivery. So, when they inquire about family photos, they are expecting to hire someone who has enough experience under their belt so as to make the client’s experience an enjoyable one. Imagine for a moment, they hire a photographer who has limited experience photographing families, but is great with still life or product photography. Now suddenly, halfway through the shoot, the kids decide enough is enough and start acting up. Will the still life photographer, who does not expect his subject to simply get up and walk away, really know how to handle the situation? It’s more than likely that photographer is going to panic, making the client extremely upset, and they will expect to be offered a full refund, no matter how the final images turn out. Remember a positive client experience is the number one priority of any professional photographer!

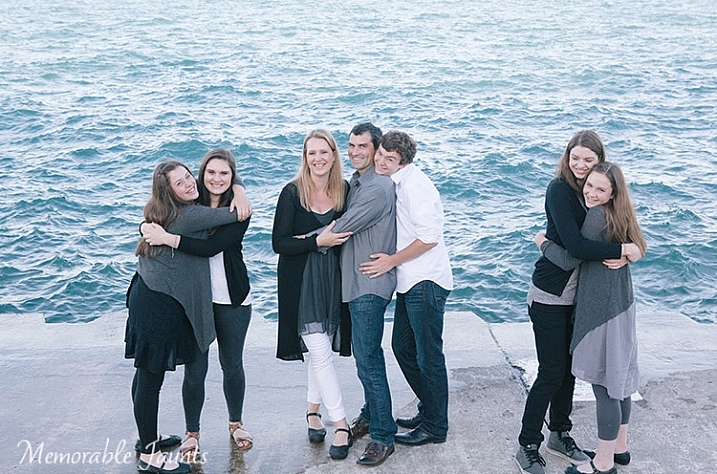
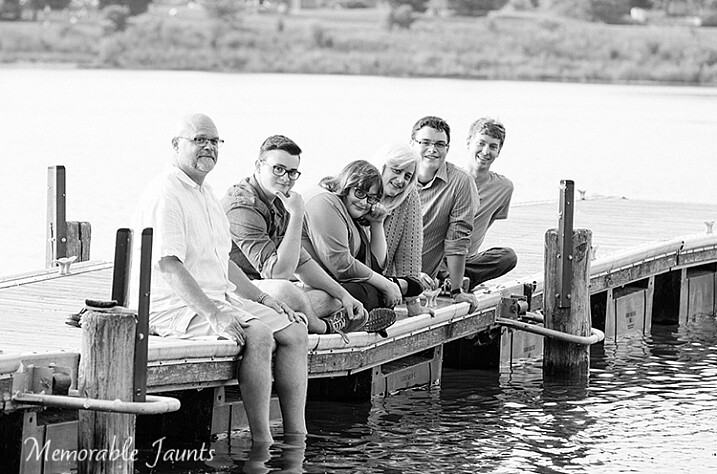
Memorable Jaunts DPS Article Specializing in your photography Family Portraiture Images 02

This family session was a highlight of 2014 that got me several clients who wanted extended family photoshoots!

Another family that loved the images from past sessions and moved schedules to accommodate me! - It felt awesome to be appreciated.

Another family that loved the images from past sessions and moved schedules to accommodate me! – It felt awesome to be appreciated.

#3 Understanding your own strengths and weaknesses

I feel like this one is not just relevant for photographers, but for everyone in general. When I get asked what I like to photograph, I immediately know what to say. I love photographing people and travel (preferable with people in the images). I specialize in portraiture because I feel one of my key strengths lies in interacting with people, and getting natural emotions and expressions through my imagery. As an extension to this genre, I love photographing weddings, because it is such an emotional day for all concerned. Being able to document a couple’s special day, surrounded by family and friends, has been a wonderful experience for me.

Now, if you ask me what I don’t like photographing, I have an even faster response ready! Traditional newborn photography is something I absolutely run away from. Don’t get me wrong, I love kids, but there’s just something about hanging baskets, swaddled blankets, and twisted limbs that freaks me out. The only two newborn photo sessions I have done in my five year career, have been newborn lifestyle photoshoot which may not have been exactly what my clients wanted.

My only attempts at Newborn Photography.

My only attempts at newborn photography.

I love the emotions captured here and it is one of my favorite genres of photography!

I love the emotions captured here and it is one of my favorite genres of photography!

#4 Paying the bills verses having a career

Now you may question this one. Are they not the same? On the surface these two may be the same thing for most people, and I have to admit for a while this was true for me as well. When I was just starting off, while family portraiture was what I gravitated towards, I did take jobs like real estate photography and birthday events because they helped pay my bills. But over time, I realized that the time and effort that I was putting into these so called “bill paying jobs” was not really worth it. The time to get to the event, hire a baby sitter, rent or borrow event specific equipment like light stands and extra flashes, as well image processing time, all added up and when I factored in time-to-money ratio. It just was not bringing in the money I thought it was. Often times we don’t realize that time is more money than money itself.

#5 Doing what you love

This one falls in line with point #3 above. Most of us get into photography because we love taking photos. It is a field where creativity and motivation run high, when we do the things that we really enjoy. However, the moment photography becomes a chore, it looses its charm. We start to feel burdened, and lack motivation and creativity. We all know that photography is a field where a mediocre job is very apparent in the images we produce. Bad lighting, loose composition, and bad editing, very quickly become very apparent to all. But when we photograph things that we really enjoy, we tend to produce stellar imagery that we love.

A blogpost about Film and feeling vulnerable as a photographer when using a film camera got me two wedding inquiries because the brides appreciated my honesty and loved the emotional appeal of the images!!

A blogpost about shooting film, and feeling vulnerable as a photographer when using a film camera, got me two wedding inquiries because the brides appreciated my honesty and loved the emotional appeal of the images!!

With all this being said, I don’t mean to imply that you should say no to jobs that are outside your expertise, especially if you are just starting out in this field. But don’t promote yourself as being the person who says “yes” to everything.

Specializing also doesn’t mean you have to give up photographing all those other things out there. Go ahead and photograph those apples sitting on the counter with the warm mid-day sun streaming through your window, or get the action shot of your kids playing soccer, but those should not make their way to your portfolio. Don’t suddenly start marketing yourself as a sports photographer. It might just repeal that client who is looking for a fashion photographer, which is exactly how you want to be known.

So, what is your speciality?

googletag.cmd.push(function() {
tablet_slots.push( googletag.defineSlot( “/1005424/_dPSv4_tab-all-article-bottom_(300×250)”, [300, 250], “pb-ad-78623” ).addService( googletag.pubads() ) ); } );

googletag.cmd.push(function() {
mobile_slots.push( googletag.defineSlot( “/1005424/_dPSv4_mob-all-article-bottom_(300×250)”, [300, 250], “pb-ad-78158” ).addService( googletag.pubads() ) ); } );

The post 5 Things to Consider Before Deciding to Specialize or Not in Your Photography by Karthika Gupta appeared first on Digital Photography School.


Digital Photography School
 
Comments Off on 5 Things to Consider Before Deciding to Specialize or Not in Your Photography

Posted in Photography


Is it Time to go Full Frame? Weight These Pros and Cons Before You Decide

24 Jan

Has anyone ever said to you, “That’s a nice photo, you must have an expensive camera!”?

According to photography legend Ansel Adams, “The single most important component of a camera is the twelve inches behind it!”  

Your camera is simply a tool, that you use to create your vision of the scene in front of you. A camera can only do what you tell it, so it’s not going to capture that “nice photo” all by itself. But, what if the camera doesn’t perform up to your expectations? Then, it may be time for an upgrade.


Captured at ISO 6400 this image shows great tonal range with very acceptable noise levels.

Captured at ISO 6400 on a Nikon D750 full frame, this image shows great tonal range with very acceptable noise levels.

I recently made the jump from a cropped-sensor camera to a full frame body (a Nikon D750, used in all the images below). For the purpose of this article I am not going to get into a technical discussion about the differences between a crop sensor (APS-C), and full frame camera (the main one being is that the full frame has a larger sensor, the size of a frame of 35mm film).

But how do you know if, and when, upgrading to a full frame camera is desirable? What follows are some points to consider if you’re on the fence.

Advantages of full frame

  • Improved low light performance: Because of the larger sensor size, a full frame camera is able to capture more light, which allows it to attain focus in darker environments.
  • Higher ISO performance: The larger sensor of a full frame has larger pixels, which creates less digital noise at higher ISOs. In most cases you will get a one or two stop improvement in high ISO noise, over crop sensor cameras, though many new models of APS-C models have a much improved performance in noise reduction.
  • More control over depth of field: This is a commonly misunderstood benefit of full frame, because the larger sensor does not really affect the depth of field of an image. However, with the larger sensor of a full frame, you can move closer to the subject which causes the depth of field to become smaller. This, in turn, creates a smoother bokeh.
  • Improved dynamic range and color depth:  A full frame sensor can record more tonal range within shadows and highlights. Detail and color are much improved at both ends of the spectrum.

Disadvantages of full frame

Bird in fight was captured here at high ISO to achieve fast shutter speed to capture a very sharp image.

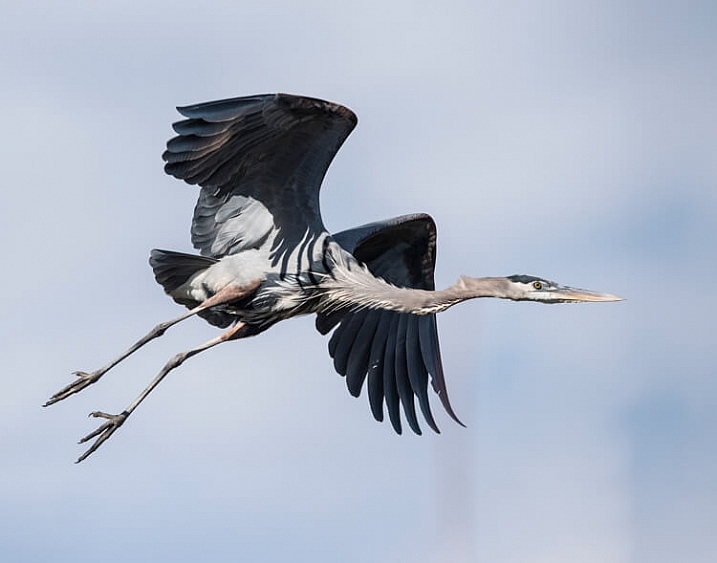
This heron in flight was captured at high ISO to achieve the fast shutter speed needed to get a sharp wildlife image.

  • Expense: Not only is the cost of the full frame DSLR higher than a crop sensor, you will most likely need to make additional investment in compatible lenses.
  • Size and weight: Not only are the sensors larger in a full frame DSLR, the overall size and weight are as well. Also, the lenses have more glass elements, and are also larger and heavier. This may not matter to many photographers, but when carrying gear for long distances it could be a factor to consider.
  • No crop factor: The telephoto reach of a full frame DSLR is lessened by not having a crop sensor. For example: a 200mm lens on full frame doesn’t have the reach of the approximate focal length on a cropped sensor  camera (about 300mm).
  • Slow frame rate in burst mode: Because a full frame DSLR has a larger sensor, there is more information to record to the memory card. Therefore, it will take longer to save images to the card, resulting in fewer frames per second when you are shooting in burst mode.

So, how do you know if you are ready to make the jump to a full frame camera? Ask yourself these questions:

How much will it cost?

As mentioned above, the cost of buying a full frame camera is significantly more expensive than a crop sensor one, plus new lenses will most likely need to be purchased. There isn’t much use in changing to full frame if you are not going use high quantity lenses designed for full frame cameras. If you plan to make the jump to full frame, you may want to begin by upgrading lenses to those compatible with full frame DSLRs.

Choosing a smaller aperture of f/22 gave enough depth of field to keep both the boys and the waterfalls in focus.

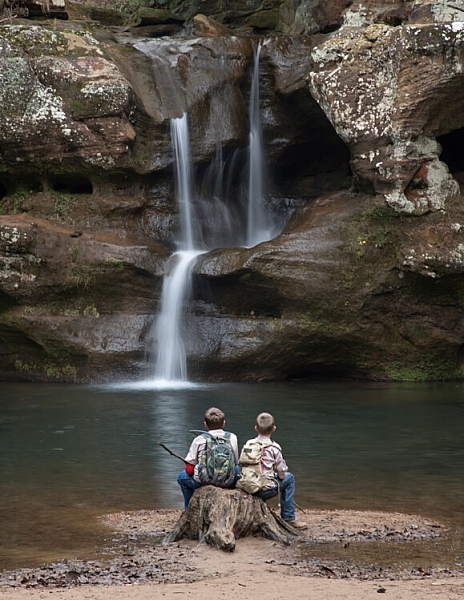
Choosing a smaller aperture of f/22 produced enough depth of field to keep both the boys and the waterfalls in focus using a full frame Nikon D750.

What type of photography do you enjoy shooting?

Full frames have advantages and disadvantages for different types of photography.

  • Landscape: Low light performance, more detail and improved ISO performance are all great advantages of full frame for landscape photography. The only possible drawback here is the effectively shallower depth of field, but this can be compensated for by using a smaller f-stop.
  • Portraits: The larger sensor size of a full frame will result in a shallower depth of field. For portraiture this means the backgrounds can feature more blur and make the subjects stand out better.
  • Wildlife: A full frame camera loses the telephoto reach that a crop sensor has. Nevertheless, a lot of wildlife photography is shot in low light situations, where a full frame gives a much improved advantage.
  • Sports: As in wildlife photography, limited reach and low light factors apply to sports photography. Shooting with a full frame, the improved focusing in low light is a helpful benefit for sports. However, the slower frame rates of a full frame can be a drawback in photographing a fast moving sport.

If you are a portrait or landscape shooter, there are many benefits that might convince you to make the switch to full frame.

This scene was captured with at 24mm on full frame Nikon D750. The white line shows how much of this image would be captured on a crop sensor from the same location.

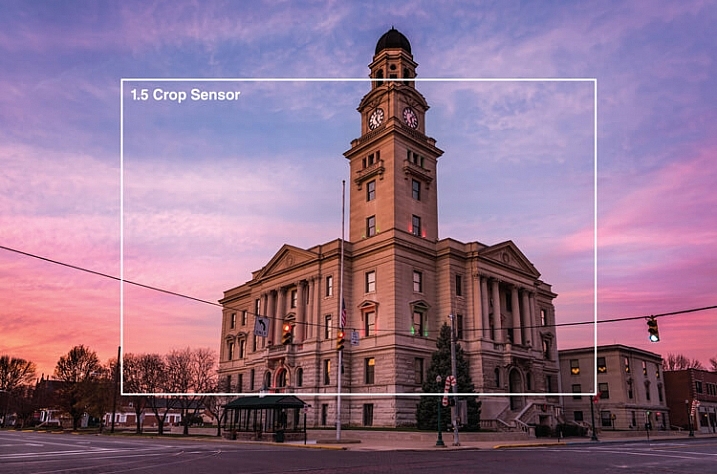
This scene was captured at 24mm on a full frame Nikon D750. The white line shows how much of this image would be captured on a crop sensor from the same shooting location.

This image was captured at 600mm with a Nikon D750. The white line shows the extra reach that a crop sensor camera would give you. This image was also captured in low light conditions with ISO of 2000 with very acceptable noise level.

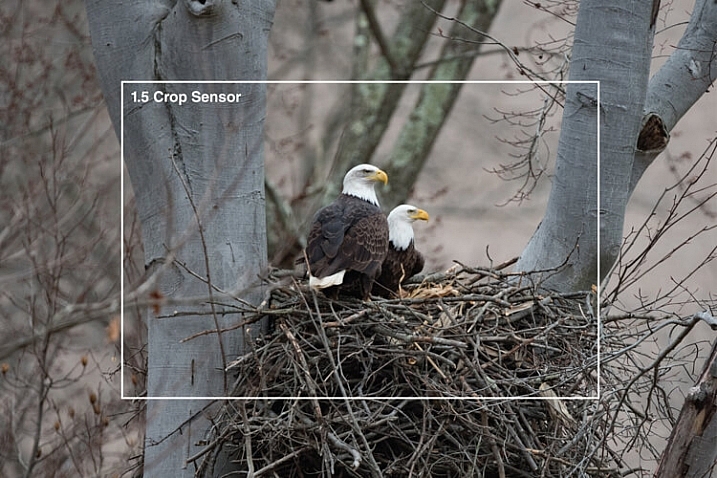
This image was captured at 600mm with a full frame. The white line shows the extra reach advantage that a crop sensor camera would provide. Still, capturing this image in low light conditions with an ISO of 2000 results in a desirable noise level.

Is your current camera holding you back?

Every camera has a limited number of shutter releases, so if your camera is nearing the end of its life cycle, it might be time to consider an upgrade. If your older crop sensor DSLR is limiting your results in low light, and you are constantly frustrated by high levels of noise, you might benefit from an upgrade to full frame.

Keep in mind that it’s convenient to blame a camera for taking poor images, but it may not be the camera holding you back. Many times photographers don’t get the results they expect by underutilizing high-end equipment. No matter what type of camera you shoot with, get to know it, and how all of its features work, before moving on to a different one.

shooting here in low light, this shot was able to be captured in low light by increasing the ISO without adding digital noise to the image.

This cityscape was captured with a full frame in low light by increasing the ISO, without adding digital noise.

What is your level of photography experience?

A full frame camera is probably not the best one to use as a beginner. Start shooting with a more entry level DSLR, and work up to a full frame model. If you are looking for a camera to take photos of family and friends, a crop sensor DSLR is a very satisfactory choice. Having a good handle on the exposure triangle (aperture, shutter speed and ISO) and how they work together is a must if you’re going to take advantage of all the benefits of full frame. You must be comfortable with shooting in manual mode. If you earn any part of your income from photography, you may benefit from switching to a full frame camera.

Do you make large prints?

A full frame sensor has a larger pixel size, which will capture more light and detail, which results in sharper images that are conducive to making large prints. If you never make any prints larger than 8×10″, then a full frame DSLR may not be of benefit to you.

Here this sunrise shot has a nice range of tones without any noise in the shadows that you might get with some crop sensor cameras.

Captured with full frame Nikon D750, this sunrise image reveals a nice range of tones, without any of the digital noise in the shadows likely to be present with some crop sensor cameras.

Will purchasing a full frame make you a better photographer?

You may have heard this quote, “Skill in photography is acquired by practice, not by purchase.”

Do you need a full frame camera to capture great images? No, of course not! Most new crop sensor cameras on the market today are engineered to take beautiful images! But if you are an experienced photographer who makes money with your camera, you may gain an advantage by switching to full frame.

The bottom line

If you are thinking of upgrading from a crop sensor camera, be sure to consider the price, lens compatibility, and type of photography you do, before you make the change to full frame. Jumping to full frame can be quite a leap! But if you are ready for that big step, the results can be rewarding.

Are you ready to go full frame? Please leave your comments below.

googletag.cmd.push(function() {
tablet_slots.push( googletag.defineSlot( “/1005424/_dPSv4_tab-all-article-bottom_(300×250)”, [300, 250], “pb-ad-78623” ).addService( googletag.pubads() ) ); } );

googletag.cmd.push(function() {
mobile_slots.push( googletag.defineSlot( “/1005424/_dPSv4_mob-all-article-bottom_(300×250)”, [300, 250], “pb-ad-78158” ).addService( googletag.pubads() ) ); } );

The post Is it Time to go Full Frame? Weight These Pros and Cons Before You Decide by Bruce Wunderlich appeared first on Digital Photography School.


Digital Photography School
 
Comments Off on Is it Time to go Full Frame? Weight These Pros and Cons Before You Decide

Posted in Photography


Do This Before You Upgrade a Lens for Your New Camera

13 Jan

new-camera-tips-5

So, you just got a new camera! Congratulations! You’re in the right place, DPS is absolutely full of amazing tutorials that will help get you started, and point you in the right direction. As for me, if there’s one thing that I could say to someone who has just purchased, or received a new camera, this is it:

If this is your first DSRL or mirrorless camera with interchangeable lenses, don’t buy any new lenses or gear for at least a month.

I know, I know. You’ve probably heard that the kit lens is terrible. You’ve probably already been given a list of things that are “must-buys” in order to take amazing photos. You may have even tested out your brand new camera, and been disappointed that your images don’t quite look like you’d hoped they would after you upgraded.

I understand, because I’ve been there. However, waiting to upgrade for at least a few months (get that you need like batteries and memory cards, but hold off on any major purchases like lenses) may actually benefit your photography in the long run. To explain why, let me tell you a little about me and my story.

New-Camera-Tips-1

I received my first DSLR, a Canon Rebel XS, in 2009. I’d done black and white film photography for years, so photography itself wasn’t new to me, but my old fully manual Pentax camera didn’t have things like white balance, or the ability to choose metering modes, and neither did my point-and-shoot digital camera at the time (at least not that I knew of), so there was definitely a big learning curve for me as I transitioned to a digital SLR.

The image above was one of the first that I took with my new camera, and I remember being so frustrated. I hated how yellow it was. I hated the fact that it didn’t really look any better than the images I took with my point-and-shoot camera, and it might have even looked worse! It didn’t take much complaining on my end before well-meaning friends and family members started suggesting different lenses, flashes, and other gear that would help me achieve the look that I was hoping to achieve.

Although I was confident that I’d need to upgrade lenses if I wanted to take my photography to a new level, my husband and I were still pretty newly married and money was tight, so I just kept on with my Rebel XS and Kit lens. I was really frustrated about not being able to upgrade at the time, but the truth was that I didn’t need a lot of new gear, I really just needed to learn how to utilize the gear that I already had.

new-Camera-Tips3

I was pretty sure that I was more interested in photographing landscapes and abstract items than I was photographing people. So, I’d take my camera to work with me and go on photo walks during lunch breaks, taking photos of whatever was around. I discovered how white balance worked, and started to chip away at learning a little more about how my camera functioned. The images still weren’t perfect, as you can see by the examples above and below, but I felt like I was making progress in terms of the overall aesthetic of the photos, and I was really starting to have fun. I was still itching to upgrade, but am forever grateful that we just couldn’t afford it at the time, because it turned out that the type of photography that I thought I was interested in, wasn’t actually my passion after all.

New-Camera-Tips-2

Over the course of the next year, I started taking photos of my nieces and nephew just for fun, and much to my surprise, discovered that I loved taking candid photos of kids. I had experience with portrait photography in high school and college, but thought I didn’t like it. As it turns out, most of my portrait experience had been in a studio setting with a professor who was very, very passionate about Rembrandt Lighting. I didn’t enjoy that kind of photography, but I discovered that I loved sitting in the grass in the backyard, and taking photos as my nieces and nephew played. I loved taking pictures while singing funny songs, and telling little jokes to see if I could make them laugh. Around the same time, I took a few senior portraits for some family friends, and discovered that it wasn’t just kids I enjoyed photographing. I loved taking pictures of people, and I especially loved taking portraits of people.

I also really loved portraits that had a nice blurry background, which was hard (but not impossible) to achieve with my kit lens. I began to look into how I could achieve that effect more easily, and quickly came across Canon’s Nifty Fifty Lens (50mm f/1.8). I purchased that lens shortly before my first daughter was born. It stayed pretty permanently attached to my camera body for the next several years.

New-Camera-Tips-4

My love for portraits has only intensified, and though I have made a number of upgrades to my gear since 2010, I’m glad that it took me about a year to make my first purchase. Being forced to wait allowed me time to discover which type of photography I was really interested in. Had I upgraded right away, I probably would have purchased a lens that would be collecting dust in the back of my closet, because I would have gotten something targeted towards landscapes or macro, rather than something more appropriate for portraits. It’s not the end of the world to own a lens that you don’t use all that often, but it’s also something that can be avoided with just a little patience!

new-camera-tips-6

Waiting to upgrade also forced me to really learn to use the camera that I had, which was actually a great camera, kit lens and all! Still need a little extra convincing that the kit lens isn’t terrible? Check out this Flickr Group called Kit Lens Losers. There are some incredible images in there, all taken with the standard kit lens. You CAN take great images, right out of the box. I promise.

When it did finally come time to upgrade to a new lens, I did so knowing that the upgrade was necessary in order to achieve something (better bokeh and the ability to shoot wide open), that my previous setup limited. The lens was important in helping me achieve the aesthetic that I like in photography, but it was only one piece of the puzzle. Learning about white balance, metering modes, shooting in RAW, and a whole slew of other camera settings were just as important as a new lens in terms of the overall affect on my photography.

I’m not saying that you need to have a perfect understanding of your camera before you upgrade, but I firmly believe that we’re never done learning when it comes to photography. What I am suggesting is that if you spend some time really getting to know your camera and what it is capable of before you upgrade, you’ll be able to ensure that you’re spending your money intentionally, in ways that will allow you to continue to grow in your photography – and that’s always a good thing.

new-camera-tips-7

Have you upgraded you gear? If so, what was your first purchase? If you haven’t, please share what has made you decide to wait.

googletag.cmd.push(function() {
tablet_slots.push( googletag.defineSlot( “/1005424/_dPSv4_tab-all-article-bottom_(300×250)”, [300, 250], “pb-ad-78623” ).addService( googletag.pubads() ) ); } );

googletag.cmd.push(function() {
mobile_slots.push( googletag.defineSlot( “/1005424/_dPSv4_mob-all-article-bottom_(300×250)”, [300, 250], “pb-ad-78158” ).addService( googletag.pubads() ) ); } );

The post Do This Before You Upgrade a Lens for Your New Camera by Meredith Clark appeared first on Digital Photography School.


Digital Photography School

 
Comments Off on Do This Before You Upgrade a Lens for Your New Camera

Posted in Photography


A Helpful Checklist to Use Before Photographing Anything

08 Dec

If you are reading this you probably find photography exciting, maybe even so exciting that from time to time you forget changing your camera settings according to the subject you’re shooting. You have probably already missed at least one amazing shot, just because you forgot to change the ISO or shutter speed.

Image2

You are not alone. This happens to both amateurs and professionals, however there are a few simple tricks to avoid ever missing that shot again due to unpreparedness. In this article I’m going to share with you the simple steps I follow before going out to photograph, the steps I have learned the hard way. A helpful checklist to use before photographing anything.

Why do you need a checklist?

Okay, before I start sharing the steps, let’s briefly talk about why you need a checklist. The reason I need a checklist might be different than yours, and it all comes down to your needs. What are you photographing? Are you photographing to make huge prints? Are you capturing a moment that only lasts a brief second?

My main field of photography is landscapes and nature. It is rare that my window of opportunity only lasts for a brief second, meaning that I often have the time to find the best settings. However, if you are more into wildlife photography, travel, or perhaps street photography, your window of opportunity is much shorter, ergo you must be able to quickly take up your camera, and fire off some shots without spending much time fiddling with your settings.

Image7

The feeling of coming back home after an amazing evening, importing your photos, and realizing all the shots are ruined as a result of forgetting to change the settings is a feeling I don’t wish upon anyone. No matter what type of photography you do, quality is the most important.

Point one – Before you leave

Step one takes place before even leaving your home. This might very well be the most important step, and I know for a fact it’s one that many often forget.

Part one of the checklist consists of four basic, yet crucial elements to check:

  • Are your batteries charged?
  • Is your memory card full?
  • Did you clean your equipment?
  • Is all your gear packed?

Are your batteries charged?

You may laugh and think, “Do’h, obviously I won’t go out with empty batteries”. Well, that’s exactly what I thought too until one time when I drove seven hours to the west of Norwa,y where I would spend the weekend in a tent photographing epic landscapes. After one hour of shooting my first battery died, and I realized that all my spare batteries where empty too. Since I was camping I did not bring a charger.

In deep frustration I ended up driving the seven hours back home, as I did not want to spend the weekend in some of the greatest nature of Norway without my camera (Yes, I should have stayed and enjoyed the nature – but my thoughts where not rational at the time). Luckily I managed to pull off one descent shot from that evening, which I did not realize before writing this article!

Image5

I have made a habit to always set my batteries to charge as soon as I get home from photographing, yet I also double check that all batteries are charged when I leave on trips.

Is your memory card full?

Now, leaving home with a full memory card is not as critical as not having any battery time. However it is rather annoying to get the message “Memory card full” after taking 10 pictures. You then have to waste time deleting images one-by-one. Make sure there is enough free space on the card when you head out on your adventures!

Is your equipment clean?

Most of us are guilty of not cleaning our equipment from time to time. It’s more exciting to process your images when you get back home rather than clean your gear, right?

Regardless of what is fun or not, cleaning your equipment needs to be done, especially after photographing in rough conditions or by the sea. I recommend always bringing a microfiber cloth, air blower, and some cleaning spray when you are out, but the more you clean at home, the more time you have to photograph when you’re out.

Personally, in my earlier days I had a couple shots ruined due to forgetting to clean my filters after being out photographing by the ocean.

The image below is a typical example of what your files might look like if you forget to clean your lens before shooting. This shot was luckily not ruined, but it took some time removing all dust spots.

Image1 DustSpots 2

Did you pack all your gear?

This is something I have yet to experience myself, probably due to my paranoia of forgetting something. But it’s happened more than once that I have been out with someone who forgot their memory card, remote shutter, or even their camera. So make sure that all of the equipment you need is in your backpack when you exit the door!

Point two – In the field

Now that your batteries are charged, your memory card has available space, your gear is cleaned, and the equipment you need is packed, let’s head out to capture some beautiful images! But don’t get too excited, remember to go through these quick steps first:

Determine the subject you are about to photograph

Before you look into the settings themselves, start by reflecting upon the subject you are going to photograph. Is it a landscape, animal, people, or something else? By spending a few seconds becoming aware of what you are about to photograph, it will be much easier for you to remember to set your settings accordingly. You will then avoid photographing a bird with a narrow aperture when you want to blur the background.

At this stage I would also recommend putting some thought towards what lens you will need most. If you’re photographing birds, you normally need a long zoom, more than the wide angle. Prepare the correct equipment right away, so you avoid having to change lenses while you watch the bird fly away.

Image4 Bird

Check your ISO

If you are a landscape photographer like myself, you want the ISO to be as low as possible in most situations. However, you are also outside photographing sunrise, daytime, sunset and nighttime. These hours often require different settings.

It sucks to photograph a beautiful sunrise, just to come home and realize you forgot to change the ISO from 1600 after photographing the stars last night.

As a default I always check that my ISO is set to 100 when turning my camera on, as this is the setting I use for most of my shots. If you are photographing wildlife you might use 400 as a default to make sure you freeze the moment.The image below is a unfortunate example of one time I forgot to reset my settings from the night before. This resulted in me missing that small moment when the bird spread its wings.

Image4

Check your White Balance

Most of us look at the image preview after firing of a couple shots so we quickly become aware of any visible mistakes we have made, such as not setting the White Balance. Sure, the White Balance is easy to fix in post processing, but I prefer to make the shot as complete as possible in the camera. Quickly check that the White Balance is set to what you normally use (even if it is Auto, Cloudy or any other pre-made setting).

Image3 WhiteBalance 2

Don’t forget the focus!

Have you ever quickly taken up your camera to photograph the bird that just passed you, and later noticed that the image is out of focus because you forgot to change to Autofocus? It’s an easy mistake to make, so before you start photographing, be aware of how you have set the focus.

This also applies for the other way around as well. Say you are about to photograph a long exposure, you set the focus perfectly and slide on the filters. Then, just as you are about to start taking the picture, your autofocus starts going. No, it’s not a disaster, just simply annoying.

Image6

Point three – Back home

At this point your memory card is hopefully filled with amazing images. This is the last step, and it loops right back to point one. Now it’s time to set your batteries to charge, import your photos, and clean your equipment. If you make a routine of doing this after every session, you will avoid making the mistake of heading out unprepared.

That’s it for this checklist, and I hope it helps the next time you are out photographing. These steps don’t take much time to follow, and you don’t need to spend hours in post-processing trying to save a image anymore.

Do you have any “rituals” you do before going out to photograph? Please share in the comments section below.

googletag.cmd.push(function() {
tablet_slots.push( googletag.defineSlot( “/1005424/_dPSv4_tab-all-article-bottom_(300×250)”, [300, 250], “pb-ad-78623” ).addService( googletag.pubads() ) ); } );

googletag.cmd.push(function() {
mobile_slots.push( googletag.defineSlot( “/1005424/_dPSv4_mob-all-article-bottom_(300×250)”, [300, 250], “pb-ad-78158” ).addService( googletag.pubads() ) ); } );

The post A Helpful Checklist to Use Before Photographing Anything by Christian Hoiberg appeared first on Digital Photography School.


Digital Photography School
 
Comments Off on A Helpful Checklist to Use Before Photographing Anything

Posted in Photography