RSS
 

Posts Tagged ‘Before’

Video: Astronaut forgets to insert SD card into GoPro before spacewalk

22 May

An unnamed NASA astronaut stationed on the International Space Station recently ran into an issue during a spacewalk: he forgot to check whether his GoPro camera had an SD card installed before embarking on a spacewalk. We’ve all been there, right?

The astronaut, who may have been Andrew Feustel, was featured in a spacewalk livestream on NASA’s Twitch account last Wednesday. During the livestream, viewers were treated to a brief conversation that started with the astronaut asking, “Hey, Houston, I gotta ask a question about the GoPro real quick.” The astronaut explains that he sees a “No SD” warning on the GoPro’s display when pushing a button.

“Do I need that to record?” he asks, referring to the SD card. “And if it’s recording, is there supposed to be a red light on?”

After a long moment of silence, Houston clarifies that the red light should appear while recording if the SD card is inserted, and that the “No SD” message likely meant the camera didn’t have a media card installed. The astronaut ultimately abandoned his plans to use the camera during the spacewalk.

Clarification about the SD card’s whereabouts was not provided, but if we had to guess, it’s probably floating (in this case literally) around in the bottom of Feustel’s camera bag alongside a half-eaten protein bar and a few extra lens cleaning cloths.

Articles: Digital Photography Review (dpreview.com)

 
Comments Off on Video: Astronaut forgets to insert SD card into GoPro before spacewalk

Posted in Uncategorized


Make Sure You Know all the Drone Regulations Before You Fly

23 Oct

Everywhere you look, it seems like everyone has their hands on a drone. YouTube is crawling with aerial drone footage, and you can buy one at just about any electronics store. But just because drones are everywhere doesn’t mean you can (legally) fly them anywhere.

Here at dPS, we dove into topics such as tips to get started with drone photography and how to get stunning aerial photos with your drone. One thing we haven’t covered that’s worth talking about is where you can and can’t fly your drone. Read on for some tips on things to consider before you fly a drone.

Aerial Drone Photography Rules - Drone Regulations to Consider Before Traveling With One

Why Are There Drone Regulations?

On the surface, drones may seem like fun toys or new tools to add to your photography or videography kit. After all, they’re marketed as such and most of the time, they don’t do any visible harm. However, drones can be dangerous from the perspective of privacy and physical safety.

No one likes the idea of a drone spying on them, or worse yet, a drone that comes crashing down and damages property or hurts someone. But these very plausible scenarios are exactly why drone regulations exist – to protect drone pilots and the general public from accidents.

Aerial Drone Photography Rules

Who Makes Drone Regulations?

So who comes up with drone rules and regulations? That depends entirely on where you live. Generally speaking, drones are considered unmanned aerial vehicles (UAVs) and as such, they are regulated by the national aviation authority of each country. Thus, most countries will have their own rules, and often each state or city within the country might have further regulations.

So it’s important to do extensive research about where specifically you plan to fly your drone. Punishment for violating drone regulations can be hefty fines or even imprisonment, so it is very important to follow drone rules, especially in foreign countries.

What Kind of Drone Regulations Are There?

Aerial Drone Photography Rules

Drone rules vary in every country, but here a few common ones:

Register Your Drone

Today, drones vary from fitting in the palm of your hand to requiring a large backpack to transport them. Generally speaking, drones weighing any more than 0.55 pounds must be registered with your national aviation association before flying.

Get Licensed to Fly

Some countries require drone operators to pass an exam to get a license before flying a drone, so be sure to get licensed if it’s necessary.

Aerial Drone Photography Rules Drone Regulations to Consider Before Traveling With One

Get Insurance for Your Drone

In some places, you must have insurance for your drone in order to fly. But drone insurance is something you should have any way to protect your investment.

Avoid Flying over People and Properties

Even the tiniest drone can be a hazard to someone or something if it comes crashing down from the sky or runs into an airplane. As a general rule, don’t fly your drone over crowds of people or near private or government property. You should also avoid flying near airports or helipads.

Sample Drone Regulations in the USA

Drone Regulations to Consider Before Traveling With One

In the United States, drones are considered unmanned aircraft systems (UAS). As such, they are regulated by the Federal Aviation Administration (FAA). There are two sets of regulations: one for those flying drones for fun, and one for those flying for commercial (professional) reasons. A summary of the FAA rules is below, with more details available here.

  • Flying drones for recreational or educational use is okay without a permit. Drones must be registered if they weigh over 0.55 lbs (250g). Drones cannot be flown within five miles of an airport or helipad without prior notification to the airport and air traffic control.
  • If flying for commercial use, the drone pilot must be over 16 years of age, have a Remote Pilot Airman Certificate, and pass TSA vetting. The drone must fly under 400 feet and at or below 100 miles per hour. Drones can only fly during the daytime, and must not fly over people.

For More Information

  • Global Drone Regulations Database
  • Master List of Drone Laws

Apps

  • UAV Forecast
  • Hover

https://www.faa.gov/uas/

In Conclusion

If your head is spinning when you reach the end of this article, you’re not alone. There are many more drone rules and regulations than most people know about, which makes enforcement of them very patchy.

What’s more is that drone regulations are in a constant state of flux, so it’s hard to say exactly what rules exist and apply at a given time. But with that said, it’s better to know the rules and do your best to follow them, or risk getting arrested and potentially fined like this French tourist in Italy.

The post Make Sure You Know all the Drone Regulations Before You Fly by Suzi Pratt appeared first on Digital Photography School.


Digital Photography School

 
Comments Off on Make Sure You Know all the Drone Regulations Before You Fly

Posted in Photography


MIT’s newest photography tech can retouch an image before it’s captured

04 Aug

MIT has developed a new machine learning technology that is able to retouch an image in real-time, presenting the photographer with the final product before they snap the photo. The system, which is being presented by both Google and MIT researchers at the digital graphics conference Siggraph in Los Angeles, was trained using thousands of both raw and retouched images that comprise a dataset created by MIT and Adobe, among others.

The automatic image retouching system is lightweight enough to be used on an ordinary smartphone, and it can be equipped with multiple different styles. While real-time image retouching isn’t a new idea, the ability to perform it on a smartphone is. Talking about this, researcher Jon Barron explains:

Using machine learning for computational photography is an exciting prospect but is limited by the severe computational and power constraints of mobile phones. This paper may provide us with a way to sidestep these issues and produce new, compelling, real-time photographic experiences without draining your battery or giving you a laggy viewfinder experience.

In order for the image retouching to work in real-time on low power devices like smartphones, the researchers developed a system that modifies a low-resolution version of the final image, then translates those edits to the full-resolution photo.

With this method arose a big problem, however. Namely, that the low-resolution image doesn’t contain enough data to adequately determine edits for the full-resolution version. Two different solutions were found to solve this problem, the first being that the system outputs ‘a set of simple formulae’ rather than the low-res image itself, and the second being a method for applying the formulae to the full-resolution photo. The team explains that technology in detail in the video below:

Articles: Digital Photography Review (dpreview.com)

 
Comments Off on MIT’s newest photography tech can retouch an image before it’s captured

Posted in Uncategorized


5 Tips for Location Scouting Before a Photo Session

20 Jul

Maybe by a show of virtual hands, how many of us have ever been in a situation where we have gone to a location for a photoshoot only to find out that something unexpected like a marathon, construction or worse demolition, is going on that prevents you from using the space as you intended? And I am being very serious in the demolition example!

One of my favorite local parks went through a complete revamp a couple of years ago and for months the only thing I could see was demolition equipment all around. The dirt paths that I loved so much had all gone and tar biking paths took their place!

5 Tips for Location Scouting Before a Photo Session

The dirt path with the cover of trees in the background was one of my favorite spots in this local park. The light would filter through the trees and the dirt path would act as a natural reflector and bounce golden light back to my subjects! – now this whole area is a parking lot that leads up to the trees!

I am a natural light outdoor photographer for the most part. Hence, I rely on outdoor locations for 75% of my photoshoots including the weddings I photograph. More often than not, my clients, the bride and groom, look to me for suggestions on natural outdoor locations for their bridal portraits and family formals. Even my lifestyle family photo shoot clients love suggestions on the best locations for beautiful family photos especially in the fall when the leaves all change colors. To that end, I am always on the look out for clean, beautiful and unique outdoor locations for my photoshoots.

Here are a few tips on how to scout and find the perfect location for your next photo shoot.

#1 Know your clients

Every client is different and every photoshoot is unique. It behooves us photographers to really get to know our clients so we can tailor the photo shoot to fit their personality. This not only ensures that they will have a good time but also that they will be more relaxed and happy during their photoshoot. This means you will get pictures that they are bound to love and hence recommend you to all their friends and family. It’s a win-win for everyone.

For my wedding clients, I have a formal questionnaire that they fill out to describe their style and that of their wedding. This helps me plan out locations and poses that will reflect their style and personality. For my family photos, I have a conversation with the family to see what type of photos they gravitate towards. Do they want to have fun outside in a park? Or do they want to hang out at home with each other? The family photo session is tailored around their needs.

5 Tips for Location Scouting Before a Photo Session

My lovely clients wanted a location in nature among the trees. She told me her outfit choices ahead of time so I chose this park with a small waterfall. It seemed to fit their personality and the theme of the shoot ‘The quiet before the storm” quite well.

5 Tips for Location Scouting Before a Photo Session

This session, on the other hand, took place at my client’s home. During our consultation, she mentioned that she wanted to use her 2.5-acre backyard for photos. I knew the green of the grass and the trees would add a lot of color cast to my subjects so I recommended neutral colored clothing. We also waited until the sun passed behind some clouds to take some of these shots to prevent too much color cast on their faces.

#2 – Scout at different times of the day

When I look at potential locations for my photo shoots, I always try and visit the place at multiple times during the day. This gives me an idea of the lighting at different times. Does the location get direct sunlight or is it shaded and hence gets only directional light? Is it a busy street and with potentially lots of people that might be walking around and getting in my shots? What are the traffic patterns to get to the location? All these little details are really important for me to be able to plan my day and photoshoot so that I can get the best possible pictures in the time I have at the location with my clients.

Tip: If you cannot get to a location ahead of time, use Google maps and sunset/sunrise times to figure out where the sun will be at the time of day you are photographing. This will help you be a little prepared when you get to your location.

5 Tips for Location Scouting Before a Photo Session

For a bridal editorial shoot at a beautiful historic location, I scouted the location a few days ahead of time and realized that the area where I wanted to photograph was full sun at 2:00pm (on the left)). So I knew that if I moved the photo shoot to the morning, this area would be in the shade and be evenly lit. Sure enough, the light was gorgeous for my editorial photo shoot! Had I not scouted the location, I would have been scrambling to find the right spot in the afternoon.

#3 Pay attention to details

One of the biggest problems that most photographers face is related to light. Not all light is equal and photographing in different lighting conditions will lead to different results.

Early morning light is generally soft and subtle. The afternoon light is often harsh, especially if you place your subject in full sun. Evening light tends to be more warm and golden hue. Post-sunset light is blue. You can photograph in each of these lighting conditions provided you know how to position, pose, and light your subject in each of instance.

Quality of light matters

When scouting a location, pay attention to details around the quality of light at different times of the day. Another thing to keep in mind is color casts from surrounding objects. This is quite prominent around trees, colorful buildings and graffiti walls. Try and find natural reflectors (eg. a white wall) that will bounce light back onto your subjects or use reflectors that do the same thing and balance off the color cast. You can always fix it in post-processing if all else fails.

5 Tips for Location Scouting Before a Photo Session

A location in historic prairie preserve is a photographer’s favorite in my town. But I find that photographing inside the front patio adds a color cast from the yellow ceilings and directional light (photo on right). Yes, in a pinch I will take the shot and fix it in post-processing. But I prefer to either photograph my clients sitting at the edge of the patio on the steps where they are still in the shade of the patio arch but don’t have any color cast.

Karthika Gupta Memorable Jaunts DPS Article Importance of Location Scouting For a Photoshoot-06

So instead of dealing with the color cast from the porch, I took my client outside along the dirt path by the house and photographed her there. The concrete and the dirt path acted as natural yet neutral reflectors and bounced soft white light back onto her face, eliminating any color casts.

#4 – Tap into other resources

I belong to several photographer groups online and offline and we constantly share tips/tricks and location ideas amongst the groups. These groups exist to help each other out and everyone is open and welcoming. If you are photographing in an area that you are not familiar with, try finding a local photographer group for that region and ask around. Be friendly and genuine in your requests, and you may find some unique and off-the-beaten-path locations from the locals in the area.

#5 – Take a road trip

I love road trips! It is the best way to explore new areas and scout potential photography locations that will suit you and your specific needs. I generally take my family along so it is a fun-for-all experience. In a pinch, my kids will also act as models helping me test the light and background ahead of my client photo shoots.

A few years back I had a high school senior’s photo session and her mom wanted to find a unique spot where we could see the fall colors. I drove around my area for a few hours but was not finding anything that I really liked. I stopped by a local farm to pick up some fresh fruits and realized that the farm had everything I was seeking for my photo shoot. So I walked up to the owner and got permission to photograph there the next day. The senior’s mom got the photos she wanted and I found a unique location for my fall photos.

5 Tips for Location Scouting Before a Photo Session

The red of the trees does add a little color cast to my subject’s face but she really wanted the backdrop of the fall colors.

What are your tips to find the perfect location for your photos?

The post 5 Tips for Location Scouting Before a Photo Session by Karthika Gupta appeared first on Digital Photography School.


Digital Photography School

 
Comments Off on 5 Tips for Location Scouting Before a Photo Session

Posted in Photography


Never before seen photos of Mount St. Helens eruption found in thrift shop camera

27 Jun
Photographer Kati Dimoff found this camera at a Goodwill in Portland, OR. The undeveloped roll of film inside contained never-before-seen photos of the Mount St. Helens eruption in 1980.

Photographer Kati Dimoff has developed a curious habit. Whenever she enters a thrift shop, she makes a B-line for the used camera section and checks each and every 35mm camera for exposed but undeveloped rolls of film. Recently, this habit yielded an incredible discovery.

On May 26th, Dimoff found herself in southeast Portland, OR. And as is her habit, she stopped by the Goodwill on Grand Ave to have a look at their film cameras. This time, she struck pay dirt.

“I found an Argus C2—which would have been produced around 1938—and it had a damaged roll of kodachrome slide film in it,” she tells DPReview over email. Naturally, she bought it and took it to the folks at Blue Moon Camera and Machine in the St. Johns neighborhood to have it developed.

When I picked up the prints on Monday, June 12th, there was a note on the package that said ‘Is this from the Mount St. Helens eruption?’

Kati tells us Blue Moon Camera is one of the last, best places to get old, expired, and out-of-production film processed, and though they couldn’t breathe color back into the iconic Kodachrome film—the developing chemicals were discontinued years ago—they were able to develop the roll in black and white. What awaited her when she picked up the prints was a short note.

“Blue Moon developed it for me,” she tells us, “and when I picked up the prints on Monday, June 12th, there was a note on the package that said, ‘Is this from the Mount St. Helens eruption?'”

It was. Three of the photos on the roll were taken on or around that fateful day in 1980 when Mount St. Helens erupted violently—considered by many to be the most disastrous volcanic eruption the United States has ever seen.

There were three photos in all. The first, which Dimoff says was likely taken from Highway 30, shows St. Helens in the distance with just a puff of ash coming out from the top. That photo may have been taken during the two months prior to the eruption, when the volcano was occasionally causing earthquakes and venting steam.

The other two photos are more striking. Captured from in front of John Gumm elementary school in St. Helens, Oregon, they show a massive ash cloud—mushroom-like and dramatic.

But this story doesn’t end with three never-before-seen photos of a historic event captured in 1980 and re-discovered in a thrift shop in 2017 (even though that would be enough for us). There was another photograph on the roll: a family portrait.

This photo actually helped Dimoff to identify the owner of the camera. Pictured are Mel Purvis, his wife Karen, his grandmother Faye, and his son Tristan. Mel saw the portrait in The Oregonian and reached out to the paper, who put him in touch with Dimoff.

Now, his grandma’s camera, negatives, and prints are on their way back to their rightful owner.


All photos courtesy of Kati Dimoff, and used with permission.

Articles: Digital Photography Review (dpreview.com)

 
Comments Off on Never before seen photos of Mount St. Helens eruption found in thrift shop camera

Posted in Uncategorized


Cull Your Photos Carefully – 5 Steps to Follow Before You Hit Delete

27 Jun

When to keep and when to hit delete on an image can be a tough decision to make sometimes. In this article I’ll give you five things you consider before you hit delete to help you with the process of how to cull your photos.

The emotional attachment lessens with time

I was shooting high on a mountain pass this past winter. Low clouds and scattered sun danced across the snow-covered slopes, blown by a chill wind from the north. The view below came and went as fog blew past, opening and closing the scene like curtains. Enthralled, I snapped photos, the stark mountains, the pale sun, the glowing patches of light on the snow. “These shots are going to be awesome.” I thought to myself.

Cull Your Photos Carefully - 5 Things to Consider Before You Hit Delete

A few hours later, I opened my computer and downloaded the images. And I could see then, that they were awesome. I sat and I stared, certain that these were some of the best of the trip. The way the light played across the mountains, the storm-light on the rock and snow slopes. Yeah, these were great.

A week later, as I was putting together images from the trip, I revisited those photos. Huh, I thought, I could have sworn those were better. I mean, they were decent, but not extraordinary. What happened?

Cull Your Photos Carefully - 5 Things to Consider Before You Hit Delete

I had distanced myself from the images for a time, and was able to separate myself emotionally from the experience of making them. I’d been able to view those shots almost as though someone else had made them. As a result, many more of those photos ended up in the delete pile than I would have expected at first glance.

But time away from your photos is just one thing to can do as you try to segregate the keepers from those to delete. Here are the five things to keep in mind as you cull and assess your images.

Cull Your Photos Carefully - 5 Steps to Follow Before You Hit Delete

Step #1 – Check the technical Details

After importing the photos of a recent shoot into my Lightroom Catalog, look at each image quickly, at full-screen size, and assess each for any technical faults.

Is the image out of focus (check at 100% or 1:1 view)? Is the composition obviously wonky? What about exposure, is the exposure so wrong that you can’t correct it? If the answer is “Yes” to any of these questions, immediately delete the image (or flag it as a reject by hitting X) and move on to the next.

Cull Your Photos Carefully - 5 Steps to Follow Before You Hit Delete

The trick in this first step is not to try and go beyond the technical details. This is not the time to try and gauge overall image quality. This is the time, merely to delete the obvious screw-ups.

Step #2 – The second round

If I’m eager to spend some time with my photos, or I’ve got a deadline, I’ll go back through them quickly a second time. Lightroom, and many other catalog programs, give you the ability to flag images with different colors, and/or rating codes.

Scrolling through the images, I’ll color code the good and bad standouts. Images that I like get coded green, purple or blue (the color relates to my own filing system), while images that I don’t particularly like, for one reason or another, get flagged red.

Cull Your Photos Carefully - 5 Steps to Follow Before You Hit Delete

Red flagged images are imperfectly sharp, have clear composition issues or other technical problems, while the green images are selects and the un-marked images are ones to hold onto for future consideration.

Some images do not get flagged at all. These are usually images to which I’m ambivalent. They are good enough not to get the dreaded red flag, but not so good that I want to highlight them immediately.

At this point, I’ll start post-processing my favorites, but I don’t delete anything. Not yet.

Cull Your Photos Carefully - 5 Steps to Follow Before You Hit Delete

A screenshot of my Lightroom Catalog after a shoot of this Rufescent Tiger Heron in Argentina. Of the 26 images, I selected two as keepers, one vertical, and one horizontal image.

Step #3 – Let them rest

Immediately following a shoot, we get emotionally caught up in our images, for better or for worse. If a shoot went well, like my experience on the mountain, you may have the feeling that your images are better than they actually are. If it went poorly, you may feel like they all suck, when in fact, they may not.

The solution is to give the images some space. Pull back for a few days, don’t look at them, don’t edit them. Put your new photos out of sight, and give yourself some emotional distance from the experience of making your images.

After a few days, a week, or even longer, you can have another go.

Step #4 – Consider how your images will be used

As you dive back into your collection, think for a moment about how an image will be put to use. If you are shooting for a client, then you may already have a good idea of the kind of images you needed to make. For example, the conservation groups I work for usually provide me a brief on the project. In that document, they will note specific types of images or video they need or want. As I’m pulling selections for them, I’ll consider their needs, and put special effort into finding and editing images that match.

Usually, there are no clients telling me which images are best. Without anyone guiding me, I lean toward variety.

Cull Your Photos Carefully - 5 Steps to Follow Before You Hit Delete

Variety includes more than framing, but also panoramic compositions like this one.

When I first started shooting seriously, I saved almost every image. I was too attached to each one. Later, as my image catalog and hard drives began to swell, I became heartless with images, deleting all but one or two from a series, even good alternatives to my selects. Now, I’ve settled somewhere in between because I don’t always know how an image will be put to use, so I like to have some variety available.

Magazine editors will often be looking for images with big areas of negative space which can be used for text placement. Large size wall prints require images that are immaculately sharp and high resolution. Illustrative shots, often sold for stock, or for small use in publications, need to be tight with only the bare minimum of room around the subject. While editing, I plan for these eventualities and select four or five images, in a variety of compositions, from any given scene, but not more.

Keep some variety of shots

As an example, below are my five selects from an encounter with a Brown Bear in southeast Alaska. Each of the five images have been published in national magazines. Each time, the editor wanted the image for a different layout, some involving text, some as a simple stamp-size illustration. The bottom line is you never know what is going to appeal to different viewers, so retain some diversity from within your shoots.

Cull Your Photos Carefully - 5 Steps to Follow Before You Hit Delete

Throw Away Your Photos Carefully - 5 Things to Consider Before You Hit Delete

Throw Away Your Photos Carefully - 5 Things to Consider Before You Hit Delete

Throw Away Your Photos Carefully - 5 Things to Consider Before You Hit Delete

Cull Your Photos Carefully - 5 Steps to Follow Before You Hit Delete

Don’t get caught up in what you think is the best image from a series. Rather, give thought to how you might want to use images from the shoot in the future. Red code (or however you tag your images) the faulty ones, or near-duplicates, but retain some variety.

Step #5 – The final cut

By this time, your collection of images will be a checkerboard of red and green. The red images flagged for deletion, the greens (and other colors) set aside as “keepers”. If you are like me, you’ve made enough duplicate, failures, and screw-ups that the reds wildly outnumber the greens and unlabeled images.

Throw Away Your Photos Carefully - 5 Things to Consider Before You Hit Delete

This image lay in my Lightroom for years before I finally noticed that it was pretty decent.

Before I hit delete, I give each image one more look, just to make sure I’m not cutting something that I might want to keep. Sometimes if an image is unique, even if it’s not what I think of as “good”, I’ll decide to hold onto it.

Throw Away Your Photos Carefully - 5 Things to Consider Before You Hit Delete

This image was taken Mexico in 2010. I found it a month ago, lingering on a hard drive. I had completely forgotten about that sunset over the Caribbean. Hard drive surprises can be great, but I recommend being more organized than I was at the time.

More than once, I’ve scrolled back through my Lightroom Catalog and stumbled on an image that, for one reason or another, I never gave a close look. At the time I created it, I must have considered it unremarkable, but didn’t consider it bad enough to delete. Years later, I’ve found some gems in those un-flagged images.

Bottom Line

Selecting keepers from a series of images is not always as straight forward as what is “good” and what is “bad”. Consider each image carefully, and use your delete key, but don’t get too enthusiastic pushing that button. Deleted images can never be recovered.

The post Cull Your Photos Carefully – 5 Steps to Follow Before You Hit Delete by David Shaw appeared first on Digital Photography School.


Digital Photography School

 
Comments Off on Cull Your Photos Carefully – 5 Steps to Follow Before You Hit Delete

Posted in Photography


Before you invest in LED lights, make sure you understand CRI

30 May

LED lighting technology is all the rage, and there are great reasons to invest in LED lights. (Beyond using them as a lightsaber.) However, photographers are keenly aware that it’s not just the light that’s important, but also the quality of light you have.

One tool we can use to assess the color accuracy of a light is the color rendering index, or CRI, which provides some information about how accurately a light can reveal color compared to an ‘ideal’ light. A light which perfectly emulates the color accuracy of natural daylight would have a CRI score of 100.

Companies love to state CRI numbers on their products, leading you to believe that they can provide the color accuracy you’re looking for. However, while a higher CRI number is generally better, it’s important to understand how that number is generated, and why it’s not as definitive as manufacturers like to make it sound.

Learn more at premiumbeat.com

Articles: Digital Photography Review (dpreview.com)

 
Comments Off on Before you invest in LED lights, make sure you understand CRI

Posted in Uncategorized


The Cars of Mad Max: Fury Road, Photographed Filth-Free Before Filming

09 Mar

[ By SA Rogers in Technology & Vehicles & Mods. ]

Screen Shot 2017-03-08 at 12.41.40 PM

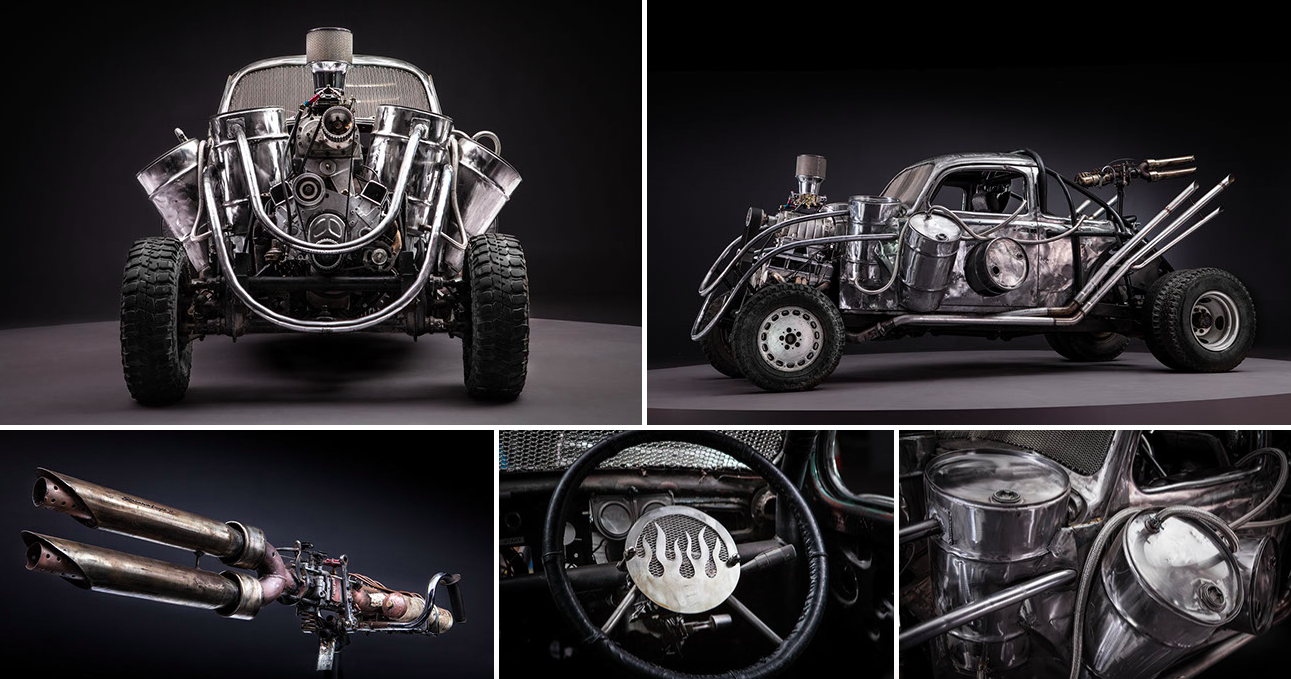
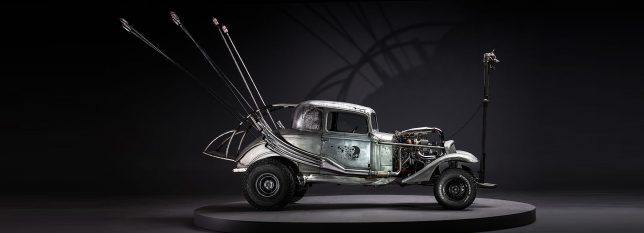
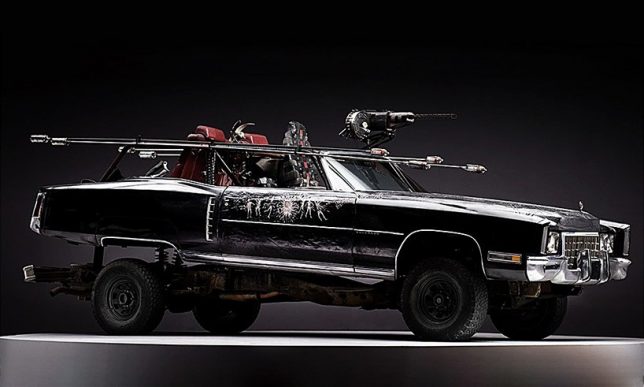
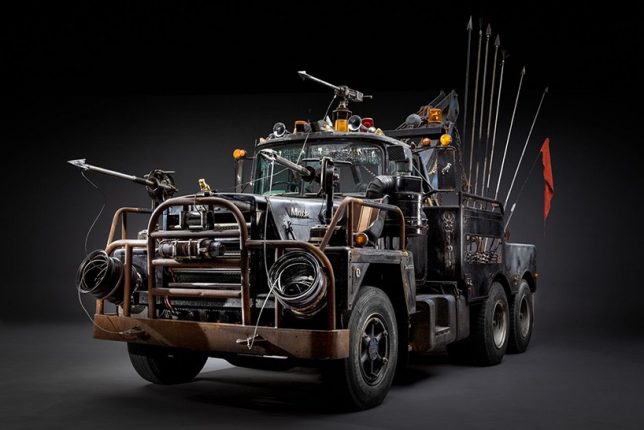
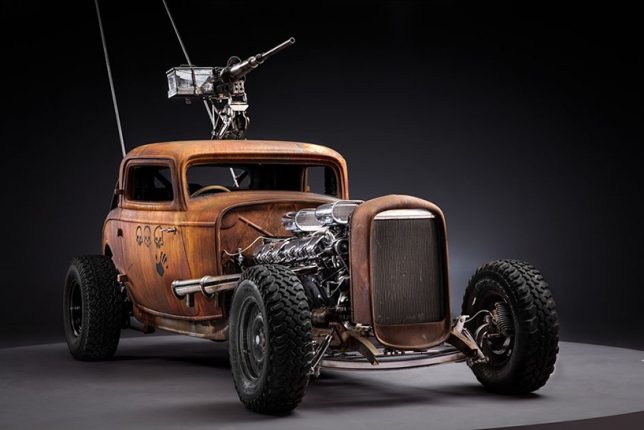
If you’ve ever wondered what the cars of Mad Max: Fury Road would look like all cleaned up, or you want some inspiration for a totally bonkers hot rod creation of your own, check out this photo series by photographer John Platt. Minute details of the vehicles can be seen in shockingly pristine states, as they were just after their creation and prior to the start of filming, giving us a good look at all the custom contraptions welded together into junkyard monsters.

mad max fury road cars 1

mad max fury road cars 2

In the movie, there’s so much desert dust kicked up by the tires of all those vehicles, we miss out on a lot of those details. The cars are appropriately filthy – and in this universe, they probably always would have been.

Screen Shot 2017-03-08 at 12.42.40 PM

mad max fury road cars 3

It’s hard to imagine anyone putting time and effort into washing and shining them up in between epic chases on the sand, and all those parts came from scrap yards anyway.

mad max fury road cars 3

mad max fury road cars 4

mad max fury road cars 5

That makes Platt’s photo series all the more satisfying. He got to photograph some of the movie’s 150 custom vehicles in his studio with proper lighting before they got dirty, and it’s a good thing, too – most of them were utterly destroyed during filming.

mad max fury road cars 6

mad max fury road cars 7

mad max fury road cars 8

Production designer Colin Gibson individually designed and sculpted each car and motorcycle according to writer and director George Miller’s vision. No wonder it took 15 years to complete pre-production. See the whole series here.

Share on Facebook


[ By SA Rogers in Technology & Vehicles & Mods. ]

[ WebUrbanist | Archives | Galleries | Privacy | TOS ]


WebUrbanist

 
Comments Off on The Cars of Mad Max: Fury Road, Photographed Filth-Free Before Filming

Posted in Creativity


Better Than Before: 10 Unwanted Structures Transformed for New Uses

02 Mar

[ By SA Rogers in Architecture & Houses & Residential. ]

time capsule factory

Creative conversion projects transform old disused structures like factories, churches, grain silos, cisterns and slaughterhouses for new purposes, helping them avoid demolition. Often abandoned yet still bearing historic, aesthetic and functional value, these buildings become the basis for unusual homes, offices, spas and museums.

La Fabrica: Cement Factory Turned Private Residence, Barcelona, Spain

time capsule factory 2

time capsule factory 3

time capsule factory 4

time capsule factory 5

A sprawling cement factory in Barcelona, built in the post-World War I era and containing structures in all sorts of interesting shapes, has become architect Ricardo Bofill’s home and studio. Bofill transformed the complex by demolishing strategic areas to create voids for open-plan spaces interspersed with gardens. Years after he began, the home is covered in greenery in a way that seems chaotic at first, as if nature is taking the formerly abandoned space over whether it was converted or not. But a closer look reveals planned rooftop gardens atop cylindrical silos, palm trees and lush ivy. Many elements of the original structures were preserved as interesting architectural details.

Military Bunker Turned Wine Museum, China

china bunker to wine museum

bunker to wine museum 2

bunker to wine museum 3

bunker to wine museum 4

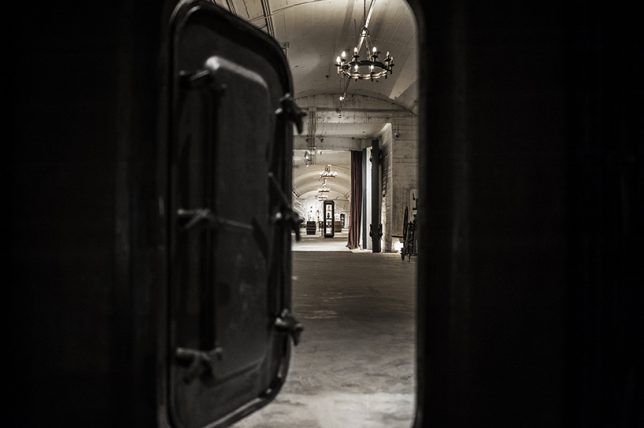
An old military bunker 1.5 hours outside Shanghai is now an unusual industrial-style winery, transformed by China-based wine lifestyle and consulting firm Shanghai Godolphin. Built inside a Chenshan Mountain cave over 80 years ago, the structure was once used to store artillery and anti-aircraft machine guns. Today, organic installations of wooden wine boxes almost seem to have populated the space naturally, like bees building their honeycomb in an abandoned vehicle.

Underground Crypt to Spa, France

crypt to spa 2

crypt to spa 3

crypt to spa

crypt to spa 4

Hundreds of years ago, this subterranean space near Saint Pierre’s Church in eastern France was likely used as a crypt. Now, the underground facility serves as the luxurious Atrium Spa & Beauté, transformed by Italian designer Alberto Apostoli into a series of soothing rooms full of tubs and massage tables.

Abandoned 1920s Bank to Co-Working Space, Montreal

bank to coworking space

bank to coworking space 2

bank to coworking space 3

bank to coworking space 4

How would you like to go do your daily work or write your novel in a gorgeous historic space instead of your local Starbucks? Architect Henri Cleinge oversaw the conversion of an opulent former 1920s bank into co-working space ‘Crew,’ inserting plenty of tables and private pods beneath the dramatic vaulted ceilings of the 12,000-square-meter space.

Water Cistern to Private Home, Madrid

water cistern home

water cistern home 2

water cistern home 3

A two-level water cistern site near Madrid is now a stunning sculptural home after an adaptive renovation by Valdivieso Arquitectos. This is one example of a conversion that uses the original structures as a guide, but mostly leaves them behind, the final product showing few signs of what the home used to be. Yet the shapes of that cistern determined the unusual curves of the residence, including the glazed wall looking onto a courtyard.

Next Page – Click Below to Read More:
Better Than Before 10 Unwanted Structures Transformed For New Uses

Share on Facebook


[ By SA Rogers in Architecture & Houses & Residential. ]

[ WebUrbanist | Archives | Galleries | Privacy | TOS ]


WebUrbanist

 
Comments Off on Better Than Before: 10 Unwanted Structures Transformed for New Uses

Posted in Creativity


Disappearing Road: Cross Quickly, Before It’s Swallowed by the Sea Again

25 Feb

[ By SA Rogers in Destinations & Sights & Travel. ]

passage du gois

Twice a day, when the tides go down, this causeway appears to connect the French mainland to the island of Noirmoutier, but cross quickly or the road will disappear, stranding you in the middle of the Bay of Bourgneuf. The Passage du Gois was built upon a strip of silt that just barely elevates it above the surface during low tide for a little over an hour at a time. Crossers often wait too long to get started, bet that they’ll be able to make it across, and lose.

passage du gois 7

passage du gois 8

passage du gois 2

Once it starts flooding, it happens quickly. That’s why there are elevated rescue towers located along the stretch – you might just have to swim over to one, climb up and wait it out. When the tide is low, abandoned, ruined cars can be seen littering the sand.

Passage du Gois 3

passage du gois alain

passage du gois alain 2

Each year, runners gather for the Foulées du Gois, a race across the causeway. The road also tends to be covered with seashells, making it a popular destination for both souvenir-seeking tourists and locals who look for edible shellfish.

passage du gois wikimedia

Photos via Flickr Creative Commons: garder le cap, ludovic, pics by brian, oliver gobin, alain bachellier, marc bourbon, oliver hankeln, wikimedia commons

Share on Facebook


[ By SA Rogers in Destinations & Sights & Travel. ]

[ WebUrbanist | Archives | Galleries | Privacy | TOS ]


WebUrbanist

 
Comments Off on Disappearing Road: Cross Quickly, Before It’s Swallowed by the Sea Again

Posted in Creativity