RSS
 

Posts Tagged ‘adjustments’

How to Use the Local Adjustments Tools Inside Lightroom

27 Oct

Local adjustments in Lightroom

Whenever you take a photo, no matter what the subject, it would be extremely unusual if it couldn’t be improved in some way by making local adjustments in Lightroom.

Local adjustments affect part of the image. Whenever you carry out any processing action in Lightroom you are either making a local adjustment (only affects part of the image) or a global adjustment (affects the entire image).

If you have been following this series and trying out some of the techniques I wrote about in my earlier Lightroom articles that you have been mainly making global adjustments. There is an exception. Adding a vignette in the Effects panel is a local adjustment because it affects the edges of the image but not the centre.

Lightroom gives you three powerful tools for making local adjustments. They are the Adjustment Brush, the Graduated filter, and Radial filter.

The Adjustment Brush

The Adjustment Brush is for creating an odd shaped mask – one that can’t be made easily with the Graduated or Radial filters.
Local adjustments in LightroomNote that masks work differently in Lightroom than in Photoshop. In Photoshop, the adjustment is applied to the area that isn’t covered by the mask. In Lightroom, the adjustment is applied to the area covered by the mask.

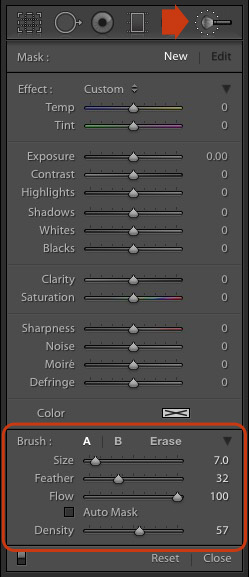
Creating a mask in Lightroom is the same as making a selection in Photoshop. Go to the Develop module and click the Adjustment Brush icon (marked on the right) or use the keyboard shortcut K.

The Adjustment Brush panel opens up underneath the icon. The first 14 sliders show the adjustments you can make with this tool. The Effect menu contains a number of presets that you can use (click the word “Custom” to see the pull-down menu).

At the bottom (circled) are sliders for setting the size, softness and strength of the Adjustment Brush.

To start, select Brush A (if not already selected) and use the [ and ] keys to make the brush smaller or larger respectively, until it is the right size to create the mask you need. You can also use the Size slider, but the keyboard shortcuts are easiest.

Hold down the Shift key and use the [ or ] to adjust the amount of feathering. Again, you can use the Feather slider but the keyboard shortcuts are faster once you get to know them.

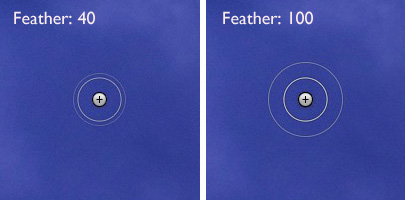
The size of the Adjustment Brush is shown by two concentric circles on the screen. The inner circle shows the area fully covered by the brush. The outer circle shows more or less where the effect of feathering ends. The distance between the circles increases when you increase the feathering amount. This diagram shows how it looks on screen.
Local adjustments in Lightroom

You can create another Adjustment Brush by clicking on B and changing the parameters. You can switch between the A and B brushes whenever you like, useful for complex retouching.

Select Erase to delete part of the mask that you have created. You can adjust the size and feathering of the Erase brush as well.

Flow controls the opacity of the mask. 100 is full strength. Set it here unless you have a reason to do otherwise.

Density sets the maximum strength of the effect.

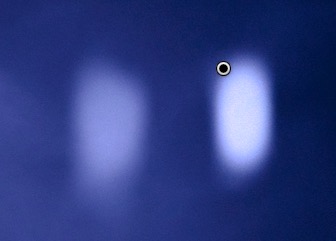
The difference between Density and Flow is this. If you set Flow to 25% and repeatedly brush over part of the image, each brush mark builds on the one below it, increasing the strength of the effect until you reach 100%. If you set Density to 50%, and flow to 25%, then repeatedly brush, the maximum strength you can reach is 50%.

This diagram shows the difference. On the left I set the Exposure slider to +4.00, Flow to 25%, Density to 50% and brushed repeatedly. On the right I did the same with Density set to 100%.
Local adjustments in Lightroom

Tick the Auto Mask box to limit the edges of the mask to any edges in the photo. Sometimes this tool works well, but other times it reacts to textures and creates a patchy mask that doesn’t cover the area you want. I leave this unticked most of the time.

You can add as many Adjustment Brushes to an image as you like. Each one is represented by a grey dot that is revealed when you select the Adjustment brush tool and move the mouse over the photo. The current Adjustment Brush is marked by a black circle within the grey pin. Click on a grey dot to activate that adjustment and make changes to it, or delete it (press the Backspace key).

Now, let’s put that into practice. I’d like to do two things to the photo below. One is reduce the intensity of the highlights created by the lights inside the church; the second is emphasize the texture of the stone. We can do both with the Adjustment Brush.

Local adjustments in Lightroom

First, I brushed in the areas affected by the bright highlights (shown in green below).

Local adjustments in Lightroom

You can see the area covered by the Adjustment Brush at any time by pressing the O key.

This is called the Mask Overlay and is coloured green in my screen shots. The default colour is red. Press the Shift and O keys together to change it. Press O again to hide the Mask Overlay.

Then I moved the Highlights slider left (to -67) to reduce the intensity of the highlights. These screen shots show the difference.
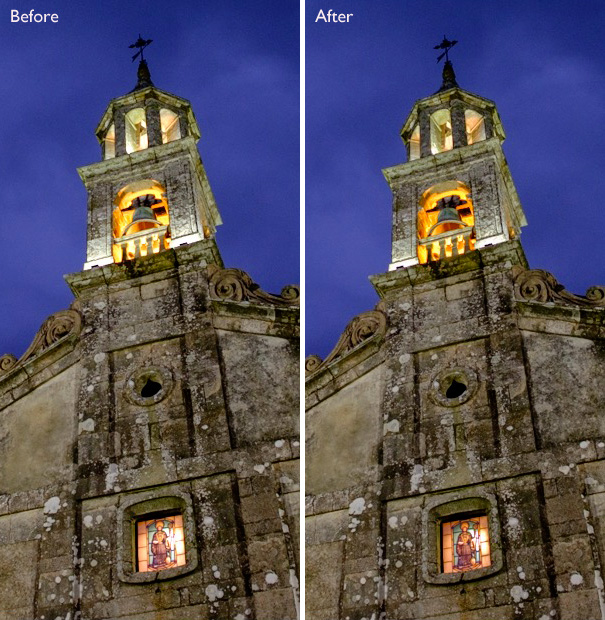
Local adjustments in Lightroom

Next, I created a new mask covering the stonework.
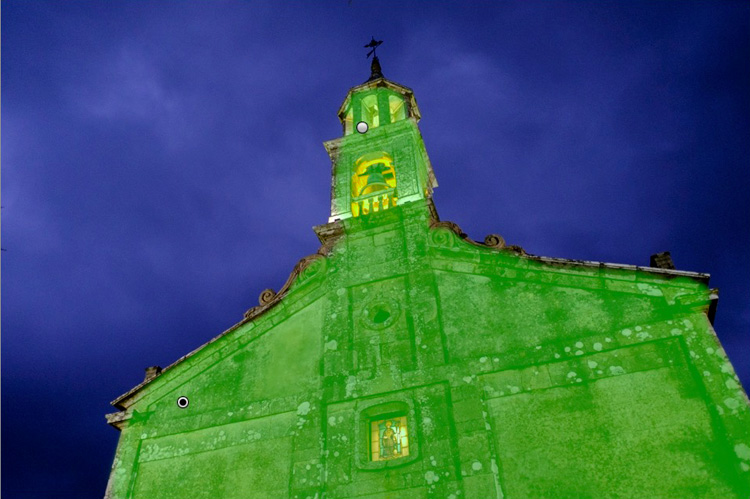
Local adjustments in Lightroom

Then I increased Clarity to +58 to bring out the texture of the stone wall.

Here’s the final result, compared to the original.
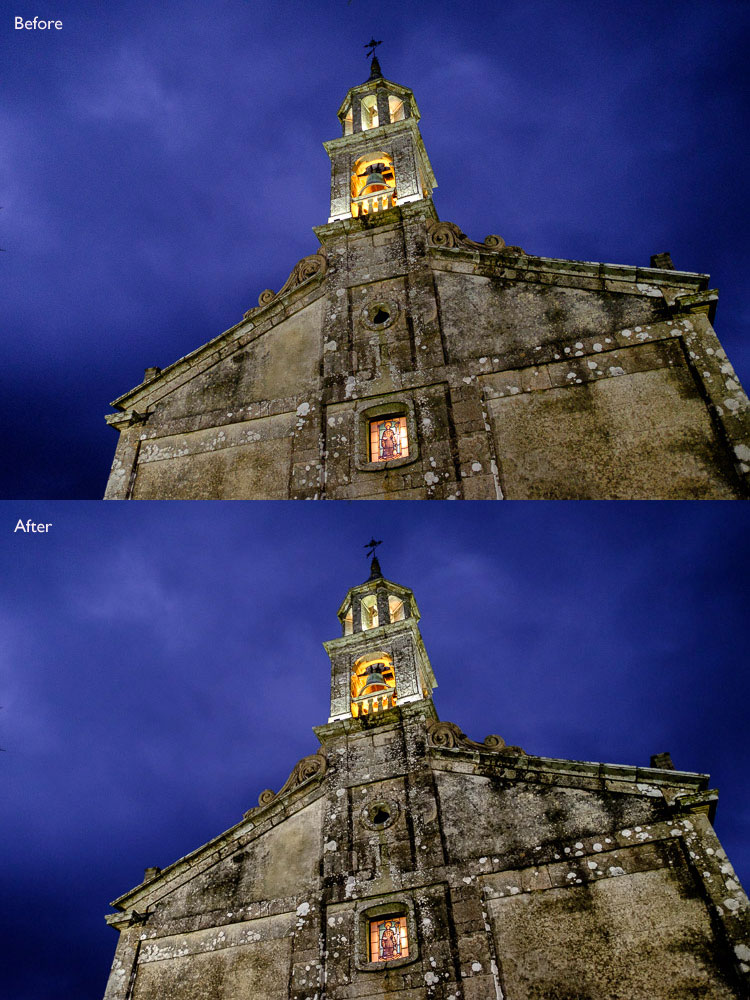
Local adjustments in Lightroom

Here are some more uses for the Adjustment Brush:

  • Portrait retouching. Use the Adjustment Brush to select the model’s skin and apply the Soften Skin preset. You can also enhance eyes by increasing exposure and Clarity.
  • Enhancing black and white photos. Many black and white images rely heavily on texture for impact. Use the Adjustment Brush to select the textured areas you would like to have the most impact, and increase Clarity to enhance them.
  • Selectively desaturating the background to add impact to portraits.

My article, Four Ways to Improve your Photos with the Clarity Slider in Lightroom, shows you how to do it.

The Graduated filter

Lightroom’s Graduated filter is named after the type of filter used by landscape photographers to make skies darker.

This is also the most obvious use for Lightroom’s Graduated filter. However, it only works if detail was recorded in the sky. it doesn’t replace a physical graduated neutral density filter.Local adjustments in Lightroom
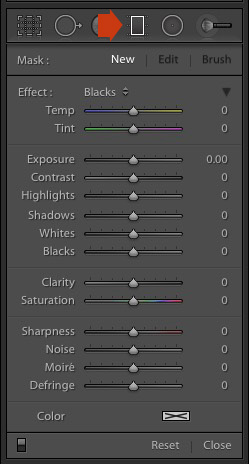
Go to the Develop module and click the Graduated filter icon (marked right), or click the keyboard shortcut – M. The Graduated filter panel opens, revealing the same sliders as the Adjustment Brush.

Click and hold the left mouse button down, and pull the mouse down over the image. Lightroom adds a Graduated filter to the photo.

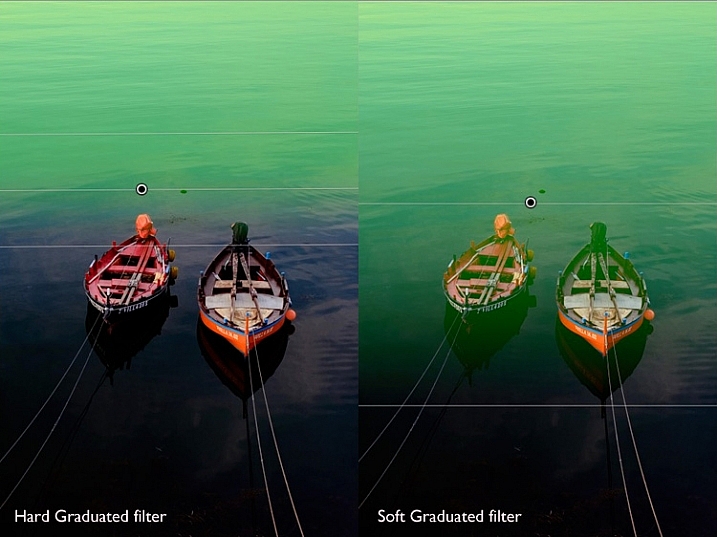
The Graduated filter is marked by three lines that move further apart as you move the mouse across the photo. The lines represent the softness of the filter – the further they are apart, the more graduation you get.

Let go of the mouse button to place the filter. If you do so close to the edge of the photo, you will create a filter with three lines close together. This is a hard filter, with a rapid graduation between full effect and no effect.

If you hold the mouse button down for longer, you get a filter with three lines spaced far apart. This is a soft filter, with a gentle graduation between full effect and no effect.

The two types of filter are shown below. I pressed the O key to show the Mask Overlay (you can only do this in Lightroom 6 and Lightroom CC).
Local adjustments in Lightroom

After creating the filter, you can move it by clicking and dragging the central pin.

If you hold the Shift key down while creating the filter, it is placed parallel to the edge that you started from.

To rotate the filter, hold the mouse over the central line (the one with the pin) until the cursor changes from a plus sign to a curly double arrow. Hold the left mouse button down and move the mouse to rotate the filter.

To change the softness of the filter, hold the mouse over the outer line until the cursor changes to a hand. Click and drag to move the line closer to, or further from, the central line. If you hold the Alt key down while you do so, the central line stays in position.

The best way to come to grips with this is to try it out. It may sound complex, but it’s quite simple, and you’ll quickly get the hang of it.

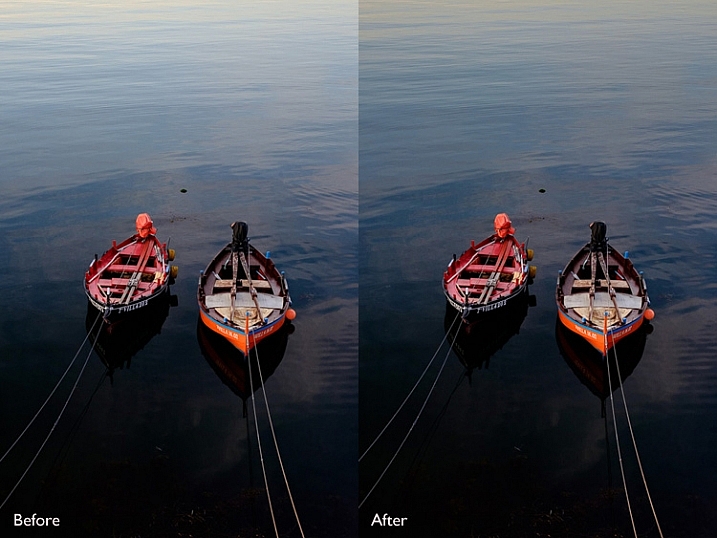
Here’s an example of how you can use the Graduated filter to improve an image. The water behind these boats is very bright, and I wanted to make it darker to fit in with the foreground. The Graduated filter is the perfect tool for this. Before and After photos shown below.
Local adjustments in Lightroom

In Lightroom 6 and Lightroom CC you can combine the Graduated filter with the Adjustment Brush. The Adjustment Brush is used to alter the shape of the mask created by the Graduated filter.

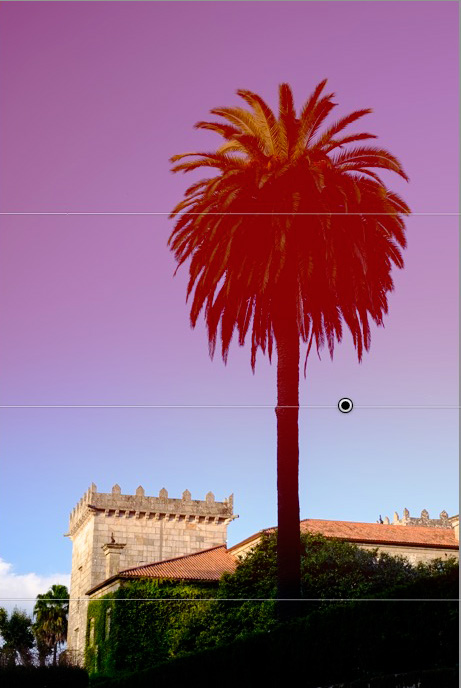
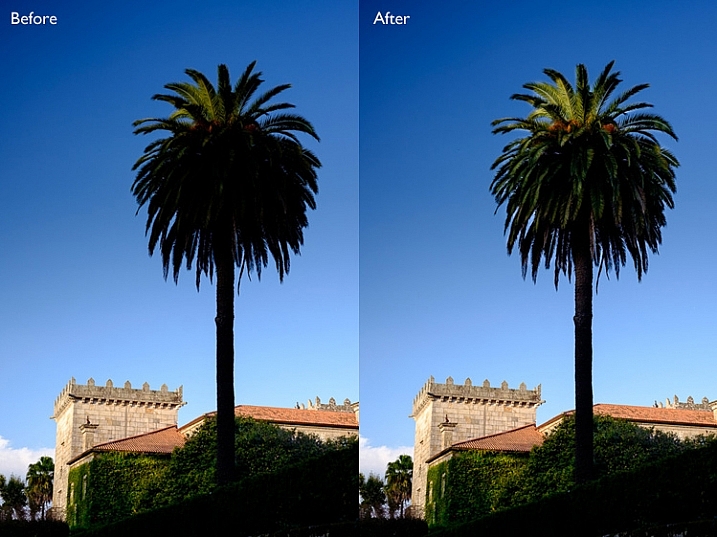
In this example, I used the Graduated filter to darken the sky. The only problem is that the Graduated Filter also makes the palm tree darker, which I don’t want. Here’s the Mask Overlay (shown in red).
Local adjustments in Lightroom

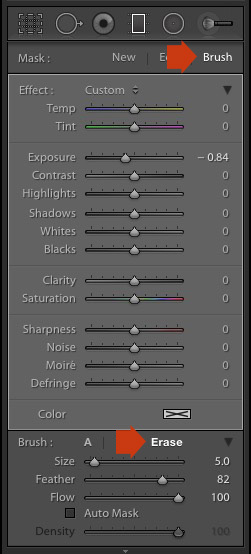
Press O to show the Mask Overlay, then click on the word Brush in the Graduated filter panel (marked below). The Brush options open up below the panel. Click Erase (also marked below) and adjust the size (and other settings) to suit.
Local adjustments in Lightroom

Here’s what the Mask Overlay looks like with the part that covers the palm tree erased.
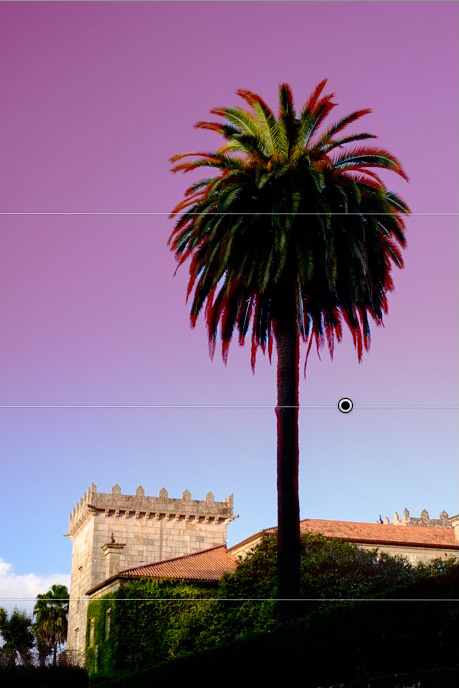
Local adjustments in Lightroom

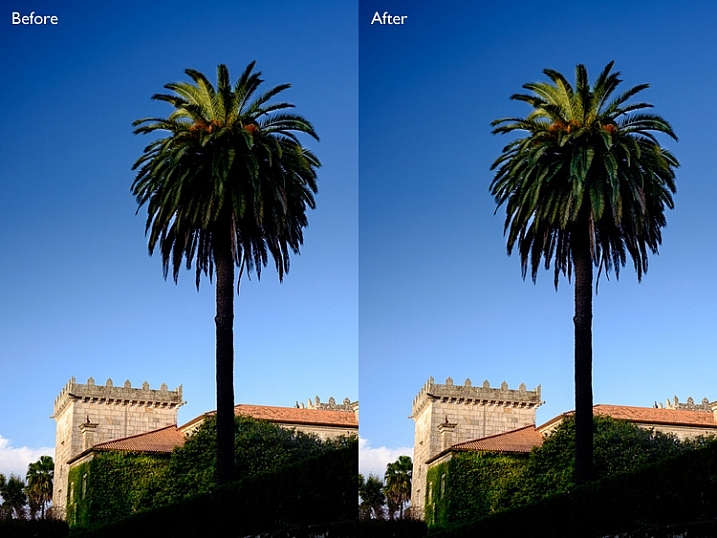
Here are the before and after versions.
Local adjustments in Lightroom

Before (left) showing the graduated filter to darken the sky. After (right) showing the tree portion having been erased or masked out from being darkened by the graduated filter.

My article Improve Your Images with the Lightroom Graduated Filter Tool shows you six ways you can use the Graduated filter to improve your photos.

The Radial filter

The Radial filter (new in Lightroom 5) is for creating circle or oval shaped masks. If you have Lightroom 6 or Lightroom CC you can press O to show the Mask Overlay. You can also combine the Radial filter with the Adjustment Brush.Local adjustments in Lightroom
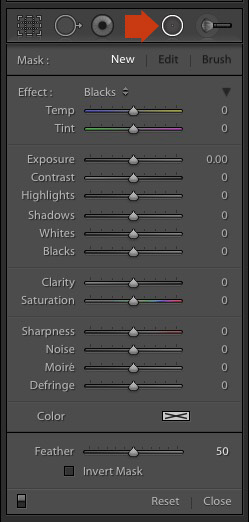
Go to the Develop module and click the Radial filter icon (marked right). The Radial filter panel opens. The sliders are the same as those used by the Graduated filter and the Adjustment Brush.

Hold the left mouse button down and drag the mouse across the photo. Let the mouse button go when you are done.

Change the size and shape of the Radial filter by clicking and dragging the four white squares at the compass points of the filter.

Rotate the Radial filter by moving the cursor to the edge of the filter until it changes from a hand or plus icon to a double curly arrow. Click and drag to rotate.

Use the Feather slider to set the softness of the gradient at the edges of the Radial filter. The default setting of 50 seems to work well for most masks, but you can change it if you need to.

By default Lightroom applies the adjustments to the area outside the Radial filter. Tick the Invert Mask box to apply the adjustments to the area inside it instead.

The screenshot below shows a Radial filter that I placed on photo used in the previous demonstration. I ticked the Invert Mask box to apply the adjustment to the area inside the Radial filter. The Mask Overlay is on to show you the affected area (in red).
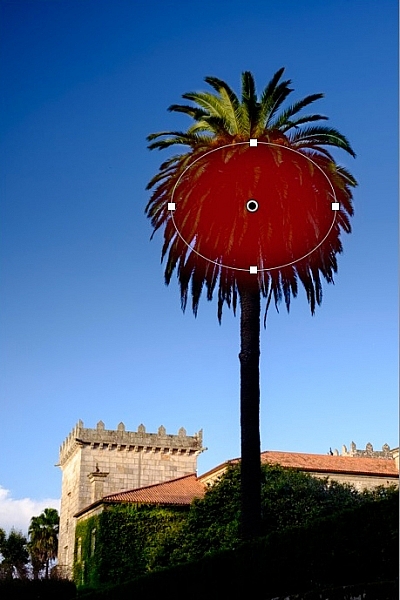
Local adjustments in Lightroom

Then I increased Exposure to bring out some detail in the palm tree. Before and after versions below.
Local adjustments in Lightroom

Here are some uses for the Radial filter:

  • Portrait retouching. Select eyes or lips and enhance using exposure and Clarity sliders.
  • Making portrait backgrounds darker. Place a Radial filter over the model’s face and make the background darker.
  • Add a vignette to off-centre subjects. When you create a vignette in the Effects panel, it is always centred. With the Radial filter, you can place it wherever you need.

In my next article I’ll show you how to harness the power of Lightroom using Virtual Copies. Until then, if you have any questions about the techniques in this article, or you would like to share how you use local adjustments in Lightroom, please let us know in the comments.


The Mastering Lightroom CollectionMastering Lightroom ebooks
My Mastering Lightroom ebooks will help you get the most out of Lightroom. They cover every aspect of the software from the Library module through to creating beautiful images in the Develop module. Click the link to learn more or buy.

googletag.cmd.push(function() {
tablet_slots.push( googletag.defineSlot( “/1005424/_dPSv4_tab-all-article-bottom_(300×250)”, [300, 250], “pb-ad-78623” ).addService( googletag.pubads() ) ); } );

googletag.cmd.push(function() {
mobile_slots.push( googletag.defineSlot( “/1005424/_dPSv4_mob-all-article-bottom_(300×250)”, [300, 250], “pb-ad-78158” ).addService( googletag.pubads() ) ); } );

The post How to Use the Local Adjustments Tools Inside Lightroom by Andrew S. Gibson appeared first on Digital Photography School.

Digital Photography School

 
Comments Off on How to Use the Local Adjustments Tools Inside Lightroom

Posted in Photography


Manfrotto releases XPRO Geared tripod head for precision adjustments with heavy kit

05 Mar

Italian tripod and accessory manufacturer Manfrotto has announced it is introducing a new heavy-weight head to its XPRO range. The XPRO Geared Head is designed for photographers who use weighty equipment and who like to be able to make precise adjustments to their composition. Read more

Articles: Digital Photography Review (dpreview.com)

 
Comments Off on Manfrotto releases XPRO Geared tripod head for precision adjustments with heavy kit

Posted in Uncategorized


How to Apply LAB Color Adjustments in Photoshop to Enhance Your Photo

05 Nov

In this video we explore the most powerful color space in Photoshop LAB. You can do things in the LAB that are impossible in any other color mode, but in this video we keep it simple to start. We show you how LAB can help not only boost saturation in an image, but also how it can help separate colors Continue Reading

The post How to Apply LAB Color Adjustments in Photoshop to Enhance Your Photo appeared first on Photodoto.


Photodoto

 
Comments Off on How to Apply LAB Color Adjustments in Photoshop to Enhance Your Photo

Posted in Photography


How to do Quick and Easy Curves Adjustments in Photoshop

02 Oct

Photoshop-make-adjustments-using-the-curves-dialog-opener

When you are starting out learning to edit in Photoshop there are a lot of tools from which to choose. The Curves Adjustment is one of the more advanced tools, so it often overwhelms new users. However it is such a powerful tool that it is well worth investing some time learning to use it. In this article I’ll explain what you can understand about your image from the Curves dialog and how to use curves to edit your photos.

Creating a Curves Adjustment

You can get to the Curves dialog in two ways; by choosing Image > Adjustments > Curves or you can add it as a new adjustment layer by selecting Layer > New Adjustment Layer > Curves. In each case the dialog is a little differently laid out but the same features are available.

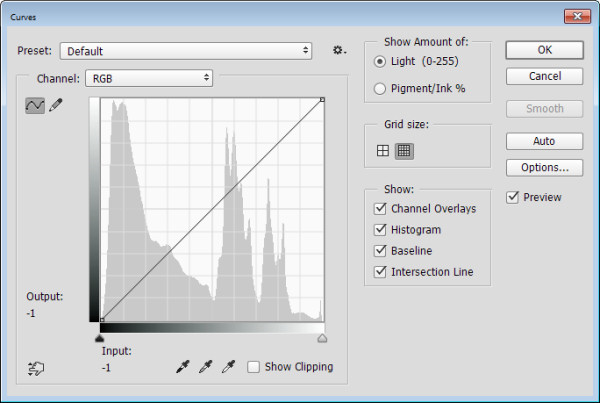
This is the curves dialog you see when you choose Image > Adjustments > Curves:

Photoshop-make-adjustments-using-the-curves-dialog-1

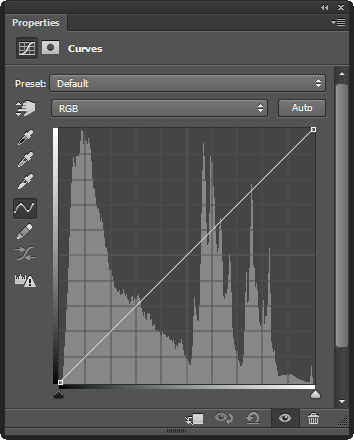
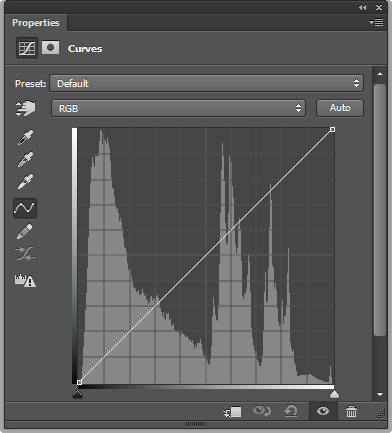
And this is the Curves dialog you see when you choose Layer > New Adjustment Layer > Curves:

Photoshop-make-adjustments-using-the-curves-dialog-2

In this article I’ll focus on the Curves Adjustment Layer dialog because when you edit a photo using Adjustment Layers you can come back later and remove the adjustment or fine tune it. It would be more difficult to do this if you were to apply the effect directly to the image. In addition an adjustment layer has a mask that you can use to remove its effect from selected areas of the image. In short, using a Curves adjustment layer is a non-destructive editing technique.

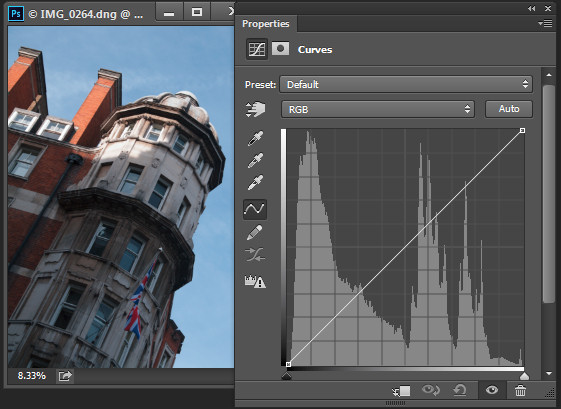
When you open the Curves dialog you’ll see a chart – called a histogram – beneath the curve line (you must be using Photoshop CS3 or later to see this). The histogram is a plot of the brightness of every pixel in the image so it is an indication of the image’s tonal range. The darker pixels are plotted on the left and the lighter pixels on the right.

Photoshop-make-adjustments-using-the-curves-dialog-3

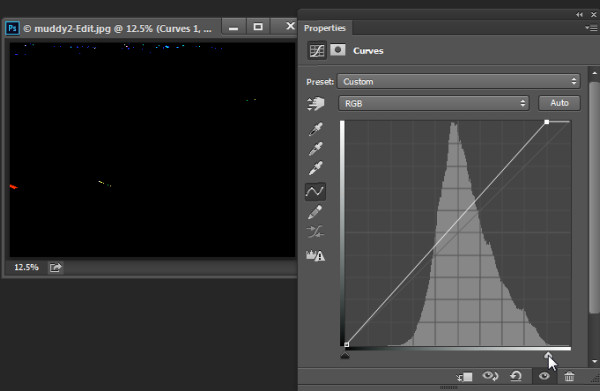
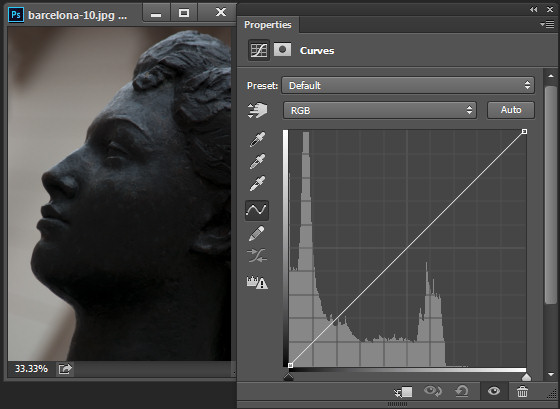
Ideally the histogram should stretch between the left and right side of the grid without bumping up heavily against either edge. If the histogram is hard up against the left edge of the grid as in the following example, the image is underexposed so the image contains plugged up shadows where detail has been lost.

Photoshop-make-adjustments-using-the-curves-dialog-4

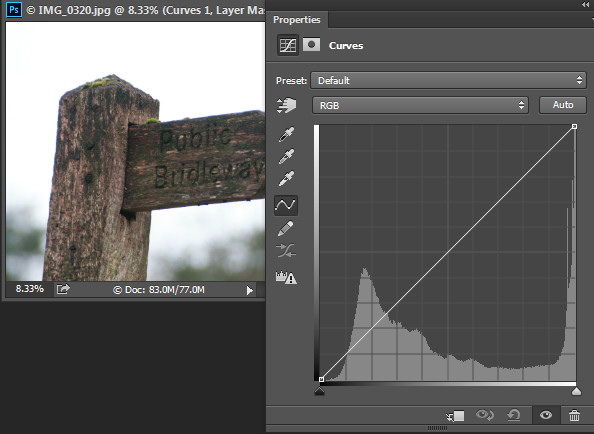
On the other hand, if the histogram is jammed up against the right side of the grid, the image contains blown out highlights. It is overexposed and some detail has been lost in the highlight areas.

Photoshop-make-adjustments-using-the-curves-dialog-5

Plugged up shadows and blown out highlights may be difficult, if not impossible to recover, particularly if you capture images as jpeg files. If you capture in a raw format you have a better chance of recovering detail in these areas because more data is retained in the raw file.

Setting the White and Black points

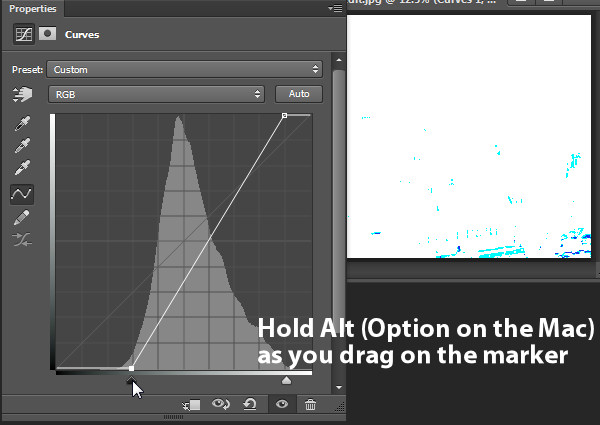
If the histogram does not reach either edge of the grid then you will have an image that lacks either blacks, whites, or both. Hold the Alt key (Option key on a Mac) and drag each triangle marker underneath the histogram to move them inwards so they appear just under the point where the first white or black pixels are located in the chart.

Photoshop-make-adjustments-using-the-curves-dialog-6

Holding the Alt or Option key ensures that you can see the pixels change on the image as you are adjusting them. Adjust the markers under the chart until you only just see a few white and black pixels in the image (as seen above as areas that are light or a color).

Photoshop-make-adjustments-using-the-curves-dialog-7

Remove a Color Cast

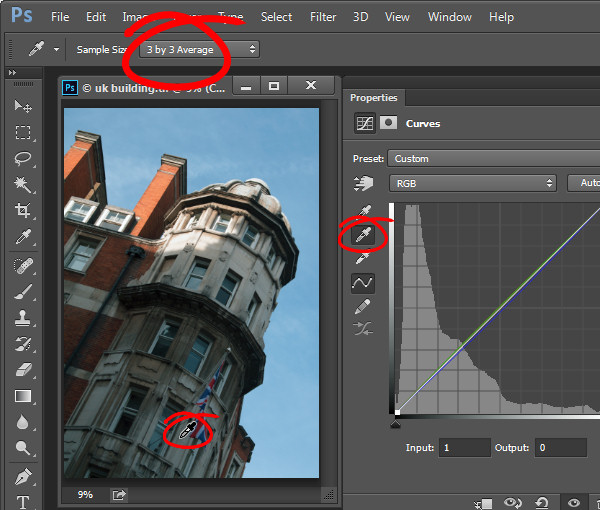
The Curves dialog also has an eyedropper that you can use to remove a color cast from the image. Click the middle of the three eyedroppers to set a grey point by clicking on an area of the image which should be neutral grey. If the color under the eyedropper isn’t neutral (if it’s Red, Green and Blue values are not equal) then Photoshop will adjust the image to make the color neutral – effectively removing the color cast. You can click repeatedly on the image until you find a place that gives you a good result. It is advisable to set the sample size on the tool options bar to 3 by 3 Average before you sample a gray point so that your sample is more than just a single pixel.

Photoshop-make-adjustments-using-the-curves-dialog-7a

Adjusting the Curve

The standard curve is actually a straight line running diagonally across the grid from the bottom left to the top right of the chart. This straight line is equivalent to no adjustment at all so, by default, the Curves adjustment does nothing to the image.

Photoshop-make-adjustments-using-the-curves-dialog-8

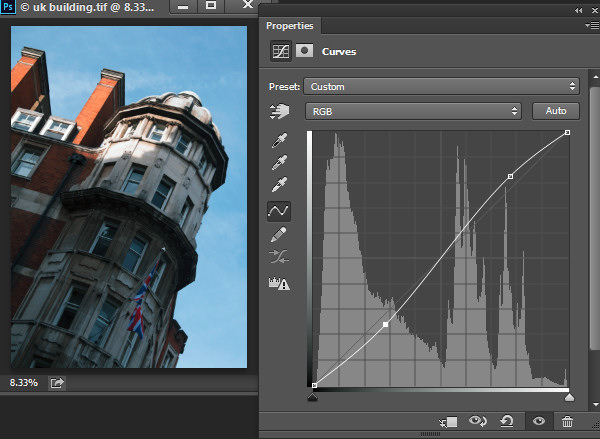
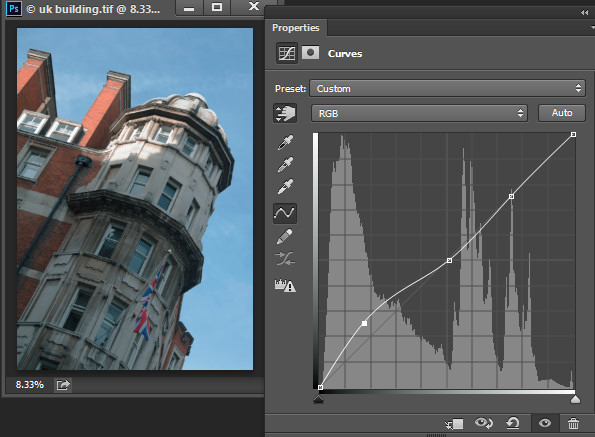
You can adjust the Curve line a couple of ways. One option is to click and drag on the line in an upward or downward direction to adjust the pixels of that tone in the photo. One adjustment that you can perform using this technique is to drag the line into what is often referred to as a shallow S-curve.

To do this, click and drag the line down on the left side of the grid and drag the line slightly up on the top right of the grid. This adds additional contrast to the image mid-tones – because anywhere that the curve line is steepened, you add contrast and anywhere it is flatter you reduce the contrast. By dragging the line into a shallow S-curve you’re steepening the line through the area in which the image mid-tones are located increasing contrast in those tones.

Photoshop-make-adjustments-using-the-curves-dialog-9

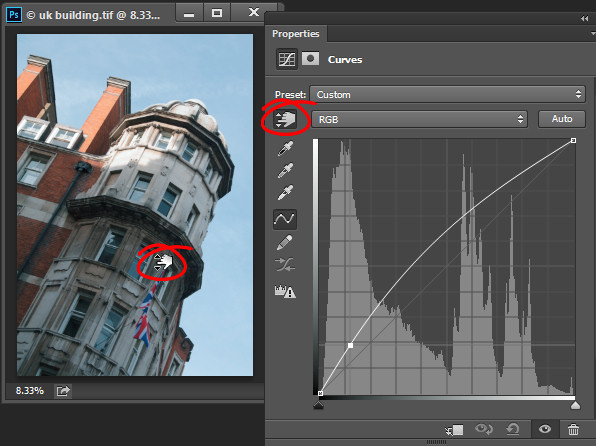
You can also adjust the curves line by clicking the onscreen adjustment tool and then drag on an area of the image that you want to adjust. Drag upward to lighten the tones represented by the pixels under the eyedropper, and drag downward to darken them. Notice that you aren’t just adjusting the area around the point where you are dragging, you are also adjusting all the pixels of that tonal value in the image, wherever they are located.

Photoshop-make-adjustments-using-the-curves-dialog-10

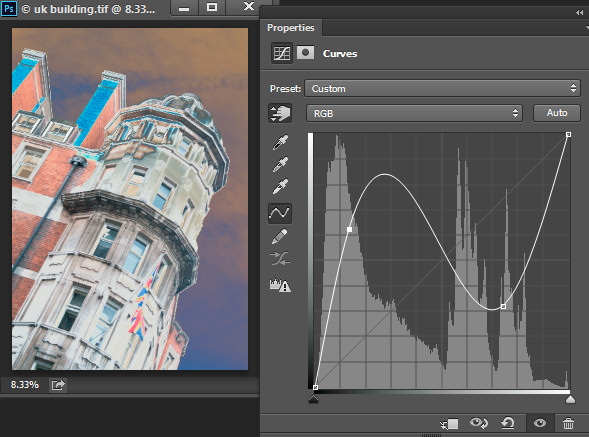
Whenever you’re adjusting the curve line make sure not to flatten it or invert it. If you invert the line as shown below then you’ll invert the colors in the image.

Photoshop-make-adjustments-using-the-curves-dialog-11

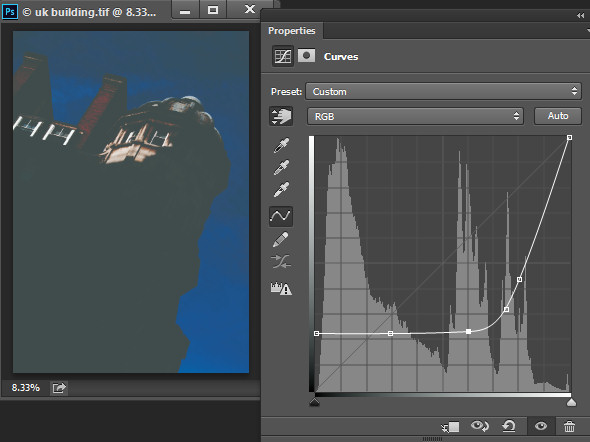
If the line is flat (horizonally) then the pixels in the flat area will all become the same shade of gray.

Photoshop-make-adjustments-using-the-curves-dialog-12

Working with Points on the Curve

To add points to the curve line simply click on the line where the point should be added. To remove a point on the curve, click on it and drag it off the edge of the chart and it will be removed.

Sometimes you may want to fix the line so it does not move, thus allowing you to adjust the curve on either side of the fixed point. To fix the line, click on it to add a point at its current position. Sometimes you may need to add a couple of points so that you can then adjust other areas of the line without also affecting tones that you don’t want to change. In the image below I have fixed the highlights so that the curve line wouldn’t move when I dragged up on the left end to lighten the darker areas of the photo. If I hadn’t locked down the highlights the entire curve line would have moved upwards, risking the highlights become too light.

Photoshop-make-adjustments-using-the-curves-dialog-13

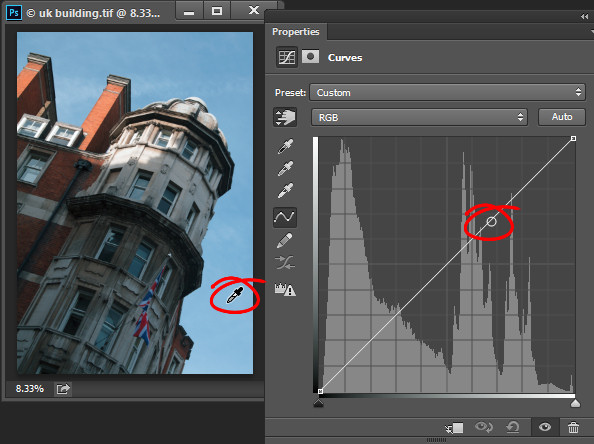
Using the onscreen (targeted) adjustment tool you can also determine where on the curve line certain tones in the image are located. Instead of clicking and dragging on the image, simply hold your mouse pointer over an area of interest. When you do this the appropriate point on the curve that relates to the pixels under the mouse pointer will be indicated with a hollow circle.

Photoshop-make-adjustments-using-the-curves-dialog-14

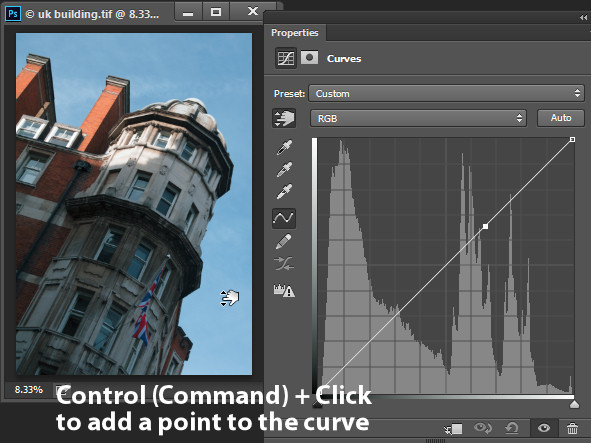
If you want to add a point on the curve at this location Ctrl + Click (Command + Click on a Mac) on the image to do so.

Photoshop-make-adjustments-using-the-curves-dialog-15

Adjusting Individual Colors with Curves

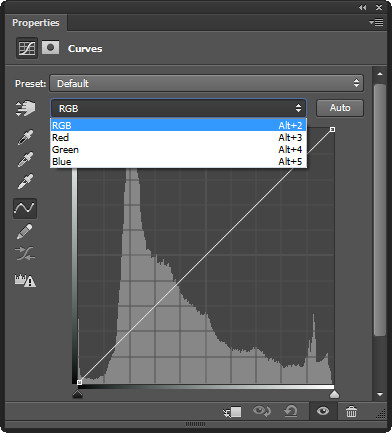
In addition to the RGB channel you can also adjust the curve for individual color  channels. From the dropdown list that displays RGB by default, choose the channel you want to adjust – there are selectors for Red, Green and Blue.

Photoshop-make-adjustments-using-the-curves-dialog-16

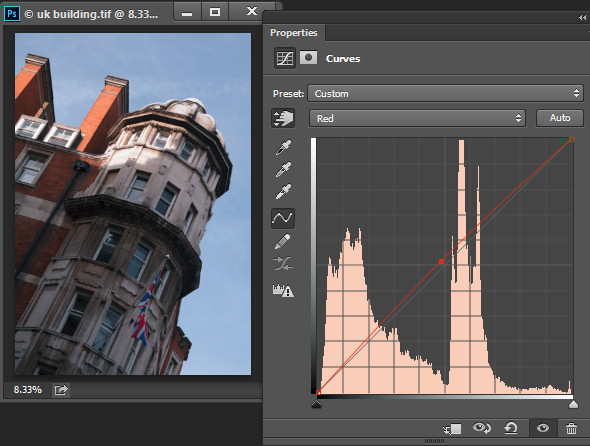
The red channel controls both red and cyan in the image; drag upward to add red to the image and downward to add cyan. The green channel controls green and magenta, so drag upward to add green and downward to add magenta. Likewise the blue channel controls blue and yellow; drag upward to add blue and downward to add yellow.

Using the color channels you can, for example, warm up an image. You could do this by adding red (drag up on the curve in the red channel) or yellow (drag down on the curve in the blue channel), or both.

Photoshop-make-adjustments-using-the-curves-dialog-17

Adjusting the Curves Adjustment

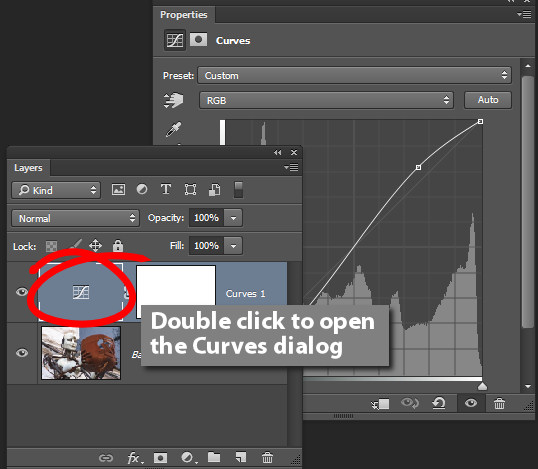
Once you have applied a Curves adjustment to your photo you can close the Curves Properties dialog. At any time, if you used a curves adjustment layer you can double click on the curves layer thumbnail to open the curves dialog and further adjust it.

Photoshop-make-adjustments-using-the-curves-dialog-17a

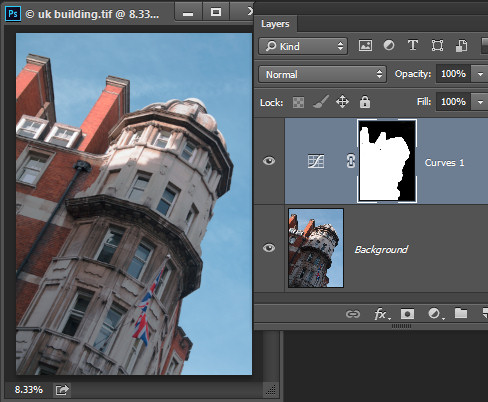
As with other adjustment layers a layer mask is automatically added to the curve adjustment layer. Target the mask in the Layers palette and you can then paint on it with black or gray to remove the effect of the curve from a selected area of the image. Paint on the mask with white to paint reveal the adjustment in that area again. In the image below, the mask shows that the curves adjustment affects only the building (white area) and not the sky (black area).

Photoshop-make-adjustments-using-the-curves-dialog-18

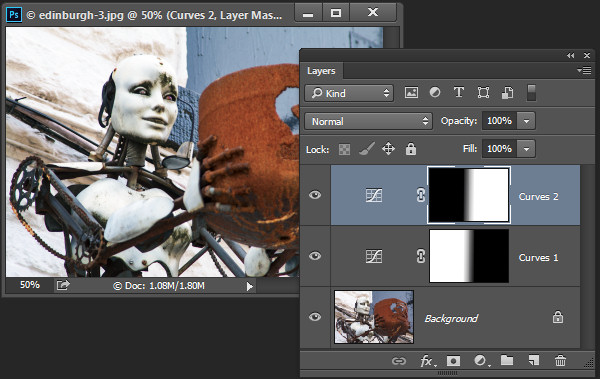
You can also add a black to white gradient fill to mask the curves adjustment so it is applied to the top part of the image and not the bottom.

In some situations you may want to add multiple curve adjustments to an image – the first which fixes one part of the photo and another to fix another part of the photo. You can use the layer masks to control how each curves adjustment affects the photo.

Photoshop-make-adjustments-using-the-curves-dialog-19

Using Presets

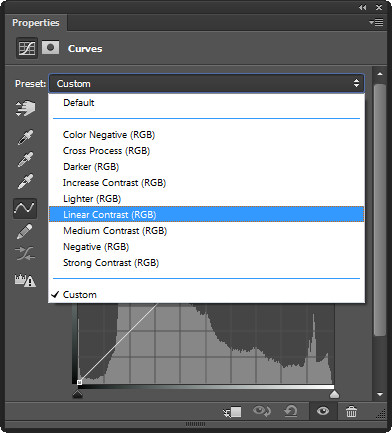
Photoshop ships with some curves presets that you can use by selecting them from the Preset dropdown list.

Photoshop-make-adjustments-using-the-curves-dialog-20

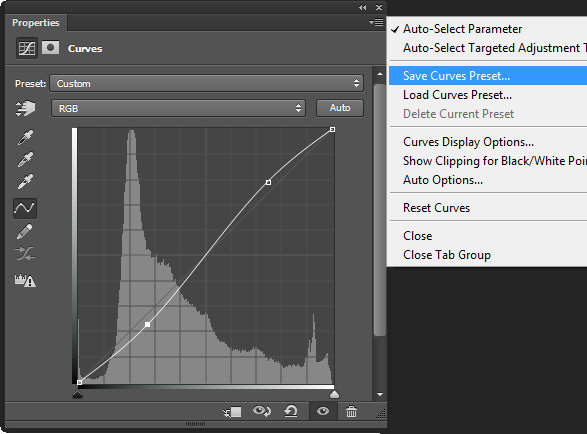
You can also create your own presets. So if there is an adjustment such as a shallow S-curve that you like to apply to many of your photos, you can save this curve as a preset by first adjusting the line to the desired shape then click the fly-out menu and choose Save Curves Preset, type a name, and click Save. In future your preset will be available from the list.

Photoshop-make-adjustments-using-the-curves-dialog-21

Learning to use curves will give you more options when editing your images in Photoshop. You’ll find curves are a feature of most advanced editing software so it is an adjustment you will find in other programs including Gimp, Lightroom and Adobe Camera Raw.

You can view a video of this tutorial on curves below:

Do you have any other tips for using curves in Photoshop? Please share in the comments below.

The post How to do Quick and Easy Curves Adjustments in Photoshop by Helen Bradley appeared first on Digital Photography School.

Digital Photography School

 
Comments Off on How to do Quick and Easy Curves Adjustments in Photoshop

Posted in Photography


Create Better Black and White Photos Using Local Adjustments in Lightroom 5

08 Jul

Local adjustments in Lightroom

I showed you how to convert your photos to black and white in Lightroom in an earlier article. But, considering it dealt purely with global adjustments, the piece only gives you half the story. Global adjustments get you started, but in order to get the best black and white conversion possible you need to make local adjustments as well. This article will show you how to do this.

First, a couple of definitions:

Global adjustments: Any adjustments (to brightness, contrast etc.) that affect the entire image.

Local adjustments: Adjustments that affect only part of the photo.

Before I show you how to make local adjustments, let’s think about why you would do so. Certain things pull the eye more than others. For example, when you look at a photo with people in it, your eye will go straight to them, even if they are small in the frame. This is probably down to human curiosity more than anything, but it works.

Two other things that pull the eye are highlights and contrast. The idea behind making local adjustments is that you can alter the brightness or contrast of certain areas in the frame to influence where the eye goes. This creates a better, more beautiful photo.

Dodging and burning

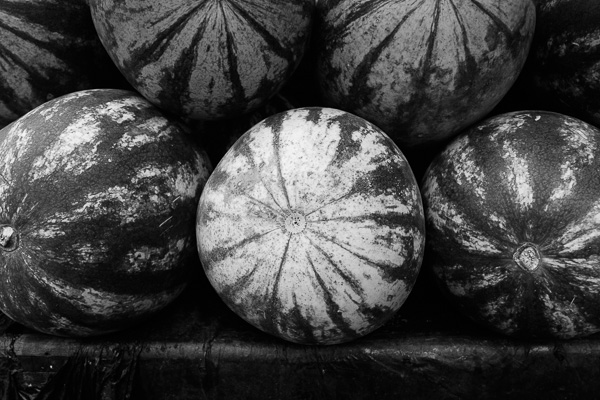
Here’s the photo we’re going to work with in today’s article. I’ve already converted it to black and white using global adjustments.

Local adjustments in Lightroom

As you can see, it lacks a focal point. It also contains lots of beautiful textures which will look great in black and white if we can bring them out.

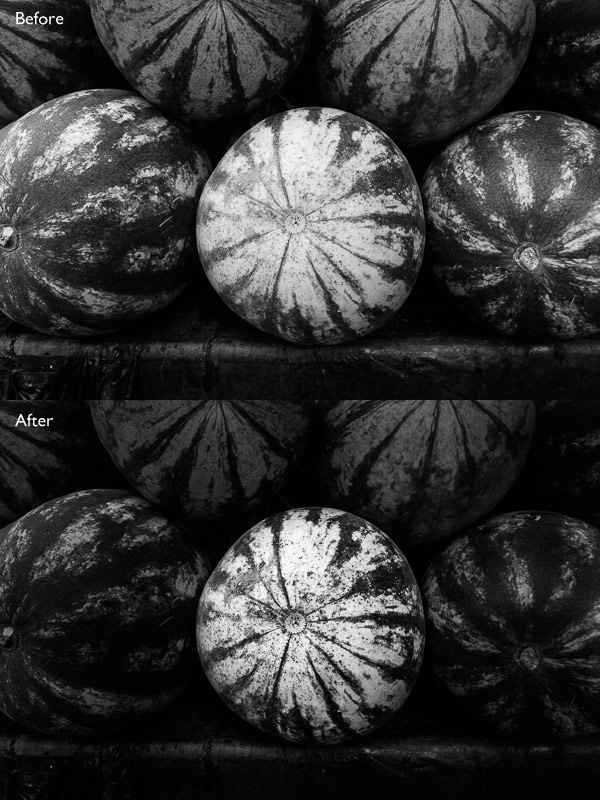
In order to make effective local adjustments you need to decide what you want to achieve before you start. Here, I decided to make the central watermelon the focal point of the composition. Decision made, it’s just a question of how to achieve it.

Dodging and burning

Although Lightroom itself doesn’t use these terms, you will find them referred to time and again in post-processing. Dodging is the act of making part of the photo lighter, and burning is the act of making it darker. They originated in the chemical darkroom and are also done in photo editing programs like Photoshop.

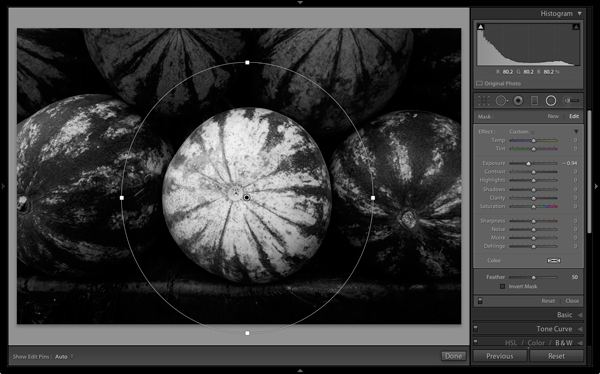
The first step to achieving my aim of making the central watermelon the focal point, is to make the rest of the photo darker. I did that by placing a Radial Filter over the central watermelon and moving the Exposure slider left.

Local adjustments in Lightroom

Note: The Radial Filter is new to Lightroom 5. If you have an earlier version of Lightroom, you can use either Post-crop Vignetting or the Adjustment Brush instead.

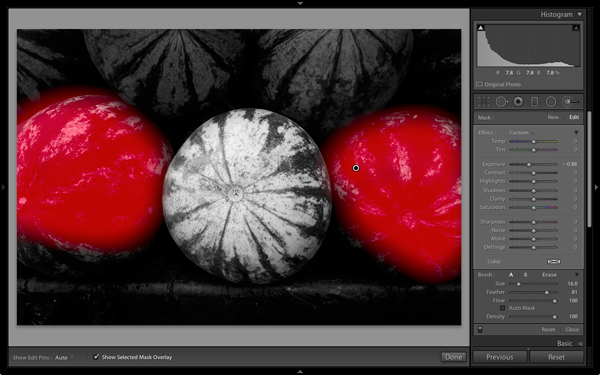
The two watermelons either side of the central one are a little too bright. So I used the Adjustment Brush to select (mask) them and moved the Exposure slider left to make them darker. The screenshot below shows the area covered by the mask. Note how I only painted the top parts of the watermelons as the bottom part was already dark.

Local adjustments in Lightroom

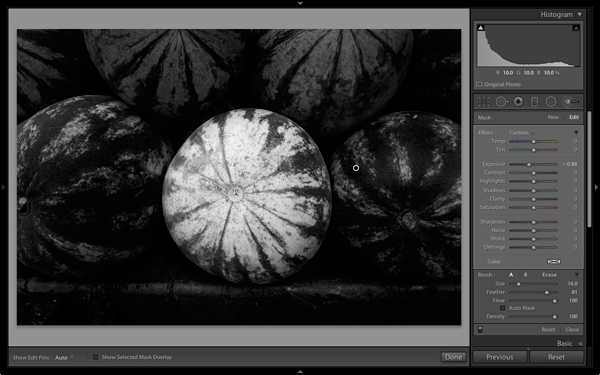
This is the result of the local adjustment.

Local adjustments in Lightroom

Contrast and Clarity

The next step is to improve the appearance of the central watermelon. I can do that by increasing contrast to bring out the beautiful textures of its skin.

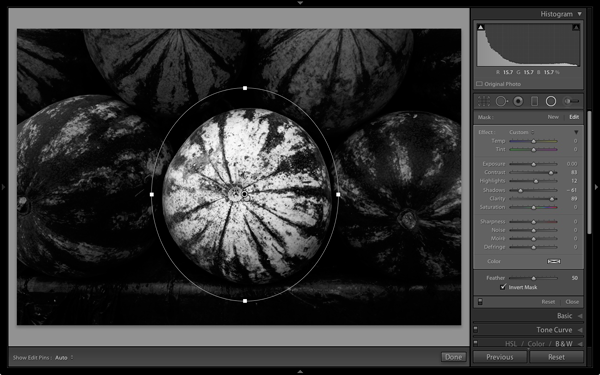
I placed another Radial Filter over the watermelon (you could also use the Adjustment Brush) and ticked the Invert Mask box so the adjustment was applied inside, rather than outside, the filter. Then I increased Contrast and Clarity, and moved the Highlights slider right and the Shadows slider left. The result is a big increase in contrast, bringing out the texture of the watermelon’s skin. Here’s the result.

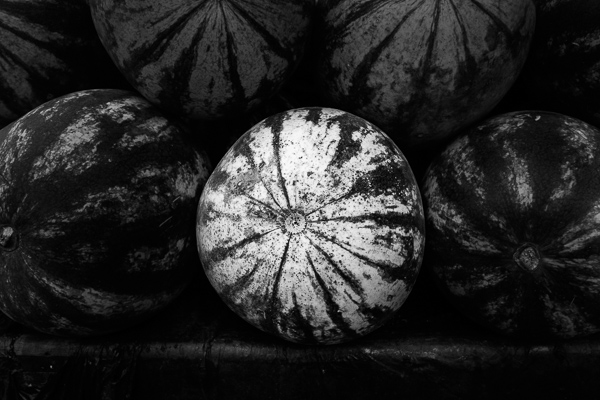
Local adjustments in Lightroom

Here are the before and after views so you can see the difference, which is entirely down to the local adjustments.

Local adjustments in Lightroom

That completes my overview of using local adjustments in Lightroom. As you can see, the local adjustments turned an average photo into a much stronger one. There is nothing overly complicated about it, it’s more a matter of training your eye to see in black and white and then deciding how to use the tools that Lightroom gives you to realize your vision.

I’m curious to hear how you use local adjustment when you convert your photos to black and white. Please let us know in the comments.


Mastering Lightroom: Book Three – Black & White

Masterlng Lightroom: Book Three – Black & White by Andrew S GibsonMy ebook Mastering Lightroom: Book Three – Black & White goes into the topic of black and white in depth. It explains everything you need to know to make dramatic and beautiful monochrome conversions in Lightroom, including how to use the most popular black and white plug-ins. Click the link to visit my website and learn more.

The post Create Better Black and White Photos Using Local Adjustments in Lightroom 5 by Andrew S. Gibson appeared first on Digital Photography School.

Digital Photography School

 
Comments Off on Create Better Black and White Photos Using Local Adjustments in Lightroom 5

Posted in Photography


Major update to Instragram brings control over filter adjustments

04 Jun

instra.jpg

Instagram is one of the most popular image filter and sharing apps for mobile devices but its feature set has remained almost unchanged since it was introduced, with a relatively small number of effects, and little control over them. The latest version 6 update to the Android and iOS versions of Instagram now offers control over filter strength and a range of new editing options, including brightness, contrast, warmth, saturation, highlights, shadows and vignette. Click through to read more at connect.dpreview.com

News: Digital Photography Review (dpreview.com)

 
Comments Off on Major update to Instragram brings control over filter adjustments

Posted in Uncategorized


The Triangle of Color Adjustments in Lightroom

11 Apr

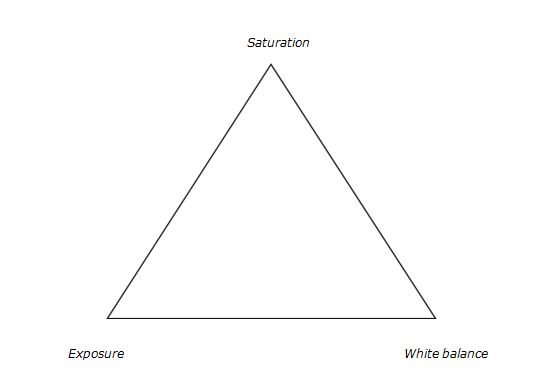
In digital photography, just like exposure, colors too have a triangle of their own.

3 Color correction triangle

Color adjustment triangle

The triangle of color adjustments in Lightroom. The three attributes that form the triangle are shown above, now let’s see how they affect the colors of an image.

Exposure

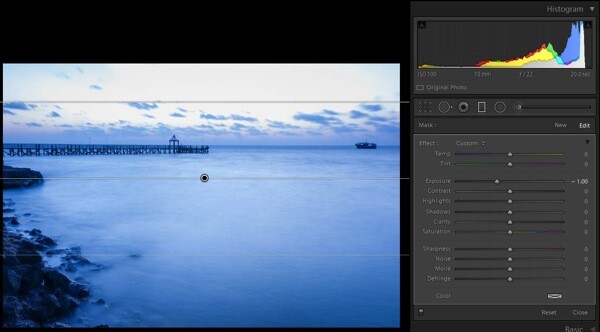
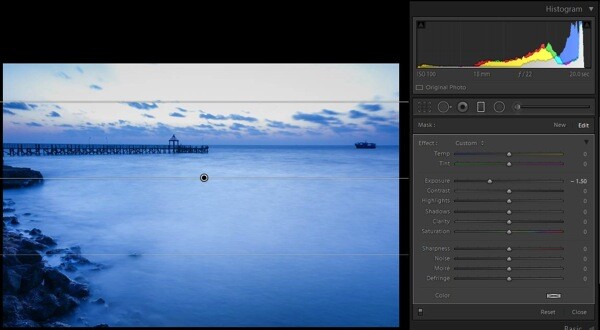
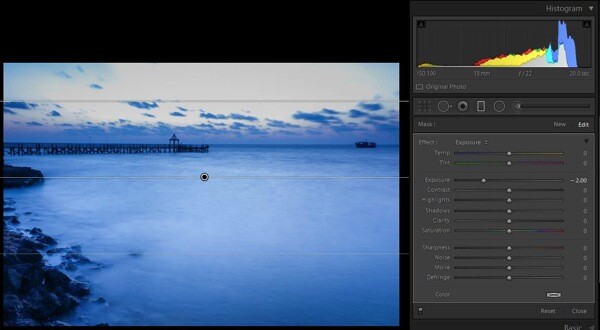
This attribute controls the brightness level of all the pixels that constitute an image. Whenever the brightness level of the pixel is altered, the color value too gets changed. You can easily identify this effect in a photograph of a landscape. Apply a Graduated Filter on the sky area with a value of -2.00 on the exposure slider and then take a look at the sky area. You will immediately notice that the blue color has become richer. You would do well to remember that you didn’t change any other value in that sky area except the exposure.

Let’s look at some examples of exposure adjustments and how it affects the color:

1 with nothing applied

No adjustments applied on graduated filter

2 EV minus 1

-1.0 stop exposure adjustment applied

2 EV minus 1 5 applied

-1.5 stop exposure adjustment applied

2c EV minus 2 applied

-2.0 stop exposure adjustment applied

Saturation

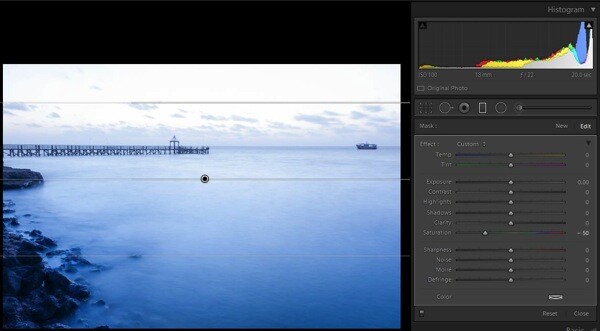
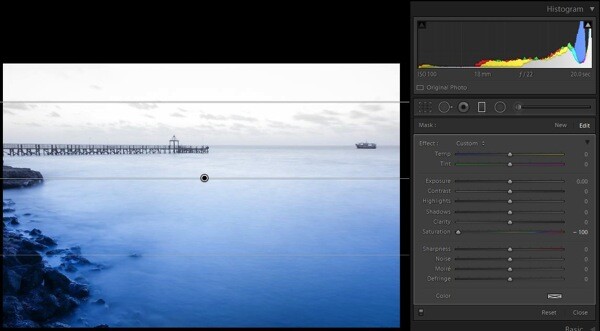
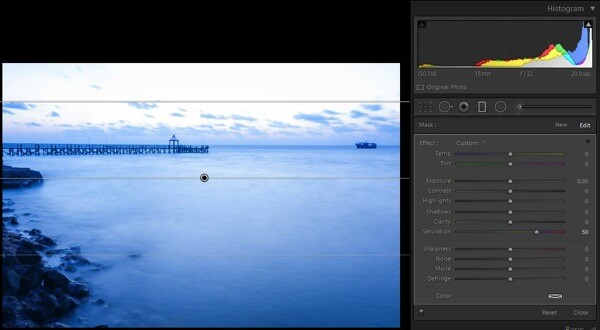
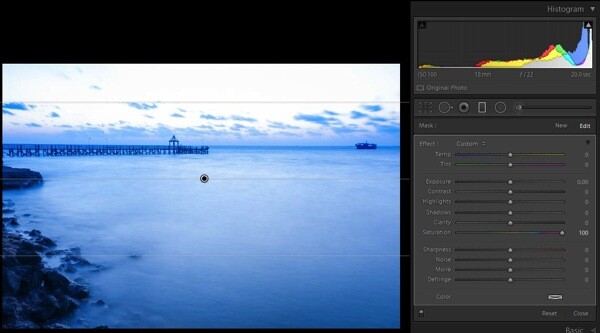
This attribute controls the intensity of all colors in all of the pixels that constitute an image. Since the effect of this tool is global, it needs to be used with caution; otherwise it is guaranteed that the picture will end up looking artificial. To check the effect of this tool, keep the same graduated filter applied and active, reset the exposure values by double clicking the exposure slider (or the word Effect), then move the saturation slider towards the right; you will notice the changes that are wrought in the sky area.

4a Sat minus 50

Saturation set to -50

4b Sat minus 100

Saturation set to -100

4c Sat plus 50

Saturation set to +50

4d Sat plus 100

Saturation set to +100

There is another tool called Vibrance, just above the saturation slider. I have considered this as part of saturation tool. It plays only with the less intense colors, one of the smartest tools in Lightroom (Note: this tool can be found only in the Basic Deveolop panel not in the Graduated Filter or any other local correction tools).

White balance

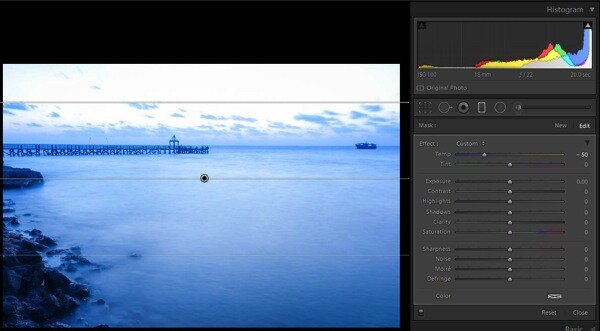
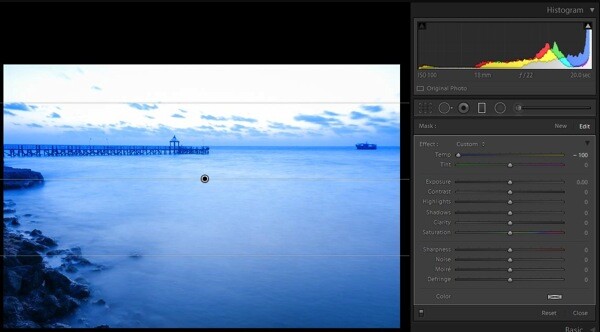
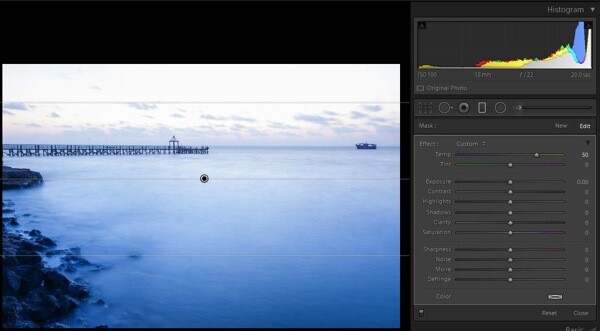
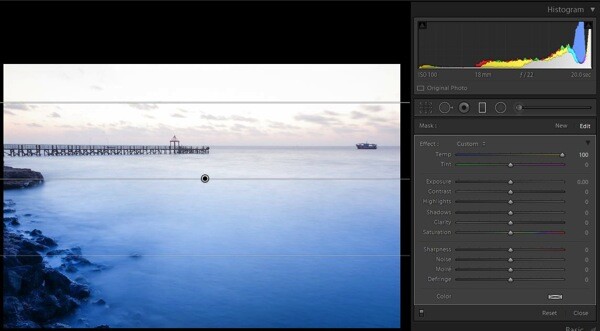
This is one of the most discussed topics in the internet. What white balance exactly does is to change all of the color values of all the pixels in the photograph; yes I mean all three RGB values of a pixel. When you move the White Balance slider towards the right the photograph gets warmer, specifically towards yellow side. When you move it towards the left, the photograph gets cooler, specifically towards blue side. (Note: this tool is at its full power when the image is captured in RAW format) To check this effect, reset the previous graduated filter and move the White Balance slider either way to see for yourself.

3a WB 50

White Balance adjustment made to -50

3b WB minus 100

White Balance adjustment made to -100

3c plus 50 WB

White Balance adjustment made to +50

3d plus 100 WB

White Balance adjustment made to +100

There is another tool below White Balance called tint, it is part of adjust the white balance. This tool needs to be used cautiously, as the name suggests the tool can be used to add or remove the tint primarily green or magenta in color, and mostly helps to bring out the real colors. If this tool is used carefully, it will help you to remove the color cast from your photograph if any.

Putting it all together

Now that you know how all three major tools control the colors in a photograph, the question is how to apply this knowledge. There is no universal prescription, and each photograph demands its own treatment. Understanding how all these tools work, and developing your skill by practicing on a few photographs, will make you so much better in visualizing and bringing out the colors in any given photograph.

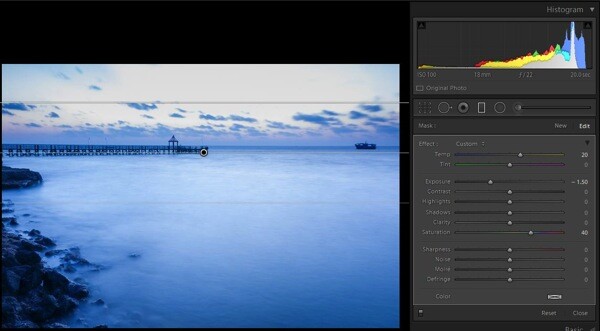
5a all 3 components applied

Graduated Filter all sliders applied

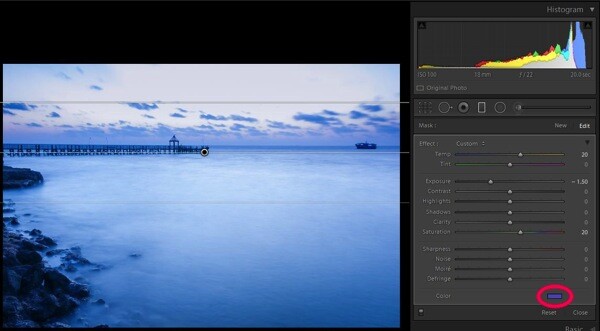
Now, you know the major tools controlling the colors in an image and how they are being applied on this sample image (see screen shot above) but I still felt something was missing in the sky region. So I applied a slight color tint from the color picker tool (see image below).

5b small colour tint used  balance

Graduated filter slider adjustments plus a color tint added, see red circle

Some photographs might be underexposed, whereas others might be under saturated to some extent. Remember RAW images tend to be less saturated, lower in contrast, and less sharpened. In some photographs a little adjustment to the White Balance slider may fix almost all the problems.

Final image

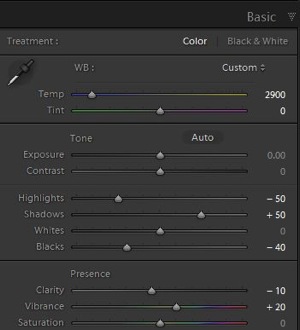
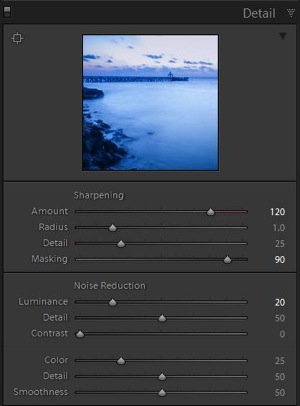
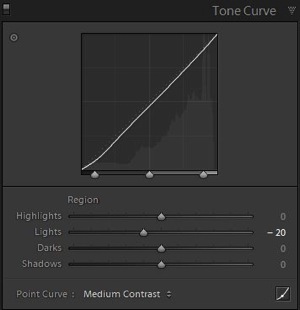
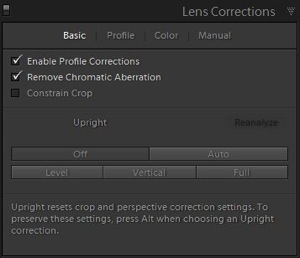
Here is a look at the sliders in all the panels used to produce the final image.

6a Global adjustments

Basic panel slider adjustments

6c Detail panel adjustments

Detail panel slider adjustments

6b adjustments Tone curve panel

Tone curve panel adjustments

6d Lens correction panel adjustments

Lens correction panel adjustments

6e mild vignetting

Post-crop vignette added

After using almost all the panels in Develop module here are the before and after photographs.

1 As shot

As shot right out of camera

2 Final image

Final image after all corrections have been applied

All said, you are the creator of your photograph. You have to decide which tool needs to be used and in what proportion with other tools, to give you the results you hoped for when you pressed the shutter button. Hope this article helps you make more beautiful photographs.

If you have any other Lightroom color adjustment tips of tricks please share with us in the comments below.

The post The Triangle of Color Adjustments in Lightroom by Navan Viswa appeared first on Digital Photography School.

Digital Photography School

 
Comments Off on The Triangle of Color Adjustments in Lightroom

Posted in Photography


Making Basic panel adjustments in Camera Raw | lynda.com tutorial

31 Oct

This Camera Raw tutorial discusses how to make image adjustments using the Basic panel and the Crop tool. Watch more at www.lynda.com This specific tutorial is just a single movie from chapter ten of the Photoshop CS5: Athletic Retouching Projects course presented by lynda.com author Chris Orwig. The complete Photoshop CS5: Athletic Retouching Projects course has a total duration of 6 hours and 9 minutes, and covers removing blemishes from the subject and the background, adding motion blur, enhancing muscle tone, making adjustments to photos shot in an outdoor setting, and more. Photoshop CS5: Athletic Retouching Projects table of contents: Introduction 1. Outdoor Portrait 2. Simplicity 3. Strength 4. Speed 5. Gym Workout 6. Energy 7. Pushup 8. Indoor Track Sprint 9. Enhancing Strength 10. Surfer Portrait 11. Underwater Portrait 12. Jump 13. Father and Son Portrait Conclusion

Check out Bas Rutten’s Liver Shot on MMA Surge: bit.ly In this video, Mahalo expert Justin Z. briefly explains how the Sharpen tool works in Photoshop. Sharpen Tool ——————————————————————— The Sharpen tool is a neat feature that allows you to make pixels look slightly more jagged. On photographs, it will help create a sharpened effect that will make the selection look clearer. 1. To access this tool, click and hold the “teardrop” icon in the tool bar. Drag down to the tool that looks like a “triangle” that says Sharpen Tool.2. Click and drag on a portion of your canvas to see the effect. This tool can prove useful for both enhancing and hiding blur created by photographs. You can use it for all kinds of effects.3. The top Options panel has a few choices: * Brush Size and Stroke * Strength (which determines how much blur will be created with each stroke) * All Layers (which allows you to use the Sharpen tool on all layers at once) Read more by visiting our page at: www.mahalo.com
Video Rating: 5 / 5

 
Comments Off on Making Basic panel adjustments in Camera Raw | lynda.com tutorial

Posted in Retouching in Photoshop


lynda.com Tutorial | Photoshop CS5 One-on-One: Advanced—Channel-by-channel adjustments

02 May

Watch the course at www.lynda.com Photoshop is one of theworld’s most powerful image editors, and it can be daunting to try to use skillfully. Photoshop CS5 One-on-One: Advanced, the second part of the popular and comprehensive series, updated for CS5, follows internationally renowned Photoshop guru Deke McClelland as he dives into the workings of Photoshop. He explores such digital-age wonders as the Levels and Curves commands, edge-detection filters, advanced compositing techniques, vector-based text, the Liquify filter, and Camera Raw. Deke also teaches tried-and-true methods for sharpening details, smoothing over wrinkles and imperfections, and enhancing colors without harming the original image.
Video Rating: 3 / 5

 
Comments Off on lynda.com Tutorial | Photoshop CS5 One-on-One: Advanced—Channel-by-channel adjustments

Posted in Retouching in Photoshop


Cosmetic Eye Adjustments With Lightroom 2.0

04 Mar

JohnEsberg.com shows us how to create cosmetic eye adjustments using Lightroom 2.0. Photoshop not required!

Discuss this video at forum.irakrakow.com and network with other Blender 3D users. Read the script for this video at http One of the powerful reasons for using Blender is that it can do just all the steps in video production, from pre production right through post production, by itself. Although you might want to call on another product, such as an external renderer like Yafaray or an image editor such as the Gimp or Photoshop, for some specialized needs, in many cases Blender can do the job. The fewer pieces of software you have to juggle in your workflow, the better. Importing and exporting files between programs is a royal pain. Enhancing the quality of the color of images is one of these areas. When combined with Blender’s composite node system, which I discussed in a basic way in a previous Youtube video, Blender can do just about everything a 2D image editor such as the Gimp or Photoshop can do. In this tutorial, I will show how to use the Mix Node to blend two colors. This is a start to get you comfortable with tweaking 2D images entirely in Blender. This is just the tip of the iceberg. There is plenty of material, just in color processing, for many more tutorials. We’ll spend the entire time in the Node Editor, pretending that Blender is really Photoshop in disguise. I will use Blender 2.49b.