RSS
 

Posts Tagged ‘adjustment’

5 Tips for Using the Lightroom Adjustment Brush Tool

03 Apr

One of Lightroom’s most useful tools is tucked away at the top of the Develop panel, under a rather strange-looking icon that looks like a magic wand from Harry Potter. Clicking this Adjustment Brush icon, gives you access to many of the macro-scale alterations and edits available on some of the other Develop panels, but lets you control them on a micro level. It’s a fantastic tool for editing specific portions of an image, as opposed to the whole picture, but figuring out how to use it can be a bit overwhelming.

Here are my five favorite tips and tricks for using the Lightroom Adjustment Brush tool, and hopefully some of these will be useful to you as you explore how to use it for your own editing.
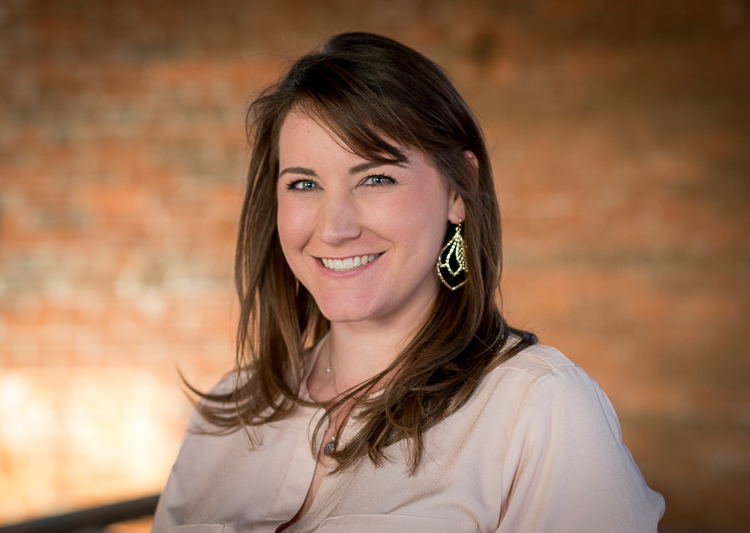
five-tips-brush-tool-woman-portrait

1. Use the A/B brush options to alternate between different types of brushes

My wife and I have done a great deal of painting in our house over the years. From hallways, to walkways, to bedrooms, we have spent more time and money on painting than I ever thought possible before we became homeowners. One of the most valuable lessons we have learned is that different types of painting jobs require different brushes. Sometimes you need a large roller, other times you need a small one. Sometimes you need a two-inch angled brush, and other times you need a small foam one. Each brush has its own purpose, and all are required to properly complete a painting task.

The same principle holds true in Lightroom, and you often need more than one brush to make the adjustments necessary on a given image. This problem is easily remedied by switching between the A and B brushes near the bottom of the Adjustment Brush panel.

five-tips-brush-tool-a-b-brushes

Brush A is highlighted by default when you click on the Adjustment Brush panel, which means that any size, feather, flow, mask, and density settings you use will be automatically applied to that brush. When you click on Brush B you can use an entirely different set of options, then cycle between the two brushes just by clicking A and B. In the example above, Brush A is small with a medium feather and flow rate. Brush B is larger with a much lower flow rate and no Auto Mask, which makes it better suited for large-scale edits, whereas Brush A would be better suited for fine-tuning specific parts of an image. Setting up two different brushes is a great way to speed up your editing workflow, since you won’t need to continually change the parameters of a single brush, and you can instantly switch between the brushes by pressing the forward slash (/) key.
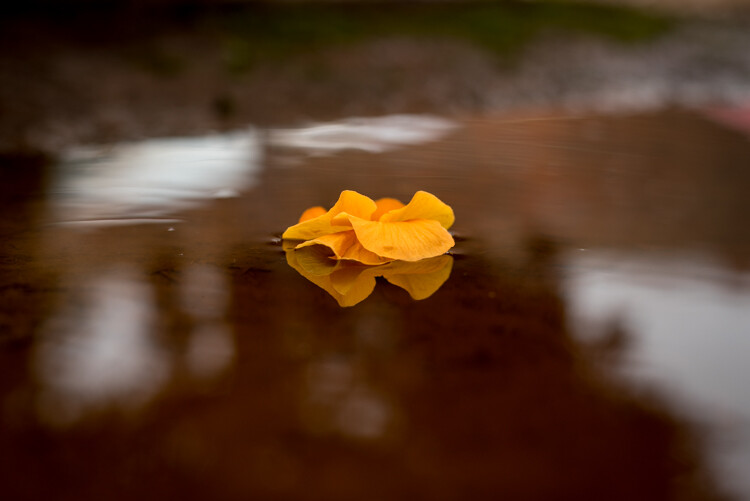
I used a large brush on the background and a smaller brush on the flower petals, and was able to switch between the two easily to get the edits I needed quickly.

I used a large brush on the background and a smaller brush on the flower petals, and was able to switch between the two easily to get the edits I needed quickly.

2. Create custom brush effect presets

If the A/B brushes are similar to choosing different physical brushes at a hardware store, then the brush effect presets are like picking out different types of paint. Lightroom has several different presets that are available as default options, and they have names like “Highlights,” “Temp,” and “Teeth Whitening.” These presets are just default values that Lightroom thinks would work well to accomplish specific tasks like: adjusting exposure, adding contrast, or reducing noise. You can see how they work just by looking at the sliders, as you change from one preset to another.
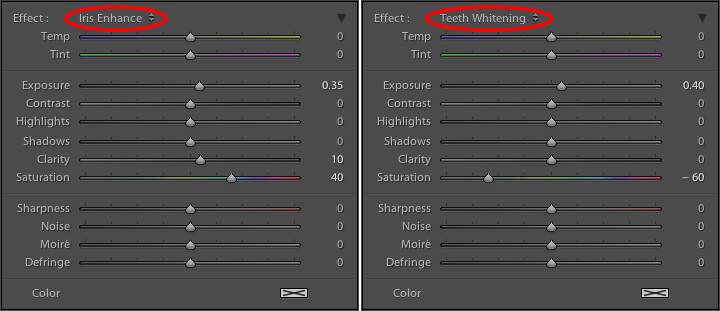
These presets don't inherently do anything special, they just adjust various sliders in different ways.

These presets don’t inherently do anything special, they just adjust various sliders in different ways. You can create your own presets to do unique tasks as well.

The beauty of these presets is you are free to add new ones that suit your own workflow. You would never select from only a dozen colors when choosing how to paint a room in your house, and neither should you be forced to stay within the confines of the existing presets in Lightroom. To add your own presets, adjust the sliders how you want, click the name of the existing preset to pull down the list, and choose “Save Current Settings as New Preset.” Give your new collection of slider settings a name, and you can now select it whenever you want, right alongside the rest of the presets.

For example, I have found that on many of my portraits I need to brush in some sharpness while reducing the noise so I created a preset to do exactly that. I also have custom skin smoothing and teeth whitening presets that are a bit different from the default set Lightroom uses, and it’s very handy to switch over to these brushes whenever I need to, instead of configuring the sliders from scratch every single time.

3. Adding color to a brush

I started this article with an analogy comparing the Adjustment Brush tool in Lightroom to a literal paint brush, but what some people don’t realize is you actually can use the tool exactly like a paint brush to add color to your images. Near the bottom of the color panel is a rectangular box with a large X through it, and if you click on that you will see a color picker with an eyedropper tool that you can use to give your brush strokes a bit of color.
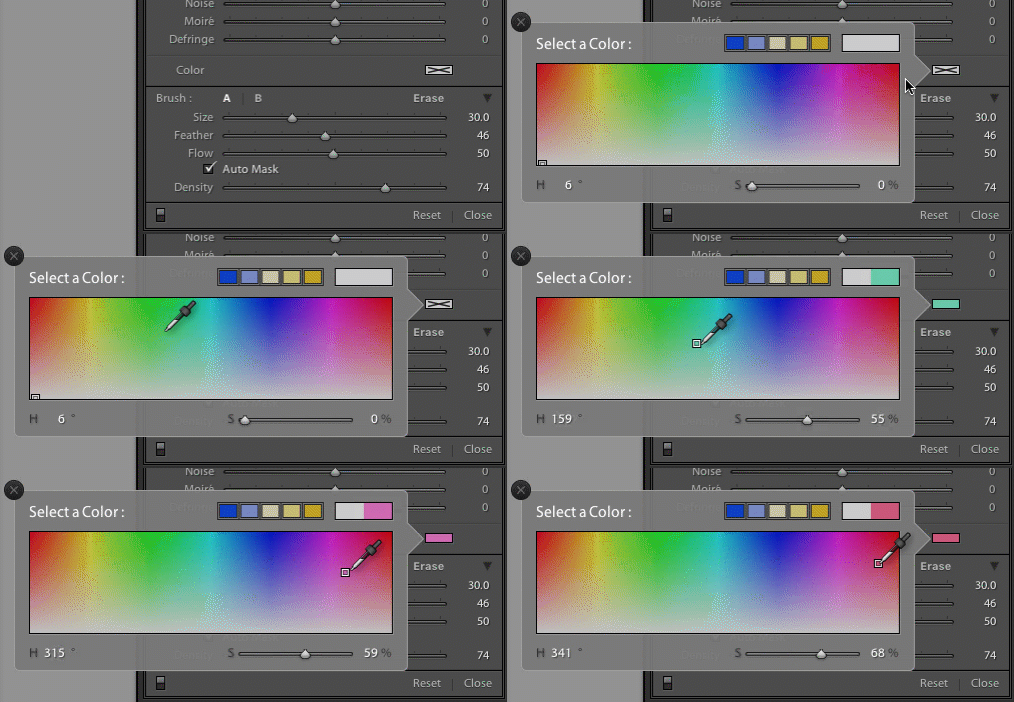
five-tips-brush-tool-color-selection-animated

Once you apply a color, the Lightroom Adjustment Brush tool now functions just like the paintbrush in any standard painting application on your computer. It applies any effects you are already using such as exposure, clarity, or saturation while also painting in the color you specified. In the following picture I used this technique to add a subtle splash of color to the baby’s face, but you can also use it on much larger edits like changing the color of flowers or altering the eyes on a portrait.
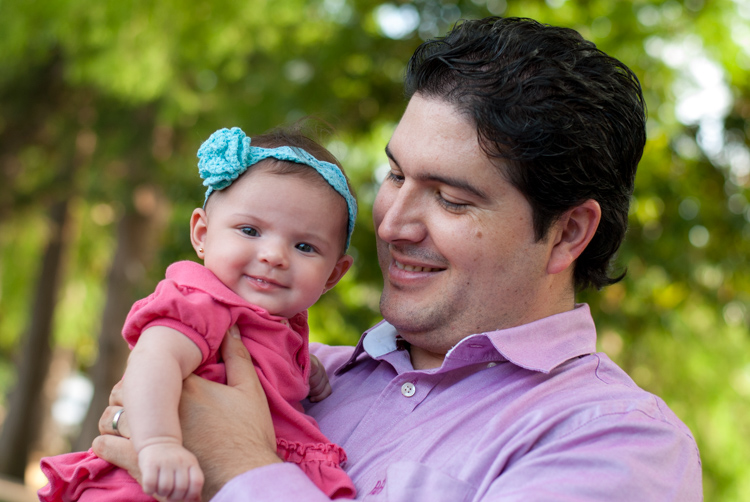
five-tips-brush-tool-man-baby

4. Use Auto Mask to contain the brush to specific areas

One of the most frustrating parts about the Adjustment Brush tool is that, unlike regular paintbrushes, it only comes in one shape: a circle, which can present a bit of a problem when editing photos with hard lines and angles. How do you confine your brush edits to just a specific area? The key to this lies in the Auto Mask feature which, when checked, tries to keep all the brush edits to places on the image that are similar to where you started painting. In the following picture I used some custom brush settings involving highlights and clarity and then clicked the Auto Mask function to keep these edits within the petals only, and not the surrounding areas.
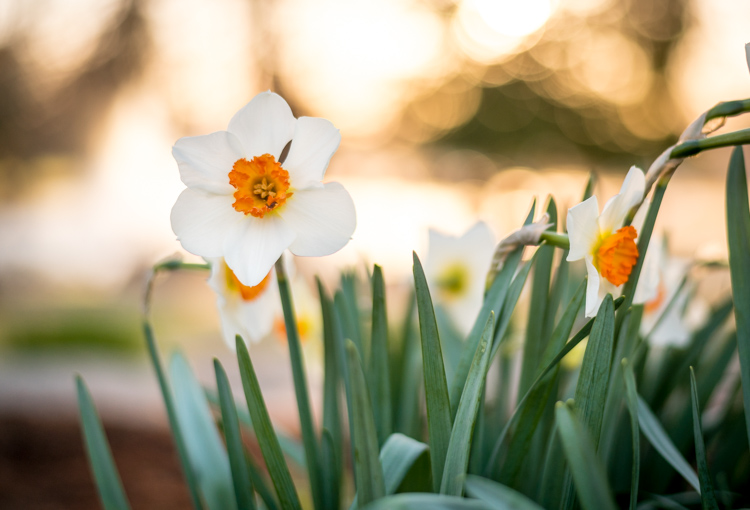
five-tips-brush-tool-white-yellow-flower

An easy way to make sure the Auto Mask is doing what you want is to hover your mouse over the black dot that appears where you started brushing in your edits (hit the H key if you do not see it). You will then see a red overlay that shows precisely where your edits for that particular brush have been applied, and as you can see below they were confined to the precise area that I wanted, the flower petals. This type of precision is very difficult without the Auto Mask option, but with the click of a button Lightroom makes it very easy for you to do as your kindergarten teacher likely admonished years ago, color inside the lines.
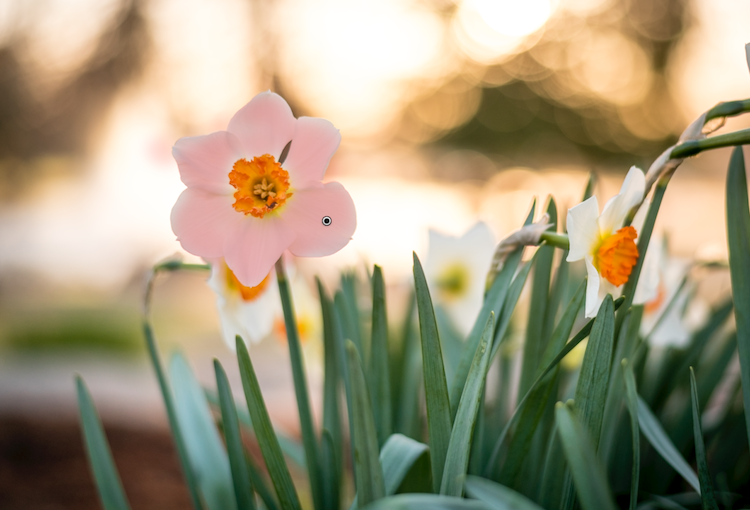
five-tips-brush-tool-white-yellow-flower-edits

5. Changing brush size, resetting settings, and fixing mistakes

There are so many useful elements to the brush tool that it’s kind of difficult to distill everything down to five points. As such, here are a few more tips and tricks that I have found quite handy and you might too.

  • Use the scroll wheel on your mouse to quickly change the size of your brush. For fine-grain adjustments you can click the numbers in the brush parameters that indicate Size, Feather, Flow, and Density and increase or decrease them with the arrow keys on your keyboard. To go up and down in units of ten, hold the [shift] key while pressing arrow-up or arrow-down.
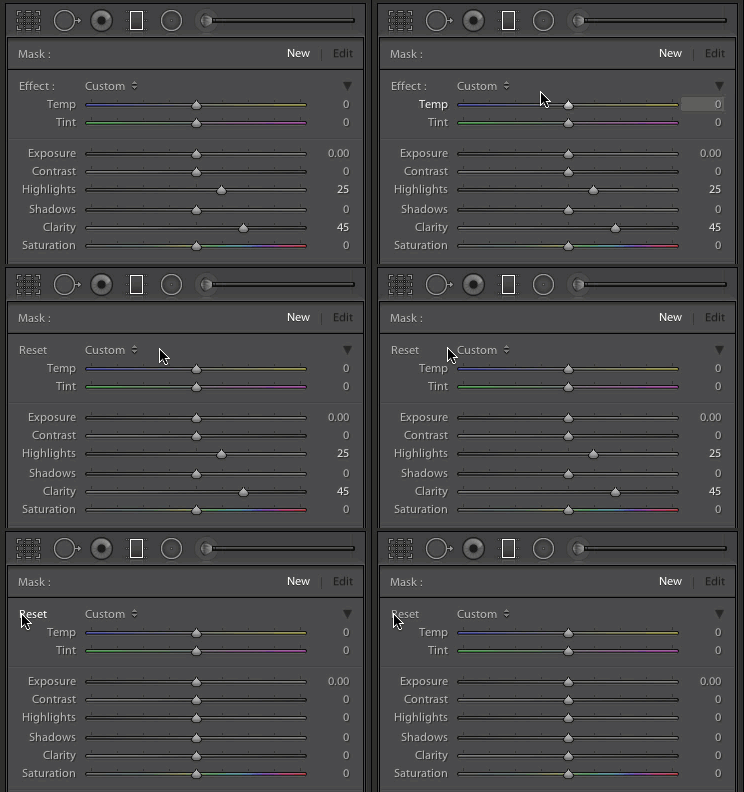
  • five-tips-brush-tool-resetAfter you have brushed in a particular set of edits, click “New” on the top-right of the Brush panel to create a new brush, but notice that all your sliders and adjustments remain unchanged. To reset all your parameters to their default values, hold down the alt key (option on a Mac) and you will see the Effect label at the top change to Reset. Click on that and everything will be set back to zero for you to start creating a fresh set of edits.
  • Pencils have erasers, but fixing errors when painting with brushes and pigment is not so easy. Fortunately the Brush tool in Lightroom has a feature that makes it much more like its wood-and-graphite counterpart in the real world, and makes fixing mistakes as simple as pressing a button. No, I’m not talking about Edit > Undo. If you’re brushing away with some edits and realized that you made a mistake or two, press and hold the Alt key (option on a Mac) and your brush will instantly switch over to eraser mode. Now, just like using the rubber end of a pencil, clicking and brushing will remove any edits you have made to the photo with the current brush. If you have used several different brush edits within one photo, your edits will mercifully be confined to the whatever brush is currently selected, and you can also adjust parameters of the eraser like size, feather, and so on.
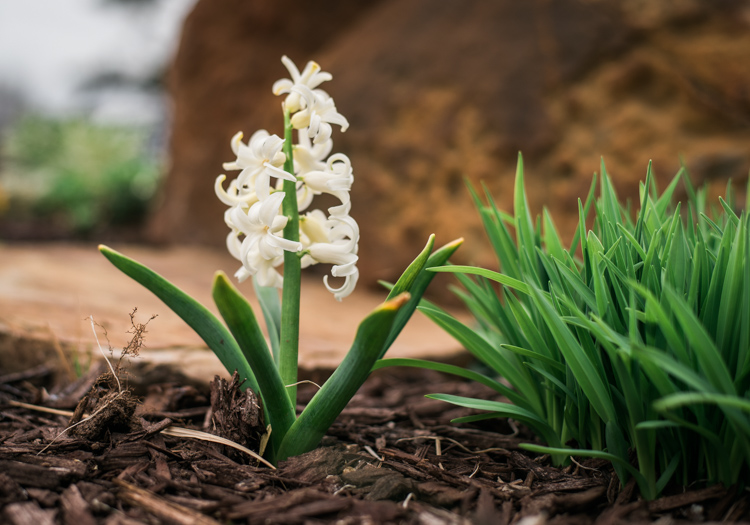
five-tips-brush-tool-white-flower
As I mentioned earlier there are enough tricks with the Adjustment Brush tool to fill several articles, but I’m going to stop here and instead ask you for your favorite tips and hidden features. Leave your thoughts in the comments section below and I’m sure I will learn a thing or two from your experiences as well!

googletag.cmd.push(function() {
tablet_slots.push( googletag.defineSlot( “/1005424/_dPSv4_tab-all-article-bottom_(300×250)”, [300, 250], “pb-ad-78623” ).addService( googletag.pubads() ) ); } );

googletag.cmd.push(function() {
mobile_slots.push( googletag.defineSlot( “/1005424/_dPSv4_mob-all-article-bottom_(300×250)”, [300, 250], “pb-ad-78158” ).addService( googletag.pubads() ) ); } );

The post 5 Tips for Using the Lightroom Adjustment Brush Tool by Simon Ringsmuth appeared first on Digital Photography School.
Digital Photography School

 
Comments Off on 5 Tips for Using the Lightroom Adjustment Brush Tool

Posted in Photography


How to Use the Hue Saturation Adjustment in Photoshop – a Video Tutorial

06 Mar

Learning to understand and master the hue/saturation settings in both Lightroom and Photoshop can help you take your editing to the next level. If you want to see how it’s done in Lightroom check out: Understanding the HSL Panel in Lightroom for Beginners.

Hue Saturation Adjustments in Photoshop

If you prefer Photoshop, watch this video from Phlearn on how to use the Hue/Saturation adjustment tools in Phtoshop to change colors both globally, and locally in your image. He also goes over the Colorize function, and painting on your image with a color.

Have you experimented with Hue Saturation in Photoshop? Tell us what you’ve learned, and you’ve applied it to your images. Share the in the comments below as well.

googletag.cmd.push(function() {
tablet_slots.push( googletag.defineSlot( “/1005424/_dPSv4_tab-all-article-bottom_(300×250)”, [300, 250], “pb-ad-78623” ).addService( googletag.pubads() ) ); } );

googletag.cmd.push(function() {
mobile_slots.push( googletag.defineSlot( “/1005424/_dPSv4_mob-all-article-bottom_(300×250)”, [300, 250], “pb-ad-78158” ).addService( googletag.pubads() ) ); } );

The post How to Use the Hue Saturation Adjustment in Photoshop – a Video Tutorial by Darlene Hildebrandt appeared first on Digital Photography School.

Digital Photography School

 
Comments Off on How to Use the Hue Saturation Adjustment in Photoshop – a Video Tutorial

Posted in Photography


How to Create a Surreal Look in Photoshop Using Hue Adjustment

03 Nov

When you start learning photoshop it is scary to see all those different tools you can choose from. It is often said there are seven ways to achieve the same results, using different tools in photoshop. So, it means you have to find the one that suits you perfect, in order to give to your pictures the look that you want.

In this article I want to show you how you can change colors in your pictures using Photoshop. This is a very easy method that you can use, either you are a beginner or you are a more advanced user.

You could add a surreal twist to your images, or remove colors you do not feel like comfortable working with (I am sure we can all relate to this, because as artists we have our favorite and least favorite colors- the ones we struggle to work with!). You can use this technique for anything from changing the color of a dress or any other prop, to changing the forest tones to enhance the autumn feeling, or creating it if you want to create an autumn picture even though it is still spring.

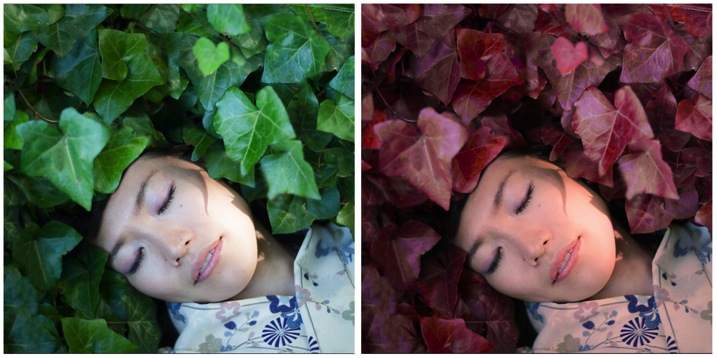
This is the before and after color change:

Picture01 before after

Create a color adjustment with Hue/Saturation

You can get to the Curves dialog in two ways:

  1. Image adjustment: By choosing Image > Adjustments > Hue/Saturation or Click the Hue/Saturation icon in the Adjustments panel.
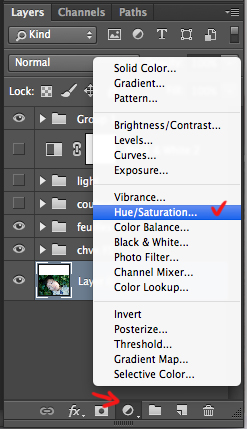
  2. As an adjustment layer: Layer > New Adjustment Layer > Hue/Saturation, or in your layers panel use the shortcut: New adjustment layer> Hue/Saturation.

Picture02 new adjustment layer shortcut

I strongly recommend working with layers. It allows you to come back to the adjustment and to erase it, or modify it, as many times as needed. Especially when you make big changes, you may want to be able to have full control. Layers can be scary at the beginning, but trust me, they will become your best friend once you overcome this fear.

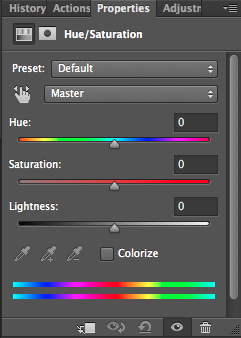
Creating a new layer you will have the following Hue/Saturation dialog box:

Picture03 HueSaturation dialog box

Select the color you want to change.

The more different you want your original color to be, the more important this selection is so that the color change does not affect areas do not want to shift. Removing a general color cast is usually a very light change. But, a total different color requires you to be more careful when selecting, and sometimes require several color adjustments.

When your object has a very clear color – as to say all red, one red tone – it is easy. When your object has different color shades it is tricky but not impossible.

In this case we are changing the color of ivy leaves, with different tones of green, blue, and even yellow.

First step: Make the color selection:

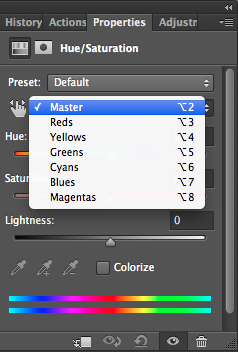
You can choose Master to adjust all colors at once, or one of the other preset color ranges listed for the color you want to adjust (reds, yellows, greens, cyans, etc.).

Picture04 Master or preset color

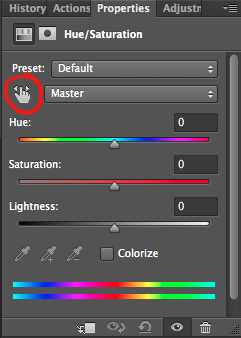
Or you can also choose the Targeted Adjustment Tool (the little white hand) – this is the easy way to select color if the area/object you want to change is a mix of several color tones.

Picture06 On image adjustment tool

Click on the Targeted Adjustment Tool and put your cursor on your image, the eyedropper tool appears. Drag it on your image, and click on the color tone you want to select.

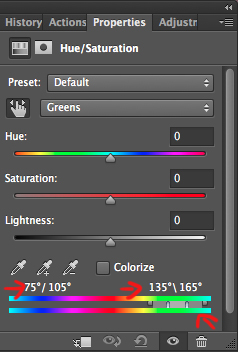
Picture05 color values

Four color values appear in degrees in your properties panel. If you click again, you change the selected colors.

Second step: Refine your selection

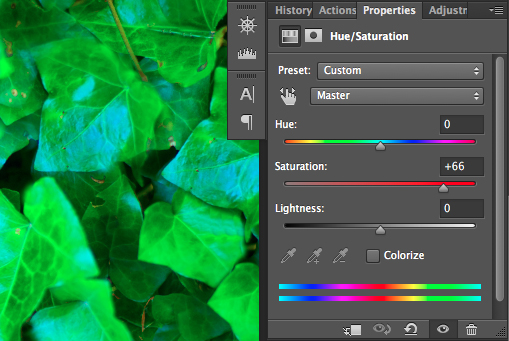
To check your selection, grab the saturation slider and move it to the right to increase saturation. The idea here is to see what you have selected, and make sure you have the right colors, therefore helping you adjust the selection. For example, when editing a portrait, you want to make sure it doesn’t affect the skin tones of your subject. If editing a forest you want to make sure you have selected the leaves, but not the tree trunks (or anything in the background).

Picture07 increase saturation to check selected colors

As you can see there is still a lot of blue of the leaves, that is not included in the selection. To add those blue tones you will drag the adjustment sliders to expend your selected colors, and change the color value (appearing in degrees in your properties panel).

There are four sliders. The ones in the middle allow you to expend or shorten the selected color ranges. The two sliders on both sides are to adjust the range of color and fall-off. Play with those sliders until you find a good selection. Don’t worry if it’s not perfect, you can still make a second hue/saturation adjustment layer, or mask this layer.

Third step: Change the color

In your properties window, drag the hue slider to the left or right depending on the new color tone you want to give to your selection. Then you can play with adding or removing saturation by dragging that slider either way.

Picture01 after

Learning to use hue/saturation will give you more creative options when editing your images in Photoshop. Share any images that you’ve changed the color on, or any other methods you use for doing this technique.

googletag.cmd.push(function() {
tablet_slots.push( googletag.defineSlot( “/1005424/_dPSv4_tab-all-article-bottom_(300×250)”, [300, 250], “pb-ad-78623” ).addService( googletag.pubads() ) ); } );

googletag.cmd.push(function() {
mobile_slots.push( googletag.defineSlot( “/1005424/_dPSv4_mob-all-article-bottom_(300×250)”, [300, 250], “pb-ad-78158” ).addService( googletag.pubads() ) ); } );

The post How to Create a Surreal Look in Photoshop Using Hue Adjustment by Amélie Berton appeared first on Digital Photography School.

Digital Photography School

 
Comments Off on How to Create a Surreal Look in Photoshop Using Hue Adjustment

Posted in Photography


Using the Adjustment Brush in Adobe Camera Raw

17 Mar
Adjustment-Brush-title2

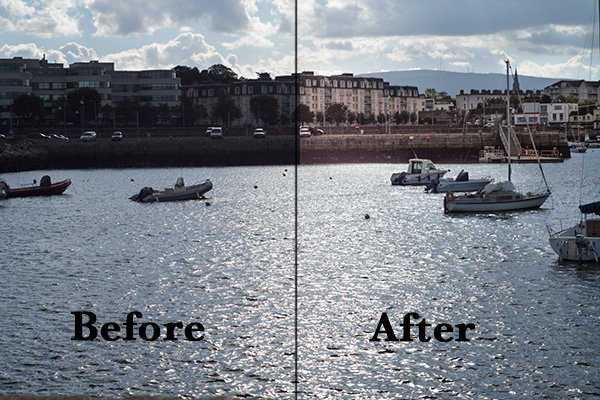
A before and after using the Adjustment Brush on the buildings.

What is the Adjustment Brush?

The Adjustment Brush is an editing tool in Adobe Camera Raw (known simply as ACR). This tool is possibly the equivalent of the Dodge and Burn tools in Photoshop. So what is dodging and burning? To dodge is to lighten and to burn is to darken a specific area.

What does it do?

When you make your initial global adjustments of a RAW file in ACR, more than likely, you will need to make local adjustments too. This is where the Adjustment Brush is useful for making adjustments to specific areas of your photo.

Recently, I have found I am using this tool more and more. If I am out and about just shooting for my own library, I tend to take photos slightly underexposed. This way, I can recover a lot of detail in the post editing stage. This is useful if you don’t have time for metering the shot perfectly, especially in the case where skies are involved.

How does it work?

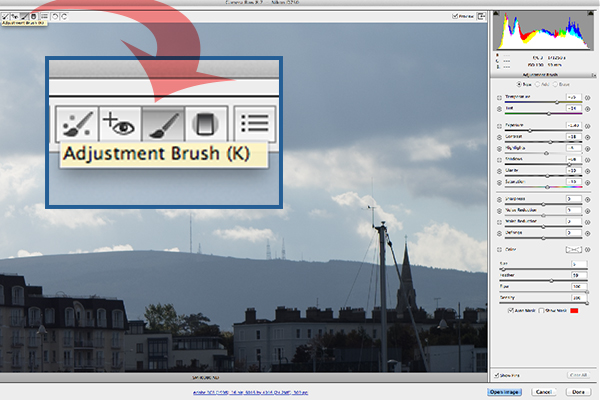
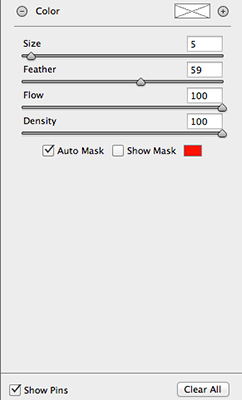
The Adjustment Brush isolates a specific area by masking it, similar to using layer masks in Photoshop. When you click on the Adjustment Brush icon, the right panel changes to the Adjustment Brush tab. The bottom sliders modify the size of the brush and you can also determine how much feather and density (flow) you wish to apply.

When you use the Adjustment Brush on a particular part of your image, a pin icon appears to determine where your adjustment has just been made.

Adjustment-brush-zoomed-up

The Adjustment Brush is located at the top left of the dialog box.

Adjustment-Brush-and-Pin-icon

How the Adjustment Brush looks when in use and the Pin icon which determines where on the image the adjustment has been made.

Adjustment-Brush-slider

These sliders adjust the size, feather and flow of the Adjustment Brush.

I do find using the Adjustment Brush a bit cumbersome. But this tool definitely has its merits. Like most of the editing tools in ACR, Photoshop, Lightroom, etc., there is simply no one-click button that magically does it all.

You may find with a bit of practice using the Adjustment Brush that it could speed up your editing workflow. Take for example this image that I shot of some blue containers on a pier. I made the basic adjustments in ACR. I then used the Adjustment Brush in several areas: to lighten the sky; to keep the highlights on the small white boat on the left from being blown out completely. I also used the Adjustment Brush on the wood section to give it more warmth.

blue-drums

Several areas where the Adjustment Brush has been used as shown by the Pin icon.

The Graduated Filter in conjunction with the Adjustment Brush is a great combination. It behaves in a similar way to a Graduated Neutral Density filter. I use this filter on skies, then use the Adjustment Brush to mask areas that I don’t want the Graduated Filter to effect.

Pros

  • Broad local adjustments lightened or darkened.
  • Speed up your editing workflow as you may not need further adjustments in Photoshop or Lightroom.
  • Works really well in conjunction with the Graduated Filter tool.

Cons

  • Cumbersome and sometimes awkward to use.
  • More refined detail is better done in Photoshop using layer masks where you have more control.

Tip:

A fantastic feature in Photoshop CC is that Camera Raw is now a filter. However, if you are using previous versions such as CS5/6, a substitute workaround is before you open your image from within ACR to Photoshop, make sure you open it as a Smart Object. You can do this by holding the Shift key and the Open Image button changes to Open Object. Or you can have this option ticked in Workflow Options. This is a pop-up dialog box located by clicking on the link at the bottom of the ACR screen. That way you can go back into ACR by double clicking on the layer.

Harbour

By using the Adjustment Brush on just the buildings, I was able to recover a lot of detail.

googletag.cmd.push(function() {
tablet_slots.push( googletag.defineSlot( “/1005424/_dPSv4_tab-all-article-bottom_(300×250)”, [300, 250], “pb-ad-78623” ).addService( googletag.pubads() ) ); googletag.pubads().enableSingleRequest();
googletag.pubads().disableInitialLoad();
googletag.pubads().collapseEmptyDivs( true );
googletag.enableServices();
} );

googletag.cmd.push( function() { googletag.display( ‘pb-ad-78623’ ); } );

googletag.cmd.push(function() {
mobile_slots.push( googletag.defineSlot( “/1005424/_dPSv4_mob-all-article-bottom_(300×250)”, [300, 250], “pb-ad-78158” ).addService( googletag.pubads() ) ); googletag.pubads().enableSingleRequest();
googletag.pubads().disableInitialLoad();
googletag.pubads().collapseEmptyDivs( true );
googletag.enableServices();
} );

googletag.cmd.push( function() { googletag.display( ‘pb-ad-78158’ ); } );

The post Using the Adjustment Brush in Adobe Camera Raw by Sarah Hipwell appeared first on Digital Photography School.

Digital Photography School

 
Comments Off on Using the Adjustment Brush in Adobe Camera Raw

Posted in Photography


Altitude adjustment: Alpine photographer Jonathan Griffith

08 Mar

Based out of the climbing town of Chamonix, France, Jonathan Griffith has been making ‘life threatening’ a sport for more than a decade. With exceptional sets of images from extended mountain hikes and nearly vertical ice climbs as well as perilous extreme sports like cliff-face paragliding, the alpinist and photographer has toured worldwide sites from Alaska to the Alps. We asked him a few questions about his photography and passion for climbing. See gallery

Articles: Digital Photography Review (dpreview.com)

 
Comments Off on Altitude adjustment: Alpine photographer Jonathan Griffith

Posted in Uncategorized


How to Retouch a Portrait with the Adjustment Brush in Lightroom

04 Mar

Portrait retouching Lightroom

You have probably seen several portrait retouching programs advertised in magazines or online, and wondered if they were worth buying. The answer is no. I have tried out quite a few, and the truth is that the Soften Skin preset in Lightroom does just as good a job as any of them. For most photographers Lightroom’s retouching tools all are you will ever need. For high end retouching purposes you can go to Photoshop.

It’s worthwhile taking some time to think about your personal approach to portrait retouching. Some photographers seem to like the airbrushed, almost plastic look of heavy processing. It’s a style you see used a lot in commercial photography or movie posters.

Others will go for a more natural effect, and use the retouching tools with a light touch. That’s definitely my approach, and it fits with my preference for natural light and for creating portraits that capture character.

Either way,the Adjustment Brush in Lightroom can accommodate your needs.

Retouching portraits of women

When retouching portraits of women it is conventional to use a skin smoothing technique to make the portrait look more flattering. There are exceptions of course, sometimes skin smoothing is not necessary, especially if your model has good skin and you shoot in soft light, or use a wide aperture to throw some of the face out of focus.

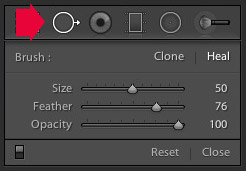
Portrait retouching LightroomThe first step in portrait retouching is to remove any blemishes with the Spot Removal tool. To do so, click on the Spot Removal tool icon to activate it, adjust the size of the  brush with the square bracket keys on the keyboard, and click on the spot you want to remove.

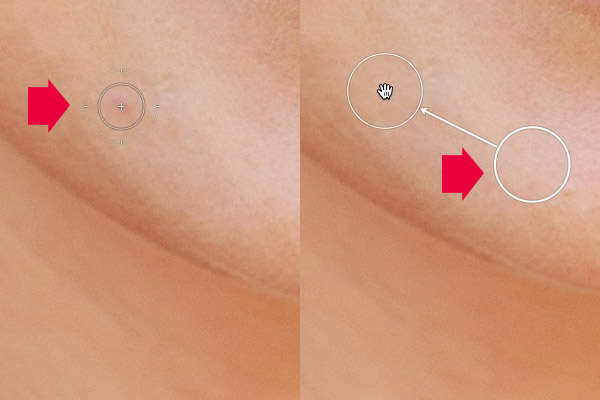
Lightroom automatically selects another area of the portrait to sample from, healing the blemish. Sometimes Lightroom won’t select the most appropriate area – in this case you can click on the circle representing the sample and move it to a more suitable location.

Portrait retouching Lightroom

Click on a blemish with the Spot Removal tool (left). In this case Lightroom’s healing algorithm worked perfectly, but if it doesn’t then click on the circle representing the sampled area and move it to a location where the skin matches the tone and texture of the area to be healed (right).

Adjustment Brush adjustments

Now it’s time to look closely at the portrait and decide what other retouching is required. It’s important that you have already made the required adjustments to tone and contrast in the Basic panel before you get to this stage. Increasing Contrast and Clarity, for example, will emphasize skin texture, wrinkles and blemishes. On the other hand, you can move the Exposure or Highlights sliders right to brighten the skin, making wrinkles and skin texture less obvious. Retouching with the Adjustment Brush should be left until last, so you know what you’re working with.

I like to start with the area underneath the model’s eyes. The skin here is thinner than the rest of the face which is why people get dark patches there. There may also be wrinkles, and some people have a strong crease along the lower eyelid.

The idea is not to eliminate these completely (unless you’re going for the heavily retouched, airbrushed look) but to minimize them. They’re a natural part of the skin’s texture and it will look unnatural if they are not there.

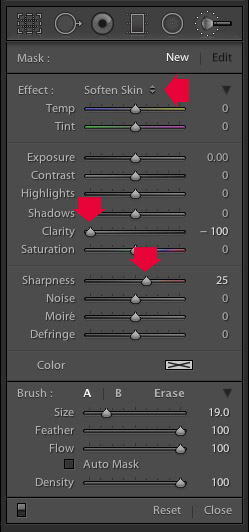
Portrait retouching LightroomClick on the Adjustment Brush icon to activate it. Select the Soften Skin preset from the Effect menu. Lightroom sets Clarity to -100 and Sharpness to +25. Make sure Feather, Flow and Density are set to 100, use the square bracket keys on the keyboard to adjust the size of the brush and paint over the areas under the eyes. The Soften Skin preset blurs the area that you paint in with the brush.

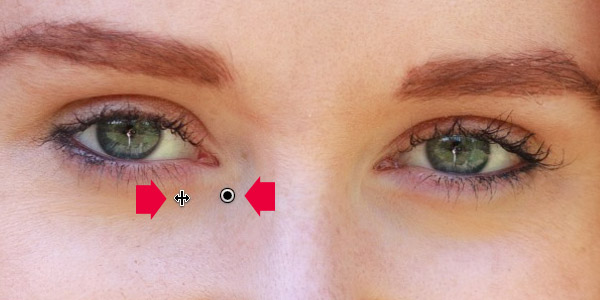
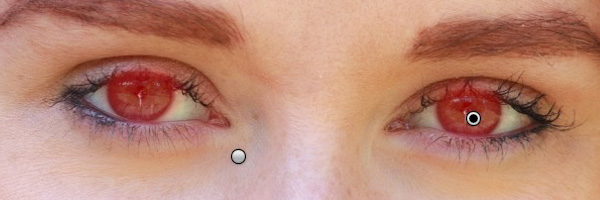
If the effect is too strong, hover the mouse over the Adjustment Brush pin (a grey circle with a black dot in the middle) until a double arrow icon appears (below). Hold the left mouse button down and move the mouse left. Lightroom reduces the value of the Clarity and Sharpness sliders, effectively lessening the strength of the Soften Skin preset. Stop when it looks about right. You can also reduce shadows by moving the Shadows slider (in the Adjustment Brush sliders) to the right. Every portrait is different so you have to adjust the effect by eye.

Portrait retouching Lightroom

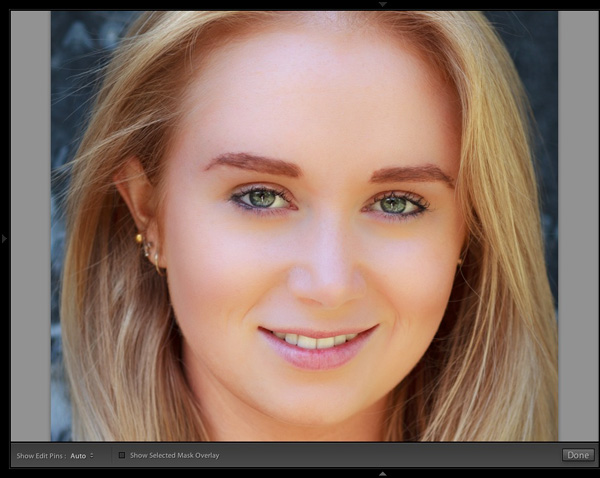
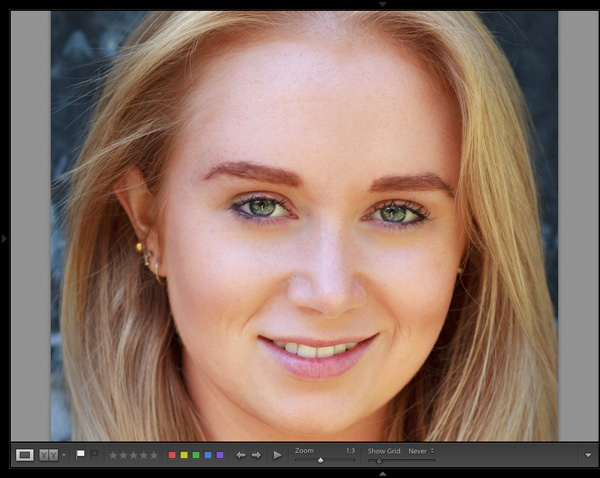
These are the results.

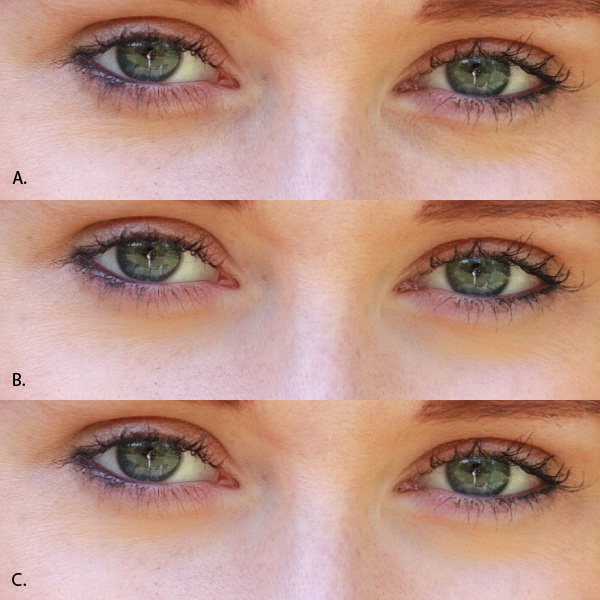
Portrait retouching Lightroom

A. Original, unretouched portrait.
B. Retouched, with Soften Skin preset at full strength.
C. Retouched, with strength of Soften Skin preset reduced and Shadows slider moved to the right (subtle difference only).

Enhancing eyes

You can also use the Adjustment Brush tool to enhance your model’s eyes. This is useful if the eyes are dark due to the lighting. Be careful of overdoing this effect as it may not look natural.

Click New at the top of the Adjustment Brush panel to create a new Adjustment Brush. Set Feather to around 50 and paint in the pupils of the model’s eyes. If you need to, press O (the letter) on the keyboard to see the masked area (it is displayed in red shown below).

Portrait retouching Lightroom

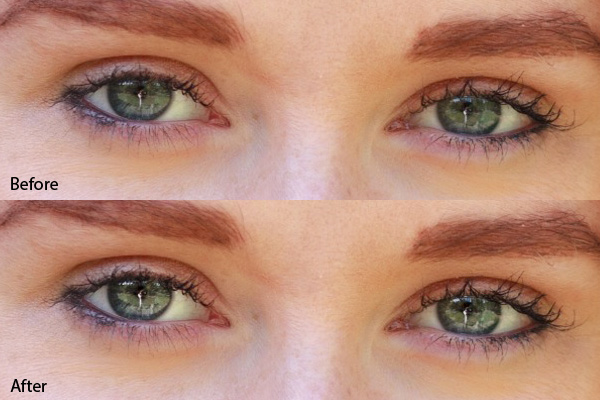
Now set Exposure to around 0.50 and Clarity to 30. The effect will vary depending on the colour of your model’s pupils and the amount of light on them. It’s a good idea to zoom out and look at the entire portrait to see if the effect is too strong. You can see this adjustment on the model’s eyes below, which I think is about right.

Portrait retouching Lightroom

You can make the effect stronger or weaker on your photo using the technique described above. Hover over the Adjustment Brush pin until the double arrow icon appears, move the mouse left to make the effect weaker, and right to make it stronger (you can also just drag the sliders one by one to change the settings)

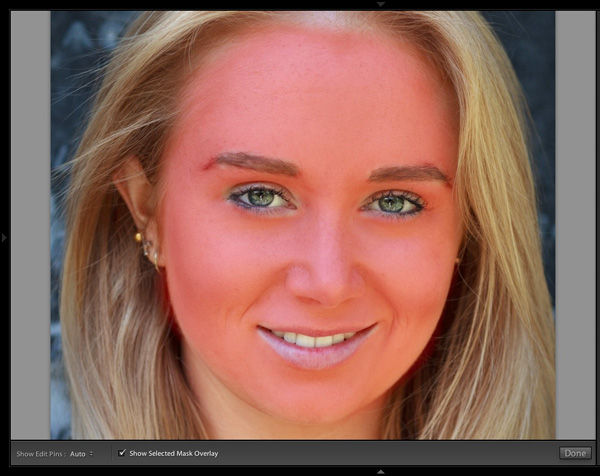
The final step is to apply gentle skin softening to the rest of the face. Create another Adjustment Brush, set Feather to 100 and paint the entire face (use the O keyboard shortcut to display the red overlay). Then select Erase in the Adjustment brush panel, set Feather to 50 and erase the eyebrows, mouth and eyes. The idea is that you only want to soften the skin, not these parts of the face. It should look something like the mask below.

Portrait retouching Lightroom

Go to the Effect menu and select the Soften Skin preset. Press O to hide the mask overlay and you will see something like the screenshot below. Remember, this is the Soften Skin preset at maximum strength so it has a strong effect on the photo.

Portrait retouching Lightroom

Use the technique we learned earlier to reduce the strength of the effect. How far you go is up to you. I like to apply the Soften Skin preset subtly to retain as much skin texture as possible. Here’s the result with Clarity reduced to -20 and Sharpness to +5.

Portrait retouching Lightroom

This video shows how I retouched another portrait, using the Adjustment Brush tool to enhance the model’s eyes and facial hair.

I’ve only touched on the number of ways you can use Adjustment Brushes in Lightroom for portrait retouching. What techniques do you use? Please let us know in the comments.


The Mastering Lightroom Collection

Mastering Lightroom ebooksMy Mastering Lightroom ebooks will help you get the most out of Lightroom 4 and Lightroom 5. They cover every aspect of the software from the Library module through to creating beautiful images in the Develop module. Click the link to learn more or buy.

googletag.cmd.push(function() {
tablet_slots.push( googletag.defineSlot( “/1005424/_dPSv4_tab-all-article-bottom_(300×250)”, [300, 250], “pb-ad-78623” ).addService( googletag.pubads() ) ); } );

googletag.cmd.push(function() {
mobile_slots.push( googletag.defineSlot( “/1005424/_dPSv4_mob-all-article-bottom_(300×250)”, [300, 250], “pb-ad-78158” ).addService( googletag.pubads() ) ); } );

The post How to Retouch a Portrait with the Adjustment Brush in Lightroom by Andrew S. Gibson appeared first on Digital Photography School.

Digital Photography School

 
Comments Off on How to Retouch a Portrait with the Adjustment Brush in Lightroom

Posted in Photography


Using the Lightroom Adjustment Brush to add Dimension to a Landscape Photo

25 Feb

Adding layers of dimension with the Lightroom brush

Lightroom has the power to completely transform your landscape photograph into something far more powerful, something that hits home with viewers, and something that pops off the screen.

By default digital cameras create flatter image files than what you see with your eye. Your eye has the ability to see dimensions like no camera can really capture. Although many try.

What is Dimension?

The definition of dimension is: an aspect or feature of a situation, problem, or thing. When utilizing the word dimension in your photograph, think of the features of specific locations and objects within the frame. As an example, in the photo you will see here, there are multiple layers of dimension to play with. There’s the sky, the water, the rocks, the buildings, the grass, and the shed. Each has its own uniqueness to it, and can and should be treated as such.

The Adjustment Brush Tool

Like the other local adjustment tools in Lightroom, the adjustment brush tool has the ability to fine tune specific parts of a photograph. Using the tool can create new dimensions you would never have otherwise seen from a camera rendition. Your eye, however, most likely did see the dimensions.

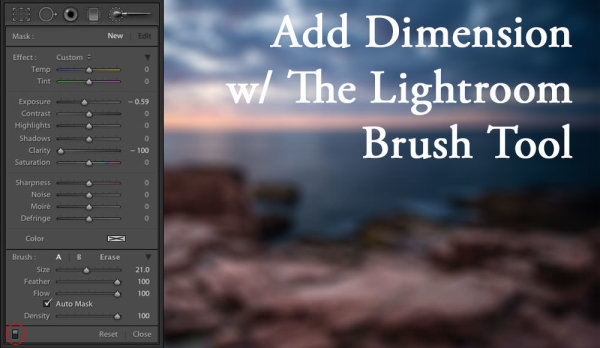
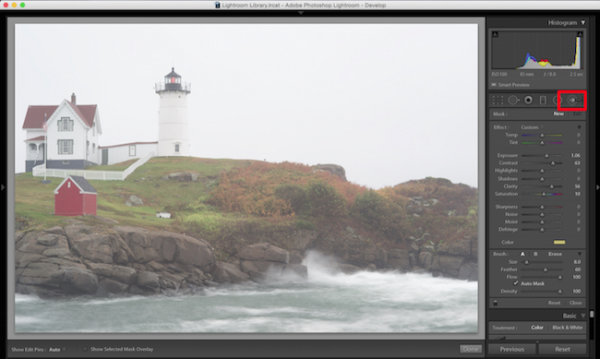
Lightroom Brush Tool

Where to find the Lightroom brush tool

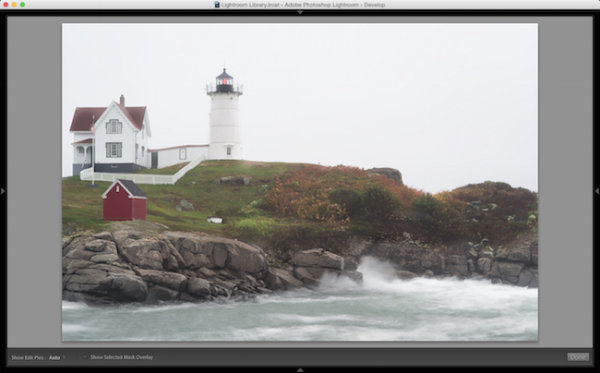
You can see in the first photo that it’s a really cool lighthouse scene, but there is something drastically gone wrong. The photo is super flat. That is because it was a very rainy day with tons of fog everywhere, and mist from the water constantly hitting the camera.

To use the Lightroom Adjustment Brush, open a photo in the Develop module, then select the brush icon at the top right, just under the Histogram (the keyboard shortcut is K).

Once selected, a variety of local adjustments will appear. From there you have a wide range of options that you can make on a very specific section of your photo. For example, sharpness, exposure, or even brushing on a new color.

The first thing you should know before starting with the Adjustment Brush is that Lightroom keeps your last settings whenever adding a new brush. To zero out the settings simply double click on the word Effect.

Also, the Auto Mask feature is very smart. Think of it like a content aware brush. Simply put, it looks at the cross hairs inside of your brush and will try to stay “within the lines” and not brush on what doesn’t match up. This is fantastic for edges. However, the Auto Mask feature uses more Lightroom performance, so you may notice a slow down. My workflow is to fill in big spaces and then turn on Auto Mask when I need it.

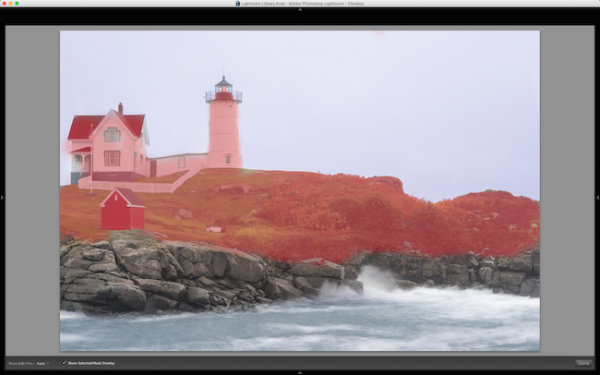
As you are brushing in areas, hit the O key on your keyword to see a red mask of where you have brushed (hit Shift+O to cycle through the available mask colors).

Lightroom masking

Hit the O key to view the current mask in a red overlay

I started brushing the middle section of the photo with more contrast, and reduced highlights and shadows. This broke through the haze and enhanced the greens enough to where I like it.

I then made another brush by clicking on New in the brush panel. This one was to bring down the extreme highlights of the house and lighthouse. I brought it down just enough so it’s still white, but doesn’t blend in with the sky, which is also very white.

Then came a third brush, which was for the rocks. I wanted to make sure they popped out more than anything else. I didn’t want them to just have contrast, so I also used the clarity slider. Clarity will enhance a lot of edge detail, which is awesome on rocks.

Lightroom brush clarity

Add clarity to select objects using the Adjustment Brush

Now that the grass, the structures and the rocks all have different dimensions of contrast, clarity and light, it is time to play with the color dimension. So I created another brush with a hint of transparent blue to the water. This adds more life to the boring gray tone it had previously.

I then did the same with the sky, but with less transparency due to the whiteness of the sky already. Adding a hint of color the white sky helps separate the house and lighthouse from the background even more.

The last brush I added to the photo was on the roof of the house. The intention there was to recover the red color subtly, so it doesn’t take away from the rest of the photo. So I increased the contrast, dropped the exposure slightly and added a hit more red to the roof.

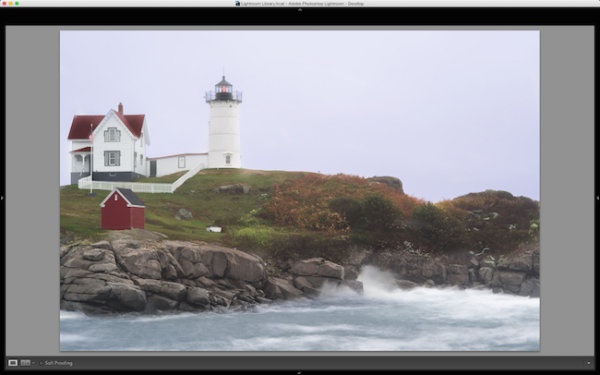
Lightroom brush color

Add color to specific areas using the Lightroom brush

At the end of the day, the photo has multiple layers of dimension. It’s no longer flat, and notone section has the same feel as the rest. Using the brush feature in Lightroom I was able to not only recover color and contrast, but add even more texture and life to the scene.

Think of the Adjustment Brush tool like layers in Photoshop or onOne Software. There are no actual layers but rather brush points which can be adjusted individually.

Below is a video showing what I’ve done with this photograph.

There is a lot more that can be done, like sharpness, noise reduction and even changing color temperature and tinting for specific areas in a photo. But what I have shared here is a handful of what you are capable of doing within your favorite photography workflow software, Lightroom.

I’d love to see some photos you have processed using Lightroom Adjustment Brush tool. Please comment to share with the dPS community.

googletag.cmd.push(function() {
tablet_slots.push( googletag.defineSlot( “/1005424/_dPSv4_tab-all-article-bottom_(300×250)”, [300, 250], “pb-ad-78623” ).addService( googletag.pubads() ) ); } );

googletag.cmd.push(function() {
mobile_slots.push( googletag.defineSlot( “/1005424/_dPSv4_mob-all-article-bottom_(300×250)”, [300, 250], “pb-ad-78158” ).addService( googletag.pubads() ) ); } );

The post Using the Lightroom Adjustment Brush to add Dimension to a Landscape Photo by Scott Wyden Kivowitz appeared first on Digital Photography School.

Digital Photography School

 
Comments Off on Using the Lightroom Adjustment Brush to add Dimension to a Landscape Photo

Posted in Photography


How to Use the Adjustment Brush in Lightroom

08 Jul

In this video tutorial Trevor Dayley gives a few quick and helpful tips on using the Adjustment brush in Lightroom. If you’re new to Lightroom this is a great place to start to get a little more creative control. Enjoy!

Post originally from: Digital Photography Tips.

Check out our more Photography Tips at Photography Tips for Beginners, Portrait Photography Tips and Wedding Photography Tips.

How to Use the Adjustment Brush in Lightroom


Digital Photography School

 
Comments Off on How to Use the Adjustment Brush in Lightroom

Posted in Photography


AF Micro Adjustment – Is It Neccessary? (Canon 60D, Canon 7D, Nikon D7000, Nikon D700)

03 Dec

www.artoftheimage.blogspot.com – A lot of people were disappointed when the Canon 60D came out without AF Micro Adjustment for fine tuning focus on your lenses. The Canon 7D has it. The Nikon D7000 and D700 have it. But is it neccessary? Are we over-doing? Check out the article over at http
Video Rating: 3 / 5

A review/test of professional level collection of photos demonstrating everything from slow shutter speed night photos to amazing daylight photos. The new Nikon d5100 has a 16.2 MP CMOS sensor much like that in the D7000, 1080p movie capability and a side-articulated 921K dot 3.0″ tilt/swivel LCD. The D5100 also becomes the first Nikon DSLR to be able to apply special processing filters to stills and video. The company has also introduced the ME-1 external microphone. The camera will be available from this month as a kit with the 18-55mm VR lens for 9.95 while the microphone will retail at 9.99.
Video Rating: 4 / 5

 
Comments Off on AF Micro Adjustment – Is It Neccessary? (Canon 60D, Canon 7D, Nikon D7000, Nikon D700)

Posted in Nikon Videos


Adjustment Brush in Lightroom 3

04 Nov

Kerry Garrison shows the local adjustment brush in Adobe Photoshop Lightroom 3. This video is from the Learning Resource Center at cameradojo.com
Video Rating: 4 / 5

Additional videos for this title: j.mp Lightroom 4 202: Nature and Landscapes by Martin Perhiniak Video 23 of 32 for Lightroom 4 202: Nature and Landscapes Mother Nature doesnt always cooperate when you take photos outdoors! Thats why weve asked Adobe Lightroom expert and acclaimed educator Martin Perhiniak to show you how to enhance and optimize even the most challenging Nature and Landscape photos. Martin starts off by underscoring the usefulness of the Camera Raw format as well as the importance of keeping your catalogs well-organized. He then covers a wide variety of techniques for enhancing your Landscape photos. Youll learn how to both visually recreate the original mood of a photo as well as how to create alternate artistic interpretations. Specifically, youll learn techniques for dealing with everything from tricky elements like water and clouds, as well as sunset and night conditions. Youll even have fun learning how to work with photos taken from airplanes! Then, Martin takes his photos over to Lightrooms sister product, Photoshop, to develop them further. He shows you how easy and smooth it is to move back and forth between the two Adobe family members. See how to convert and combine your photos to create realistic Panoramas and stunning HDR (High Dynamic Range) images! Upon finishing this course, youll have the the Lightroom skills to take your photos to the next level and beyond! Watch all of the advanced and specialized courses in our Lightroom 4 and

 
Comments Off on Adjustment Brush in Lightroom 3

Posted in Retouching in Photoshop