RSS
 

Posts Tagged ‘adjustment’

Your Quick Guide to Understanding Photoshop Adjustment Layers

09 Dec

The post Your Quick Guide to Understanding Photoshop Adjustment Layers appeared first on Digital Photography School. It was authored by Simon Ringsmuth.

photoshop adjustment layers a quick guide

Adjustment layers are one of the most essential aspects of editing images in Photoshop. They let you apply rich, detailed edits to your photos that go well beyond what you can accomplish in other programs.

Now, adjustment layers can be a bit difficult to understand if you’re used to a more streamlined application like Lightroom, Apple Photos, or Luminar. But with a bit of practice, you can easily master Photoshop adjustment layers and take your photo editing to the next level!

Photoshop adjustment layers magnolia seed
Nikon D7100 | 50mm f/1.8G | 50mm | 1/500s | f/2.8 | ISO 250

What are Photoshop adjustment layers?

When you open a picture in Photoshop, you can’t just start dragging sliders to change its appearance. Before you can do much of anything, you need to start with layers, which serve as the bedrock of everything that makes Photoshop so powerful.

Photoshop adjustment layers leaf
Nikon D7100 | 50mm f/1.8G | 50mm | 1/250s | f/2.8 | ISO 450

To help visualize the concept of adjustment layers, think about a physical picture sitting on your desk. If you wanted to give the picture a green tint, you could simply drape a sheet of green cellophane over it.

That’s exactly how adjustment layers work in Photoshop: They let you change the visual properties of your image without destroying the underlying file. You can add as many adjustment layers as you want and use them to change things like white balance, exposure, hue/saturation, and over a dozen other properties.

In other words:

Photoshop adjustment layers are like stacking sheets of digital cellophane on top of your images. Each layer can be controlled individually and combined with layer masks to apply edits to specific parts of your images. All of this might seem needlessly complicated compared to the simplicity of other programs, but once you get the hang of Photoshop adjustment layers, you’ll never want to go back.

Photoshop adjustment layers dandelion
Nikon D7100 | 50mm f/1.8G | 50mm | 1/2000s | f/2.8 | ISO 100

Another way to think about Photoshop adjustment layers is by comparing them to panels in the Develop module of Lightroom.

However, the Develop panels only offer a handful of adjustments that you can use. Photoshop lets you stack as many layers as you need – even multiple layers of the same type of adjustment – so you can tweak your images as much as you could possibly want. There is a bit of a learning curve, but the results are well worth the effort.

How to add an adjustment layer

The first step when working with adjustment layers is to load an image into Photoshop. Then click on the Adjustments panel, which is usually located above the Layers panel.

(If you don’t see the Adjustments panel, go to the Window menu and choose Adjustments.)

Photoshop adjustment layers
Load an image into Photoshop and then click the Adjustments panel.

The Adjustment panel offers sixteen adjustments to choose from, and sorting through all of these can be overwhelming (especially if you’re used to the simple, straightforward editing parameters available in Lightroom).

Photoshop adjustments
Each one of these icons is a specific type of adjustment. Hover your cursor over each one to see a brief description.

Some of these adjustments are similar to what you might find in Lightroom, such as Brightness/Contrast and Color Balance. But using the adjustments is much different from working in Lightroom and, in some ways, more complicated. Fortunately, that also means you can get much better results.

To see how this process works, I’ve included an image (below) that clearly needs some editing. Thankfully, Photoshop adjustment layers are here to help!

Photoshop adjustment layers Minnesota
Fujifilm X100F | 23mm | 1/4000s | f/8 | ISO 200

I’ll start by adding a Brightness/Contrast adjustment layer, which is a simple matter of just clicking the Brightness/Contrast icon in the Adjustments panel. Immediately, two sliders appear, which you can use to make the picture brighter or darker and to add or remove contrast.

Brightness/Contrast editing parameters
After clicking an adjustment layer icon, the available editing parameters show up for you to start working with.

A few seconds later, my picture is much improved, thanks to a brightness boost. However, there is still a lot of work left to do.

Photoshop adjustment layers Minnesota
Brightness +75, Contrast -5

One other thing happens when you click an adjustment layer icon that you might not notice but is critically important:

The Layers panel will create a layer specifically for that adjustment.

adjustment layers
Clicking an adjustment icon automatically adds a new layer to your image with the selected adjustment as its title.

This new layer, along with all the icons associated with it, is what gives an adjustment so much flexibility. In Lightroom, you can enable and disable individual panels in the Develop module, but you don’t have this level of control over your adjustments.

masking icon

Note the different icons in the short screen capture above:

  • Indicates layer visibility: Click this to hide or show the adjustment.
  • Layer thumbnail: Double-click this to show the editing parameters (sliders, eyedroppers, etc.) for the adjustment layer.
  • Indicates layer mask is linked to layer: Click this to unlink the adjustment layer mask from the adjustment. If you’re new to adjustment layers, you can just ignore this altogether.
  • Layer mask thumbnail: This is a very tiny preview of the layer mask that is created by default when you click on a new adjustment layer icon. Click this to show the editing parameters of the mask.

While my picture of the Minnesota sign is better than when I started, it still needs a lot of improvement. The next thing I want to do is set the white balance, but this option is missing from the Adjustments panel.

Instead, you have to use the Curves adjustment, then click the gray point eyedropper. Next, click a neutral or slightly gray portion of your image to counteract any color casts. Note that this process essentially replicates the White Balance function of Lightroom.

curves adjustment
Select the gray point tool, then click a slightly gray or neutral area of your photo to set the white balance of the image.

One thing you might notice is that the Curves options in Photoshop are much more comprehensive than the Curves options in Lightroom. This should give you an indication of how much more flexibility you have with adjustment layers. You can use Curves to do everything you would do in Lightroom, along with much, much more.

The final operation to fix this image involves a Hue/Saturation adjustment layer. Click on the Hue/Saturation icon to bring up a panel that looks like this:

Photoshop adjustment layers
The Hue/Saturation adjustment layer parameters

The key to this panel is the hand icon in the top-left. Click it, then click on a part of your image that you would like to saturate or de-saturate.

In this case, I want to start with the grass below the sign. Clicking and dragging to the right makes it much greener, and gives a sense of vibrance that is sorely missing from the original.

Photoshop adjustment layers Minnesota
The grass and foreground elements really pop, thanks to a quick tweak with the Hue/Saturation adjustment layer.

This is a good start, but I need to fix the sky, and that is where a layer-based approach really starts to come in handy.

Instead of editing the sky with the adjustment layer I just created, I can add a new adjustment layer and use that for the sky. This allows me to control my Hue/Saturation edits for individual parts of the image, instead of having just one Hue/Saturation adjustment layer that affects the entire scene.

Minnesota statue with boosted sky colors
The sky colors are now improved. These edits are applied using a layer separate from the grass edits, and thus can be controlled independently.

While the resulting picture is much better than the original, there is still some tweaking that needs to be done for it to truly feel finished.

Adjustment layer masks, explained

Eagle-eyed observers might notice something amiss with the picture above:

The Minnesota sign now has a purple tint to it.

Never fear, adjustment layers are here! Click the white rectangle next to a layer name to edit its mask:

layer masks

You see, by painting black onto a layer’s mask, you prevent that area of the photo from being affected by the adjustment. So if you don’t want the sign to be affected by the Hue/Saturation adjustment layer, simply paint black over the portion of the mask that covers the sign!

Here’s how it works:

First, select the Brush tool (press B or click the Brush icon in the left-hand toolbar).

Make sure your foreground color is white and your background color is black (to do this quickly, just hit D).

Now it’s time to actually paint the mask. Press the X key to switch between white (revealing) and black (hiding), and the [ and ] keys to increase or decrease the size of the brush.

For tricky shapes like the sign, you can use the Magic Wand tool to select the shape. Then, with the shape still selected, use the Brush tool to mask (remove) the adjustment from that portion of the image.

Photoshop adjustment layers Minnesota

A closer inspection of the Layers panel now shows a black silhouette over the portion that has been masked out of the top Hue/Saturation adjustment layer. I have also renamed the top two layers so as to accurately describe the type of effect they have on the image.

(Double-click a layer name to rename it, and press Enter when you finish typing.)

Photoshop adjustment layers
The mask for the Hue/Saturation Sky adjustment layer shows a black patch where the adjustment has been concealed.

Nondestructive editing

One mistake some beginners make when editing images in Photoshop is applying adjustments directly to the original photo. This can be done using the Image>Adjustments menu, which gives you common editing options such as Brightness/Contrast, Hue/Saturation, and more. Unlike adjustment layers, these edits are not easy to work with, nor are they easy to alter once they have been implemented.

Photoshop adjustment layers, on the other hand, are nondestructive. You can tweak and change layers after they have been implemented, and you can easily delete them. That’s why layer adjustments are much more flexible than edits applied directly to an image.

Photoshop adjustment layers
Adjustment layers can be renamed, re-sorted, locked, disabled, and made transparent. And that’s just the beginning!

You can perform all manner of custom tweaks and changes to adjustment layers, such as:

  • Showing/hiding a layer by clicking the eye icon
  • Editing the adjustment by clicking the light/dark circle icon
  • Adjusting the opacity of a layer
  • Changing the blend mode, which adjusts how the layer interacts with layers below it
  • Adjusting the order of the layers by clicking and dragging
  • Locking a layer to prevent further changes by clicking the lock icon

Photoshop adjustment layers open up new editing possibilities that simply cannot be achieved in Lightroom. For example, the image of a leaf from the beginning of this article can be altered with a selective color adjustment in a matter of seconds. All I need to do is add a Black & White adjustment layer. I can then select the leaf with the Magic Wand tool and paint over the selection on the layer mask.

leaf in color with black and white background
Adding a selective color black and white effect took about four seconds.

Photoshop adjustment layers: conclusion

If you have a Creative Cloud Photography subscription, you can use Photoshop in addition to Lightroom at no extra charge. Now, if the sheer level of options and buttons in Photoshop makes you want to run to the comfort and safety of Lightroom, I get it. I have been there, too, and I still have that feeling from time to time.

However, learning to use Photoshop adjustment layers is one of the first steps in understanding how powerful and flexible Photoshop can be. If you have not yet tried working with layers, take a moment to test them out. See what layers can do for you.

You might be surprised at how easy it is!

The post Your Quick Guide to Understanding Photoshop Adjustment Layers appeared first on Digital Photography School. It was authored by Simon Ringsmuth.


Digital Photography School

 
Comments Off on Your Quick Guide to Understanding Photoshop Adjustment Layers

Posted in Photography


How to Dramatically Shape the Light and Mood Using Adjustment Brushes in Lightroom (video)

18 Apr

The post How to Dramatically Shape the Light and Mood Using Adjustment Brushes in Lightroom (video) appeared first on Digital Photography School. It was authored by Caz Nowaczyk.

How to Dramatically Shape the Light and Mood Using Adjustment Brushes in Lightroom (video) Featured image

In this video from PiXimperfect, you’ll learn how to dramatically shape the light and mood of a photo using Adjustment Brushes in Lightroom.

Throughout this tutorial you’ll learn:

  • the difference between local adjustments and global adjustments
  • how to auto-set particular sliders
  • ways to expand the tonal range
  • how to avoid edge glow when using particular sliders
  • about the tone curve and how to use it effectively
  • valuable shortcuts to help you see when you are creating clipping (blown-out, and underexposed areas with no detail), to view before and after shots, to select the adjustment brush and more
  • how to use the HSL panel to great effect
  • ways to use split toning

We’d love to see the images you edit after watching this tutorial. Please share them with us in the comments section.

You may also like:

  • Landscape Editing Techniques for Fine Art Photography Using Lightroom
  • 5 Things to Do to Every Photo In Lightroom to Improve Your photos
  • How to Jump from Lightroom to Photoshop and Back Again When Editing Photos (video)
  • Answers to Your Most Common Lightroom Questions
  • How to Make Your Photos Pop in Lightroom (With Just 4 Quick Edits!)
  • Create Amazing Sunrise Photos with these Easy Lightroom Editing Tips
  • How to Make Your Photos Awesome in Lightroom or Photoshop Camera RAW

The post How to Dramatically Shape the Light and Mood Using Adjustment Brushes in Lightroom (video) appeared first on Digital Photography School. It was authored by Caz Nowaczyk.


Digital Photography School

 
Comments Off on How to Dramatically Shape the Light and Mood Using Adjustment Brushes in Lightroom (video)

Posted in Photography


DxO PhotoLab 3.2 introduces improved local adjustment tools, new camera support and more

19 Mar

DxO PhotoLab 3 has been updated to version 3.2. The free update includes numerous improvements plus raw file support for five new cameras. Long known for its local adjustment tools, DxO PhotoLab 3.2 introduces new Duplicate and Rename features in the Local Adjustments Palette. The Repair Tool, used to remove distracting elements from your image, has a new display mode for better visibility. DxO PhotoLab 3.2 includes new multi-image keywords, plus Windows users now have access to renaming functionality.

Regarding improved local adjustment mask management, with the new Duplicate and Rename features, users can reproduce masks from image to image. Once applied to a new image, the mask can then be adapted as needed for each image. To aid in easy identification of individual masks you have created, DxO PhotoLab 3.2 adds the ability to rename your masks. You can also quickly move each mask with a single click when using the brush tool.

DxO PhotoLab 3.2 introduces new Duplicate and Rename functionality for local adjustment masks. Image credit: DxO

The simplified Repair Tool display mode interface has been redesigned to allow the user to see more of the background when removing objects. This means that it will be easier to make accurate and realistic looking repairs to your images. The area being retouched is now outlined with a thin line, as can be seen in the screenshot below.

The Repair tool in DxO PhotoLab 3.2 has a simplified repair tool user interface. This introduces a new thin white outline surrounding the area being retouched. Image credit: DxO

In prior versions of DxO PhotoLab 3, users could add and delete individual keywords. In PhotoLab 3.2, users can now differentiate between keywords that are tagged to multiple images. As mentioned earlier, Windows users can also now rename keywords.

In DxO PhotoLab 3.2, users can differentiate between keywords that are tagged to multiple images. Image credit: DxO

DxO PhotoLab is well regarded for its excellent and powerful optical corrections, which are customized by the DxO team for different camera and lens combinations. DxO PhotoLab 3.2 introduces support for five new cameras: The Canon EOS-1D X Mark III, Nikon D780, Olympus E-M1 Mark III, Leica D-Lux 7 and Leica Q2. Nearly 770 new optical modules have been added in DxO PhotoLab 3.2, which now includes more than 60 million different camera and lens combinations.

For existing DxO PhotoLab 3 users, the 3.2 update is available free of charge. For new customers, DxO PhotoLab 3.2 is available in Essential and Elite editions. To learn more about which version is best for you, click here to see a breakdown of version differences. With the new 3.2 update, DxO has introduced special pricing for new users. Until March 31, new users can purchase DxO PhotoLab 3.2 Essential for $ 99.99 USD or the Elite edition for $ 149.99. These are savings of $ 30 and $ 50 respectively. For more information or to download a free trial of the software, visit DxO.

Articles: Digital Photography Review (dpreview.com)

 
Comments Off on DxO PhotoLab 3.2 introduces improved local adjustment tools, new camera support and more

Posted in Uncategorized


Photoshop Adjustment Layers Explained and How to Use Them (Part 2)

08 Dec

The post Photoshop Adjustment Layers Explained and How to Use Them (Part 2) appeared first on Digital Photography School. It was authored by Nisha Ramroop.

photoshop-adjustment-layers-explained-part-2

Part 1 of How to Use Photoshop Adjustment Layers introduced you to the first eight of the adjustment layer type editing tools, which allow you to work non-destructively. Here, we continue to look at some of the other tools available as Adjustment Layers.

Photoshop Adjustment Layers Explained and How to Use Them (Part 2)

1. Photo Filter

Did you know that there are colored filters that you place in front of your camera lens that alter the color temperature and balance of your final image? Well, the Photo Filter adjustment layer adds a color filter to your image similar to this.

There are many preset photo filters in Photoshop, but the most common are those that make your image warm or cool. You can further tweak each preset to your liking. For instance, you can change the density of the effect easily using the Density slider. There is also the Preserve Luminosity box to check so that the applied filter does not darken your image.

You can also choose an exact color that you would like to overlay as a filter by clicking on “color” and chosing from the color menu or by using the eyedropper tool to chose a color from your image.

Image: Warm (oranges) and Cool (Blues) Photo filters applied to the image above

Warm (oranges) and Cool (Blues) Photo filters applied to the image above

2. Channel Mixer

The Channel Mixer Photoshop Adjustment Layer is another great tool to create stunning black and white and tinted images.

The principle is similar to that used by the Black and White Adjustment Layer. In each of these, you can adjust the displayed grayscale image by changing the tonal values of the color elements of the image.

There are three channels in the RGB view: red, green and blue. Note: The source channel is the one that defaults to 100%. The Channel Mixer, therefore, allows you to combine and mix the best of each channel. It does this by adding (or subtracting) grayscale data from your source channel to another channel.

Also, of note, adding more color to a channel gives you a negative value and vice versa. Hence, at the end of your edit, it is advisable that all your numbers total 100%.

Photoshop Adjustment Layers Explained and How to Use Them (Part 2)

The Channel Mixer also allows you to exaggerate color and make creative color adjustments to your image.

3. Color Lookup

The Color Lookup adjustment layer uses presets to instantly color grade or change the “look” of your image. The presets are called LUTs or lookup tables. Each lookup table contains specific instructions for Photoshop to remap the colors in your image to a different set of colors to create the selected look.

Image: Applying the Late Sunset LUT creates a dramatic finish

Applying the Late Sunset LUT creates a dramatic finish

When you choose the Color Lookup Adjustment Layer, three options are available to you: 3DLUT File, Abstract and Device Link.

Most of the presets reside under the 3DLUT File option. Of note, 3D (in 3DLUT) refers to Photoshop’s RGB color channels (and not three-dimension).

Image: Late Sunset LUT applied at 60% opacity for a more realistic finish

Late Sunset LUT applied at 60% opacity for a more realistic finish

Furthermore, LUTS are available for download from various websites or you can create your own LUT.

4. Invert

The Invert Photoshop Adjustment Layer is self-explanatory. It inverts the colors and is an easy way to make a negative of your image for an interesting effect.

Image: The first image with colors inverted gives a surreal otherworldly effect

The first image with colors inverted gives a surreal otherworldly effect

5. Posterize

Looking for a flat, poster-like finish? The Posterize Adjustment Layer gives you that by reducing the number of brightness values available in your image.

You can make an image have as much or as little detail as you like by selecting the number in the levels slider. The higher the number, the more detail your image has. The lower the number, the less detail your image has.

This can come in handy when you want to screenprint your image. You can limit the tones of black and white. This is also true of the Threshold Adjustment Layer.

Image: Posterize Adjustment Layer

Posterize Adjustment Layer

6. Threshold

When you select Threshold from your Photoshop Adjustment Layers list, your image changes to black and white. By changing the Threshold Level value, you control the number of pixels that are black or white.

Image: Threshold Adjustment Layer

Threshold Adjustment Layer

7. Gradient Map

The Gradient Map lets you map different colors to different tones in your image. The gradient fill, therefore, sets the colors representing both the shadow tones on one end and highlight tones on the other end of the gradient.

Likewise, checking the “Reverse” box swaps around the colors of your gradient. This means that the shadow colors are moved to the highlights end and vice versa.

A good rule of thumb is to keep your shadows dark and your highlights brighter for ease of reference.

Photoshop Adjustment Layers Explained and How to Use Them (Part 2)

Your gradient map also makes available many presets that are adjustable via the gradient editor window. Additionally, you can also define/create your own gradients by changing the slider colors.

8. Selective Color

Use the Selective Color Adjustment Layer to modify specific amounts of a primary color without modifying other primary colors in your image. Check the Absolute box if you want to adjust the color in absolute values.

Example: If you have a pixel that is 50% yellow and you add 10%, you are now at a 60% total. The Relative box is a little more complicated as it would adjust the yellow pixel only by the percentage it contributes to the total. Using the same example, if you add 10% to the yellow slider (with relative checked), it actually adds 50% of the 10%, which brings your total to 55%. Relative, therefore, gives you a more subtle effect.

Photoshop Adjustment Layers Explained and How to Use Them (Part 2)

However, when it comes to this editing tool, the potential is far beyond this simplistic edit technique. You can use it to correct skin tones and for general toning.

While selective color adjustments are similar to hue/saturation adjustments, there are subtle differences. Selective Color allows you to subtract/add color values, whereas Hue/Saturation does not.

The Hue/Saturation adjustment allows you to work with a range of hues that are included with the six color ranges in Selective Color, so there is more control there if you need it.

Conclusion

These basic examples of how to use the Photoshop Adjustment Layers tools merely scratch the surface of their capabilities. Certainly, you will appreciate editing non-destructively, whether you are just starting out or advanced with adjustment layers.

Some of the adjustment layers seem similar, but each has its differences and its pros and cons. Either way, there are many possibilities of playing around with your image, while preserving the original.

If you haven’t already, be sure to check out Part 1 in this series.

Do you use Photoshop Adjustment Layers? If so, which ones do you use and why? Share with us in the comments.

The post Photoshop Adjustment Layers Explained and How to Use Them (Part 2) appeared first on Digital Photography School. It was authored by Nisha Ramroop.


Digital Photography School

 
Comments Off on Photoshop Adjustment Layers Explained and How to Use Them (Part 2)

Posted in Photography


Photoshop Adjustment Layers Explained and How to Use Them (Part 1)

02 Dec

The post Photoshop Adjustment Layers Explained and How to Use Them (Part 1) appeared first on Digital Photography School. It was authored by Nisha Ramroop.

Photoshop Adjustment Layers Explained and How to Use Them (Part 1)

If you use Photoshop, you probably already know that layers are a great non-destructive way to edit. Within the realm of layers, there exists a group of very useful editing tools called Adjustment Layers that allows for easy editing of your images. As with most Photoshop tools, there are several ways to achieve the same result. When you use Photoshop adjustment layers (as with other layer types), you can make changes, save it as a Photoshop file (PSD) and undo/change it many years later. Since no pixels are destroyed or changed, your original image stays intact. Let’s take a look at the basics of using Photoshop Adjustment Layers.

Accessing Photoshop Adjustment Layers

There are two ways to access Photoshop Adjustment Layers.

1. To access via the Layers Menu; choose Layer->New Adjustment Layer, and choose one of the many adjustment types (which are expanded upon below).

photoshop-adjustment-layers-explained

2. To access via the Layers Panel; click on the half black/half white circle at the bottom of the Layers Panel, and choose the adjustment type you want to work with.

Photoshop Adjustment Layers Explained and How to Use Them (Part 1)

Adjustment Layer Types

1. Brightness and Contrast

Brightness and Contrast allow you to make simple adjustments to the brightness and contrast levels within your photo. When you adjust brightness, the overall lightness (or darkness) of each pixel in your frame is changed. To increase a photo’s tonal values and increase the highlights, slide the Brightness to the right. To decrease a photo’s tonal values and increase the shadows, slide the Brightness to the left.

Contrast, however, adjusts the difference between the brightness of the elements in your image.  Thus, if you increase brightness you make every pixel lighter, whereas if you increase contrast you make the light areas lighter and the dark areas darker.

photoshop-adjustment-layers-explained

2. Levels

The levels tool adjusts the tonal range and color balance of your image. It does this by adjusting the intensity levels of the shadows, mid-tones, and highlights in your image. Levels Presets can be saved and then easily applied to further images.

Of note, if you use the Image menu to open the levels tool (Image->Adjustments->Levels) a separate layer will not be created and the changes will be committed directly (destructively) to your image layer. Thus, I recommend using the Adjustment Layers menu (as shown above)  to access this very useful tool.

Photoshop Adjustment Layers Explained and How to Use Them (Part 1)

3. Curves

While the Levels adjustment allows you to adjust all the tones proportionally in your image, the Curves adjustment lets you choose the section of the tonal scale you want to change. On the Levels graph, the upper-right area represents the highlights, while the lower-left area represents the shadows.

Use either of these adjustments (levels or curves) to correct your tone when your image’s contrast is off (either too low or high).

The Levels Adjustment works well if you need to apply a global adjustment to your tone. To apply more selective adjustments, you are better off using Curves. This includes adjustments to just a small section of the tonal range or if you only want to adjust light or dark tones.

photoshop-adjustment-layers-explained

4. Exposure

When you think of exposing an image properly, you are concerned with capturing the ideal brightness, which will give you details in both the highlights and shadows. In Photoshop Adjustment Layers, the Exposure Adjustment has three sliders that adjust Exposure, Offset and Gamma.

Use the Exposure slider to adjust the highlights of the image, the Offset slider for the mid-tones and the Gamma to target the dark tones only.

Photoshop Adjustment Layers Explained and How to Use Them (Part 1)

5. Vibrance

Use the Vibrance Adjustment Layer to boost the duller colors in your image. The great thing about increasing vibrance is that it focuses on the less-saturated areas and does not affect colors that are already saturated.

Image: Vibrance adjusts only the duller colors in an image

Vibrance adjusts only the duller colors in an image

photoshop-adjustment-layers-explained

Look at the difference in the greens between this image and the one above. Saturation adjusts all the colors (and tonal range) in an image.

6. Hue/Saturation

Hue and Saturation, allows you to change the overall color hue of your image, as well as how saturated the color is.

You can change the hue (color) of your entire image by keeping “Master” selected in the dropdown (this is set by default). Alternatively, you can pinpoint the color you would like to change the hue of. You can choose from Reds, Yellows, Greens, Cyan, Blues or Magentas.

In addition to adjusting the obvious hue and color saturation of your image, this Photoshop Adjustment Layer allows you to adjust the lightness of your entire image as well as work with specified colors. Keep in mind that changing the overall saturation of an image affects your tonal range.

Image: Use the Hue Adjustment to get creative

Use the Hue Adjustment to get creative

Color Balance

The Color Balance Adjustment layer is used to change the overall mixture of colors in an image and works well for color correction.

photoshop-adjustment-layers-explained

Color Balance adjusted for the mid-tones to include more red

You first need to select either Shadows, Midtones or Highlights, to choose the tonal range you want to change.

Check the Preserve Luminosity box to preserve your luminosity values (brightness or darkness) and maintain the tonal balance as you change the color in your image. Move your slider toward the color you want to increase and away from the color you wish to decrease.

Black and White

As the name implies, the Black and White adjustment layer allows you to easily take your images to a grayscale version or apply a color tint entirely.

There are many ways to achieve black and white image processing. The Black and White Photoshop Adjustment Layer is one of the better ones. It allows you to lighten or darken specific color ranges to enhance your black and white conversion. Example: If you want the blues of your color image to stand out more when converted to black and white, simply toggle that slider. You can add more or less contrast by making particular colors lighter or darker.

photoshop-adjustment-layers-explained

1. When you choose the Black & White Adjustment Layer, you get a default black & white conversion 2. You can tweak the image based on selective colors. In this example, the blues and yellows were adjusted 3. You can apply a tint (of any color) over the entire image by ticking the Tint box and selecting the color you wish to overlay.

Important Note: While most of these adjustments are available under the Image menu (Image->Adjustments), using them from there does not work the same. The main difference is that these are applied directly to the image (destructively) as opposed to when done under Adjustment Layers. When done under Adjustment Layers, you can turn the adjustment on and off by selecting and deselecting the “eye” in the layers panel.

Conclusion

Photoshop Adjustment Layers are a great group of tools that allow you to smartly edit your image in a non-destructive way. Your original pixels are preserved, so you are able to come back and change your edits years later. Thus, they give you the power to undo easier and work more efficiently.

Photoshop Adjustment Layers group together the most common editing tasks, along with a few others to help you bring your images to life.

In Part 2, we will explore some other tools in the Adjustment suite.

Share with us in the comments your favorite adjustment tool and how you use them.

The post Photoshop Adjustment Layers Explained and How to Use Them (Part 1) appeared first on Digital Photography School. It was authored by Nisha Ramroop.


Digital Photography School

 
Comments Off on Photoshop Adjustment Layers Explained and How to Use Them (Part 1)

Posted in Photography


DxO PhotoLab 3 brings improved repair tools, local adjustment masks and new camera support

25 Oct

DxO has launched DxO PhotoLab 3, the latest version of the company’s photo editing software. The new version of PhotoLab brings new and improved tools, including an optimized Repair Tool and entirely new Local Adjustments Masks Manager, as well as support for keyword searches in PhotoLibrary and new camera support.

PhotoLab 3 introduces a new color adjustment mode as part of the software’s Hue, Saturation, and Luminance (HSL) Tool, one that is based on the DxO ColorWheel. With the tool, users are able to choose color ranges from eight separate channels, according to the company, as well as replacement colors and more.

Joining the ColorWheel is the new Local Adjustments Masks Manager, which enables users to manage an image’s layered local correction masks. This control includes individually adjusting opacity, reversing selected masks, and more.

Below is a brief rundown of the new features from photographer Robin Whalley:

Beyond that, PhotoLab’s Repair Tool, which allows users to scrub specific elements from an image, has also been ‘optimized’ to include a new Clone Mode and support for manually repositioning the tool’s source area. Both Repair Tool modes include support for opacity adjustment and feathering.

As mentioned, the software’s PhotoLibrary has also been updated to include keyword searches and management. The PhotoLibrary now shows image keywords in the interface, plus there’s the ability to add, rename, and delete keywords, including for multiple images at once. At this time, support for keywords in multi-criteria searches is only available on the macOS version of the software, but DxO says it will bring the same functionality to the Windows version soon.

DxO is offering PhotoLab 3 Essential and Elite Editions for Mac and PC at discounted prices until November 24:

  • DxO PhotoLab 3 Essential Edition: €99.99 / £86.99 / $ 99.99
  • DxO PhotoLab 3 Elite Edition: €149.99 / £129.99 / $ 149.99

DxO PhotoLab 3: The most colourful upgrade yet

DxO, one of the most innovative companies in the photography and image editing industry, is announcing its latest version of DxO PhotoLab, the most advanced photo editing software on the market in terms of image quality. With its completely redesigned HSL colour adjustment feature, optimized Repair Tool, and brand-new Local Adjustments Masks Manager, DxO PhotoLab 3 offers an exceptional level of colorimetry control, making the photographer’s job easier than ever before. Because the DxO PhotoLibrary now supports keyword searches, it offers an even more comprehensive workflow and improved compatibility with other photo editing software programs.

A new approach to adjusting colour

With its innovative and visual approach to colour management, DxO PhotoLab 3’s HSL (Hue, Saturation, and Luminance) Tool offers unparalleled control so you can produce even more natural- looking or creative images. It features a new colour adjustment mode based on a chromatic circle called the DxO ColorWheel. With this tool, you can select a colour range from eight different channels, fine-tune the value, select a replacement colour, and adjust your transitions to your heart’s desire. A new Uniformity setting also lets you adjust colour variations within a specific range. The Saturation and Luminance sliders now operate more independently, which offers more flexibility, especially when converting from colour to black and white and creating partially desaturated images.

“With the DxO ColorWheel, we were looking to create a new approach that could make colour management both flexible and fun. This tool is incredibly user friendly,” says Jean-Marc Alexia, VP Marketing & Product Strategy at DxO.

A Repair Tool that offers even more control

DxO PhotoLab 3 continues to improve its local adjustments options to offer users even more precision. One of these features, the Repair Tool, which acts as a brush that can erase unwanted elements from the image, has been updated. You can now manually reposition the area in the source image that you want to use to reconstruct an area in the image being edited. In addition to Repair Mode, DxO PhotoLab 3 also offers Clone Mode, which lets you directly replace the area you are editing. Feathering and opacity level can also be adjusted in both modes.

New Local Adjustments Masks Manager

DxO PhotoLab 3’s new Local Adjustments palette lets you manage local correction masks that have been layered within a single image. Make them visible, mask them, or adjust their opacity individually. The tool also lets you reverse the selected mask with a single click, adding additional flexibility and saving a significant amount of time.

A more complete workflow through keywords

In addition to the search criteria that are already available in the DxO PhotoLibrary (metadata, shooting parameters, folders, etc.), DxO PhotoLab 3 now offers keyword management and optimizes image organization all the way up to export. The keywords associated with an image can now be displayed in the interface, including when they are imported from other software programs. You can now add, delete, or rename keywords for one or multiple images simultaneously and include them in multi-criteria searches (macOS version only; this feature will be available in the Windows version in the near future). DxO PhotoLab 3 also offers more complete information and metadata display options as well as additional Projects management options.

New camera support

DxO PhotoLab 3 continues to add new cameras to the list of equipment it supports. It recently added the Canon G5 X Mark II and G7 X Mark III, the Nikon P1000, the Panasonic Lumix DC- G90/G95/G99/G91, the Lumix DC FZ1000 II and Lumix TZ95/ZS80, the Ricoh GR III, and the Sony A7R IV and RX100 VII. More than 3,000 optical modules have also been added to the database, which now includes over 50,000 different camera/lens combinations. The software’s de-noising capabilities for RAW photos taken with certain Canon and Olympus cameras has been improved as well.

Price & availability

The ESSENTIAL and ELITE editions of DxO PhotoLab 3 (PC and Mac) are now available for download on DxO’s website for the following launch prices until November 24, 2019:

page2image570121568

DxO PhotoLab 3 ESSENTIAL Edition: DxO PhotoLab 3 ELITE Edition:

DxO PhotoLab 3 ESSENTIAL Edition: DxO PhotoLab 3 ELITE Edition:

DxO PhotoLab 3 ESSENTIAL Edition: DxO PhotoLab 3 ELITE Edition:

€99.99 instead of €129 €149.99 instead of €199

£86.99 instead of £112 £129.99 instead of £169

$ 99.99 instead of $ 129 $ 149.99 instead of $ 199

You do not need a subscription to use DxO PhotoLab 3. You can install the program on two computers with the DxO PhotoLab 3 ESSENTIAL Edition or on three computers with the DxO PhotoLab 3 ELITE Edition. Photographers with a license for DxO OpticsPro or DxO PhotoLab 2 can purchase an upgrade license for DxO PhotoLab 3 by signing into their customer account on www.dxo.com. A fully-functional, one-month trial version of DxO PhotoLab 3 is available on the DxO website.

Articles: Digital Photography Review (dpreview.com)

 
Comments Off on DxO PhotoLab 3 brings improved repair tools, local adjustment masks and new camera support

Posted in Uncategorized


Hasselblad Phocus 3.4 update adds new shadow/highlights tool, adjustment layers, more

07 Dec

Hasselblad has released an update to its medium format post-production program Phocus. Focus version 3.4 adds improvements across the board, including improved shadow and highlight tools, new adjustment layer tools, expanded live view options, new lens profile, and more.

The enhanced Shadow Fill and Highlight Recovery tools have been ‘significantly enhanced.’ Hasselblad says the updated algorithm ‘enables photographers to fully utilize the dynamic range available in their images,’ although exactly how it’s changed remains a mystery. In the event the updated methodology isn’t what a user wants, or the a user is working with previously-corrected images, Hasselblad has also included the old algorithm under a selectable version option.

Hasselblad has added Shadow Fill and Clarity options to the adjustment layer tools so they can now be used as local adjustments with the brush tool and linear and radial gradients. A new Detail tool has also been added under the exposure toolset. This new tool is used alongside the Clarity tool to fine-tune the local contrast in an image.

Focus 3.4 also includes a new Live View Aperture option that lets users ‘to automatically open to the widest aperture possible or to use the selected aperture instead when activating live view.’

Also new is an updated Noise Filter tool and additional lens profiles for the following lenses:

• XCD 2,8/65
• XCD 1,9/80
• XCD 2,8/135 with X Converter 1.7

To download Hasselblad Phocus 3.4, head over to Hasselblad’s Phocus download page.

Articles: Digital Photography Review (dpreview.com)

 
Comments Off on Hasselblad Phocus 3.4 update adds new shadow/highlights tool, adjustment layers, more

Posted in Uncategorized


RAW Power 2.0 for Mac and iOS launched with batch editing, new adjustment tools, Dark Mode

20 Nov

A year ago, Nik Bhatt, founder of Gentlemen Coders and a former lead developer for Apple’s Aperture and iPhoto team, released RAW Power, an iOS-based Raw photo editor. Today, a year after its initial launch, RAW Power 2.0 has been released and with it comes updated adjustment tools, batch editing, and more.

RAW Power for Mac 2.0

RAW Power for Mac 2.0 operates as both a standalone app, as well as an extension for Apple Photos. The updated version brings new adjustment tools including chromatic aberration correction, perspective correction, a black and white mode, a vignette tool, and a new enhance module.

Batch processing has also been adding. Now, users can apply filters and adjustments in bulk and copy edits from one photo to another. A new custom naming tool has been added for better organization upon exporting photos.

RAW Power for Mac 2.0 has also received a few UI tweaks. It now includes a full file browser, multiple window and tab support, a thumbnail grid view, Quick Look support, improved metadata information, and a new dark look to go along with maxO Mojave’s Dark Mode.

RAW Power for Mac 2.0 works with macOS High Sierra and Mojave. It retails for $ 29.99 as a one-time purchase, but Gentleman Coders is currently offering it for $ 26.99 throughout the month of November. Version 2.0 is a free update for existing RAW Power for Mac 1.0 users.

RAW Power for iOS 2.0

RAW Power for iOS 2.0 claims to be ‘the first app to combine Raw image editing with seamless iOS and iCloud library integration.’ Like its macOS counterpart, this update brings along the same new adjustment tools (some of which are hidden behind a $ 1.99 in-app purchase) including chromatic aberration correction, perspective correction, a black and white mode, a vignette tool, and a new enhance module. Gentleman Coders says these adjustments are 100 percent compatible with the macOS version and will sync through iCloud Photo Library if you have it enabled.

Batch processing is also present in the iOS version. Users can now ‘apply presets, paste adjustments, revert to original, and generate JPEG previews for [Raw photos] for multiple images at a time.’ The UI has also been updated across the board, including a customizable adjustment panel and a new option to share and export directly to the Photos app in various formats.

RAW Power for iOS 2.0 is available for $ 2.99 in the iOS App Store with two optional in-app purchases for $ 1.99: Advanced Adjustment Pack 1 and 2. Advanced Adjustment Pack 1 includes Depth Effect, Curves, and white balance adjustments. Advanced Adjustment Pack 2, a new pack for version 2.0 of the app, includes chromatic aberration, vignette, perspective, and black and white adjustments.

RAW Power for iOS 2.0 supports iOS 11 and 12 and ‘does not support iPhone 5s, 6, or 6 Plus, or iPad mini 3 or earlier.’

Articles: Digital Photography Review (dpreview.com)

 
Comments Off on RAW Power 2.0 for Mac and iOS launched with batch editing, new adjustment tools, Dark Mode

Posted in Uncategorized


Lightroom Local Adjustments – Radial Filter Versus the Adjustment Brush

18 Aug

Adobe Lightroom is image editing software that allows you to edit and make color adjustments to your photos. Among many, the Radial Filter and Adjustment Brush are two very useful local adjustment tools in Lightroom.

But often people get confused between both of these tools and are not sure which one to use in which situation. So I thought I’d share a few tips on the basis of which you can easily figure out the importance of each respective tool.

Radial Filter Tool

This tool is a blessing for portrait, event, wedding, and wildlife photographers. The reason why I am pointing to these genres of photography is that such photos usually have a single subject in the frame which needs to be highlighted.

The Radial Filter allows you to select an area using an elliptical mask. Then the shape of the ellipse can be changed by dragging one of the points. Once the area is selected, you can make adjustments inside or outside the shape using the new Brush component depending on your requirements.

radial filter Lightroom local adjustments

Adjustment Brush Tool

The Adjustment Brush is like painting the image canvas with the required adjustments. You can use the mouse pointer, drag and select the area manually where you wish to make desired adjustments. You have the ability to increase or reduce the size of the brush to make a fine and precise selection.

 Lightroom local adjustments - adjustment brush

Radial Filter or Adjustment Brush? How to Decide?

As you saw in the example above, using the Radial Filter allows you to select a particular area using the elliptical mask whereas the Adjustment Brush allows you to manually select the area using the cursor.

As a photographer and a creative person, you have to first visualize the result you want to achieve for your picture. If you believe that using the Radial Filter would suffice for your editing needs, go ahead with it. But if you feel that you need more manual and precise control over the selection of the area where you need desired changes, go with the Adjustment Brush.

It may sound easy but it might be challenging in some situations, so let me help you with this by looking at two examples.

Example 1: When to use the Radial Filter

 Lightroom local adjustments - radial filter image of an Indian boy

In the image above, my intention was to make changes to the area around the face of the boy. Now as the shape of the face is defined, I can easily select the area using the elliptical shape of the Radial Filter tool. Later, if I feel that I need to change the shape of the selection I can easily do that by dragging the points or using the Brush feature.

It does not make any sense to use the Adjustment Brush in this particular scenario as I can save my time by simply using the Radial Filter.

Basically, you should use the Radial Filter when the shape of your subject is defined and you can easily make the selection using the ellipse. Weddings, portraits, wildlife, events, and sports are some of the genres of photography where you can use the Radial filter to make changes faster.

Example 2: When to use the Adjustment Brush Tool

 Lightroom local adjustments - landscape scene sky selected

In this particular image, I wanted to make exposure and highlight changes selectively in the sky region. As you can clearly see, the shape of the sky area in this photo is not defined therefore I can not use the Radial Filter. If I use the Radial Filter I would either select unwanted areas of the mountains or would miss out some parts of the sky.

But by using the Adjustment Tool I can manually select the area I want to make changes in and I was able to do that precisely. Though this approach is a bit time consuming as compared to the Radial Filter, but you surely get an accurate selection. Now whatever changes I make would perfectly be made only on the sky region.

Conclusion

So the conclusion is that you should be using the Adjustment Brush when the shape of the area that you wish to select is not well defined. Landscapes, Cityscapes, or any photo where the shape of the subject is very complex, the Adjustment Tool would give you much accurate selection than the Radial Filter.

If you want to read more about each of these tools check out these dPS articles:

  • Creative Use of the Radial Filter in Lightroom
  • Lightroom’s Secret Weapon: The Radial Filter and How to Use it
  • Lightroom Mastery: The Power of the Adjustment Brush
  • 5 Tips for Using the Lightroom Adjustment Brush Tool
  • How to Use the Local Adjustments Tools Inside Lightroom

The post Lightroom Local Adjustments – Radial Filter Versus the Adjustment Brush appeared first on Digital Photography School.


Digital Photography School

 
Comments Off on Lightroom Local Adjustments – Radial Filter Versus the Adjustment Brush

Posted in Photography


Lightroom Mastery: The Power of the Adjustment Brush

10 Aug

If there is one thing I wish I would have spent more time learning early on in my time with Lightroom, it’s the adjustment brush.

Lightroom is an incredible editing tool, arguably the easiest one to use, and the quickest to learn. The one thing that took me a while to wrap my head around when starting out, was how to use the Adjustment Brush. In this article I’d like to share a quick excerpt from the new Lightroom Mastery course I created for Digital Photography School. I hope you find it helpful.

Why the Adjustment Brush is Great

Lightroom excels at making changes to the entire image (global adjustments) super simple and effective. It really becomes a joy to use Lightroom once you get the hang of it. Need to pull up the shadows in an overly-contrasty image?  No problem; just pull up the shadow slider.  Need to correct for overexposure?  Easy – just drop the exposure slider.

But what do you do when you need to make a change to a very specific area (local adjustments), and you don’t want that to affect the rest of the image? This is exactly when you want to call upon the power of the Adjustment Brush.

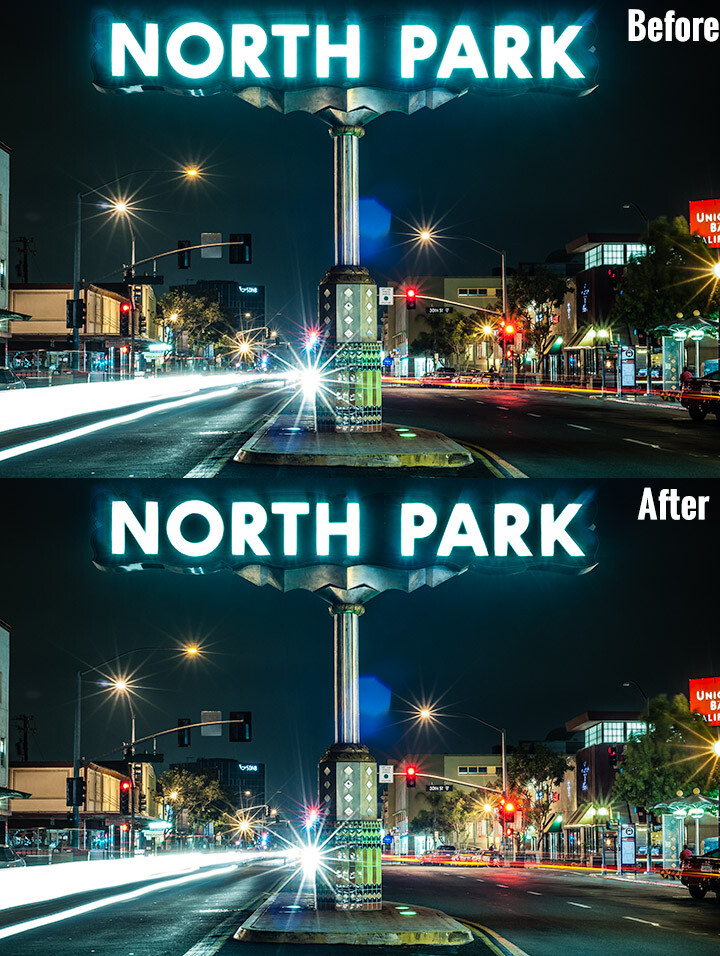
Look at the difference an adjustment brush made in the sign, as well as brightening up the lower right corner.

Look at the difference an adjustment brush made in the sign, as well as brightening up the lower right corner of this image.

How the Adjustment Brush Works

Instead of making a global change to the entire canvas, the Adjustment Brush enables you to get very specific and just paint over where you would like to make changes.

This sounds simple, but is incredibly powerful – you now have the ability to affect big change in many different areas of your image, without resorting to bouncing the image over to Photoshop. Hey, I’m all about simplicity, and if I can get all my edits done in one program versus two, I’m all in!

A Perfect Example – Corvettes and Chrome

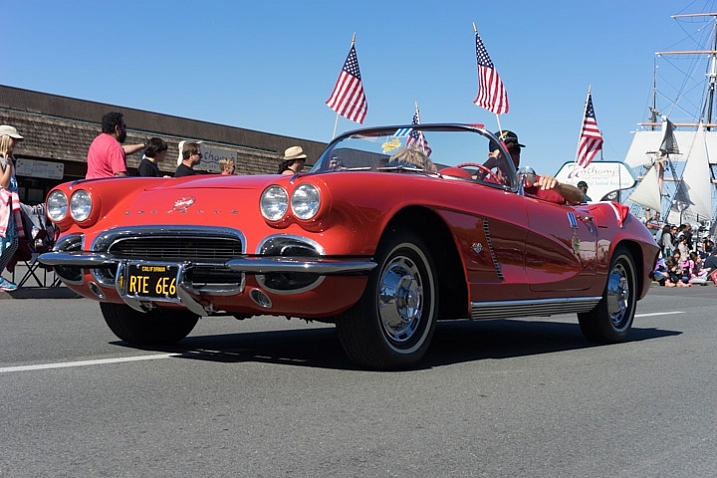
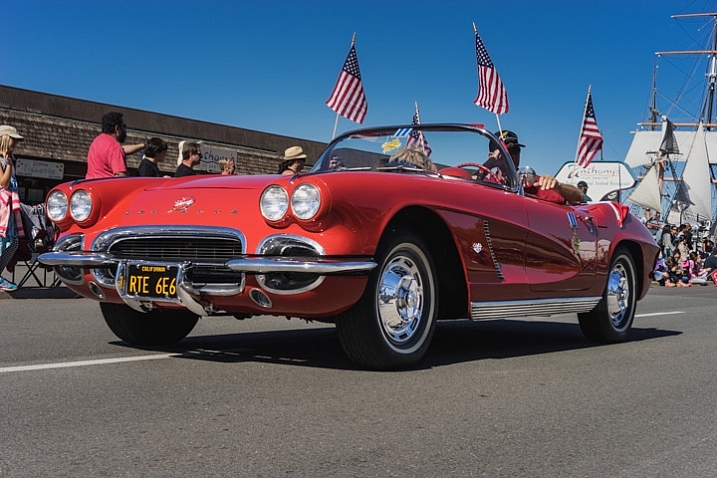
A good friend had just come to visit me from China, we decided to walk around the neighborhood and managed to catch a parade. It may not look like it, but this was in November in San Diego, one of the benefits of fair weather every day. I caught this image of this beautiful car driving by:

Lightroom adjustment brush, lightroom mastery course, lightroom mastery, dps, corvette, chrome, parade

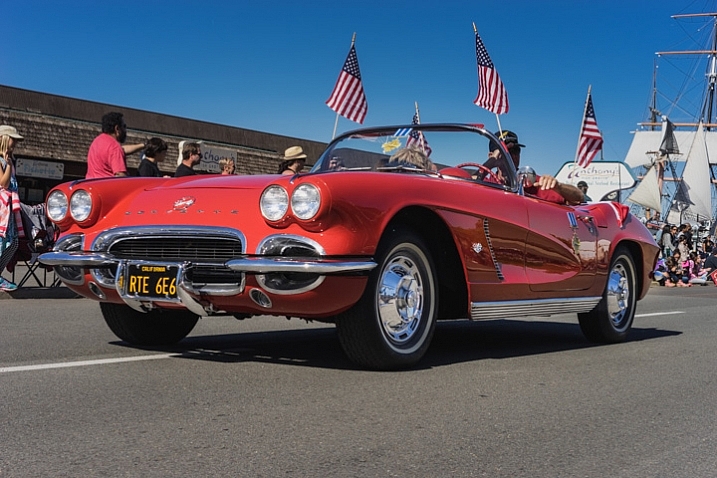
I darkened the sky a bit and applied some more contrast to the ground and ended up with this:

Lightroom adjustment brush, lightroom mastery course, lightroom mastery, dps, corvette, chrome, parade

That looks good, but the photo really wasn’t capturing how bright the chrome wheels and bumper accents were. In short, I needed to do some local editing on just those pieces. Adjustment brush to the rescue!

Time to Shine – Creating a Chrome Adjustment Brush

Deciding where to start when creating your custom brush

I knew the key to making this photo pop was getting that chrome to come back to life. I first clicked into my Adjustment Brush window (hit K on your keyboard or select the Brush tool from the top of the right hand panel in the Develop Module) and reset all the sliders back to zero. Since the wheels were not facing the sun, they were underexposed and caught in shadow.

Creating the brush itself

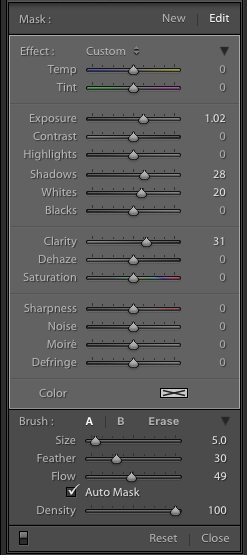
Lightroom adjustment brush, lightroom mastery course, lightroom mastery, dps, corvette, chrome, paradeI decided to increase the exposure +1 stop, bump the shadows up to +28 to correct the darkness, and increase the whites to +20 to make the highlights in the chrome pop.
For good measure I increased the clarity to +30 to make sure the edges in that chrome highlights were nice and snappy. Here is what the adjustment window looked like before I started painting (see right)

This was an educated guess as to what I thought would work. If this worked well, I could leave it. If it didn’t, I could always move the sliders after painting, to change it as necessary.

Painting with the Adjustment Brush – best practices

There are a few guidelines I like to follow when painting with the Adjustment Brush. Here a few helpful tips to make this easy:

  • Use a brush size that is a bit smaller than the area you are trying to paint.  It helps if you don’t “color outside the lines”, although that is an easy fix if you do. A quick tip here: if you use a mouse with a scroll wheel you can change the size of your brush by scrolling up and down. It works the same with my Apple magic mouse.
  • Check the box for Auto Mask if you are painting something with fine edges you don’t want to go over. Auto Mask does a good job of keeping your brush inside the lines even if you go outside, which saves time.
  • I like to see the mask I’m painting versus the effects of the mask I’m painting. To have the mask show up in red either click Show selected mask overlay or simply click the O key on the keyboard to toggle the mask on and off.

Let’s get painting!

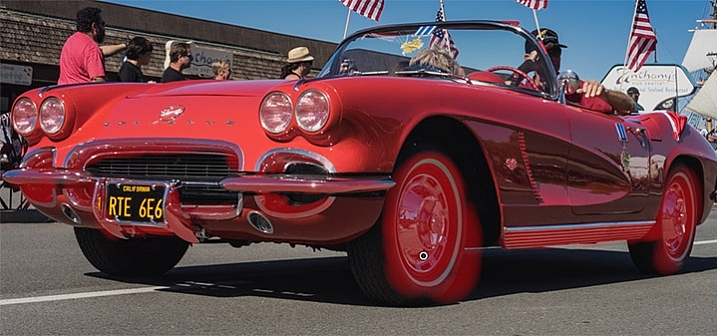
I quickly painted over the wheels, front bumper, headlights, and any other chrome I could find. It’s a bit difficult to see, since the mask is nearly the same color as the car (you can change the mask color by clicking Shift+O repeated times until you find a better color) but here is what the mask looked like after my initial run:

Lightroom adjustment brush, lightroom mastery course, lightroom mastery, dps, corvette, chrome, parade

Using the eraser tool to clean up mistakes

Wow, I’m apparently terrible at coloring inside the lines! In all reality, going outside the lines on this image didn’t make a noticeable difference, but we might as well do this right.

To clean up areas where you’ve overpainted all you have to do is click Erase in your Adjustment Brush window. This will pull up a brush that will erase the mask area when you paint over it. This is important: make sure to click click the A or B brush after using the eraser so you don’t forget and start painting over areas with the eraser versus the brush by accident!

After a quick clean-up I ended up with this, which is much better:

Lightroom adjustment brush, lightroom mastery course, lightroom mastery, dps, corvette, chrome, parade

Let’s turn off the mask and see how it looks

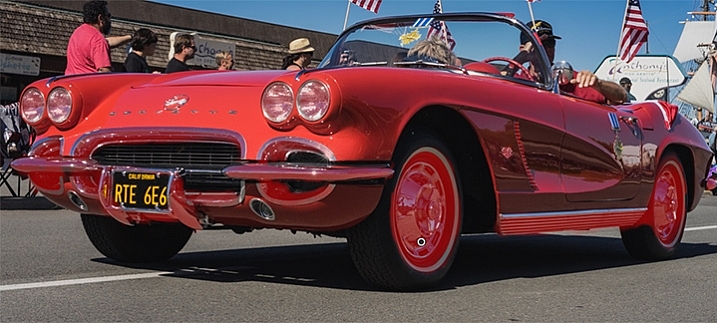
Remember, to turn off the mask you can simply click the O key on your keyboard. Here you see my image after the adjustment brush has been applied:

Lightroom adjustment brush, lightroom mastery course, lightroom mastery, dps, corvette, chrome, parade

Much better!  The chrome wheels and bumper are much brighter now, and look a lot better.  The only thing I don’t like now, is how dark the drivers-side door is.

It’s a pretty easy fix to create a new brush to bring up the shadows, so I’ll do that.

Starting a new mask in the same image

It’s important to think of masks like layers. The wheels and bumpers are painted with one mask, that has one group of settings.

If I want to make a new adjustment brush with different settings for the door, I need to create a new mask, as opposed to just moving the sliders around. If I move the sliders around without creating a new mask, that will make changes to the current active mask (my wheels and bumpers).

To make a new mask just click New at the top of the mask menu. I only increased the exposure setting to +1 to add a full stop of light to the side, painted over the door and rear of the car, and got this:

Lightroom adjustment brush, lightroom mastery course, lightroom mastery, dps, corvette, chrome, parade

Let’s compare that to the second edit before I used any adjustment brushes:

Lightroom adjustment brush, lightroom mastery course, lightroom mastery, dps, corvette, chrome, parade

Before Adjustment Brushes were applied.

Much better!

This is just one simple example, the sky’s the limit!

There are endless possibilities with the adjustment brush. I could have changed the color of this entire car if I wanted to as well.

You can lighten up dark areas of images and vice versa. You can apply sharpening or clarify to individual areas. You can do a whole host of beauty editing like whitening teeth, giving eyes more color,  and more.

If you found this helpful, you will LOVE the new DPS Lightroom Mastery course!

lightroom-mastery.jpg

There are far too many excellent tips to learning how to master Lightroom to include in a blog post, so Digital Photography tasked me with creating the best and most comprehensive Lightroom video course on the web!

In Lightroom Mastery I break down everything in Lightroom and teach you more in three hours, than most photographers learn in years. I cover every module, tool, tip, and trick from my 10 years using Lightroom.

During the initial launch, dPS is doing a huge 50% discount on the course!  The price will regularly be $ 99, but during this special launch it’s only $ 49!

Go grab the course before the sale is over

You can click this link to learn more about what is included in the course, watch a preview video, and purchase the course!

googletag.cmd.push(function() {
tablet_slots.push( googletag.defineSlot( “/1005424/_dPSv4_tab-all-article-bottom_(300×250)”, [300, 250], “pb-ad-78623” ).addService( googletag.pubads() ) ); } );

googletag.cmd.push(function() {
mobile_slots.push( googletag.defineSlot( “/1005424/_dPSv4_mob-all-article-bottom_(300×250)”, [300, 250], “pb-ad-78158” ).addService( googletag.pubads() ) ); } );

The post Lightroom Mastery: The Power of the Adjustment Brush by Mike Newton appeared first on Digital Photography School.


Digital Photography School

 
Comments Off on Lightroom Mastery: The Power of the Adjustment Brush

Posted in Photography