RSS
 

Archive for October, 2016

Watch thousands of books being re-shelved in a two minute time-lapse

29 Oct

After a two-year closure for repairs, the Rose Main Reading Room at the New York Public Library re-opened earlier this month. That meant a whole lot of books had to go back on the shelves. Thankfully, the whole process has been documented in a totally engrossing time-lapse video that makes it look way easier than it actually was. Take a look at the video above, and head to the NYPL’s blog for more on the grand re-opening of their Rose Main Reading Room.

Related: Photos of Cincinnati’s impressive ‘Old Main’ public library

Articles: Digital Photography Review (dpreview.com)

 
Comments Off on Watch thousands of books being re-shelved in a two minute time-lapse

Posted in Uncategorized


Kipon launches EF to Sony E adapters with built-in variable ND filter

29 Oct

Chinese lens and accessory maker Kipon has introduced an adapter that includes a variable neutral density filter, primarily for video shooters. The filter is placed between a Canon EF-S mount and a Sony E-mount body. The Kipon EF-S/E AF ND retains the autofocus and image stabilisation features of the lens, according to the company, and EXIF data is communicated so it can be recorded in the image files. The adapter also allows manual focusing of the lens to trigger MF assistance features of the camera – such as peaking or magnification.

Kipon has produced adapters that contain graduated neutral density filters before but this is the first that has a variable ND filter. The filter is turned via a wheel that sticks out of the barrel and is marked with values between 1.5 and 7 f-stops. The idea of the adapter is that wide apertures can be used with shutter speeds appropriate for shooting video – as well as for stills shooters who want a shallow depth of field outdoors on bright days.

The adapter features an EF-S mount, so that it can use both EF and EF-S lenses but covers the full frame image circle for use on a7 series cameras.

The company suggests that the selling price should be 45,000 yen before tax, which is approximately $ 430.

You can read more about the adapter, including camera compatibility, on this translated version of Japanese agent Focus Workshop’s website.

Articles: Digital Photography Review (dpreview.com)

 
Comments Off on Kipon launches EF to Sony E adapters with built-in variable ND filter

Posted in Uncategorized


Nikon KeyMission action cameras now shipping in US

29 Oct

The Nikon KeyMission action cameras are now shipping from retailers in the US. As previously stated, the Nikon KeyMission 80 is priced at $ 270, the KeyMission 170 at $ 399, and the KeyMission 360 at $ 499. However, all three models are being offered on Amazon, B&H Photo, and Adorama at slight discounts.

The Nikon KeyMission 360 was first introduced at CES 2016, and followed later by the KeyMission 80 and KeyMission 170, with the numbers referring to each model’s field-of-view. The KeyMission 80 features a 12.5 megapixel front camera and 4.9 megapixel rear camera with support for 1080p recording, while the KeyMission 170 and 360 both support 4K recording. All three cameras are rugged to various degrees, including being waterproof and shockproof.

Via: NikonRumors

Articles: Digital Photography Review (dpreview.com)

 
Comments Off on Nikon KeyMission action cameras now shipping in US

Posted in Uncategorized


World’s First All-Electric Mobile Office Built Into a Nissan Van

29 Oct

[ By SA Rogers in Technology & Vehicles & Mods. ]

Who wants to sit in a stale, noisy central office when they could take their job – not to mention the coffee maker – on the go instead? This Nissan vehicle houses the world’s first all-electric mobile office, and it’s more than just a fold-down desk in the back of a van. The whole enviable setup includes a panoramic glass roof, wood flooring with built-in LED lights, an intelligent system that adjusts the lighting and color, wireless mobile charging and an espresso machine that pops up out of the counter.

Devised to show off what the e-nv200 van can do, the mobile office concept spotlights changing workspace trends, especially as flexible and remote working becomes more widespread. Lots of workers are no longer chained to permanent desks anymore, with the freedom to do their jobs from any number of places.

nissan-mobile-office-2

nissan-mobile-office-3

nissan-mobile-office-1

Both of the side sliding doors on the e-nv200 can be opened, along with the split rear doors, to open up the office to the worker’s chosen surroundings. Drive the van to the park, a beach or any other spot that inspires you and helps you focus, pull out the floating deck at the rear and enjoy working conditions most of us can only dream about.

nissan-mobile-office-4

The fold-down desk console features a built-in touch screen computer, wireless mouse and keyboard along with storage space and stationery supplies, and there’s even a mount inside one of the rear doors for a folding Brompton bike if you want to take a break and get some exercise. Watch the video to take in all of the details.

Share on Facebook


[ By SA Rogers in Technology & Vehicles & Mods. ]

[ WebUrbanist | Archives | Galleries | Privacy | TOS ]


WebUrbanist

 
Comments Off on World’s First All-Electric Mobile Office Built Into a Nissan Van

Posted in Creativity


How to Add a Sun Flare to Your Images Using Photoshop

29 Oct

If you read my previous article where I give you some tips for doing more spectacular sunset photography, you’ll understand that I love taking photos during the magic hour. For my portraits, I also book my sessions during that time because the light is very soft and flattering. There is one thing I particularly like to do when I process my images and that’s adding a sun flare to my portraits and landscapes. I love to use Photoshop to recreating a scene that would have ideally been there in real life.

How to Create a Sun Flare in Photoshop

I added sun flares to this portrait to add depth.

It’s difficult to not underestimate the effect of a sun flare but it really does make a big difference, especially if you like cinematic results to your images. They’re a great way to add color and depth to your images.

Analyze your image first

The process of adding sun flares is actually quite easy, it only takes two steps and a few minutes. The most difficult thing however is to get a realistic result. You need to analyze your image before doing anything. Start by looking at the position of the sun, how the shadows and highlights are wrapping around your subject.

In the image below, I added a sun flare on the left, but before doing that I noticed that the highlights were hitting the Taj Mahal from the left and the shadows were in the right side of the monument. If I were to position the sun flare on the right side of the image, the results wouldn’t be realistic because the highlights and the shadows wouldn’t correspond to the direction of the light of my sun flare. Try to consider the position, direction and intensity of the light.

How to Create a Sun Flare in Photoshop - Taj Mahal

This is another example of a GoPro image I took. I added a sun flare on the right side of the image because the sun was positioned there in real life. We’re not trying to create another sun, we’re just enhancing it with more colors and more intensity.

How to Create a Sun Flare in Photoshop

In this portrait, I added a sun flare to the left of the model. The result looks realistic because you can see the orange flair spreading and lightning the hair of the model but her face isn’t affected.

How to Create a Sun Flare in Photoshop

How to create and add a sun flare in Photoshop

It’s actually quite easy to add a sun flare in Photoshop. Start by opening your file in Photoshop and creating a new empty layer. The next step is to analyze where you want to place your sun flare and how strong do you want the effect to be. In this case, I want to place my sun flare in the top right of the image and make it pretty big. The sun was actually setting in that position but I am not completely satisfied with how it looks. I want to make the flare more vivid and more intense.

How to Create a Sun Flare in Photoshop

Select the Brush Tool and pick a color

The next step is to select the Brush Tool with an opacity and flow of 100%. Make sure to select a soft brush with a hardness of 0%. I usually like to pick my own color of the sun flare, the color code I use is #fd9424, but there are different ways to pick a color for the sun flare.

You can use the Eye Dropper Tool and select a color from the image by pressing I on your keyboard or by selecting it in the tool box on the left (the chosen color will automatically be set in your palette). Or after you have created the flare, you can create a hue/saturation adjustment layer only affecting that layer and just playing around until you find a color you like.

How to Create a Sun Flare in Photoshop

Adding your flare

To create the sun flare, the first step is to simply create one brush stroke (you just have to press once). Make sure your brush is quite big. So far your image should look something like this:

How to Create a Sun Flare in Photoshop

The next step is to go to blending modes for your current layer (the layer with the brush stroke). The default blending mode is normal, you need to change it to Screen. The screen blending mode by definition will invert both layers, multiply them, and invert the result. Your sun flare is going to get brighter and blend in with the sky after you do that.

How to Create a Sun Flare in Photoshop

Transform

The next step is to select your layer with the sun flare and press CTRL/CMD+T to transform (resize) it. A little box will appear, you want to drag the corners to make it bigger. How big you want to make it depends on your image and your desired effect. The sun flare will affect the whole image if you make it too big and will brighten up the shadows.

Using a brush tool on a new layer is really helpful because you have full control. You can change the position, color, brightness, or saturation of your flare whenever you want by creating new adjustment layers that only affect that layer.

If you think that your effect if too strong, you can reduce the opacity of the layer, if it is not strong enough, you can duplicate the layer. Always remember that the effect should be subtle otherwise if will look quite unrealistic. We are just trying to create a scene taking in consideration how light works.

How to Create a Sun Flare in Photoshop

 whenever you want

Your turn

Now you try you hand at adding a sun flare to one of your images using Photoshop. Please share your images and any questions in the comments below.

googletag.cmd.push(function() {
tablet_slots.push( googletag.defineSlot( “/1005424/_dPSv4_tab-all-article-bottom_(300×250)”, [300, 250], “pb-ad-78623” ).addService( googletag.pubads() ) ); } );

googletag.cmd.push(function() {
mobile_slots.push( googletag.defineSlot( “/1005424/_dPSv4_mob-all-article-bottom_(300×250)”, [300, 250], “pb-ad-78158” ).addService( googletag.pubads() ) ); } );

The post How to Add a Sun Flare to Your Images Using Photoshop by Yacine Bessekhouad appeared first on Digital Photography School.


Digital Photography School

 
Comments Off on How to Add a Sun Flare to Your Images Using Photoshop

Posted in Photography


Facebook takes aim at Snapchat and Prisma with new camera features

28 Oct

If cute animal selfie masks are the wave of the future, then Facebook isn’t going to sit idly by. The company will be updating its in-app camera function with some Snapchat and Prisma style functions soon. It is currently testing a new version that includes animated selfie masks, overlaid graphics, and geofilters, similar to those available on Snapchat, and a range of filter effects that convert your images and videos into fine-art paintings, like on the popular Prisma app.

In addition there is a series of new ‘reactive’ filters that respond to movements of your body. They cover the screen with ‘bubbles’ that can be move around by waving your arms, or line patterns than be disrupted by motion. 

Once you have accessed the new camera, filter options can be made visible by swiping down. In addition, you can tap on the new creative tools button for even more effects. The latter include pieces of virtual clothing and fashion accessories and art-filters. And it’s not just the filters that will remind you of Snapchat. Like on Snapchat, photos disappear after a 24 hour period, unless unless someone leaves a comment to start a conversation. The new Facebook camera features are currently being tested in Ireland, but should be expected to roll out globally soon.

Articles: Digital Photography Review (dpreview.com)

 
Comments Off on Facebook takes aim at Snapchat and Prisma with new camera features

Posted in Uncategorized


Video: Game Boy Camera revisited

28 Oct

Some of us were thrilled to be reunited with the Game Boy Camera of our childhood. Others? Less thrilled. Watch as DPR staff revisit the Game Boy Camera – or in some cases, pick it up for the very first time. 

Read more about the Game Boy Camera

Articles: Digital Photography Review (dpreview.com)

 
Comments Off on Video: Game Boy Camera revisited

Posted in Uncategorized


Sigma introduces trio of firmware updates for Quattro, MC-11 and 150-600mm F5-6.3

28 Oct

Lens and camera manufacturer Sigma has released three firmware updates that improve the functionality of its sd Quattro camera, the company’s MC-11 mount adapter and the two versions of its 150-600mm F5-6.3 zoom lens.

The update to the sd Quatrro camera deals with an issue that causes the camera to freeze when being controlled via the company’s Capture Pro tethered-shooting software package, while the update for the MC-11 prepares the device for Sigma’s new and forthcoming 12-24mm F4, 500mm F4 and 85mm F1.4 lenses. The MC-11 allows users to mount certain Sigma EF- and SA-mount lenses to Sony E-mount cameras, and the update improves AF accuracy of EF-mount lenses that aren’t fully compatible with the system. It also allows lenses with Optical Stabilizer built-in to switch off in-body stabilization systems to use the in-lens system even when the lens isn’t fully compatible with the MC-11. With the firmware installed the start-up time of the combination is also improved.

AF accuracy is also the main theme of the update to the 150-600mm F5-6.3 DG OS HSM Sports and Contemporary lenses in the Canon and Sigma mounts. The lenses will perform better when used with the MC-11 mount adapter, and with the sd Quattro in the case of the Sigma mount version. The update also reduces the sound made by the aperture blades in the Canon mount versions during filming both with and without the MC-11 – and the lenses are now fully functional with the Canon Digital Cinema Camera EOS C300 Mark ll.

Those with the Sigma USB dock can install these updates themselves, and those who don’t have it can take their lenses and MC-11 to a Sigma approved service center and have the firmware updates installed for free. For more information visit the Sigma website.

Manufacturer information:

SIGMA sd Quattro firmware download

Thank you for purchasing and using our products.
Sigma Corporation is pleased to announce that new firmware of SIGMA sd Quattro is available for download.

Benefit of the firmware update;

SIGMA sd Quattro [Ver.1.03]
It corrects the phenomenon where the camera stops responding to any operation after pressing [AF Capture] button, [AF Drive Only] button, and/or [MF Capture] button on SIGMA Capture Pro during shooting using SIGMA Capture Pro.

SIGMA sd Quattro firmware Ver.1.03 download page
http://www.sigma-global.com/en/download/cameras/firmware/

* SIGMA Photo Pro 6.4.1 is required to develop RAW data (X3F files, X3I files) taken with sd Quattro cameras with firmware Ver1.02 or later.

SIGMA Photo Pro 6.4.1 Download page
http://www.sigma-global.com/en/download/cameras/sigma-photo-pro/

Firmware Update for SIGMA 150-600mm F5-6.3 DG OS HSM | Sports / Contemporary in SIGMA and Canon mount

We would like to announce the availability of a new firmware update for the SIGMA 150-600mm F5-6.3 DG OS HSM | Sports in SIGMA and Canon mount, and the SIGMA 150-600mm F5-6.3 DG OS HSM | Contemporary in SIGMA and Canon mount. The firmware can be updated using SIGMA Optimization Pro.

The lens firmware update improves the AF accuracy and reduces the operating sound of the diaphragm blades when it is attached with the SIGMA MOUNT CONVERTER MC-11.

For customers who own the following applicable products and the SIGMA USB DOCK, please update the lens firmware using SIGMA Optimization Pro.

Applicable products
SIGMA 150-600mm F5-6.3 DG OS HSM | Sports – SIGMA and Canon mount
SIGMA 150-600mm F5-6.3 DG OS HSM | Contemporary – SIGMA and Canon mount

Benefits of this firmware update

  • It has improved the AF accuracy when the lens is attached with the SIGMA MOUNT CONVERTER MC-11.
  • For customers who own SIGMA MOUNT CONVERTER MC-11, it is necessary to update this to the latest firmware Ver1.02.
  • It has improved the AF accuracy of this lens when mounted on the SIGMA sd Quattro (SIGMA mount only).
  • It has reduced the operating sound of the lens diaphragm blades when attached with the SIGMA MOUNT CONVERTER MC-11 EF-E and used for shooting movies (Canon mount only).It has improved the AF accuracy when the lens is used for shooting movies as well as Live View on EOS DIGITAL SLR cameras (Canon mount only).*1
  • It has reduced the operating sound of the lens diaphragm blades when used for shooting movies on EOS DIGITAL SLR cameras (Canon mount only).*1
  • It is fully functional with the Canon Digital Cinema Camera EOS C300 Mark II.
  • *1 The degree of improvement differs depending on the camera used.

Please ensure the SIGMA Optimization Pro has been updated to Ver1.3.1 or later from the following download page before updating the lens firmware.

SIGMA Optimization Pro Download page
http://www.sigma-global.com/en/download/lenses/sigma-optimization-pro/

For customers who do not own the SIGMA USB DOCK, the lens firmware update will be provided free of charge but you will need to provide the proper documentation as listed in the instructions on the Service & Support section of our website

Firmware Update for SIGMA MOUNT CONVERTER MC-11

We would like to announce the availability of a new firmware update for the SIGMA MOUNT CONVERTER MC-11 EF-E and SA-E.

This firmware update supports the following new products; SIGMA 12-24mm F4 DG HSM | Art, which we started the delivery from October 2016, SIGMA 500mm F4 DG OS HSM | Sports and SIGMA 85mm F1.4 DG HSM | Art, which are scheduled to be delivered from November 2016. In addition, it has improved the operation when some lenses that are not fully compatible are attached. It has also corrected the phenomenon where the distortion correction figure is not indicated properly in the camera when the SIGMA 24-105mm F4 DG OS HSM | Art is attached.

For customers who own the SIGMA MOUNT CONVERTER MC-11, please update the firmware using SIGMA Optimization Pro.

Please ensure the SIGMA Optimization Pro has been updated to ver1.3.1 or later from the following download page before updating the MC-11 firmware.

SIGMA Optimization Pro Download page
http://www.sigma-global.com/en/download/lenses/sigma-optimization-pro/

Applicable products
 SIGMA MOUNT CONVERTER MC-11 EF-E
 SIGMA MOUNT CONVERTER MC-11 SA-E

Benefits of this firmware update

  • It is fully functional with the SIGMA 12-24mm F4 DG HSM | Art, the SIGMA 500mm F4 DG OS HSM | Sports and the SIGMA 85mm F1.4 DG HSM | Art lenses.
  • It has reduced the startup time between turning on the camera and taking an image by not initially driving the focus when the camera is turned on.
  • When lenses with Optical Stabilizer (OS) function that are not fully compatible with the SIGMA MOUNT CONVERTER MC-11 are attached with the SIGMA MOUNT CONVERTER MC-11 and mounted on a camera which incorporates a stabilizer unit, it enables the camera’s stabilizer unit to be turned off and the lens’s OS function to be turned on and off.
  • It has improved the AF accuracy of Canon EF lenses that are not fully compatible with the SIGMA MOUNT CONVERTER MC-11 (EF-E only).
  • It has corrected the phenomenon where the distortion correction figure is not indicated properly in the camera, when the SIGMA 24-105mm F4 DG OS HSM | Art is attached.

Articles: Digital Photography Review (dpreview.com)

 
Comments Off on Sigma introduces trio of firmware updates for Quattro, MC-11 and 150-600mm F5-6.3

Posted in Uncategorized


YI M1 Sample Gallery

28 Oct

The YI M1 is a new Micro Four Thirds camera by a China-based company called Young Innovators. Built around a familiar 20MP Sony sensor, the M1 offers quite a bit of room for Raw post processing. We took the YI around Seattle and over the hills to Leavenworth, WA to photograph some fall color.

See our YI M1
real-world sample gallery

Articles: Digital Photography Review (dpreview.com)

 
Comments Off on YI M1 Sample Gallery

Posted in Uncategorized


How to Compose Better Images and Make your Images More Extraordinary

28 Oct

When we think about what goes into making a photograph most often our thoughts leap to camera settings like aperture and shutter speed. “What ISO should I use? Should I incorporate more or less of the foreground and is that tree branch really in the way?” We burden ourselves with the technical, while unfortunately overlooking other elements of the shot which potentially mean more to the outcome of the finished image. In this article, I will share a few of my own images and then break down a few key points that you can use to make your own images more consistently extraordinary. I won’t even mention the word exposure…well, maybe just that once.

dsc07896-edit

Don’t worry, this will not be an overly introspective study of the all the “feelings” which we might pour into making a photo. Instead, this is an examination of the how and why we include what we do in our images and it covers some of the thought processes which drive our own creative visions. Once we begin to have a general understanding of how our artistic nature approaches composition the better we can work towards refining our own techniques.

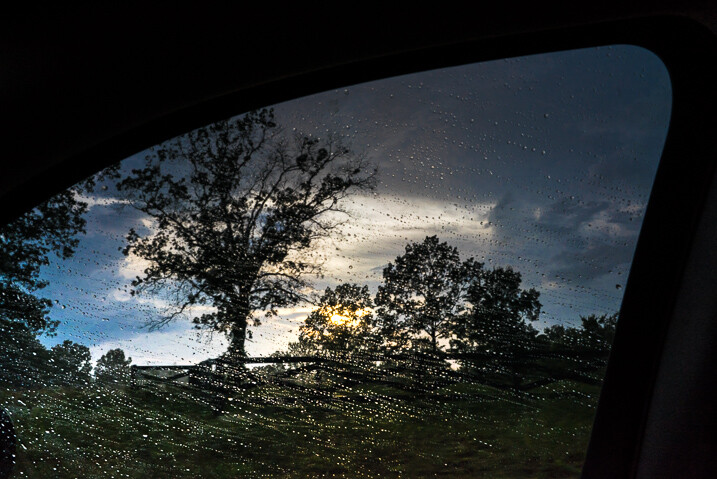
Photo #1: The Brooding

The Brooding

This is one of my personal favorite images. It came about very unexpectedly but it would turn out to be one of the most successful photographs of my career thus far. But why? There must be a reason this image was so well received. So let’s break it down and see what can be learned from the composition.

Use leading lines

This is a photographic methodology that has been mentioned many times. Leading lines are simply guideposts within a frame which lead the attention of the viewer to certain elements and essentially direct their attention within the photo itself. Oddly enough, leading lines can be worked into your composition in many ways and there are no set “rules” for using them. But generally, they originate in the foreground and extend into the frame. That isn’t to say that leading lines can’t be horizontal, diagonal, or anywhere in between.

In the case of this image, the lines of the fence and road move from the foreground to the background thereby creating a sense of depth in the mountains. Meanwhile, the horizontal line of the mountains converges with the vertical lines of the road. This helps to highlight the central element of the photo which is the tree.

The Brooding Notes

Don’t fear the weather

It goes without saying that this photo was made during some less than hospitable weather. An incredibly strong mountain thunderstorm had moved through the valley the night before and the rain had just stopped as I made my way out to shoot. Normally, bad weather deters many photographers from venturing out to make images. This is wrong.

When the weather gets rough it brings with it interesting cloud patterns and awesome light that you wouldn’t encounter on clearer days. Not only do the clouds add a sense of moodiness to the photo but the wet asphalt imparts the feeling of the dankness in the morning air after the storm passed. The yellowish post-storm light works well with the hazy mist in the valley which was hanging low after the rain.

Work with proportions

Whenever you begin mentioning words such as proportions, scale, or ratio as they relate to photography – you lose people’s attention. Usually, because it can seem complicated. Stay with me here! Composing your images based on certain aesthetic ratios and proportions isn’t as difficult as it sounds and I’m about to prove it to you. Ratios don’t have to be exact or perfect in every case but can really add that something extra to your photographs.

Golden Spiral Overlay

The image we have here incorporates what’s called the Golden Spiral or a Fibonacci Spiral to add interest and draw attention to the main elements of the composition. It’s a proportion based on the Fibonacci Sequence and it occurs in nature frequently. In this case, the spiral has been tweaked (flipped horizontally) to guide the viewer, yet again, towards the tree and into the distant mountains. Have a look at this overlay set on top of the flipped photo above and you can see how it lines up.

Pretty cool, huh? Try the Golden Spiral or the simpler Rule of Thirds for yourself to see an immediate boost in your compositions.

Photo #2: Summertime

Summertime

When most people see this photo they either love it, hate it, or say “Adam, your feet are really, really dirty”. It’s true, this was a very impromptu and unorthodox exposure of yours truly as I swayed in my hammock during a hiking trip last summer. Unbelievably, it went on to win First Place Professional in a state magazine a couple months ago. No matter your initial impressions of this image there are still a few important lessons that can be gleaned to help you with your own work.

Find natural framing

This is a close cousin to using leading lines to enhance the viewability of an image. There are many cases when a strong composition makes use of what is referred to as natural framing. This is when a photographer composes certain elements (not always the main subject) in a way so that they are framed by other elements within the shot. Sometimes this framing is obvious, such as when a portrait photographer positions the client in a doorway or when a landscapist places the sunset between two mountain peaks. Other times natural framing is less obvious, as is the case with this image. Look closely.

Summertime Notes

You’ll notice that my beautiful feet occupy the empty space between the hammock at the left and the trees to the right. The empty space created between the structures offers a place for the central subject to really stand out from the rest of the elements of the photo. The lines created by the hammock also help with the overall framing of the image and gives it a very anchored perspective. Speaking of perspective…

Use perspective

This photo was shot using a Rokinon 14mm F/2.8 super wide-angle lens, mounted on a full-frame mirrorless camera. The 14mm focal length bulges the exterior aspects of the frame. This causes the trees to bend in towards the center of the frame. The camera was held relatively close to my feet so that the entire scene seems relatively compressed around them. The overall effect is one of first-hand perspective and allows the viewer feel as if they themselves are swinging in the hammock on a warm summer afternoon…with dirty feet.

dsc07923

Shoot what you want

When I was about to enter this photo into the contest (in which it eventually took first prize from among 2,000 other entries) there were some politely well-worded reservations expressed by some of my friends. Why would anyone want an image of some dirtbag hiker’s feet? Well, when I shot the image I knew it carried the feeling of summer. The earthy remnants of a day’s trek and the welcomed relaxation of a swinging hammock that chases away all worries. I knew the photo fit the theme of the contest which was Summertime. It was an image which I felt was worth entering even though it was slightly unorthodox.

Shoot the images you want to shoot. Hopefully, this is a lesson you already know and have been putting into practice for some time now. If not, now is the perfect time to start.

Photo# 3: The Stars Fell

Falling Stars

On the night this image was made my girlfriend and I had been out chasing the Milky Way through the mountains. There was nothing planned as far as a self-portrait was concerned. This was one of the last photos to be made that night and it came about completely by accident. It is the only exposure I made of us under the stars, which to me makes it even more special, but I digress.

Incorporate the environment

Consider your environment as another subject and use it to enhance the image. This may go without saying when working with landscapes or nature photography, but it can’t be overstated when it comes to portraiture and working with human subjects in general. In the case of this image, the stars wheeling overhead become almost a completely separate subject. Add in the human element and it produces a wonderful duality between man (or woman) and nature.

Here we see a few of the environmental elements which came together in the photo. Some of them may be familiar.

Falling Stars Notes

Open yourself up

Let’s face it, not everything goes to plan. There have likely been many times a shot didn’t pan out, your camera wasn’t set on the ISO you needed, or the light faded before you could click the shutter. Other times everything goes completely to plan. So much goes to plan in fact, that you consider it a job well done and stop thinking creatively.

While it’s great when everything goes right, we shouldn’t stop looking for the next exceptional image. Be open to those great moments that produce great work even if they go beyond what you had set out to do originally.

We were on the verge of packing up and heading back to camp when I had the idea for our spur of the moment self-portrait. I had already produced all the images I wanted to make so we had chalked it up as a success. But as it turns out, the image I never intended to make that night ended up being the best.

dsc08347

Trust your instincts

The reason this photo came about was due to a feeling I had that the image was there before I made the exposure. I was told later that my exact words were, “Want to try something weird?”

Even though it had already been a successful night of shooting the stars I knew there was one more frame to take and that frame should include us. It wasn’t something that was planned but it turned out being one my most cherished images to date.

When shooting any type of image it always pays to go with your gut. More often than not, your instincts will be right. If it feels like a photographic opportunity is presenting itself then it’s usually a good idea to follow your intuition and pursue the idea. Don’t think you have astute instincts? Don’t worry. They will develop and mature as you do as a photographer.

_mg_9049-edit

Conclusion

Remember, strong images are made by more than just perfect camera settings. Begin looking beyond your exposure and aperture to understand how your photos impact you and ultimately the viewer. The methods mentioned above will give you a great start to producing consistently better images time and time again.

googletag.cmd.push(function() {
tablet_slots.push( googletag.defineSlot( “/1005424/_dPSv4_tab-all-article-bottom_(300×250)”, [300, 250], “pb-ad-78623” ).addService( googletag.pubads() ) ); } );

googletag.cmd.push(function() {
mobile_slots.push( googletag.defineSlot( “/1005424/_dPSv4_mob-all-article-bottom_(300×250)”, [300, 250], “pb-ad-78158” ).addService( googletag.pubads() ) ); } );

The post How to Compose Better Images and Make your Images More Extraordinary by Adam Welch appeared first on Digital Photography School.


Digital Photography School

 
Comments Off on How to Compose Better Images and Make your Images More Extraordinary

Posted in Photography