RSS
 

Archive for September, 2016

iPhone 7 is best Apple device yet in DxOMark Mobile testing

28 Sep

The engineers at DxOMark have put the iPhone 7 camera through its paces and found it to be a solid upgrade from the iPhone 6s and 6s Plus, in terms of both features and image quality. With an overall DxOMark score of 86 it’s better than Apple’s previous best score of 84 for the iPhone 6s Plus. This is the third best score among mobile phones tested and on the same level as devices such as the LG G5 or Samsung Galaxy S6. 

The testers were pleased by the improved texture performance, which they attribute to the new lens design, and the low noise and artifact levels. They also found the camera to produce good exposures with a wide dynamic range as well as accurate white balance and color rendering. The iPhone 7’s main weakness is a loss of fine detail and visible luminance noise in low light. The DxOMark team was also impressed by the efficient stabilization, fast autofocus and good detail in video mode.

Read the full report at DxOMark.com

Articles: Digital Photography Review (dpreview.com)

 
Comments Off on iPhone 7 is best Apple device yet in DxOMark Mobile testing

Posted in Uncategorized


Foolography and Triggertrap bring sensor-based triggering to the Unleashed camera controller

28 Sep

Foolography has announced a partnership with Triggertrap to bring new functionality to its tiny Unleashed Bluetooth camera controller that we covered at Photokina. The Unleashed works with many Canon and Nikon DSLRs and allows photographers to wirelessly control camera settings, such as aperture, shutter speed or ISO, and trigger the shutter or video using a smartphone app. You can also control multiple cameras, capture time-lapses and geotag your images. 

Triggertrap is a wired solution that is also controlled via a smartphone app. It focuses on offering creative ways of triggering a camera, such as vibration, facial recognition or motion sensors among others. A future version of the Triggertrap app will now be compatible with the Unleashed hardware dongle, allowing for wireless triggering with the Triggertrap modes. 

“We are often asked whether it’s possible to have a wireless version of Triggertrap Mobile,” says Mat Rodger, Managing Director of Triggertrap, “But so far, we have been focusing on our wired solutions. We are very excited to team up with the foolography team to deliver more options to our users, and to help foolography’s users trigger their cameras using our app.” 

foolography partners with Triggertrap to bring sensor-based triggering to Unleashed

Berlin 26 September 2016 — Berlin-based foolography (foolography.com) today announced that it is partnering with London-based Triggertrap (Triggertrap.com) to add additional functionality to its popular Kickstarter-backed Unleashed product.

foolography’s Unleashed (http://kck.st/2c8lxlu) is primarily a camera remote app. It helps Canon and Nikon users take full control of their cameras from their phones. From their app users can change all the important settings (aperture, shutter speed, ISO etc.) of their DSLR, take photos, start and stop video recording, control multiple cameras, take exposure-ramped-timelapses, geotag the images in-camera and preview thumbnails.

Triggertrap Mobile doesn’t offer as much control over the camera’s settings, but adds interesting and creative ways of triggering a camera to the mix, including sound, vibration, facial recognition, motion sensors, and much more.

Today, the two companies announced that Triggertrap will be including foolography’s Unleashed compatibility in a future version of the app. Instead of having to connect to the camera using the company’s Triggertrap Mobile Dongle, users will be able to use foolography Unleashed to trigger their cameras wirelessly based on a the triggering modes available in Triggertrap’s app.

“We are often asked whether it’s possible to have a wireless version of Triggertrap Mobile,” says Mat Rodger, Managing Director of Triggertrap, “But so far, we have been focusing on our wired solutions. We are very excited to team up with the foolography team to deliver more options to our users, and to help foolography’s users trigger their cameras using our app.”

“We have been huge fans of Triggertrap for a long time,” says Oliver Perialis, CEO at foolography, “and are very glad to announce this partnership. We always planned to open up our triggering API to other developers and couldn’t be happier that Triggertrap’s app is the first one out of the gates. This is just the beginning, and we hope developers will develop creative apps compatible with the Unleashed.”

Articles: Digital Photography Review (dpreview.com)

 
Comments Off on Foolography and Triggertrap bring sensor-based triggering to the Unleashed camera controller

Posted in Uncategorized


Photokina 2016 interview: Victor Hasselblad would be proud

28 Sep

Ove Bengtsson looks relaxed despite the scrum taking place around him on the Hasselblad booth. Photo enthusiasts jostle to see the company’s latest products while a professional photographer demonstrates various techniques and, no doubt, advantages of the Hasselblad system to a growing crowd, but he seems content to stand back and watch, the hint of a smile on his face.

‘The reception and the amount of people asking about the X1D is fantastic,’ he says: ‘There have been no negative comments, everyone seems so impressed.’

‘Of course not everyone here is going to be buying an X1D but they all seem to like the camera, like the way it feels. It’s hard to really demonstrate the image quality but when we say it can produce the same image quality as our H6D-50c, they are astounded. It uses the same sensor, the same image processing system and the lenses are equally good. It’s professional quality medium-format in a very small package.’

‘We had a projection for how many we’d sell in the first year and we’d passed that number in the first ten days.’

It’s been a similar story when photographers have had the chance to shoot with it, he says: ‘We have had a few photographers amazed at how small the camera is, how amazing the image quality is and how well the AF works, when you see it, not a lot of people have been able to use it properly, yet, but there are a number of cameras out there now and all the reaction has been very positive.’

And the reaction goes beyond passing compliments: ‘Already at the launch event we were already starting to take orders. We had a projection for how many we’d sell in the first year and we’d passed that number in the first ten days.’

Ove Bengtsson, shot using a pre-production X1D under the rather challenging, unflattering lights of the Photokina exhibition hall. 90mm lens, hand held at 1/100th sec, ISO 3200, F4.5. Manual focus. Processed through Phocus software at default settings, one dust spot removed.

In the hand, the X1D is an impressively dense, solid-feeling camera, even in comparison to professional DSLRs: ‘The body is made in three parts, all machined from a block of aluminium,’ Bengtsson explains. And this sureness in the hand is one aspect of making the camera easy to shoot with: ‘Due to the fact we don’t have any moving parts and we use an in-lens shutter, there’s nothing to introduce vibration. One of the photographers shooting with the camera to prepare for the launch event produced images shot at 1/8th of a second with a 45mm lens. That’s with good technique, of course, but I was very impressed by how good it looked.’

But the construction of the camera has a further advantage, Bengtsson says: ‘As well as the way it feels, it’s also good for transferring heat from the sensor. We have a tight connection between parts, which also helps transfer heat away from the processor – it’s an efficient way of minimizing problems with internal heat.’

‘Of course, when a product gets warm it uses a lot of energy. It drains the battery faster. Because of the amount of data we’re dealing with, the processors can become very warm. We have a thermal shut-off if the internal temperature gets to 70C, both to protect the sensor and to avoid the additional noise it would produce, but it’s mainly to protect the components.’

‘We had some experience of dealing with this sort of issue in past generations of our H series cameras. We used a fan in the H3D but were able to move to a passive system of thermal management in newer models that actually worked better, so we had some experience we were able to use. We knew what to do and also what not to do.’

‘It looks like [Fujifilm] has done some very good things, but I think their camera is very different from ours.’

Bengtsson goes to some lengths to stress that this X1D is the product of the company’s in-house expertise: ‘There have not been collaborations on this camera: we’ve developed the whole camera in Sweden, including the electronics. In terms of lenses, we have worked with a Japanese company. We design all the lenses but they do the actual manufacturing. To our specifications, of course.’

Interestingly, he’s happy to name that company. ‘It’s a company called Nittoh. They don’t sell lenses under their own brand but they make a lot of lenses for a lot of companies. We have a long history of working with them. The X-Pan, for instance, was Hasselblad’s first collaboration with Fujifilm but it was actually made by Nittoh, so we knew they’re really good. They are really good and we were extremely happy to get them.’

On the subject of Fujfilm, Bengtsson seems sanguine about the company’s sometime partner creating a mirrorless medium-format rival: ‘It looks like they’ve done some very good things but I think their camera is very different from ours.’

‘I think when looking at these cameras, they’re actually very different. The X1D is much, much smaller. It doesn’t perhaps have all the features – I suspect they’ll bring a lot of technologies across from their X-T cameras – but theirs is bigger.’

‘I think they’ll appeal to different people. If you’re looking for specs and features, the Fuji might be a good choice. But if you want something that feels good, maybe this is the one you buy. They use the same sensor, so they’ll probably come pretty close in terms of image quality but maybe our quality will be a bit better.’

The XCD 30mm F3.5, the third lens for the X1D camera, was on show at Photokina. This is a 28mm F2.8 equivalent in ‘full frame’ terms.

‘The best thing about having two cameras is that it gets more people talking about medium-format. When medium-format went digital it became so expensive. It was out of the reach of most people, it was on a different planet.’

‘We already have a certain reach to particular customers, particularly those who already use our system, but having competition will make the whole segment bigger.’

There’s a clear benefit for existing Hasselblad users, he explains: ‘H system camera users can buy an adapter to use all our other lenses, currently without autofocus. That’s something that might come later, but no promises. This means there are sixteen lenses, including the three native ones, that can be used.’

‘We don’t expect people to buy H system lenses to use with this camera, but we think some existing H system users will use it as a second camera.’

There’s no prospect of being able to adapt Fujifilm GF lenses, though. ‘Our camera doesn’t have a shutter mechanism, the shutter is in our lenses.’ But it’s unlikely that many people will be looking to adapt lenses to the X1D, he suggests: ‘I fully understand the appeal if you have a small camera of putting on cool other lenses, but there are very few that will cover the full sensor of this camera.’

In addition to the X1D, Hasselblad is showing its concept of a modern modular camera. ‘It is just a concept at this stage,’ Bengtsson is at pains to stress: ‘We involved our design team and made sure it’s possible, but what you see on the show floor is a model made by a company that specializes in making models.’

The V1D concept harks back to the company’s famous V series cameras but for now is purely a design study aimed at gauging interest.

‘We often hear the old cameras, the V system, were fantastic. We wanted to see if we could do something more modern. The thing people liked about the V-system was that it was modular, that is wasn’t a fixed camera. We wanted to see if we could do something more modern in that direction, modeled with a similar sort of modular design’

‘The modularity is in the screen and the EVF. You can move the screen, you can replace it with an electronic viewfinder instead. There’s a grip that you can mount on either side and aperture and shutter speed dials you can mount on either side. You don’t have to have both – you can choose.’

‘You will also be able to buy extra modules,’ he says, before he recognizes that his enthusiasm is running away from him: ‘Well, if we do it.’

‘We’d start with something very basic, just one screen and an aperture dial, for instance.’

‘As technology evolves, you can update to get a better display or perhaps a faster or more flexible EVF. That’s the nice thing, you’re not locked-in to current technology. That was the heart of the appeal of the V system, you can even now put a digital back on a camera from 1957 and make it digital.’

‘If you really love photography it can be better to have a slower camera. It makes you think about each photograph’

‘The response to this has been really good too. I’ve heard a few people say it’s the biggest thing a Photokina.’

‘One thing I think people are understanding is that if you really love photography it can be better to have a slower camera. It makes you think about each photograph and stops you taking 400 photos every time.’

Bengtsson is fully aware that positive comments don’t always turn into sales: ‘The tricky question is: would you buy it for €12-15,000? Some people will say yes but we’ll have to look at how big the market would really be. After the show we’ll start to summarize what the sales people have heard, but the general response is that it’s really cool. Photokina is a good place to find a lot of input.’

Like the original V series cameras, the V1D concept would be modular, and would allow users to add only the features they wanted.

The reaction from the crowds is very different from the bemusement being expressed four years ago, when Hasselblad displayed the first fruits of a collaboration with Sony. ‘I remember it very well. It’s not something we’re very proud of. I wasn’t involved very closely – it was controlled by the management at that time. It was mainly the work of an Italian design company and Hasselblad in Sweden wasn’t very involved in the process.’

‘The idea of trying to find a product that appeals to a wider audience was a good one, but the product wasn’t anything near Hasselblad: it lacked authenticity and any connection to the brand.’

‘We were in a position where we were buying a camera from Sony at a high price then taking it apart and adding things like exotic wood or carbon fibre but we didn’t change anything in its characteristics. It’s still the same NEX-7 controls and image quality and, of course, all of our customers saw that.’

‘We had a divided stand that year, Lunar on one side and our medium-format products on the other. We were also launching the H5D but many people didn’t really notice that. The first few days we weren’t allowing the people on our stand to talk about that it was a Sony, it was ridiculous.’

‘It wasn’t us and we had to pay a high price
to realise it was a mistake.’

‘We reached a much lower number than we’d anticipated. The later model, the Stellar, had a more reasonable price and didn’t look so extreme so that actually sold quite well.’

‘It wasn’t us and we had to pay a high price to realise it was a mistake. It shows that you should always be honest with what you do and never try to fool people.’

‘I think Victor Hasselblad would have been rotating in his grave.’ But that’s not the case now, Bengtsson says: ‘I think he’d certainly approve of the X1D. It’s a small camera with excellent image quality. It’s exactly what he would have wanted. Just as the V series was exactly the camera he wanted to make – he was a bird and landscape photographer – I think he’d be proud of the X1D.’

And Bengtsson believes the new products will help perpetuate that legacy: ‘we could have ended that history, the direction we were going, I think these products will lift us again.’

Articles: Digital Photography Review (dpreview.com)

 
Comments Off on Photokina 2016 interview: Victor Hasselblad would be proud

Posted in Uncategorized


Where to Get Income When You’re New to Photography

28 Sep

Photography as a career is extremely challenging and rewarding at the same time. On the one hand, photographers seem to be blessed people, because they do what they love. On the other hand, it sometimes gets very hard to make money on doing what you love – especially when you’re a freelance photographer. Luckily, there are some ways to effortlessly Continue Reading

The post Where to Get Income When You’re New to Photography appeared first on Photodoto.


Photodoto

 
Comments Off on Where to Get Income When You’re New to Photography

Posted in Photography


Alien Skin Exposure X2 launches with several new tools and Exposure Bundle

28 Sep

Alien Skin has announced the launch of Exposure X2, the second iteration of its non-destructive photo editor and organizer. The company has added several features to its latest version of Exposure, some of which have been frequently requested by users, including faded presets, a spot healing tool, metadata search and a history panel. An updated Exposure Bundle is also available, bringing with it Alien Skin’s Blow Up, Exposure and Snap Art apps.

As expected, the new spot healing tool enables users to quickly fix small imperfections in photos without opening a separate photo editor; the tool supports both healing and cloning. The faded presets, meanwhile, are customizable and add a hazy look to images. The history panel tracks any changes you make to your images, and the metadata search, of course, enables searches based on various criteria including the camera used, shutter speed, ISO and more.

Alien Skin Exposure X2 is available now for $ 149 for new customers, and $ 100 for existing Exposure X owners. The Exposure X2 Bundle is higher at $ 199 for new customers, or $ 119 for existing customers who need the upgrade.

Via: Alien Skin

Articles: Digital Photography Review (dpreview.com)

 
Comments Off on Alien Skin Exposure X2 launches with several new tools and Exposure Bundle

Posted in Uncategorized


Xiaomi Mi 5s and Mi 5s Plus offer high-end camera specs and ultrasonic fingerprint reader

28 Sep

Chinese manufacturer Xiaomi has launched two new high-end devices today, which in terms of specification and product naming, are squarely aimed at Apple’s recently launched iPhone 7 models. 

The Mi 5s is the smaller of the two new devices, featuring a 5.15″ force-sensitive 1080p display and a 3,200 mAh battery in a fully metallic body. The camera specification can compete with some of the current best Android smartphones. Sony’s 1/2.3-inch IMX378 CMOS sensor offers the same large 1.55um pixel pitch as the predecessor IMX 377 that is used in the Google Nexus 6P or HTC 10. It comes with on-sensor phase-detection and is combined with an F2.0 aperture, a dual-tone LED flash, auto HDR and 4K video recording at 30 fps. The front camera is less exciting, offering a 4-megapixel sensor with F2.0 aperture and an 80-degree wide-angle lens. Xiaomi has published a sample gallery on its website.

The Android OS is powered by Qualcomm’s latest top-end Snapdragon 821 chipset, up to 4GB of RAM and 128G internal storage. Another highlight is the ultrasonic fingerprint sensor that is located underneath the front glass. The ultrasonic technology eliminates the need for cutting a hole into the glass and, according to Xiaomi, works better with dirty fingers than capacitive versions. In China the Mi 5s can pre-ordered on September 29th for approximately $ 300 for the base model with 64GB storage and 3GB RAM. The high-end version with 4GB RAM and 128GB storage will set you back $ 345.

The larger Mi 5s Plus comes with a 5.7″ display but no force-sensitivity and a conventional fingerprint reader on the back. On the plus side it has a bigger 3,800 mAh battery and a 13-megapixel dual-camera. The latter works in a similar way to the version in the Huawei P9, combining images from a color and BW sensor for improved detail and dynamic range. Both cameras use Sony’s 1/3.06 IMX258 sensor. The Mi 5s Plus will cost you approximately $ 345 for the model with 4GB RAM and 64GB storage. A premium model with 6GB RAM and 128GB storage will be available for about $ 390. 

Articles: Digital Photography Review (dpreview.com)

 
Comments Off on Xiaomi Mi 5s and Mi 5s Plus offer high-end camera specs and ultrasonic fingerprint reader

Posted in Uncategorized


Sony announces price and release date for FE 70-200mm F2.8 GM OSS

28 Sep

Sony has released information regarding the availability and price of its delayed 70-200mm GM lens for its E-mount system. The FE 70-200mm F2.8 GM OSS was originally supposed to arrive in June or July this year, but the company announced it would be delayed until this month. The good news is that the lens will become available for sale on September 30th, but the bad news is that those orders could take up to three months to fulfill as Sony expects the lens to popular and that demand will out-strip supply for some time.

Sony has also said that the 2x converter that goes with the lens will be on sale at the same time, while the 1.4x model can be ordered at the end of October.

The company displays prices of 330,000 yen (approx $ 3300) for the lens and 70,000 yen (approx $ 700) for the 2x and 1.4x converter, though retailers are advertising the lens for the $ 2600/£2500 originally quoted.

For more information see the Sony website or see the translated version of the announcement.

Articles: Digital Photography Review (dpreview.com)

 
Comments Off on Sony announces price and release date for FE 70-200mm F2.8 GM OSS

Posted in Uncategorized


Blow-Up Party: Inflatable Black Plastic Dance Club & Bar

28 Sep

[ By SA Rogers in Drawing & Digital. ]

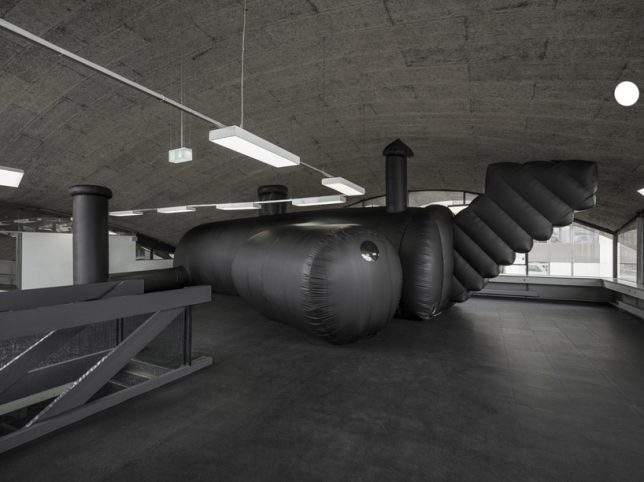
inflatable-club-1

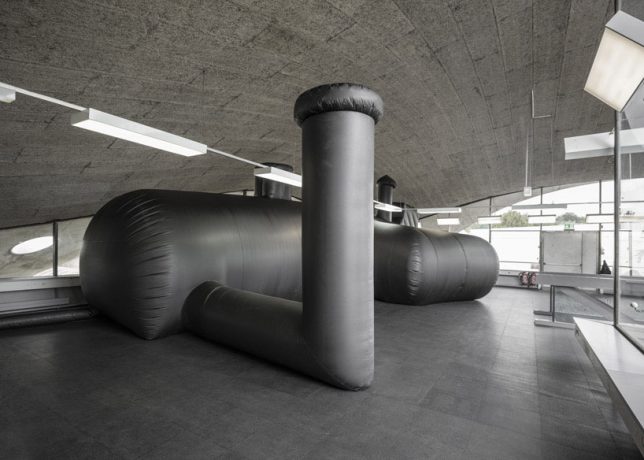
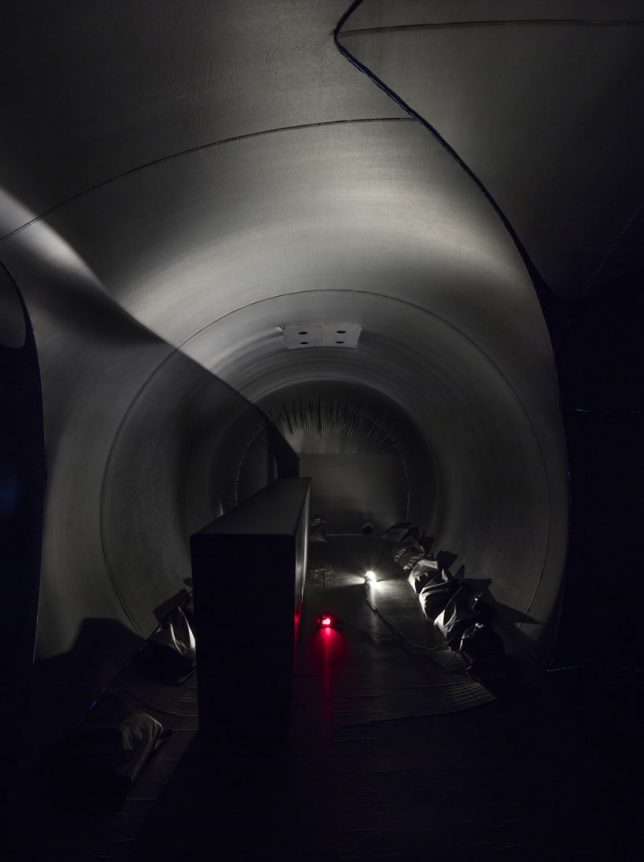
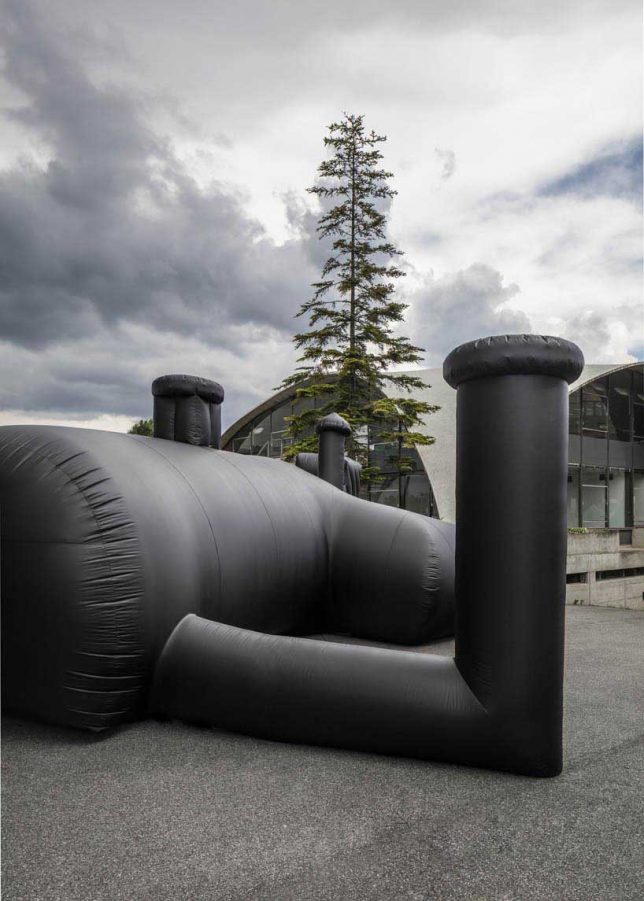
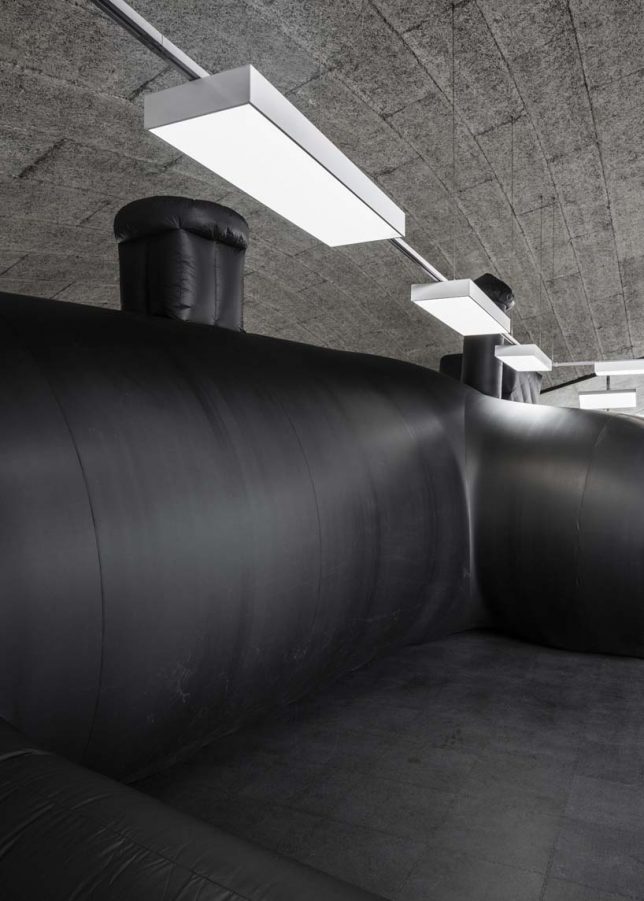
Deliberately dark and pipe-like to recreate the feel of being in a secret subterranean space, this inflatable nightclub and bar by Bureau A comes complete with blow-up benches, tables and a DJ booth. Constructed entirely from black PVC membrane, ‘Shelter’ was commissioned as a party venue for the Federation of Swiss Architects (better known as Bund Schweizer Architekten) and installed inside the cold, concrete Pavillon Sicli in Geneva.

inflatable-club-2

inflatable-club-3

“The underground fascinates and completes the hygienic and pan optical work of the over-ground,” say the architects. “For one night, the black hole of a neat and well-organized society is revealed as a potential for distortion, a potential of let-go and provoke, with a slight smile, the unsaid and the sweat. The mysterious black vessel lands in the modern space of a highly engendered concrete vault; a great spatial condition to explore the corners of what is hidden.”

inflatable-club-4

inflatable-club-6

The space inside is clearly quite limited and dark, so it would have been interesting to see what it looks like with people inside. The concept of inflatables for temporary spaces certainly isn’t new, but it’s still pretty cool to see these structures show up in unusual shapes and configurations, standing tall within mere moments of arrival on-site and then disappearing so quickly, it’s as if they were never there.

Share on Facebook


[ By SA Rogers in Drawing & Digital. ]

[ WebUrbanist | Archives | Galleries | Privacy | TOS ]


WebUrbanist

 
Comments Off on Blow-Up Party: Inflatable Black Plastic Dance Club & Bar

Posted in Creativity


Tips for Understanding the Lightroom Adjustments Panel

28 Sep

Lightroom can be an intimidating program. Even longtime users sometimes find themselves confused at all the options or unsure of exactly what to do to achieve a specific type of look for their pictures. Fortunately much of this can be mitigated by learning new things slowly and carefully, and taking the time to master just one new tool, option, or set of sliders at a time. The first thing I usually recommend to beginners is the Basic panel because, as its name implies, those sliders can go a long way towards improving your pictures. However another set of sliders in the Develop module, called the Adjustments panel, can take your images to a whole new level if you learn to use it properly.

lightroom-adjustments-panel-squirrel

What is the Adjustments panel?

While the Basic panel allows you to adjust global settings on an image related to things like white balance, overall tint, and highlights/shadows, the Adjustments panel lets you get much more specific with selective color editing. To access this panel click on the Develop module and then look on the right-hand side of your screen. If you do not see it (it’s the third one down), right-click (ctrl-click on a Mac) on any of the Develop panels and make sure the Adjustments option in the pop-up menu is checked.

lightroom-adjustments-panel

Right away you might be a little confused because the options have odd-sounding acronyms with no explanation. But once you understand how they are related it should get a little easier. For starters, here’s a brief explanation of the three main categories of HSL / Color / B&W.

  • HSL: Allows you to control the Hue, Saturation, and Luminance of all the main colors that make up a picture (Red, Orange, Yellow, Green, Aqua, Blue, Purple, and Magenta)
  • Color: This is essentially the same thing as the HSL panel, as you will see shortly, but the options are organized in order to help you focus on specific colors, and then specific types of adjustments within those colors.
  • B&W: This panel is often the most misunderstood, but one of the most powerful tools available in Lightroom when it comes to converting your images to black and white.

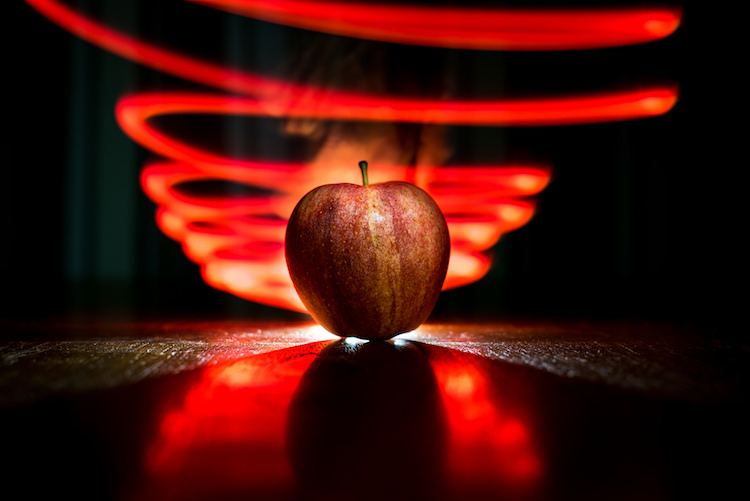
lightroom-adjustments-panel-apple

The HSL tab

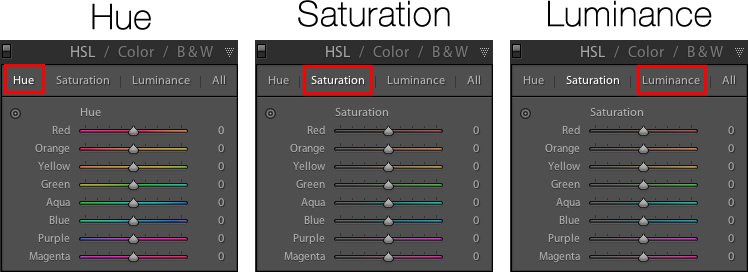
This abbreviation stands for Hue, Saturation, and Luminance and allows you to control these parameters all at once for the various colors in your image. When you click the HSL option in the Adjustments panel you can then choose each of these three options to control, or you can click the “All” option and have access to all of the parameters at a glance.

lightroom-adjustments-panel-hsl

Hue sliders

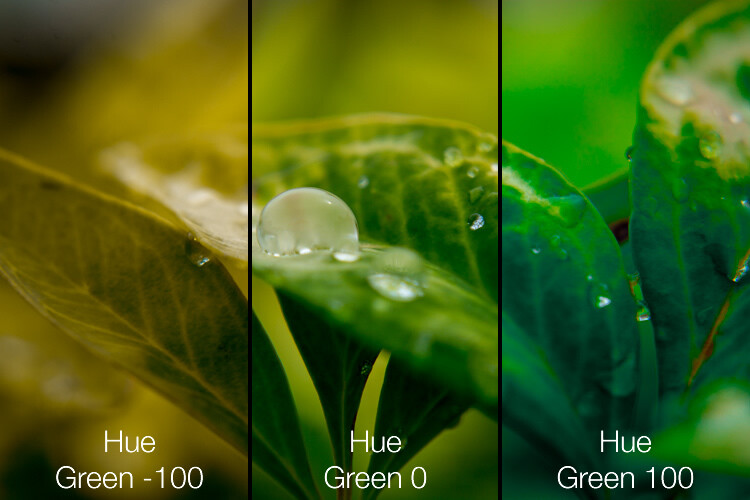
Click the Hue option and you will be able to change the look of specific colors such as Red, Green, Yellow, etc. for the entire image. For example, you could make your greens have more of a yellow tint to them, or make them look almost fluorescent just by changing the Green slider. You can give your skies a deep, rich blue or tone it down to make them look a bit pale. Your purples can be anywhere from reddish to deep violet, all with the click of a mouse button.

Simply adjusting the green hue can give your nature photos an entirely different look and feel.

Simply adjusting the green hue can give your nature photos an entirely different look and feel.

Adjusting the hue, as is the case with many editing decisions, can be most effective when used subtly and in combination with other options such as the tone curve or white balance. Too much editing can come across as obvious and give your images a look that seems overly processed, especially when it comes to portraits. Still, it’s a powerful and valuable adjustment that can greatly affect your pictures.

If you are not sure exactly which color option to select from the ones that are available to you, you can click the target button in the top-left corner of the Hue panel (circled in red below) then click and drag on a specific point in your image. This will adjust the hue that matches the target area, and all similar colors for your entire photo.

lightroom-adjustments-panel-hue-click-drag

One tip I like to use when adjusting the values is to click on the 0 and enter numerical values using my keyboard. I’ll start with something small like 5 and then press the up and down arrows on my keyboard to raise the value in increments of 1. Or you can hold down the shift key while tapping the arrows to raise and lower values in increments of 10. It’s a good way of making more precise adjustments rather than moving the slider with your mouse.

Saturation and Luminance

The Saturation and Luminance tabs function in much the same way. You use sliders or enter numerical values in order to adjust how much of each color is present (Saturation) or the brightness of each color (Luminance). Finally, clicking “All” will let you edit all three parameters at once. I find that a bit overwhelming but others can think is quite useful. See what works best for you.

Subtly editing the HSL values on this picture helped me bring out more vibrant colors and produce the final image I was really going for.

Subtly editing the HSL values on this picture helped me bring out more vibrant colors and produce the final image I was really going for.

The Color tab

At first when you click on the Color tab of the Adjustments panel you might be hit with a feeling of déjà vu. The options look remarkably similar to what you might have already seen in the HSL tab, in that you can once again change the Hue, Saturation, and Luminance. The difference here has to do with how things are organized, and it’s why I find myself working more often in the Color tab than the HSL tab.

Here all three adjustments are available to you at the same time for each individual color, which makes it very easy to work with your image on a per-color basis as opposed to a per-adjustment basis. If I’m shooting portraits and want to tweak the color of my subject’s purple shirt I will probably want to adjust all three parameters at once, but just for the color purple. This tab gives me the option to do exactly that, and once again you can click on the All option to see all the colors, along with all their corresponding adjustment options, at the same time.

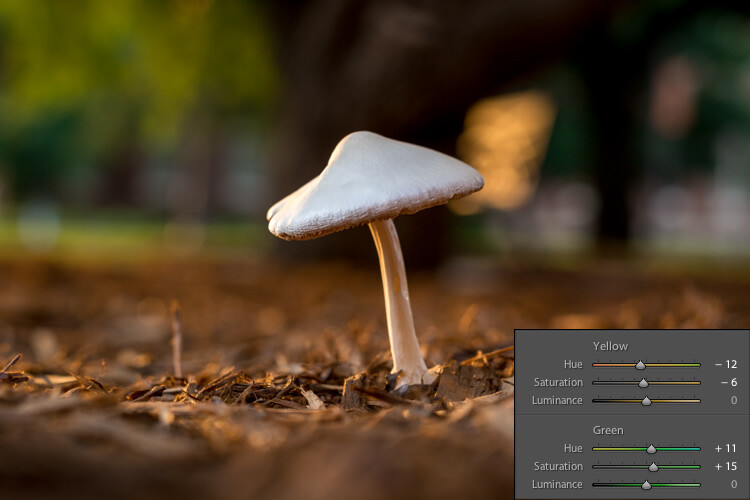
Working in the Color tab of the Adjustments panel let me tweak various parameters of the greens and yellows to get the final image I was going for.

Working in the Color tab of the Adjustments panel let me tweak various parameters of the greens and yellows to get the final image I was going for.

The B&W tab

lightroom-adjustments-panel-bwThis part of the Adjustments panel is often the most confusing because as soon as you click on it, your image turns grey, and yet you still have all the same color sliders as on the other tabs. What’s going on here?

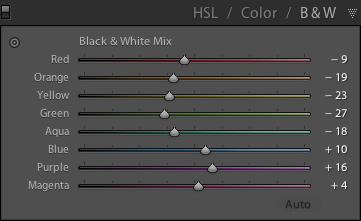
The answer lies in how Lightroom essentially tries to mimic the effect of black and white filters on color pictures. What you are doing with this panel is turning your image into a grayscale version of its colorized counterpart, then adjusting the tone of each of the individual colors as the image is processed. Incidentally, if you open this panel and then click on one of the Black and White filter presets in Lightroom (in the presets panel on the left side of LR) you will see the sliders move around because they are really just specific values for the sliders you see here.

An example B&W conversion to see how the sliders work

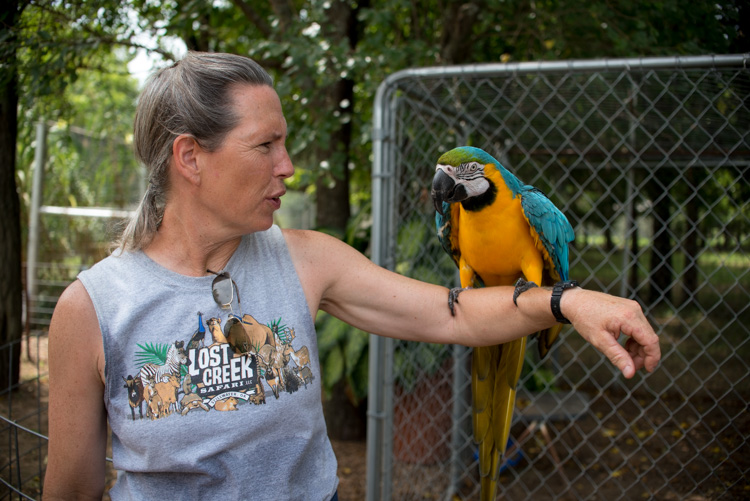
To demonstrate how these Adjustment options work, here’s an image of a woman who owns a wildlife refuge in Oklahoma holding a macaw.

lightroom-adjustments-panel-macaw-color

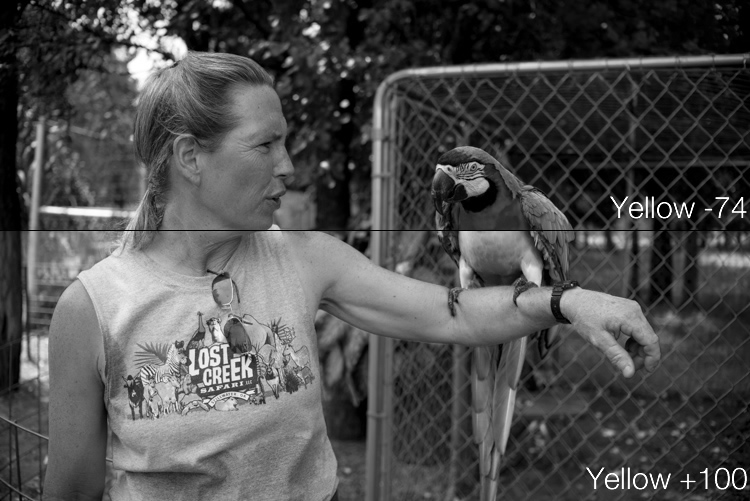
There are several distinct colors in this image such as yellow, aqua, and green, which makes it an ideal candidate for understanding how the B&W adjustments work. In this first example I have clicked the B&W filter and left all sliders at their default values, but changed the yellow option for two different results.

lightroom-adjustments-panel-macaw-bw-yellow

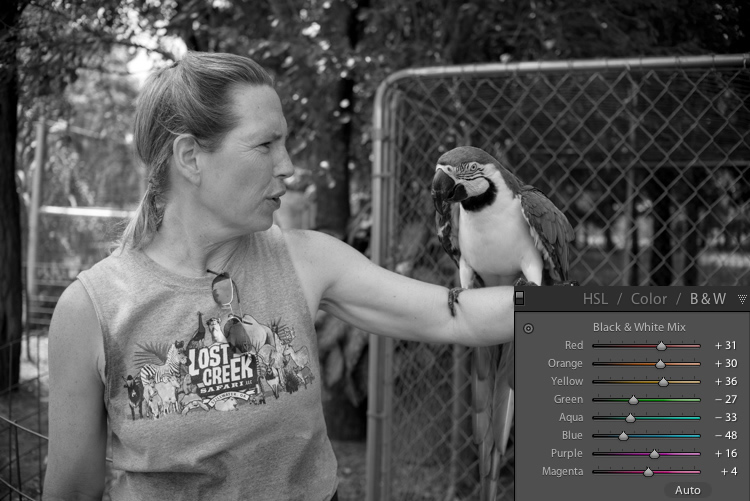
Most of the image remains unaffected except for the bird’s bright yellow chest, which is starkly different depending on the values I have selected for the Yellow slider. Increasing the numerical value of yellow has made the corresponding areas much lighter, and decreasing it has made them appear significantly darker. Once again you will likely find that in this B&W panel the best edits are the most subtle, and you can use the sliders to creatively adjust the look and feel of a monochromatic image. To further illustrate the effects of these sliders, compare the following images. The first one has higher values of colors that correspond to the skin tones of the woman and the chest plumage of the bird, and darker greens for the foliage in the background.

lightroom-adjustments-panel-macaw-bw-all-1

Be careful not to go too far

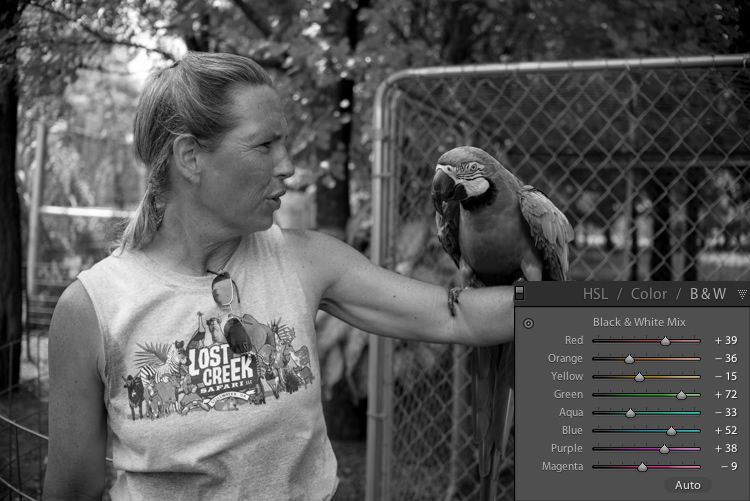
In the next example, the colors of the bird’s chest have been significantly darkened while the background is much lighter, and the woman’s skin tone has been toned down quite a bit as well. I find the top image much more natural and pleasing, whereas the bottom one significantly alters the appearance of the bird and makes the woman look almost as though her face has been burned, particularly if you look where her jawline meets her neck.

lightroom-adjustments-panel-macaw-bw-all-2

As you play around and experiment with the B&W sliders you will start to get a feel for how you might prefer various adjustments in your images. If you are the type of person who likes to try black and white photography this panel is significantly more useful than just clicking on a preset or using built-in filters in a program like Instagram.

Conclusions

I hope this article has helped you understand a bit more about some of Lightroom’s useful editing options. If you have never used the Adjustments panel before go ahead and try it out! Lightroom is non-destructive which means your edits are not permanent and can be undone at any time, so it never hurts to try something and see what happens.

If you find the Adjustments panel to be useful, or have your own tips to share, please leave your thoughts in the comments below. I’m sure other readers would enjoy hearing them.

googletag.cmd.push(function() {
tablet_slots.push( googletag.defineSlot( “/1005424/_dPSv4_tab-all-article-bottom_(300×250)”, [300, 250], “pb-ad-78623” ).addService( googletag.pubads() ) ); } );

googletag.cmd.push(function() {
mobile_slots.push( googletag.defineSlot( “/1005424/_dPSv4_mob-all-article-bottom_(300×250)”, [300, 250], “pb-ad-78158” ).addService( googletag.pubads() ) ); } );

The post Tips for Understanding the Lightroom Adjustments Panel by Simon Ringsmuth appeared first on Digital Photography School.


Digital Photography School

 
Comments Off on Tips for Understanding the Lightroom Adjustments Panel

Posted in Photography


DJI goes portable with the Mavic Pro

28 Sep

DJI just announced the release of their ultra portable consumer drone: the Mavic Pro. The Mavic offers a number of interesting features including the ability to track and follow its user, which is something that the GoPro Karma that was just released last week cannot do. It also has the same obstacle avoidance and tracking modes that can be found on the DJI Phantom 4 – features the Karma lacks.

The Mavic can fly at speeds up to 40MPH in ‘sport’ mode and can remain stable flying in winds up to 24MPH. The Mavic films in 4K/30p or 1080p at 96fps, and has a battery life of around 27 minutes of continuous flight time. On board the drone is a 12MP camera on a three-axis gimbal that can focus as close as 48cm/19in. The Mavic Pro offers DNG Raw shooting, and DJI claims that thanks to its gimbal design, it’s possible to shoot 2-second-long exposures from the air. A Tripod Mode is included that enables finer camera angle and position adjustments so you can frame your selfie just right.

Also of note is the Mavic Pro’s updated ActiveTrack mode that is trained to identify objects like people, cars and animals and can follow, circle or lead in front of its subject. 

The Mavic Pro’s controller has seen a design change from previous DJI controllers and it now sports a smaller design that features the ability to clip your phone right on the bottom of the unit. If you don’t want to use the controller, the drone can be controlled with on-screen joysticks right from your smartphone.

DJI also announced the debut of a brand new product that will allow for in flight viewing experiences called DJI Goggles. The goggles were specially designed for aerial first-person view (FPV) applications but the DJI Goggles also allow you to flick between third person view and FPV in under a second. You can comfortably wear your glasses while wearing the goggles and quit FPV mode instantly by flipping the mask up. The goggles display an 85-degree view from the drone in full 1080p for a true bird’s-eye view perspective of the world below. With built-in OcuSync, the goggles receive video directly from Mavic Pro in the air and not through the controller which reduces lag and allows you to share the in-flight view with a friend. 

The Mavic Pro’s U.S. retail price will be $ 999 with the remote controller included, and $ 749 without the remote controller. Additional Mavic Pro Intelligent Flight Batteries will cost $ 89. A Mavic Pro Fly More Combo, which includes a Mavic Pro, two extra Intelligent Flight Batteries, extra propellers, a charging hub, an adapter, a car charger and a shoulder bag, will be available for $ 1,299. It will begin shipping October 15th.

DJI Revolutionizes Personal Flight With New Mavic Pro Drone

Small Size And Folding Design Make Mavic Pro Perfect For Wherever You Go

September 27, 2016 – DJI, the world leader in unmanned aerial technology, Tuesday revolutionized personal flight by introducing Mavic Pro – a portable, powerful and easy-to-use drone featuring DJI’s most innovative flight technology in a sleek, foldable package that enables creative fun wherever you go.

Mavic Pro is DJI’s first personal drone designed to be taken just about anywhere. Small enough to toss in a bag and easy enough to launch quickly whenever the time and place are right, its unique folding design compresses the entire drone to practically the size of a water bottle.

The compact body of Mavic Pro holds a drone built for uncompromising performance. Equipped with a stabilized 4K camera and a visual navigation system, with a 4.3 mile (7 km) range and 27 minute flight time, Mavic Pro sets the new standard for compact drones.

“DJI has spent a decade making it easier for anyone to fly, and by rethinking everything about how a drones look, we have created an entirely new type of aerial platform for anyone to explore their creativity,” said Frank Wang, DJI’s CEO and founder.

“Mavic Pro is a technological triumph filled with features that once again show how DJI leads the industry. Most importantly, Mavic Pro allows you to reach the skies easily, see the world with new eyes and tell your stories like never before.”

Mavic Pro is designed to be ultra portable and quick to launch so it can take to the skies as soon as you need it. With four folding arms and propellers that tuck neatly away against its streamlined body, it can be easily carried in a purse or backpack, saving you the trouble of mounting propellers before a flight. It can be operated by the powerful long range remote controller, or simply by your smartphone at shorter range. When controlled by a smartphone, the whole system can be set up and airborne in less than a minute to capture every key moment.

Unparalleled Flight Experience

DJI’s commitment to unparalleled stability, maneuverability and safety is clear in Mavic Pro’s new FlightAutonomy system. FlightAutonomy is Mavic Pro’s brain and nervous system, a complex network of hardware and software consisting of five cameras, GPS and GLONASS navigation systems, a pair of ultrasonic range finders, redundant sensors and 24 powerful computing cores.

FlightAutonomy can position, navigate and plan routes for Mavic Pro, enabling it to avoid obstacles in various environments, with or without the help of satellite signals. FlightAutonomy provides a significant boost in working range and can cope with complex 3D environments. For navigation and obstacle avoidance, FlightAutonomy provides a superb speed-range envelope to make Mavic Pro self-navigational in various intelligent flight modes, and will avoid most obstacles at speeds up to 22 mph (36 kph).

An ultra light and aerodynamic airframe, together with DJI’s state-of-the-art propulsion and battery system, enables Mavic Pro to fly for up to 27 minutes. To experience the pure joy of flying, Mavic Pro can be switched to Sport Mode, which allows speeds of up to 40 mph (64.8 kph), increasing the drone’s agility and responsiveness. Mavic Pro flies smoothly and will remain stable in winds of up to 24 mph (38.5 kph), and uses DJI’s GEO geofencing system to help identify restricted areas, preventing flight in locations that might raise safety or security concerns automatically, and helping pilots make smarter decisions about when and where to fly.

As with all DJI drones, Mavic Pro is set to automatically return to its launch location if it ever loses contact with the controller or reaches critically low battery levels. The new Precision Landing feature records a burst of video with two stereo cameras every time Mavic Pro launches, then uses both video and satellite information when it returns to land within an inch of where it took off. If a pilot lets go of the controls, the drone will simply hover in place.

Advanced Stabilized Camera System

Mavic Pro’s small size is packed with powerful features. DJI’s advanced technology now includes our smallest-ever three-axis gimbal for shake-free photos and video. The autofocus camera features a minimum focusing distance of just 19 in (0.5 m) and can be flipped 90 degrees to portrait mode for vertical selfies and video. Mavic Pro records 4K video at 30fps and full 1080p HD at 96fps. Its 12-megapixel camera with Adobe DNG RAW support has been expertly tuned for aerial images. With the help of the high-precision gimbal, you can confidently shoot 2-second-long exposures in the air to get the most jaw-dropping aerial images.

New Remote and Live View Performance

A revolutionary new compact remote controller has been designed to provide a fully ergonomic experience with optimum comfort, and can accommodate a smartphone or control Mavic Pro on its own. Its built-in LCD screen displays essential telemetry data, while dedicated buttons for functions such as Return-to-Home and pausing during Intelligent Flight modes ensure a confident flight every single time. The video link system, OcuSync, represents new heights in DJI’s communication technology. It supports a range up to 4.3 miles (7 km) and live view resolutions up to 1080p.

The new band management algorithm makes OcuSync more robust in environments with many frequencies in operation. Mavic Pro is equipped with dual-band WiFi as a secondary link, allowing easy control via your smartphone for close range operation or for quick downloading of content from Mavic Pro straight to your device.

Most Intelligent Drone Ever

The powerful systems inside Mavic Pro are easy to use, even for beginners. Using just your phone’s touchscreen, you can use TapFly to direct Mavic Pro to go wherever you want, avoiding obstacles along the way. When you want to take a hands-free selfie, FlightAutonomy makes it possible to control the drone completely with just your gestures.

In Gesture mode, you can use gestures to have Mavic Pro locate you, center you in the frame and take the perfect shot as Mavic Pro’s flashing lights count down to the photo. Sharing your best aerial moments has never been easier with live streaming to Facebook Live, Periscope and YouTube through the DJI GO app.

An updated version of DJI’s ActiveTrack recognizes common subjects such as people, bicyclists, cars, boats and animals, which then sends Mavic Pro to follow behind, lead in front, circle above or track alongside the subject, keeping the camera focused on the subject while you concentrate on flight maneuvers. The new Terrain Follow mode means that you can race up a slope behind a subject while remaining at a constant height between 1 ft (0.3 m) and 33 ft (10 m).

At the other extreme, the new Tripod Mode is designed for indoor use, slowing and fine-tuning Mavic Pro’s position and angle based on controller movement inputs to allowing for precision framing and safe indoor flight.

Immerse Yourself

Mavic Pro also pairs with DJI’s new immersive DJI Goggles, displaying an 85-degree view from the drone in full 1080p for a true bird’s-eye view of the world below. With built-in OcuSync, the goggles receive video directly from Mavic Pro in the air and not through the controller, reducing lag to a minimum – and allowing you to share the in-flight view with a friend.

Specially designed for aerial first-person view (FPV) applications, DJI Goggles allows you to flick between third person view and FPV in under a second. You can comfortably wear your glasses while wearing the goggles and quit FPV mode instantly by flipping the mask up.

Price and Availability

Mavic Pro’s U.S. retail price will be $ 999 with the remote controller included, and $ 749 without the remote controller. Additional Mavic Pro Intelligent Flight Batteries will cost $ 89. A Mavic Pro Fly More Combo, which includes a Mavic Pro, two extra Intelligent Flight Batteries, extra propellers, a charging hub, an adapter, a car charger and a shoulder bag, will be available for $ 1,299.

Mavic Pro is immediately available for pre-order at dji.com/mavic and will begin shipping October 15. It will also be available in mid-October at DJI’s three flagship stores in Shenzhen, Seoul and Hong Kong. Mavic Pro can also be ordered on Apple.com and will be available in Apple Stores in early November.

DJI Care Refresh

A new optional protection plan, DJI Care Refresh, is available in select countries and provides peace of mind for Mavic Pro owners. DJI Care Refresh covers accidental damage to the Mavic Pro aircraft, gimbal or camera during normal use for up to 12 months, and for an additional charge will offer up to two full replacements that are new or equivalent to new. DJI Care Refresh is available for $ 99 before a new Mavic Pro is activated, or within the first 48 hours after activation.

For additional information, please contact:

Adam Najberg, DJI Global Communication Director – pr@dji.com

About DJI

DJI is a global leader in developing and manufacturing innovative drone and camera technology for commercial and recreational use. DJI was founded and is run by people with a passion for remote-controlled helicopters and experts in flight-control technology and camera stabilization. The company is dedicated to making aerial photography and filmmaking equipment and platforms more accessible, reliable and easier to use for creators and innovators around the world. DJI’s global operations currently span across the Americas, Europe and Asia, and its revolutionary products and solutions have been chosen by customers in over 100 countries for applications in filmmaking, construction, emergency response, agriculture, conservation and many other industries. 

For more information, visit our website: www.dji.com

Follow us on Facebook: www.facebook.com/DJI

Follow us on Twitter: www.twitter.com/DJIGlobal

Subscribe to our YouTube Channel: www.youtube.com/DJI

Articles: Digital Photography Review (dpreview.com)

 
Comments Off on DJI goes portable with the Mavic Pro

Posted in Uncategorized