RSS
 

Archive for September, 2016

PhotoPlus Expo 2016: What to expect at the show

29 Sep

Every October, the PhotoPlus Expo is held in New York. The biggest photography trade-show in the US, PPE is the first chance a lot of photographers get to see for themselves the latest cameras, lenses and accessories. And this year will be no different with major new releases from all of the major manufacturers. 

Covering four days, and multiple stages, there’s a lot to see at PPE, and as usual, DPReview will be at the show to report on the latest products and speak to photographers and attendees. In this article we’ve put together a quick guide to some of the standout gear – and speakers – you can expect to see at the show. So if you’re planning on visiting PPE this year (or just intending to lurk online, reading our show coverage) take a look at what you can expect to see. 

New Gear

You can expect to see all of the major Photokina announcements ‘in the flesh’ at PhotoPlus Expo, including the forthcoming medium-format Fujifilm GFX 50S.

2016 is a Photokina year, so many of the major late summer announcements were made last week in Germany. But because of the disruption caused by the Kyushu earthquake in Japan earlier this year, several of the hottest new cameras were announced as developments – not shipping products. Although we’ve handled prototypes of the Fujifilm GFX 50S, Olympus OM-D E-M1 II and Sony a99 II, we’re hoping that PPE will also provide an opportunity to take a better look at the forthcoming Panasonic Lumix DMC-GH5. We suspect that Panasonic’s new 1-inch sensor zoom compacts will be a big hit with enthusiast photographers, too.

Other new gear which should make an appearance at PPE includes Canon’s latest mirrorless offering, the EOS M5, and the 30MP EOS 5D IV. Nikon will be showing off its range of KeyMission action cameras, and a new entry-level DSLR, the D3400. As well as cameras, PPE should provide a chance to get your hands on several new lenses, including high-end zooms and primes from Nikon, Sigma and Tamron.

Check out our full Photokina coverage

Keynote Speakers

Life isn’t just about gear (despite what you might think from reading comments on DPReview). One of the reasons we enjoy going to PPE every year is to meet, speak to and listen to some of the world’s most influential and inspiring photographers.

Musician and photographers Graham Nash and Mark Seliger will be delivering a keynote on October 20th at PPE. 

On Thursday the 20th of October, two legends of rock and roll – musician Graham Nash and renowned photographer and musician Mark Seliger – will discuss their mutual love of photography and music. On Friday, three of VII Photo agency’s photojournalists – Jessica Dimmock, Ron Haviv and Ashley Gilbertson will deliver a keynote, ‘Why we Shoot’, in which they’ll speak about what it means to be a visual storyteller in today’s media landscape. Closing out the show on Saturday are National Geographic photographers Paul Nicklen and Cristina Mittermeier, who will speak about their global initiative to protect the world’s oceans. If any of these keynotes sounds interesting to you, be sure to sign up soon.

Read more about PPE Keynotes

Presentations, prints and demos

There are always lots of things to see at PPE, including some of the best in contemporary photography.

In addition to the keynotes, PPE attendees will also get the chance to see demos and presentations from professional photographers across the entire show floor. Most large booths have a schedule of presentations, prints and video slideshows, and in traditional trade-show fashion, there are sure to be plenty of strange dioramas, gymnasts and preternaturally patient costumed models scattered around the show for attendees to take pictures of. We’re expecting 360 imaging and virtual reality to be a major theme of this year’s show too, so be sure to try out a VR headset if you’ve never experienced one before. 

DPReview will be at PPE all week, so if you see one of us walking around the show floor, come up and say hello. Hopefully we’ll see a few of you there.

Register for PhotoPlus Expo

Articles: Digital Photography Review (dpreview.com)

 
Comments Off on PhotoPlus Expo 2016: What to expect at the show

Posted in Uncategorized


Nikon 105mm F1.4E ED sample images

29 Sep

The Nikon 105mm F1.4 is an ultra-fast prime lens perfect for portrait photography or as a general-use telephoto. It’s pretty heavy 34.7oz / 2.17lb, and features a relatively large, 82mm front element. But gosh darn it, there’s a lot to like about the kind of images you can get with it. We did some heavy lifting and took it out for a spin.

Articles: Digital Photography Review (dpreview.com)

 
Comments Off on Nikon 105mm F1.4E ED sample images

Posted in Uncategorized


Kano Camera Kit lets anyone build and program their own camera

29 Sep

Kano, a maker of DIY educational tools, is seeking crowdfunding for a trio of DIY project kits, one of which is its new educational Camera Kit. The Camera Kit enables anyone to build a simple camera and then program it with various functions using drag-and-drop code, the goal being to impart an overall knowledge of how cameras and their related software work.

The camera is assembled from pre-made parts using an included instructional ‘storybook.’ DIYers can choose which lens they want to use — a macro, fisheye, or wide-angle — and can add both a flash and a trigger. The Camera Kit also includes a Tripwire Sensor which, when added, emits an infrared beam. If someone or something moves through the beam, the camera will snap a picture.

Various functions can be added via the programming software, including features like triggering photos via sound using an integrated microphone, adding real-time data to photos like the current weather, and more. The software also enables users to create their own photo filters.

Overall, the Camera Kit features the camera ‘brain,’ an LED ring flash, tripwire sensor, mode dial, lenses, viewfinder, battery, charging cable, tripod, lanyard, camera case, storybook and stickers.

The Camera Kit is one of three project kits Kano is seeking funding for on Kickstarter. As with the other two kits, the Camera Kit is offered as a $ 99 pledge, with estimated retail cost being $ 129.99. Kano anticipates shipping its Camera Kit to backers in March 2017.

Articles: Digital Photography Review (dpreview.com)

 
Comments Off on Kano Camera Kit lets anyone build and program their own camera

Posted in Uncategorized


Wild & Scrappy: 3D Trash Sculptures of Animals Pop Up in Urban Spaces

29 Sep

[ By SA Rogers in Art & Street Art & Graffiti. ]

trash-sculptures-10

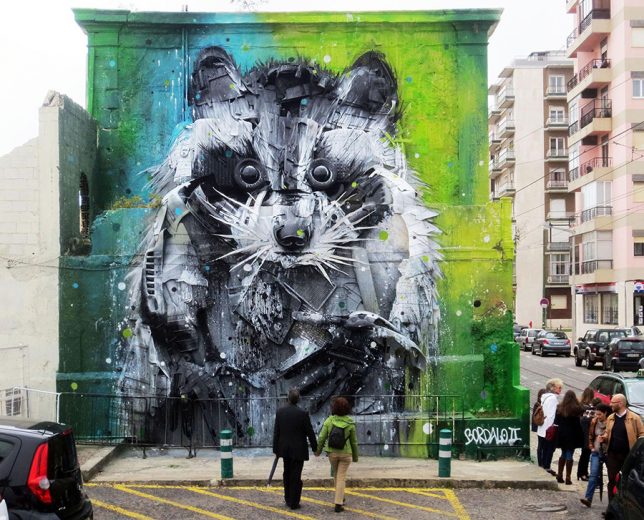
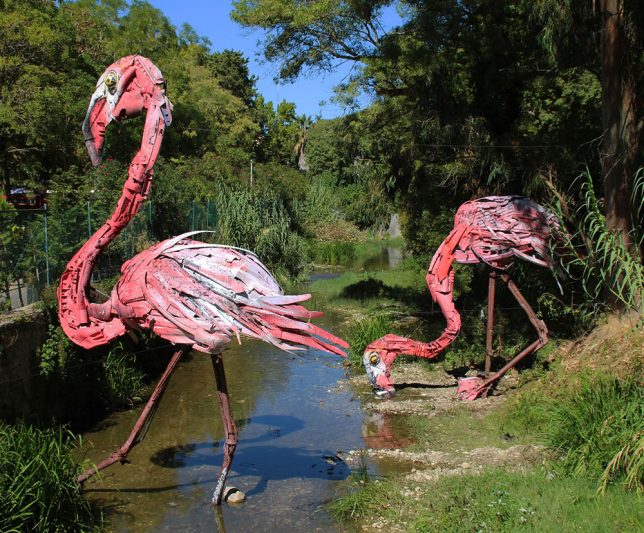
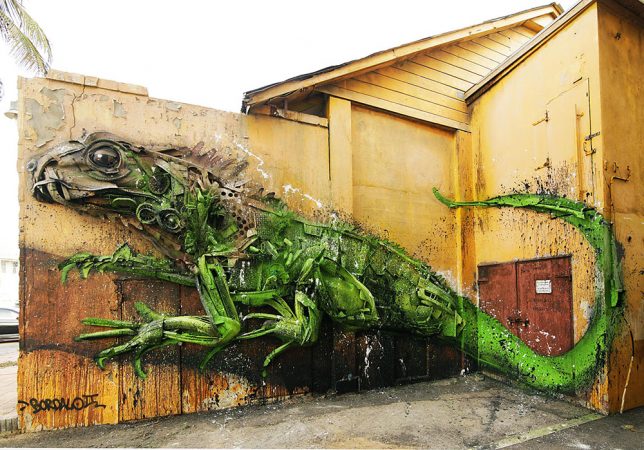
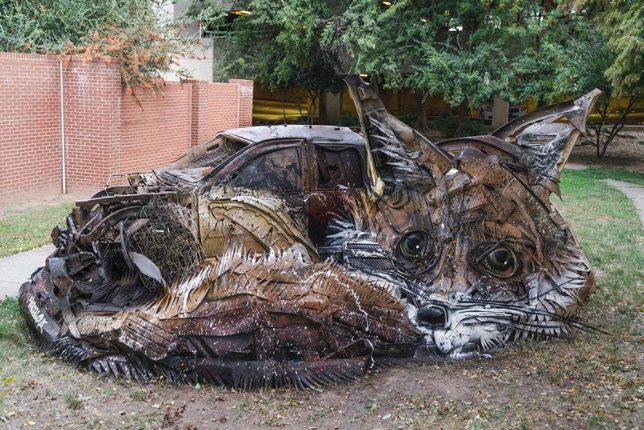
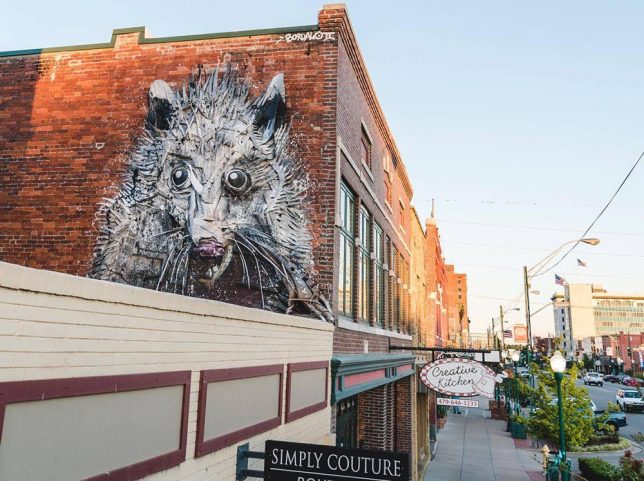
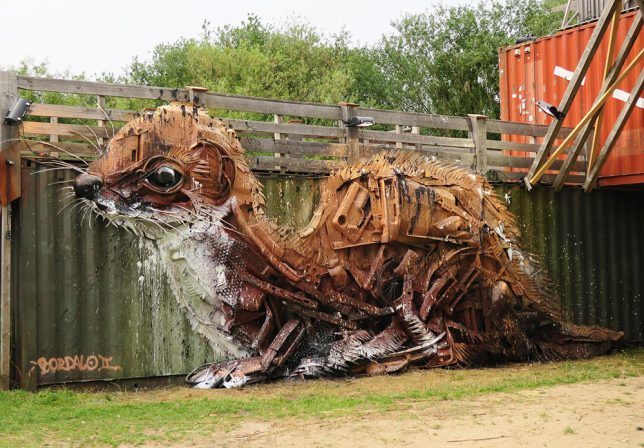
Literally popping out of city walls in three dimensions, wild animals emerge from a jumble of car parts, corrugated metal and random industrial objects masterfully layered and painted by Bordalo II. The Portuguese street artist has spent much of the last decade installing these giant murals in the streets of his hometown of Lisbon and other locales around the world, literally infusing new life into the stuff we’ve deemed junk and tossed away. Several new pieces have emerged in recent months, including a possum in Ft. Smith, Arkansas and a flying squirrel in Estonia.

trash-animals-10

trash-sculptures-7

trash-sculptures-6

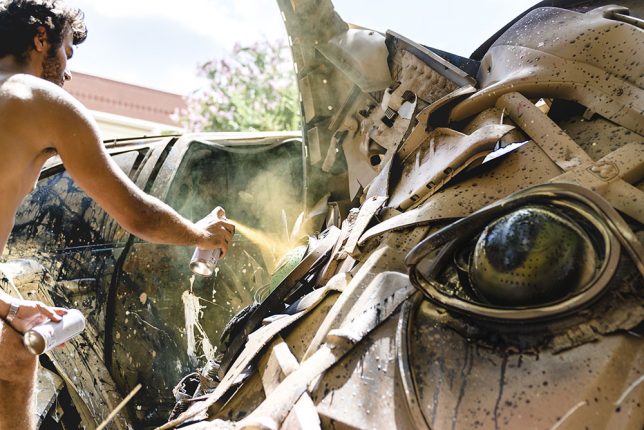
Each of Bordalo’s sculptures grows in an almost organic fashion depending on what kind of trash the artist can find on the streets near his installation location. As you can probably imagine, he has no trouble accumulating more materials than he can handle just with a quick trip driving around a few city blocks. Certain materials, like tires, are preferred because they’re easy to cut and shape.

trash-sculptures-1

trash-sculptures-2

trash-sculptures-3

trash-sculptures-4

Like so many street artists, Bordalo started out making illegal street graffiti, and his style emerged over time as he began to integrate 3D objects into the paint. “Even if in the beginning it was all about exploring and discovering the way to do, the way to make it work, I’m still trying to innovate, create new problems and have fun with them – this is the process that creates different expressions, forms, textures, etc.,” he says in an interview with Street Art News.

trash-sculptures-5

trash-sculptures-8

trash-sculptures-9

Take a look through Bordalo’s Instagram for more projects, and see if you can identify all the individual elements that go into each piece.

Share on Facebook


[ By SA Rogers in Art & Street Art & Graffiti. ]

[ WebUrbanist | Archives | Galleries | Privacy | TOS ]


WebUrbanist

 
Comments Off on Wild & Scrappy: 3D Trash Sculptures of Animals Pop Up in Urban Spaces

Posted in Creativity


iPhone 7 and 7 Plus added to mobile studio scene comparison

29 Sep

The iPhone 7 and 7 Plus don’t exactly break new ground for mobile photography. As has been the case in the past, Apple has embraced emerging technology that other manufacturers already offer in their devices. But when the most popular camera in the world gets a major update, it’s a newsworthy event all around. We’ve put the 12MP iPhone 7 and its bigger dual-cam sibling in front of our studio test scene to see what they (and their Raw capture abilities) can do.

See the iPhone 7 and iPhone 7 Plus in our studio test scene

Articles: Digital Photography Review (dpreview.com)

 
Comments Off on iPhone 7 and 7 Plus added to mobile studio scene comparison

Posted in Uncategorized


Photokina 2016 highlights: What we saw (and what we didn’t)

29 Sep

Photokina 2016: What we got, what we wanted

The anticipation and excitement of Photokina makes it a lot like the camera nerd’s Christmas. And not unlike Christmas, you don’t always get exactly what you want. Sure, we got plenty of shiny toys like the Fujifilm GFX 50S, and things we weren’t expecting like the YI M1, but a few things on our wish lists didn’t turn up.

Read on as DPR staff offer their own personal takes on the show as a whole, what they were pleasantly surprised by and what they’re still wishing for.

Dale: Innovation, big and small

To me, the really interesting products at Photokina 2016 were of the large and small sensor variety. Fujifilm’s new medium-format system is particularly exciting. If you had asked me a few years ago about the future of medium-format, I would have been pessimistic. Now we have two new medium-format systems (Fujifilm’s and Hasselblad’s X1D) in just a few months, and both should be reasonably approachable for most photographers thanks to their (relatively) compact size and similarity to existing mirrorless camera systems.

At the other end of the spectrum we saw great innovation in the Micro Four Thirds space, starting with the Olympus E-M1 Mark II. It wins the ‘How much performance can you cram into a small camera and not blow it up?’ award. It’s a performance tour de force. We also got our first glimpse of the Panasonic GH5. Panasonic has long been on the cutting edge when it comes to video; the GH4 is still a class leading camera over two years into its life cycle. The GH5 looks poised to pick up where the GH4 left off, with 4K/60p capability, 4:2:2 10-bit 4K video, 6K photo mode, and an optional hot-shoe mounted I/O unit for pro-level audio.

But wait, there’s more! As if that weren’t enough, there’s also the YI M1. We know from our initial testing that the M1 has room to grow, but what’s really exciting is that we have a new manufacturer entering the market, and one that is joining a strong Micro Four Thirds ecosystem of products. Plus, the YI’s smartphone style user interface may be the best thing out there to entice mobile phone users to migrate back in the direction of a dedicated camera.

What did I miss at Photokina? While everyone was standing around the Fujifilm booth, mouths agape and drooling on the GFX 50S, I kept wishing for an updated X100 series camera with a 24MP X-trans sensor, Acros film simulation, and maybe even a new lens. #stillwaiting

Dale Baskin

Dan: What’s the big DL?

Dear Nikon, your Photokina presence was disappointing. Yes I know, you launched the D5 and D500 earlier this year (in time for the summer Olympics), so I guess you deserve some sort of break. But to think that the only product launches you had at the world’s biggest photography trade show were an action camera and a lifestyle/POV camera is pretty lame. Of course it would be one thing if the KeyMission 170 was ground-breaking in any way. It’s not. Sure its a competitive: 4k-capable, waterproof without a case, but in the presence of the GoPro HERO5 and Sony X3000 (which offers optically-stabilized 4K), the KeyMission 170 is just another 4K-capable action cam.

Which brings me back to my initial point, what’s the big DL? I am of course referring to the the Nikon DL line of premium compacts, announced around CP+ time in late February and than quietly delayed. Do they exist (or are they delayed indefinitely)? I saw plastic mock-ups back in January (and my colleagues again saw real mock-ups in Japan). I know the DL’s are available for pre-order (though no date is indicated as to when they’ll ship). Simply put, all I wanted from Photokina from Nikon was an announcement/some sort of concrete proof that DL’s will be in consumers’ hands before the year ends. I did not get that. All I got were some stinkin’ action cams.

Dan Bracaglia

Sam: Where are all the (cheap) mirrorless lenses?

This year was a vintage year for expensive new equipment at Photokina – very, very expensive equipment.

For example, the flagship Olympus body now costs nearly $ 2,000. They also made a fancy new 25mm F1.2 that costs over $ 1,000. There’s plenty of fuss over the new Fujifilm, which should be ‘less than ten grand.’ We finally got the long-awaited Sigma 85mm F1.4 Art, which has become the most expensive prime of the Art lineup. But what about the little guy? What about enthusiasts who can’t afford a lens that costs more than a thousand bucks?

Well, for the cash-strapped consumer, not much happened this time around… we got a couple refreshed models, the Nikon D3400 and the Olympus E-PL8, but neither of those brought any significant improvements to either camera, or that market segment. I guess as a consolation prize the Nikon has a new silently focusing kit lens…

There was the Yi M1, but fiddling with our pre-production sample left me with no praise and a thousand snarky comments. They’ve got some scrambling to do if they’re going to make that autofocus remotely usable before shipping. 

We did see some less pricey things from Canon, like the new 70-300mm F4.5-5.6 IS II USM, with the super quick Nano USM tech inside. They also showed us their brand-new mirrorless camera. I like the new Canon M5, although it’s not necessarily priced to be an entry level bargain. Plus, much like the rest of the APS-C mirrorless world (except Fuji), we’re just left wanting more lenses.

That’s what I was hoping we’d see more of this Photokina: mirrorless lenses. Now that there’s a desirable mirrorless Canon, I can think of two systems that are in desperate need of good, affordable primes. I was hoping to see Sigma’s excellent DN line of primes expand to fill this gap, but we didn’t see anything at the show. 

At least the Micro Four Thirds continues to grow both on the high end and low end of things. While we did get two very expensive new lenses from Olympus, we also got a very good little 30mm macro lens that was built with cost and quality in mind — a mix that seems to favor the latter too much and forgets the former more often than not.

Sam Spencer

Chris: Where’s my D810 update?

Photokina was well, a bit interesting this year. Olympus and Fujifilm both made huge announcements with respect to flagship cameras that they are developing, but I was honestly a bit disappointed by the announcements from Nikon and Sony. There have been rumors flying for some time now about replacements for Nikon’s D810 and in Sony’s case the a7R II. There was even some talk of the release of a long fabled Sony mirrorless flagship, which fans of rumor sites are calling the a9. Instead, Nikon released their Keymission series of action cams and Sony released the SLT-a99 II.

The announcement of the a99 II was a bit unexpected, but I wasn’t completely surprised that Sony decided to revitalize the a-mount with an updated version of the a99. The action-cams from Nikon on the other hand, were a bit of shock, not so much from the perspective that Nikon wanted in on the action-cam market, but more so that they ended up being Nikon’s only major announcement at Photokina.

In a year when Canon announced the 5D Mk IV only a few months ago, Fujifilm announced the GFX 50S and Olympus announced the development of the E-M1 II, it was a bit surprising that Nikon didn’t deliver a brand new or even an updated version of a full-frame camera. Sure, they recently released the D5, but it’s an expensive, niche product. Perhaps a D820 was planned but stymied by the knock-on effects of the earthquake in Japan earlier this year?

Regardless, I’m really hoping that we won’t have to wait until the next Photokina to see a brand new or even an updated camera from Nikon or Sony to replace the aging D810 and a7R II, respectively, but I’m not holding my breath.

Chris Williams

Allison: Long live instant photography

It was a good Photokina for tech innovations, but it was also a good year for lo-fi photography: thanks to Fujifilm and Leica, instant photography enjoyed a moment at the show. Fujifilm introduced monochrome film for its mini Instax format in addition to plans for a square format camera and film, and Leica introduced their own instant camera – well, sort of. Heck, we even got an updated Polaroid instant camera.

Okay, so the Sofort may only be a re-badged Instax Mini 90, but it does mean that Leica is sitting up and taking notice of Fujifilm’s success with instant film, which has been pretty darn successful. And when brands with as much recognition and clout as Leica get interested in a medium, I can’t help but feel better about its chances. If selling a re-badged camera and film helps keep the momentum going for Instax then I’m all for it. Just pass me some of that monochrome film when you find it – I don’t care if it says Fujifilm or Leica on the package.

Allison Johnson

Carey: A big show for lenses

If there’s one thing I think everyone is missing about Photokina this year, it’s the Olympus M.Zuiko 12-100mm F4 Pro stabilized lens. Okay, everyone is aware that the lens was announced, but no one seems to be talking about the main thing I would use it for – run and gun video capture.

You see, that’s how I spent most of my Photokina experience (and how I spend a good deal of time at any trade show or conference). When I’m hopping from meeting to meeting and booth to booth, hauling around extra gear – like a tripod – definitely gets in the way. So having 6.5 stops of combined stabilization with the E-M1 Mark II is a godsend, and honestly, the extra depth of field offered by the smaller sensor size will be more help than hindrance. Shooting at F4 on the full-frame setup we use can be handy for isolating a subject, sure, but it does mean it’s easier to miss focus if you’re not careful. Finally, when you combine all of this with truly excellent 4K video capture, you have a pretty formidable package (even if I’m going to shoot in 1080p most of the time anyway to save on editing time).

The only problem? Olympus’ swap from a tilting screen to a fully-articulating one. When you flip the screen out to the side to use the camera from a low or high angle, it interferes with the side ports for headphones and a microphone. Sure, I could get better quality audio by running a separate device, but as a one-man crew, I’m always looking to simplify.

The other standouts for me? The Sigma 85mm F1.4 Art looks amazing, but it’s huge. The Nikon 105mm F1.4 also looks amazing, and it’s also huge. The Olympus 25mm F1.2 Pro offers great results, but for the system, it is – no surprise – huge. One of the reasons I love my old Nikon AF-D lenses is their relatively compact size, which goes a fair way towards offsetting the relative bulk of a full-frame DSLR. Canon’s got a pretty neat package with the EOS M5 and the EF-M 22mm F2, but come on – let’s have some more! Bring on the pancake lenses!

Carey Rose

Richard: The element of surprise

The thing I liked most about Photokina was the surprise of the first day. Between the Sony a99 II, Fujifilm’s medium-format camera and Olympus’s E-M1 Mark II, there were a range of interesting products that hadn’t already been leaked, discussed then criticized to death before the show.

This gave the whole show a bit of a buzz that I felt it had lacked in recent years. Canon is probably kicking itself for launching the EOS M5 so far in advance.

In terms of the cameras themselves, it’s the M5 and Panasonic’s LX10/LX15 that I found most interesting. The flagship cameras are all well and good and give a great insight into what’s going to be possible, but they’re not the cameras that many people will get an opportunity to use. By contrast, I suspect both the Canon and the little Panasonic will find their ways into a lot of people’s hands.

The appeal of the M5 isn’t immediately apparent from the spec sheet but is the moment you pick it up and try to use it. The LX10 is almost the opposite, based on my experience so far: the touchscreen works well but the dials are oddly set up, so it’s the specifications of the lens and video capability, along with the price that keep it interesting.

Sadly, Nikon’s continued silence on the DLs was deafening. With the arrival of the LX15 and FZ2000/FZ2500, whenever they do finally surface it may only be the wide-angle 18-50 model that isn’t entering an overcrowded market.

That said, there were plenty of products (Sigma 12-24mm, Fujifilm GFX 50S, Hasselblad X1D 50c…) that it’ll be great to get a chance to test and use. The photo industry may not be in the best of health, but Photokina showed there are a lot of people working hard to produce exciting products.

Richard Butler

Jeff: Flagships and Superzooms

It was hard to top the big announcements from Photokina 2014, which saw the announcements of the Nikon D750, Canon EOS 7D II and Samsung NX1, but the 2016 show may have done it. This year’s show has, in my opinion, at least eight blockbuster announcements, from the medium format Fujifilm GFX 50S to the Sony a99 II to the Panasonic GH5. And that’s not including some very exciting new lenses. Two cameras that I didn’t just mention that stood out to me were the long-awaited Olympus E-M1 Mark II and Panasonic’s Lumix DMC-FZ2500/FZ2000.

The E-M1 II isn’t something that’s only excited those who’ve already bought into the Micro Four Thirds system. As a Canon EOS 5D III owner I find the size and design of the E-M1 II as well as the MFT system’s still-growing selection of lenses (hello, 12-100 F4) quite appealing. The built-in image stabilizer already offers 5.5 stops of shake reduction (and can pull off another stop with select lenses) and the AF system sounds impressive based on reports from my colleagues. Oh, and the high bit rate (236Mbps) 4K video doesn’t hurt either.

Speaking of 4K, another camera that impressed me is Panasonic’s FZ2500 (read our preview). While stills-related updates are fairly minor compared to the FZ1000, the 2500’s longer lens, built-in variable ND filter and larger EVF are most welcome. The FZ2500 continues to use Panasonic’s frankly awesome DFD focus system. Video is where it’s at, though, with DCI *and* UHD 4K capture at up to 100Mbps, 120 fps Full HD recording and an insane amount of tools (there are even SMPTE color bars.) The lens can zoom super slowly and the camera’s LCD made it really easy to rack focus. Something that irked me is Panasonic’s $ 99 charge for V-Log L support – come on guys, it’s a $ 1200 camera!

Jeff Keller

Barney: Delays and surprises

Photokina is the most important event in the photographic calendar, and as such it’s the show where we tend to see major announcements from the biggest manufacturers. This year, a large spanner was thrown into the works by the Kyushu earthquake, which hit Japan in spring and badly disrupted Sony’s sensor manufacturing plant.

This is a problem not only for Sony, because Sony supplies imaging chips to virtually every camera maker. The Kyushu earthquake is the reason why Fujifilm, Olympus, Sony and Panasonic had to be content with only announcing the ‘development’ of new flagship cameras at Photokina, and may also be a contributing reason for the continued no-show of Nikon’s DL-series compact cameras (originally announced back in February). Maybe Nikon had originally planned a replacement for the D750, D820 or D610 at Photokina. Maybe Sony had planned to show off a successor to the a7 II – we don’t know. 

Although we’ve yet to see a ‘final’ sample, my standout camera of this year’s Photokina is Fujifilm’s GFX 50S. If the 50S turns out being as good as it looks, and if it really does come in at ‘well under $ 10,000’ with a 63mm prime, I suspect that they could be backordered for quite some time.

At the other end of the spectrum is the 4K-capable Olympus OM-D E-M1 II. Small, light (relatively speaking) and blazingly fast, Olympus has pulled out all of the stops with its new Micro Four Thirds flagship. Sony’s new a99 II came as a bit of a surprise, but also offers a range of attractive high-speed stills and video modes, and full-frame 4K video capture. 

Meanwhile, although we don’t have all the details yet, Panasonic’s GH5 raises the video bar even further with the ability to capture 6K footage. 

Despite the less-than-ideal circumstances, this year’s Photokina actually ended up being pretty exciting, and I’m really looking forward to some of these ‘development announcements’ turning into shipping products in the coming months. Thanks for reading!

Barnaby Britton

Articles: Digital Photography Review (dpreview.com)

 
Comments Off on Photokina 2016 highlights: What we saw (and what we didn’t)

Posted in Uncategorized


Check Out These Books: 18 Home Libraries for Ravenous Readers

29 Sep

[ By SA Rogers in Design & Fixtures & Interiors. ]

home-library-net-nook-madrid

Short of actually curling up in a relaxing space to get lost in the words on a page, there’s nothing reading enthusiasts love more than gazing at photo after photo of beautiful libraries, especially those they could potentially recreate in their own homes. This inspiration gallery of home libraries runs the gamut between secluded cabins in the woods and clever hammock placement to secret rooms and even bathtub-adjacent mini libraries.

Secluded Library & Guest House in the Woods

home-library-guest-house-1

home-library-guest-house-2

home-library-guest-house-3

If seclusion is what you’re after, this ‘secret room’ in the woods of upstate New York offers an elevated level of privacy as you browse a floor-to-ceiling collection of books. Studio Padron designed the ‘Hemmelig Rom’, a 200-square-foot black cabin made from oak, as a guest house immersed in its woodland environment. The logs that make up the bookshelves and walls came from the forest outside.

Reading Net for Kids

home-library-reading-net-1

home-library-reading-net-2

home-library-reading-net-3

Perfect for homes with mezzanines (especially if you line the walls with bookshelves), this idea from Spanish studio Playoffice would be fun to recreate. The ‘reading net’ is a meshed fabric suspended from the railings of a family library so kids (and adults) can climb in and enjoy a book in elevated comfort.

Dynamic Wall-to-Wall Library in Costa Rica

home-library-casa-kike

Architect Gianni Botsford designed this unusual narrow home on stilts for the tropical jungle of Costa Rica, lining an entire wall of it with floor-to-ceiling bookshelves broken up by dynamic diagonal lines that meat the beams of the roof.

Library in the Home of Architect Mario Bellini

home-library-bellini

Presented as part of a Salone del Mobile exhibition called ‘Where Architects Live,’ this photo lets us peek at Mario Bellini’s home drafting table in his mezzanine library, as well as the piano and record room below. What you can’t see in the picture is that the bookshelves in that library continue nearly 30 feet into the air, accessible by sliding ladders.

Wraparound Home Library

home-library-wraparound-2

home-library-wraparound

Books are the primary focus in the entire common area of ‘Hendee-Borg House’ in Sonoma, California by William O’Brien Jr. The living and dining area is flanked by wall-to-wall bookshelves on three sides.

Next Page – Click Below to Read More:
Check Out These Books 18 Home Libraries For Ravenous Readers

Share on Facebook


[ By SA Rogers in Design & Fixtures & Interiors. ]

[ WebUrbanist | Archives | Galleries | Privacy | TOS ]


WebUrbanist

 
Comments Off on Check Out These Books: 18 Home Libraries for Ravenous Readers

Posted in Creativity


Avoid These 5 Common Mistakes in Black and White Photography

29 Sep

Black and white photography has been around for nearly 180 years, ever since Louis Daguerre introduced the daguerreotype process to the world. It is still hugely popular despite the rise and ease of color photography. And yet, whenever I look at other people’s black and white photos, I see the same mistakes over and over. Are you making any of these? Let’s find out!

Black & white photography mistakes

Mistake #1: Shooting in JPEG format

Ouch! This is a big one. It’s the single worse thing you could do.

The difference between RAW and JPEG

To understand why, you need to appreciate the difference between Raw files and JPEGs. Raw files contain all the information captured by your camera’s sensor. A Raw file is not a finished picture file. It has to be processed (using software like Lightroom or Adobe Camera Raw) and converted to a JPEG or TIFF file in order to be usable.

You can think of a Raw file as the equivalent of a negative (as in from film photography). You can’t send a Raw file to a photo library or a magazine any more than you could send a negative. You need to process the Raw file (or scan and process the negative) first.

JPEG files are created by the camera. It takes the information captured by the sensor, processes it (much like you would do with a Raw file in Lightroom, but according to the camera’s built-in parameters), compresses it, discards the unused information, and saves it as JPEG. They don’t necessarily need processing in software like Photoshop or Lightroom, although most can be improved by doing so.

Advantages of shooting RAW

Using the Raw format gives you the following advantages.

  • Control: You process the file yourself, rather than letting the camera do it. You can process it to your taste from a stylistic point of view. Using Raw lets you interpret the file as many ways as you want. Using JPEG means the file gets interpreted one way only – the way the camera does it.
  • More data: The Raw file contains much more information than a JPEG, especially in the highlights and shadows, that you can draw out when you process the file. The extra information helps prevent banding in areas of smooth continuous tone like clear skies.

Black & white photography mistakes

Black & white photography mistakes

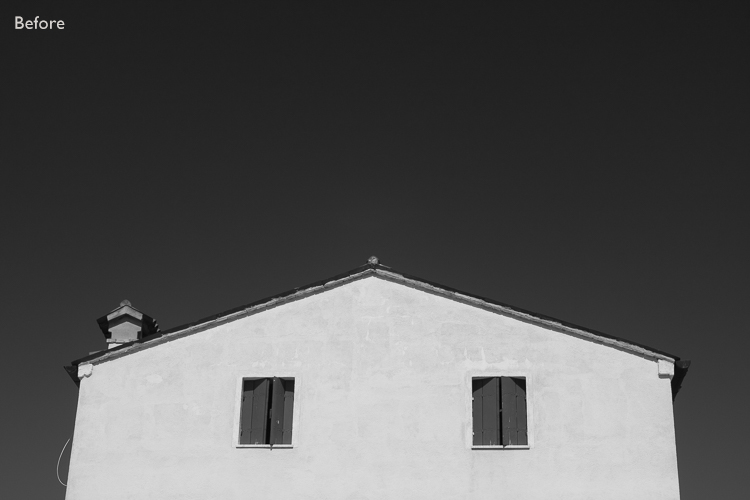
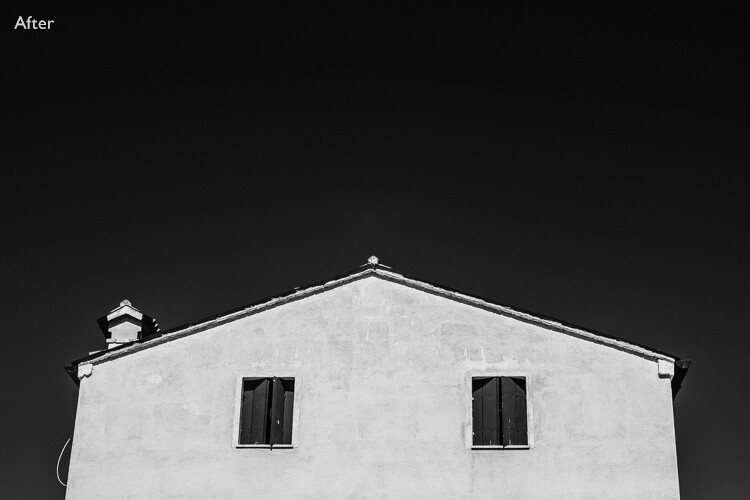
Using Raw helps you get from the before image shown above to the processed version here. With Raw, you can increase contrast and make the sky darker without introducing banding in the sky or halos along the edges of buildings. You can’t do this with JPEG files.

More advantages of shooting RAW

  • Adjust sharpness: JPEG files created by your camera are sharpened. The sharpening limits the amount you can change tonal values before introducing halos and artefacts. Yes, you can turn JPEG sharpening off in-camera – but how many people bother?
  • RAW format keeps the color info: Raw files contain all the color information captured by the sensor, so you can create a color version of the photo in Lightroom, Photoshop, etc., as well.
Black & white photography mistakes

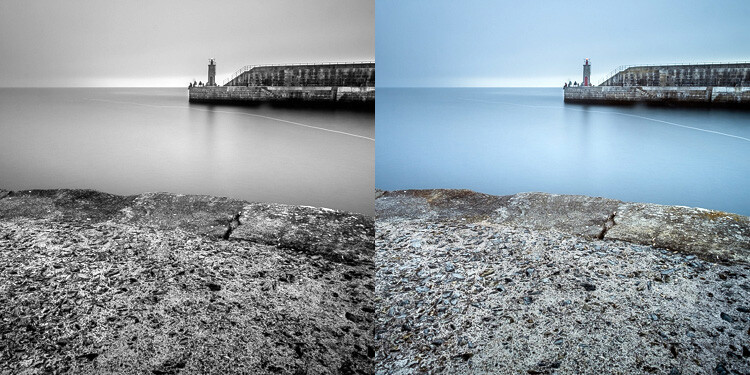
Using Raw let me create both a color and black and white version of the same image in Lightroom, without any loss of image quality.

  • Improvements: The software gets better every year. The version of Lightroom or Photoshop you use in five or 10 years time will be much better than the current one. With Raw, you can take advantage of these new improved tools and reprocess your images in the future.

So please, don’t use the JPEG format any more for black and white photography. There are, however, advantages to using your camera’s monochrome mode, as discussed in my article Mastering Monochrome Mode.

Mistake #2: Trying to save photos by making them black and white

Black and white is not a method for rescuing poorly crafted color photos. If your photo is bad in color, it will be bad in black and white too (although there are always photos that work better in black and white for compositional reasons).

There is nowhere to hide in black and white. In color, if the lighting or composition isn’t as good as it could be, the emotional impact of the colors in the photo may rescue the image (or, depending on how you look at it, cover up its shortcomings). Black and white images rely on factors like tonal contrast, textural detail, line and strong composition to work.

That’s why some photographers consider black and white to be a kind of higher art form than color photography.

Black & white photography mistakes

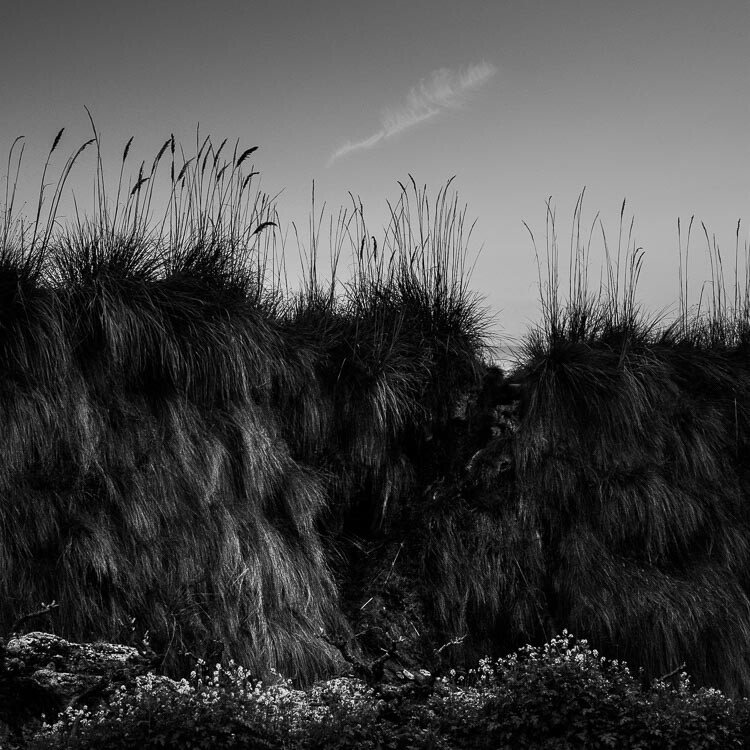
The texture in this photo is essential to make it work in black and white.

Mistake #3: Not processing the photos properly

Before digital cameras and Lightroom came along, many pro photographers used a professional printer to print their images. Creating top quality black and white prints in the darkroom is hard, and it was often outsourced to professionals.

This was a beneficial arrangement that let photographers concentrate full-time on photography and left printing to the specialists. Perhaps the best known pro printer in the UK is Robin Bell, who has worked with big names such as David Bailey, Terry O’Neil, and Eve Arnold.

Nowadays it is much easier to create beautiful black and white images in programs like Lightroom, Photoshop, or Silver Efex Pro 2, than it is to master the chemical darkroom process. But, sadly, many photographers don’t get to grips with the basics. The result is that their black and white photos are not nearly as good as they could be.

Take the time to learn how to use your software properly and your photos will get better.

Black & white photography mistakes

Black & white photography mistakes

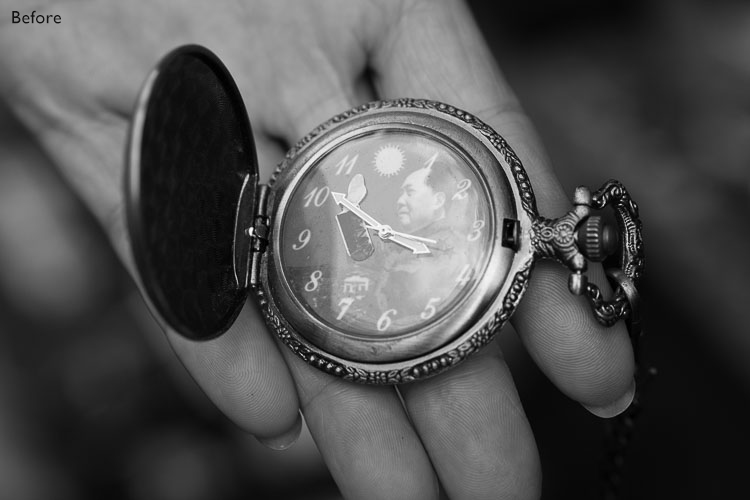
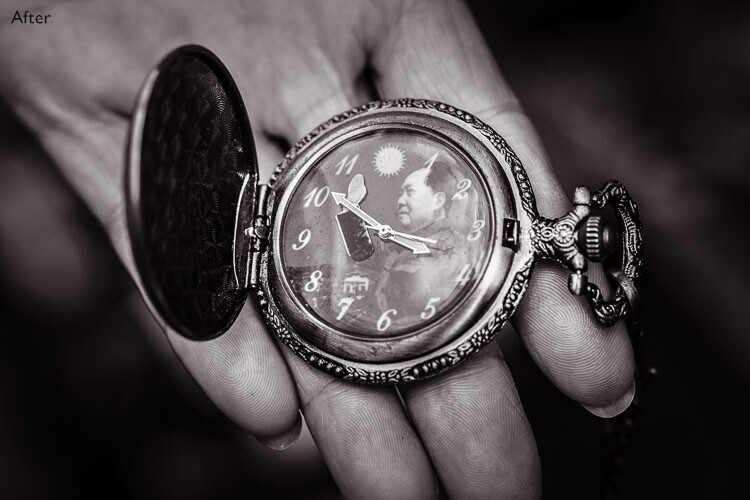
This before and after example shows the photo how it looked straight out of the camera compared to the final version, processed in Lightroom. Learn how to get from one to the other in order to get the most out of your black and white images.

Mistake #4: Not shooting in the best light

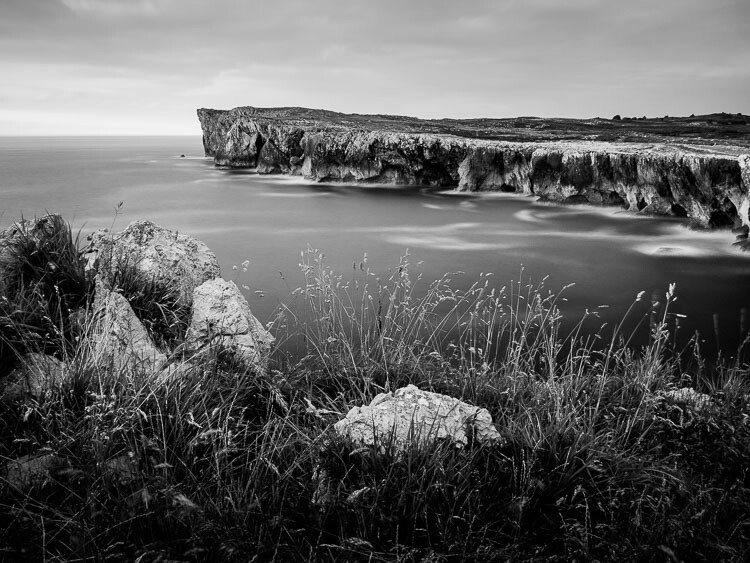
One of the advantages of black and white is that you can often shoot in lighting conditions not suitable for color photography. For example, on a cloudy day you can create beautiful black and white seascapes with a tripod and neutral density filters (this is called long exposure photography). Yet, in color, you would really need to shoot close to dawn or sunset to make the most of the scene.

But what some people do is use black and white to shoot in lighting conditions that are simply unsuitable for the subject. Using black and white isn’t the solution. The important skill is in matching the light to the subject. This takes a while to learn but it’s very important. Don’t be lazy just because it’s black and white.

Black & white photography mistakes

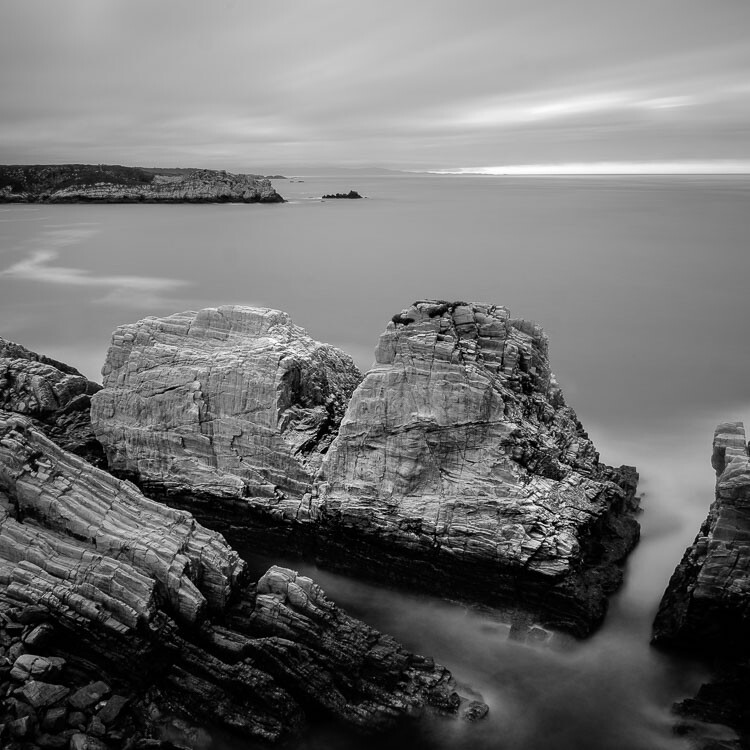
A long exposure photo made on a cloudy day. The light suits the subject – it wouldn’t have worked in sunny weather.

Mistake #5: Not having a strong composition

Black and white is a true test of your compositional skills. The best monochrome images use visual elements like tonal contrast, texture, line, shape, pattern, and negative space. The emotional power of color can mask poor composition. But in black and white there is nowhere to hide. You have to learn how to use these building blocks of composition effectively.

That starts with learning how to see them. For example, you can’t use lines in your compositions if you haven’t trained yourself to see straight, diagonal, or curved lines in the scene.

The good news is that once you understand the fundamentals of composition in black and white, you will instinctively apply them to your color photos as well.

Black & white photography mistakes

I took a lot of care with the composition of this landscape photo. It has foreground interest and plenty of texture – important elements in black and white landscapes.

Have you made any of these mistakes?

Can you think of any other mistakes that photographers make when working in black and white? Please share your thoughts in the comments below.


If you’d like to learn more about black and white photography then please check out my ebook Mastering Lightroom: Book Three – Black & White.

googletag.cmd.push(function() {
tablet_slots.push( googletag.defineSlot( “/1005424/_dPSv4_tab-all-article-bottom_(300×250)”, [300, 250], “pb-ad-78623” ).addService( googletag.pubads() ) ); } );

googletag.cmd.push(function() {
mobile_slots.push( googletag.defineSlot( “/1005424/_dPSv4_mob-all-article-bottom_(300×250)”, [300, 250], “pb-ad-78158” ).addService( googletag.pubads() ) ); } );

The post Avoid These 5 Common Mistakes in Black and White Photography by Andrew S. Gibson appeared first on Digital Photography School.


Digital Photography School

 
Comments Off on Avoid These 5 Common Mistakes in Black and White Photography

Posted in Photography


Step by Step How to Clean Camera Gear so it Stays in Good Shape

29 Sep

You may be very aware that photography equipment is not cheap. If you’re not, you’re in for a rude awakening! Camera bodies can cost thousands of dollars and it’s not uncommon for a lens to be even more expensive than a body! Sometimes it’s very tempting to baby your equipment; treat it with extra caution and wrap it up in cotton wool so as no harm will come to it. But with the right care and maintenance, your equipment will last and continue to perform for many years, no matter what, and without the babying!

DANS4206-2

Being a professional photographer myself, my equipment is often subject to some not-so-camera-friendly circumstances. Rain, snow, dust, and even champagne (!) are not uncommon encounters for my equipment. Even though I generally take the right precautions (for example, I use rain covers on for my cameras and lenses if it’s raining) there are times when the conditions are just unavoidable and my equipment gets a little dirty. It’s going to happen. But because I care for my equipment (even though it may look like I don’t!), it keeps on performing and hasn’t let me down. So I thought that I would share some of my tips to help you do care and maintenance on your gear, too.

Supplies needed

The good news about caring for your equipment is that it’s relatively cheap to buy what you need. With so few things in photography being cheap, this comes as a nice relief! Here is a list of what I use to care for my gear.

From a camera store (camera specific tools)

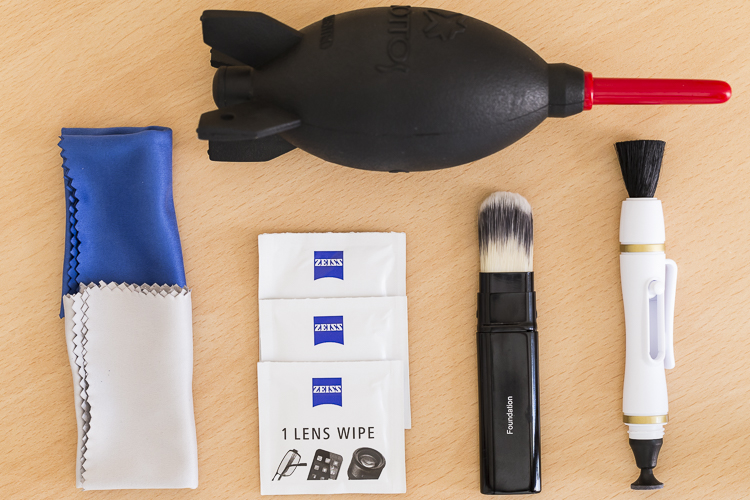
An overview of essential cleaning items.

An overview of some essential cleaning items.

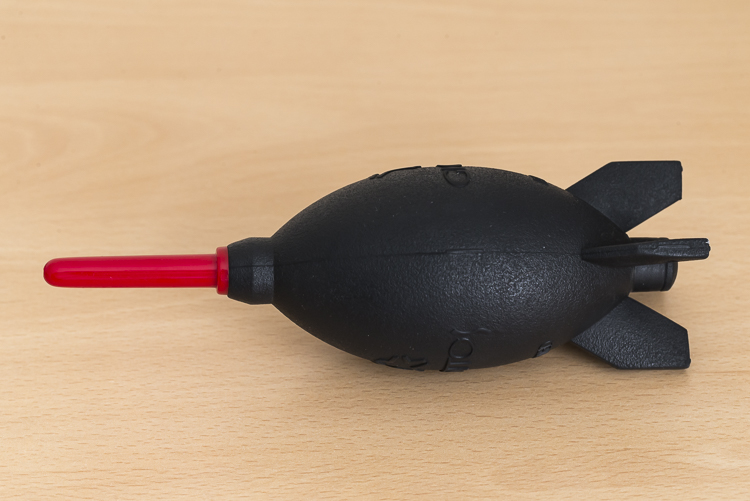
  • Rocket blower: I use this a lot! Squeezing it blasts out a puff of air to blow away any dust.

DANS4199

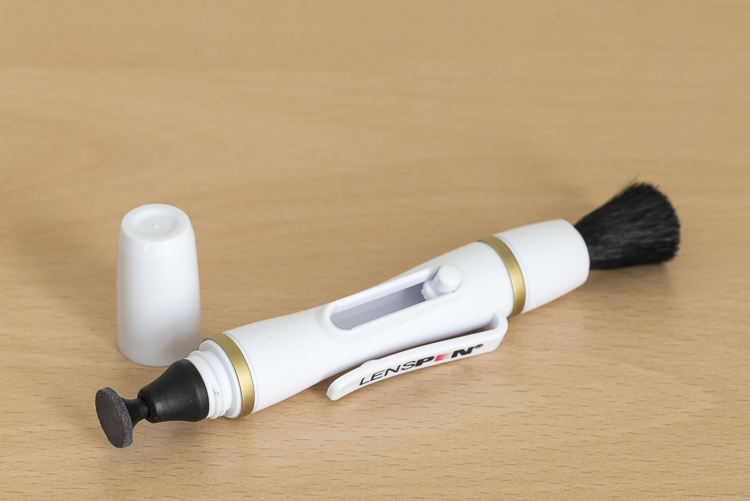
  • LensPen: I have just added one of these to my kit. At one end there’s a small soft, cleaning tip. At the other, is a retractable brush. I haven’t yet used it extensively but have been impressed with it so far. However, the cleaning tip is quite small so it’s not something I use on my larger lenses, such as a 400mm f/2.8; it would take forever.
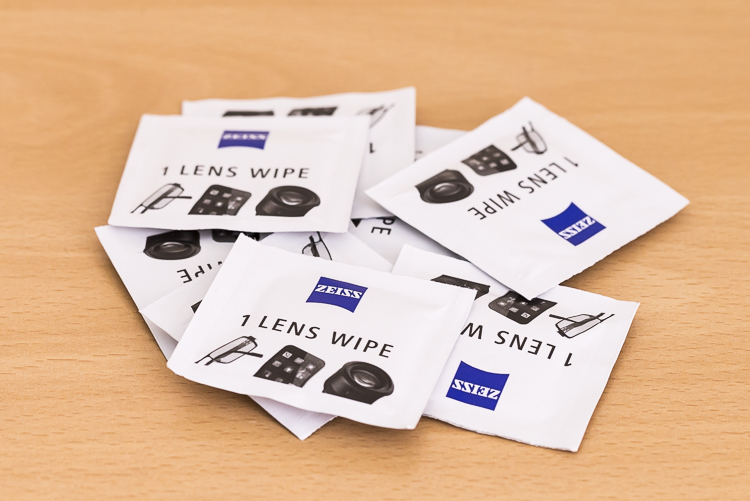
  • Pre-moistened lens wipes: I love these things. These are almost like the refresher towelettes you can get at KFC, but for lenses. They’re pre-moistened with a lens cleaning solution that quickly evaporates from the lens. They’re also dirt cheap. I use the Zeiss brand ones (only ones I’m aware of) which for a pack of 200, cost about $ 13.90USD. (Note: also available by Hoodman especially for camera lenses)

DANS8686

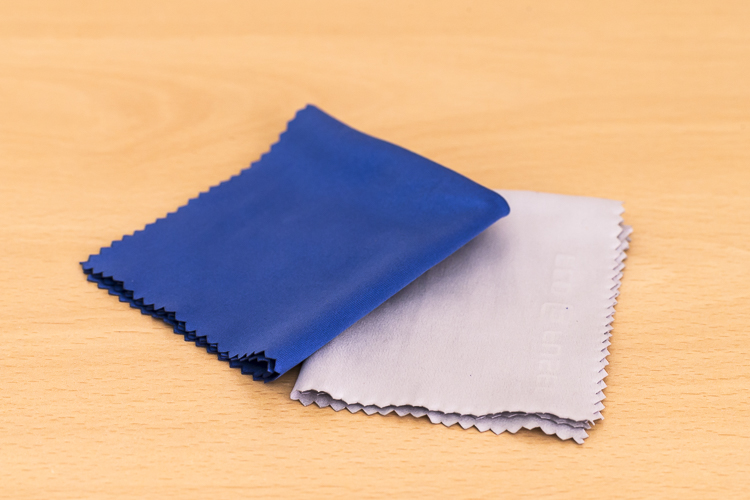
  • Microfibre cleaning cloths: Another cheap must have. I like to have several of these. I reserve one just to buff lenses after using the wipes, and another just for cleaning the lenses without any product at all. I avoid using the same one across many devices, for example, using the same clothing to clean my iPhone screen, then using it to clean my lenses.

DANS8688

From a regular store (non-camera tools):

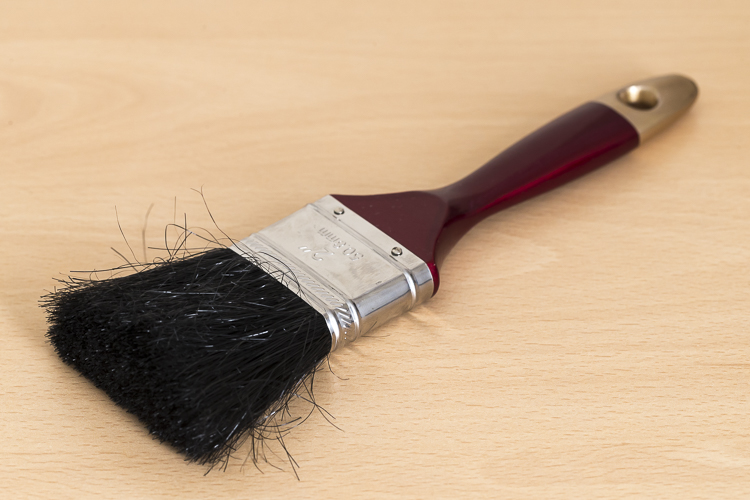
  • A paint brush: These are very handy at removing dust from the surface of camera bodies and lens barrels. Again, buy this brand new. You don’t want this to be super soft either, as it’s just being used on the outside of the cameras and lenses and not on anything that needs to be protected.

DANS4195

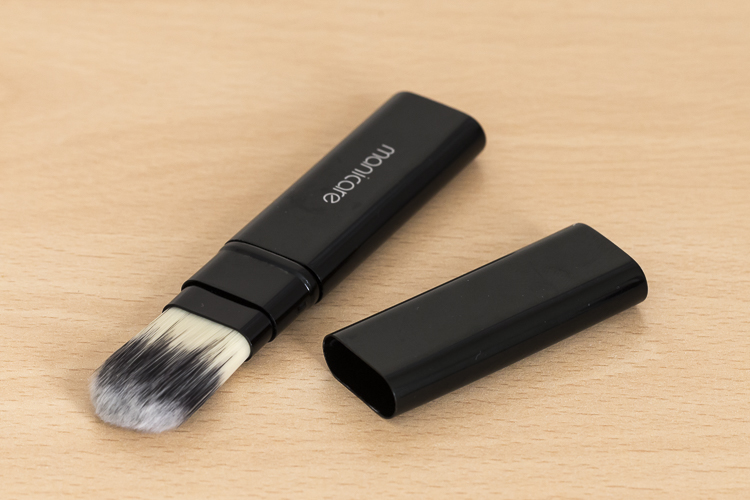
  • Make-up brush: this is something that people often have a laugh at when they see it in my bag. But then think, “Hey that’s a good idea”. If you want to add one to your kit, make sure you buy one brand new. You don’t want your partner’s blush going all over your lens. Generally, the more expensive brushes are better as their bristles are much softer. The one I have is also retractable, which is ideal as it protects the brush.

DANS4193

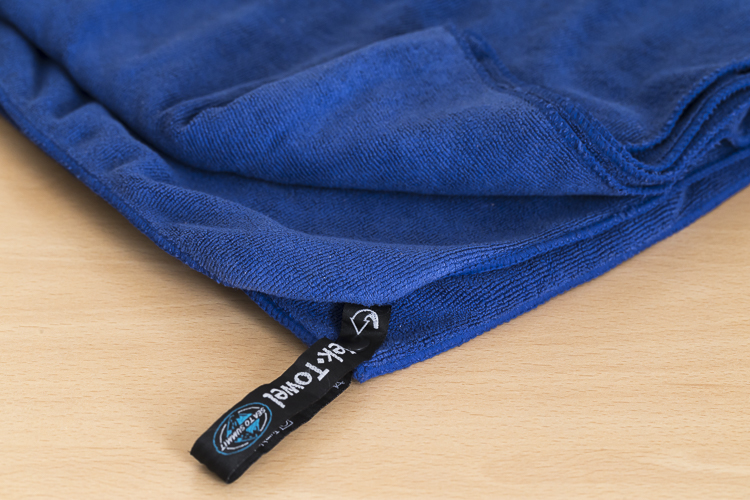
  • Teck Towel: I got a Tek Towel for my birthday years ago and decided to give it a go cleaning my gear. It works brilliantly, but a clean towel will work just as well.

DANS4197

  • Zip-Lock Bag: This is where I store my cleaning gear, to keep it clean and as dust free as possible!

With these items, I am able to keep my lenses and camera bodies looking (almost) like new. Here’s my workflow when it comes to cleaning time.

Lenses

Step 1. Use the Rocket Blower

The first step is to remove any larger bits of dust, etc., from the lens. For this, I use the rocket blower. Squeezing it blows air out of the tip and will blow away larger, loose bits of dust, etc. It’s important not to use a cloth for this step as this can drag dust over the lens and scratch it. This is why the Rocket Blower is very useful.

Step 2. Use the LensPen

DANS4194

Hopefully, the blower was able to remove all the dust. However, there are times when some little specs remain. To remove these, I use the brush on the end of the LensPen. Doing a quick flick of the brush around the lens should do the trick. There shouldn’t be a need to apply much if any pressure at all. This should remove all the dust from the surface of the lens. You may need to do a quick repeat with the blower, though. If you don’t have a LensPen, using a makeup brush works just as well.

If you don’t have a LensPen, using a makeup brush works just as well.

Step 3. Clean the glass

Your lens should now be free of dust and other debris. If there are some marks surface on the lens, this is when to give it a little clean. First off, use the cleaning end of the LensPen. It is very soft and doesn’t damage the glass at all so it is ideal for this. Using a circular motion, work your way around the lens until all the marks have been removed. This may take several passes to achieve. It’s important to not be tempted to push on the lens too hard. Just keep going around in a circular fashion until it’s satisfied. Give the blower another quick go over, too if necessary.If you don’t have a LensPen using a

If you don’t have a LensPen using a clean micro fibre cloth will also do the job. Just use the same circular motion and again, repeating the motion is preferred over applying more pressure.

Step 4. Get rid of stubborn marks

After Step 3, I am normally done cleaning the lens. Step four is completely optional, but sometimes, there is some muck on the lens that just will not budge; no matter how many times it’s gone over. This is when to use the pre-moistened lens tissues.
Using the same circular motion, I work my way around the lens until it’s been completely gone over (I normally go over it two or three times). Then I get a microfibre cloth (generally, a different one that I use just for this purpose) and give the lens a bit of a buff using the same circular motion. I’ll go over it a few times.

I favour these tissues over sprays because I don’t like the idea of having a bottle of liquid inside my camera bag. If it breaks, it can leak into my gear and cause major damage. I also quite like their single-use quality.

For me, using cleaning solutions is an absolute last resort and not something I do each and every time I clean my gear. I also don’t breathe on my lenses (you know, to fog them up to make it easier to wipe off grime) if I can avoid it. If you’re like me and quite a coffee drinker, your breath can be slightly acidic and with repeated use, it can wear down the coatings on your lens. At least that’s what Nikon mentioned a while back in an article I read (ps, I’m a Canon guy).

Step 5. Don’t forget the lens cap

The front element is now clean. But for me, the process is still not yet finished. Before placing the lens cap back on, I have a quick look at it – there could be grit and dust on it that is about to put back on my newly cleaned lens. Giving it a quick once over with the blower and a paint brush will keep it and the lens cleaner.

Step 6. Clean the rear element

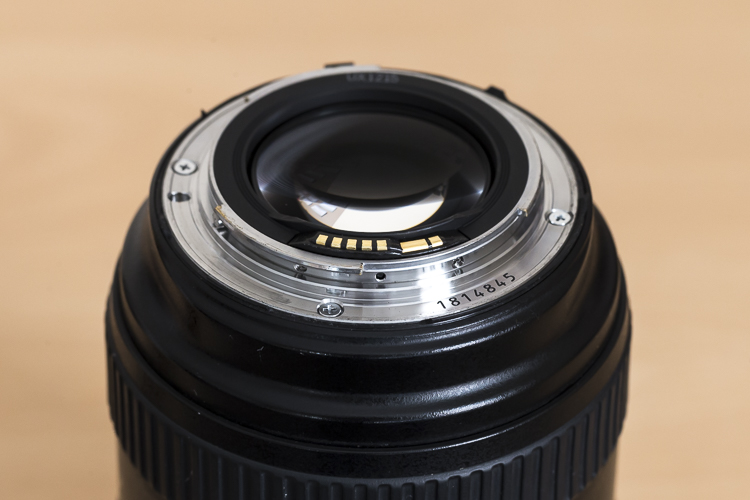
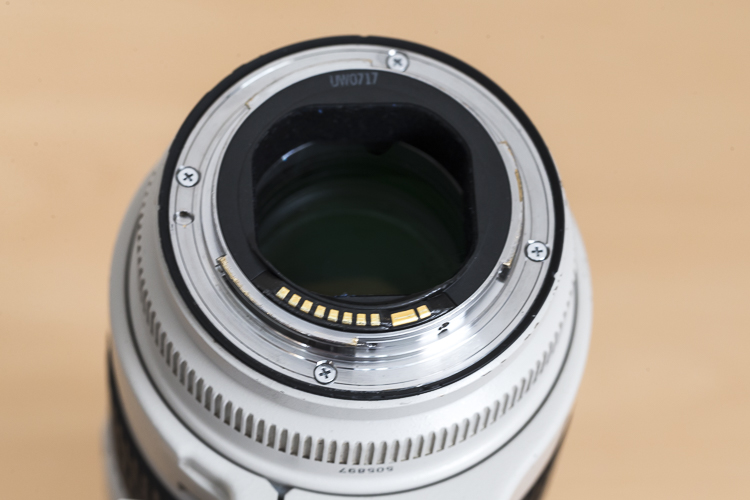
Now it’s time to have a quick look at the rear element – the bit that goes inside your camera. This shouldn’t be too messy; after all, it stays inside the camera. But dust can fall on it, especially when changing lenses and this dust, while it may not show up in pictures, can definitely make its way on to the sensor. I give it a quick once over with the Rocket Blower making sure the bottom of the lens is facing down. Doing so will stop any dust from falling back on it.  Some rear elements are further recessed into the lens than others. With lenses that have the rear element much closer, I also may give it a quick wipe with a micro fibre cloth or LensPen to clean it up.

DANS4207

Notice with this lens, the rear element is very close to the surface. Also, those gold bars are the lens contacts.

Occasionally, I’ll also give the mount a clean up too, as well as the lens contacts. For this, I just use a Tek Towel, although any clean towel will do. Carefully wipe around the mount and go over it a couple of times. A small amount of alcohol on a cotton tip can be used to clean the contacts. Cleaning the contacts every now and then can help to prevent errors between the camera and lens caused by a build up of grime.

Now it’s time to give the rear cap a quick go over. Remove any dust with the blower and put it back on the lens.

With this lens the rear elements sits deeper in the lens barrel.

With this lens, the rear element is recessed deeper into the lens barrel.

Step 6. Clean the outside of the lens

Now that the elements (both front and rear) and the lens mount are clean, it’s time to give the outside a quick go over. For this, I whisk away any dust with the paint brush and wipe the whole surface area with the Tek Towel. If I’ve been at the beach (salt in the air), or my lens has had a shower, I’ll dampen the towel in fresh water to remove any salt or champagne, etc.

This step, while very quick and simple, has proven to be quite helpful in picking up some things that may need my attention. For example, a while back I was cleaning my 70-200mm lens and I noticed that the end of the barrel was a little loose. I took it into Canon it was fixed in 10 minutes and cost nothing. Prevention is the best remedy.

Camera

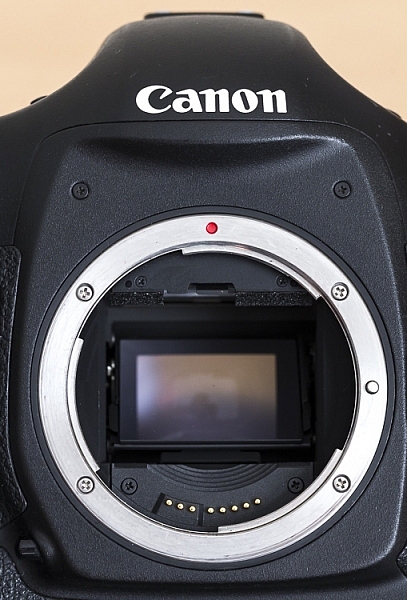
Here is a view of one of my camera bodies without its body cap. Care should be taken when cleaning around the lens mount so as to avoid dust/dirt etc from falling in. It's good practice to do this with the lens mount facing down.

Here is a view of one of my camera bodies without its body cap. Care should be taken when cleaning around the lens mount as to avoid dust, dirt, etc., from falling inside. It’s good practice to do this with the lens mount facing down.

Cleaning the camera is MUCH easier and quicker than the lenses. First off, I start by giving the outside a once over with the paint brush, followed by a thorough wipe down with the towel. I make sure the screens and the viewfinder are all nice and clean, too. As with lenses, I make sure that the mount and the contacts on the body are clean using the same steps and dampen the towel in fresh water if I’ve been at the beach.

While I have the body cap off, I’ll also blow out any dust that may be in the camera with the blower. With this step, I am much more cautious as I don’t want to blow into the body too much. Again, I also have the camera mount facing down to prevent dust from re-entering. This step can help reduce the amount of particles inside the camera which may eventually find their way onto the sensor.

Sensor

For me, this is where the cleaning process stops. I don’t do my own sensor cleaning as I much prefer it be done by the right people. Some people like to do their own sensor cleaning, and that’s completely fine. This is just something I like to give to professionals because if anything goes wrong, I can blame them.

Filters

Cheap-UV-Filters-202px.jpgYou may have noticed that I haven’t mentioned anything about UV filters. The reason for that is simply I don’t use them. I am yet to be convinced that they will actually save a lens from breaking if being dropped and have the view that if a lens is going to break from a fall, it will break; filter or no filter. I always use lens hoods which not only help to reduce lens flare but also provide some protection from objects falling on to the front element. However, if you’re in an extremely dusty environment, for example, then the use of a UV filter could be a smart investment.
Conclusion

So that’s it for my gear cleaning process. This isn’t something I do after each and every shoot, but I do try to get to it at least once a month or after shoots where my gear has been a little abused by the elements. It may seem that there are a lot of steps involved, but it really doesn’t take that long to do it. It’s even quite therapeutic when you get into it.

How do you clean your gear? Do you have any other tools you use? What’s your procedure and how often do you do it? Please share in the comments below.

googletag.cmd.push(function() {
tablet_slots.push( googletag.defineSlot( “/1005424/_dPSv4_tab-all-article-bottom_(300×250)”, [300, 250], “pb-ad-78623” ).addService( googletag.pubads() ) ); } );

googletag.cmd.push(function() {
mobile_slots.push( googletag.defineSlot( “/1005424/_dPSv4_mob-all-article-bottom_(300×250)”, [300, 250], “pb-ad-78158” ).addService( googletag.pubads() ) ); } );

The post Step by Step How to Clean Camera Gear so it Stays in Good Shape by Daniel Smith appeared first on Digital Photography School.


Digital Photography School

 
Comments Off on Step by Step How to Clean Camera Gear so it Stays in Good Shape

Posted in Photography


How to Connect With Your Photography Followers Through Instagram Stories

28 Sep

Recently Instagram released on of their biggest updates this year, Instagram Stories. It was met with both love and hate and I’ve found it interesting to see how it has been used since its release. Regardless of what you feel about this “Snapchat-copy”, it could be a great tool to connect with your Instagram audience. Here are my best tips on how you can benefit from Instagram Stories and improve your reach!

IMG_0193

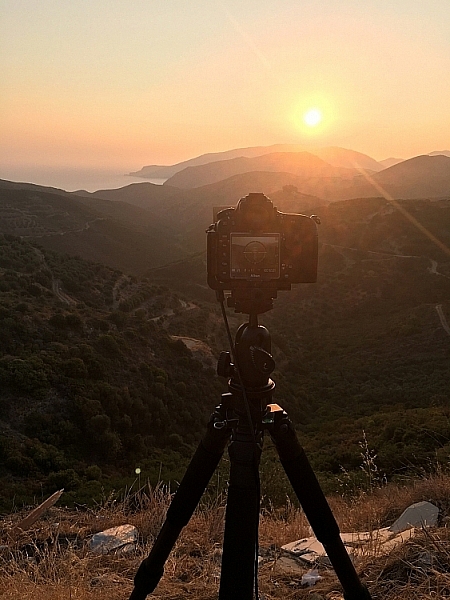
During a recent trip to Greece I was able to interact with my followers through Instagram Stories

What is Instagram Stories?

Instagram Stories is Instagram’s latest feature which allows you to share pictures and videos that, similar to Snapchat, will disappear after 24 hours.  This lets you share images with your followers that you don’t want in your feed. Instagram itself describes their new feature like this:

With Instagram Stories, you don’t have to worry about overposting. Instead, you can share as much as you want throughout the day — with as much creativity as you want. You can bring your story to life in new ways with text and drawing tools. The photos and videos will disappear after 24 hours and won’t appear on your profile grid or in your feed.

Why should you use Instagram Stories?

The big question is then; why should you use Instagram Stories? Perhaps you already use Snapchat to share your day-to-day stuff, why do it another place?

Personally, I wasn’t on Snapchat until a few months ago but after enough nagging from friends and clients, I decided to finally jump on board. Talking to the phone and taking pictures of my travels felt a bit strange, to begin with, but I soon got used to it. However, I did feel like the time it would take to build a new audience, on a new platform, might not be worth it.

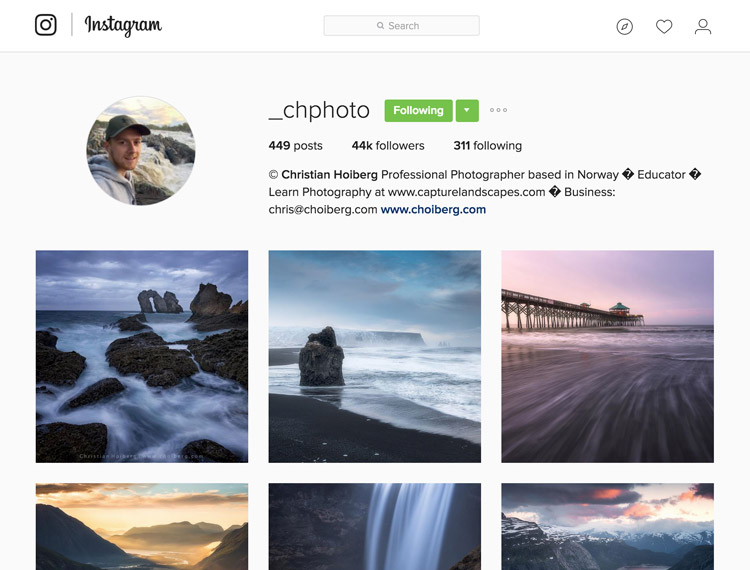
Instagram, however, is where I have the majority of my followers. With Instagram Stories I’m now able to do the exact same as I did for a while on Snapchat but with a much larger reach. Already I’ve received hundreds of emails and Direct Messages from people letting me know how much they enjoy my stories.

instagram-stories

Obviously, if you have a greater following on Snapchat than Instagram you might not want to ditch Snapchat completely. Uploading images and videos from Snapchat to Instagram Direct is rather easy, though, so you can be present at both.

I’ve found Instagram Stories to be an excellent way to connect with my audience and get to know them better. The reach and engagement in my feed have also increased slightly (I haven’t done any extended research so this increase might not be related). Instagram Stories is also a great way for your audience to get to know you better.

What should you share on Instagram Stories?

Since the release of Instagram Stories, I’ve paid attention to how photographers use it. What surprised me is how poorly they exploit this new tool. Sorry, but what you had to dinner or a picture of your dog laying on your lap isn’t interesting to most of us. The fact is if you start by uploading that type of content most people won’t come back and look at your stories even though you start creating more interesting content later.

If you wish to benefit from this tool and connect better with your audience you should be more aware of what you upload. If you just want to send pictures of your food perhaps it’s better to stay with Snapchat and send those images directly to your friends.

Here are some examples of interesting content to share with your audience:

Behind the Scenes

IMG_0439

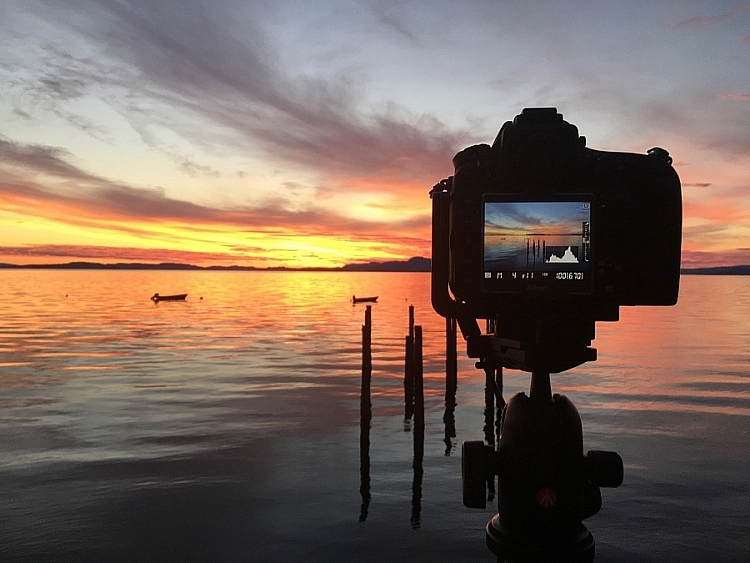
When you’re out traveling or photographing, uploading images and videos from behind the scenes is something many people will find interesting. I love to see behind the scenes images from the photographers I follow and I enjoy seeing how the image turns out later on.

This can be done with both video and images. Perhaps you even could talk a little about the place you’re at or the subject you’re photographing.

Tips and Tricks

You don’t need to be an expert to share tips and tricks with your followers. In fact, it’s often interesting to see how beginners process their images or choose their settings.

I’ve gotten a lot of positive feedback on my short tutorials, tips, and tricks that I share on Instagram Stories. Many people have said that they don’t follow anyone else’s stories but mine due to this.

Gear talk

Another interesting thing you could talk about is your equipment. “What camera do you use” is one of the questions I get asked the most, so going through your camera bag every now and then is a good way to answer these questions, while also creating interesting and engaging content.

IMG_0402

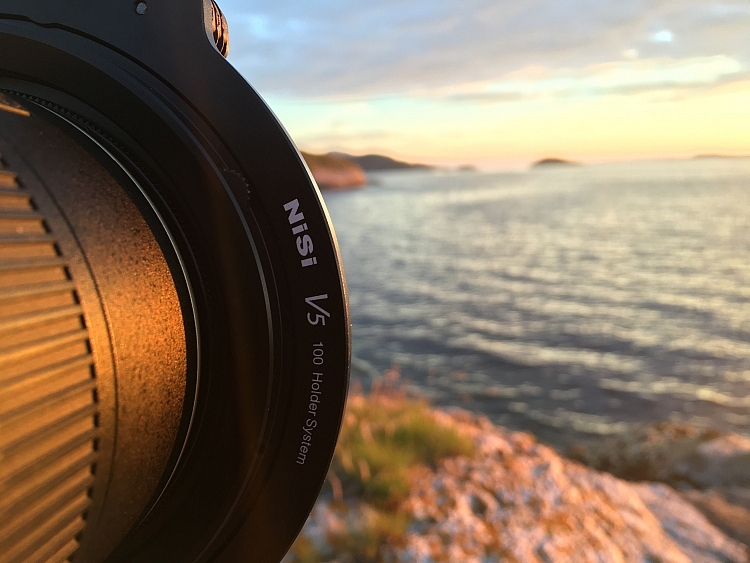
I got much positive engagement when sharing my first impressions of the NiSi filter system

Q&A Sessions

Unfortunately, when you grow a large following online you don’t always have the time to reply to all the questions you receive through email or through social media platforms. Many of these questions take time to answer, so a good and efficient way of replying to as many as possible, is through Instagram Stories. When I receive questions now I answer them through videos in my story. This saves me a lot of time but my followers still get most of their questions answered.

Since Instagram Stories is still a rather new feature there’s still much to be taken from it. There are many  ways to benefit from this tool but this is how I’ve found it to be most beneficial.

Have you started using Instagram Stories yet? What do you think about this new feature?

googletag.cmd.push(function() {
tablet_slots.push( googletag.defineSlot( “/1005424/_dPSv4_tab-all-article-bottom_(300×250)”, [300, 250], “pb-ad-78623” ).addService( googletag.pubads() ) ); } );

googletag.cmd.push(function() {
mobile_slots.push( googletag.defineSlot( “/1005424/_dPSv4_mob-all-article-bottom_(300×250)”, [300, 250], “pb-ad-78158” ).addService( googletag.pubads() ) ); } );

The post How to Connect With Your Photography Followers Through Instagram Stories by Christian Hoiberg appeared first on Digital Photography School.


Digital Photography School

 
Comments Off on How to Connect With Your Photography Followers Through Instagram Stories

Posted in Photography