RSS
 

Archive for July, 2016

Tips for Taking Candid Portraits of People

28 Jul

Get Andrew’s ebook The Candid Portrait at 43% off, now over at Snapndeals, for a limited time only (August 9, 2016 AUS time).

A candid portrait is often defined as one which you take without the subject being aware that you have done so. The idea is to capture a natural moment, that shows the person’s character or something interesting about them.
A candid portrait

Wedding and portrait photographers often strive to capture candid portraits, so do street photographers. It is the latter form of candid portrait photography that I will concentrate on in this article.

I prefer to take candid portraits when I am travelling, it is rare that I do so at home. There is something about the excitement of travelling and seeing a new place with fresh eyes, that makes me want to take photos that capture life in the streets.

The question is, how do you take photos of other people safely when you are travelling, and how do you create evocative images that capture the spirit of that place? Good photos aren’t taken, they are made by the photographer. The following tips will help you create candid portraits.

All the photos in this article were taken while I was traveling, but you’ll find the principles hold true when you are working close to home as well.

1 – Think about your equipment

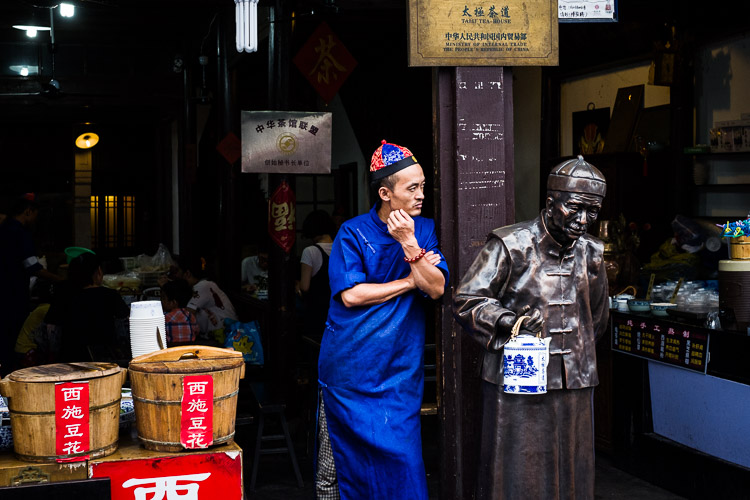
Part of the craft of photography is selecting the most appropriate tool for the job. There are two approaches you can take here. One is to use a telephoto lens and take photos from distance. You are unlikely to be spotted by your subject, especially if you are quick, but your photos may also have a lack of involvement in the scene as they are taken from some distance away. Having said that, you can use a telephoto lens to create a cinematic look that pulls the background in closer to the subject, or throw it out of focus.

A candid portrait

I took this photo with a 50-150mm Sigma lens. It’s an enormous lens that I no longer own, but it enabled me to take photos like this from a distance, without being noticed.

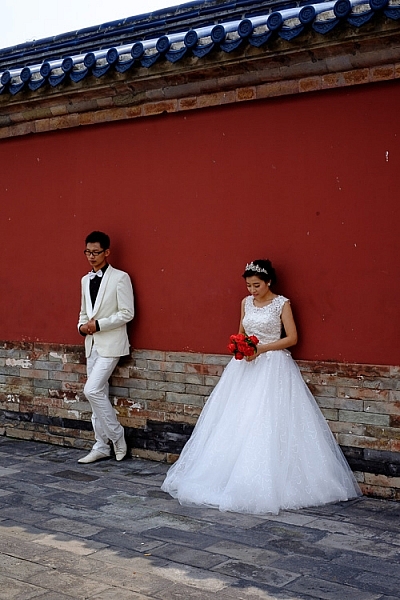
The second approach is to use a small camera with a small lens, and get in much closer to the action. The idea here is that the small camera gives you the perception that you are less intimidating, than somebody using a large digital SLR and lens setup. You are much more likely to be able to take photos without being noticed, or to be ignored if you are.
A candid portrait

I used a small 35mm lens on a Fujifilm camera to take this photo. The smaller size of this gear lets me get much closer to people than I ever could with the Sigma 50-150mm lens.

The ideal small camera could be a small digital SLR (such as the Canon EOS 100D), a mirrorless camera (such as the Fujifilm X-T1, my personal favorite), a compact camera (like the Ricoh GR II) or a smartphone.

If you are using an interchangeable lens camera, then a prime lens may be a good choice. Primes are usually smaller than zooms, and the wide apertures come in handy in low light.

2 – Slow down and explore

Become an observer of life. Go somewhere interesting and just watch what happens. Every city and town have their own rhythms. The tide of people ebbs and flows as the hours pass by. Where are the most interesting parts of the city? The most picturesque? Where is life lived on the streets?

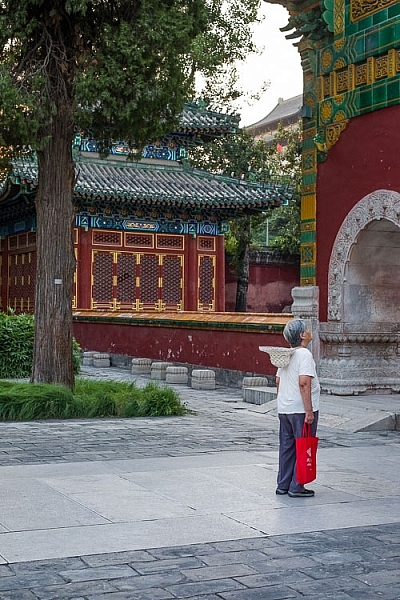
What are the unique aspects of that city? A photo of somebody taken in front of a shop could be created almost anywhere, but a photo taken with a well known landmark or typical building in the background (such as the Eiffel Tower in Paris, or the Forbidden City in Beijing) has the potential to be much more evocative.

The key is to relax, take things slowly, and enjoy yourself. A small camera helps because it is easier to carry around all day than a large system.
A candid portrait

This photo could only have been taken in Beijing. The ancient buildings in the background are unique to this city.

3 – Enjoy the process

Don’t put too much pressure on yourself. An empty memory card can be as terrifying for a photographer as a blank piece of paper (or empty computer screen) is for a writer.

One way to get started is to take a photo of anything remotely interesting. It doesn’t really matter what it is, but I find that taking the first photo gets my creativity going and puts me in the right frame of mind to start seeing other images. Remember that you are there to enjoy the day, the sights, and the process of exploration and meeting new people, as well as photography.

4 – Don’t be afraid to talk to people

Talk to people, not necessarily only the people that you want to photograph, but anybody, particularly in shops, markets or working in cafes, who may be open to a conversation. You may have to forget about this option if you don’t speak the language. But don’t let that stop you from using non-verbal communication. Smile, and be open and friendly.

Talking to people lets you get to know the area, and the people who live there. Afterwards, you may be able to ask the person you spoke to if you can take a photo of them, or if there is anywhere that is a good place to take photos. Local people often like to make recommendations, especially if they are proud of their city.

If you can’t speak the language don’t let that put you off even rudimentary attempts at communication. Last year in China, I came across a group of men playing a game of Xiangqi (Chinese chess). I stopped to watch, and held up my camera with a questioning look. One of them nodded to say yes, and I took a few photos before saying thank you and moving on. This is my favorite photo from the set.

A candid portrait

5 – Use a wide-angle lens

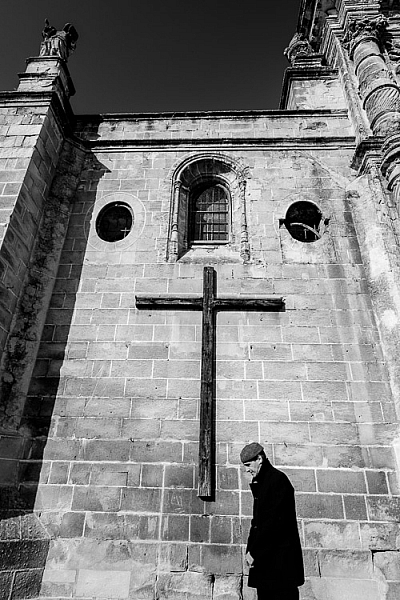
The beauty of wide-angle lenses is that you can get in close and photograph somebody, without them even being aware that you are doing so. How? Simply place them at the edge of the frame, or on one of the thirds. The camera will point away from them and they may not even be aware that they are being photographed.

As long as you don’t look at them or make eye contact they will think you are photographing whatever is behind them. This works best when there is something interesting there that a tourist would naturally take a photo of.
A candid portrait

I was taking a photo of the church when I noticed the man was about to walk in front of me. The wide-angle focal length (14mm, APS-C camera) meant that he became part of the photo without realizing it.

6 – Find a rich environment

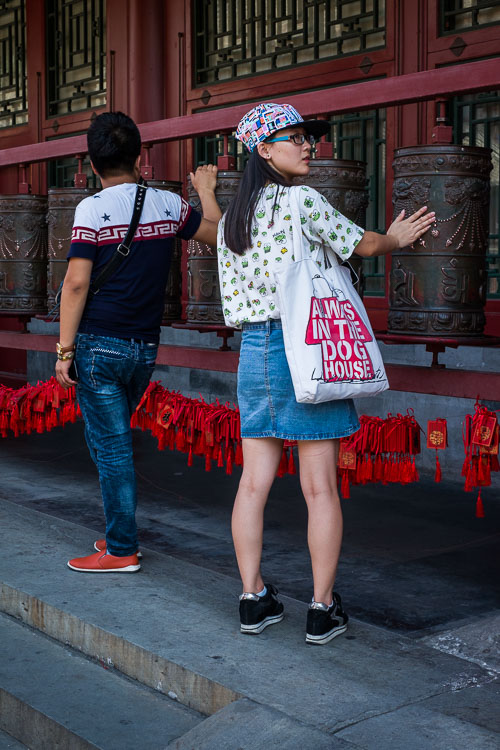
Sometimes all you have to do is find an interesting location, and observe how the local people behave as they pass through. While in Beijing last year, I became fascinated at the different ways that the local people interacted with the city’s historical buildings. All I had to do was wait, observe, and take photos of interesting moments.
A candid portrait

While visiting Prince Gong’s mansion, a historical building in Beijing, I noticed that people like to walk by these Tibetan style prayer wheels. I stayed there for a while and took photos as people passed by. The incongruous message on the woman’s bag adds a little extra to this photo.

7 – Go when the light is beautiful

Beautiful light is key to creating evocative portraits that capture the spirit and atmosphere of a place. You’ll increase your chances of creating beautiful images exponentially by going out when the light is beautiful. That means getting out at the end of the day during the golden hour. There is also lots of potential during dusk, especially with the mix of artificial and natural light that you find in urban environments.

A candid portrait

The orange light cast by tungsten light bulbs adds atmosphere to this photo taken in Xi’an, China.

Can you think of any other tips for taking candid portraits of people in the street? Please let us know in the comments, I’d like to hear your thoughts.

Get Andrew’s ebook The Candid Portrait at 43% off, now over at Snapndeals, for a limited time only (August 9, 2016 AUS time).

googletag.cmd.push(function() {
tablet_slots.push( googletag.defineSlot( “/1005424/_dPSv4_tab-all-article-bottom_(300×250)”, [300, 250], “pb-ad-78623” ).addService( googletag.pubads() ) ); } );

googletag.cmd.push(function() {
mobile_slots.push( googletag.defineSlot( “/1005424/_dPSv4_mob-all-article-bottom_(300×250)”, [300, 250], “pb-ad-78158” ).addService( googletag.pubads() ) ); } );

The post Tips for Taking Candid Portraits of People by Andrew S. Gibson appeared first on Digital Photography School.


Digital Photography School

 
Comments Off on Tips for Taking Candid Portraits of People

Posted in Photography


Time for New Technology: 13 Modern Wristwatch Designs

28 Jul

[ By SA Rogers in Gadgets & Geekery & Technology. ]

smartwatch darth vader

Apple Watch’s failure to catch on tells us most people probably don’t want to wear full-on smartphones on our wrists, but that doesn’t mean standard analog watches couldn’t use a bit of modernization. These concepts for technology-augmented timepieces include hybrid digital-analog designs, watches that communicate with your car, wrist-launched camera drones and a smartwatch Darth Vader would love. Some are cool ideas, some need work and others are downright terrible, but they might give us an idea of what’s to come in terms of wearable technology.

Nixie Wearable Camera Drone

smart watch nixie 3

smart watch nixie 2

smart watch nixie 1

Launch a camera zone from your wrist anytime you want with ‘Nixie,’ which uses motion-prediction algorithms and sensors to guide itself along four pre-programmed paths to capture full HD photos or video from the air. Weighing less than 0.1 pounds, it can connect with a smartphone for easy data transfer. Th idea is that the camera can capture whatever you’re doing and then fly right back, whether you want to take a quick selfie or record some kind of stunt. Mimicking the look of a wrist watch, it’s an interesting piece of wearable tech for sure, with one problem: it doesn’t tell the time, so if you like wearing a watch, you’ll have to double up.

Luxury Smart Strap for Analog Watches by Montblanc

smart watch strap

If you can’t bear to part with your analog watch, but wish you could upgrade it somehow, this one’s for you: the Montblac e-Strap, which adds a 14.2-millimeter-wide OLED screen to the inside of your wrist. Connecting to a smartphone via Bluetooth, it works as a remote camera trigger, controls for a music player, incoming text and call alerts and physical activity data collection. It also has a ‘find me’ function in case you’re prone to misplacing your phone.

Simple, Elegant Watch Tells Time with Color Gradient

smart watch gradient

smart watch gradient 2

This watch needs no hour hand, using a color gradient to indicate the time. ‘Hidden Time’ by Jiwoong Jung has a minimalist look that’s constantly shifting as the minute hand makes its rounds, with the hard line between black and white telling you what hour it is.

Darth Vader’s Watch by Devon

smartwatch darth vader

smartwatch darth vader 2

What would Darth Vader wear? Los Angeles watchmaker Devon answers that question with its Star Wars watch, with a silhouette calling to mind the villain’s helmet, a strap modeled after his Sith gloves and a stand that makes it look like a TIE fighter. If you want one for yourself, you might have to do something villainous to get it: the price tag is a hefty $ 28,500.

Smell the Time with ‘Scent Rhythm’

smartwatch scent

smartwatch scent 2

‘Scent Rhythm’ doesn’t care exactly what time it is so much as it wants to help your body ease into each phase of the day naturally, aiding your circadian rhythms through the release of four different fragrances. Detecting a certain scent will give an a general “feel” of the time every six hours, activating our natural sense of time, called chronoception. The smells were specifically selected and timed to amplify the rhythms that help govern our sleep and waking cycles. First comes coffee, then a library-like smell of paperback books, then whiskey and tobacco, and finally chamomile. Like the idea? Designer Aisen Caro Chacin offers plans to build your own.

Next Page – Click Below to Read More:
Time For New Technology 13 Modern Wristwatch Designs

Share on Facebook


[ By SA Rogers in Gadgets & Geekery & Technology. ]

[ WebUrbanist | Archives | Galleries | Privacy | TOS ]


WebUrbanist

 
Comments Off on Time for New Technology: 13 Modern Wristwatch Designs

Posted in Creativity


Fear, Laziness & Change

27 Jul

Fear Laziness Change – Lazy, slow and un-imaginative industries , companies and people


Fashion Photography Blog

 
Comments Off on Fear, Laziness & Change

Posted in Uncategorized


Nikon introduces ultra-fast AF-S 105mm F1.4E ED prime lens

27 Jul

$ (document).ready(function() { SampleGalleryV2({“containerId”:”embeddedSampleGallery_8415058717″,”galleryId”:”8415058717″,”isEmbeddedWidget”:true,”standalone”:false,”selectedImageIndex”:0,”startInCommentsView”:false,”isMobile”:false}) });

Nikon has unveiled the AF-S Nikkor 105mm F1.4E ED, the fastest full-frame lens of its kind with autofocus. Resistant to dust and moisture, the lens uses 14 elements in 9 groups, including 3 ED elements, along with Nano Crystal and fluorine coatings. The lens has 9 rounded aperture blades, and the aperture is electronically controlled, which keeps exposure consistent while shooting high-speed bursts. As you might expect, this is a heavy lens, weighing in at 985g/2.1lbs.

The 105mm F1.4 is expected to ship in late August with a $ 2,199.95 MSRP.

Press release:

GLAMOROUS GLASS: NIKON CELEBRATES 100 MILLION NIKKOR MILESTONE AND THE INTRODUCTION OF THE AF-S NIKKOR 105mm f/1.4E ED LENS

MELVILLE, N.Y. (July 27, 2016 AT 12:01 A.M. EDT) – Today, Nikon Inc. is celebrating a momentous NIKKOR production milestone as well as the announcement of the AF-S NIKKOR 105mm f/1.4E ED, a premium lens for the most discerning photographers. This luxurious new medium-telephoto lens is engineered to help create flattering images with gorgeous bokeh, while delivering impressive sharpness and beautiful color rendition. As a testament to a lasting legacy of high-caliber lenses, Nikon has also announced that NIKKOR lens production has reached the landmark achievement of 100 million units produced worldwide.

“Surpassing the 100 million lenses produced milestone is a great honor and a testament to the photographers who both love and rely on NIKKOR glass to get the job done,” said Kosuke Kawaura, Director of Marketing and Planning, Nikon Inc. “The AF-S NIKKOR 105mm f/1.4E ED represents the embodiment of the NIKKOR line of high-quality lenses, giving photographers a robust, well-balanced lens that provides intense sharpness, astounding image quality and background bokeh that is sure to be a favorite among portrait photographers.”

Captivating Image Quality
The AF-S NIKKOR 105mm f/1.4E ED is a fast, full-frame (FX-format), medium-telephoto prime lens and is the world’s first1 to strike the impeccable balance of 105mm focal length and large f/1.4 aperture for a truly outstanding optic. This new NIKKOR lens is ideal for professional and advanced enthusiast photographers, especially those capturing portraiture, from in-studio fashion to a golden hour engagement session on the beach. These users will love the precise sharpness from this fantastic glass, which provides a flattering compression to subjects with a sensational, sultry bokeh. Beyond the gorgeous image quality lies stellar resolving power, especially when used with Nikon DSLRs such as D5, D810 or D750.

The 105mm f/1.4E is a fast lens with endearing character, providing stellar optical performance, even in the peripherals. Sharp rendering is attained for shooting distant subjects throughout the aperture range – from maximum aperture to being stopped down by several stops. Gradual alteration from the focal plane helps render subjects in high-fidelity with a natural depth, giving colorful portraits and landscapes that little bit of extra “pop” to help create a truly distinct image. The AF-S NIKKOR 105mm f/1.4 is also an excellent choice for low-light photography, as its large maximum aperture allows photographers to shoot at the fastest possible shutter speeds. Additionally, this lens can reproduce point light sources faithfully without sagittal coma flare, even on the edges of the frame.

Masterful Lens Construction
Decades of precision, knowledge and experience are put forth into every NIKKOR lens, and the AF-S NIKKOR 105mm f/1.4E ED is an exceptional example of brilliant craftsmanship and Nikon technologies merging. Packed with the latest advanced optical innovations, the 105mm f/1.4 features Nikon’s electromagnetic aperture control technology for consistent exposures, even during high speed continuous shooting.2

On the outside, solid build quality is well-balanced for all-day shooting, while the lens is sealed and gasketed to resist dust and moisture. Additional Fluorine coatings are used on the front and rear elements, so that smudges, dirt or moisture are easily removed. Inside the lens, the optical formula consists of 14 elements in nine groups, which include three ED glass elements. A 9-blade diaphragm further helps to create a circular, pleasing out of focus area. The lens also features Nikon’s Nano Crystal Coat technology to significantly reduce instances of ghosting and flare.

The new AF-S NIKKOR 105mm f/1.4E ED joins other NIKKOR f/1.4 lenses in the Gold Ring Series, which include only premium primes with Nano Crystal Coat and pro-grade build quality. These other lenses include the AF-S NIKKOR 24mm f/1.4G, AF-S NIKKOR 35mm f/1.4G, AF-S NIKKOR 58mm f/1.4G, AF-S NIKKOR 85mm f/1.4G.

A Landmark in the NIKKOR Legacy
Nikon is also pleased to announce that the total production of NIKKOR lenses for Nikon interchangeable lens cameras reached the landmark 100 million milestone in mid-July 2016.

With a robust line-up of high-quality lenses for all types of photographers, the NIKKOR name has become synonymous with a rich history of superior lenses. Nikon continues to introduce new NIKKOR lenses that further optical technology, utilizing cutting-edge techniques and knowledge from experience cultivated over its long history. Such revolutionary advancements include Nano Crystal Coat, which acts as a powerful anti-reflection coating, and significantly reduces instances of ghosting and flare. More recently, NIKKOR lens technologies such as the use of Phase Fresnel (PF) and Fluorite elements have helped to create smaller and lighter lenses with superb balance and handling. Many NIKKOR lenses now also feature a Fluorine coat that helps repel a variety of contaminants such as dust, dirt, water, oils and grease. The introduction of an electromagnetic diaphragm has also helped to create lenses that provide consistently crisp exposures, even during high-speed shooting.

Pricing and Availability
The AF-S NIKKOR 105MM f/1.4E ED will be available in late August for a suggested retail price (SRP) of $ 2,199.953. For more information on Nikon’s latest products including their newest NIKKOR lenses, please visit www.nikonusa.com.

1: Among AF lenses for digital SLRs compatible with FX-format image sensor; as of July 27, 2016; statement based on Nikon research

2: The lens incorporates an electromagnetic diaphragm mechanism. The following cameras are compatible with this lens: D5, D4 series, D3 series, Df, D810, D810A, D800 series, D750, D700, D610, D600, D500, D300 series, D7200, D7100, D7000, D5500, D5300, D5200, D5100, D5000, D3300, D3200, D3100, Nikon 1 J1, J2, J3, J4 with FT-1, Nikon 1 V1, V2, V3 with FT-1, Nikon 1 S1, S2 with FT-1 

3: SRP (Suggested Retail Price) listed only as a suggestion. Actual prices are set by dealers and are subject to change at any time.

Nikon AF-S Nikkor 105mm F1.4E ED specifications

Principal specifications
Lens type Prime lens
Max Format size 35mm FF
Focal length 105 mm
Image stabilization No
Lens mount Nikon F (FX)
Aperture
Maximum aperture F1.4
Minimum aperture F16
Aperture ring No
Number of diaphragm blades 9
Aperture notes Rounded blades
Optics
Elements 14
Groups 9
Special elements / coatings Three ED elements + Nano Crystal and fluorine coatings
Focus
Minimum focus 1.00 m (39.37)
Maximum magnification 0.13×
Autofocus Yes
Motor type Ring-type ultrasonic
Full time manual Yes
Focus method Internal
Distance scale Yes
DoF scale No
Focus distance limiter No
Physical
Weight 985 g (2.17 lb)
Diameter 95 mm (3.72)
Length 106 mm (4.17)
Sealing Yes
Filter thread 82.0 mm
Tripod collar No

Articles: Digital Photography Review (dpreview.com)

 
Comments Off on Nikon introduces ultra-fast AF-S 105mm F1.4E ED prime lens

Posted in Uncategorized


Adobe Lightroom launches for Apple TV

27 Jul

Adobe has announced the launch of Lightroom for Apple TV. The app is available now from the App Store, and is compatible with all fourth-generation Apple TV devices. Users must have an Adobe Creative Cloud subscription to log in and access their photos. Once logged in, photos can be accessed as collections and showcased in slideshows. You can’t do any actual editing in the app – it’s for viewing photos only.

Via: Adobe Blog

Articles: Digital Photography Review (dpreview.com)

 
Comments Off on Adobe Lightroom launches for Apple TV

Posted in Uncategorized


Leica improves Q functionality with firmware 2.0

27 Jul

Leica’s Q compact camera has been given a functionality boost with a firmware update that adds the option to shoot Raw-only, and extends the longest shutter speed from 30 seconds to 120 seconds. Firmware version 2.0 makes a number of changes to the way the full-frame 24MP camera operates adding some new features and fixing issues that made handling difficult in some cases.

The AF system functionality has been changed to allow different sized AF selection areas, while at the same time correcting an ability to focus on subjects outside the picture area when shooting in the cropped modes. Face detection also now reverts to multi-area AF when no face is detected in the scene. A useful new feature automatically switches the camera to use the rear LCD to display image review and menu navigation when the EVF is being used – for viewfinder photographers who prefer to see their images and menus in a larger format. Additionally, now user profiles can be accessed via the rather under-utilized Function button.

Leica Q owners can download the new firmware via the Leica website.

Press release: 

Leica releases firmware update 2.0 for Leica Q

Leica has released firmware update 2.0 for the Leica Q, bringing numerous new features to the highly successful full-frame compact camera. The update is available to download now from the Leica web site.

Leica works continuously in close collaboration with Leica photographers on the development and optimisation of its products, and, as a result, a number of enhancements in this latest firmware update have been based on specific customer recommendations and suggestions.

The first of several improvements, DNG format can now be selected as a separate option in addition to JPG and DNG + JPG, allowing photographers to save space on their memory card.

An optimised EVF mode makes navigation even easier than before. With this firmware update, a press of the Menu or Play button now allows the user to switch straight to menu control / picture assessment on the LCD screen.

The shutter speed range has been expanded and now includes speeds of up to 120 seconds.

‘User Profile’ is now directly selectable via the FN button, facilitating quick and easy access to all functions stored in a particular user profile.

The spirit level display has also been improved, remaining visible when the shutter release is pressed.

Three optimised autofocus functions bring further creative freedom:

  • The 1-field autofocus metering area can now be selected in three different sizes: small, medium and large.
  • AF motion in digital zoom mode for focal lengths of 35mm and 50mm has been limited to avoid focusing on objects outside the zoom range.
  • Face Detection has also been optimised: if no face is detected, AF now automatically reverts to multi-field autofocus mode.

Furthermore, a fourth information screen has been added, with the option to display the lower bar separately. The touch-controlled magnification function in playback mode has been revised, whereby double-tapping calls up the maximum enlargement or reduces the image back to original size.

Other new additions include a countdown display for long exposures / noise reduction, three modes available for the thumbwheel (Off/Auto/Exp. Comp.) and deactivation (Mode Lock) of the video button, if required. A change to WiFi password setting now allows the characters to remain visible when entered, and flash-unit compatibility has been extended to support the Leica SF 40 and SF 64.

Leica Q owners can download the firmware update from the Leica web site, or visit their local Leica Store or Leica Customer Care in the UK, for a complimentary firmware update service.

Articles: Digital Photography Review (dpreview.com)

 
Comments Off on Leica improves Q functionality with firmware 2.0

Posted in Uncategorized


Gold Infill: Japanese Pottery Repair Tradition Applied to Concrete

27 Jul

[ By WebUrbanist in Design & Fixtures & Interiors. ]

gold floor cracked resin

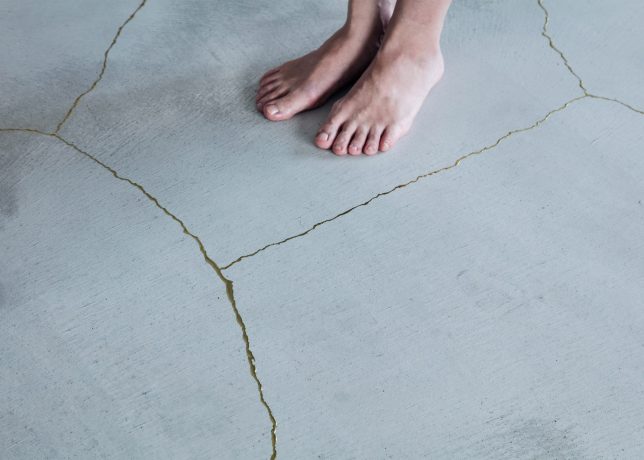
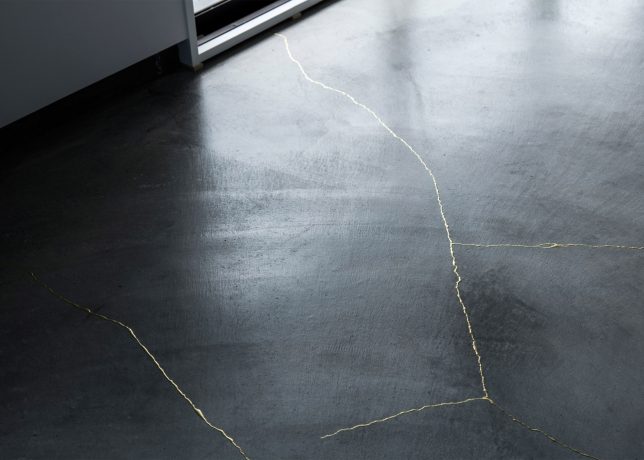
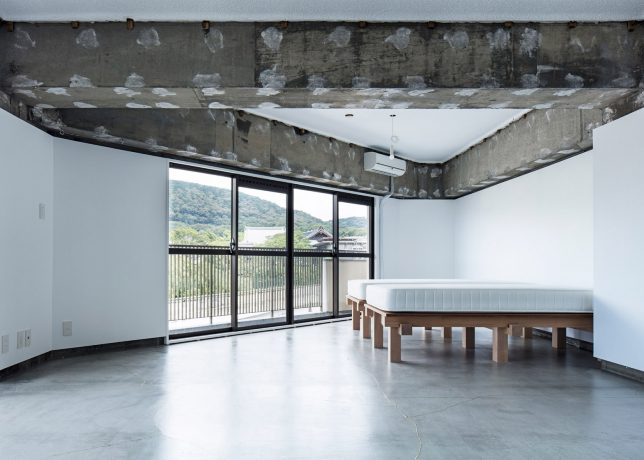
Strands of gold fill the cracks of this apartment in Kyoto, replicating in architecture a longstanding tradition of repairing pottery in a way that tells a true history of its use and reconstruction. Mixed with resin, glittering gold dust sparkles against adjacent surfaces.

goldinfill pottery

Kintsugi, which translates as “to repair with gold,” is a philosophy as much as an artistic approach. It reflects the idea that breakage and reassembly is part of the life of an object. In this case, the cracks that almost invariably form in concrete were repaired in the same fashion.

gold fills cracked floor

When Kintsugi was first employed centuries ago by a Japanese shogun, others were so enamored with the effects that, as the story goes, they began breaking their own pottery just to have an excuse to patch it back together with gold-laced lacquer.

gold concrete infill

In this case as with pottery artifacts, the effect is dazzling. Cracks stand out as something intentional, artistic and organic rather than shied away from as simply damaged. Spearheaded by architecture studio Tank, this may in turn also become more of a bigger trend, if only in Japan.

gold interior design

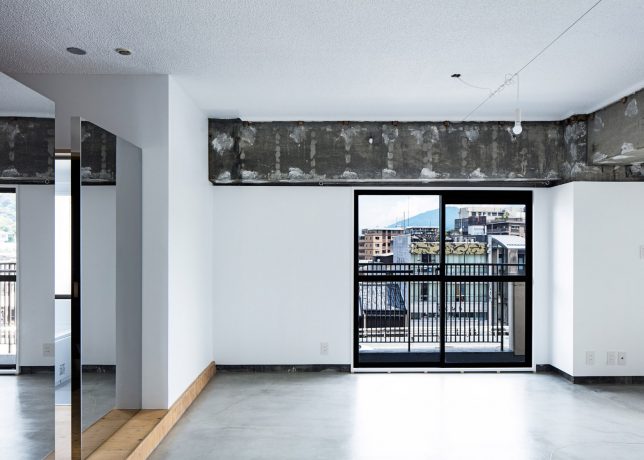
“The Japanese have traditionally repaired broken ceramics by gluing fragments together with lacquer and gilding the seams with gold powder to enjoy the beauty of imperfection,” said TANK. “Using traditional mortar, we emulated the art of Kintsugi in the living room by joining the cracks, thus transforming what was considered imperfect into a subject of beauty.”

raw interior design

Meanwhile, the winding gold cracks form part of a larger puzzle, elegantly juxtaposed against raw ceilings and reflected in a series of mirrored doors. The overall effect is minimalist, but with materials and textures adding life through creative details. Depending on the time of day and type of light, the gold blends in or stands out as lighter (or darker) against cementitious surrounding surfaces.

Share on Facebook


[ By WebUrbanist in Design & Fixtures & Interiors. ]

[ WebUrbanist | Archives | Galleries | Privacy | TOS ]


WebUrbanist

 
Comments Off on Gold Infill: Japanese Pottery Repair Tradition Applied to Concrete

Posted in Creativity


How to Use Upright Guided Tools in Lightroom’s New Transform Section

27 Jul

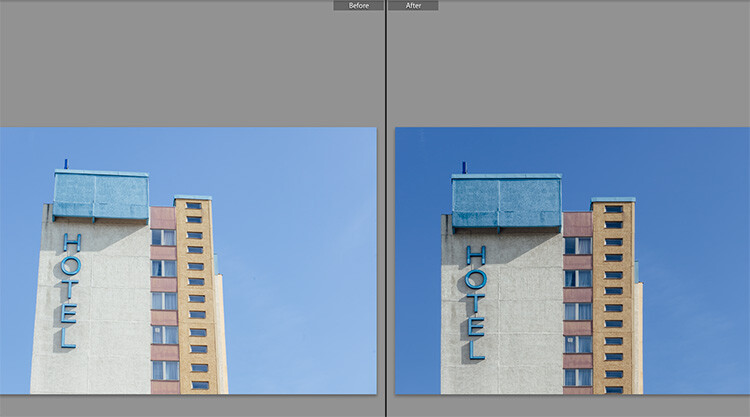
In their latest release of Lightroom 6.6 (or CC 2015.6 if you are using the Creative Cloud subscription package), Adobe has added a new feature, allowing us photographers to straighten our images even easier than before.

Dps LR Transform 01

The image above is a typical example of a photo that can use some straightening. A tall building, shot from the ground, will always look tilted or skewed (unless you have the budget to buy a tilt-shift lens, designed to overcome these issues right in camera).

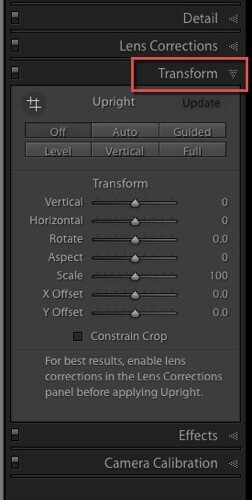
The latest update of Lightroom comes with a new Transform section

For these purposes, Adobe Lightroom had already offered an Upright feature within the Lens Corrections tab in its Develop module. In the newest version 6.6/CC 2015.6, this feature was extended, and is now in its own section called Transform.

Tansform panel LR

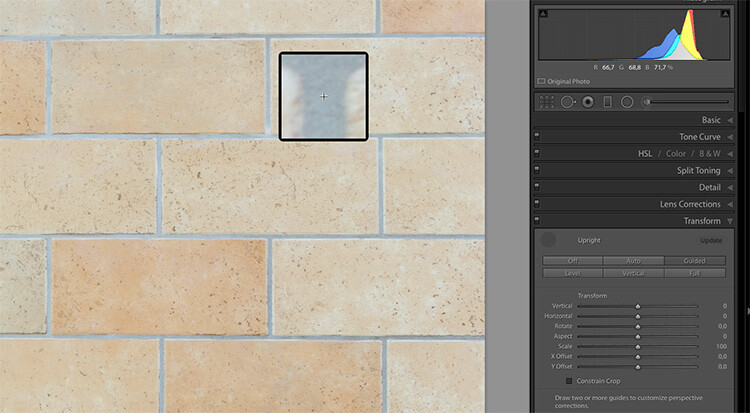
In this new Transform section, some of the known Upright features from the old Manual section can be found again. The image shown below is a good and easy sample to test the new features. I shot it slightly tilted against the wall, and there is also a slight barrel distortion visible, due to the mild wide angle lens used.

Dps LR Transform 03

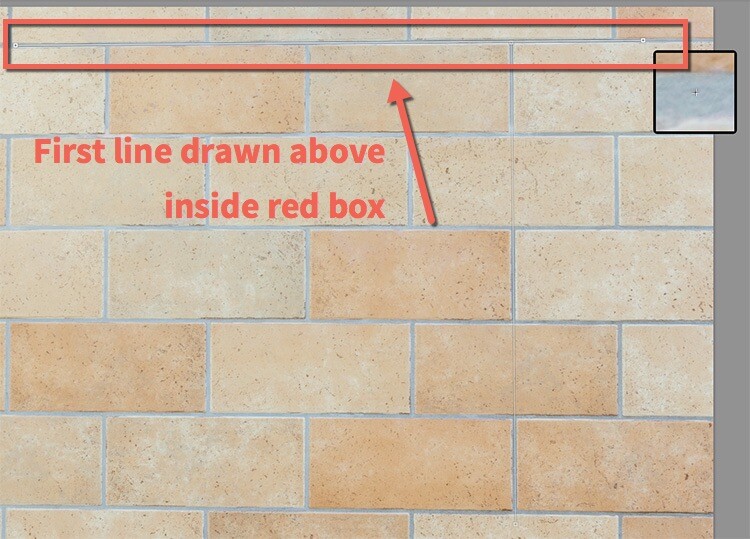
Most interesting for us is the new Guided button, that allows us to show Lightroom which lines we want to have straightened. When you click on this button, Lightroom allows you to draw lines on the image, that show the software where and how you think your image is supposed to look straight.

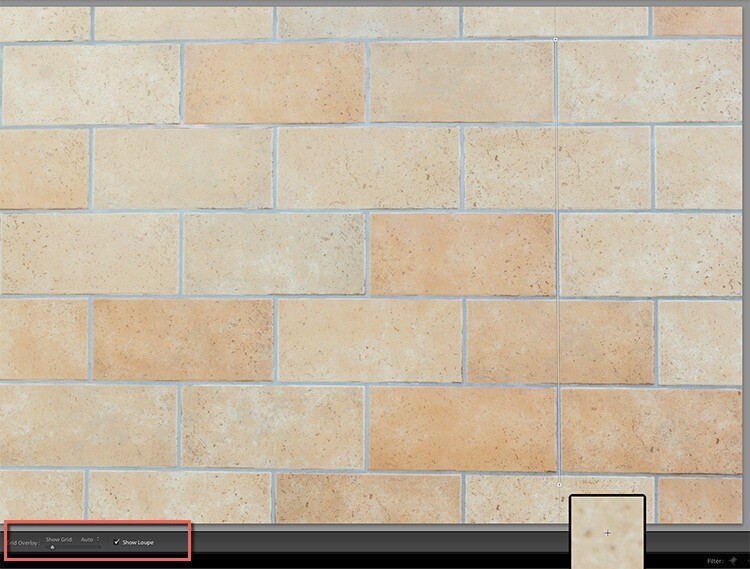
dps-LR-Transform-04c

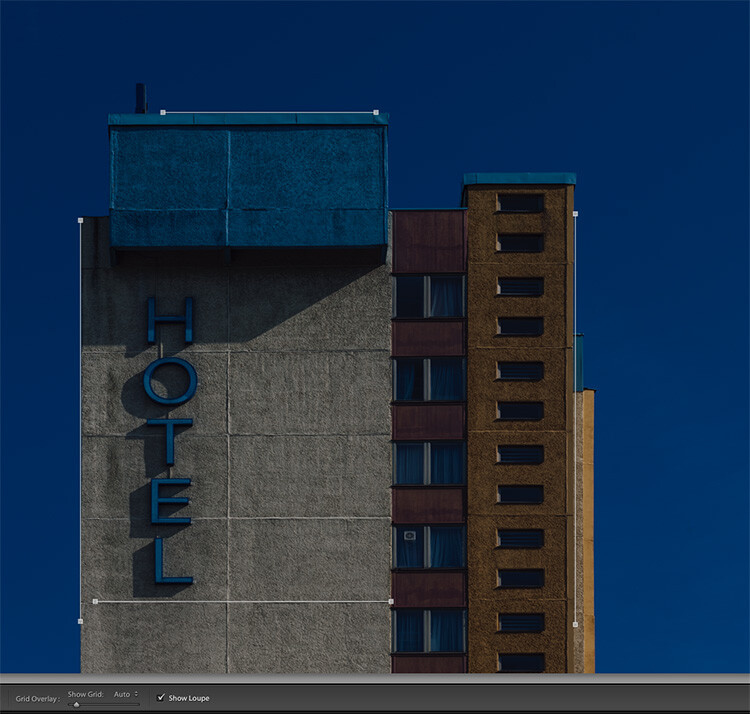
When you turn on the Show Loupe checkbox below the image (if you don’t see that on your screen hit T on your keyboard to toggle the toolbar), you can now move the mouse over the image, and Lightroom will close in on the details you are hovering over. This can help you find the perfect spots to click on, and make your lines.

The first click (click and hold it down) starts a new line that now moves along with your mouse. Move the line to a second spot in the image (and let go of the mouse) and Lightroom will have drawn the first line. You can click on both of the endpoints of this line if you want to correct it.

dps-LR-Transform-05c

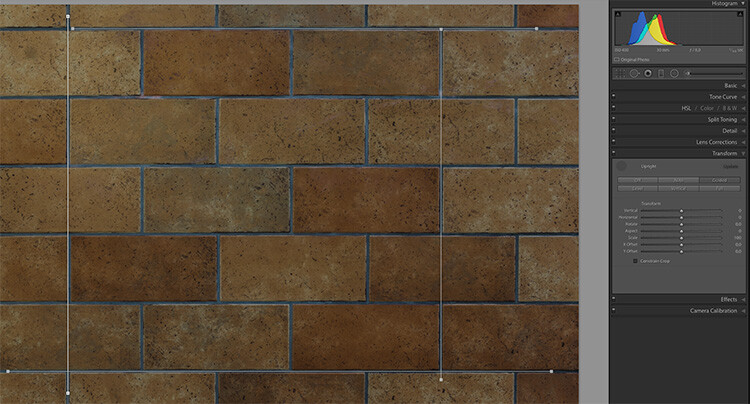
As soon as you draw a second line, Lightroom starts correcting the image. The best way to use this tool is to draw one vertical, and one horizontal line at the start. You may notice the improvement already in this but if you look closely, not all of the tilt, nor the distortion, has been corrected yet.

You can then draw two more lines (it accepts up to four guide lines in total) to help Lightroom catch the last perspective issues and resolve them.

Dps LR Transform 06

Bonus tip: To make the lines more visible, I have temporarily reduced the Exposure value for the image, as you may notice in the last image (above). As the lines are thin and white, I found it easier to use when I darkened the photo to allow for good contrast with the tool.

Example image – correct a building tilt

Now, I will show you how I used the guides in the architectural image I showed on top of this article. Once again I have lowered the exposure to show the lines. As you can see, I have used two vertical and two horizontal lines, each of them way off the center of the image, to get the best results of this new feature.

Dps LR Transform 07

Finally, you might want to use the sliders to change the Aspect, Scale and the X and Y Offset to compensate for the changes in perspective that might turn the objects in your image into looking slightly wider or slimmer form, than would be seen in real life.

Additional tool tips for using Guided Upright

Adobe found the Guided Upright tool to be valuable enough to define a keyboard short cut for it. Shift-T will bring you to this tool directly from either the Develop module or even from the Library.

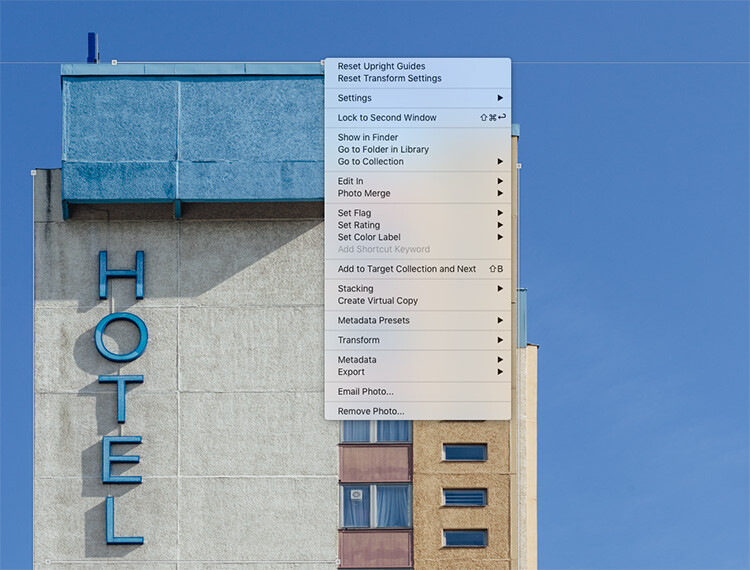
If you ever wish to reset the upright guides, or the whole Transform section, you can right-click into the image while using this tool. Lightroom will show two settings on top of the context menu offering you the option to reset the guides only, or all Transform settings.

Dps LR Transform 08

Do you shoot architecture? Has this been a feature you’ve found useful? How have you applied it to your images? Let us know in the comments below. If you have any questions post them there as well.

googletag.cmd.push(function() {
tablet_slots.push( googletag.defineSlot( “/1005424/_dPSv4_tab-all-article-bottom_(300×250)”, [300, 250], “pb-ad-78623” ).addService( googletag.pubads() ) ); } );

googletag.cmd.push(function() {
mobile_slots.push( googletag.defineSlot( “/1005424/_dPSv4_mob-all-article-bottom_(300×250)”, [300, 250], “pb-ad-78158” ).addService( googletag.pubads() ) ); } );

The post How to Use Upright Guided Tools in Lightroom’s New Transform Section by Michael Zwahlen appeared first on Digital Photography School.


Digital Photography School

 
Comments Off on How to Use Upright Guided Tools in Lightroom’s New Transform Section

Posted in Photography


Popular Prisma photo app now available on Android

27 Jul

Just when we thought filter apps were falling by the wayside, along came Prisma – a wildly popular iOS app now available for Android. Prisma uses a mix of neural networks, artificial intelligence and cloud-based machine learning to apply a range of filter effects, mimicking styles of artists such as Munch or Picasso, to your images. Since its launch a month ago for iOS it has become one of the year’s most popular imaging apps.

Until now, Android users had been limited to a buggy beta-version app, but today Prisma Labs, the developers of the app, has finally released the production version on Google Play. As on iOS, the app creates dynamic brush strokes and pencil drawings based on your images. Filters are fine-tunable and the final results can be shared in a variety of ways. Prisma for Android is compatible with devices running version 4.1 or newer of the Google mobile OS and can be downloaded and installed for free from the Google Play Store now. 

Articles: Digital Photography Review (dpreview.com)

 
Comments Off on Popular Prisma photo app now available on Android

Posted in Uncategorized


This is what it looks like when Getty prepares for the Olympics

26 Jul

Michael Heiman, Getty’s Director of Global Event Operations, has his work cut out for him in Rio. He’s been posting photos to his Instagram account showing the work going on behind the scenes as his team prepares to cover the Summer Olympics. From the not-so-glamorous task of installing cables, to the confusion caused when he wore a green shirt to a local hardware store, his posts have offered a fascinating look at what it takes to cover a colossal event like the Olympics.

And of course, there’s the gear. Observe:


It takes a lot gear to cover the Olympics. This is just some of our lens…. #mygettyriooffice #rio2016 #cps #thankscanon #lotsofglass

A photo posted by Michael Heiman (@heiman225) on

But what about the camera bodies? Glad you asked.


You obviously need some camera bodies to go with all that glass. #rio2016 #mygettyriooffice #gearporn #lotsofcameras #eos1dxmarkii #cps #canon #thankscanon #gettysport

A photo posted by Michael Heiman (@heiman225) on

Not surprisingly, the table is loaded with Canon EOS-1D X Mark I and II bodies, with a couple of 5DSR bodies for good measure, and L-series glass as far as the eye can see. Just another day at the office, right?

Articles: Digital Photography Review (dpreview.com)

 
Comments Off on This is what it looks like when Getty prepares for the Olympics

Posted in Uncategorized