RSS
 

Archive for February, 2016

CP+ 2016: Fujifilm gets new X-Pro2 and X70 into photographers’ hands

28 Feb

CP+ 2016: Fujifilm gets new X-Pro2 and X70 into photographers’ hands

Fujifilm didn’t announce any new products at CP+ this year, but the show is the first chance that a lot of Japanese enthusiast photographers have had to get their hands on the X-Pro2 and X70, which were unveiled last month.

CP+ 2016: Fujifilm gets new X-Pro2 and X70 into photographers’ hands

In an effort to get cameras into photographers’ hands, Fujifilm is running a rental service at this year’s show, where prospective X-series users can hire gear while they’re attending the show. 

CP+ 2016: Fujifilm gets new X-Pro2 and X70 into photographers’ hands

Here’s the camera that a lot of people at the booth have come to see – the 24MP X-Pro2. The long-awaited replacement for the X-Pro1 brings a higher resolution sensor, upgraded processor and significantly revamped autofocus system. 

CP+ 2016: Fujifilm gets new X-Pro2 and X70 into photographers’ hands

Ergonomically, the X-Pro2 is very similar to its predecessor but in terms of performance, it’s a totally different beast. The snappier processor, revamped ergonomics and higher-resolution viewfinder all make a welcome difference to the camera’s operation. 

CP+ 2016: Fujifilm gets new X-Pro2 and X70 into photographers’ hands

Less obvious are the changes that Fujifilm has made under the hood. The X-Pro2 is weather-sealed and – Fujifilm claims – more able to withstand punishment than its predecessor. This is what happens to an X-Pro2 after it has been aged in a simulated (i.e. sped up) process which appears to have involved rather a lot of sandpaper. Even with paint missing from pretty much all of its edges, the camera remained operational (we’re told). 

CP+ 2016: Fujifilm gets new X-Pro2 and X70 into photographers’ hands

Apologies for the poor quality photograph, but this camera is an early mockup of an ‘X-Pro1 S’, which ultimately became the X-Pro2. Cameras often go through several design changes during the course of their development but it’s unusual to be able to see any of the rejected versions. The X-Pro1 S is a little boxier, and a little more ‘classic’ looking than the eventual X-Pro2.

CP+ 2016: Fujifilm gets new X-Pro2 and X70 into photographers’ hands

And slimmer, too. Although of course it’s impossible to say whether the camera would have stayed quite so skinny by the time it entered production. We’re pretty sure that this prototype doesn’t actually contain any working electronics. 

CP+ 2016: Fujifilm gets new X-Pro2 and X70 into photographers’ hands

Again, sorry about the poor quality of this image, but if you look carefully at this exploded view of the X-Pro2 you’ll see various yellow lines around the body shell on the left of the picture. These are gaskets for weather-sealing. 

CP+ 2016: Fujifilm gets new X-Pro2 and X70 into photographers’ hands

Fujfiilm is really pushing the X-Pro2 at CP+, and has even created a gallery space showcasing images from its newest X-series camera. We must say, these prints (which are mostly around 20 inches in size) look great. 

CP+ 2016: Fujifilm gets new X-Pro2 and X70 into photographers’ hands

Let’s not forget about the X-70 though, Fujifilm’s new APS-C format compact camera. Essentially the X70 takes the imaging components from the X100T, and puts them into a smaller, more compact body. Gone is the X100T’s hybrid viewfinder (an optical one – shown here – can be added if you like) but new is a 28mm equivalent F2.8 lens. 

CP+ 2016: Fujifilm gets new X-Pro2 and X70 into photographers’ hands

The X70’s rear screen can tilt outwards, and up for shooting from low and high angles (and self portraits if you’re so inclined). It’s touch-sensitive, which allows for direct placement of AF point by touch, and quick swiping through images in review mode.

CP+ 2016: Fujifilm gets new X-Pro2 and X70 into photographers’ hands

A major booth at CP+ just wouldn’t be complete without some scantily-clad ladies to take pictures of, and Fujifilm has even created a nice little garden for them to stand in. How kind. 

CP+ 2016: Fujifilm gets new X-Pro2 and X70 into photographers’ hands

Meanwhile, photographers use Fujifilm’s new 100-400mm telezoom to snap overhead portraits of the ladies in their garden. . 

CP+ 2016: Fujifilm gets new X-Pro2 and X70 into photographers’ hands

Fujifilm isn’t focused completely on digital technology of course. The company still makes (and sells a lot of) instant film cameras. Instax had a prominent and very colorful corner of the Fujifilm booth at this year’s show.

CP+ 2016: Fujifilm gets new X-Pro2 and X70 into photographers’ hands

It looks like Rishi has found his favorite color – what’s yours?

Articles: Digital Photography Review (dpreview.com)

 
Comments Off on CP+ 2016: Fujifilm gets new X-Pro2 and X70 into photographers’ hands

Posted in Uncategorized


Lightweight & Portable Egg-Shaped Drone Folds Up Into Shell

28 Feb

[ By WebUrbanist in Gadgets & Geekery & Technology. ]

poweregg drone

Boasting practical portability with an eye to aesthetics, the new PowerEgg stands out against its more ungainly competitors, able to fold up into a smooth oval when not in use.

powervision egg drone

PowerVision “wanted to create a beautiful yet functional design for the poweregg,” explains CEO Wally Zheng. “The oval shape is not only clean and pure but also has the structural and functional benefits. This simple yet vital design means that this is more than a flying robot but a work of art.”

poweregg size

The device features a 360-degree panoramic HD camera able to relay long-range video, advanced optical flow sensors for indoor navigation and an easy-to-use remote control.

powervision detail

Developed over a year and a half, a great deal of work went into structural engineering, particularly making the moving parts work as it transforms to active from passive modes and back again.

poweregg deployed

“We want flying a drone to be child’s play, something even a five-year-old can do,’ continued Zheng. “With this next generation of drones, much like the internet expanded access to information in the virtual world, drones 2.0 led by innovations like the PowerEgg can expand access to the physical world and bring together humans and machines in this journey.”

Share on Facebook


[ By WebUrbanist in Gadgets & Geekery & Technology. ]

[ WebUrbanist | Archives | Galleries | Privacy | TOS ]


WebUrbanist

 
Comments Off on Lightweight & Portable Egg-Shaped Drone Folds Up Into Shell

Posted in Creativity


CP+ 2016: Pentax K-1 past and present

28 Feb

With CP+ 2016 in full swing, we stopped by a very crowded Ricoh booth to get our hands on the hotly anticipated Pentax K-1 full-frame DSLR. During our visit, we couldn’t help but notice something very special hiding in the back – the original Pentax full-frame DSLR prototype from Photokina 2000. Take a look, as we take a peek at Pentax full-frame – both past and present. 

Articles: Digital Photography Review (dpreview.com)

 
Comments Off on CP+ 2016: Pentax K-1 past and present

Posted in Uncategorized


CP+ 2016: Nissin gets serious with radio-triggered flash solutions

28 Feb

CP+ 2016: Nissin Stand Report

Flash manufacturer Nissin offers some compelling alternatives to on-brand flashes, and they’ve recently updated their lineup with the announcement of the i60A, pictured in the middle here. The i60A features a Guide No. of 60 at at 200mm (ISO 100), which is more powerful than the company’s flagship Di700A, which has a GN of 54 under the same conditions. Impressive, given the flash’s overall smaller size. It also features High Speed Sync (HSS).

Possibly the most compelling feature of the i60A (and the flagship Di700A)? Integrated 2.4GHz radio wireless control in conjunction with the Air 1 commander and Di700A flash. Off-camera event flash photography’s best friend. They’re ergonomically fantastic as well. Read on as we dig a little deeper into these products.

CP+ 2016: Nissin Stand Report

The i60A is significantly smaller than the Di700A (illustrated in grey here) – Nissin’s flagship and the flash that introduced the 2.4GHz radio wireless control system. At only 98mm tall, the i60A is significantly smaller than the 140mm tall Di700A. It’s lighter too: 300g (without batteries) vs. the Di700A’s 380g. And yet it provides brighter flash output. Nice.

CP+ 2016: Nissin Stand Report

The i60A is Nissin’s second flash to work with the company’s 2.4 GHz radio wireless control system, meaning you can trigger it off-camera with the Air 1 commander (on right) or Di700A flash on-camera. It can even act as a radio trigger itself in commander mode. Radio triggering can be essential for fast-paced, unpredictable scenarios, like at a wedding reception or dance floor where objects might momentarily block off-camera flashes triggered optically or via infrared.

While Canon has had their own solution in the 600EX-RT flash and ST-E3-RT emitter, Nikon has only just recently announced their radio solution, and Sony has no such solution at all. Given the intuitive on-board control of manual power or auto TTL flash exposure bias on both the Air 1 commander and any flash units, the Nissin solution is quite attractive, even mandatory if you’re looking for radio-triggered flash on a Sony system.

CP+ 2016: Nissin Stand Report

So you’ve seen the Air R in a couple of photos now and are probably wondering what it is. It’s a receiver for Nissin’s 2.4GHz radio wireless control system, meaning you can attach it to flashes without radio control to have them join Nissin’s system. There are versions for Nissin, Canon, and Nikon flashes.

CP+ 2016: Nissin Stand Report

The Nissin i60A has a tiltable, rotatable head, capable of rotating up and down 90°, and left and right 180° in either direction. This is great for creating a softer bounce flash effect, either on or off-camera. The flash is powered by 4 AA batteries, which should provide 220 full power bursts.

Every version of the i60A helpfully comes with the ability to act as a Canon, Nikon, or Sony radio slave, triggered by an Air 1 commander. That means that you can have a Canon version of the Air 1, mounted to a Canon body, fire a Nikon version of the i60A off-camera. Cool.

CP+ 2016: Nissin Stand Report

Pictured here is the i60A in comparison to the Di700A. As we’ve said before, the i60A is significantly smaller. The downside? The i60A is missing the red AF assist beam. It does, however, have a small LED light that can be used for AF assist, though its far more annoying to subjects than a red assist beam.

Speaking of AF assist, it’s important to note that the Sony versions of these flashes can only fire AF assist beams on Sony Alpha SLT cameras, not Sony E-mount cameras. That means the assist beams are useless on the popular a7 and a6000-series cameras. We confirmed with Nissin that this is due to Sony E-mount cameras failing to send a signal over the hot-shoe connection when the shutter button is half-depressed. That’s a shame, because pros need focus ability in extremely low light conditions – the dance floor of a wedding reception, for example. I told Nissin we’d stress this with Sony, and their response was ‘please, please do’.

Sony: your move.

CP+ 2016: Nissin Stand Report

We mentioned favorable ergonomics earlier on, and here’s why. Take a look at the user interface of the Air 1 commander. You’ve got visual indicators for manual power and flash exposure compensation (TTL), for each group. It’s simple to use the dial to bias these. No menu digging. The Di700A has a similar display, though the i60A’s truncated display means it can’t show quite as much information. 

Articles: Digital Photography Review (dpreview.com)

 
Comments Off on CP+ 2016: Nissin gets serious with radio-triggered flash solutions

Posted in Uncategorized


7 Tips for Better Adventure Photography

28 Feb

Adventure photography has continuously become more and more popular for outdoor photographers, thanks to new technology in cameras, and the outlets of social media platforms like Instagram, that are very photography-friendly. You may have seen some posts that are routinely labeled as “epic” and want to know how to create the same awe-inspiring feeling in your own photographs.

The good news is you can! But, just like in other fields of photography, composition is extremely important when you want to start dabbling in epic scenes. Let’s look at some tips to help you start shooting better adventure photography.

1- Always have your camera on

PHOTO 1

Like a lot of photographers, you may suffer from battery anxiety, the fear that your battery is going to die and you’ll miss that one shot you’ve been waiting for your entire life. Well, when you constantly have your camera turned off, you’re probably going to miss more amazing split second shots, than if your battery died. That’s why you should always leave your camera on when you’re out shooting adventure photography.

Are you out hiking with your friends? Leave the camera on. What about spelunking in some caves? Leave the camera on. What if you’re zip-lining through a jungle canopy? First, leave your camera on, and then hold on to your camera tightly.

You won’t have to worry about battery anxiety if you properly pack, including extra batteries to take with you. Simply leave your camera on, never put your lens cap on, use a lens hood to protect the lens, and take a micro-fibre cloth to clean the lens. Your fear of the battery going dead should never stand between you, and freezing an adventurous moment in time.

2 – Put yourself in the frame

Adventure photography features people living their lives to the fullest, by placing them in amazing landscape scenes. But, what if you aren’t in nature with anyone else? I’m sure you’ve faced that dilemma before. Well, instead of feeling like all is lost, think outside the box and put yourself into the frame.

PHOTO 2

It may feel a bit strange at first to feature yourself in a photograph, but sometimes you have to do what you have to do,in order to get the shot! If you’ve never done this before, all you have to do is mount your camera on a tripod, and set it to the 10-second delayed timer. Once you press the shutter and the timer starts, get into position, and wait for the camera to do its thing.

You might want to also set your camera to take a series of shots once the ten second timer is complete, to be sure you get a suitable photograph. Many cameras have the option to use the timer, or one with continuous shots. Sometimes you might not get in place fast enough, but using a multiple shot sequence will allow you to have a couple more frames to get into position.

3 – Subject placement in adventure photography

Subject placement is extremely important in adventure photography. You want to feature your subject (the person out adventuring) in the landscape, without any distractions or limitations. Anyone viewing your adventure photograph should never be confused about where the subject is, or what they are doing.

It doesn’t matter whether your subject is close to the camera, or way off in the distance. What matters is their placement in space. So, when you’re inspecting a landscape, and trying to decide where to place your subject, always look for a solid color or a negative space to place them.

PHOTO 3

The people in the landscape will stand out against a solid color and negative space, to allow your audience to locate the subject immediately. The last thing you want when you show a photo, is someone trying to find your subject because they are right on the horizon line, or lost in a pattern of shadows.

Not only will placing your subject in negative space clearly reveal where and what your subject is, but it will also eliminate any boring spaces in the photograph’s composition.

4 – Choose a better perspective

Perspective, or point of view, in photography ia always important when you’re trying to show a scene more creatively. Think about it; everyone walks around all day seeing everything at eye level. So, if you want to show something differently, shoot a perspective that isn’t at eye level.

Getting lower to the ground gives your subject in adventure photography a larger than life feel. This is usually shot with a wide angle lens, to fit a low perspective foreground, and the landscape into one photograph. Low perspectives show the importance of a person or activity, more than the landscape surrounding them.

PHOTO 4

Higher perspectives feature the landscape more than the subject, making the natural elements of the frame seem larger than they actually are in reality. These points of view are usually used to look down on your subject, while allowing you to show more of a landscape as well.

5 – Show scale

Do you remember doing science projects in school where you’d have to collect photo evidence of your specimen, by placing a pencil or coin next to it to show its size? Well, that’s called scale. You use an object of a well-known size next to your find, to give your audience an idea of the actual size of the specimen shown.

You can actually do the exact same thing in adventure photography. Everyone knows the average size of a human. However, when you show a photograph of just a cliff, it’s difficult for someone to get a really good idea of how large the cliff actually is.

The solution is to incorporate a well-known average size (in adventure photography that would be a person) into the frame, so your audience is able to get a much better idea of how large and grand the landscape actually is. This is a tremendous composition technique to use whenever you feel absolutely dwarfed in nature.

PHOTO 5

6 – Think about using silhouettes

Silhouettes are another great technique that you can use in adventure photography. Whenever you’re stuck in a bad lighting situation, one that has too much dynamic range to be able to capture both your subject and the landscape in good light, go directly for the silhouette shot.

To use silhouettes effectively in adventure photography, place your subject on a solid line within the scene. This could be either a horizontal or a vertical line. For example, you could place your subject on a hiking trail, or on a vertical wall, while rock climbing. Next, compliment your subject by placing an interesting background behind them, such as a forest or sunset.

The key to an effective complementary background is to create a composition that features your subject first. This goes back to what you learned on subject placement in adventure photography. Never overpower the subject of the photograph by hiding them in a complementary background.

PHOTO 6

7 – Make your audience jealous

Lastly, make your audience jealous with your adventure photography. Compose an adventure photograph in a way that makes people want to go where you went, and do what you did. The overall goal of adventure photography is to get people outside, exploring new places.

Let your audience live vicariously through your photography. When you’re able to do that, you’ve definitely stepped up your adventure photography game.

PHOTO 7

So, by all means, get out and document your adventures!

Do you have any other adventure photography tips to share? Or perhaps some of your favorite adventure photography images? Please do so in the comments below.

googletag.cmd.push(function() {
tablet_slots.push( googletag.defineSlot( “/1005424/_dPSv4_tab-all-article-bottom_(300×250)”, [300, 250], “pb-ad-78623” ).addService( googletag.pubads() ) ); } );

googletag.cmd.push(function() {
mobile_slots.push( googletag.defineSlot( “/1005424/_dPSv4_mob-all-article-bottom_(300×250)”, [300, 250], “pb-ad-78158” ).addService( googletag.pubads() ) ); } );

The post 7 Tips for Better Adventure Photography by David Johnston appeared first on Digital Photography School.


Digital Photography School

 
Comments Off on 7 Tips for Better Adventure Photography

Posted in Photography


Let there be light: Photographing Yosemite’s elusive ‘Firefall’

27 Feb

$ (document).ready(function() { SampleGalleryV2({“containerId”:”embeddedSampleGallery_8698705739″,”galleryId”:”8698705739″,”isEmbeddedWidget”:true,”standalone”:false,”selectedImageIndex”:0,”startInCommentsView”:false,”isMobile”:false}) });

Once a year, photographers turn their lenses toward Yosemite’s Horsetail Fall and hope for the best. If the conditions are right, the waterfall will be transformed into a spectacle known as ‘Firefall’ as the mid-to-late February sun casts a blazing orange glow on the water – that is, if the water is flowing, and if the horizon isn’t too cloudy. And that’s not to mention the difficulty of nabbing a coveted spot in view of the falls, as well-informed photographers claim their spaces early in the day.

After years of drought, the falls in Yosemite are finally flowing this month and photographers like Taylor Gray have been able to capture the event with a lot of patience and a little luck. It’s quite the effort to put in to get the shot, but the results are truly spectacular. Read Gray’s recounting of capturing the magic moment at the falls over at Resource Travel. You might just want to book a trip to Yosemite this time next year…

Articles: Digital Photography Review (dpreview.com)

 
Comments Off on Let there be light: Photographing Yosemite’s elusive ‘Firefall’

Posted in Uncategorized


Something we’ve never seen before: LensRentals eviscerates the Fujifilm XF55-200mm F3.5-4.8R LM OIS

27 Feb

Into ‘the land of Fuji’

Roger and Aaron over at LensRentals have been tearing lenses down again. This week they’ve ‘eviscerated’ Fujifilm’s XF 55-200mm F3.5-4.8R LM OIS – the company’s mid-price tele zoom. The name may be redolent of a ‘$ 100 extra for a dual lens kit’ zoom but inside they found surprises at every turn. And not just with regards the number of screws holding the thing together.

The 55-200mm doesn’t have the fastest aperture range but it’s a fast-focusing, weather sealed telephoto zoom that we’ve always been impressed with. Fujifilm has often hinted that the X Series was partly an opportunity for its lens designers to show-off what they could do, so it’s probably to be expected that the designs are quite creative.

The system with the most screws

Having only broken a minor element of the lens in trying to open it up (something Roger didn’t want to embarrass Aaron by mentioning, so we shan’t dwell on it), they found the front section of the lens was held together with a lot more screws than usual. And, that many of these were screwed into metal inserts, rather than easily stripped or broken plastic columns. This turns out to be something of a recurrent feature of the 55-200, prompting Roger’s assertion that: ‘If you want the system with the most screws, you want Fuji, no question.’

Commenter helps Cicala find his orientation

Things got interesting when they dug a little deeper. Having removed the rear screws from their metal-inlaid holes, they discovered two sensors attached around the lens’s rear element. Since the element is static, Roger wasn’t clear what their role was and hoped that he’d be able to rely-on (and recognise) the wisdom of the crowd. He was right to, as pro photographer Trenton Talbot immediately guessed that they were gyroscopic sensors. A look at the way they’re orientated, relative to one another, along with a bit of Googling, suggests he’s right: they appear to be Epson gyro sensors, presumably feeding information to the lens’s stabilisation system.

The ‘R’ is for ‘by-wire’

Digging further into the lens revealed one of the few conventional parts of the 55-200mm’s design: the spring ball-bearings used to provide clicks as you turn the aperture ring. That ring being secured in place with screws, of course. It’s a similar approach to the one we saw in LensRentals’ tear-down of the Sony FE 35mm F1.4 a little while ago: the ring itself doesn’t directly drive anything, its movement is registered with a sensor, then sprung ball bearings are added to provide a stepped feel to the dial. Unlike the Sony, they can’t be disengaged.

Full metal barrel

A few loosened screws later, our intrepid duo found themselves facing a solid-looking metal zoom barrel, attached with three similarly solid ‘keys’ with which the zoom barrel transfers its motion to the mechanisms below. Cicala says he’s impressed with this level of construction on such a modestly-priced lens: another recurrent feature.

Fujifilm takes and eccentric path

Roger noted the ‘complex dance’ performed by the lens elements in Leica’s SL 24-90mm F2.8-4 when he tore that apart. That lens featured six helicoid paths that different elements trace as the lens is zoomed. That’s a $ 5000 lens. By comparison, the Fujifilm drives five groups in a similarly intricate optical shuffle, in a package you can pick up for one tenth of the cost.

Limited degrees of freedom

Down past the IS mechanism and carefully screwed-down aperture assembly, Aaron and Roger reached the focus element. There’s a sensor detecting the position of the focus group within the lens barrel then, on the group itself, what appears to be another one to detect the focus element’s position within the group’s housing.

But, wherever the focus element itself is, you can be fairly sure it’s not crooked: as Roger points out, the twin linear motors (10 o’clock and 2 o’clock in this image) and the rail along which the focus element moves (12 o’clock) are all broad, flat bars, rather than circular rods, meaning the element shouldn’t go askew as it races on its way.

Conclusion

Overall, Cicala says he’s impressed with the construction of the 55-200mm, especially given how much the lens sells for. He also seems pleased by the degree of optical adjustment that can be conducted on the lens, given the challenges of building lenses consistently. ‘This looks like a lens that was designed by people who know how to make reliable lenses,’ he concludes.

When ‘modern’ lens design is discussed, it’s often in terms of the use of Computer Aided Design to develop the optical formulae. But, just like the Sony FE 35mm, the Fujifilm shows an innovative approach to construction and focus drive. LenRentals ventured into the land of Fuji, ‘where things are done differently,’ with some trepidation but seem to have returned with a healthy respect for what goes on there, as well as a couple of screws that were probably supposed to stay there.

Articles: Digital Photography Review (dpreview.com)

 
Comments Off on Something we’ve never seen before: LensRentals eviscerates the Fujifilm XF55-200mm F3.5-4.8R LM OIS

Posted in Uncategorized


10 Ways to Use a 5-in-1 Reflector

27 Feb

ten-ways-to-use-reflectors-1803

In photography books, magazines, and websites, references to reflectors are often and many. They’re a quintessential tool for modifying light in just about every genre, and they’re an indispensable part of many photographers’ toolkits.

If you’re new to the idea of using reflectors, or new to photography in general, the problem with reflectors is that, although they seem self-explanatory in use, their effects can often be too subtle to be noticed if you lack experience using them. To combat this, and make the learning process easier, this article will give you examples of 10 common uses for a 5-in-1 reflector. It will also show you what the reflector is doing in each instance, as well as provide diagrams for you to repeat the exercise in your own time.

The best way to take full advantage of the information in this article, is to duplicate all of the following setups, using your own equipment and subjects. Once you understand the basics outlined here, you can start experimenting, and altering variables, to see how small changes can affect your images.

What is a 5-in-1 reflector?

5in1reflector


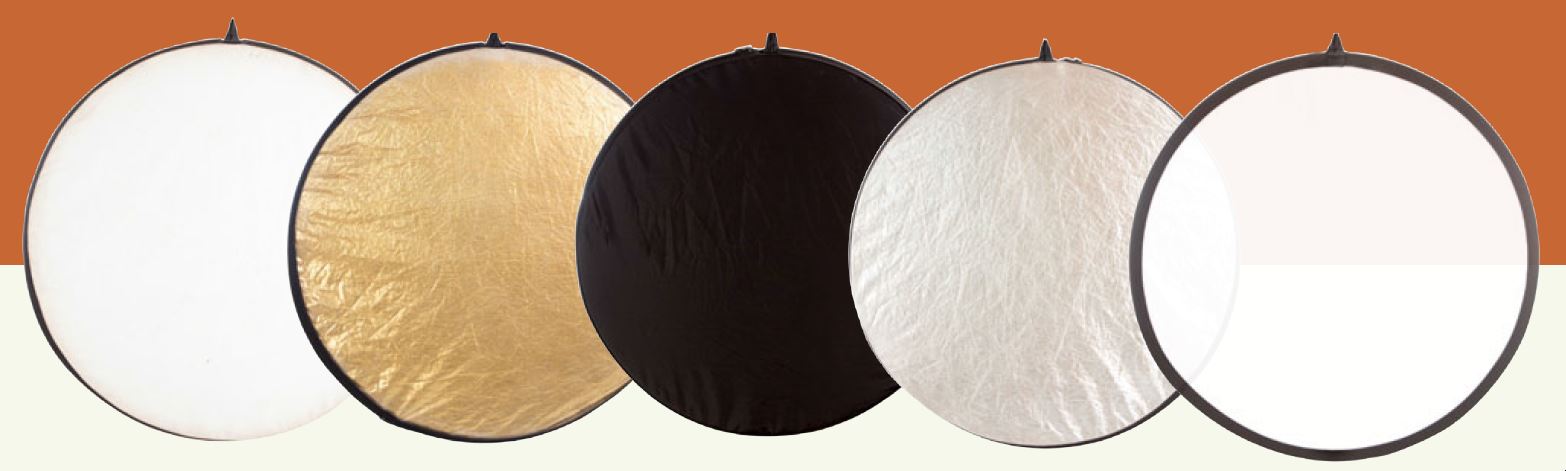
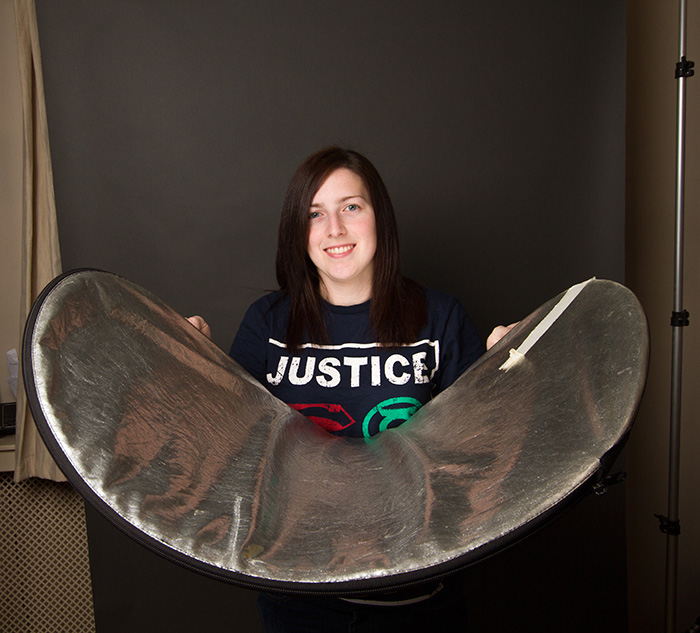
A 5-in-1 reflector is a nifty gadget that incorporates several different types of reflector, into one portable and easy to use package. These include white, silver, gold, black reflectors (or flag), and a diffusion panel.

05-westcott-photo-basics-reflector
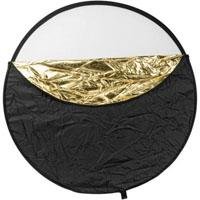
The way they are put together is that the four reflector sides are sewn into a sort of pouch, that fits around the diffusion panel; making a change to a different color as simple as unzipping it, removing the diffusion panel, turning the pouch inside out, and replacing it over the diffusion panel.

Clarifications

This article focuses on practical uses for 5-in-1 reflectors, but to use and understand them most effectively there a couple things to keep in mind.

Quality of light

When referring to the quality of light, this term has nothing to do with whether light is good or bad. The word quality refers to the physical properties, traits, or characteristics of the light. These properties include the softness or hardness, the shape, the color, and the intensity of the light.

A little confusing, I know, but it’s just one of the many quirks of the English language. If it helps, try to remember there is no such thing as good or bad light; only light more suitable for a different subject.

Softness, hardness and intensity

In terms of reflectors, it is important to understand how they modify your light.

Softness and hardness are affected by the apparent size of your light source. If you move your reflector closer to your subject, you get softer light. If you take it further back, you get harder light. The same applies to different sized reflectors. A larger reflector, at the same distance from the subject as a smaller one, will produce softer light, while the smaller one (in the same position) will produce harder light. However, if you put the larger one farther away from the subject, and the smaller one closer – they may become equal.

When swapping between the colors on your 5-in-1 reflector, from white to silver for example, the properties of the light you are altering are the color and the intensity. Providing that the reflector hasn’t moved, a silver and a white reflector will give the same softness/hardness of light. However, a silver reflector will reflect more light than a white one, thereby providing more intensity. Because of this, anytime you change out your reflectors, you will also need to alter your exposure settings.

Additionally, using a different colored reflector will change the color of the light and you may need to alter your white balance settings. The exception to this is when using a gold reflector which is often done to intentionally add a color cast to the image.

Exercises

Exercise One – white/silver on the side

ten-ways-to-use-reflectors-diagramA

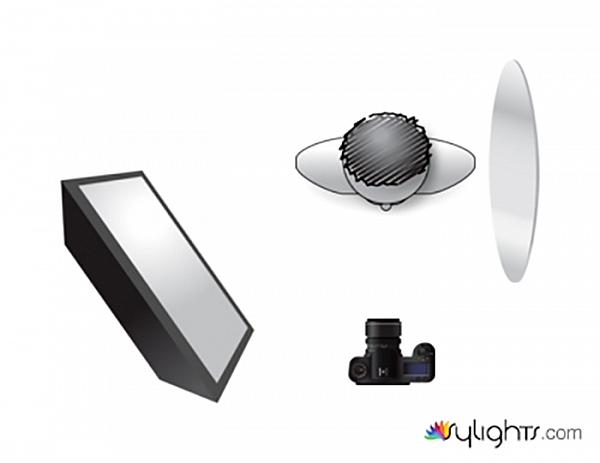
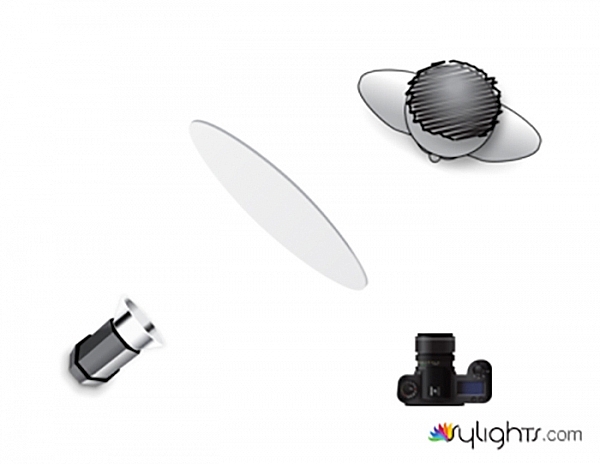
This first example may be the most common way to use a reflector. The light is illuminating the subject from camera left. This is causing dark shadows on the subject’s face at camera right. While these shadows can often be pleasing and acceptable, at other times you may choose to fill them in with additional light. This is where the reflector comes into play.

To do this, place your reflector, either silver or white, to the side and close to your subject, facing the light. This will fill in the shadows, brightening up the frame.

Note: You can also vary the intensity of the light reflected by moving the reflector toward, or away from the subject. Move it closer to brighten the shadows more, move it away to have less fill-light and darken the shadows.

ten-ways-to-use-reflectors-A

Left: without reflector. Right: with reflector

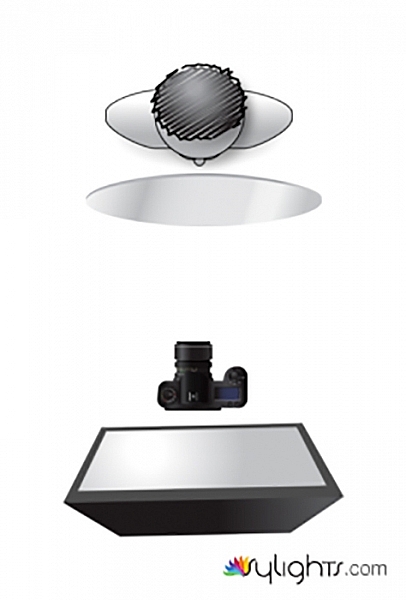
Exercise Two – white/silver from below

ten-ways-to-use-reflectors-diagramB

This setup is also very common, and is a slight variation on exercise one above. Here, the reflector is placed underneath your subject, and is filling in shadows from below.

ten-ways-to-use-reflectors-B

Left: no reflector. Right: with reflector.

Note: be very careful doing this on a subject that is heavy-set or has a double chin, as it will highlight that and make it stand out more – not overly flattering for them. You could also light up the nostrils so be conscious of that as well.

Exercise Three – white/silver bend it

You can also take advantage of a 5-in-1 reflectors lack of rigidity, by shaping it. This will allow you to mould your light, to fill in shadows that may not have been affected by a flat reflector. To do this, simply hold two opposite sides of your reflector and bend it inwards, thus creating a curved surface that will fill in shadows that a flat surface could not reach.

ten-ways-to-use-reflectors-diagramG

ten-ways-to-use-reflectors-1817

ten-ways-to-use-reflectors-G

Left: no reflector. Right: reflector in place bent to fit.

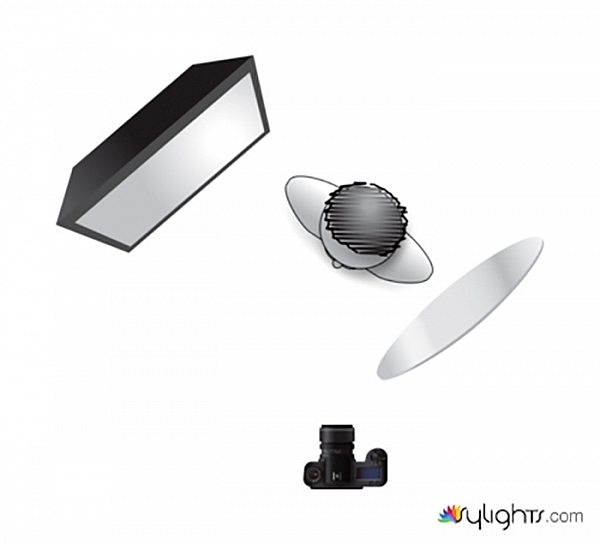
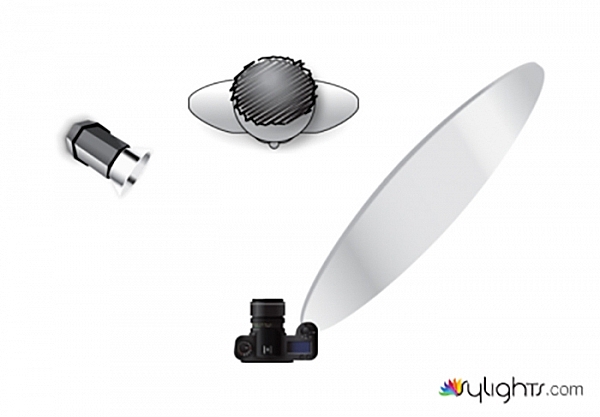
Exercise Four – white/silver

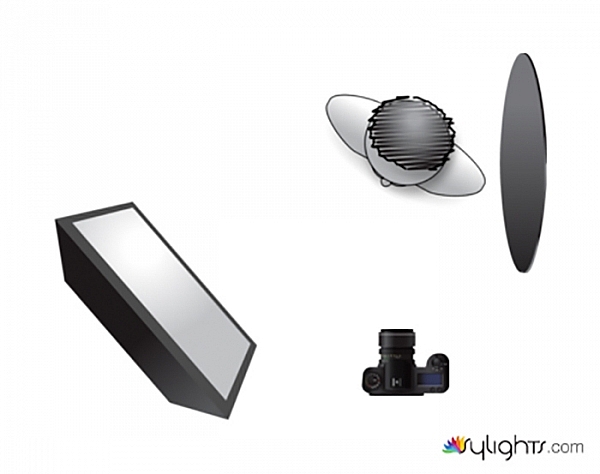
In this example, the light source is coming from behind the subject. The reflector is used parallel to the light source in order to bring detail into the heavy shadows caused by the backlighting technique. While it is possible to use this technique for portraits, it can be tricky. However, it comes into its own in food photography and other still life situations.

ten-ways-to-use-reflectors-diagramC

ten-ways-to-use-reflectors-C

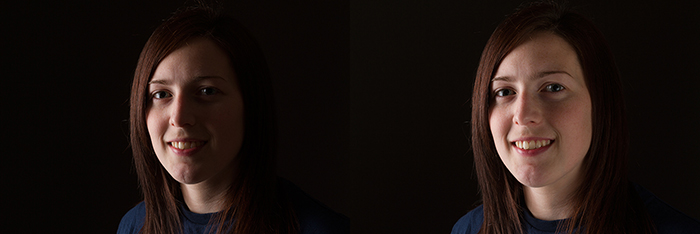
Left: no reflector with strong backlight. Right: with reflector.

Exercise Five – white/silver

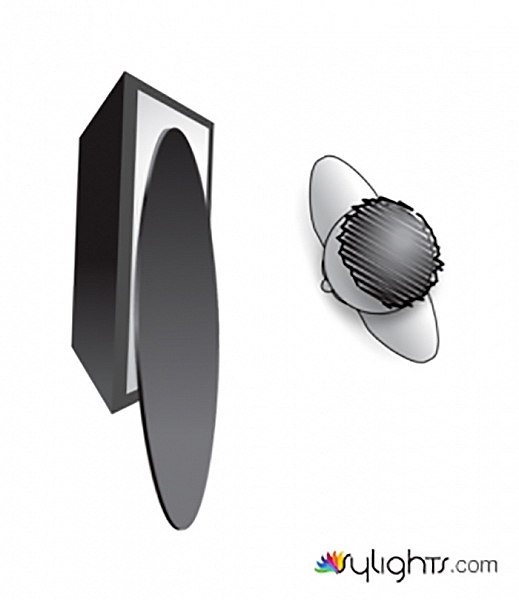
If your light source is small, and the light is too hard for the effect you are trying to achieve, 5-in-1 reflectors offer a few options to help you soften the light.

Here, instead of lighting your subject directly with the light source, bounce the light off of the reflector. Doing this effectively increases the size of your light source, thereby softening it. You will lose some of the intensity of the light doing this, and you will need to meter for the reflected light, rather than the output from your flash.

ten-ways-to-use-reflectors-diagramJ

ten-ways-to-use-reflectors-J

Left: direct, small light source. Right: light bounced off white reflector.

Diffusion

Exercise Six – diffusion panel

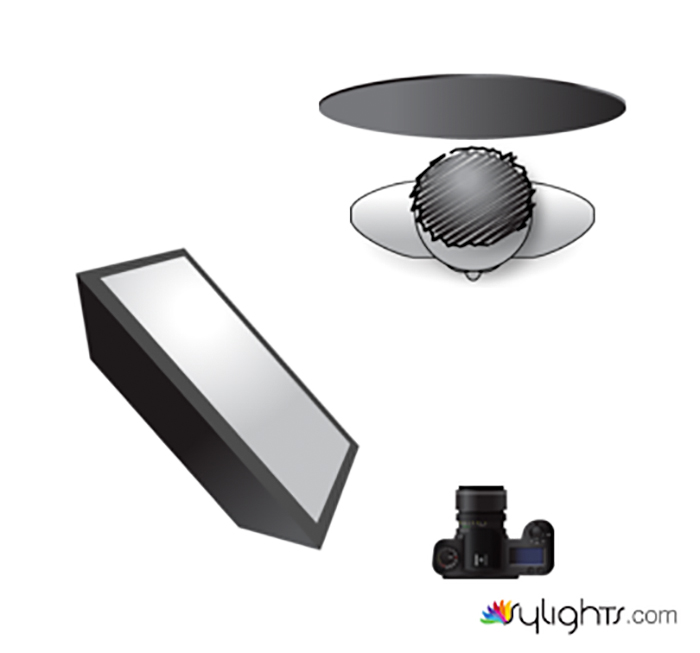
Another way to soften hard light with a 5-in-1 reflector, is to use the diffusion panel. Simply place the diffusion panel somewhere between your light source and subject, making sure that all of the light is hitting the reflector. Diffusion panels do come with an inherent loss of light. Many are designed to cut down two stops of light, but this will depend on your exact reflector. As such, you will want to calculate your exposure with the diffusion panel in place, before taking any images.

Where this technique really comes into its own, is that you can move the diffusion panel anywhere between your light source and the subject, without altering your exposure. This allows you to manipulate the shape and quality of your light in moments, without having to further alter your settings.

ten-ways-to-use-reflectors-diagramI

ten-ways-to-use-reflectors-I

Left no diffusion, small hard light source. Right with diffusion panel in place, softens the light.

Black reflector

Exercise Seven – black reflector or flag

For the first use of your flag, use it as you would a white or silver reflector, as in example one above. Doing this with the black side of your reflector will help to deepen, and intensify the shadows on your subject. This technique isn’t as common as the others, but it can be used to great creative effect.

ten-ways-to-use-reflectors-diagramE


ten-ways-to-use-reflectors-E-700

The difference is subtle but look at the shadows.


Exercise Eight – black reflector or flag

Instead of reflecting light, you can also use your flag to block, and shape the light in your scene. With the black side of the reflector facing your subject, hold it so that it obscures a large portion of your light source. This technique can be use in lieu of time consuming modifier changes, and can allow for some dramatic lighting effects without a great deal of equipment.

ten-ways-to-use-reflectors-diagramF

ten-ways-to-use-reflectors-F

Left: before. Right: after.

Exercise Nine – black reflector or flag

ten-ways-to-use-reflectors-diagramD

Another use for your flag is to use it as a background. You probably won’t do this very often, as it isn’t an ideal solution in most cases, but in a pinch you can get rid of messy backgrounds with ease.

ten-ways-to-use-reflectors-D

Gold reflector

Exercise Ten – gold

To be honest, you will probably never want to use a gold reflector. The effect, and the color cast they provide are often far too intense for most purposes. However, with judicious care, they can be used to provide a warm colored rim light. Here, the reflector is placed behind the subject and is reflecting light back onto her hair.

ten-ways-to-use-reflectors-diagramH

ten-ways-to-use-reflectors-H

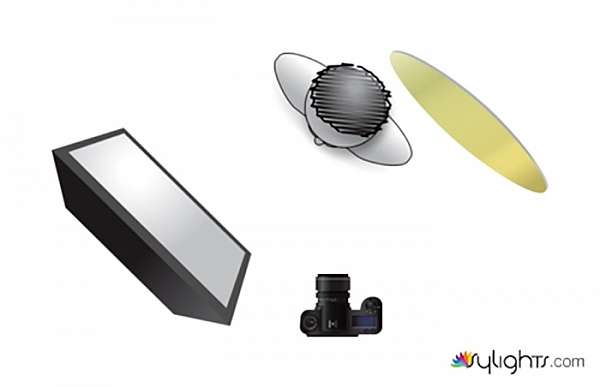
Left: before. Right: after. Notice the warm tone added to her hair, it’s very subtle.

Just the beginning

These 10 examples barely scratch the surface of what can be accomplished with a 5-in-1 reflector. However, by going through these exercises a number of times, with a variety of subjects, you will quickly begin to notice how reflectors modify light in a given situation. From there you will be able to employ them effectively in your photography. Do you have any other uses or tips for using one? Please share in the comments below.

googletag.cmd.push(function() {
tablet_slots.push( googletag.defineSlot( “/1005424/_dPSv4_tab-all-article-bottom_(300×250)”, [300, 250], “pb-ad-78623” ).addService( googletag.pubads() ) ); } );

googletag.cmd.push(function() {
mobile_slots.push( googletag.defineSlot( “/1005424/_dPSv4_mob-all-article-bottom_(300×250)”, [300, 250], “pb-ad-78158” ).addService( googletag.pubads() ) ); } );

The post 10 Ways to Use a 5-in-1 Reflector by John McIntire appeared first on Digital Photography School.


Digital Photography School

 
Comments Off on 10 Ways to Use a 5-in-1 Reflector

Posted in Photography


Winner Winner! See Who Won Our Game of Phones

27 Feb

We played a super fun round of Game of Phones on Twitter yesterday.

We tweeted out cards and you all replied. Scroll along to see the winners (and proud new owners of $ 50 Photojojo gift cards).

If you didn’t win, we’ve still got a prize for you – take $ 4.43 off of your very own Game of Phones with the coupon code AnswerEm, in honor of Luke’s texts. Who’s Luke? You’ll see …

(…)
Read the rest of Winner Winner! See Who Won Our Game of Phones (0 words)


© laurel for Photojojo, 2016. |
Permalink |
No comment |
Add to
del.icio.us

Post tags:


Photojojo

 
Comments Off on Winner Winner! See Who Won Our Game of Phones

Posted in Equipment


Winners of the Portfolio Website CMS Giveaway

27 Feb

A big thank you to all entrants of our recent portfolio website CMS giveaway. We were excited to see such a great response, you rock guys! We won’t drag things out any longer. Drumroll please… And the lucky winners of the MotoCMS giveaway are: 1st Place Winner – Wayne Johnson Prize: Full License for MotoCMS 3.0 “I’m Wayne a portrait Continue Reading

The post Winners of the Portfolio Website CMS Giveaway appeared first on Photodoto.


Photodoto

 
Comments Off on Winners of the Portfolio Website CMS Giveaway

Posted in Photography