RSS
 

Archive for April, 2015

Maternity Photography: Hot Pregnancy Trends

30 Apr

Isn’t it a wonder to see a new life being created inside you? It’s a miraculous tiny little being living in your belly for nine months, must be a terrific feeling to be living with! Many women say, pregnancy is a wonderful time that every woman must go through, and these days capturing this priceless time in good photos has Continue Reading

The post Maternity Photography: Hot Pregnancy Trends appeared first on Photodoto.


Photodoto

 
Comments Off on Maternity Photography: Hot Pregnancy Trends

Posted in Photography


MindShift creates bag range for action cameras and accessories

30 Apr

US bag manufacturer MindShift Gear has introduced a new range of bags and pouches aimed at the GoPro and action cam market. The GP series is made up of 10 individual cases that can be purchased individually or in three bundles of differing sizes. Read more

Articles: Digital Photography Review (dpreview.com)

 
Comments Off on MindShift creates bag range for action cameras and accessories

Posted in Uncategorized


Electronic Autopsy: 24 Sculptures Made of Computer Parts

29 Apr

[ By Steph in Art & Sculpture & Craft. ]

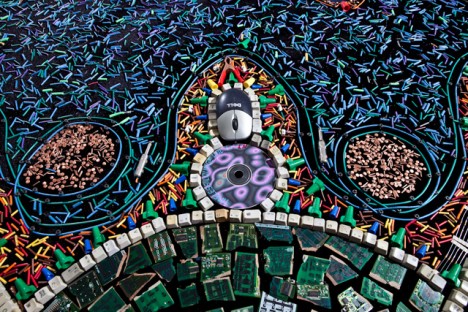
circuit art mandala 4

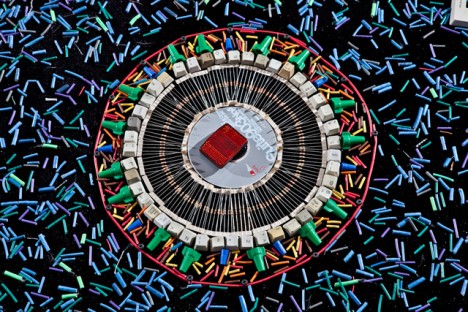
Art made of salvaged circuit boards and other computer parts put what is normally hidden on full display in a sort of autopsy of our consumerist society, highlighting how quickly the things we create become obsolete. Is our obsession with technology a sign of our achievements as a species, or a festering problem threatening to overtake the natural world? These artists are all working with unwanted components, but have different takes on the issue of electronic waste.

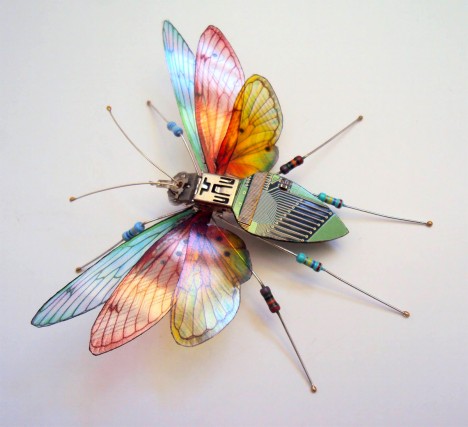
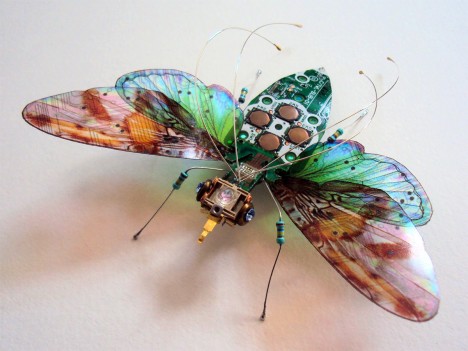
Computer Bugs by Julie Alice Chappell

circuit art insects 3

circuit art insects 2

CIRCUIT ART 1

Pesky metaphorical computer bugs are made literal when artist Julie Alice Chappell transforms reclaimed circuit boards from electronics into little winged insects. The project started when Chappell discovered a box of tiny electronic components at a ‘craft bank’ in Portsmouth, England, instantly seeing the bodies and legs of bugs. Chappell hopes her work will raise awareness about the problem of electronic waste.

Technological Mandalas by Leonardo Ulian

circuit art mandalas 3

circuit art mandala 5

circuit art mandalas 2

circuit art mandala 4

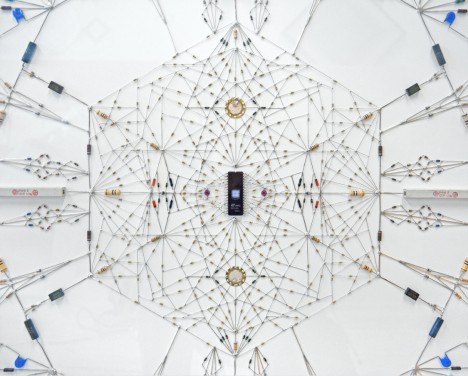
Circuitry and microchips come together into intricately arranged, perfectly symmetrical mandalas in the work of London-based artist Leonardo Ulian. “With the Technological Mandala series I combined the suggestive and spiritual meaning of the Indian Mandalas with something that has been perceived as far from that sphere of influence, technology,” says Ulian. “The search of perfection as necessity within the electronics industry has stimulated my curiosity to produce this series of pieces in order toe locate that specific need. I wanted to show what has been hidden from the eyes of the consumer, representing electronic circuits as extraordinary objects where the perfection of the design can become almost something ethereal.”

Ornate Rug Made from Computer Parts by Federico Uribe

circuit art rug 1

circuit art rug 2

circuit art rug 3

You won’t be getting too comfortable on this particular rug by Federico Uribe, which consists of thousands of tiny, sharp electronic components. The mixed-media piece, which mimics the patterns on traditional Persian carpets, measures 22 by 12 feet. Uribe specializes in making art from unwanted ‘waste’ objects as well as everyday items found in the home.

Next Page – Click Below to Read More:
Electronic Autopsy 24 Sculptures Made Of Computer Parts

Share on Facebook


[ By Steph in Art & Sculpture & Craft. ]

[ WebUrbanist | Archives | Galleries | Privacy | TOS ]


WebUrbanist

 
Comments Off on Electronic Autopsy: 24 Sculptures Made of Computer Parts

Posted in Creativity


29. April 2015

29 Apr

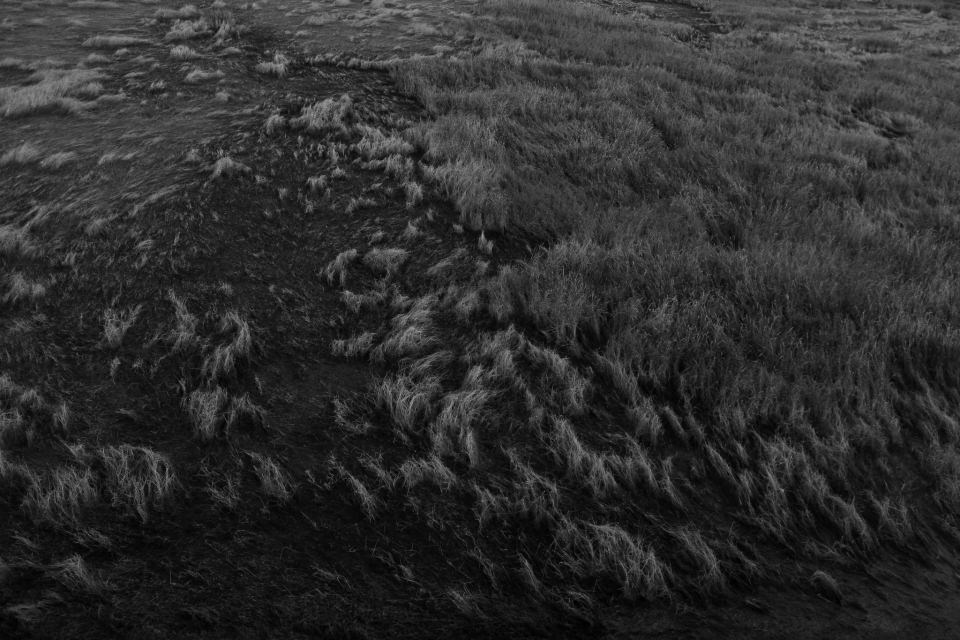
Das Bild des Tages von: Melf Mayer

Dunkle Graslandschaft, vom Wind verweht.

Im Ausblick: Zwillingsmädchen, Smartphone-Fotografie und eine Gasse in Norwegen.
kwerfeldein – Fotografie Magazin | Fotocommunity

 
Comments Off on 29. April 2015

Posted in Equipment


12 Tips for Mastering the Clone Stamp Tool in Photoshop

29 Apr
Clone Stamp Tool - Opera Garnier shot

You will not often find the stairs of Opera Garnier in Paris free of people, so you will need to put the Clone Stamp tool to work to remove the people if you want a clean picture. This applies at many other tourist destinations as well.

There are a lot of good post-processing tools available for making minor edits to your photos. Within Photoshop, there are the Healing Brush and the Spot Healing Brush tools. Lightroom now has its own healing brush. Those are great for minor edits to your photos like removing spots or power lines. When it comes time for serious, intensive surgery on your photos, however, there is no substitute for the Clone Stamp tool. You will only find this in Photoshop and Photoshop Elements, there is no Lightroom substitute.

Getting started with the Clone Stamp tool is simple. You just have to tell Photoshop two things: (1) where you want to replace the pixels (target area), and (2) from where Photoshop should take the pixels to use as replacements (s0urce area). To use the Clone Stamp tool, just follow these steps:

  1. Select the Clone Stamp tool from the tool bar on the left side of your screen (you can also use the keyboard shortcut S). Once selected, set the brush size and hardness.
  2. Put your cursor in the area where you want to change the pixels.
  3. Select the source area: Press the Alt key (your cursor will now become a target) and move your cursor to the location where you want to take pixels from (source area). Click your mouse in that location.
  4. Paint in the target area: Release the Alt key and move your mouse back to the original location. Hold down the mouse button and paint in the pixels from the location you chose.

That is a simple process, but if you have used the Clone Stamp tool you realize that there is a lot more involved if you want to master it. This article will provide you with some tips to move you along the road towards conquering this important tool in Photoshop.

#1 – Work on a New Layer

First, always create a new layer before making changes with the Clone Stamp tool. Any changes you make should be made on the new layer. You can flatten the image when you’re done.

Why should you do this? There are many reasons. First of all, it is non-destructive – meaning you are not changing the underlying pixels of your image. In addition, when you use a layer, you can delete it if you don’t like where the changes are going. You can also create a mask if there are portions of the changes that you decide later you do not want. Finally, you can target adjustments to just the cloned areas if they are on a new layer (as will be shown below).

Creating a new layer is easy; simply press Ctrl+J (Cmd+J on Mac) to create a duplicate. You can also press Shift+Ctrl+N (Shift+Cmd+N on Mac) to create a new blank layer, but if you do so, make sure that you have “All Layers” selected as your source in the Clone Stamp Tool settings.
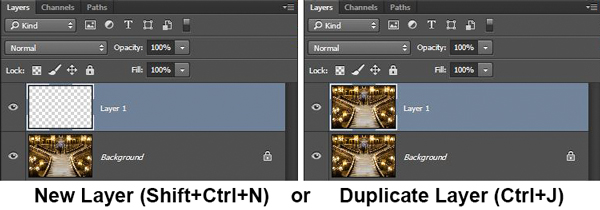
Clone Stamp Tool - Work on a New Layer

I prefer working on a new layer (as opposed to a duplicate layer) but either way will work.

#2 – Zoom in (way in)

When working with the Clone Stamp tool, zoom in on the area you are working on. In fact, zoom way in (to 100% even). That will help isolate the area you are working on, and importantly, it will also allow you to work at a much greater level of detail than you otherwise would. Make your changes look as good as you can at this higher level of detail, then when you zoom back out, the changes will be indistinguishable (which is what you want).

A shortcut for zooming quickly is to hold the Alt key with your left hand while using the scroll wheel on your mouse to zoom in and out (or use Cntrl/Cmd and the + or – key on the keyboard). That will allow you to move in and out quickly.

#3 – Set Your Brush Size Quickly

You will change your brush size often when working with the Clone Stamp tool. You should do this often to make sure that your brush size is tailored to the change you are making. Changing the size through the Brushes panel is cumbersome. Instead, use the keyboard shortcuts for changing brush size:

  • Left bracket [ makes brush smaller
  • Right bracket ] makes brush larger

Using these keys will allow you to rapidly tailor your brush to the specific circumstance.

#4 – Set the Proper Brush Hardness

The Clone Stamp brush’s edges can be set to whatever hardness you desire. Hardness determines the level to which the cloning will blend in with the surrounding pixels. If you set the hardness level more toward 100%, the edges will be hard and definite. If you set the hardness more toward 0%, the edge will blend in with the surroundings.

Clone Stamp Tool - Setting Hardness of Brush

In general, keep the hardness level at 0%. That will help you seamlessly blend in the effect. There will be times, however, where you are working near a defined edge, in which case you should increase the hardness. Even then around 50% will usually do. Setting the hardness any higher creates harsh transitions that are dead giveaways to your use of the Clone Stamp tool.

#5 – Clone Without Adjustments

Do your cloning before making other adjustments to contrast, color and other changes often made via adjustment layers in Photoshop. If you use the Clone Stamp tool after creating those layers, you are baking the changes permanently into your picture when you clone.

Clone Stamp Tool - Adjustments

However, in some cases you will have already made changes on an adjustment layer, and you need to decide whether your cloning should include those adjustments. Photoshop lets you decide whether to include those changes in your cloning. After you have selected the Clone Stamp tool, the top row of your screen will include a circle with a line through it (see graphic above). Photoshop defaults to applying the changes of any adjustment layers, but if you click on this icon, Photoshop will ignore any adjustment layers when cloning.

#6 – Grab the Low Hanging Fruit

Most of the time your pictures will have some easy items to clone out, as well as some harder things. Clone out the easy ones first. In addition to giving you confidence in the tool, this will also help you when the time comes to make the hard changes.

How will that help you? Remember that you need clear space from which to draw pixels when using the Clone Stamp tool. By making the easy changes first, you are doing just that so you can draw replacement pixels and will make your job easier when it comes time for the harder, more in-depth changes.

#7 – Watch for Patterns

Sometimes you want to include patterns in your cloning. In that case, when selecting pixels from which to draw, try to find patterns in your picture that match the area you are replacing. For example, if the background is a building, look for a similar building. Then make them match (which will be the subject of the next tip).

Clone Stamp Tool - removing distractions without creating a pattern

Here is a different example to show the Clone Stamp tool in another context. The right side of this image was filled with distractions, but the Clone Stamp tool eliminates them. Be careful that you do not create patterns by using pixels immediately adjacent, or it will give away your use of the Clone Stamp tool

But many times you will not want there to be any discernible patterns in your cloning. Usually a pattern is a dead giveaway to your having cloned something out. In that case, the way to ensure that there will be no patterns is to keep resetting your source point. Sample from one area and clone one part, then sample from another area – repeat frequently. Keep doing that to blend everything together without repeating a pattern.

#8 – Follow the Lines

A key to successful use of the Clone Stamp tool is making all the lines in your picture match. Even slight deviations look fake and destroy the effect you are trying to achieve. For example, in a landscape setting make the edges of tree branches match up. In an urban context, follow lines in buildings such as roof lines, doorways, and patterns on the ground.

When you are using the Clone Stamp tool, start with the lines and then let the rest of the pixels fall where they may. After that, if you need to go back over other areas, you can do so.
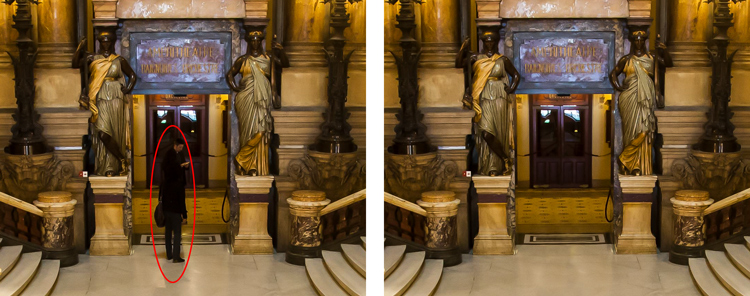
Here I've zoomed in on a portion of another shot of the Opera Garnier. Use the patterns on the floor and door to recreate the space where you clone over the people.

Here I’ve zoomed in on a portion of another shot of the Opera Garnier. Use the patterns on the floor and door to recreate the space where you clone over the people.

#9 – Avoid Selecting from Adjacent Areas

As previously mentioned, a dead giveaway of Clone Stamp tool usage is repetition. The Clone Stamp tool is all about repetition – you just need to do it in such a way that the viewer doesn’t notice it. If you draw pixels from an immediately adjacent area, you are risking the viewer noticing the repetition. Take the pixels from somewhere else in the picture instead.

Inadvertently creating a pattern is an easy trap to fall into because the immediately adjacent areas usually are the closest in color and tone to the area you want to replace. As you move further away, tones and colors change so that the pixels get harder to match. Working hard to find a way to use pixels from somewhere else in your picture will pay dividends because the viewer won’t see the repetition.

#10 – Muddle Through (accept the messiness)

By now you have fixed all the easy areas in your picture and you’re ready to tackle a bigger problem. It might be a crowd of people or a car that entered your frame, but it is a large area of your picture. This is the scary part of using the Clone Stamp tool.

The key is to just dive in. Don’t try to figure it all out beforehand (you never will). You can do this in a couple of different ways:

  1. Go big first: Set your brush a little larger than you might otherwise use and just replace the entire area in one fell swoop (and then clean up with a smaller brush), or
  2. Go small and steady: Stick with the smaller brush and paint in gradually, but the key is to keep going. Remember that you can go over it again. Whatever you are doing, while it is probably not perfect, will undoubtedly look better than what you started with.

The key thing is just to do it. There is a tendency to freeze up and plot the entire change before doing anything, which causes you to stare at the computer screen for long periods of time.

Remember, you can always undo what you’ve done (Ctrl/Cmd+Z). In addition, because you followed tip #1 above and are working on a new layer, you can always mask this area off or delete it if it isn’t heading in the direction you want.

#11 – Use the Mirror Function

You can affect a lot of settings involving the Clone Stamp tool in the Clone Source panel (to see it, go to Window and then click on Clone Source). For instance, you can change the shape of the brush or the angle of the replacement pixels.

One of the most useful features in the Cone Source panel is the flip-horizontal option in the middle of the panel. If you click on it, the pixels will be replaced in the opposite horizontal direction as the source. This can be extremely useful in many instances since often you will be dealing with a symmetrical subject where you can now draw from the other side.
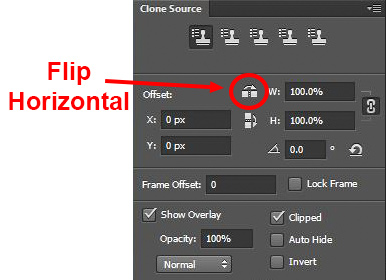
Clone Stamp Tool - Flip Horizontal setting

A typical example where you might want to use the flip horizontal option is where something covers one side of a doorway or window that you want to remove. By clicking on flip-horizontal, you can use the other side of the doorway or window as your source. Take another look at the Opera Garnier examples above and you will see how the flip horizontal tool would be used quite frequently whenever your picture contains any symmetry (I used this feature in those pictures quite a bit).

#12 – Change the Cloned Areas with Adjustment Layers

Sometimes your cloned areas just won’t look exactly like the surrounding areas. Perhaps it is too bright or too dark, or perhaps the colors are just off a little bit. You can fix it without affecting the surrounding pixels.
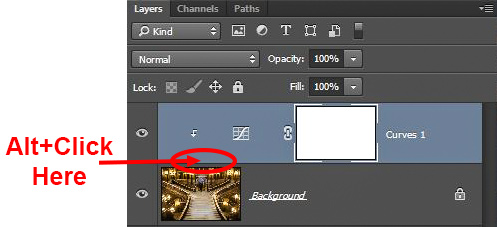
Clone Stamp Tool - tying adjustment layers

One of the great benefits of working on layers is that you can create adjustment layers that affect only the areas you just cloned. Simply create a new adjustment layer (levels, curves, or hue/saturation), which will appear above your cloning layer. Then hold down the Alt key and click at the bottom of the adjustment layer (you will see your cursor change). Doing so will apply the changes of the adjustment layer only to the layer below it.

Conclusion

Remember that using the Clone Stamp tool can be a messy process. Don’t worry if you find yourself having to redo changes or make things up as you go. There is no magical “clean” process. One of the fun parts about the cloning process is the problem-solving that goes into it. Take your time and just keep moving. You can always redo your changes or, if you are working in layers, get rid of them without losing the rest of your work.

The Clone Stamp tool will save more pictures than almost any other tool in your post-processing. If you master it, you can remove almost anything in your pictures that you do not want.

googletag.cmd.push(function() {
tablet_slots.push( googletag.defineSlot( “/1005424/_dPSv4_tab-all-article-bottom_(300×250)”, [300, 250], “pb-ad-78623” ).addService( googletag.pubads() ) ); } );

googletag.cmd.push(function() {
mobile_slots.push( googletag.defineSlot( “/1005424/_dPSv4_mob-all-article-bottom_(300×250)”, [300, 250], “pb-ad-78158” ).addService( googletag.pubads() ) ); } );

The post 12 Tips for Mastering the Clone Stamp Tool in Photoshop by Jim Hamel appeared first on Digital Photography School.


Digital Photography School

 
Comments Off on 12 Tips for Mastering the Clone Stamp Tool in Photoshop

Posted in Photography


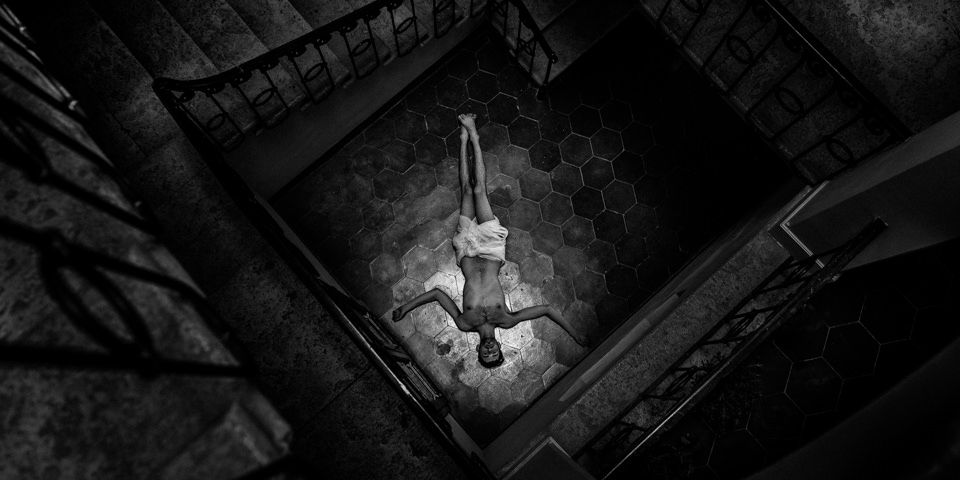
Sündhafte Heilige

29 Apr

Ein Mann liegt am Boden eines Treppenhauses

Ich bin der Sohn eines muslimischen Vaters und einer streng christlichen Mutter. Die christliche Seite sollte die prägende sein. Aufgewachsen bin ich mit einem beschränkten Weltbild, in einem Käfig aus Moral und Gehorsam. Ich nannte eine Welt mein Zuhause, die mir heute fremd ist und für die ich mich schäme.
kwerfeldein – Fotografie Magazin | Fotocommunity

 
Comments Off on Sündhafte Heilige

Posted in Equipment


Special Special Sale!

29 Apr

Oh yes, a doubly special sale is here.

Some of our biggest discounts ever on never before seen treasures and PJ goodies from the days of ‘yore.

We’ve even thrown in some brand new items with less than perfect packaging. Poor things were feeling like Misfit Toys, but we’ve seen enough claymation movies to know that they’re not misfits … they’re extra special!

Get Yourself a Special Something
(…)
Read the rest of Special Special Sale! (0 words)


© Erin for Photojojo, 2015. |
Permalink |
No comment |
Add to
del.icio.us

Post tags:


Photojojo

 
Comments Off on Special Special Sale!

Posted in Equipment


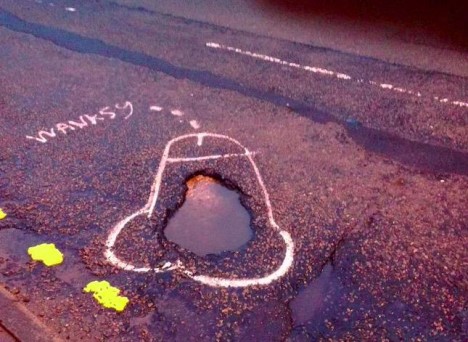
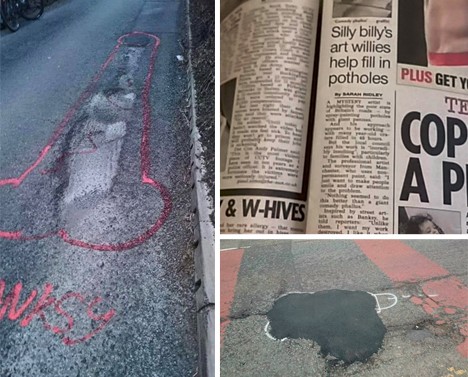
Wanksy: Phallus Graffiti Draws Attention to Dangerous Potholes

29 Apr

[ By WebUrbanist in Art & Street Art & Graffiti. ]

wanksy pothole street art

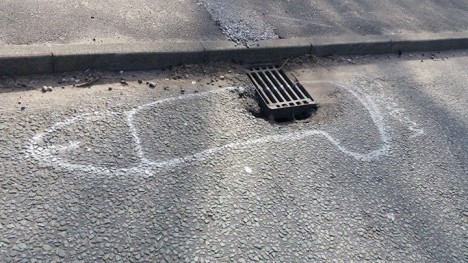
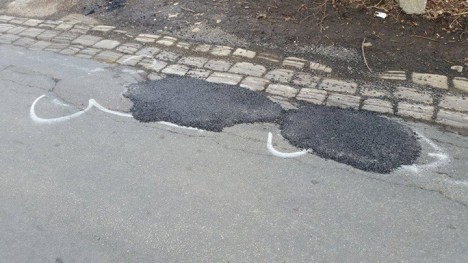
In a quest to evoke a faster fix from city authorities, a lone street artist going by the name Wanksy is highlighting holes in the ground with (NSFW) spray paintings sharing one thing in common: the rough but instantly recognizable shape of a phallus.

penis pothole filler art

Like Hanksy, Wanksy is a play on Banksy, a world-renowned art activist. Found all around Manchester, England, Wanksy’s penis-shaped pothole sketches are perhaps crude but they serve more than one point. First, they provoke public calls to officials to clean them up while also filling in the holes. Second, but equally important for the safety of the artist, the phallus represents an easy-to-draw figure that can be sketched quickly with less risk of getting hit bye a vehicle. Third, the rough markings serve as interim warnings to drivers who might not see a water-filled hole at night.

wanksy street artist

Though the paint washes away over time, making these temporary, this response from a local council member shows that the powers that be are not particularly amused: “Has this person, for just one second, considered how families with young children must feel when they are confronted with these obscene symbols as they walk to school? Not only is this vandalism, but it’s also counter-productive. Every penny that we have to spend cleaning off this graffiti is a penny less that we have to spend on actually repairing the potholes.”

wanksy road penis street art

wanksy filled pothole

The notion of highlighting or filling in potholes by activists takes many forms beyond this novel approach, including a Chicago tile artist who fills in holes with mosaics, a guerrilla gardener who plants pansies in these street voids and even a pothole robin hood who steels asphalt from the city to fill in gaps with his own work and time. In the grand scheme, one could argue that this newest contributor is somewhat juvenile, but if it solves a real-world urban infrastructure problem, it is hard not to smile at least a little at his attempt to lighten the mood while fixing city streets.

Share on Facebook


[ By WebUrbanist in Art & Street Art & Graffiti. ]

[ WebUrbanist | Archives | Galleries | Privacy | TOS ]


WebUrbanist

 
Comments Off on Wanksy: Phallus Graffiti Draws Attention to Dangerous Potholes

Posted in Creativity


Massive $33,500 2450mm f/8 NASA lens surfaces on eBay

29 Apr

If $ 180,000 seems a bit steep for the Canon 1200mm f/5.6L lens B&H is currently offering in its used department, then perhaps this $ 33,500 NASA 2540mm f/8 lens on eBay sounds a bit more reasonable. That’s twice the focal length for a fifth of the price! Read more

Articles: Digital Photography Review (dpreview.com)

 
Comments Off on Massive $33,500 2450mm f/8 NASA lens surfaces on eBay

Posted in Uncategorized


5 Tips for Geting Sharper Images When Doing Long Exposures

29 Apr

Long exposure photography makes it possible to show the passage of time in a still photograph. It does this by blurring moving elements and sharpening the static parts. But there is a downside to long exposures – any camera movement blurs the static elements. Here are four simple ways you can prevent unwanted blurring.

Salt Lake Sunset at Mandurah

1. Use a Good Tripod

For very short exposures there are ways to hold yourself and your camera steady, like: How to Reduce Camera Shake – 6 Techniques. However, when you’re taking an exposure of a few seconds, you need something steadier than your hands to hold your camera. You may set the camera on a table, or a rock but risk dropping the camera or accidental movement that can ruin your shoot.

The most common way is to put it on a sturdy tripod. You have to get at least a decent tripod as El Cheapo tripods are going to give you camera shake too.

Light Trail Central

2. Use a Remote Shutter Release

Even with a tripod the act of snapping the shutter can cause the camera to shake. There are a couple of ways to combat this problem.

One is to set the delay on the camera (2-sec timer) so any movement is done by the time the shutter snaps. The other is to get a remote shutter release.

Remotes can be connected to the camera by a cable or wireless – either one snaps the shutter without shaking the camera. They are also called remote cable releases. This is a small and cheap accessory which can help you get rid of camera shake.

Rockingham Sunset

3. Use Manual Focus

Autofocus is a wonderful thing. Most of the time it does exactly what you want, making it easier to take great photos. But there are times, especially when shooting long exposure, that it can have the opposite effect.

In low light situations autofocus has trouble finding something to focus on. Even when it seems focused it can readjust when the shutter is snapped. Using ND filters can cause the same problem.

Light Trail IFC

Fortunately, there is a simple solution. When shooting in low light you can use manual focus, or use a flashlight for focusing and once the focus is set, turn autofocus off so it won’t change once the light is off.

For ND filters set the focus manually (either before or after mounting the filter) or autofocus first, turn it off and mount the filter. The shot will stay focused, the picture sharp.

Moving Cloud Sunrise at Kings Park

4. Lock the Mirror Up

If you are using a DSLR camera – and you probably are since you are shooting long exposure – it has a mirror that reflects the image from the lens to the viewfinder. It is between the lens and the camera sensor, so it has to move before the shutter snaps.

That small movement causes vibration. When you turn on the mirror lockup it turns the shutter button into a two stage button. The first click lifts the mirror and the shutter doesn’t open until the second click. The time between the two clicks allows the vibration of the moving mirror to stop.

Light Trail Hong Hum

5. Use Your Aperture Sweet Spot

Closing down the aperture can make you shoot longer. However, when your aperture is too small, it will start to have a diffraction effect which lowers the sharpness.

In most lenses, the sweet spot of the lens aperture is between f/5.6 to f/8. In other words, you will get the sharpest images when using this range.

When you step down to f/16 or smaller, you will get images like that seem out of focus. You can learn the physics about diffraction in the below video by Steve Perry:

Conclusion

Taking long exposure photographs is a science and an art. Like any art, taking long exposure pictures with the right balance of sharpness and blur takes both skill and intuition. These five tools will help you use your skills to turn intuition into great photographs.

googletag.cmd.push(function() {
tablet_slots.push( googletag.defineSlot( “/1005424/_dPSv4_tab-all-article-bottom_(300×250)”, [300, 250], “pb-ad-78623” ).addService( googletag.pubads() ) ); } );

googletag.cmd.push(function() {
mobile_slots.push( googletag.defineSlot( “/1005424/_dPSv4_mob-all-article-bottom_(300×250)”, [300, 250], “pb-ad-78158” ).addService( googletag.pubads() ) ); } );

The post 5 Tips for Geting Sharper Images When Doing Long Exposures by Kevin Choi appeared first on Digital Photography School.


Digital Photography School

 
Comments Off on 5 Tips for Geting Sharper Images When Doing Long Exposures

Posted in Photography