RSS
 

Archive for April, 2014

Improve Your Images with the Lightroom Graduated Filter Tool

30 Apr

Using the Graduated Filter in Lightroom

The Lightroom Graduated Filter is a versatile tool for making local adjustments to your photos. Don’t be fooled by the name – it may be named after a type of filter used for making skies darker in landscape photography, but its uses go far beyond that.

Before we look at how you can use the Graduated Filter tool to improve your images, you may want to think about the style in which you’d like to process the photo. What is your ultimate aim? My article Finding and Achieving Your Style in Lightroom will give you some advice on figuring that out. Once you know what you want to do, the rest falls into place.

How to use Graduated Filters

Using the Graduated Filter in Lightroom

This is how you apply a Graduated Filter in Lightroom

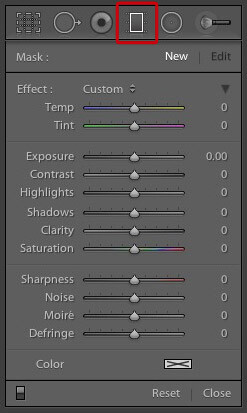
1. Click on the Graduated filter icon underneath the Histogram (the keyboard shortcut for it is “M”). The Graduated filter panel opens up beneath, revealing the sliders that you can adjust.

2. Hold the left mouse button down and drag the mouse across the image to place the Graduated filter. In this example I held the mouse button down while I dragged to create a wide Graduated Filter. There is a lot of space between the lines making up the filter, indicating that it will create a smooth graduation.

Using the Graduated Filter in Lightroom

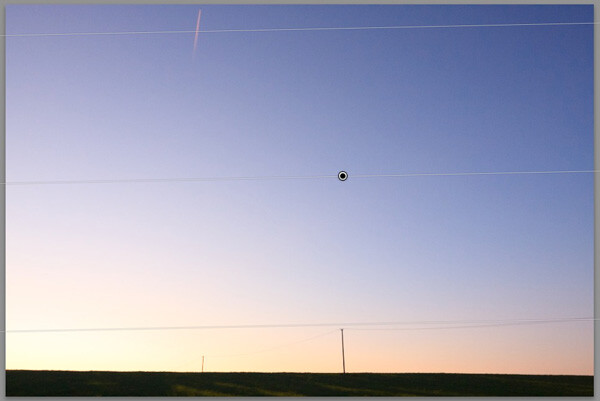
3. If you let go of the mouse button early, you create a narrow Graduated Filter that gives a harder graduation. Drag the pin to position the Graduated Filter where you need it.

Using the Graduated Filter in Lightroom

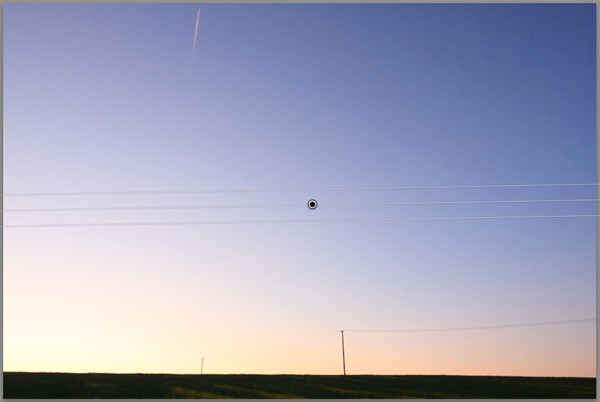
Here, I set Exposure to -4.0 to show you the difference between the two types of Graduated Filter:

Using the Graduated Filter in Lightroom

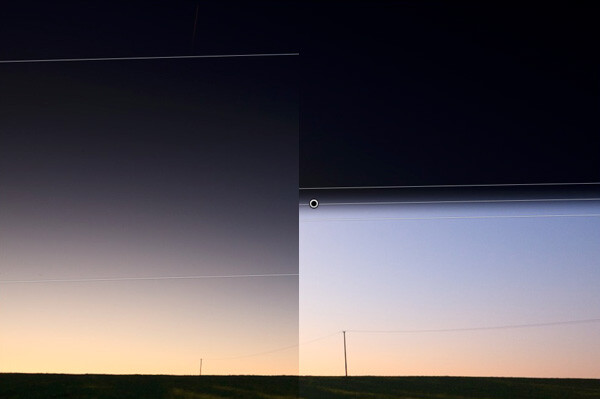
This illustration shows the difference between creating a wide Graduated Filter (left) and a narrow one (right). Experiment with both to see how they affect your photos.

Now you know how to use the Graduated Filter tool, here a few ways you can make your photos better with it.

Note: you can reposition the placement by dragging the pin, or widen the gradation any time even after applying the filter. Just reactivate it, select it (the dot will be black) and adjust. To adjust the gradation just hover the mouse over one of the edges, click to grab it, hold down the mouse button and pull to widen or narrow the spread. 

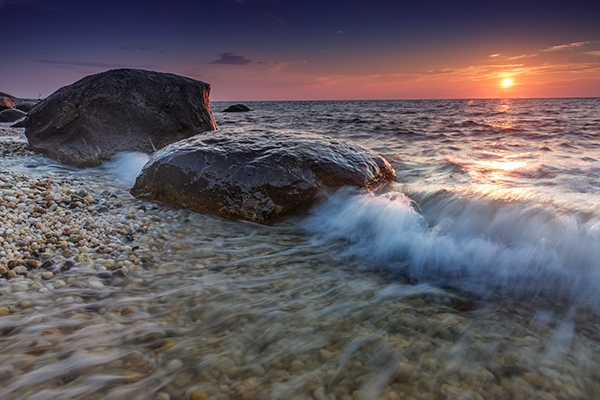
1. Making skies darker

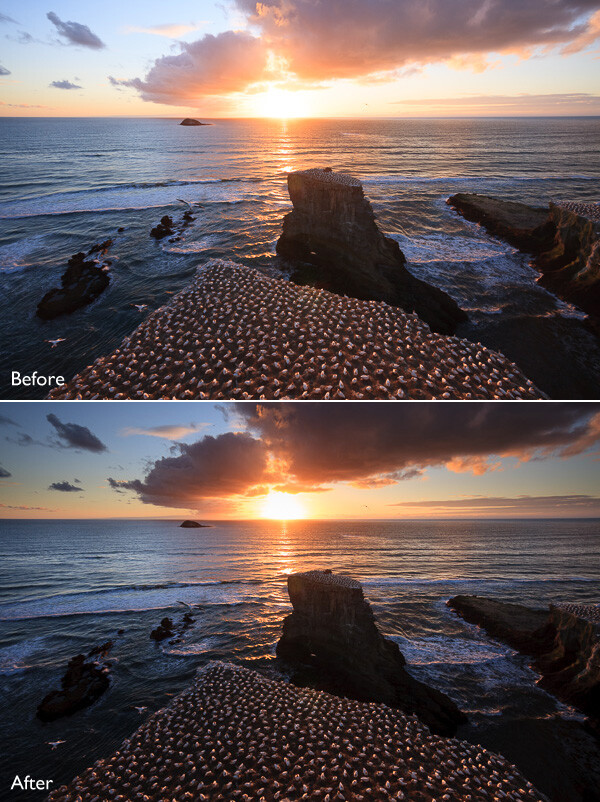
Let’s start with the obvious application of using the Graduated Filter to make the skies in landscape photos darker. Note that the Graduated Filter can’t rescue you if the sky in your photo is so overexposed that detail is lost – you may still need to use a neutral density graduated filter when you take the photo in the first place.
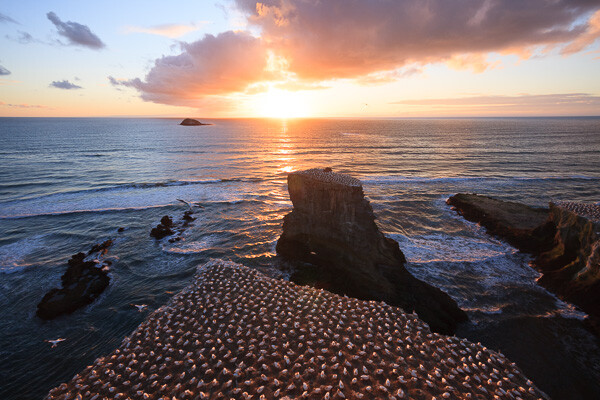
Using the Graduated Filter in Lightroom

Starting image

The first step is to make the sky darker. I did this by adding a Graduated Filter and pulling back Exposure to -1.81. Every photo is different, so use your eye to judge the Exposure adjustment required on your photos.

Using the Graduated Filter in Lightroom

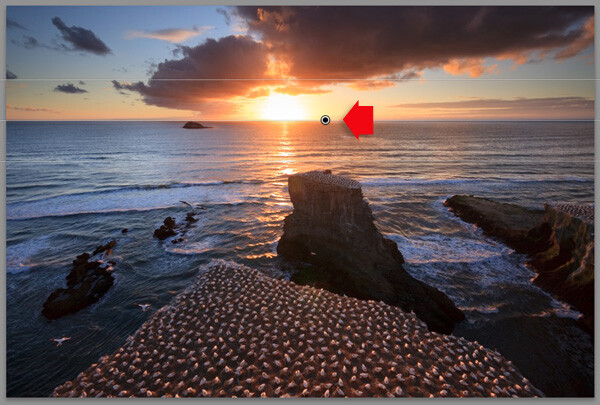
Exposure -1.81 applied using the Graduated Filter

2. Adjusting Contrast and Clarity locally

My aim with this landscape was to make the foreground darker and sharper, directing the viewer’s gaze towards the horizon. I achieved this by adding another Graduated Filter from the bottom. But this time, as well as adjusting Exposure to -0.79, I increased Contrast to +20 and Clarity to +27:

Using the Graduated Filter in Lightroom

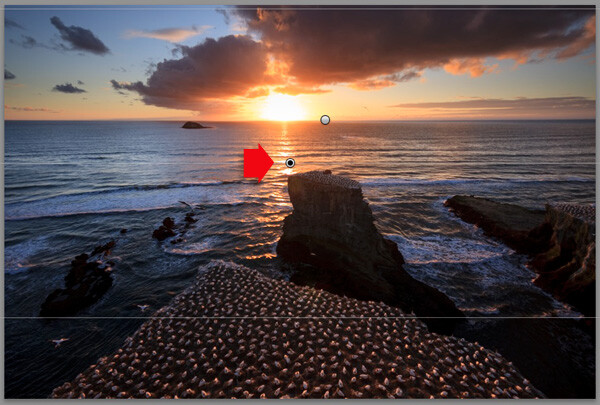
Bottom Graduated Filter applied, Contrast +20 and Clarity +27

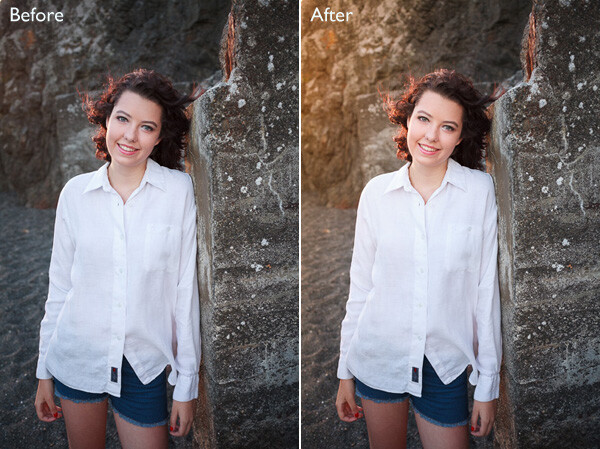
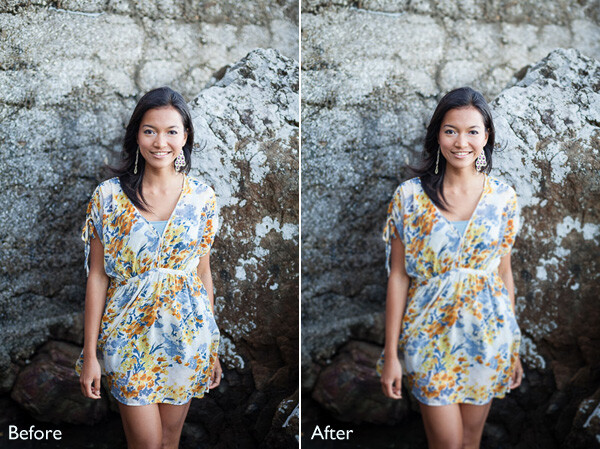
Here’s a before and after comparison, so you can see the difference adding the Graduated Filters has made. The two simple adjustments have transformed the photo.

Using the Graduated Filter in Lightroom

3. Adjusting White Balance

Another use of the Graduated Filter is to adjust colour temperature in part of the image. Sticking with the same landscape photo, I selected the top Graduated Filter to activate it and set Temp to 30. This warmed up the sky, emphasising the deep orange and red colours of the sunset:

Using the Graduated Filter in Lightroom

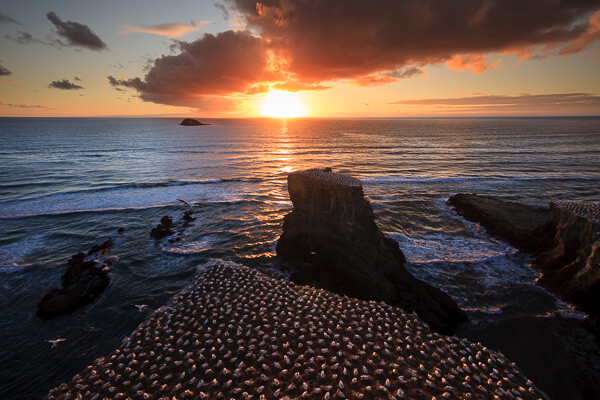
Be careful with adjusting Temp. If you push the slider too far the results may not look natural.

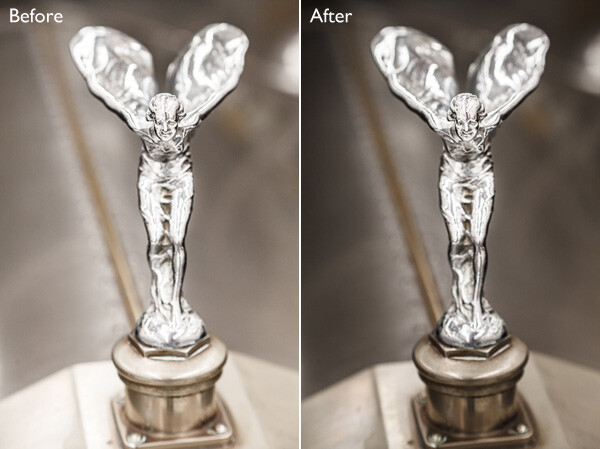
4. Making edges of your image darker

Moving away from landscapes, Graduated Filters are a handy way of making the edges of your images darker. This helps direct the viewer’s attention towards the focal point.

Using the Graduated Filter in Lightroom

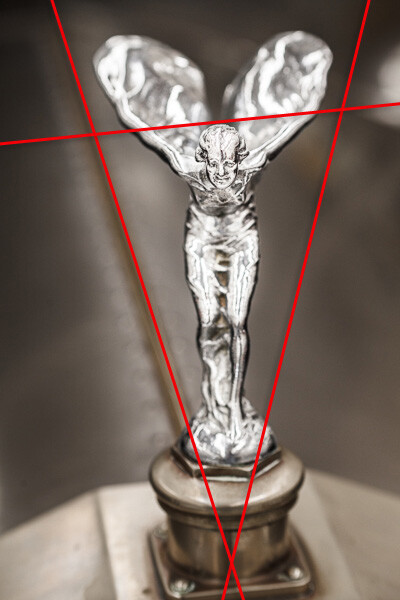
This diagram shows roughly where I placed the three Graduated Filters. The benefit of using individual Graduated Filters (instead of the Radial Filter or Adjustment Brush) is that you can adjust each one individually.

Using the Graduated Filter in Lightroom

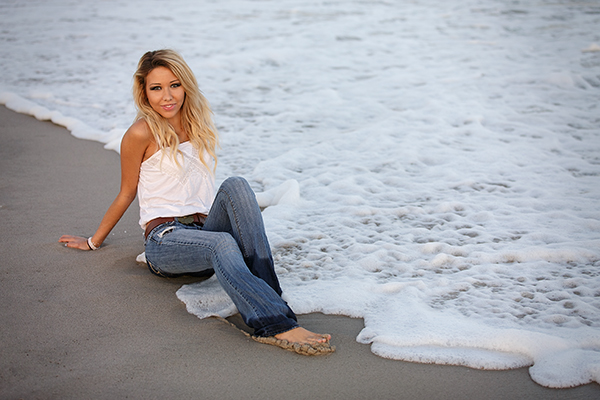
5. Adding a colour wash

The Color setting at the bottom of the Graduated Filter panel lets you add a tint. It is laid over the filter in addition to the effects created by whichever sliders you choose to adjust. To select a colour, click on the colour picker icon at bottom of the Graduated Filter panel (the white rectangle with black cross inside indicates no colour has been selected) and select the colour you wish to add:

Using the Graduated Filter in Lightroom

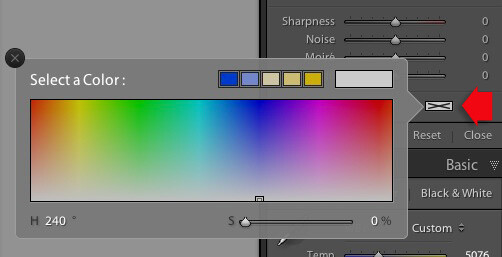
Slider below is for adjust the Saturation of your selected color

One use of this is to add a colour wash to a photo, to make it look as though the subject is lit by the light from the setting sun. This technique works best when the subject was genuinely shot during the golden hour, and you use the Graduated Filter to emphasize that. In this example I selected an orange hue to imitate the sun and set Exposure to +1.16 to lighten that side of the image.
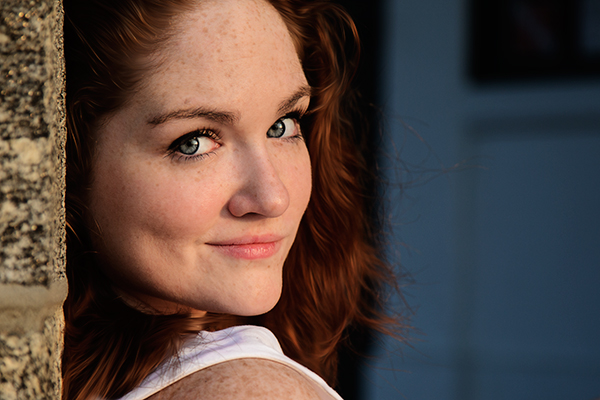
Using the Graduated Filter in Lightroom

6. Lens blur effect

The Sharpness slider in the Graduated Filter panel is dual purpose. From zero to -50 it reduces sharpness. From -50 to -100 it creates lens blur. This lets you replicate the effect of using a tilt-shift lens or large format camera to create a photo with a tilted plane of focus. This is what it looks like. You may have to look closely – the model’s head is sharp but the areas at the top and bottom are not.

Using the Graduated Filter in Lightroom

I created this effect by adding five Graduated Filters, two at the top, and three at the bottom, their position shown by the coloured lines. The effect works best with a narrow Graduated Filter.

Using the Graduated Filter in Lightroom

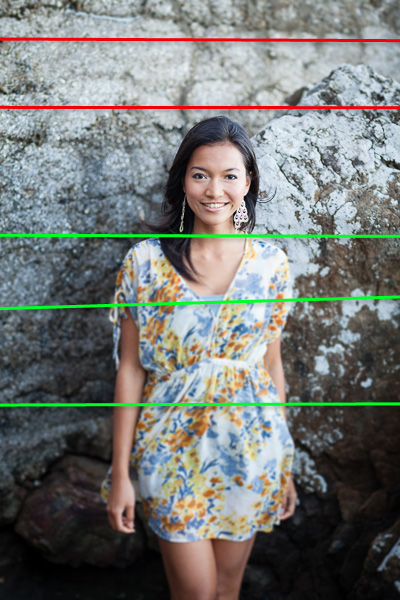
The red lines indicate where I added Graduated Filters with Sharpness set to -100 at top. The green lines show you where I placed three filters at the bottom. Spacing the Graduated Filters mean the effect is strongest at the edges, replicating the true effect of using a tilt-shift lens.

Hopefully these tips will help you use the Graduated Filter more creatively. Lightroom is great for processing your photos and understanding how its tools work will help you use it more effectively. If you’re new to Lightroom, then my article Seven Pieces of Advice for New Lightroom Users will help you get started. Once you’ve mastered the Graduated Filter, I suggest you read Four Ways to Improve Your Photos With the Clarity Slider in Lightroom or 3 Uses for the Radial Filter Tool in Lightroom 5 to learn how to use more of Lightroom’s fabulous tools. Have fun!

By the way, I’m curious to hear how you use Graduated Filters in Lightroom. What techniques have you come up with? Please share them with other readers in the comments.


Mastering Lightroom: Book One and Two
mastering-lightroom-bundle-1

My Mastering Lightroom ebooks are a complete guide to using Lightroom’s Library and Develop modules. Written for Lightroom 4 & 5 they take you through every panel in both modules and show you how to import and organise your images, use Collections and creatively edit your photos.

The post Improve Your Images with the Lightroom Graduated Filter Tool by Andrew S. Gibson appeared first on Digital Photography School.


Digital Photography School

 
Comments Off on Improve Your Images with the Lightroom Graduated Filter Tool

Posted in Photography


29. April 2014

30 Apr

Ein Beitrag von: Futzliputzli

blue © Futzliputzli


kwerfeldein – Fotografie Magazin | Fotocommunity

 
Comments Off on 29. April 2014

Posted in Equipment


Ultimate DIY RV: High-Tech Caravan Made for a 4-Year-Old

30 Apr

[ By WebUrbanist in Technology & Vehicles & Mods. ]

kirivan all terrain vehicle

Named after its creator’s progeny, the Kirivan may be the most impressive mobile home ever made, using cutting-edge technologies to blend the best elements of a luxury motorhome, zombie apocalypse vehicle and high-tech hideout.

kirivan design diagram sketch

2204_FF_ALLTERRAIN_DH_bf_08-cab-ext_0219.tif

Inspired by the birth of his daughter, innovator and inventor Bran Ferren began this incredible multi-year project in anticipation of future travel. The resulting adventure vehicle is designed to drive for up to 2,000 miles without stopping for supplies and features a pop-up penthouse for use as Kira’s personal retreat.

kivivan apocalypse proof ride

2204_FF_ALLTERRAIN_DH_bf_03-trailer-family_0071.tif

As Wired reports, the vision involved “a mix of high-powered machinery, bomb-shelter self-sufficiency, and luxe-life accoutrements. It would be a mobile, malleable five-star fortress. It could form the centerpiece of his and Kira’s exploration of the world and be her ride into the future.” (infographic diagram below by Bryan Christie Design)

kirivan descriptive diagram view

So how does one man find the time, skills and money for such an ambitious undertaking? Ferren is the former head of research and development for Disney’s Imagineering department, for starters, and currently heads Applied Minds, a design and technology company that has done work for everyone from General Motors to the US Air Force. All of this shows in the design, which reflects a hybrid of engineering strategies appropriated from the design of land, air and even space vehicles.

2204_FF_ALLTERRAIN_DH_bf_02-trailer-controls_0032.tif

kirivan front unit view

A futuristic marvel with endless technological surprises, this all-terrain vehicle is designed to climb 45-degree slopes, use thermal imaging for road analysis, deploy advance drones to scout out obstacles ahead and so much more. On the flip side of its amazing array of safety features are a range of luxury ones as well, including comfortable seats, a full kitchen and bathroom and other amenities that provide for far more than mere survival. Of course, it is also a work in progress – there no doubt this creative dad will evolve ever more functionality as his child grows older as well.

Share on Facebook


[ By WebUrbanist in Technology & Vehicles & Mods. ]

[ WebUrbanist | Archives | Galleries | Privacy | TOS ]


WebUrbanist

 
Comments Off on Ultimate DIY RV: High-Tech Caravan Made for a 4-Year-Old

Posted in Creativity


Samsung launches Galaxy K Zoom with 10x optical zoom

30 Apr

Galaxy-K-zoom_Charcoal-Black_10v2.jpg

Smartphone imaging components have improved a lot in recent years but the lack of an optical zoom is still a major disadvantage compared to traditional compact cameras. Now Samsung is aiming to make its hybrid model more attractive to consumers and has launched the second generation of the Galaxy Zoom series. Learn more

News: Digital Photography Review (dpreview.com)

 
Comments Off on Samsung launches Galaxy K Zoom with 10x optical zoom

Posted in Uncategorized


Alien Skin Software announces Exposure 6 plugin

29 Apr

Cliff_Mautner_Exposure_6_2__Medium_.jpg

Alien Skin Software has released the latest version of its flagship photography effects software. Exposure 6 now includes a ‘Bokeh’ focus and lens-simulation feature, an updated image processing engine for instant previews, enhanced user interface for quick workflow, and unlimited creative texture control. The analog film emulation and creative effects software integrates with Photoshop, Photoshop Elements, Lightroom, and Aperture or can be launched as a stand-alone program. Learn more

News: Digital Photography Review (dpreview.com)

 
Comments Off on Alien Skin Software announces Exposure 6 plugin

Posted in Uncategorized


The Magic Light of the Golden Hour

29 Apr
EOS-1D Mark IV with EF 24-105 f/4L IS. 1/500 at f/4, ISO 200.

EOS-1D Mark IV with EF 24-105 f/4L IS. 1/500 at f/4, ISO 200.

What is Golden Hour?

My absolute favorite time to photograph anything is a time of day called the Golden Hour. The Golden Hour occurs during the time just before sunset, and just after sunrise. When the sun is lower in the sky, near the horizon, it must travel through more of the atmosphere, reducing the intensity of direct light and thus reducing the contrast in the scene. More blue light is scattered, so sunlight will appear reddish and shadows won’t be as deep as when the sun is higher in the sky. In addition, the lower angle of the sun creates longer shadows, which can add interest to images.

EOS 5D Mark II with EF 24-105 f/4L IS. 1/15 at f/14, ISO 100.

EOS 5D Mark II with EF 24-105 f/4L IS. 1/15 at f/14, ISO 100. The low sun casts a longer shadow, creating foreground interest for this shot.

The Golden Hour does not necessarily last an hour. The closer to the equator you are, the shorter the Golden Hour is. The further from the equator, the longer the golden hour lasts. For instance, in Alaska during the summer, there is a period of several hours of Golden Hour light later in the evening, and during the winter, nearly all daylight hours have a Golden Hour quality to them.

EOS 5D Mark II with EF 24-70 f/2.8L. 1/2500, f/4, ISO 200. The sun was placed over the boy's shoulder to camera left, and a reflector to camera right.

EOS 5D Mark II with EF 24-70 f/2.8L. 1/2500, f/4, ISO 200. The sun was placed over the boy’s shoulder to camera left, and a reflector to camera right.

Golden Hour light is so good, I find it hard to convince myself to photograph at other times.  It’s excellent lighting for any subject, but especially lends itself to portraits and landscapes.

Portraits at Golden Hour


For portraits, I use the light in a couple of ways.  First, I will position my subject so that the sun is shining on their face directly, as in the image at the top of this article.  The light tends to be so soft, I can put down my reflector and just let the shadows fall and create depth.  Simply position your subject so the sun is full in their face, and ask them to turn back and forth to watch the way the shadows fall. Move around your subject to watch how the light changes.  Shoot from multiple angles. It will end up being like you changed your lighting setup for each shot.

The only portrait angle that will be difficult to shoot at the Golden Hour will be when your subject is completely backlit. In this case, I will use a reflector. Since the light already has a warm temperature, I use the white side of the reflector, or silver if the reflector has no white.  I will position my subject so the sun is behind him and over his shoulder, and will position the reflector in front of him on the opposite side. The effect is similar to having two lights, a hair light, and a fill. Again, move around your subject, and have them turn as well, placing the sun at different angles to them. Do the same with the reflector to see the ways you can make the light fall on your subject’s face.  The beautiful thing about Golden Hour light is that it comes from such a low angle, you can hold the reflector higher and position it just above your subject’s head, to get those pleasing downward shadows from the nose and other facial features.

Golden Hour for Landscapes

The Golden Hour is also perfect for shooting landscapes.  The light creates depth by casting long shadows and defining the character of the landscape.  I will often try to put the sun to my side when shooting Golden Hour landscapes. This allows the light to rake across the landscape and create shadows where the surface changes, or create greater detail in grasses, or trees, creating more apparent detail and sharpness than if the light was from the front. This is apparent in the two images below.

EOS 5D Mark II with TS-E 24mm f/3.5.  1/1250 at f/3.5 ISO 100.  The sun coming from camera right creates definition in the sand and dune grass.

EOS 5D Mark II with TS-E 24mm f/3.5. 1/1250 at f/3.5 ISO 100. The sun coming from camera right creates definition in the sand and dune grass.

EOS 5D Mark III with EF 70-300 f/4-5.6L IS. 1/13 at f/16, ISO 100. The low angle of the sun and warm golden light creates definition in the foreground trees.

EOS 5D Mark III with EF 70-300 f/4-5.6L IS. 1/13 at f/16, ISO 100. The low angle of the sun and warm golden light creates definition in the foreground trees.

In addition, landscapes shot during the Golden Hour have more color in the sky, especially if there are clouds picking up the warm reddish light. However, shooting directly into the sun, capturing a sunset, creates a very contrasty scene. In cases like that, I use graduated neutral density filters to darken the sky and bring it down so that the foreground and the sky both fall within the dynamic range of the camera, as with the image of the crashing wave and rocks (below). A graduated neutral density filter (ND Grad for short) is half darkened glass, half clear. You can position the filter so the darker area covers the sun and sky, and the clear is over the darker foreground.  This helps bring the color back to those sunsets or sunrises, whereas without the filter, the sky would appear washed out and lifeless.

The Golden Hour offers plenty of opportunities for great photos, and the really beautiful thing is that it happens twice a day!

EOS 5D Mark III with EF 24-70 f/2.8L II. 1/6 at f/14, ISO 200.  A 4-stop ND grad was used to darken the sky and match the foreground exposure.

EOS 5D Mark III with EF 24-70 f/2.8L II. 1/6 at f/14, ISO 200. A 4-stop ND grad was used to darken the sky and match the foreground exposure.

EOS 5D Mark III with EF 24-70 f/2.8L II. 1/15 at f/16, ISO 100.

EOS 5D Mark III with EF 24-70 f/2.8L II. 1/15 at f/16, ISO 100.

EOS 5D Mark II with EF 24-105 f/4L IS. 1/1000 at f/4, ISO 100.  In this case, the sun was positioned more to the side with a reflector bouncing light back into the subject's face.

EOS 5D Mark II with EF 24-105 f/4L IS. 1/1000 at f/4, ISO 100. In this case, the sun was positioned more to the side with a reflector bouncing light back into the subject’s face.

EOS 5D Mark III with EF 70-200 f/2.8L IS II. 1/1000 at f/2.8, ISO 100.

EOS 5D Mark III with EF 70-200 f/2.8L IS II. 1/1000 at f/2.8, ISO 100. The soft, warm light of the Golden Hour was perfect for this shot.

More tips on working with light in the Golden Hour:

  • The Golden Hour – Perfect Times for Portraits
  • Finding and Working with Available Light
  • 5 Reasons for Doing Natural Light Portraits
  • 10 Reasons to Shoot Portraits During the Golden Hour [Illustrated]

On sale now at SnapnDeals – Golden Hours eBook + Exposure Blending eBook – grab the pair now before the sale is over! 

The post The Magic Light of the Golden Hour by Rick Berk appeared first on Digital Photography School.


Digital Photography School

 
Comments Off on The Magic Light of the Golden Hour

Posted in Photography


[MODIFIED] Disk Usage Utility – Display a Directory Tree Representation of What is Taking Up Hard Drive Space

29 Apr

Find out why your hard drive is running out of space by scanning it with TreeSize Free.

TreeSize Free for Windows can help you determine what is taking all your hard drive space by displaying a directory tree. After selecting a drive or folder for scanning by running the application or selecting TreeSize Free from a folder’s right-click menu, you can change options such as displaying a folder’s size, allocated space, usage percent, or file count. File size can be reported in gigabytes, megabytes, kilobytes, or a combination (“automatic units”).

Other features include sorting files and folders by name or size, showing details of each subdirectory inside a directory tree, and performing filters so only certain paths or files are visible. A report can be printed from the results. Options include forcing the application to only use one thread (if you are performing other CPU-intensive tasks simultaneously), displaying or not displaying compressed files and folders in blue, and choosing the gradient colors used in the background of each folder to represent disk usage….

Read more at MalekTips.
New Computer and Technology Help and Tips – MalekTips.Com

 
Comments Off on [MODIFIED] Disk Usage Utility – Display a Directory Tree Representation of What is Taking Up Hard Drive Space

Posted in Technology


A Glimpse of Ancient Egypt by Jayant Neogy

29 Apr

It is almost impossible to compress the history and architecture of ancient Egypt into a brief travel blog. Perhaps, that is why it is an audacious and an exciting challenge. So, here is a highly compressed whirlwind tour of Egypt from the Nubian desert in the South to the Northernmost part of this ancient land […]

The post A Glimpse of Ancient Egypt by Jayant Neogy appeared first on dslrBlog.

dslrBlog

 
Comments Off on A Glimpse of Ancient Egypt by Jayant Neogy

Posted in Photography


Der Mond

29 Apr

Der Mond faszinierte schon immer die Menschen und auch heute noch birgt er einige Geheimnisse, trotz größter Bemühungen der Forschung. Kein Wunder, dass er bereits kurz nach der Entdeckung der Fotografie zum Motiv eben dieser wurde.

Das erste bekannte Foto des Mondes stammt von John W. Draper und wurde von seiner Dachsternwarte in New York City am 26. März 1840 aufgenommen. Die Daguerrotypie wirkt sehr surreal und viel erkennt man nicht: Der Mond als kreisrundes Objekt mit einer dunklen Sichel links. Die anderen kreisrunden Objekte sind Bildfehler auf der Platte, auf der das Bild aufgenommen wurde.

© John W. Draper

Draper verbesserte seine Technik und schnell wurde deutlich, dass die Fotografie die Astronomie revolutionieren kann und immer mehr Astronomen begannen, die Himmelskörper mit der neuen Technik zu dokumentieren, statt Handskizzen anzufertigen, um Erkenntnisse über Positionen, Helligkeiten und besondere Merkmale zu sammeln.

Besonders hervorzuheben ist dabei der Astronom Lewis. M. Rutherfurd, nachdem auch der Mondkrater Rutherfurd benannt ist. Auf seinem Foto vom 6. März 1865 erkennt man schon deutlich mehr der Kraterlandschaft des Mondes. Es wurde ebenfalls im privaten Observatorium des Fotografen aufgenommen. Die Aufnahme wurde kommerziell vermarktet. Rudolf Wolf schreibt im Verzeichniss der Sammlungen der Zürcher-Sternwarte von 1878:

Diese wundervolle Abbildung stellt den Mond nach einer von Herrn Rutherford 1865 III 8, also etwa am 12. Tage seines Alters, zu New-York gemachten, und sodann bis auf 53cm Durchmesser vergrösserten Aufnahme dar.

© Lewis M. Rutherfurd

Eines der ersten Bilder der Erde vom Mond aus machte die Mondsonde Lunar Orbiter 1 am 23. August 1966. Über der Mondoberfläche unten im Bild sieht man unsere Erde als kleine Sichel aufgehen. Das Bild könnt Ihr auch in größerer Auflösung im Flickr-Account der NASA bewundern.

© NASA

Das erste vom Menschen angefertigte Bild, das auf dem Mond entstand, ist nicht der berühmte Fußabdruck von Buzz Aldrin, sondern eine etwas unspektakulärere Aufnahme der Mondoberfläche mit angeschnittener Raumsonde links im Bild. Der Fußabdruck entstand erst einige Minuten und Fotos später, bleibt jedoch im kollektivem Gedächtnis als Symbol für die Mondlandung am 20. Juli 1969 bestehen.

© NASA

© NASA

Ende 2013 landete das erste Mal seit etwa 40 Jahren mit der chinesischen Mondsonde Chang’e-3 wieder ein ferngesteuerter Rover auf der Mondoberfläche und sendete erneut erstaunliche Bilder zur Erde.

Von der Erde aus ist es mittlerweile selbst Hobbyfotografen möglich, mit relativ einfachen Mitteln beeindruckende Bilder unseres Mondes zu machen.

Quellen:
• Stiegler, Bernd / Thürlemann, Felix: Meisterwerke der Fotografie. Stuttgart 2011.
• http://www.nasa.gov [Stand: 20. April 2014]
• http://blogs.ethz.ch [Stand: 20. April 2014]
• http://art-stronomy.tumblr.com [Stand: 20. April 2014]


kwerfeldein – Fotografie Magazin | Fotocommunity

 
Comments Off on Der Mond

Posted in Equipment


MIT algorithm predicts photo popularity

29 Apr

Screen_Shot_2014-04-25_at_2.58.49_PM.png

Ask the average social media user what makes a photo popular online and they’ll probably answer ‘cats’ or ‘pretty women’. That gut feeling has now been confirmed by MIT PhD candidate Aditya Khosla who has analyzed more than 2.3 million images hosted on Flickr to answer the question ‘what makes an image popular’? Learn more 

News: Digital Photography Review (dpreview.com)

 
Comments Off on MIT algorithm predicts photo popularity

Posted in Uncategorized