RSS
 

Archive for August, 2013

Flickr improves capture and editing tools in latest iOS app update

29 Aug

Screen_Shot_2013-08-29_at_9.52.55_AM.jpg

As part of its effort to ‘make Flickr awesome again’, parent company Yahoo has released a hefty update to its Flickr app for iOS. Improved capture tools include the ability to lock separate focal and exposure points on the capture screen with a two finger tap. In addition, users can view the filters ‘live’. When you are ready to edit, you can customize the exposure using the new Levels adjustment, correct color balance, sharpen, brighten, crop, straighten, or even add vignetting to your image. Click through for more details at connect.dpreview.com.

News: Digital Photography Review (dpreview.com)

 
Comments Off on Flickr improves capture and editing tools in latest iOS app update

Posted in Uncategorized


Q&A: China Answers!

29 Aug

Upon reading the post earlier this week asking for a male-male hot-shoe-to-mini coiled sync cord, reader Shirley Lu, of Guangzhou, China noted in the comments:

If this cable is 10 meters, maybe it will have a delay on signal transfer. And other point is the cost of a 10-meter cable is much higher than a set wireless triggers.

Great question (er, comment), Shirley. I am so glad you posted it. And especially so, considering a quick look at your screen name shows you work at Pixel Enterprises, a Chinese lighting gear manufacturer. (Welcome!) My answers are below.

Read more »
Strobist

 
Comments Off on Q&A: China Answers!

Posted in Photography


Build Your Own DIY Slide Light

29 Aug
Extra photos for bloggers: 1, 2, 3

Are you ready to come along on a fantastic voyage? No time travel to throwback music videos required.

We were thinking a voyage to the hardware store to gather building supplies for the coolest tutorial yet — a DIY slide light.

It’s a minimalist light box that can display pictures, and it sure looks good doing it. Whether you shoot film, digital, or even Instagram (remember this tutorial?) – the slide party is open invite!

Think of this project as a way to create a mini gallery, with which to show off and rotate tiny versions of your photography.

To start you’ll only need one more power tool than your average tool-free craft project. Totally coolio, huh?

Build Your Own Slide Light

p.s. Photo Week (from our buddies at creativeLIVE) is coming up! RSVP for 6 days of free live workshops with primo instructors.

Why It’s Cool

We were so inspired by the most awesome light ever that we wanted to make one ourselves! Like the hits of our rapper friend Coolio, Slide Light has been rocking it since the 90′s. Completely classic.

Although your cameras aren’t out for this tutorial, you can still pay homage to your beloved craft by building a beautiful home for teeny photographs. Isn’t that thoughtful of you?

Since keeping fingers intact for future shutter clicking is priority, all measurements used to build this light are based on standard sized cuts. No saws or reasons to fear tools! Your new slide light will be easier to assemble than, well… just about anything from Ikea.

Ingredients:

  • 24” Fluorescent cabinet light
  • 32” by 24” sheet of acrylic
  • Two 36” by ¾” Aluminum Angles (L shaped)
  • One 6ft  1” by 3” piece of pine wood – (cut in half at store)
  • One 6ft  1” by 4” piece of whitewood – (cut in half at store)
  • One piece outside corner finished moulding (see photo)
  • Small piece of balsa wood (or sub any thin plywood)

  • Eight 1 ¼” #8 phillips round head screws
  • Six 1” #8 phillips round head screws 
  • Ten 1/2” #4 phillips head wood screws
  • Power Drill with 1/8 & 5/64 bits
  • Phillips screwdriver
  • Staple gun
  • Box cutting knife
  • Measuring tape / straightedge
  • Vellum paper (enough to cover 32” by 2.25”)
  • Spray adhesive

STEP 1: Measure, Mark, and Mount

before

Off-center the cabinet light on a 1″ by 4″ board, with power chord positioned near the outside left edge. Leave at least 1” of space on all sides (to build the frame around the light). Use two #4 screws and follow the instructions on the package to mount your light to the board.

After mounting the (unplugged) light, ensure the switch is in the “on” position. Once the light is enclosed in the box, the plug will become the on/off switch.

before

Starting at opposite ends, mark both your Aluminum “L” angles 4 times, spaced every 12 inches. Use this same spacing measurement on the top and bottom edges on the back 1″ by 4″ board of the light.

Next, mark both of the 1” by 3” boards three times along the 1” side. Offset marks on the left side by at least 1 ½” from the edge. The other two marks will go in the middle of the light and 1 1/2″ from the right edge. When the frame for the light is assembled, these marked edges will face forward.

Use a permanent marker and a straightedge to mark the acrylic sheet so it is 2 1/4” tall by 32” wide.

STEP 2: Cutting and Prepping

before

Find a safe, level surface for cutting. Use the box cutter and a straightedge to score both sides of the acrylic along your guide line. Repeat this step as many times as it takes to ensure a deep cut.

Next, line up the the scored cut with a straight edge of a table. Use your forearm (for evenly distributed pressure) to press down on the side of acrylic that is not supported not on the table.

Keep applying pressure till it breaks! Feel free to clean up a jagged edge with wire cutters or sand paper… although, this edge isn’t going to be visible so it’s more important that it fits the dimensions.

Use spray adhesive to attach vellum paper to the piece of acrylic. Smooth out any bubbles and trim away excess paper.

Use scissors to cut the outside corner molding to the same length as the acrylic.

STEP 3: Pre-drill, Pre-drill, Pre-drill! Oh… and tack.

before

Because the wood is 1” thick in a lot of places, you’ll have more control installing the screws by hand when you use pre-drilled pilot holes as a guide.

Line up the acrylic along the left corner and trace the spacing of the marks from the side of the top 1” by 3” board. Use the ? bit to drill holes in the plastic where marked.

Use the 5/64 bit to drill holes in the aluminum along where marked (see step 1 if you missed it!).

With the staple gun, tack moulding to the inside edge of the bottom 1” by 3” board. Make sure the lip (edge that will hold the slides) is sticking out slightly to the front.

Next, line up the boards in a “U” shape. The 1″ by 3″ boards are the sides of the “U” and the 1″ by 4″ board is the base. Level the sides and use the staple gun to tack the top and bottom boards to the 1″ by 4″, so they will stay in place when you beforesecure the frame.

Flip the attached pieces so the back of the light is facing up. Use the ? drill bit to drill eight pilot holes on the top and bottom edges of the 1″ by 4″ board holding the light. If tacked down securely, the pilot hole should extend a little into the attached 1” by 3” board.


STEP 4: Business Time

before

When installing screws, apply pressure to the surfaces being connected until you feel the screw has engaged.

Install all eight 1 1/4″ #8 screws in the coordinating pilot holes along the back of the light.

Flip light over. Line up the acrylic with the top board so that the bottom of the plastic rests in the lip of the moulding. Use the 1/8 bit to drill pilot holes through the holes in the plastic. Install the six 1” #8 screws in the locations you marked. Although there is no plastic attached to the bottom board, the screws will ensure the bottom aluminum angle is flush with the rest of the light.

Position aluminum angles with the pre-drilled holes on top and on bottom. Use the 5/64 bit to drill pilot holes through the pre-existing holes, and install eight 1/2″ #4 screws.

STEP 5 – Finishing Touches

before

Trace the edge of both sides on the balsa wood in pencil. Return to your cutting surface and cut out end caps using box cutting knife.

Make a hole for side with plug and feed chord through the hole prior to stapling the balsa wood along the open edges of the light frame. Attach hanging hardware of your choice and hang on wall. Mount your slides and flex/change/rearrange to your heart’s content.

**note: as with most electrical dohickeys, do not leave on and unattended for extended periods of time. Remove the top aluminum angle and acrylic when the bulb needs to be replaced.


Taking It Further

  • Use the opening on the right side of the light as a mini library for your extra slides! Or get creative with your leftover materials to make a storage box.
  • Make Instagram slides using transparencies. Print on vellum paper for bold colors.
  • Let your slides work together! Use photo-editing software to adapt this tutorial and resize a wide landscape photo so it fits over several slides.
  • Enlist the pros at Digital Slides to turn your digital photos into 35mm slides!

Jenny Sathngam is a tutorial writer/photographer for Photojojo, based in Austin, TX. If she’s not shooting or editing, you’ll find her building, crafting, or scheming up the next big project.  

Related posts:

  1. Make a Magnetic Photo Bulletin Board for Under $ 15 ~Have a cool photo product or site? Reach 260,000 photo…
  2. DIY: Make Crazy Detailed Light Paintings with Photo Light Stencils Extra photos for bloggers: 1, 2, 3 Ever tried painting…
  3. How to Make a Mini Light Studio Using School Supplies When school’s out, most kids are thinkin’ “Oh man, summer’s…


Photojojo

 
Comments Off on Build Your Own DIY Slide Light

Posted in Equipment


Samsung announces pricing for Android-based Galaxy NX camera

29 Aug

funshot.jpg

As the first hybrid smartphone and interchangeable lens camera, the Samsung Galaxy NX certainly cut a unique profile when we first looked at it in June. The Galaxy NX merges the features of Samsung smartphones, including a huge 4.8-inch touch LCD and 3G/4G/Wi-Fi connectivity, with a NX-mount ILC with a 20.3MP APS-C sensor, hybrid AF system, and 8.6 fps burst mode. At long last, the Galaxy NX has been given a price: $ 1,599.99 body only, or $ 1,699.99 bundled with an 18-55mm lens. 

News: Digital Photography Review (dpreview.com)

 
Comments Off on Samsung announces pricing for Android-based Galaxy NX camera

Posted in Uncategorized


Did Sigma design the Olympus M.Zuiko 75mm F1.8?

29 Aug

olympus_75.png

It’s an open secret that many compact cameras are produced by OEMs – companies that produce large numbers of products that are then sold under other brand names. There are also consumer-grade zooms from big name manufacturers that look much alike (we know for a fact that third-party makers commonly create lenses for the bigger brands). But we were still surprised to read about Sigma’s latest patent for a 75mm F1.8 prime lens…

News: Digital Photography Review (dpreview.com)

 
Comments Off on Did Sigma design the Olympus M.Zuiko 75mm F1.8?

Posted in Uncategorized


Landschaftsfotografie bei Nacht

29 Aug

Ein Beitrag von: Raik Krotofil

Landschaften in der Dunkelheit, ohne Lichtquellen und nur mit Sternenhimmel, vom Mond ausgeleuchtet oder auch Großstädte in der Nacht und deren beleuchtete Straßenzüge sind für mich immer wieder reizvolle Motive. Aber diese auf den Sensor zu bannen ist gar nicht so einfach.

Für jede Motivsituation gibt es auch ideale Bedingungen. Der Vollmond ist eine hilfreiche Lichtquelle, wenn es darum geht, die Landschaftsformationen in ein mystisches, befremdliches Licht zu tauchen. Zu diesem Thema hatten wir auf kwerfeldein bereits einen Artikel.

Es erscheinen Schatten, die ohne Mondlicht nicht da wären, Täler werden sanft ausgeleuchtet und Wolken bekommen Struktur. Ich mag Vollmondnächte und fotografiere von mir bereits ausgesuchte Motive gern in diesem Licht. Der Sternenhimmel wird allerdings vom Mond überstrahlt, so dass die Sternendichte auf den Fotos später nicht so spektakulär ist.

Einsames Tipie  © Raik Krotofil

Für Landschaftsfotos mit detailiertem Sternenhimmel sind Nächte ohne Mondlicht ideal. Aber dann hat man als Fotograf oft mit Lichtverschmutzung, dem Störlicht unserer Zivilisation, zu kämpfen. Es ist unglaublich, wie viele Sterne am Himmel sichtbar sind, wenn man sich außerhalb der Großstädte in ländlichen Gebieten oder in Erdteilen mit wenig Besiedlung aufhält.

Von daher bin ich froh, in einer Region zu wohnen, in der ich meine Fototouren in dunkle Waldgebiete legen kann. Der Himmel sollte dann idealerweise klar sein und die Luftfeuchtigkeit niedrig. Perfekt sind windstille Nächte.

Koh Tao  © Raik Krotofil

Das Handicap bei der Fotografie jenseits des Tageslichts ist, per se kein oder sehr wenig Licht zu haben. Der High-ISO-Bereich und weit geöffnete Blenden ermöglichen dennoch „kurze“ Belichtungszeiten. Eine Schwierigkeit ist dabei die bei weit geöffneten Blenden fehlende Schärfentiefe.

Ich achte deshalb auf einen Bildaufbau, der wenig Vordergrund in Kameranähe erzeugt. Fokusstacking wäre ein probates Mittel, um mehr Schärfentiefe zu erzeugen, es ist jedoch nicht meine Arbeitsweise. Gelegentlich kann man Unschärfe im Vordergrund sogar bewusst als Gestaltungsmittel einsetzen.

Und dann ist da noch das Rauschen, das im hohen ISO-Bereich zunimmt. Es gibt hier eine Methode, bei der mehrere Belichtungen unter Hinzunahme sogenannter Darkframes aufgenommen und mit Hilfe von Programmen wie Fitworks oder DeepSkyStacker verrechnet werden. Dabei wird das Rauschen des Kamerasensors aus den Fotos herausgemittelt und es werden mehr Details im Sternenhimmel sichtbar.

Ich oute mich als bequemer Fotograf, der ausschließlich die One-Shot-Fotografie nutzt. Mein Credo lautet: Ich bin lieber eine Stunde mehr unterwegs und genieße das Fotografieren, als eine zusätzliche Stunde am Rechner zu sitzen und mit dem Zusammenbasteln von Fotos beschäftigt zu sein.

Dabei profitiere ich von der Auflösung einer Vollformatkamera und der Möglichkeit, selbst bei ISO-Werten von 1600 bis 3200 noch Fotos mit akzeptablem Rauschen zu machen.

Mit den folgenden Beispielen möchte ich Euch nun ein wenig meine Vorgehensweise bei der Landschaftsfotografie mit Sternenhimmel zeigen.

Landschaften mit detailiertem Sternenhimmel

© Raik Krotofil

Das Foto oben, ein zugefrorener See oberhalb von Sankt Martin in der Pfalz, habe ich unter den oben beschriebenen idealen Bedingungen aufgenommen. Es war in einer klaren Dezembernacht, als ich bei -8 °C loszog. Zum ersten Mal seit mehreren Wochen riss der Himmel auf und ich musste gleich mein neues „Nachtobjektiv“ testen. Das Objektiv meiner Wahl bei Nachtfotos mit Sternenhimmel ist das manuelle Samyang 24mm mit einer Offenblende von f/1.4.

Zum einen werden mit geöffneten Blenden wesentlich mehr Sterne eingefangen, oft mehr als mit bloßem Auge zu sehen sind. Zum anderen bleiben die Verschlusszeiten in dem Bereich, in dem die Sterne gerade noch scharf, ohne Bewegung, abbildet werden. Dieser Bereich ist abhängig von der eingestellten Brennweite. Bei meiner Aufnahme am Vollformat der Canon 5D MkII waren es 20 Sekunden.

Ich nutze hierbei gern die Formel 500 / Brennweite in mm als groben Richtwert, um die maximal mögliche Belichtungszeit zu ermitteln. Astronomen werden vielleicht genauere Berechnungen vornehmen. Für mich ist es als ungefährer Richtwert ausreichend.

Neuscharfeneck © Raik Krotofil

Die Burg Neuscharfeneck in der Pfalz thront mitten im Wald oberhalb der Hügel. Eine wundervolle, exponierte Lage. Ideale Bedingungen für dieses Foto mit der Milchstraße fand ich in einer Nacht kurz vor Neumond. Der Mond ging in jener Julinacht eine Stunde nach Entstehen dieser Aufnahme auf und war somit nicht als störende Lichtquelle anwesend.

Zur Orientierung und Bestimmung der Position der Milchstraße nutze ich im Vorfeld eine drehbare Sternenkarte. Die Milchstraße hat nicht immer die gleiche Position am Firmament des Himmels. Ähnlich den Sternbildern ändert sich diese abhängig von der Uhr- und Jahreszeit.

Ein wolkenloser Himmel und klare Luft ließen die Milchstraße am Nachthimmel so strahlen, wie ich es in unseren Breiten selten gesehen habe. Das Motiv konnte ich nur mit vier Einzelaufnahmen im Hochformat in Form eines Panoramas darstellen. Meine Kameraeinstellungen waren hier ISO 4000 bei Blende f/2.0 und 20 Sekunden Belichtungszeit. Nur durch die Wahl dieser Werte konnten ich die Burgmauern auf dem Foto so hell festhalten.

Teufelstisch  © Raik Krotofil

Der Teufelstisch ist eine skurrile Sandsteinformationen im Pfälzerwald. Monatelang habe ich darauf gewartet, dass der Vollmond nicht von Wolken verdeckt wird. Die Mondphasen sind im Jahr auf zwölf Vollmonde verteilt. Da kann man sich in etwa ausmalen, wie oft der Vollmond sichtbar ist und dann auch noch zum richtigen Zeitpunkt hinter mir steht und den Teufelstisch sanft ausleuchtet.

An einem Aprilabend dieses Jahres war es endlich soweit. Um die Belichtung vor Ort zu ermittelten, stellte ich zunächst einen Schätzwert manuell ein. Mit ISO 1600, Blende f/4 und 15 Sekunden Belichtungszeit machte ich die erste Testaufnahme und tastete mich dann durch Beurteilung des Histogramms an die endgültigen Einstellungen heran.

Das waren in diesem Fall 20 Sekunden, bei Blende f/2.8 und ISO 800. Die Natur meinte es in dieser Nacht gut mit mir. Da es windstill war, wurden die Äste der Bäume scharf abgebildet.

Landschaften mit Sternenspuren

Teufelstisch Trails © Raik Krotofil

Das zweite Foto vom Teufelstisch entstand noch in der gleichen Nacht. Nachdem ich mein Foto mit fixem Sternenhimmel im Kasten hatte, widmete ich mich noch einer Fotoserie mit Sternenspuren. Die Sternenbahnen erzeugen bei langen Belichtungszeiten Striche auf dem Foto. Meine Erfahrung hierbei ist, dass ein sogenannter Oneshot, also nur eine 30- bis 40-minütige Belichtung, wesentlich weniger Sterne zeigt als ein Stacking von kürzeren Einzelaufnahmen.

Auch ist die Himmelsrichtung, in die fotografiert wird, maßgeblich für die Länge der Sternenbahnen. Der Himmel in Richtung Norden, wie auf dem Foto vom Teufelstisch, zeigt um den zentral gelegenen Polarstern bei gleicher Belichtungszeit etwa kürzere Startrails als der Himmel im Süden, der, wenn man sich in der nördlichen Hemisphäre befindet, zusammen mit dem Südosten und Südwesten die längsten Spuren zeigt.

Trails Tipie © Raik Krotofil

Doch wie funktioniert das Stacken von Startrails? Dafür möchte ich an meinem Lieblingsmotiv, einem Tipie ganz in meiner Nähe, den Workflow dafür aufzeigen.

In einer klaren, wolkenlosen Nacht ohne Mondlicht suchte ich das Zelt mit einer speziellen Bildidee auf. Ein leuchtendes Tipie mit Statrails sollte es werden. Den richtigen Bildaufbau zu finden, war im Dunkeln nicht einfach und ich brauchte einige Anläufe, bis kein „Fremdlicht“ der Ortschaften auf dem Foto war.

Der Vordergrund war rabenschwarz. Nur durch Ausleuchten mit einer Stirnlampe war es möglich, einen geordneten Bildaufbau zu finden. Drei Testaufnahmen brauchte ich, um die korrekte Belichtung zu ermitteln und diese anhand des Histogrammes abzuschätzen.

Das erste Foto machte ich dann bei Blende f/5.6 und ISO 1600 für mehr Schärfentiefe. Während der Belichtungzeit von 200 Sekunden leuchtete ich das Zelt von innen mit einer LED-Taschenlampe und einem Lee-Farbfilter aus.

Die nachfolgenden Belichtungswerte sahen dann wie folgt aus: ISO 3200, Blende f/4 und 69 Sekunden Belichtungszeit. Ich programmierte meinen Timer auf 31 Aufnahmen und legte mich entspannt auf meine Isomatte ins Gras. Alle 32 Aufnahmen würde ich später in Photoshop in 32 einzelnen Ebenen mit dem Verrechnungsmodus Aufhellen stapeln.

Während meine Kamera 35 Minuten lang fleißig Fotos machte, beobachtete ich den Sternenhimmel und wurde immer wieder durch das Rascheln im Wald direkt hinter mir aufgeschreckt. Die Waldkauze schrien in die Nacht hinein.

Das sind die Augenblicke in der Landschaftsfotografie, die das Auslösen des Verschlusses in den Hintergrund treten lassen. Die Momente, in denen man die Landschaft spürt, in denen man sie schmecken, riechen und fühlen kann, sind für mich unersetzliche Erinnerungen und Faszination zugleich. Beim Anschauen der Fotos später am Rechner oder als großformatiger Druck kommen diese Erinnerungen wieder und bescheren mir ein tiefes Glücksgefühl.


kwerfeldein – Fotografie Magazin

 
Comments Off on Landschaftsfotografie bei Nacht

Posted in Equipment


Battle of the Wi-Fi Cards: Eye-Fi and Transcend SDHC cards reviewed

29 Aug

Showdown-Feature_1.jpg

Being able to wirelessly connect your camera to a smartphone, computer or to ‘the cloud’ has a lot of appeal. Wi-Fi can expedite workflow by allowing you to transfer image files remotely while on location and also negate the need for card readers or cables. It’s easy to forget that your camera doesn’t have to have Wi-Fi built-in to benefit from the advantages of connectivity. In this article, we pit Eye-Fi’s 16GB Pro X2 Wi-Fi SDHC card against the cheaper, higher-capacity Transcend 32GB Wi-Fi card and see which comes out on top. 

News: Digital Photography Review (dpreview.com)

 
Comments Off on Battle of the Wi-Fi Cards: Eye-Fi and Transcend SDHC cards reviewed

Posted in Uncategorized


How to Photograph Mixed Skin Tones

29 Aug

by Elena Wilkins

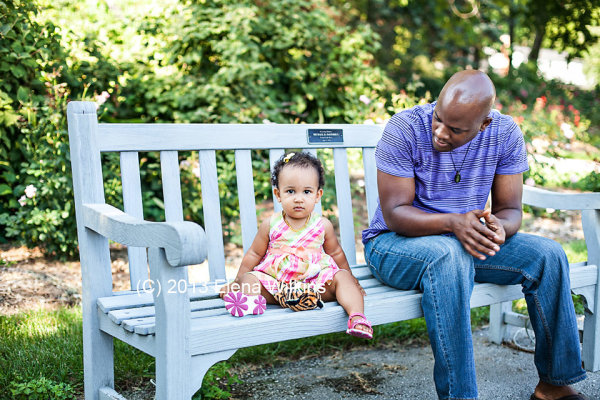
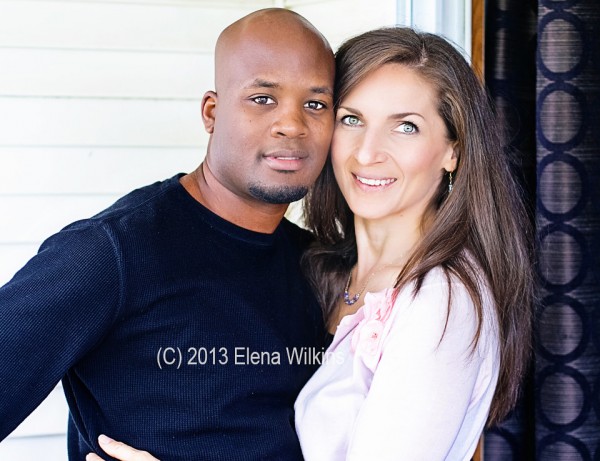
If you ever had my family as your clients, you could feel a tad lost at how to photograph us. Why? Well, there are three of us, and we come in a wide range of skin tones—from my fairly light skin, to my husband’s, pretty dark and handsome; our child fits right in between. We are a true colored family—a perfect fusion of all tones—a photographer’s conundrum, or, maybe even, a nightmare!

Who do you expose for? The mom? The child? Or the father? All three of us would need different camera settings… or a few tricks to make magic happen.

Because very few photographers get enough experience to properly shoot families like mine, or people of darker color in general, and even fewer know to properly process such images to perfection, we always find it hard to find the “perfect” photographer for us. I remember the first time I organized a multi-photographer photo shoot in the Northwest (Washington State), and brought my husband to it—he was everyone’s favorite model to practice on, since he happened to be the very first person of darker hue for most of the photographers at the event. Since I am the photographer and often the subject in our family images, I have been able to perfect these skills.

In this post I will share a few of my tricks, which helped me successfully satisfy not only my picky taste, but many of my darker complexion clients, as well as families, much like mine, with mixed skin tones.

But first, meet my colorful family.

My perfect child. It is the mother’s right to think that her child is the cutest and most perfect :) .

How-to-Photograph-Mixed-Skin-Tones-5

The beautiful duo—both loves of my life.
How-to-Photograph-Mixed-Skin-Tones-4

How-to-Photograph-Mixed-Skin-Tones-3

Things to keep in mind for this post:

  1. as a photographer, I use only natural light—I shoot almost exclusively outside, on location, and barely ever use fill flash, even with darker skin people;
  2. studio techniques for photographing people of color or mixed skin tones might be slightly different—I will not be covering them in this post;
  3. I do not use reflectors, since I shoot solo, but they might be helpful, if you have an assistant;
  4. I shoot RAW, so that I could easily adjust highlights and shadows in post processing;
  5. when I refer to people of color, I mean ALL people, since all of us are of some color :) ,
  6. I live by a motto: get images right in the camera as much as possible to cut down on post processing time—I usually spend no more than 30-60 seconds per image in post processing.

5 Tips and Tricks to Photograph People of Color

1. It’s all about clothing

If at all possible, I ask my dark skin complexion clients not to wear white clothing. It makes life easier. In cases of wedding, as you can imagine, this is not an option. Sometimes I do have clients who want to be wearing white clothing specifically—I never say no! I will discuss how to make those images magical in post processing shortly.

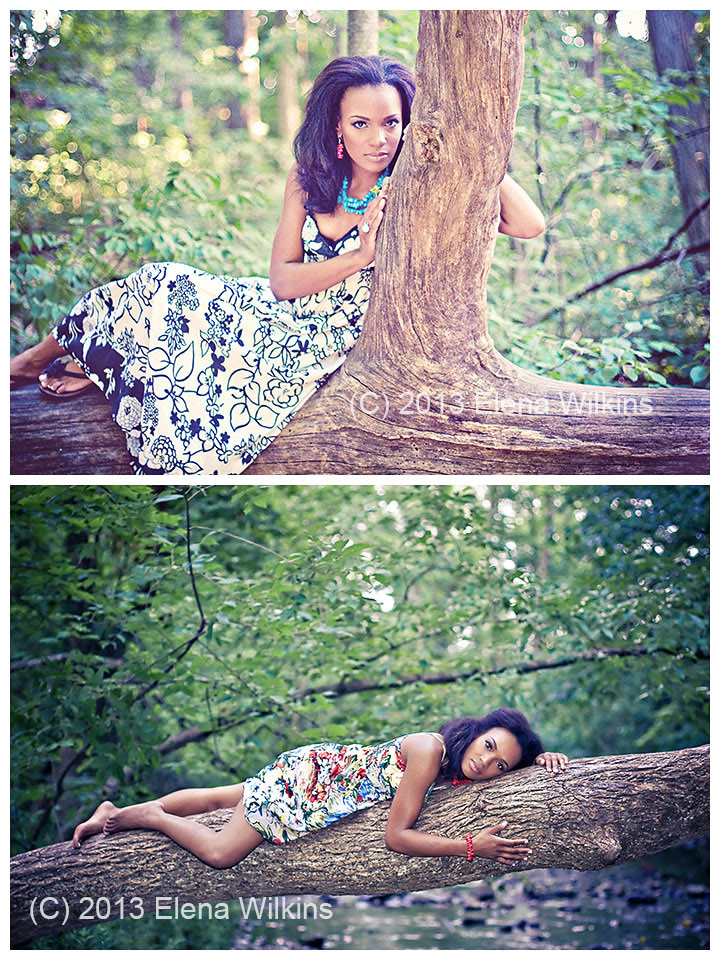
During my initial consultation with clients, we discuss best clothing options for the shoot, depending on the look we want to achieve and the mood they want to create. Often my clients come with a few sets of clothing to the shoot and a wide range of jewelry (for the ladies, and I help them coordinate to create the best, and the most magical images.

I coordinated every piece of clothing and accessories for this shoot, at my client’s request

I coordinated every piece of clothing and accessories for this shoot, at my client’s request

2. Away from Bright Lights

I love to shoot either early in the morning or in the evening, when the sun goes down, lavishing its golden rays to create perfect magic. In cases, especially with weddings, if that is not an option, and I have to shoot in the afternoon sun, I look for evenly shaded areas, so there is no competition between the natural light and my subjects’ skin. If all else fails, I do use fill flash.

This image was shot in an evenly shaded area, away from harsh light. I exposed for Francesca’s face.

This image was shot in an evenly shaded area, away from harsh light. I exposed for Francesca’s face.

3. Expose for the Skin

When shooting a darker skin complexion person, expose for the face. Get the face right, and the rest of the image will fall into place.

If she is wearing complimentary colored clothing, concentrate on getting perfect skin tone, so you won’t need to spend too much time in post processing, and also have something to show your client during the shoot to inspire her with her beauty.

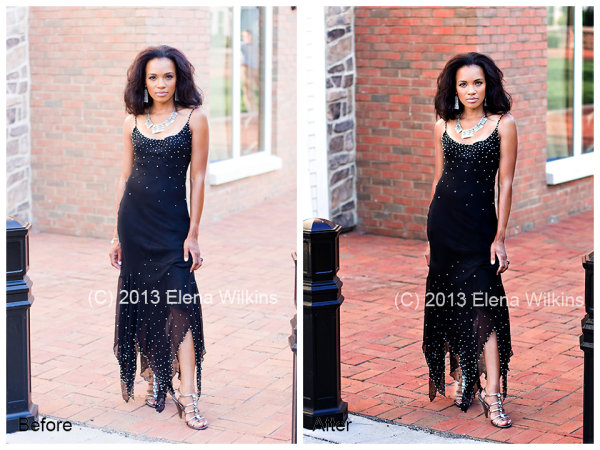
Courtnee’s face was my focus; the brick, as gorgeous as it is, was easily darkened back to its beauty in post processing with a quick action and a few brush strokes

Courtnee’s face was my focus; the brick, as gorgeous as it is, was easily darkened back to its beauty in post processing with a quick action and a few brush strokes

4. Balancing Whites and Darker Skin Tones

If your clients are wearing light clothing, especially true with weddings, make sure not to blow out highlights, so you can adjust it in post processing. This is why I shoot RAW, without exception, when it comes to weddings. I want to make sure I still can tone down my whites in post processing.

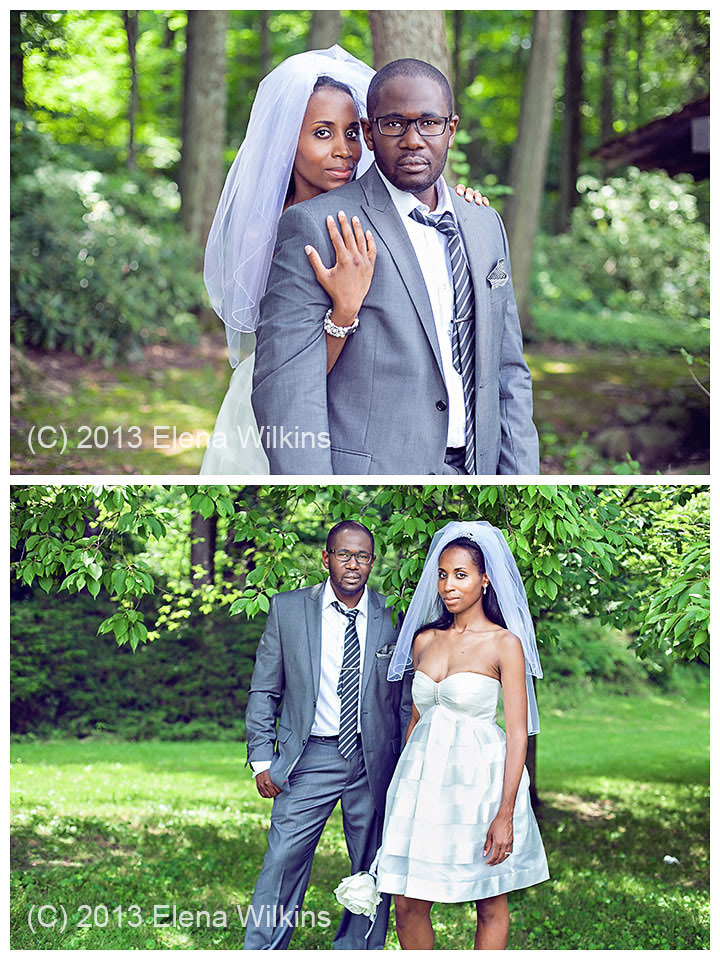
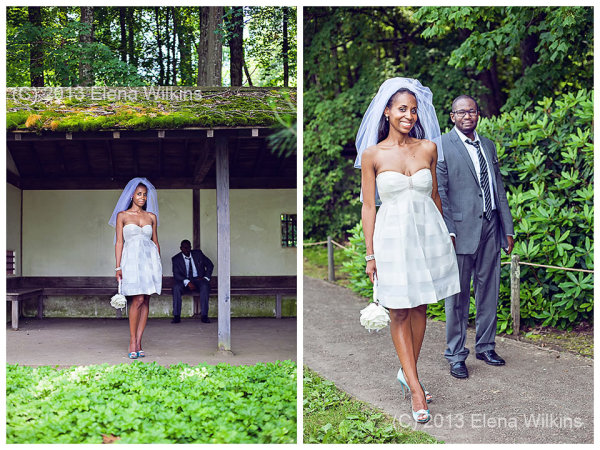
In these images I focused on my clients’ faces, making sure not to blow out whites, so I would still get detail in the dress, the shirt and the veil in post processing. In post processing, I used Bridge/Camera Raw, I brought down highlights and whites, bumped shadows, and then finished magic in Photoshop, selectively processing areas of the images that needed extra attention.

In these images I focused on my clients’ faces, making sure not to blow out whites, so I would still get detail in the dress, the shirt and the veil in post processing. In post processing, I used Bridge/Camera Raw, I brought down highlights and whites, bumped shadows, and then finished magic in Photoshop, selectively processing areas of the images that needed extra attention.

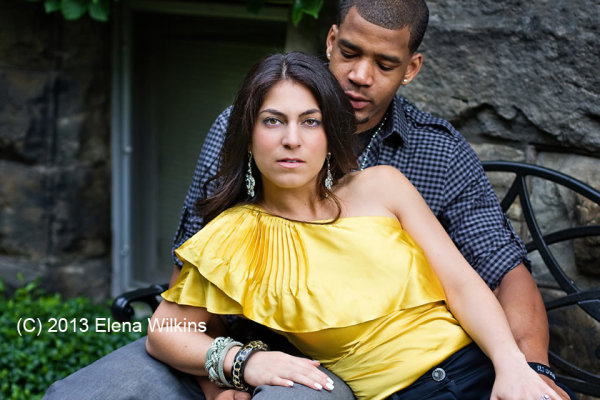
In these images I exposed for Candice, since she was the focal point of the images, and ensured that whites were not blown out, so they could be fixed, if needed, in post processing

In these images I exposed for Candice, since she was the focal point of the images, and ensured that whites were not blown out, so they could be fixed, if needed, in post processing

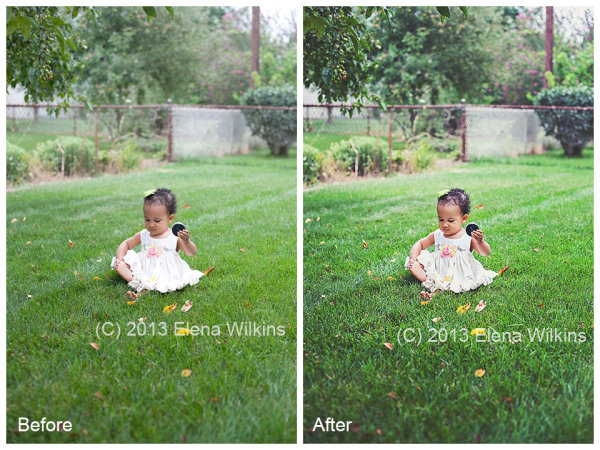
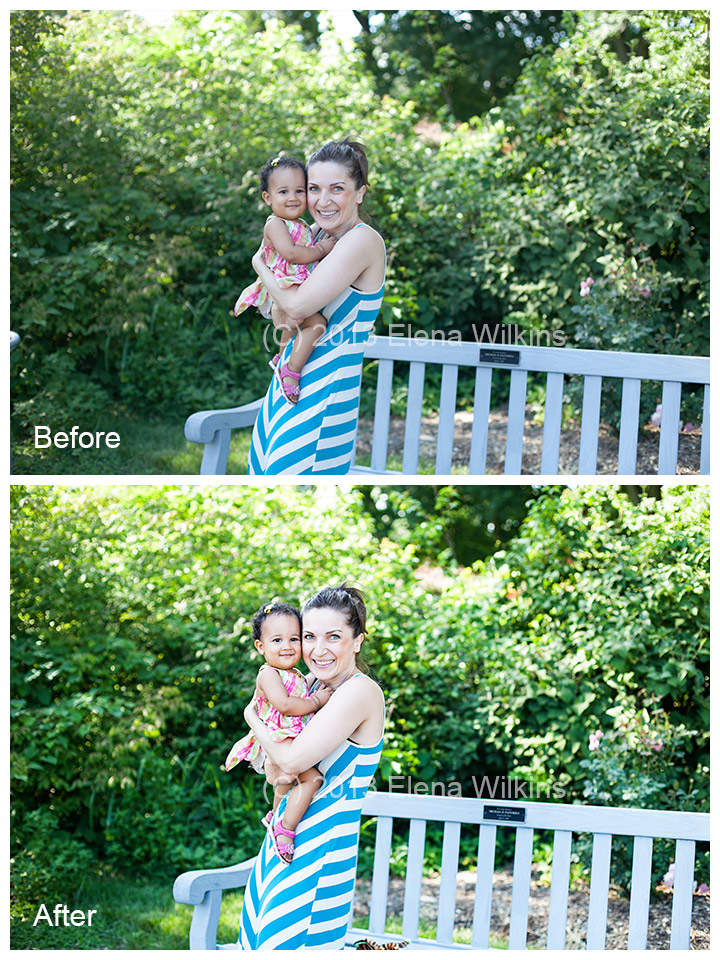
In this image of my little girl, she was facing away from direct light, I made sure to get her face just right, in camera, which left some of the highlights in her dress just a tad too bright. Not to worry! I was able to fix that in post processing, in less than 20 seconds!

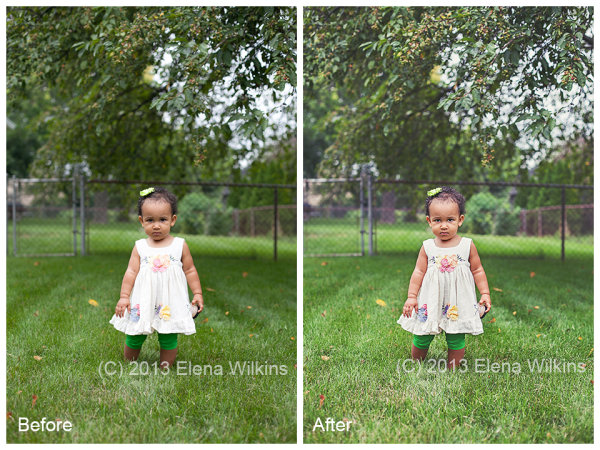
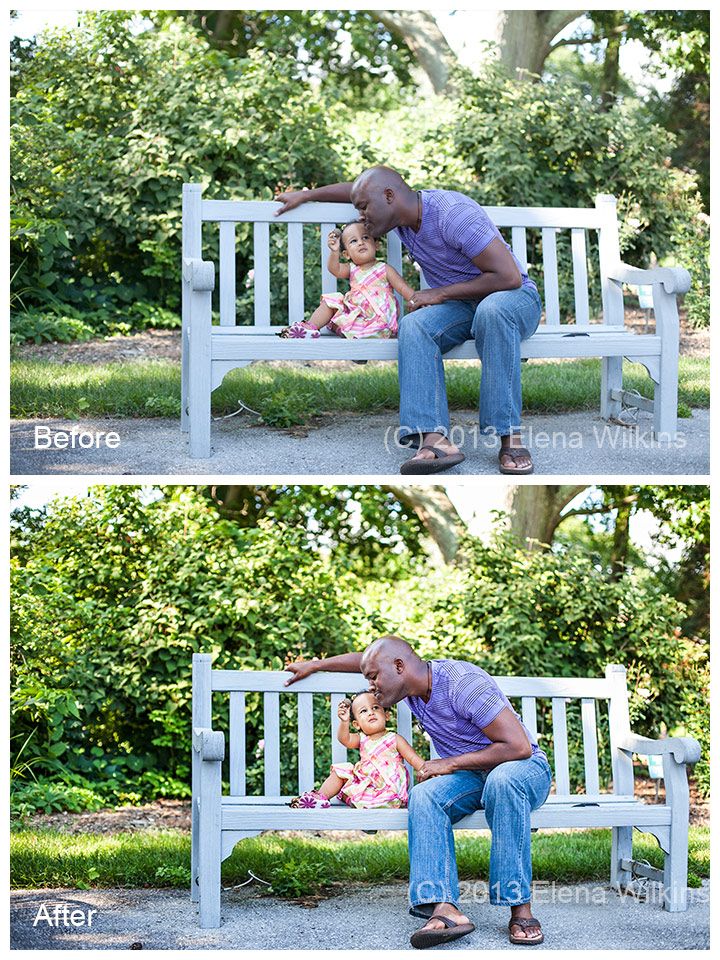
In this shot, since she was facing direct light, I made sure not to blow out highlights, so, her face turned out a tad darker, but the dress was not blown out. In post processing I lightened the face and darkened the dress. The image turned out magical, although she might not have been too happy to be interrupted for the image during her playtime.

In this shot, since she was facing direct light, I made sure not to blow out highlights, so, her face turned out a tad darker, but the dress was not blown out. In post processing I lightened the face and darkened the dress. The image turned out magical, although she might not have been too happy to be interrupted for the image during her playtime.

I will mention actions used in processing these two image at the end of the post

I will mention actions used in processing these two image at the end of the post

5. Go for the Mid-Range: Photographing Mixed Skin Tones in the Same Image

If you are photographing people of different skin tones in the same image, go for the mid-range; the rest can be adjusted in post-processing. I always make sure that the lightest person is not too light, while the darkest person is not too dark. If the lightest person turns out too light, you might have a case of blown highlights, and no Photoshop tricks will fix that. If the darkest person turns out too dark and you will try to adjust it in post processing, there might be too much digital noise on that person’s face, compared to the rest of the image.

When I photograph my husband and myself, I usually take a couple of test shots to make sure I do now pale completely next to him. Having over ten years of experience, however, these days I normally do a quick test shot with just him in it, since I know how I would look next to him.

When I photograph my husband and myself, I usually take a couple of test shots to make sure I do now pale completely next to him. Having over ten years of experience, however, these days I normally do a quick test shot with just him in it, since I know how I would look next to him.

Magic Happens in Post Processing

How to Post Process Images with Mixed Skin Tones

While batch processing is the best thing since sliced bread, as you can imagine it is not always possible in situations such as I just described. Batch post-processing can be done only to a point—you could not just throw all images of clients with mixed skin tones into Lightroom and have magic happen. Some selective image post-processing (processing only parts of the images) will need to be done.

Most of us are visual people, so instead of trying to explain something with a thousand words, I created a ten minute video to show you how I photograph and post-process images of clients with mixed skin tones to perfection.

How to Photograph Mixed Skin Tones from Elena Wilkins on Vimeo.

Here are the images used in the video, and, as promised, a list of actions I used in post-processing.

How-to-Photograph-Mixed-Skin-Tones-2

Actions used:

  • Boost action from Pioneer Woman Set 1 (used to boost tones for the entire image)
  • Touch of Light | Touch of Darkness by MCP Actions (used selectively)
  • MCP High Definition Sharpening action by MCP Actions (used for the entire image)
  • Polished Picture Sparkling Eyes by Polished Picture (used to sharpen eyes only)
same set of actions used to process this image

same set of actions used to process this image

In the two images of my little girl, after adjusting them in Bridge/Camera Raw (I decreased highlights to -82, bumped up shadows by +50 and added contrast at +24), I used the same actions as in these images, with an addition of:

  • Polished Pictures Funky Curves (Ruby curve at 40% and Matte curve at 25%, I then painted back her face at 60%).

I hope that having read this post you will feel more equipped to photograph people of color and know how you can create magic in post-processing.

Happy Shooting!

Elena Wilkins is a lifestyle and wedding photographer. Since becoming a Mom, she took a break from full-time photography, concentrating on raising her baby and running a health and nutrition blog Vegalicious, which is filled with images of delicious foods and her colorful family. She still photographs occasional weddings and sessions, dedicating herself to serving people who need her expertise the most—people of color and families with mixed skin tones. She is getting ready to relaunch her photography web-site, Color Fusions, which she will dedicate to sharing tips and tricks of the trade, and serving her colorful clients.

Post originally from: Digital Photography Tips.

Check out our more Photography Tips at Photography Tips for Beginners, Portrait Photography Tips and Wedding Photography Tips.

How to Photograph Mixed Skin Tones


Digital Photography School

 
Comments Off on How to Photograph Mixed Skin Tones

Posted in Photography


Battle of the Wi-Fi Cards: Eye-Fi and Transcend SDHC cards reviewed

29 Aug

Showdown-Feature_1.jpg

Being able to wirelessly connect your camera to a smartphone, computer or to ‘the cloud’ has a lot of appeal. Wi-Fi can expedite workflow by allowing you to transfer image files remotely while on location and also negate the need for card readers or cables. It’s easy to forget that your camera doesn’t have to have Wi-Fi built-in to benefit from the advantages of connectivity. In this article, we pit Eye-Fi’s 16GB Pro X2 Wi-Fi SDHC card against the cheaper, higher-capacity Transcend 32GB Wi-Fi card and see which comes out on top. 

News: Digital Photography Review (dpreview.com)

 
Comments Off on Battle of the Wi-Fi Cards: Eye-Fi and Transcend SDHC cards reviewed

Posted in Uncategorized


Forest Pavilion is World’s First 3D-Printed Architecture

29 Aug

[ By Steph in Conceptual & Futuristic & Technology. ]

Worlds First 3D Printed Architecture 1

There has been a lot of competition to design and execute the first prototype of a 3D-printed architectural structure, including complex concepts for houses inspired by nests and möbius strips. But it looks like that honor goes to Smith | Allen, an Oakland, California-based duo of designers who have created the Echoviren Pavilion.

Worlds First 3D Printed Architecture 2

The airy white pavilion consists of 585 interlocking components made of plant-based bio plastics, printed over 10,800 hours, mimicking the look and feel of its setting in a redwood forest. Measuring 10x10x8, the structure was assembled in four days.

Worlds First 3D Printed Architecture 3

The bioplastics will enable the pavilion to eventually decompose naturally within the forest, just like the trees that grow all around it. That process will take 30 to 50 years. It will also become a habitat for insects, moss and birds during its time in the forest.

Worlds First 3D Printed Architecture 4

The Echoviren Pavilion was made using 7 of the Type A Machines Series 1 printers. The team actually used these small-scale printers to create large bricks with which to build, leading some critics to state that it’s not a truly 3D-printed structure, printed in much larger parts to create the whole. The true test of 3D architecture will come when larger printers are used to lay out the material for the components, layer by layer, but the Echoviren Pavilion is still a beautiful example of what 3D printers can do.

Share on Facebook


[ By Steph in Conceptual & Futuristic & Technology. ]

[ WebUrbanist | Archives | Galleries | Privacy | TOS ]


WebUrbanist

 
Comments Off on Forest Pavilion is World’s First 3D-Printed Architecture

Posted in Creativity