RSS
 

Archive for April, 2013

Fill in the Blanks: Illustrated Sky Spaces Between Buildings

29 Apr

[ By WebUrbanist in Art & Drawing & Digital. ]

sky art

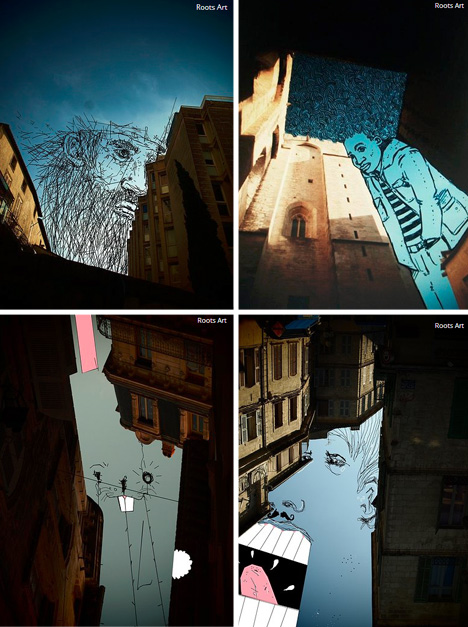
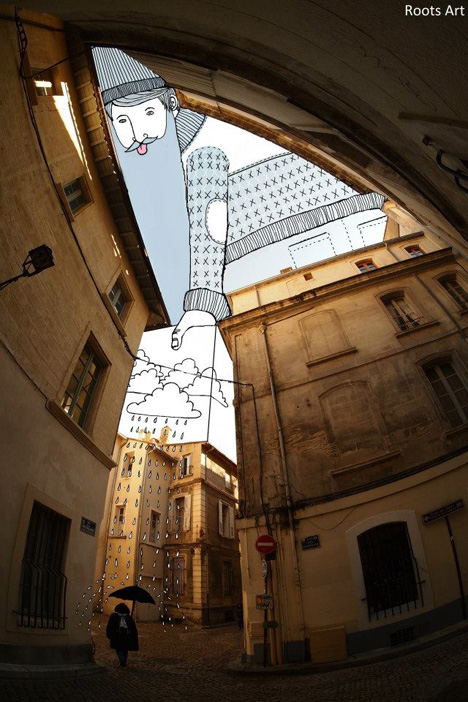
Street art uses roads, sidewalks, walls and infrastructure as canvasses, but one of the brightest and blankest slates of all may be the spaces in between.

sky scape cloud canvass

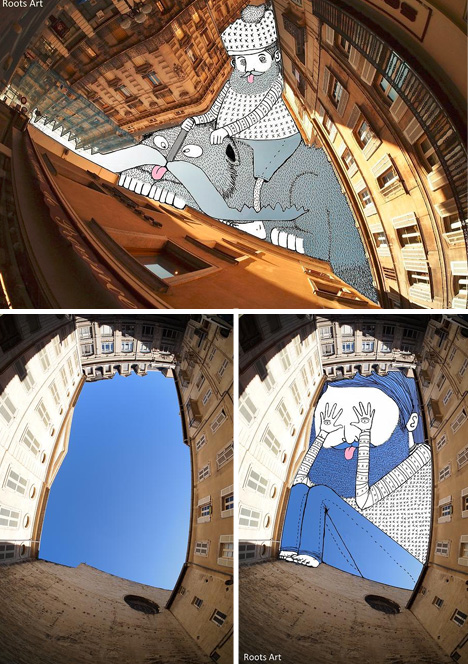
Thomas Lamadieu, a French artist, looks up and sees subject, not void, in blue and clouded city skies, then uses his imagination to fill in the picture, playing on notions of figure and ground.

sky art infill drawings

His Sky Art series shows a given and take between shapes being worked with and what he puts in, often working with minimalist lines and splashes of color.

sky art interactive sketch

In the process, he turns tapering alleys into uncomfortable figures, sinuous spaces into leaning ladies, and cramped courtyards into crouching pranksters, all the while challenging us to see back and forth between positive and negative space (and selectively breaking the boundaries in between).

Share on Facebook


[ By WebUrbanist in Art & Drawing & Digital. ]

[ WebUrbanist | Archives | Galleries | Privacy | TOS ]


WebUrbanist

 
Comments Off on Fill in the Blanks: Illustrated Sky Spaces Between Buildings

Posted in Creativity


Albanische Landschaften – Lochkamerafotografie mit Bunkern

29 Apr

Ein Beitrag von: Tim Hölscher

Mitte der neunziger Jahre reiste ich mit meinem Vater zum ersten Mal nach Albanien, um Hilfsprojekte zu besuchen, für die er verantwortlich war. Mit dem VW-Bus setzten wir damals von Korfu aus über nach Sarandë und bereisten für ein paar Tage das Land.

Die Erinnerung an diese Reise ist bruchstückhaft, was sich aber eingeprägte, war diese unglaubliche Anzahl kleiner, pilzartiger Bunker, die einfach überall im Land verstreut waren. Sie säumten Straßen, wuchsen mitten in Städten aus dem Boden und reihten sich kilometerlang an den Stränden der albanischen Adriaküste.

Als ich mich dann Jahre nach dieser Reise während meines Fotografiestudiums an der FH Bielefeld intensiv mit der Lochkamera als kreativem Instrument befasste, waren neben Fotoexperimenten mit 60-Loch-Ringkameras, Liveview- und Postpaket-Lochkameras plötzlich wieder diese Bunker in meinem Kopf und die Idee zu meinem Fotoprojekt „Albanische Landschaften“ war geboren.

Bunker © Tim Hölscher

Ich wollte diese destruktiven Bauwerke, die hunderttausendfach vom albanischen Diktator Enver Hoxha zwischen Anfang der 70er und Mitte der 80er Jahre zum „Schutz vor Feinden des Sozialismus“ errichtet wurden, zum ersten Mal in ihrer Existenz einem realen Nutzen zuführen.

Plötzlich waren die 750.000 kleinen Betonpilze, die nie genutzt wurden, da der Feind bis zum Tode Hoxhas Mitte der achtziger Jahre nicht auftauchte, nicht mehr nur stumme Zeugen der sozialistischen Ära Albaniens, sondern, in ihrer Funktion als Lochkamera-Rohlinge, kreative Instrumente.

Ich wollte mit ihnen Landschaftsfotos erstellen und den Blick aus ihren Schießscharten auf Fotopapier bannen. Die Tatsache, dass ich die Gebäude selbst zu Kameras umbauen wollte, verlieh meinem Vorhaben noch eine weitere konzeptionelle Ebene:

Es gab in meinen Augen keine bessere Möglichkeit, das fotografierte Bild mit dem Ort seiner Entstehung zu verbinden und so mit dessen Geschichte aufzuladen, als den Ort selbst als Kamera zu verwenden und das Papier auszustellen, das wirklich die Reise nach Albanien angetreten hatte.

Bunker © Tim Hölscher

Von der Idee zur Umsetzung – Oder: Wie mache ich aus einem albanischen Bunker eine funktionierende Kamera?

Nach einigen „Trockenübungen“ mit aus Teichfolie gebastelten Lochkamera-Zelten, in denen ich mir die theoretische Machbarkeit meines Plans noch einmal praktisch vor Augen führen konnte, stand der Umsetzung meines Projektes nichts mehr im Wege – dachte ich…

Wie aufwändig und kompliziert es aber tatsächlich ist, diese kleinen, recht dunklen Orte mit einer Öffnung zum Betreten und einer Öffnung zum Beobachten der Umgebung zu Lochkameras umzufunktionieren, war mir vor Beginn meiner Arbeit nicht wirklich klar.

Klar war lediglich, dass ich gern großformatige Positivbilder in Farbe produzieren wollte. Während ich in meinen bisherigen Lochkamera-Arbeiten mit kleineren Formaten auf Film oder Schwarzweiß- und Colorpapier gearbeitet hatte, brauchte ich dieses Mal definitiv größere Formate, da meine „Kameras“ einen Innendurchmesser von ca. 1,3 m hatten und ich entsprechend große Motive fotografieren wollte.

Unter diesen Voraussetzungen kam eigentlich nur ein Material in Frage: Das – Ende 2011 bedauerlicherweise eingestellte – Positivpapier Ilfochrome. Es erlaubte mir, großformatige Color-Unikate mit meinen Bunkerkameras herzustellen – ohne den Umweg über ein Negativ.

Die erste Reise nach Albanien trat ich zusammen mit meinem Kollegen Kristian Barthen im Oktober 2009 an. Ausgerüstet mit einer 30m-Rolle Ilfochrome-Papier, einer Ilford CAP-40 Entwicklungsmaschine für Teststreifen, hunderten Metern Klebeband und einer Rolle Verdunkelungsfolie, alles gut verstaut in einem VW Bus, ging es über Italien mit der Fähre nach Albanien.

Die Aufgaben während unserer Reise durch das Land waren klar verteilt: Der Fahrer konzentrierte sich auf die „speziellen“ Straßenverhältnisse, während der Beifahrer nach geeigneten Bunkern Ausschau hielt. Natürlich hätte das Konzept der Arbeit praktisch mit jedem Bunker funktioniert, allerdings bot die gigantisch große Anzahl die Chance, diejenigen auszuwählen, bei denen der Ausblick durch die Schießscharten zusätzlich ein interessantes Bild versprach.

Scharte © Tim Hölscher

Hatten wir einen vielversprechenden Kandidaten gefunden, war die Vorgehensweise fast immer dieselbe, da die Bunker zwar nicht immer komplett identisch, aber doch in den meisten Fällen sehr ähnlich waren.

Der erste Schritt bestand in der Regel darin, einen Stein oder ähnliches durch die Schießscharte ins Innere zu werfen, um größeres Getier zu vertreiben. Ein Bunker bietet im Sommer ein schattiges Plätzchen und im Winter einen Unterschlupf – daher war dieser kleine „Weckruf“ in vielen Fällen äußerst angebracht, um später im abgedunkelten Bunker nicht zu viel Gesellschaft zu haben. Allein war man jedoch nie.

Umbau © Tim Hölscher

Anschließend wurde das im Inneren benötigte Material in den Bunker gebracht: Lichtdicht verpacktes Fotopapier, eine Leerrolle für das belichtete Material, zwei Stative und eine weiße Holzplatte als Projektionsfläche sowie ein kleiner Hocker für meinen Aufenthalt im Bunker während der Belichtung.

In die Schießscharte wurde ein Holzbrett eingesetzt, in dessen Mitte eine Irisblende montiert war. Die Ränder wurden extrem sorgfältig abgedichtet, weil die Lochblende für das eigentliche Foto nur etwa einen Millimeter weit geöffnet werden sollte und deshalb jeder Spalt eine Konkurrenz für das eigentliche Loch dargestellt hätte. Im Inneren des Bunkers wurde eine weiße Holzplatte als Projektionsfläche mit Hilfe von Stativen gegenüber der Schießscharte positioniert.

Umbau © Tim Hölscher

Sobald dieser grundlegende Aufbau erledigt war, konnte die eigentliche Arbeit im Inneren beginnen. Mein mitgereister Kollege Kristian Barthen begann, den Bunkereingang von außen lichtdicht zu verschließen, während ich mich im Inneren des Bunkers auf einen längeren Aufenthalt einrichtete.

Sobald der Eingang einigermaßen verschlossen war, bot sich bei weit geöffneter Irisblende nach kurzer Gewöhnungszeit für die Augen ein eindrucksvolles Bild: Das Innere des Bunkers war komplett erfüllt mit einem Abbild der Landschaft, die der Schießscharte gegenüberlag.

Umbau © Tim Hölscher

Die Projektion beschränkte sich nicht auf die Holzplatte, sondern erfüllte den gesamten Raum. Da ich die Breite der Platte recht genau auf die Innenmaße des Bunkers angepasst hatte, war der Bewegungsspielraum zur Auswahl eines Bildausschnittes sehr begrenzt. Meine Aufgabe als Fotograf im Bunkerinneren beschränkte sich aus diesem Grund eher darauf, das von der Schießscharte vorgegebene Bild im Inneren des Bunkers „einzufangen“, ohne dabei allzu viel an der Komposition des Bildes arbeiten zu können.

Tatsächlich wurde dieser Aufnahmebereich meiner Kamera schon zu Zeiten der Diktatur festgelegt, als die Architekten der Bunker über die Ausrichtung der über 750.000 Schießscharten entscheiden mussten – eine Frage, deren Lösung aufgrund der unzähligen Standorte eine absolute Mammutaufgabe gewesen sein muss.

Umbau © Tim Hölscher

Umbau © Tim Hölscher

Sobald der Bunker komplett abgedichtet war, wurde die Irisblende bis auf einen Millimeter verschlossen und mit einem Tageslichtfilter versehen, der das einfallende Licht nochmals um eine Blende verringerte. Im Bunkerinneren fixierte ich das Ilfochrome-Papier auf der Projektionsfläche. Da es im unentwickelten Zustand eine dunkelbraune Oberfläche hat, war von der Landschaftsprojektion nun nicht mehr viel zu erkennen.

Versuche mit Teststreifen, die dank der mitgebrachten Entwicklungsmaschine im zum mobilen Labor umgebauten Bulli direkt am Bunker entwickelt wurden, hatten eine Belichtungszeit von ca. 2 Stunden bei strahlendem Sonnenschein ergeben. Diese Zeit musste ich also definitiv unbeweglich unterhalb der Schießscharte verharren, um im Anschluss das Papier wieder von der Fläche zu entfernen und es lichtdicht zu verpacken.

Entwicklung @ Tim Hölscher

Entwicklung © Tim Hölscher

Die genaue Belichtungszeit wurde flexibel an die äußeren Bedingungen angepasst – mehr Wolken am Himmel bedeuteten weniger Lichteinfall und somit eine Verlängerung meiner „Sitzung“. Am Rande bemerkt machte die Tatsache, dass das Bleichbad im P-30 Prozess zur Entwicklung der Probestreifen Schwefelsäure enthält, den anschließenden Aufenthalt im Auto zu einem unangenehmen Unterfangen, da der Geruch nach faulen Eiern sich erstaunlich lange im Wageninneren halten konnte.

Die Ergebnisse

Natürlich bringt diese spezielle Art und Weise, Fotografien zu erstellen, Widrigkeiten und körperlichen Entbehrungen mit sich. Der Augenblick, der sie jedoch jedes Mal aufs Neue lohnenswert erscheinen lässt, ist der Moment, wenn die fertigen Unikate aus der Maschine laufen und zum ersten Mal betrachtet werden können.

Aus mehrwöchigen Reisen mit vielen Strapazen und noch mehr Erlebnissen werden in diesem Moment Landschaftsfotografie-Unikate, die durch den Ort ihrer Entstehung aufgeladen sind mit der Geschichte eines ganzen Landes.

Rrjull © Tim Hölscher

Plazhi-I-Generalit © Tim Hölscher

Pogradec © Tim Hölscher

Die Tatsache, dass die Bauwerke selbst das Bild liefern und ich es lediglich „abholen“ muss, entfacht meine Faszination für diese Art der Fotografie immer wieder aufs Neue. Jeder Ort oder Gegenstand, der sich verdunkeln und mit lichtempfindlichem Material bestücken lässt, kann eine Kamera sein, die mit ihrem Motiv auf besondere Weise verbunden ist. Dies lässt im wahrsten Sinne Raum für unendlich viele künstlerische Konzepte.

Wer sich nach diesem Bericht intensiver für meine Bunkerbilder sowie weitere Arbeiten aus den letzten sechs Jahren interessiert, dem sei mein gerade im Zentralverlag Berlin erschienenes Buch „Experimentelle Wege zum Bild“* ans Herz gelegt (auch über meine Website erhältlich). Darin enthalten sind neben dieser Arbeit viele verschiedene Ansätze auf meiner Suche nach alternativen Wegen zur Bilderstellung, die sich etwas abseits der konventionellen Fotografie bewegen.

* Das ist ein Affiliate-Link zu Amazon. Wenn Ihr darüber etwas bestellt, erhalten wir eine Provision, Ihr zahlt aber keinen Cent mehr.


kwerfeldein – Fotografie Magazin

 
Comments Off on Albanische Landschaften – Lochkamerafotografie mit Bunkern

Posted in Equipment


Child’s Place: 10 Eerie Abandoned Orphanages

28 Apr

[ By Steve in Abandoned Places & Architecture. ]

abandoned orphanages
Orphanages served as repositories for unwanted, illegitimate and unsupportable children in relatively recent yet still socially unenlightened times and places. Modern initiatives in family planning and social welfare along with the realization that institutionalizing children adversely affects their development have seen a steep reduction in the number of functional and operating orphanages. These 10 eerie abandoned orphanages represent a fading vestige of “the good old days” whose loss is in no way disappointing.

Greek Orphanage: Büyükada, Turkey

abandoned Greek Orphanage Buyukada Turkey(images via: Archaeopop)

The former Büyükada Greek Orphanage (Büyükada Rum Yetimhanesi) was designed in the Ottoman Beaux-Arts style by French-Turkish architect Alexandre Vallaury and opened in 1899. Its remote location on Büyükada, one of the Prince’s Islands just off Istanbul in the Sea of Marmara, probably contributed to its preservation even though it’s been abandoned since the 1960s.

abandoned Greek Orphanage Buyukada Turkey(image via: Archaeopop)

The orphanage closed in 1936 after running afoul of official regulations and was subsequently used as a government administration building. A lengthy court battle that finally ended in 2010 saw the title of the building returned to the Greek Orthodox patriarchate. It remains one of the world’s largest wooden buildings.

Abandoned Orphanage: Jena, former East Germany

abandoned orphanage Jena Germany GDR(image via: ashes_and_sackcloth)

This abandoned orphanage in the German city of Jena displays a jarring combination of hope and despair on its grimy facade: bright, colorful window frames epitomize the former while dull, lifeless masonry blighted by graffiti typify the latter. In its heyday, administered by authorities in the former German Democratic Republic, the place may have been almost cheery compared to the trials and tribulations of everyday life. Thanks to Flickr user ashes_and_sackcloth for capturing this unique emotional image.

Abandoned Orphanage Nursery: Pripyat, Ukraine

abandoned orphanage Pripyat Ukraine(images via: Nige820, Wikipedia and BBC)

State-funded orphanages were common in most medium to large cities of the former Soviet bloc, though they are gradually giving way to family support programs and foster care. The process is slow, however – as of 2011 slightly over 100,000 children were residents of orphanages in Ukraine.

abandoned orphanage Pripyat Ukraine(image via: Imgur)

Bad as that seems, at least children no longer reside in the orphanage at Pripyat, the city of 50,000 founded in 1970 and abandoned 16 years later in the wake of the Chernobyl nuclear disaster. Judging from the cramped conditions in the nursery above, life must have been difficult at best; depressing at worst.

St John’s Orphanage: Goulburn, NSW, Australia

St John's Orphanage Goulburn Australia abandoned(image via: Viewed At Once)

St. John’s Orphanage (also known as the Goulburn Boys Orphanage) located in Goulburn, New South Wales, opened in 1912 and closed in 1976. At any one time, approximately 100 boys aged 5 to 16 called the Goulburn Boys Orphanage home. After the orphanage closed, the Christian Interdenominational Organisation conducted discipleship training courses in the building before it was finally abandoned in the late 1990s. The structure is reputed to be haunted and although entry into the interior is not allowed, nocturnal ghost tours are regularly conducted by a local company.

Next Page:
Childs Place 10 Eerie Abandoned Orphanages

Share on Facebook


[ By Steve in Abandoned Places & Architecture. ]

[ WebUrbanist | Archives | Galleries | Privacy | TOS ]


WebUrbanist

 
Comments Off on Child’s Place: 10 Eerie Abandoned Orphanages

Posted in Creativity


28. April 2013

28 Apr

Ein Beitrag von: Andreas Hering

Pinhole-Bride-river


kwerfeldein – Fotografie Magazin

 
Comments Off on 28. April 2013

Posted in Equipment


28 April, 2013 – Vision, Part 2

28 Apr

We have just published Vision – Part 2, of an ongoing new series by Alain Briot.

I just returned from a shoot with Sean Reid and Mark Dubovoy where I had an opportunity to shoot with the new Leica M 240 for the first time.

I will have a First Impressions report here in a few days, and then in a while we will publish an extended round-table video discussion by the three of us in which the main topic is not just the M240 but non-DSLR camera in general. Watch for it!


"Yes I downloaded the videos. THEY ARE AWESOME!!! I learned so much I think my brain is going to explode.


The Luminous Landscape – What’s New

 
Comments Off on 28 April, 2013 – Vision, Part 2

Posted in News


Canadian Travelogue – Introduction

28 Apr

PREFACE:

In 2000, as a millennium project, my good friend and noted landscape photographer Daryl Benson, and I joined forces and produced a book called “A Guide to Photographing the Canadian Landscape.”  In this tome we presented our favourite places to photograph across Canada, how to get there and showed images of what to expect once the reader arrived at that destination.  We called the book our “armchair trek” across this vast landscape.

It wasn’t long after I started contributing to Digital Photography School that personal messages started arriving from folks living in Europe (primarily) asking questions about where they should go in Canada to get good pictures.  My answer has remained steadfast over the years: The best photos are where you happen to be at that point in time.  Successful photography really is a combination of research, skill and mindset; with the later being the most important in my opinion.  However, this did not satisfy those enquiring, and follow up questions continued.

From both an aesthetic and technical perspective, much has changed since we produced that 152 page book. Daryl and I were heavy users of filters – Photoshop wasn’t yet a viable option for landscape photographers as it was still in its infancy as a software, as well as snails-pace computer hardware meant excruciatingly long wait times for various functions to complete. As you can imagine, overt filter use has gone out of favour as have many trends (sorry to say that to all us HDR proponents).  Our film cameras have essentially become antique and valueless – a Pentax 67 looks at me as I write this duly retired to its role as a bookend. And books are now delivered to the offset press as PDF files as opposed to huge CMYK sheets of film.

With all these considerations taken into account, it simply is not worthy of consideration to re-print the original book verbatim. Therefore, what I will do over the next few months is re-write the text, insert new photos, and generally re-work this book to bring it up to day’s styles and standards. The content will be posted in a systematic fashion, starting where the sun first reaches the North American coast and then eventually sets on the Pacific coast. We will take this journey from coast-to-coast-to coast (yes, I am fortunate to say I have literally dipped my toes in the Atlantic, Pacific and Arctic Oceans).

I have two requests from dPs readers:  1. Accept the fact that those initial entries in the original book written by Daryl, will be annotated in these entries as “DB” and the entries originally penned by myself will be signified with a “DW”; and 2. Let me know as we get going on this journey if you would like to see it produced as an e-book.

Other than that, I hope you enjoy this journey across what I consider the greatest country on the planet – my home, Canada.


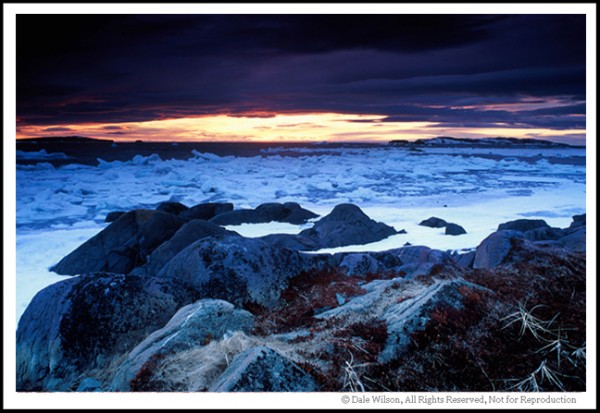
Bordered on three sides by salt water in a northern climate, ice is never far away. As the Canadian comedian Pete Soucey, aka Snook" says: We ahve nine months of winter and three to get ready for it. It's not all ice, there are also deserts and temperate rain forests. This image was made in mid-May at L'Anse aux Meadows, Newfoundland and Labrador; Canada's easternmost province.

Bordered on three sides by salt water in a northern climate, ice is never far away. As the Canadian comedian Pete Soucey, aka Snook,” says: We have nine months of winter and three to get ready for it. It’s not all ice, there are also deserts and temperate rain forests as well. This image was made in mid-May at L’Anse aux Meadows, Newfoundland and Labrador; Canada’s easternmost province.


INTRODUCTION:

“An incomplete Guide to Photographing the Canadian Landscape” was the original title for this book, but very early in the project our ace marketing, research and development team told us that no one would buy a guide book that admitted to being anything less than comprehensive. Bowing to wisdom, we re-named the book, but deep down we know that really it is incomplete.

Why so?

Well, Canada covers 9,970,610 square kilometres (second largest in the world behind Russia) and has 243,000 kilometres of shoreline (the most of any country in the world). If you could walk 20 kilometres per day, and followed the shoreline, it would take you 33 years to complete the trek. It is simply impossible to cover the vastness, the diversity and the natural beauty of Canada in any finite work.  Consequently, we know our book will forever be incomplete despite what that crack team of marketing people suggest.

A Guide to Photographing the Canadian Landscape has been created to make it easier for you to “hit the ice with sharp skates, so to speak; this is a Canadian metaphor that means, roughly, to arrive prepared. Interestingly enough, in the Russian language the same metaphor appears as “punch some vodka with a shaving device,” which is a good suggestion should your vodka be old and growing fur.

This guaranteed hair-free and clean shaven series is not intended to be a definitive photographic guide to areas that will be profiled –each one of them is worth a book itself- but merely a starting point at the head of the trail.

You are strongly encouraged to hike and explore further on your own, using the following words and information as a key to open the front door; what lies beyond is infinite.


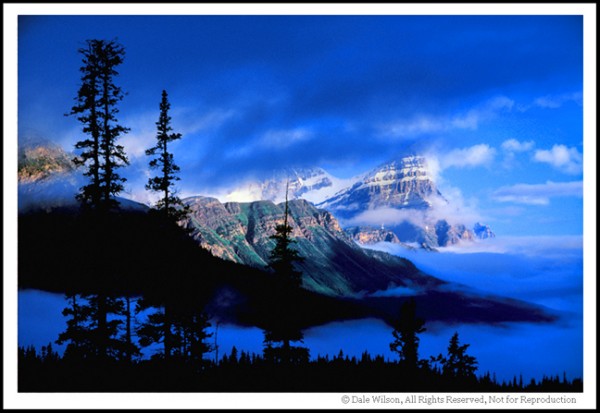
The majestic Mount Cephren rises 3,307 metres (10,850 feet) from the Mistaya River Valley at Banff National Park in Alberta. The north-south running mountain range that is also a border between Alberta and British Columbia, is a continuation of the Rocky Mountain range which originates far to the south in New Mexico.

The majestic Mount Cephren rises 3,307 metres (10,850 feet) from the Mistaya River Valley in Banff National Park, Alberta. The north-south running mountain range  is also a physical border between Alberta and British Columbia, and is a continuation of the Rocky Mountain range which originates farther to the south in New Mexico.

Post originally from: Digital Photography Tips.

Check out our more Photography Tips at Photography Tips for Beginners, Portrait Photography Tips and Wedding Photography Tips.

Canadian Travelogue – Introduction


Digital Photography School

 
Comments Off on Canadian Travelogue – Introduction

Posted in Photography


browserFruits April #4

28 Apr

Da wir Euch zum morgigen Welttag der Lochkamerafotografie thematisch passend versorgen möchten, gibt es unseren wöchentlichen Früchtekorb schon heute. Und morgen tolle Lochkamerafotografie. Wer dabei kurzentschlossen auch mitmachen möchte, kann sich heute schnell noch einmal unsere Anleitung für die Streichholzschachtellochkamera vom letzten Jahr ansehen. Oder Ihr baut einfach etwas anderes zu einer Kamera um. Was Ihr gerade so zur Hand habt.


Fotospecial: Lochkamera

Flickr

500px


Deutschsprachig

• Diesmal haben wir eine Anti-Wettbewerbsempfehlung für Euch: Den Frontex-Fotowettbewerb. Zum Thema empfehlen wir Euch auch das Fotoessay: „At The Wall Of Fortress Europe“ unseres Gastautoren Martin Ritzmann.

• „Der Fotograf, der niemals fragt“ nennt die taz einen Artikel über einen Fotografen, der gern anonym bleiben möchte und Menschen auf der Straße fotografiert.

• Die Ausstellung „Siehste, jeht doch!“ zeigt in Berlin bis zum 2. Juni die Arbeiten des letzten Jahrgangs des Fotografen und Lehrers Arno Fischer. Ausgewählte Bilder gibt es auch bei Zeit Online zu sehen.

• Dusard fotografiert Cowboys und rückt das gängige Bild vom Wilden Westen in ein neues Licht. Das Interview mit Bildern haben wir auf Spiegel Online gefunden.

• Pete Souza ist Barack Obamas Haus- und Hof-Fotograf. Die Süddeutsche berichtet über ihn und seine Bilder.


International

• Tierisch gut: Der chinesische Fotograf Liu Di setzt sich in seiner Serie Animal Regulations mit dem zwiespältigen Verhältnis von Natur und Mensch auseinander.

• Sehr beeindruckende und deprimierende Aufnahmen verlassener Städte finden wir auf BuzzFeed.

• Michael Mullers macht ganz wunderbare Tierbilder. Aber auch seine Portraits überzeugen.

• Navis, ein Studio in Los Angeles, hat ein paar wirklich gute Portraits und Stadtaufnahmen in petto.

• „Ich und mein Auto“ – Polaroidbilder aus den 50er bis 70er Jahren.

• Photo Blog Stop erklärt ausführlich die Zusammenhänge und mathematischen Hintergründe der in Photoshop verfügbaren Ebenenmodi. Nicht nur für Fotografen interessant.

• Wired stellt uns den nicht unbekannten Fotografen Platon vor, der die mächtigsten Menschen der Welt portraitiert.

• Die nächste Generation Fotojournalisten bereitet sich vor, um im hart umkämpften Genre Fuß zu fassen, etwa mit dem Studium und selbst finanzierten Fotoprojekten. Es folgt eine Auswahl der besten Fotos, die von Fotografen und Fotografinnen unter 25 Jahren gemacht wurden.


Neuerscheinungen und Tipps vom Foto-Büchermarkt

buchtipps

• Sebastião Salgados „Genesis“ ist eine Hommage an den ursprünglichen Zustand unseres Planeten und die Schönheit der Natur. Wem das nötige Kleingeld für die Collector’s Edition fehlt, für den gibt es auch eine handelsübliche gebundene Ausgabe*.

• „Bilder des Wandels in Schwarz und Weiß: Afro-amerikanische Identität im Medium der frühen Fotografie (1880-1930)“* – Anhand schwarzer und weißer fotografischer Darstellungen afro-amerikanischer Personen wird in diesem Buch zum Thema Identitätsbildung geforscht.


Videos

Sehens- und nachdenkenswert: Der deutsche Streetfotograf Roman Tripler im Interview.


Inspirierendes Video: Phil Hansen über die Kunst des Nicht-Perfekten.


Unser Redakteur Michael zeigt eine interessante Möglichkeit, um die Perspektive in Fotos anzupassen und den Horizont aus der Mitte zu bekommen.


Ausstellungen

50 Jahre koreanische Bergarbeiter und Krankenschwestern in Deutschland
Zeit: 12. April – 3. Mai 2013
Ort: Koreanisches Kulturzentrum, Leipziger Platz 3, 10117 Berlin
Link

Die ersten Jahren der Professionalität 32
Zeit: 24. April – 24. Mai 2013
Ort: Galerie der Künstler, Maximilianstraße 42, 80538 München
Link

Albert Camus…und ein bisschen kalter Rauch – Fotoausstellung von Christian von Alvensleben
Zeit: 22. April – 15. Juni 2013
Ort: Galeriebibliothek im Institut Français, Bilker Str. 9, 40213 Düsseldorf
Link

Experimente. Marta Hoepffner, Irm Schoffers
Zeit: 13. April – 16. Juni 2013
Ort: Kunstmuseum Dieselkraftwerk Cottbus, Uferstraße/Am Amtsteich 15, 03046 Cottbus
Link

Thomas Wrede. Inszenierung und Wirklichkeit
Zeit: 22. März – 23. Juni 2013
Ort: Neue Galerie im Haus Beda, Bedaplatz 1, 54634 Bitburg
Link

Evelyn Richter. Das Fotobuch
Zeit: 10. März – 23. Juni 2013
Ort: Museum der bildenden Künste Leipzig, Katharinenstraße 10, 04109 Leipzig
Link

Oliver Hartung: The Arabian Monument
Zeit: 21. April – 23. Juni 2013
Ort: Stadthaus Ulm, Münsterplatz 50, Ulm
Link

Mârten Lange | ANOTHER LANGUAGE
Zeit: 25. Mai – 6. Juli 2013
Ort: Robert Morat Galerie, Kleine Hamburger Str. 2, 10115 Berlin
Link

No-Men’s Land – 7 Positionen zeitgenössischer Fotografie
Zeit: 26. Mai – 14. Juli 2013
Ort: Neuer Kunstverein Aschaffenburg, Landingstraße 16, 63739 Aschaffenburg
Link

Von A bis Z. Fotografie im Ruhr Museum, Teil 2
Zeit: 1. Oktober 2012 – 8. September 2013 (verlängert!)
Ort: Ruhr Museum, Essen
Link

Mehr aktuelle Ausstellungen


* Das ist ein Affiliate-Link zu Amazon. Wenn Ihr darüber etwas bestellt, bekommen wir eine kleine Provision, Ihr bezahlt aber keinen Cent mehr.


kwerfeldein – Fotografie Magazin
 
Comments Off on browserFruits April #4

Posted in Equipment


Nikon Coolpix P330 Review

28 Apr

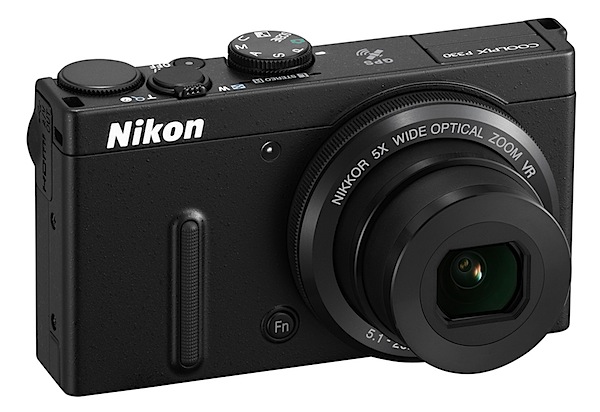
Nikon Coolpix P330 Review.jpg

Nikon has again upped the ante in its compact digicam lineup and the Nikon Coolpix p330 is an excellent example of the movement.

A biggish 15mm CMOS sensor, moderate pixel count plus a fast f1.8 lens leads to a surprisingly high performance in such a moderately-priced camera.

Coupled with this is the camera’s small size, easy pocketability and light weight.

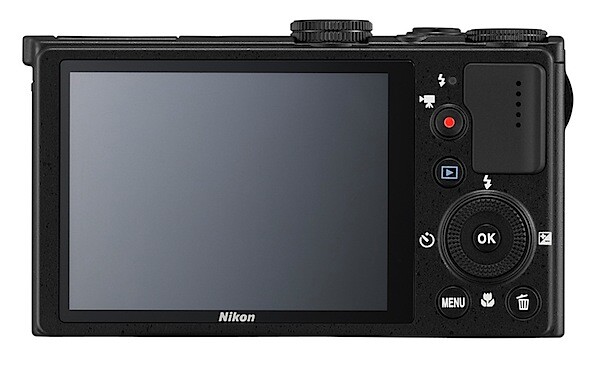
Nikon Coolpix P330 Review-back.jpg

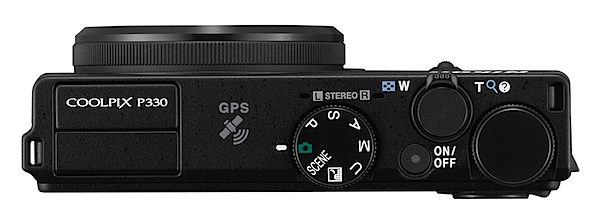
Nikon Coolpix P330 Review top.jpg

Nikon Coolpix P330 Features

After months of wading through high end DSLRs, MILCs and other complex babies it was a relief to handle this easy to use camera from the well known house of Nikon!

It was indeed a surprise and confirmation in one sense that, in the pursuit of taking images, flashier is not always finer! And, as I’ve often said, it’s the driver not the car!

In many respects this camera is a top buy.
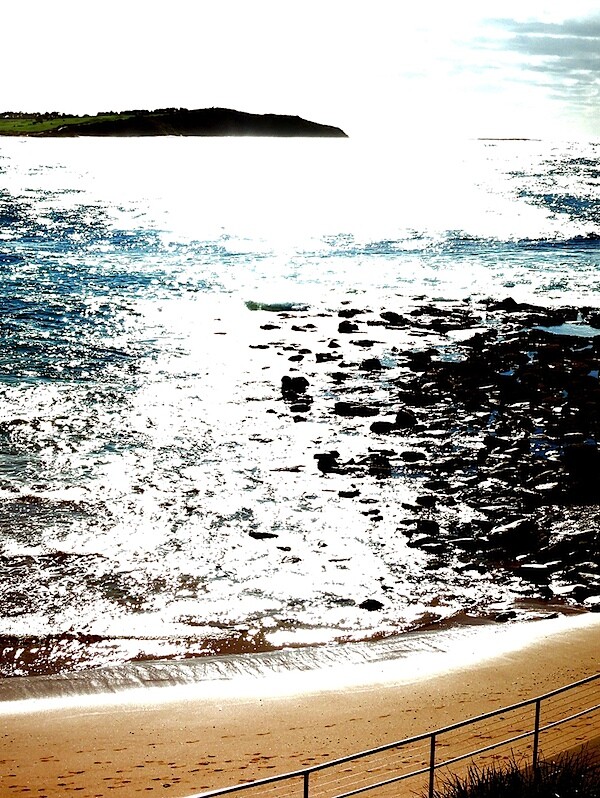
Backlit sea 2.JPG

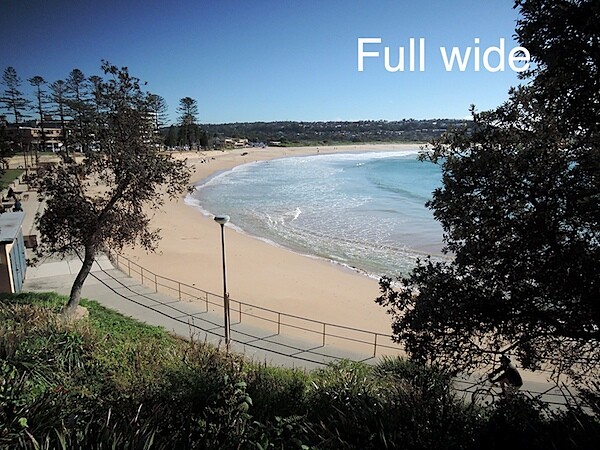
Beach full wide.JPG

Beach full tele.JPG

For one thing its maximum still image size is 4000×3000 pixels or 34x25cm as a print is notable.

Video can be shot in MPEG4 as Full HD 1920×1080 pixels. And yes, you can stills during a video shoot without interrupting the latter.

Rarely seen on a camera at this price level, you can capture in JPEG and RAW formats.

The camera has lens-shift VR (Vibration Reduction) which worked well in my time with the camera.

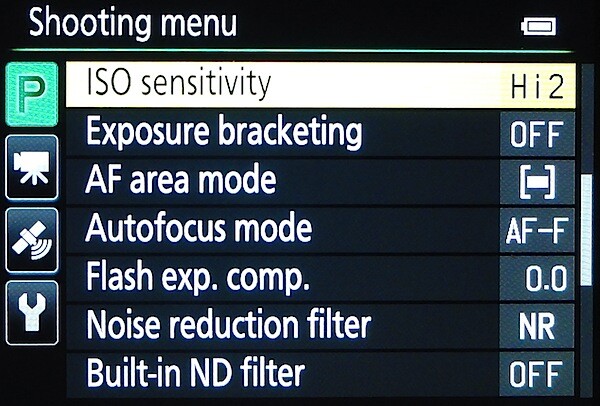
Menu.jpg

There is built in GPS which logs where shots are taken and this data can be stored for later reference. An onboard database of approximately 1.86 million POI (Points of Interest) lets you confirm and record the name of the location.

Controls

At the front is a Function button which gives quick access to such matters as ISO, single/continuous shooting, AWB etc.

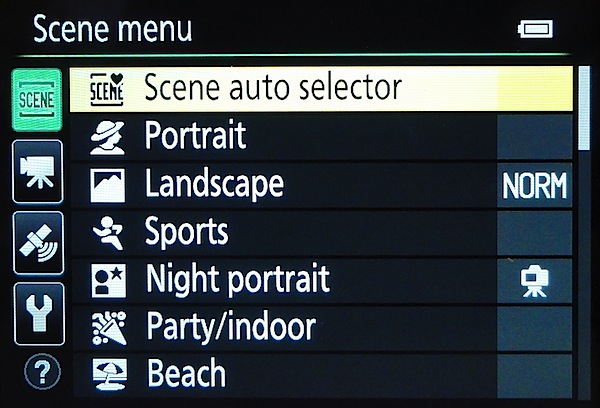
Top deck: at left is the pop up flash cell; at mid position is the mode dial to access PASM settings plus auto, as well as 20 scene modes (sports, fireworks, panorama etc) and a custom user setting; power button; zoom and shutter button; command dial.

Scene menu.jpg

Rear: replay; rotary selector to select flash options, exposure compensation, single/continuous shooting and macro; menu; trash.

And tass all. To my mind the external control layout is exemplary. And the menu selections are sufficient.

Nikon Coolpix P330 ISO Tests

Nikon P330 ISO 80.JPG

Nikon P330 ISO 400.JPG

Nikon P330 ISO 800.JPG

Nikon P330 ISO 1600.JPG

Nikon P330 ISO 3200.JPG

In my tests, the camera handled all ISO settings up to 3200 very well …a good performance for such a low priced camera.

Startup Time

Two seconds from startup to first shot; follow on shots about two seconds apart. Not the fastest kid on the block!

Distortion

No problems at the wide or tele ends of the zoom.

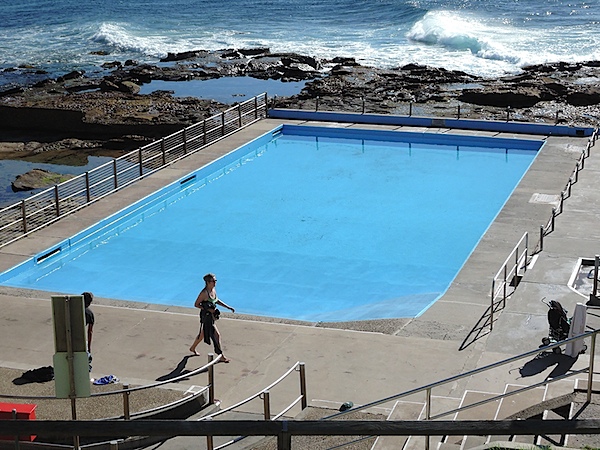
Pool.JPG

Nikon Coolpix P330 Review Verdict

Quality: above average image quality.

Why you would buy it: pocketable; zoom range for average shooting; easy to use.

Why you wouldn’t: you may want a longer zoom.

Impressive camera. If you’re on a tight budget and still want above average quality, go for it!

Available in black or white.

Nikon Coolpix P330 Specifications

Image Sensor: 12.2 million effective pixels.
Metering: Multi, centre-weighted and spot.
Sensor: 15mm CMOS.
Lens: Nikkor f1.8-5.6/5.1-25.5mm (24-120mm as 35 SLR equivalent).
Exposure Modes: Program AE, shutter and aperture priority, manual.
Shutter Speed: 60 to 1/4000 second.
Continuous Speed: 10fps.
Memory: SD/SDHC/SDXC cards plus 15MB internal memory.
Image Sizes (pixels): 4000×3000 to 640×480. Movies: 1920×1080, 1280×720, 960×540, 640×480 at 25 or 30fps.
Viewfinder: 7.5cm LCD (921,000 pixels).
File Formats: JPEG, NRW (RAW), MPO (3D), WAV, MPEG4
ISO Sensitivity: Auto, 100 to 12800.
Interface: USB 2.0, AV, HDMI mini, WiFi, DC input.
Power: Rechargeable lithium ion battery, AC adaptor.
Dimensions: 103x58x32 WHDmm.
Weight: 200 g (inc battery and SD card).
Price: Get a price on the Nikon COOLPIX P330 at Amazon.

Post originally from: Digital Photography Tips.

Check out our more Photography Tips at Photography Tips for Beginners, Portrait Photography Tips and Wedding Photography Tips.

Nikon Coolpix P330 Review


Digital Photography School

 
Comments Off on Nikon Coolpix P330 Review

Posted in Photography


27. April 2013

28 Apr

Ein Beitrag von: Christopher Wesser

Christopher Wesser


kwerfeldein – Fotografie Magazin

 
Comments Off on 27. April 2013

Posted in Equipment


Brand Re-Versioning: Trading Logos with the Competition

27 Apr

[ By WebUrbanist in Design & Graphics & Branding. ]

coke pepsi logo swap

Our brains recognize brands before we even get to the text … but what happens when that second of the process process yields the reverse of what we expect?

logo trade branding identities

In this series of experimental logo swaps by Graham Smith, our expectations are subverted right at the point of recognition – Coke replaces Pepsi, UPS becomes FedEx and so forth in realms ranging from fast food to digital technology.

logo brand swap designs

The result is a kind of temporary cognitive dissonance, and poignant reminder of just how much we rely on visual cues – from shape and layout to color and typography – to interpret input and apprehend iconic designs.

logo exchange visual exercise

Some of the trades work relatively seamlessly – a surprise number actually work visually – you could almost believer that Twitter, Facebook and Google could simply have gone a different direction with their designs.

logo swap tech brands

But given our own familiarity biases when viewing them, it is hard to say in some cases, too. Either way, it is clear that our experience and associations play a major part in the power of branding.Thanks to our partners, you can find ties online to suit every preference and budget, from budget to top-of-the-range super stylish models.

Share on Facebook


[ By WebUrbanist in Design & Graphics & Branding. ]

[ WebUrbanist | Archives | Galleries | Privacy | TOS ]


WebUrbanist

 
Comments Off on Brand Re-Versioning: Trading Logos with the Competition

Posted in Creativity