When you’re just starting out, it can sometimes be frustrating trying to get sharp photos. The camera’s autofocus often seems like it has a mind of its own. Here are five quick tips that can help you get the autofocus under control.

AI Servo AF or Continuous Focus will continue to track moving subjects.
1. What is your subject doing?
If your subject is sitting still and not moving, be it a person, a still life, or a landscape, you’ll want to choose One-Shot autofocus (AF-S for single on Nikon). One shot AF allows the camera to focus, and then as long as the button is depressed, focus will stay locked. This is useful if you want to focus and recompose your shot, especially if an autofocus point doesn’t cover the area you want to be in sharp focus (see #2 below).
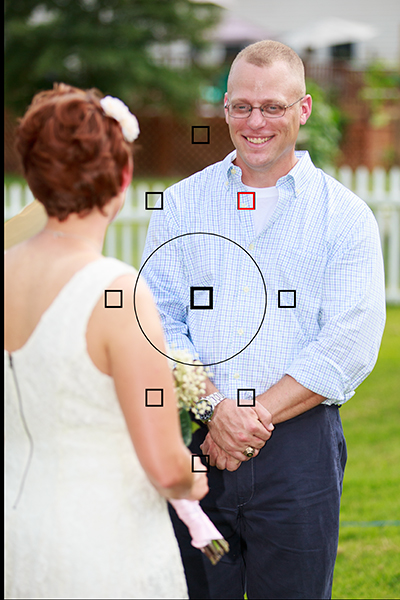
If your subject is moving, such as a child at play, an animal, or a car, change the autofocus mode to AI Servo AF, or Continuous AF (AF-C, depending on the brand of camera you have). This means the camera will continue to focus on the subject even as it moves toward or away from you. Just be sure to keep the AF point on your subject. The image at left was taken using AI Servo AF with the center point as the active focus point. If you use AI Servo (AF-C) with automatic point selection, you will most likely start tracking with the center focus point, and as your subject moves, the AF point will automatically shift to another area to maintain focus. Some cameras offer the option of letting you choose which point focusing starts with before shifting to other points. In manual autofocus point selection mode (not to be confused with manual focus), you choose one point and keep your subject covered with that one point.
2. Check your AF point selection mode

Using Manual AF Point Selection I was able to keep my brother in focus despite the fact that my sister in law was closer and covered by an AF point. Automatic AF point selection would have selected her instead.
If you find your camera isn’t focusing where you want it, check your AF point selection mode. All DSLRs offer at least two modes. There may be other options as well, but most people use one of these two main modes. The first is automatic AF point selection. This means that all AF points are active, and in one shot mode, the camera will try to focus on the nearest object to it with detail. This means that if something between you and your subject is covered by an AF point, the camera will focus there, rather than where you want it to. This can be a problem if trying to photograph through a window or fence as well.
To combat that problem, you’ll want to choose a single AF point. This will most likely be called Manual AF Point selection, depending on the brand of camera you have. This mode allows you to choose which AF point you want to use, giving you the ability to choose the one that covers your subject, regardless of what’s between you and the subject.
3. There are two types of autofocus points
 Most modern cameras have two types of AF points: Single-line, and Cross-type. Single line AF points are able to focus on lines going either horizontally or vertically. Which one it reads will depend on how the AF point is oriented. Horizontally oriented AF points can focus on vertical lines, and vertically oriented AF points can focus on horizontal lines.
Cross-type points are simply vertically oriented AF points, overlaid with horizontally oriented ones. So a single cross-type AF point can read both vertical and horizontal lines, making it more likely that it will be able to focus on the right object. Why is this important? If you have selected an AF point and the camera is unable to focus on the subject, it could be that there isn’t any detail that the AF point can pick up. A cross-type AF point has a better chance of finding a line of detail to focus on. Try selecting one of the cross-type points in your camera. Most of today’s DSLR’s have at least one, if not more. Check your camera’s manual to find out where the cross-type points are in your autofocus array.
4. Learn how to change AF points without taking your eye from the viewfinder
Once you’ve learned to set Manual AF Point Selection, and have started using a single AF point, you’ll want to practice selecting an AF point quickly without taking your eye away from the viewfinder. Some cameras offer a single control such as the joystick type controller on the EOS 5D Mark III, while other cameras such as the EOS Rebels require a combination of a button push and spin of the dial to change an AF point. The faster you are able to do this, the less likely it is you will miss a key moment.
5. Try to compose with the AF point you are using exactly where you want it

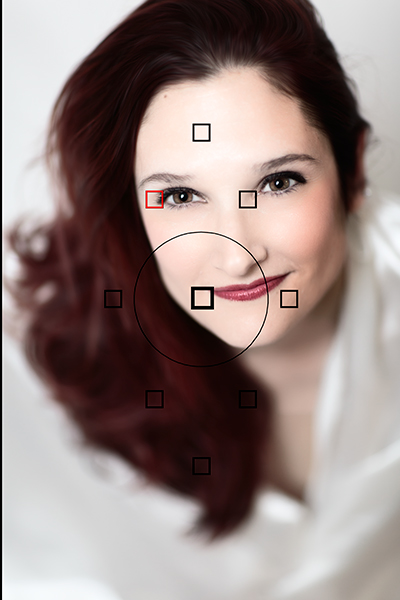
Putting the AF point right on her eye meant that despite having a very shallow depth of field, I was still able to focus on the eyes and keep them sharp, without having to recompose.
Many people who are just starting to do photography often stick to the center AF point for focusing, and then lock focus and recompose the shot to put the subject where they want in the frame. For most shots, this will work just fine. However, there is a chance that when recomposing, you are actually shifting the plane of focus enough that your subject will no longer be sharp. This is very likely when you are close to the subject with a shallow depth of field. To avoid this, choose the AF point that is closest to, or covers your subject. For instance, when shooting a portrait, use the AF point that covers your subject’s eye.
Your thoughts
Keep these five tips in mind the next time you take out your camera. What are your favorite autofocus tips?

I have had people who let running water confuse them, unsure which AF mode to select. Yes, the water is moving, but the stream is not, it stays the same distance from the camera, so you would use One Shot AF for a scene like this.
The post 5 Beginner Tips for More Autofocus Success by Rick Berk appeared first on Digital Photography School.
You must be logged in to post a comment.