RSS
 

Posts Tagged ‘Success’

How to Photograph Travel Icons With Success

17 Jan

The post How to Photograph Travel Icons With Success appeared first on Digital Photography School. It was authored by Jeremy Flint.

how-to-photograph-travel-icons

With far-reaching places more accessible than ever, many more people are traveling around the world. Seeing the many pictures people post of popular landmarks on social media, it seems everyone has traveled to the same places. Amongst some great shots of the famous travel icons that are frequently shared, there are many below average shots. So how should you photograph travel icons successfully? Here are some useful travel photography tips to help you return with better shots.

Photograph Travel Icons

Taj Mahal, India

Research

To photograph travel icons well, start by doing a bit of research to identify some of the world’s famous sights.

Some of the most popular places include the Taj Mahal, the Eiffel Tower, Machu Picchu, Angkor Wat, the Houses of Parliament and the Grand Canyon.

During your research, think about when and where you want to go and the best times of day to visit. Some of the top travel sights in the world are only open during certain hours, so do your research and time your visit accordingly.

Explore on foot

One way to get around on your travels is to explore on foot. What are the benefits of doing so?

A benefit of walking around is that it is more enjoyable than being confined to a vehicle. You may also come across things to photograph that you wouldn’t see from a car.

Exploring on foot is a great way to photograph travel icons as you have the ability to move around freely and can change your perspective with ease. By exploring on foot, you can find other interesting points of view to shoot. For example, you can shoot at ground level or find a higher elevation to shoot from.

Image: Blue Mosque, Turkey

Blue Mosque, Turkey

Use a tripod

If there are too many people at your chosen sight, there are other ways to photograph travel icons, such as using a tripod and doing long exposures to blur people out of the shots entirely. You may need to use a neutral density (ND) filter to slow your exposure down in bright conditions.

Other benefits of using a tripod besides blurring people out are that it will help to minimize the risk of movement in your shots and allow extra light to enter the frame making your pictures brighter than if you were taking pictures by hand. It also helps to take the weight off your shoulders if you carry a heavy camera bag and allows you to return to a place and replicate shots at different times of the day.

If you do use a tripod to photograph travel icons, be aware that certain travel locations, such as the Taj Mahal, won’t allow you to bring in a tripod, so consider this when planning your trip.

Capture the moment

Photograph Travel Icons

Iguazu Falls, South America

Capturing the moment is about choosing when to shoot and anticipating the right moment to press the shutter button to get a great image.

The best time to capture the moment and make an image stand out is at a decisive moment. This could either be the instant something interesting happens or a sequence of events that occur quickly – that disappears in the blink of an eye.

A fleeting occasion could be some dramatic light hitting the side of a well-known building, a rainbow suddenly appearing and adding drama to the background of a travel icon or when the northern lights (Aurora Borealis) appear and dance in the night sky before the moment fades.

Whatever moment you want to capture, think about how you could present your travel icon at the decisive moment.

Look for new angles

Research the travel icon on social media and see how most photos represent it. Then look for new angles to photograph travel icons successfully and capture the sight uniquely. Consider what makes the icon so special and change your composition to capture the most exciting parts.

Image: Taj Mahal, India

Taj Mahal, India

Storytelling

To photograph travel icons well, try telling the story of the icon through wide shots, details shots, and both interior and exterior images. This can add interest to your pictures and show a famous landmark in a new light.

Conclusion

In summary, to photograph travel icons well, do your research and plan ahead. Think about where and when you want to go. Bringing a tripod can be useful for shooting longer exposures and to create more blur in your shots. Try capturing a new angle and shoot a variety of pictures to tell a story of a familiar landmark including a wide-angle and close-up shots.

With these tips, get out and capture a travel icon near you or during your next holiday. Share your pictures with us below and any tips you have for photographing travel icons well?

The post How to Photograph Travel Icons With Success appeared first on Digital Photography School. It was authored by Jeremy Flint.


Digital Photography School

 
Comments Off on How to Photograph Travel Icons With Success

Posted in Photography


How to Use Vibrant Colors in Photography with Great Success

19 Aug

The post How to Use Vibrant Colors in Photography with Great Success appeared first on Digital Photography School. It was authored by Nisha Ramroop.

How to Use Vibrant Colors in Photography with Great Success

Your camera is capable of capturing intense, true color that is almost everywhere you look. So how hard could it be? Answer: It is actually quite easy to capture color. However, you need to practice a little more awareness when it comes to creating images with that extra “oomph.” Here are a few tips to help you capture vibrant colors in photography.

1. Keep it simple/details

As with other types of photography, simplicity is an art on its own. While details are can be essential too, sometimes scaling back on the amount of details is required. Thus, when working with vibrant colors in photography, your story may have more impact when you include only the key elements as opposed to having too much going on.

How to Use Vibrant Colors in Photography with Great Success

You can achieve simplicity in different ways. The first is by minimizing the number of colors in the frame. Yes, there are instances when many colors work well together in an image, but at other times it gets confusing. You need to direct your viewer’s eyes. Another way to keep it simple is to avoid too many details in your composition. It has the same effect as too many colors. When working with vibrant colors, simple works better.

2. Experiment with color combinations

Starting small is usually better with bolder colors. You can focus on one main color and build from there. When you start adding other colors in, determine if they work well together. Fortunately, you do not have to reinvent the color wheel and have tried-and-true color harmonies to use to your advantage.

How to Use Vibrant Colors in Photography with Great Success

Color harmony is a combination that is visually appealing to the eyes. Some of the options include complementary colors (those directly opposite each other on the wheel) and analogous color (those next to each other).

Both of these harmonies exist in the natural world. A sunset of oranges and blues is an example of complementary colors. Whereas a green tree against the midday blue sky is more along the lines of analogous color. When you are working with color combinations, spend the time to make the final image pleasing to the eyes.

How to Use Vibrant Colors in Photography with Great Success

3. Make colors stand out/playoff

Your scene may be full of color, vibrant and busy. If this is what you want to portray, then all is well. On the other hand, what if there is a subject in that chaos that you want to isolate? You can use color to make that happen. To do so, one of your options is to desaturate/tone down the colors that are not contributing to your subject’s story.

How to Use Vibrant Colors in Photography with Great Success

Another is putting a bright color against a dull one to help it to stand out more. Also, adjusting the hue and lightness of the colors next to your main color can help it pop.

Here are a few easy ways for you to help your colors play off each other:

White Balance

Pay attention to your use of white balance when working with bold and strong colors. Your camera has several white balance options to deal with different lighting situations (Shade, Cloudy, Fluorescent, etc.). Each of these affects the overall color of your image. They either move your color to the warmer side (by adding yellow) or to the cooler side (by adding blue). Thus, white balance can enhance your colors or change the hue altogether.

vibrant-colors-in-photography

Note: If you do not want your colors to end up looking too blue or yellow, you have the option of manually adjusting your white balance color temperature.

Saturation

By default, Saturation is used to enhance the color intensity of every color in an image. However, you can use editing software and use Saturation selectively. When trying to make colors play off each other, you can increase the intensity of one color while desaturating other colors in the scene.

vibrant-colors-in-photography

Vibrance vs Saturation (the same level applied)

Vibrancy

When you change the Vibrance in an image, it is a little more specific than Saturation. Vibrance only adjusts the intensity of the duller colors in your image. When playing off colors, this tool can be very effective.

How to Use Vibrant Colors in Photography with Great Success

Conclusion

When working with vibrant colors, be aware of your palette. Keep your compositions simple by minimizing the number of colors and details in your image. Work with the color wheel and learn about the various harmonies that exist. When you pay attention to all the colors in your image, you get a better sense of how they work together. You also understand the way each color affects and plays off the other. Most of all, have fun experimenting while you learn about color!

Do you have other tips for using vibrant colors in photography? Share with us in the comments section!


vibrant-colors-in-photography

The post How to Use Vibrant Colors in Photography with Great Success appeared first on Digital Photography School. It was authored by Nisha Ramroop.


Digital Photography School

 
Comments Off on How to Use Vibrant Colors in Photography with Great Success

Posted in Photography


How to Photograph Wedding Receptions with Great Success

06 Aug

The post How to Photograph Wedding Receptions with Great Success appeared first on Digital Photography School. It was authored by Jackie Lamas.

Wedding receptions are often referred to as the most boring part of the day since the most exciting part are the bride and groom portraits. However, it would be wrong to treat receptions as such since receptions hold many of the meaningful details of an actual wedding celebration. So here are some tips on how to photograph wedding receptions with great success.

How-to-Photograph-Wedding-Receptions

1. Schedule the reception with a time buffer

Weddings are high paced and often begin on time, but as the day progresses, it can be easy to fall behind schedule. When you’re creating the wedding day itinerary for your clients, add in an extra 15-minute buffer to any travel or transition time before the reception.

How-to-Photograph-Wedding-Receptions

The reason for this is because you’ll want to grab a snack and hydrate before getting into the last leg of the wedding day. You’ll also want to test out your gear, change batteries, or memory cards. Some photographers take this time to do the same-day slideshow.

This extra buffer means no rushing to the reception but instead preparing your gear and yourself for the last few hours of the day so that you’re not running on empty.

How to Photograph Wedding Receptions with Great Success

It also will allow you to get to the reception early, which is my next point.

2. Photograph the reception alone

Getting to the reception area those extra few minutes early also allows you to photograph all the details without any guests in the background. This makes for really nice wide shots and closeup shots of the entire set up.

You can then create real depth to your photos and zone in on particular details like the seating chart, place cards, centerpieces, and the sweetheart table. You can capture them without drinks, purses, or other guest items.

How to Photograph Wedding Receptions with Great Success

If at all possible, have the bride and groom enter the reception area and photograph them alone in the middle of the set up as part of their wedding portraits. It can add a little more emotion and tie the narrative of the event together.

3. Make a list of all the must-have photos

How to Photograph Wedding Receptions with Great Success

Most wedding receptions are much the same in terms of what you should photograph for the bride and groom. While they can vary in time of day, location, or style, these are the main details that you should be sure to photograph:

How to Photograph Wedding Receptions with Great Success

  • Entrance details: Do they have a sign? Are there photos from their engagement session? Is there a sign-in guest book, meaningful mementos like wood blocks to sign and write notes on? All of these are important to photograph as a whole and each detail individually or a group of details.
  • Wide photo of the space as a whole. Photographing the entire space gives the reception and final wedding photos a nice transition in the narrative or album. Take a few photos from different perspectives so that you can choose the best one for the final gallery of images.
  • Centerpieces: If there is only one style, photograph it both horizontally and vertically as well as taking a close up detail photo of it. If there are different styles on each table, take photos of each style. If, for example, they have placed a different photograph on each table, you don’t have to photograph each table. Instead, find one or two that you like and photograph two or three different tables.
  • Table seating/ seating cards: Table seating and table cards are how guests know where to sit during receptions. These may present in various and creative ways. You should photograph a wide shot of the setup and then a detailed photo of the seating. Choose a name that sounds familiar to you (perhaps a family member or member of the bridal party) to focus on for the detail photo.
  • Dinnerware set up: If you notice that the dinnerware and stemware have been chosen with a little more intention, photograph the setup. Get different perspectives and angles.
  • Florals: This is most likely to be found as part of the centerpiece; however, some weddings have beautiful florals decorating different parts of the space.
  • Desert table/candy bar
  • Cake
  • Lounge or seating area
  • Any other detail that you feel the couple put lots of effort, time, or money into.

How to Photograph Wedding Receptions with Great Success

How-to-Photograph-Wedding-Receptions

3. Staging

A big mistake that many new wedding photographers make is failing to stage photos. Staging the photos will help you get the perfect photo of the detail while still keeping the main aesthetic that the bride and groom have chosen.

Image: Staging and moving things around can help the final photo.

Staging and moving things around can help the final photo.

This means, moving salt and pepper shakers out of the way, lighting the votive candles if necessary, turning a table number to face the camera, or even moving a chair so you can get the whole table in one photo.

After getting your shots, make sure to place everything back to where it belongs. That way, when the guests arrive, they see the complete look and aren’t missing their water glass or chairs.

4. Lighting

If you are photographing a reception in a salon or closed venue, the lighting may not be ideal for photos. If the ceiling is white, you can use it to bounce light from your flash back down onto the table and reception details. This will give you more even lighting and a pretty straightforward light in your photos.

Image: At left the flash is pointed to the side. At right, the flash is bouncing from the ceiling. Y...

At left the flash is pointed to the side. At right, the flash is bouncing from the ceiling. You can see the difference in both.

In addition, using an external flash attached to your camera, point the flash to the side so that you can get more side lit photos. These add more depth to your detail photos and adds shadow. For example, this type of lighting makes for great depth to cake photos and also centerpieces.

You can also use an external LED video light or small light to help you light the reception details. This also gives you a lot more flexibility in getting different lighting that is immediately obvious. As for flash, you have to take test shots first to see how the light looks.

How-to-Photograph-Wedding-Receptions

Having an external flash can help you get really nicely lit photos. Use the flash in manual mode to control the output.

If you don’t have any external lighting then you can use the ambient light for the details. Just make sure that your camera is stable enough to photograph by using a tripod. Having a fast lens can also help you capture ambient light.

How-to-Photograph-Wedding-Receptions

Be aware of the color temperature of the ambient light as well. This can change the color of florals, table linens, seating cards, etc. if you’re photographing with ambient light.

How-to-Photograph-Wedding-Receptions

As a good resource, you can also use your cell phone flashlight to help light or fill in light on the details that you’re photographing.

5. Events of the reception

How to Photograph Wedding Receptions with Great Success

During the reception there will most likely be some, if not all, of the following events:

  • Grand entrance
  • First dance
  • Mother/Son and Father/ Daughter dance
  • Toasts
  • Cake cutting
  • Bouquet toss/Garter toss
  • Money or Honeymoon dance
  • DJ-led games or trivia
  • Dancing

How to Photograph Wedding Receptions with Great Success

All of these usually get coordinated by the wedding planner, bride, or DJ himself. Look to them to know what is next after dinner has begun. Never leave your camera and always be ready to photograph anything and everything that you feel is important or fun.

Dancing is always fun. If you can make sure to photograph the key players, like the mother of the bride, bridal party, children dancing, or the best man, these all make for meaningful and fun photos later.

How to Photograph Wedding Receptions with Great Success

It’s really important to photograph the bride and groom dancing with their guests as well.

Don’t be afraid to get creative when you feel like you have photographed all of the most important events. Slow your shutter to get interesting lighting effects. Use multiple flashes to light the dance floor evenly. Even get a different perspective of the party.

How to Photograph Wedding Receptions with Great Success

The main thing is to enjoy yourself while taking photos!

6. Before you leave the wedding

Before you leave the wedding reception, make sure to thank your clients and ask this one important question: Is there anything you’d like for me to capture before I leave?

How to Photograph Wedding Receptions with Great Success

This allows them to get last-minute photos that they may have forgotten to ask for earlier in the day. They may want a quick one with their grandmother or a photograph of them with their best friends from college.

Do this about 10 minutes before you are set to leave. That way, you can have time to photograph all of those last-minute requests before you pack it up and head out.

How-to-Photograph-Wedding-Receptions

It’s also a great way to say goodbye to the couple for the night.

In Conclusion

How to Photograph Wedding Receptions with Great Success

Photographing wedding receptions can be really fun even though they usually happen at the end of a really long day.

Give yourself some time to get into the mindset and get creative during the reception.

Do you have any great tips on how to photograph wedding receptions? Feel free to share with us in the comments below.


How-to-Photograph-Wedding-Receptions

The post How to Photograph Wedding Receptions with Great Success appeared first on Digital Photography School. It was authored by Jackie Lamas.


Digital Photography School

 
Comments Off on How to Photograph Wedding Receptions with Great Success

Posted in Photography


Tips to Help Newbies Find Success in the Photography Business

04 Aug

Many dream about becoming a professional photographer, but unfortunately it can be difficult to last longer than two years in business, if you don’t have the right plan. People fail every day. They question themselves, wonder if their work isn’t as good as they thought it was, then pass along the common belief that it’s impossible to make a living in photography.

Corporate Portrait

Corporate portraiture. Every business needs photography.

You commonly hear that everyone is a photographer these days, but that’s just not true. There are lots of photographers, in the same way that there are many people who enjoy writing – as there should be, because it’s an incredibly fun passion. But there are not as many professional photographers pushing themselves in the right way and making a living, and this is solely due to their marketing ability, not the state of the industry.

If anything, there is more opportunity than there used to be. With the Internet, LinkedIn and social media, everyone needs a good portrait. Companies need their events documented to then be shared. People are spending so much money on weddings. Good photography is more important than it ever has been. What people really mean when they talk about the industry being saturated with photographers, is that the old gatekeepers who once sought out the skilled photographers are gone. Now to succeed you have to figure out how to do it on your own, and to raise above the noise.

Here are some tips to help you find success in your photography business.

1. Create a strong and unique body of work

Gowanus, Brooklyn.

Gowanus, Brooklyn. This photograph sells very well due to its uniqueness.

There is no way around it, if you want to succeed as a photographer, you have to learn how to create strong work. There are no excuses these days. Everything you need to learn is on the Internet. There are videos, courses, ebooks, YouTube, you name it. Map out what you need to learn, particularly where you feel your weaknesses are, and seek out content to address them. Maybe it’s posing, or studio lighting, or printing. Everything’s out there, and it’s not hard to locate. Go to town.

Train your eye. Find 10 photographers whose work you love, and figure out how to do what they do. Study them, go deep into their archives, and then try to recreate the look of their images. Use friends as models, do whatever you need to do. Recreating their look is not copying, it’s learning, and eventually as you continue to improve, you will take elements from all of your favorite photographers, and mesh them into your own style.

Plan creative days. It’s not good enough to say that you will find time within your schedule. Set aside entire creative days, and put them in your calendar. Turn off all other distractions and treat it as a job, because it is a job. Plan what you are going to do ahead of time and execute it. This is where your portfolio will begin, and what you will use to get jobs.

2. Realize that nobody notices you or your work

Polka Dots and Pink Shoes, Subway, 2012.

Another New York print that sells well.

It’s important to understand how people see you, and they don’t. Everyone is being bombarded with imagery everyday from so many sources. Even if you put yourself out there, people aren’t going to notice you. It takes time and persistence, so keep at it.

The reason that you need to understand this, is because you have to grind at first. The beginning is always a grind, particularly as you’re trying to get to an income that can stabilize you for the long term. People may not notice you the first time, or the second, and when they do first notice you, they will probably write you off. It’s common for some people’s first reaction to be negative and dismissive about you, before they even give you a chance. But, the more they see you, the more they will notice you and warm up to you. It takes time, and people appreciate seeing others work hard for it. One try is not enough. Neither is two.

3. Reach out to your community

Every successful photographer that I’ve spoken to has received their first smattering of jobs through word of mouth. Who else is going to hire you right away? Your personal community is so important to your early and ongoing success. Your friends and colleagues know you and trust you. They will give your work more of an eye and a chance right away, and they will recommend you. Be social, surround yourself with a strong community, and your professional life will benefit.

Facebook Event

A job I received through a fellow photographer.

However, these word of mouth referrals are not going to happen on their own. Your community isn’t going to help if they don’t understand what you are doing. Make it official. Create an email list and send out an official announcement about your business. Explain, and show what you do, and make it clear how you can help people. If you are building a portraiture business, explain that you do photography for engagements and families, businesses, law firms, actors, and artists. You know who that covers? Everybody. Suddenly, everyone will have you at the top of their mind. They will understand how you can help them when they are in need of your services. People will not know this unless you tell them.

Start fostering a community of other photographers around you. It can be easy to think of other photographers as competition, but that is so far from the truth. The only one keeping you from getting jobs is yourself, and photographers are the ones that you can bounce ideas off. If you need to gain experience, offer to assist for them whenever they need. This is particularly popular in wedding and commercial businesses, but every photographer can use a hand. This will teach you more than any Internet website or tutorial can. As you get closer, this community of photographers will give you advice in times of need, and will pass you jobs when they are booked. It’s a win-win for everybody involved.

4. Active versus passive marketing

Local Business Photography

The owner of my favorite local restaurant.

Passive marketing is the act of putting yourself out there over and over again, while waiting for the jobs to come to you. This is so important for the long term, but it takes time to come to fruition, and in the short term it does nothing. Instead, take an active approach to your marketing and directly reach out to your potential clients.

If you want to work with local businesses, contact them and introduce yourself and your services. Make an appointment to show them your portfolio, or call them on the phone. If you want to work with restaurants, start with the ones you eat at, and work the town. If you want to do portraits of actors, go to acting schools, and the places where the actors hang out. If you want to sell your prints, seek out interior designers, art consultants, and businesses without art on their walls. Figure out who your clients are, where they are, and then plan out the best way to approach them.

5. Create a business plan
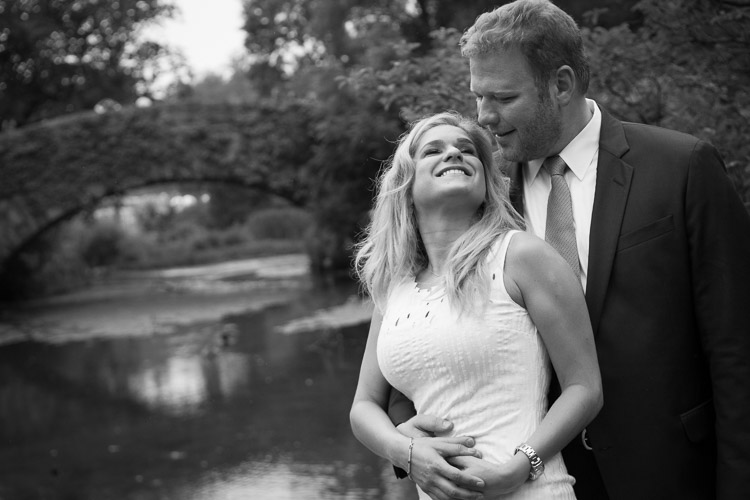
Engagement Photography.

Engagement and family photography can be a great business to start off and gain skills you need.

Creating a business plan is vital to your success. Figure out the income number that you will need to earn in the first year, and create a plan for how to achieve it. How much will your expenses be? How much will you charge, and how many jobs will you need to book to reach your desired income? Who are you marketing to? What are all the ways that you can reach your potential clients, and which have the potential to pay off the best? What promotional material will you need? Do this in a spreadsheet, map it all out, and continue to reference and tweak it as you go.

6. Contact people!

Corporate Portraiture.

Corporate portraiture.

Once your portfolio and website are ready, start contacting the people on your list. Do this consistently, and not all at once, so you don’t burn yourself out. Try a few, see how your pitch went, then refine it. The first few might not go so well, and if that happens, try to figure out what went wrong. If they do not seem to have a strong reaction to your work, then maybe you need to improve or tweak it. As you achieve more success, you can start to contact additional people. This is the grind phase of your career, and it is the only way to succeed.

You will fail more often than not, but be elegant in failure. Someone who rejects you now could be doing it for so many reasons, and could be a great client down the road. Even if they can’t work with you now, make a good impression and don’t give up on them.

7. Follow through

Every step that you did before this is how you got hired for the job. Don’t screw it up. You want your career to snowball, and the only way it will do that is if you impress everyone. Jobs are the quickest way to get more jobs and new referrals. Unfortunately, as some photographers start gaining jobs consistently, they can become cocky or complacent. You know how much work went into gaining these clients, and you want the grind to pay off.

Event Photography.

Event photography.

Respond quickly. Under-promise and over-deliver. Plan out jobs, communicate well with clients in the planning phase, and don’t mess up details. Always keep a smile on your face and look confident, even during the many times when you will be freaking out inside. Make sure to talk to the clients when you have the chance, and get to know them. Send thank you notes, and don’t be afraid to ask for referrals.

Do you see from all of this how a career can take off when you approach it in the right way? It’s not rocket science, but unfortunately it often takes newer photographers much longer to figure all of this out than necessary. It took me a long time. Now you know it, so go do it. Fight the fear, and kick some butt.

googletag.cmd.push(function() {
tablet_slots.push( googletag.defineSlot( “/1005424/_dPSv4_tab-all-article-bottom_(300×250)”, [300, 250], “pb-ad-78623” ).addService( googletag.pubads() ) ); } );

googletag.cmd.push(function() {
mobile_slots.push( googletag.defineSlot( “/1005424/_dPSv4_mob-all-article-bottom_(300×250)”, [300, 250], “pb-ad-78158” ).addService( googletag.pubads() ) ); } );

The post Tips to Help Newbies Find Success in the Photography Business by James Maher appeared first on Digital Photography School.


Digital Photography School

 
Comments Off on Tips to Help Newbies Find Success in the Photography Business

Posted in Photography


Tips for File Renaming Success in Lightroom

03 Jul

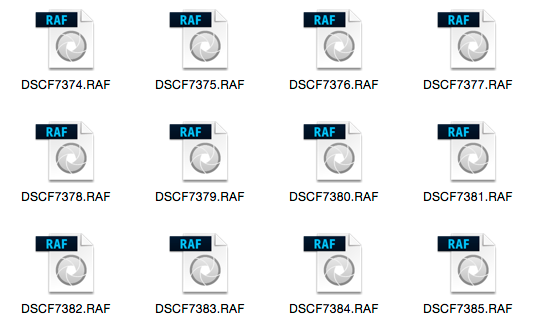
This article is about how to build a useable file renaming strategy, and how to implement it in Lightroom. Your standard camera names are generally pretty boring. IMG this or DSC that, or even P0235425653. If you’re not using continuous naming you might even end up with hundreds of IMG_0001 files. Don’t laugh, I was there once upon a time after reading some terrible advice on camera settings.

If you’re using Lightroom, renaming is really straightforward and accessible from quite a few places in the application.

File naming in lightroom 1

Before we talk about how to rename your files, let’s talk about what you should name them. First and foremost, each photo should have a unique name. There are two number sets that can pretty much ensure this. The first is the date the photo was taken, and the second is the sequence number the camera creates (assuming you do use a continuous camera naming system). Mixed together these give each file a unique name. You’d need to shoot 10,000 images in a day to get two identical names with this structure. You could just use this method and nothing else, but a series of numbers, while great for sorting, is generally meaningless to most people.

File naming in lightroom 2Some photographers use those number sets and their initials to get the filename. It’s enough to create that unique pattern. A string of numbers doesn’t tell you what’s in the file though, even with some initials. For this reason, I use a custom text field that I change with each shoot that I import. In Custom Text field I put a little description of the shoot. That way even outside Lightroom I can tell the contents of the file just from the name. It also gives me additional search terms I can use when looking for a file. Let’s look at how to set this up.

File naming template in Import

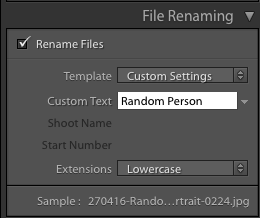
Renaming in Lightroom uses a mix of tokens and direct text in the box. The Dialog for creating File Naming Templates can be called up from a variety of places in Lightroom. The first place you see it is in the Import Dialog box when using one of the following settings: Move, Copy or Copy as DNG. It’s on the right hand side in the appropriately named File Renaming panel. As well as the type of File Naming, you can choose Custom Text/Shoot Name, a Start Number, and whether the file extension is upper or lower case.

File naming in lightroom 3

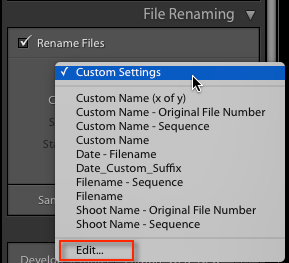
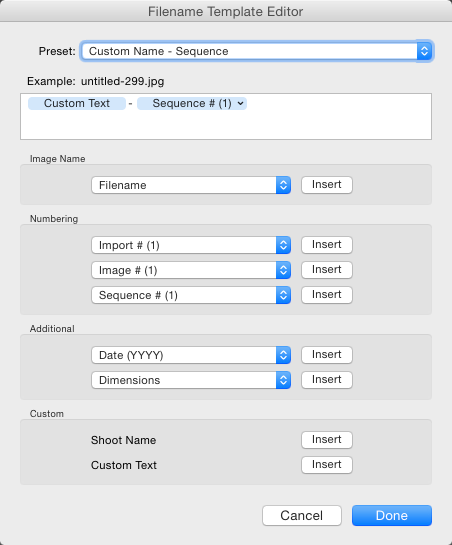
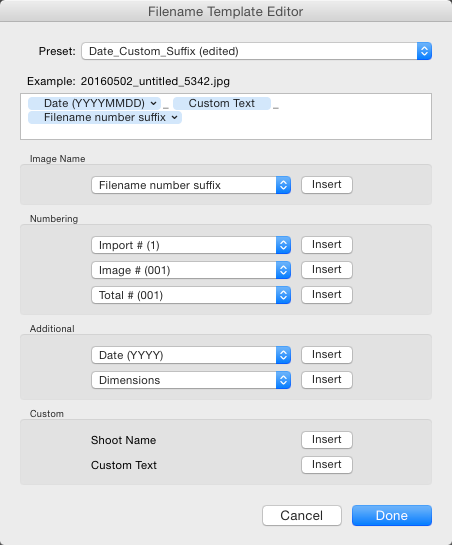
File naming in Lightroom depends on Templates, so click on the Template list and choose Edit from the bottom of the list (shown above). This opens the Filename Template Editor (below). At the top we see the current Template, or in a typically Lightroom fashion, it’s called a Preset here, versus being called a Template in Import. The contents of this list matches the one you saw in Import from the Template dropdown. Note that the Filename Template Editor is not exactly the same in each location you can use it in Lightroom. You’d think it would be, but nope, it’s not.

File naming in lightroom 4

Note this is the box you will see in the Import dialog popup. If you access rename files from the Library module it looks slightly different.

Next is the text box where the template is built. Any item you click from the list below will be added to the box, in the order you click them. You can also type directly into the box. Remember that text typed directly into the box will be added to all filenames, so use it sparingly (above there is only a hyphen added between tokens Custom Text and Sequence # to separate them).

File naming in lightroom 5

Below this are the tokens, split into sections of similar information. Image name has two options, Filename and Filename number suffix. The latter refers to the string of numbers at the end of the current filename (not necessarily the original file numbers). Note: When you use Edit in the Library version of renaming, you also get Folder Name as an option.

File naming in lightroom 6

Numbering has far more options. In each case you can choose an option with leading zeros. It’s good practice to include enough of these so your sorting looks okay. For example, Image1 is followed by Image10, then Image2 if you have no leading zero in the file name. For most things three leading zeros is enough.

File naming in lightroom 7

Import refers to the number of imports and can be set in the Catalog Settings dialog (under the Edit menu on PC, Lightroom menu on Mac), as can Image. Image itself refers to the number of images imported into Lightroom. Sequence creates a new sequence each time, with the start number set in the renaming panel (except on Export). Total refers to the number of images that are being imported at that time.

File naming in lightroom 8Next is the Additional Section. For the Date, you can opt for any combination of year, month, day, hour, minute or second. Personally I go for the YYYYMMDD version, though you could choose Year YY, Month MM and Date DD as as shorter year set. Using this at the start of the name puts all the photos in a dated chronological order when when sorting by name.

File naming in lightroom 9

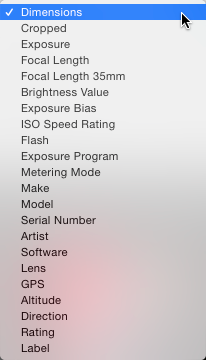
The 2nd part of Additional is a metadata list (above). It contains things like the camera serial number and file dimensions.

Custom lets you add text that can change between imports. Shoot Name is available only in the Import menu. Shoot related naming is not available using Auto Import.

File naming in lightroom 10

When you’ve entered the tokens you can either click Done, to have the settings apply as Custom Settings or you can go back to the Presets menu, where you now have additional options. If you started off by editing an existing Preset (e.g. Filename) you can Save you settings as a new Preset, Update the Current Preset, or restore the default presets.

File naming in lightroom 11

If you select a Preset and don’t edit it, you get the options to Delete or Rename the preset (below) instead of the Update option. That covers the mechanics of creating a File Naming Template.

File naming in lightroom 12

My method:

My preferred renaming method is: {YYYYMMDD}_{Custom Text}_{Original Filename Suffix}. The items in {} are the tokens from the Date, Custom Text and Filename menus (see right). The underscores are written directly into the textbook between the tokens. You may prefer to use a dash instead. I use underscores, because the Web module changes dashes into underscores.

File naming in lightroom 13

This keeps files in order by set based on the Date and Custom text, the Suffix then keeps the sequence. You can use any naming system you like, of course. The important thing is that you use the same naming consistently. When I first started using this kind of renaming system, I had the Custom Text first, but it turned out to be a pain for sorting. Generally when I look through a shoot now, I visually ignore the date part of the name and look at the custom text if I’m just browsing. I don’t need to see it generally, but it helps the sort.

File naming in lightroom 15

This is how my file naming looks

Renaming inside the Library Module

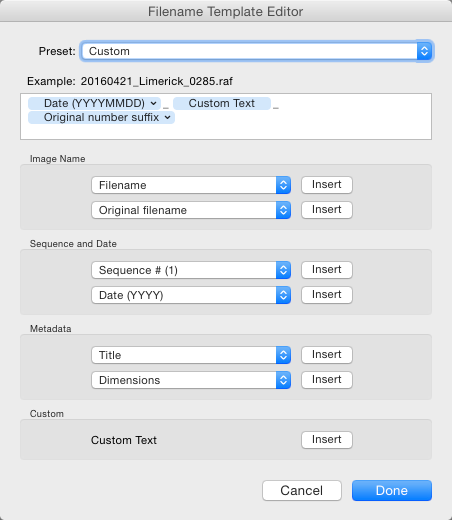
As well as renaming on Import, you can batch rename inside Library by pressing the F2 key. This brings up a really basic dialog where you can select or edit a preset, change the Custom Text, or the Start Number if you’ve chosen a sequence. When you select Edit from the Preset list, the Filename Template Editor has a slightly different set of options to that of the editor inside of Import.

File naming in lightroom 14

We’ve looked at Image Name. The other main differences are the Sequence menu now has Date as well and the Additional section is now called Metadata with a 2nd set of Metadata, in this case IPTC metadata. Other than that, it works identically to in Import.

File naming in lightroom 16

Renaming on Export

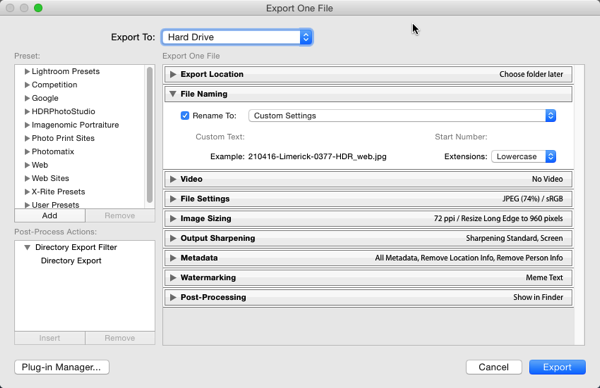
You can also rename when Exporting. In the Export Dialog, File Naming is usually the second option. It’s similar to the other instances where you can select or edit a file naming preset, add Custom Text or choose a Start Number. In this case the Filename Template Editor is the same as the one available in the Library module.

File naming in lightroom 17

So that’s a look at how to choose a suitable naming system in Lightroom, and how to create a filename template to match it. How do you do your file names? What structure do you find works best for sorting and finding images later? Please share your thoughts in the comments below.

googletag.cmd.push(function() {
tablet_slots.push( googletag.defineSlot( “/1005424/_dPSv4_tab-all-article-bottom_(300×250)”, [300, 250], “pb-ad-78623” ).addService( googletag.pubads() ) ); } );

googletag.cmd.push(function() {
mobile_slots.push( googletag.defineSlot( “/1005424/_dPSv4_mob-all-article-bottom_(300×250)”, [300, 250], “pb-ad-78158” ).addService( googletag.pubads() ) ); } );

The post Tips for File Renaming Success in Lightroom by Sean McCormack appeared first on Digital Photography School.


Digital Photography School

 
Comments Off on Tips for File Renaming Success in Lightroom

Posted in Photography


Watch This: The Secret(s) to Alexis Cuarezma’s Success

19 Feb

Up for a quick shot of knowledge, with an order of motivation on the side?

Take a few minutes to watch this interview with photographer Alexis Cuarezma, a sports portrait specialist based in San Francisco and LA.

The short version? Be like water finding downhill. But the video is full of good tips, strong work and solid dose of BTS pics to satisfy your jones for lighting.Read more »
Strobist

 
Comments Off on Watch This: The Secret(s) to Alexis Cuarezma’s Success

Posted in Photography


5 Beginner Tips for More Autofocus Success

19 Nov

When you’re just starting out, it can sometimes be frustrating trying to get sharp photos. The camera’s autofocus often seems like it has a mind of its own. Here are five quick tips that can help you get the autofocus under control.

AI Servo AF or Continuous Focus will continue to track moving subjects.

AI Servo AF or Continuous Focus will continue to track moving subjects.

1. What is your subject doing?

If your subject is sitting still and not moving, be it a person, a still life, or a landscape, you’ll want to choose One-Shot autofocus (AF-S for single on Nikon). One shot AF allows the camera to focus, and then as long as the button is depressed, focus will stay locked. This is useful if you want to focus and recompose your shot, especially if an autofocus point doesn’t cover the area you want to be in sharp focus (see #2 below).

If your subject is moving, such as a child at play, an animal, or a car, change the autofocus mode to AI Servo AF, or Continuous AF (AF-C, depending on the brand of camera you have). This means the camera will continue to focus on the subject even as it moves toward or away from you. Just be sure to keep the AF point on your subject. The image at left was taken using AI Servo AF with the center point as the active focus point. If you use AI Servo (AF-C) with automatic point selection, you will most likely start tracking with the center focus point, and as your subject moves, the AF point will automatically shift to another area to maintain focus. Some cameras offer the option of letting you choose which point focusing starts with before shifting to other points. In manual autofocus point selection mode (not to be confused with manual focus), you choose one point and keep your subject covered with that one point.

2. Check your AF point selection mode

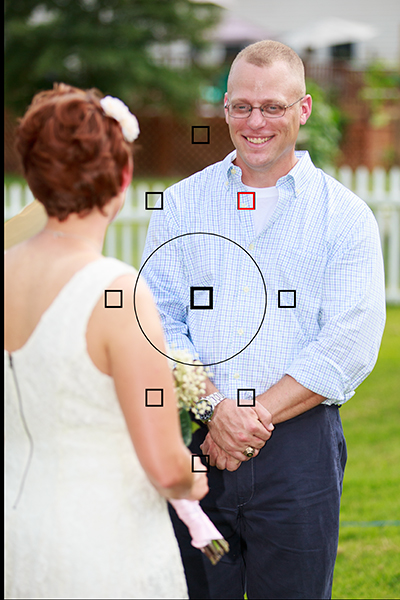
Using Manual AF Point Selection I was able to keep my brother in focus despite the fact that my sister in law was closer and covered by an AF point. Automatic AF point selection would have selected her instead.

Using Manual AF Point Selection I was able to keep my brother in focus despite the fact that my sister in law was closer and covered by an AF point. Automatic AF point selection would have selected her instead.

If you find your camera isn’t focusing where you want it, check your AF point selection mode. All DSLRs offer at least two modes. There may be other options as well, but most people use one of these two main modes. The first is automatic AF point selection. This means that all AF points are active, and in one shot mode, the camera will try to focus on the nearest object to it with detail. This means that if something between you and your subject is covered by an AF point, the camera will focus there, rather than where you want it to. This can be a problem if trying to photograph through a window or fence as well.

To combat that problem, you’ll want to choose a single AF point. This will most likely be called Manual AF Point selection, depending on the brand of camera you have. This mode allows you to choose which AF point you want to use, giving you the ability to choose the one that covers your subject, regardless of what’s between you and the subject.

3. There are two types of autofocus points

AF_PointsMost modern cameras have two types of AF points: Single-line, and Cross-type.  Single line AF points are able to focus on lines going either horizontally or vertically. Which one it reads will depend on how the AF point is oriented. Horizontally oriented AF points can focus on vertical lines, and vertically oriented AF points can focus on horizontal lines.
Cross-type points are simply vertically oriented AF points, overlaid with horizontally oriented ones. So a single cross-type AF point can read both vertical and horizontal lines, making it more likely that it will be able to focus on the right object. Why is this important? If you have selected an AF point and the camera is unable to focus on the subject, it could be that there isn’t any detail that the AF point can pick up. A cross-type AF point has a better chance of finding a line of detail to focus on. Try selecting one of the cross-type points in your camera. Most of today’s DSLR’s have at least one, if not more.  Check your camera’s manual to find out where the cross-type points are in your autofocus array.

4. Learn how to change AF points without taking your eye from the viewfinder

Once you’ve learned to set Manual AF Point Selection, and have started using a single AF point, you’ll want to practice selecting an AF point quickly without taking your eye away from the viewfinder. Some cameras offer a single control such as the joystick type controller on the EOS 5D Mark III, while other cameras such as the EOS Rebels require a combination of a button push and spin of the dial to change an AF point. The faster you are able to do this, the less likely it is you will miss a key moment.

5. Try to compose with the AF point you are using exactly where you want it

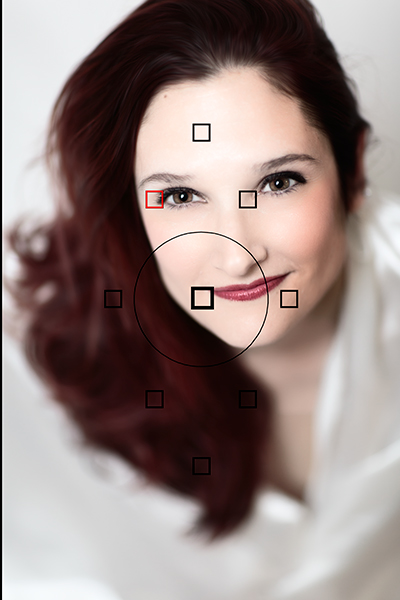
Putting the AF point right on her eye meant that despite having a very shallow depth of field, I was still able to focus on the eyes and keep them sharp, without having to recompose.

Putting the AF point right on her eye meant that despite having a very shallow depth of field, I was still able to focus on the eyes and keep them sharp, without having to recompose.

Many people who are just starting to do photography often stick to the center AF point for focusing, and then lock focus and recompose the shot to put the subject where they want in the frame.  For most shots, this will work just fine. However, there is a chance that when recomposing, you are actually shifting the plane of focus enough that your subject will no longer be sharp.  This is very likely when you are close to the subject with a shallow depth of field.  To avoid this, choose the AF point that is closest to, or covers your subject. For instance, when shooting a portrait, use the AF point that covers your subject’s eye.

Your thoughts

Keep these five tips in mind the next time you take out your camera.  What are your favorite autofocus tips?

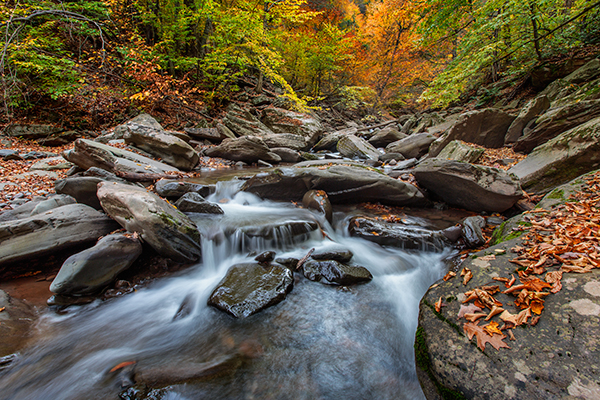
I have had people who let running water confuse them, unsure which AF mode to select. Yes, the water is moving, but the stream is not, it stays the same distance from the camera, so you would use One Shot AF for a shot like this.

I have had people who let running water confuse them, unsure which AF mode to select. Yes, the water is moving, but the stream is not, it stays the same distance from the camera, so you would use One Shot AF for a scene like this.

The post 5 Beginner Tips for More Autofocus Success by Rick Berk appeared first on Digital Photography School.


Digital Photography School

 
Comments Off on 5 Beginner Tips for More Autofocus Success

Posted in Photography


16×9 – Threatened Fertility – Part 3 – Success Rates

21 Jan

Men who can’t have children. Scientists are on the hunt to find out why on this special episode of 16X9: The Bigger Picture.

photographyequipment.yolasite.com (Budget Equipment) razzi.me www.facebook.com twitter.com
Video Rating: 4 / 5


Fujifilm delays XF14mm F2.8 in light of XF 18-55mm F2.8-4 R LM OIS success

13 Dec

FUJINON_XF14mm.png

Fujifilm has announced it is delaying the introduction of its XF 14mm F2.8 prime lens by a month so it can concentrate production on the XF 18-55mm F2.8-4 R LM OIS. The 14mm (21mm equivalent) prime lens is the first in the X-mount lineup to feature a pull-back focus ring that engages manual focus and reveals distance markings to allow use of its depth-of-field scale. It will now start to become available from late January 2013. Meanwhile we’ve been shooting with the 18-55mm zoom and will include a gallery of images along was an expanded XE-1 preview later this week.

News: Digital Photography Review (dpreview.com)

 
Comments Off on Fujifilm delays XF14mm F2.8 in light of XF 18-55mm F2.8-4 R LM OIS success

Posted in Uncategorized


Fujifilm delays XF14mm F2.8 in light of XF 18-55mm F2.8-4 R LM OIS success

04 Dec

FUJINON_XF14mm.png

Fujifilm has announced it is delaying the introduction of its XF 14mm F2.8 prime lens by a month so it can concentrate production on the XF 18-55mm F2.8-4 R LM OIS. The 14mm (21mm equivalent) prime lens is the first in the X-mount lineup to feature a pull-back focus ring that engages manual focus and reveals distance markings to allow use of its depth-of-field scale. It will now start to become available from late January 2013. Meanwhile we’ve been shooting with the 18-55mm zoom and will include a gallery of images along was an expanded XE-1 preview later this week.

News: Digital Photography Review (dpreview.com)

 
Comments Off on Fujifilm delays XF14mm F2.8 in light of XF 18-55mm F2.8-4 R LM OIS success

Posted in Uncategorized