There will be a time when the wizards behind your camera technology conjure up a sensor so powerful they will swallow up any scene and spit it out just as it was – no over, or underexposed areas. Until then, in order to produce an image with a high dynamic range of light, you have to work with the sensors available to you and create your own post-processing magic.
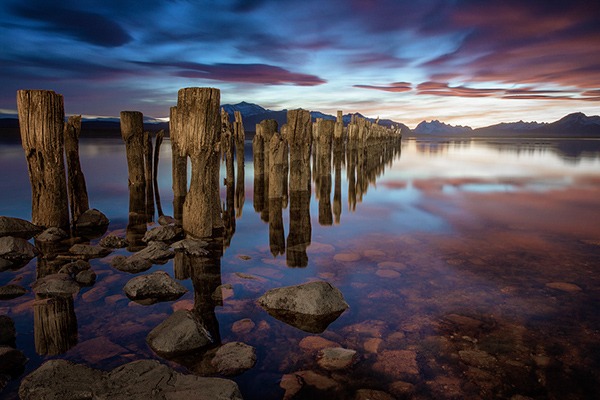
Image created by blending two exposure with luminosity masks, one for the sky and one for the foreground.
While you, and many photographers, may have relied heavily on HDR programs in your exposure blending quest, many more are now beginning to turn to luminosity masks as a cleaner alternative. Through the use of luminosity masks you can create stunning, balanced images that encapsulate a vast dynamic range of light. They give you incredibly fine control over your imagery in almost every area.
While some HDR programs nowadays produce very natural, clean HDR images, luminosity masks do not affect the original files at all, so there is literally zero image degradation during the blending process. That is why so many digital photographers are beginning to make luminosity masks a staple in their workflow.
What are Luminosity Masks?
Luminosity masks break an image down into various channels of luminosity. In other words, they allow you to make very specific selections in Photoshop based on how bright or dark an area is. Let’s say you were looking at a beautiful nighttime cityscape shot. Everything is exposed correctly apart from the street lights, which are completely blown out. You also have a darker exposure in which the street lights are ideally exposed.
Through luminosity masks you can make an accurate selection of the street lights because you can hone in on their brightness, or luminosity values. With this selection you can simply replace the overexposed streets lights with the correctly exposed ones in the darker image.
What You Need to do Luminosity Masking
Firstly, creating your own luminosity masks is a complex and cumbersome process. However, I have a free Photoshop Luminosity Mask Action Set that will do all of the work for you. You can download it here: Free Luminosity Mask Action Set.
Secondly, it is imperative that you have a good understanding of Masking in Photoshop. If you’re a little bit unsure of the process, you can visit Adobe’s site which has a useful video tutorial for you to follow: Masking in Photoshop.
Which exposures to blend?
Ideally, the exposures you choose to blend should cover the full range of light in a given scene. Your brightest exposure should contain information in the darker areas, while your darkest exposure should contain information in the brightest areas. You are not limited to the number of exposures you can blend. Sometimes, in scenes of extremely high contrast, you may need to use as many as five to ensure a smooth transition between exposures and to cover the full range of light in the scene.
The order you choose to layer the exposures in Photoshop is dependent on your personal preference and the exposures you’re working with. Usually working with your normally exposed image as the base layer will derive the best results, but sometimes you may need to work with a darker or brighter exposure as your base layer.
Once you’ve decided on your exposures and have layered them in Photoshop, you now must decide which exposure you will run the actions on. Generally this will be done on your normally exposed image because it will offer the widest range of usable masks. For example, if you ran the luminosity mask actions on a darker exposure, you would gain a full range of dark and mid-tone luminosity masks, but very few, if any, workable bright masks, because the darker exposure is lacking in highlights. The converse is true for a strongly overexposed image.
Blending Exposures Using Luminosity Masks Tutorial
Today you’ll work with two exposures. One is ideally exposed for the sky and sea (download the underexposed image here), while the other is exposed for the foreground elements (download the overexposed image here).
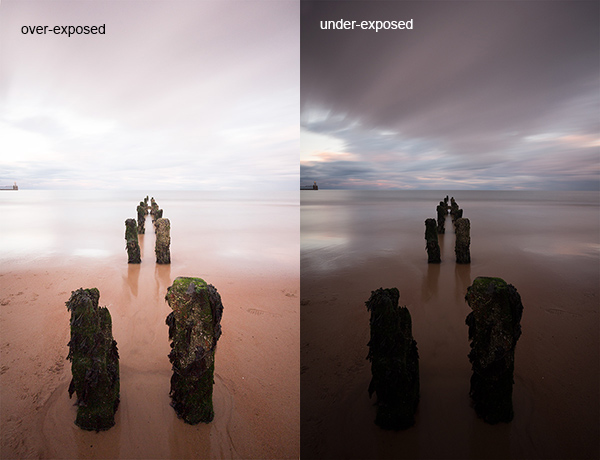
You want to combine the sky and the sea in the underexposed image with much of the foreground in the overexposed image. To do this, you need to find a way of selecting the sky and the sea (i.e., the blown out areas) in the overexposed shot. Once you’ve done that you just need to replace it with the sky and sea of the darker exposure.
Steps in Photoshop For Blending Exposures
1. Install the Photoshop Action set
Instructions on how to install actions can be found here: Get Creative With Photoshop Actions
2. Import your two images into Photoshop
Bring both images into Photoshop as layers, placing the underexposed image on top. Align the images by selecting both of them on the layers panel, and going to Edit > Auto-Align Layers.
3. Turn off the top layer
Uncheck the eye on the layers panel next to the underexposed layer. This will make it invisible and ensure that the luminosity mask actions will run on the overexposed layer only.
4. Run the Masking Action
Go to your Actions panel, which looks like a Play button on the toolbar. Open it up and go to the set called JM Luminance Masks. Click on the arrow to the left of that. You will now see an option called Generate Luminance Masks. Select it and press the Play button at the bottom of the Actions panel to begin the process.
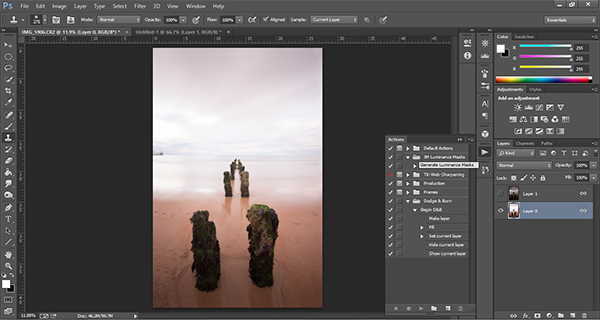
5. Add a Layer Mask to the Dark Underexposed Layer
Now, check the eye next to the underexposed layer, so that it is visible again. Make sure that layer is selected, then go down to the bottom of the Layers panel and, while holding Alt (Option on a Mac), left click the Add a Mask icon. This will create a black layer mask on the underexposed layer, making it invisible again.
6. View Luminosity Masks
To see the Luminosity Masks that you’ve generated, go to your Channels palette, next to the Layers panel (if it is not showing go to: Window > Channels and it will appear). You’ll see 18 monochromatic channels, ranging from Brights 1-6, Darks 1-6, Midtones 1-6. Every one of these channels is a potential mask.
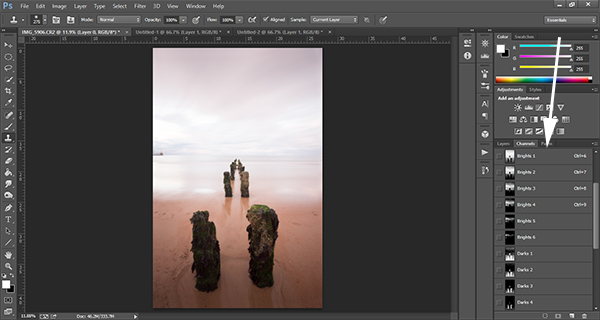
7. Comparing and Selecting a Luminosity Mask
For this set of images, you only need to use one mask in order to blend the sky from the darker exposure into the overexposed image. In this instance, you’ll need to select Brights 3.
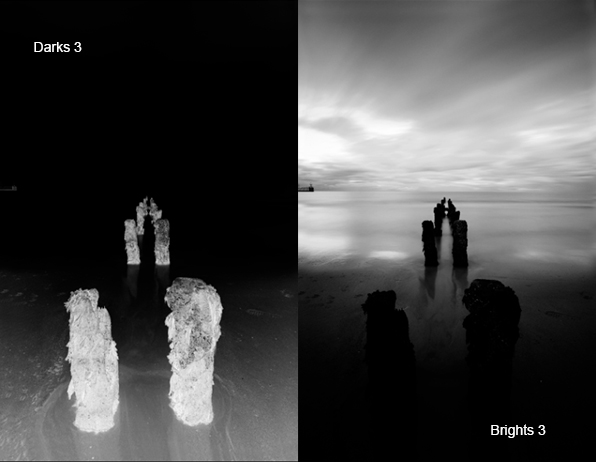
Just as with normal masking, the brighter the pixel the stronger the selection. In other words, in the image above, if you used Brights 3 you are selecting much of the sky and sea, but none of the foreground which is completely black. Conversely, if you selected Darks 3, for example, you would only be making a selection of the foreground sand and the poles that lead out to sea.
When choosing the appropriate mask, you are looking to isolate different areas. Therefore, it’s important that the mask you choose has the greatest contrast between the areas you wish to select and the areas you wish to ignore.
For example, if you were working on an image of a nice green field on sunny day, but the sky was blown out and you wished to exchange it with the sky from a darker exposure. You would run the luminosity mask actions and choose the mask where the field was black and the sky was white. This would ensure you would only select the sky and not the field in the foreground.
To turn Brights 3 into an actual selection, you just need to hold Control (Command on a Mac) and click the left mouse button on the thumbnail of the Brights 3 channel. Marching ants will appear to indicate your selection. Press “Control + H” to hide the marching ants.
8. Get Ready to Paint on the Mask
Now switch back to your Layers panel and select the underexposed layer. Make sure you select the mask, and not the actual layer itself.
9. Set up the Paint Brush Tool
Choose the Paint Brush tool on the toolbar and make sure the foreground colour is set to white. Choose the correct brush size. This will depend entirely on the area you’re working with in a given image, but usually, a larger brush is better. A brush size of 2,000 pixels was used here. Set the opacity depending on the strength of the masking you wish to use. For example, with this image, you will mask the sky with an opacity of 100%, but the overexposed areas in the water and foreground will only be masked at 40% opacity. This is because you don’t want to darken the sea too much.
10. Painting or Applying the Mask
Now you’re ready to begin masking. Freely move your paint brush around the areas you wish to affect. Since you are masking with a luminosity mask selection you don’t have to worry about going over the edges. Try varying opacities in different places. Even if your brush opacity is set to 100%, you can still run your brush through certain areas a few times to strengthen the effect.
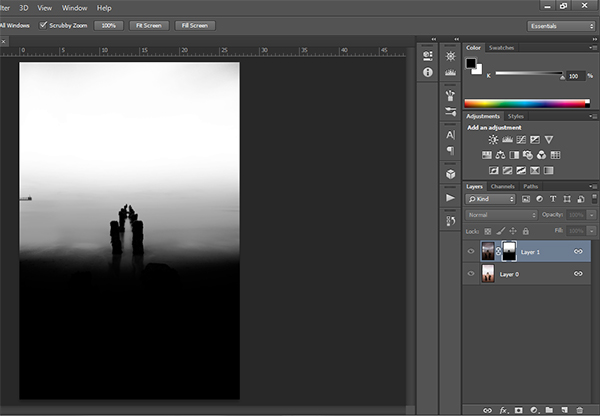
By holding Alt (Option on a Mac) and clicking on the layer mask you’re working on, you can see exactly what the mask now looks like. The image below is the final layer mask after you’ve finished painting. Remember that white equals visible and black equals invisible. So the sky in this layer is completely visible, the sea is grey so it is partially visible. Since the foreground is black, which means invisible, you will be left with a foreground that is 100% from the overexposed layer below.
After a small contrast adjustment and a selective vignette added, here’s the final image along side the original overexposed image you were working with.
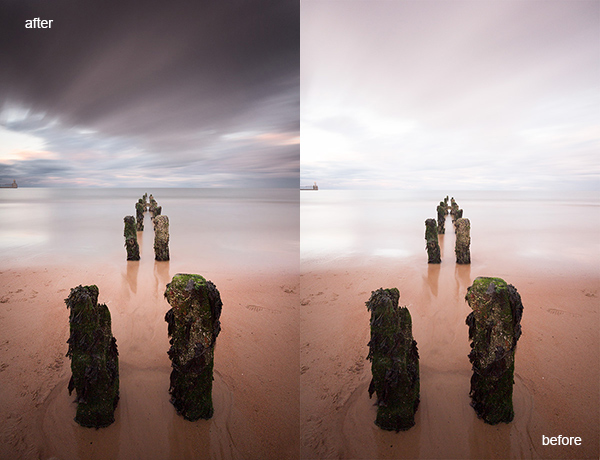
You now have a nicely balanced image with a good range of dynamic light and tones.
Deleting the Luminosity Masks
While working in Photoshop, the more layers you work on, the larger the demand on Photoshop and your system. Large workflows can seriously slow down your operating system. To ease the load, you should delete the luminosity masks once you’ve finished working with them.
To do this, go back into your Channels palette and select Brights 1. Then hold down Shift and press your left mouse button on Brights 2 to select this too. Do the same with each luminosity mask below. Once all are selected, click your right mouse button on any of the selected masks and choose the Delete Channels option. This will remove the selected channels.
Summary
At first, luminosity masks seem complex and sometimes daunting, but in truth, this whole workflow took less than 5 minutes. After a little bit of practice you begin to get an intuitive sense of how to use these powerful tools, and once you do, you gain extensive control over your images that can change your photography forever.
Have you tried this method of blending images, if so share your thoughts or images in the comments below. Or do you prefer the HDR tone-mapping process? Do you think HDR is dead or maybe it should be? Or perhaps you are somewhere in the middle in the 10 steps every HDR photographer goes through? What are your thoughts?
Check out the newest dPS ebook – Loving Landscapes A guide to landscape photography workflow and post-production – a brand new dPS ebook by the authors of Living Landscapes
The post Exposure Blending Using Luminosity Masks Tutorial by Jimmy McIntyre appeared first on Digital Photography School.