
The Blend If feature in Photoshop blends one layer into another based on the content of either of the two layers. It can be used, for example, to replace a sky by making it easy for you to knock out the blue sky without having to make a complex selection.
In this article, you’ll learn some Photoshop tips on how to use Blend If to replace a sky.
Start by opening an image such as the one shown here. Right click on the background layer and choose Duplicate Layer to make a second copy (keyboard shortcut is “command/control + J”). You now have two layers with the same content.
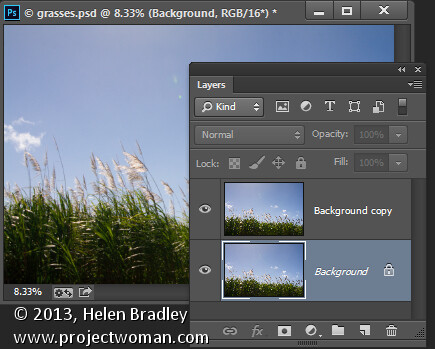
Make a duplicate layer
Open an image with good sky. Choose Select > All and then Edit >Copy. Click on the main image and choose Edit > Paste. Drag the sky layer between the two image layers. Size the sky layer, if necessary, so it is big enough to replace the unwanted sky in the original image. Alternately you can use File>Place to choose the new image, and Photoshop will automatically add it as a layer and make it a Smart Object (so it can be resized without any quality loss).
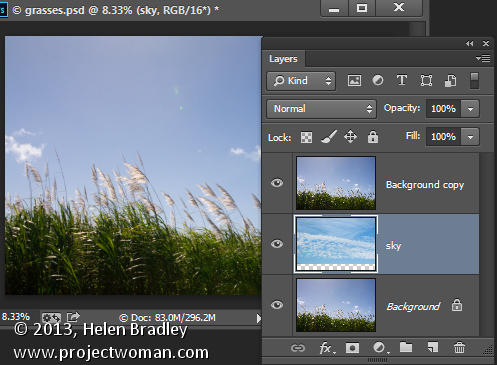
Put the layer of the new sky in between the other two
Target the top layer, click the Add Layer Style icon (fx)at the foot of the Layers palette and click Blending Options to open the Layer Style dialog box (see below).

The Blend If sliders and channel selector are at the foot of this dialog. To start, you will choose the channel to use. The Gray channel is the luminance channel so it lets you make your adjustment based on the lightness/darkness of either the image layer or the layer below. If you choose Red, Green or Blue you’ll be using that channel as the basis for your blending.
The layer underneath the current layer contains the sky that we want to use. So you will use the sliders called This Layer to remove the existing sky, to be able see through to the sky underneath. If we were to select the Gray channel we won’t be able to make the selection very easily because both the sky and the grasses have similar luminosity or lightness values.
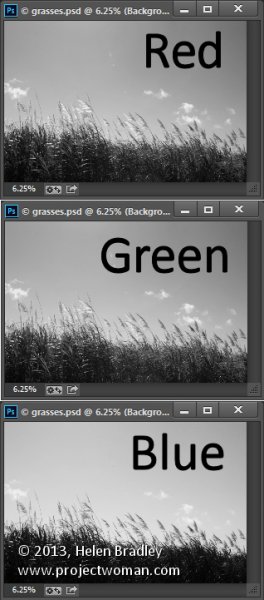
However if you exit this dialog for a minute and take a look at the individual channels in the image, you may find one where there is plenty of contrast between the area you are seeking to hide (the blue sky) and the areas you want to keep (the grasses).
To do this close the dialog box temporarily, choose Window > Channels and click on the Red, Blue, and Green channels in turn to view them.
In this case the Blue channel displays the sky as a lighter tone than the grasses, which are darker. This channel has the most contrast in the area we are interested in so it will be a good one to use.
Select the RGB channel again before you leave the Channels palette. Return to the Layers palette and target the top most layer again. Display the Blending Options dialog again and choose the Blue channel in the Blend If pull down.
Drag the right most slider in the This Layer area to the left. As you do so, the lighter blue areas will disappear and you will see through to the sky layer underneath.
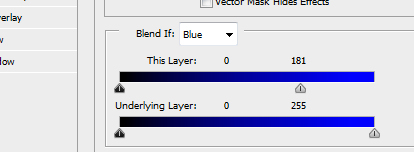
Pull the right slider for “This Layer” to the left
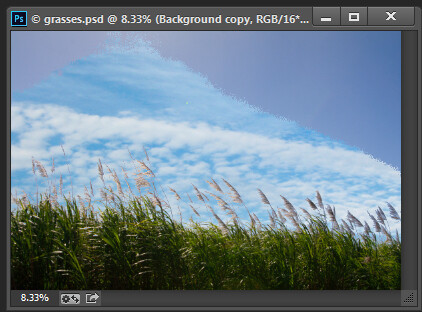
The result is the the layer below will start to appear, but the transition is not smooth
To smooth out the transition between the area being removed and the area which remains, break the slider in two. You do this by holding the Alt key (Option on a Mac) and drag half of the slider away from the other half.
The rightmost half of the slider indicates the point at which the blending effect is fully impacting the image. So pixels which have a value greater than the value indicated by this slider will be fully transparent. The left half of this slider controls the point at which the blending ceases. Any values in the blue channel that are smaller than the value indicated by this slider will be fully opaque. Pixels which have values in the blue channel that match the values between the two sliders are partially transparent.
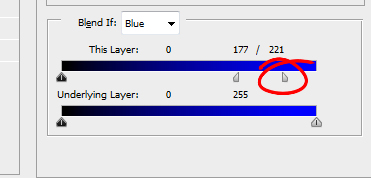
For some images you may get better results by combining multiple channels. So you might use the blue and the red channels but use the rightmost slider on the blue channel and the leftmost slider on the red channel. You’ll need to experiment to see what works for your image. When you have a good result click Ok.
In a perfect world you’ll be able to fully remove the unwanted sky with just this adjustment. Chances are your results will be less than perfect! Mine certainly are, see below.

If this is the case, make sure that the Blend If adjustment gives you the best results in the area that would require you to make a complex selection. For me that is where the grass meets the sky. Selecting around the grass would be a big job so I want the Blend If results to be good in this area. That it doesn’t get rid of the rest of the sky is just fine – that it is easy to get rid of manually.
Target the top layer and click the Add Layer Mask icon at the foot of the Layers palette. Target the mask by clicking on it. Choose a soft round brush and paint using black over the mask to hide the remainder of the sky. Using a soft brush (0% Hardness) will ensure you get a seamless transition between the original image and the new sky.
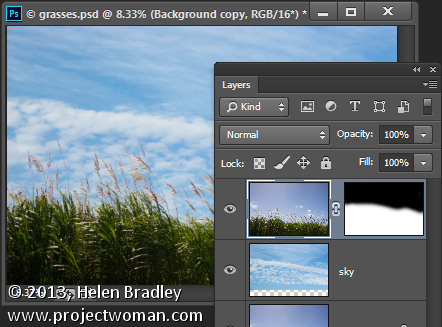
Problems elsewhere
Occasionally you will find that using the Blend If sliders to remove the sky also results in some unwanted transparency appearing elsewhere in the image. If this occurs you can use content from the background layer to fill the transparent areas.
Make a selection over the area to fix, click on the Background layer to target it and choose Layer > New > Layer via Copy. Drag this layer to the top of the image and it will cover the areas that were made transparent.
Although this wasn’t a problem with this image, this is what the layer stack might look like if you do need to fix some transparency appearing elsewhere in the image.
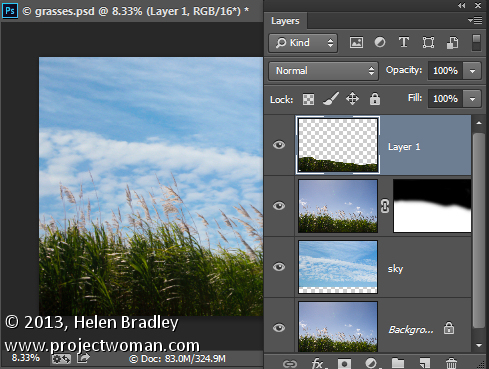
The Blend If sliders are a useful way to blend layers without needing to make complex selections. You can make even better use of these sliders when you use the channel data as a guide to determine which channels to use for your blending.
Post originally from: Digital Photography Tips.
Check out our more Photography Tips at Photography Tips for Beginners, Portrait Photography Tips and Wedding Photography Tips.
Photoshop Tips – Using the Blend If Feature
The post Photoshop Tips – Using the Blend If Feature by Helen Bradley appeared first on Digital Photography School.
You must be logged in to post a comment.