RSS
 

Posts Tagged ‘Blend’

How to Use Soft Light Blend Mode in Photoshop to Improve Exposure and Contrast

19 Oct

Do you have an overexposed sunny side and an underexposed shadow on the other side of your image? Or maybe a well-exposed photo that needs more vibrancy? There’s a tool so versatile that can help you fix any of these problems and more: the Soft Light Blend Mode.

What are Layers?

Imagine your photo as a printed one. Then you take a sheet of acetate and draw on it. Then you take another sheet and you put it on top of the others and obscure a part of it; and so on, and so forward. Each acetate sheet is a layer and you can make as many alterations as you want on top of your original this way.

To create layers in Photoshop you need to go to Menu > Layers > New. A pop-up window will appear where you can name your layer, choose the color, the blending mode and the opacity. When you click OK the new layer will appear on the Layers panel window on top of the background, which is the original image.

Layers - How to Use Soft Light Blend Mode to Improve Exposure and Contrast

What is the Blend Mode?

The default setting of a new layer is normal blending mode. This covers the background or the layer underneath. However, Photoshop gives you the option of choosing a different Blend Mode, which changes the way your edit affects the pixels. You can change it in the pop-up window of the new layer.

Blending Modes - How to Use Soft Light Blend Mode to Improve Exposure and Contrast

In the case of the Soft Light blending mode it is similar to using the dodge or burn tool. In other words, every color that is lighter than 50% grey will get even lighter, like it would if you shine a soft spotlight to it. In the same way, every color darker than 50% grey will get even darker. However it will never reach pure black.

So, why not use dodge and burn instead?

First of all, when you work in layers you don’t lose any information. You can always discard the layer and start over because there is no damage to the original image.

With layers, you can change the opacity or transparency of each one, which allows you to control how evident your edit is in the final image. You will find the opacity tool on the Layers panel with a slider that goes from 0 to 100 %.

Note that there is another slider next to it called Fill. There are 8 blending modes in which these two sliders make a difference, however, Soft Light is not part of these “special 8” so the Fill opacity and Standard opacity have the same result when using this Blend Mode.

Opacity - How to Use Soft Light Blend Mode to Improve Exposure and Contrast

Another advantage is that you can change the blending mode of each of the layers. In this article, we are exploring the use of Soft Blend, however, each mode offers different possibilities. One blending mode can have different uses, here are three of them.

3 ways to use Soft Light Blending Mode

1. Add punch to your image

Increase the contrast and saturation to have more vivid colors and give a punch to your image. You can do this by duplicating the background layer: Menu > Layer > Duplicate Layer and changing the blending mode from normal to Soft Light. Finally adjust the opacity until you are happy with the result.

Duplicate Layer - How to Use Soft Light Blend Mode to Improve Exposure and Contrast

BeforeSoftLight - How to Use Soft Light Blend Mode to Improve Exposure and Contrast

AfterSoftLight - How to Use Soft Light Blend Mode to Improve Exposure and Contrast

2. Gradient tool to balance the lighting

If you have an image that is underexposed on one side and overexposed in the other you can easily even it out with a Soft Light blend layer. First go to Menu > Layer > New Layer. Pick the Gradient tool and draw a line from the brightest side to the darkest one. The gradient will look like this:

Gradient How to Use Soft Light Blend Mode to Improve Exposure and Contrast

Then change the layer blending mode to Soft Light and lower the opacity to find the best results.

Before Gradient - How to Use Soft Light Blend Mode to Improve Exposure and Contrast

Before gradient

After Gradient - How to Use Soft Light Blend Mode to Improve Exposure and Contrast

After gradient

3. Dodging and burning with a Soft Light layer

The past workflows altered the entire image, however, if you need to do a more precise job you can also do that using Soft Light. First, add a new layer with Soft Light blending mode like you did in the previous procedure. Only this time instead of the gradient tool, you are going to use the brush tool. When you select it you can choose the size of the brush on the top menu and the color on the bottom.

Brush How to Use Soft Light Blend Mode to Improve Exposure and Contrast

If you paint with black you will darken the image:

Darken - How to Use Soft Light Blend Mode to Improve Exposure and Contrast

Painting with white will lighten certain areas, and with different shades of grey, you can also control tones of your image.

Painting - How to Use Soft Light Blend Mode to Improve Exposure and Contrast

Keep going until you are happy with the contrast and exposure of your image.

Before Painting - How to Use Soft Light Blend Mode to Improve Exposure and Contrast

After Painting - How to Use Soft Light Blend Mode to Improve Exposure and Contrast

Conclusion

Now you know that blending modes have a lot of potential, so keep exploring. How do you use Soft Light Blend Mode? Please share your ideas and tips in the comments below.

The post How to Use Soft Light Blend Mode in Photoshop to Improve Exposure and Contrast by Ana Mireles appeared first on Digital Photography School.


Digital Photography School

 
Comments Off on How to Use Soft Light Blend Mode in Photoshop to Improve Exposure and Contrast

Posted in Photography


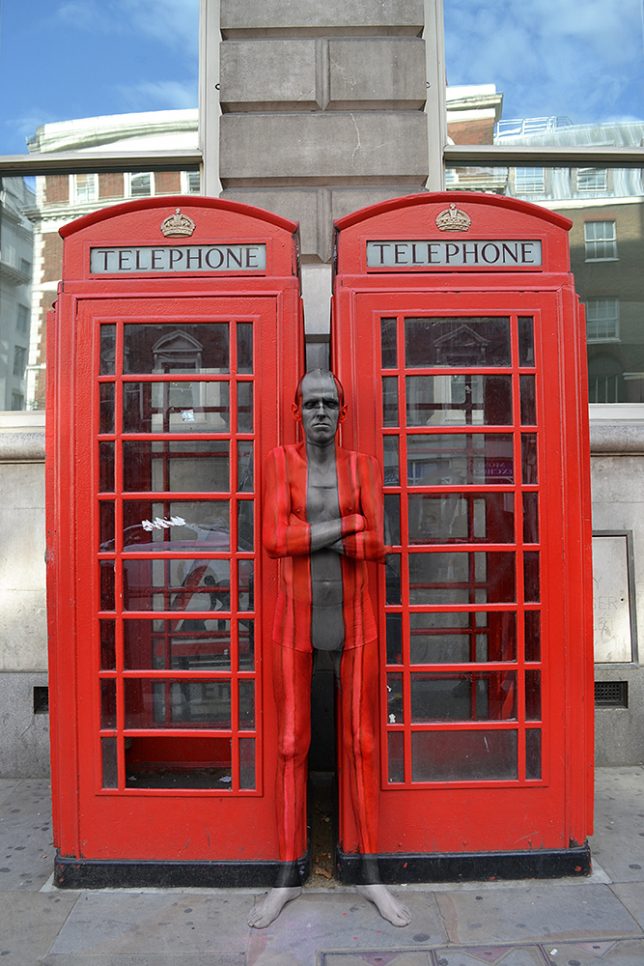
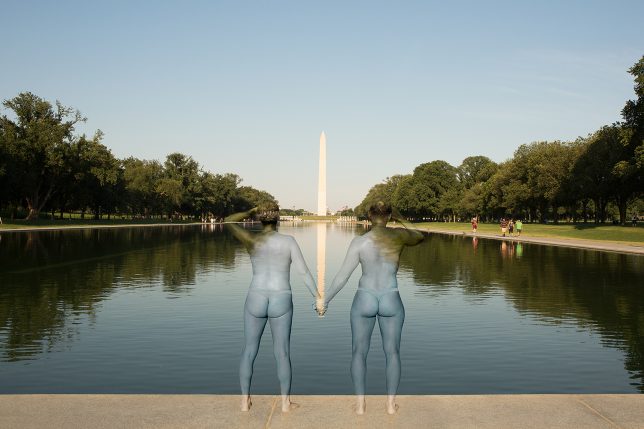
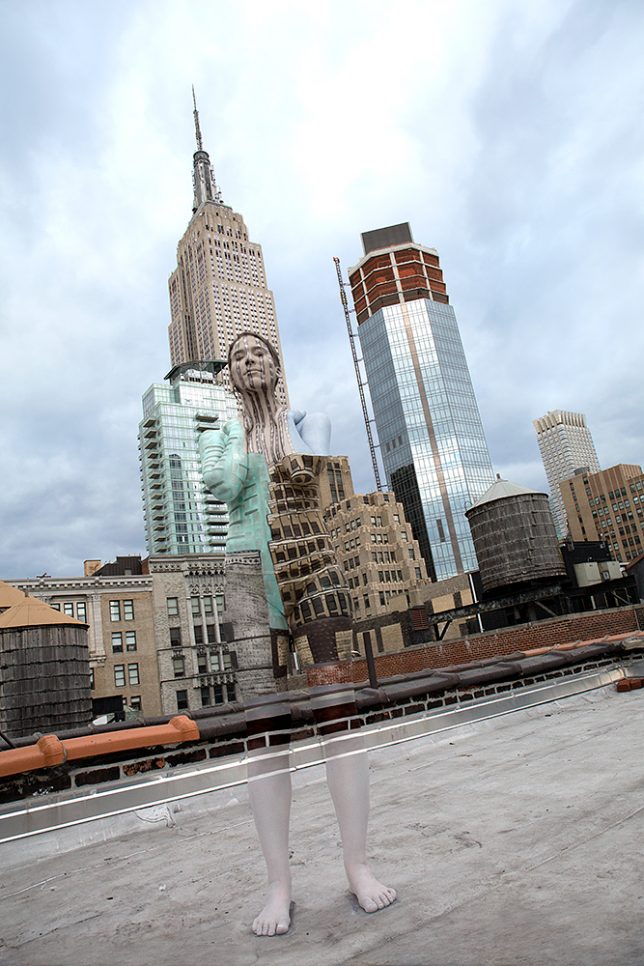
Urban Camouflage: Nude Body-Painted Models Blend Into Built Environments

13 Dec

[ By SA Rogers in Art & Photography & Video. ]

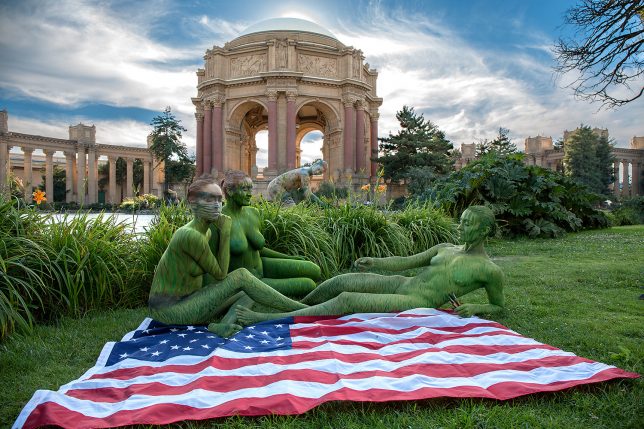
body-painting-san-francisco-2

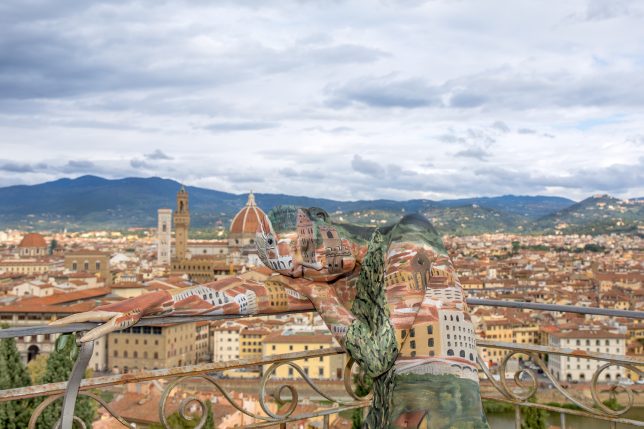
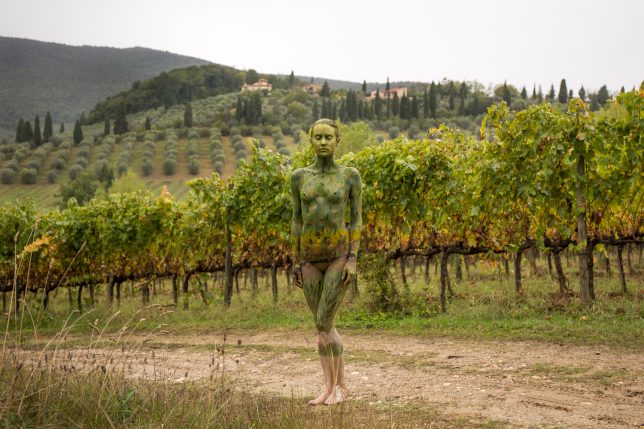
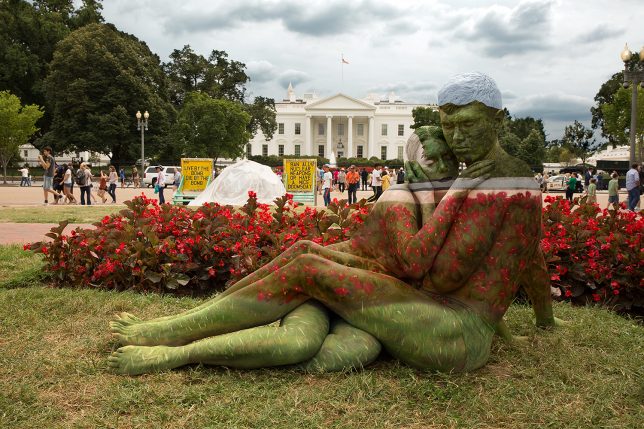
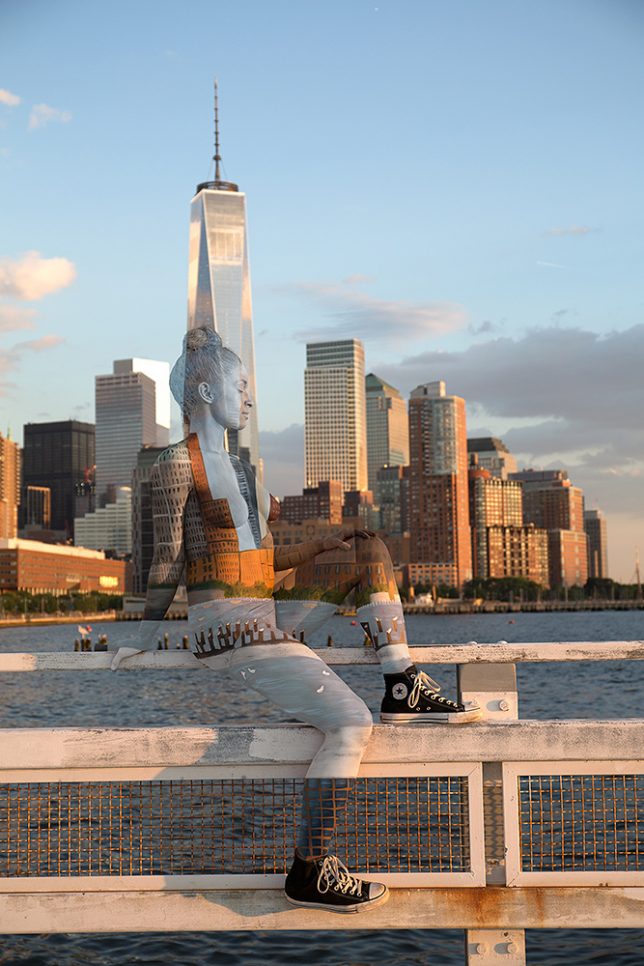
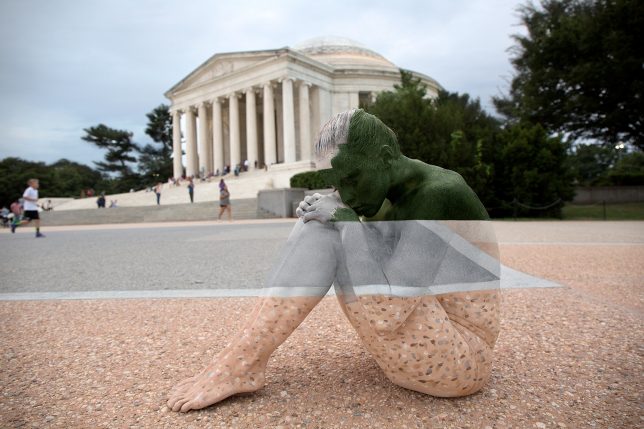
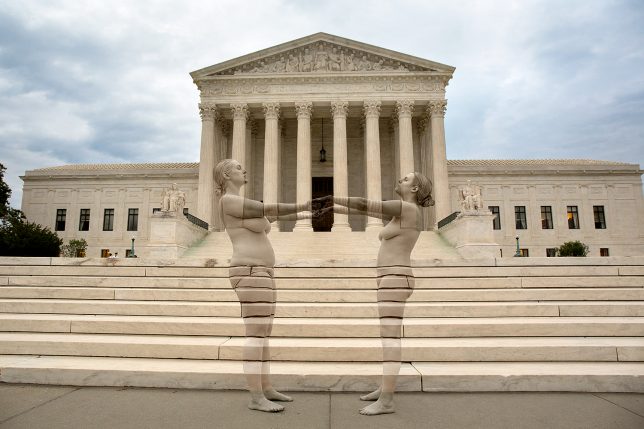
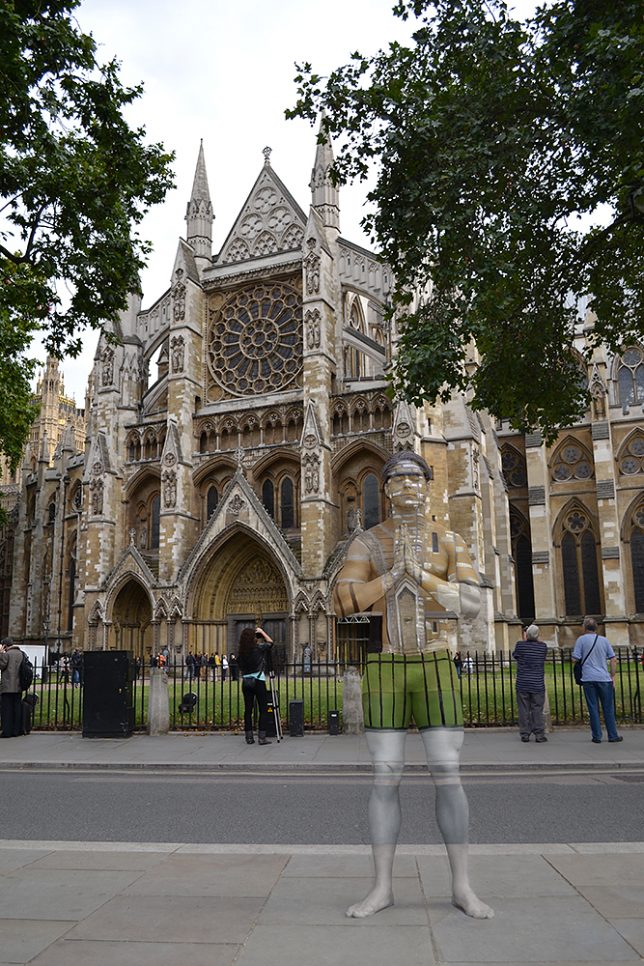
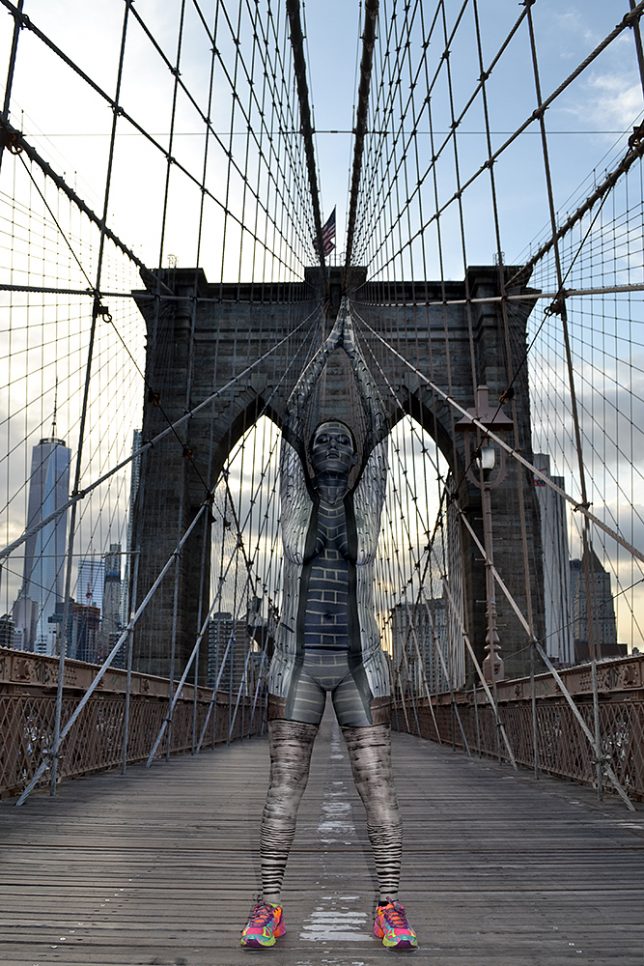
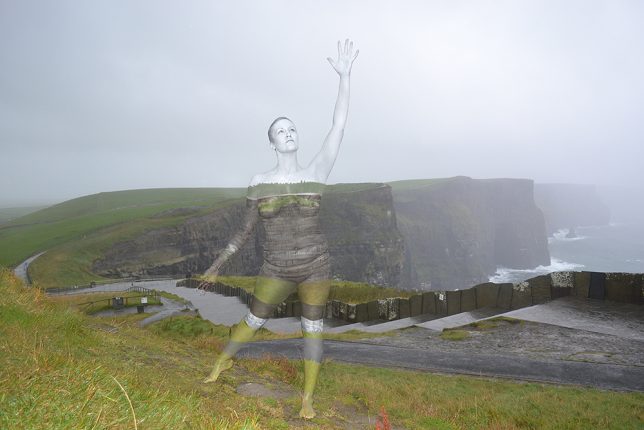
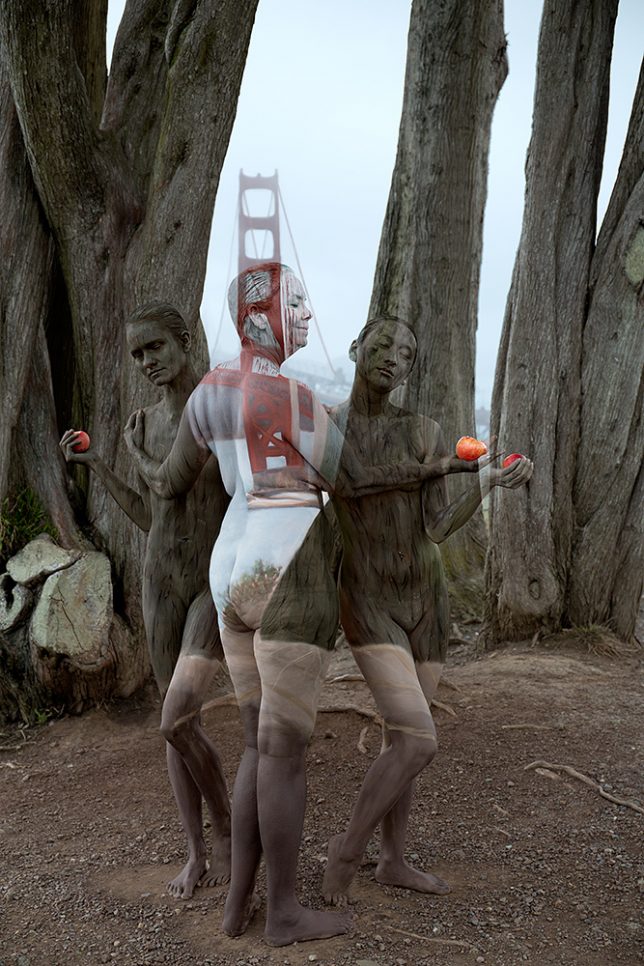
Nude human bodies seem to melt into their surroundings, expertly hand-painted to match their environments in an artistic form of urban camouflage. Artist Trina Merry dodges traffic, police, pedestrians and inclement weather to capture photographs of her subjects against such backdrops as the Florence skyline, the Washington Monument, the Brooklyn Bridge and Westminster Abbey.

body-painting-florence

Artist: Trina Merry - Model: Vitalia Abramova

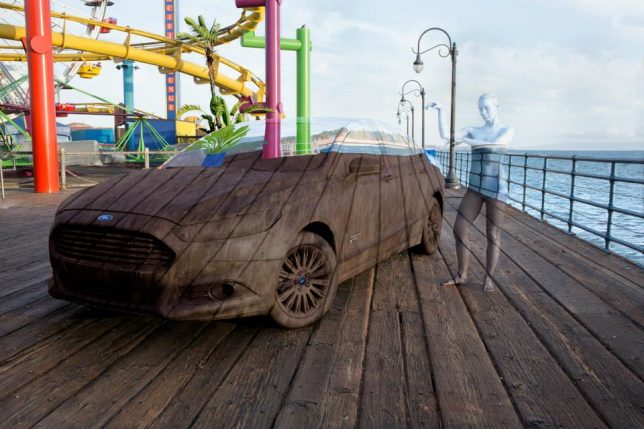
body-painting-car

body-painting-london

Typically working guerrilla-style without the permission of authorities in most cases, Merry selects locations that can make a big visual impact and then paints her models in place. Getting all those angles right is no small challenge – the human body is three-dimensional, after all, and nobody can stand perfectly still for very long. But somehow, it all comes together in the final images of Merry’s work.

sweet-land-of-liberty-body-painting-series-1

sweet-land-of-liberty-2

sweet-land-of-liberty-3

sweet-land-of-liberty-4

sweet-land-of-liberty-7

For her latest series, ‘Sweet Land of Liberty,’ Merry poses subjects in front of iconic patriotic landmarks like the White House and the Lincoln Memorial, asking her audience to think about what we have to be grateful for. Previous projects have been set in cities around the world, along with natural cliffs and meadows of Ireland and studio shoots. Many scenes are made even more complicated by the use of several models, contorted to create specific shapes. Some incorporate larger objects, like entire cars, as in a commission for Ford.

body-painting-london-2

body-painting-new-york

body-painting-new-york-2

body-painting-ireland

body-painting-san-fracisco

“Body paint is an ancient art form and the use of ochre on the skin dates back 425,000 years and has a deeper part in all of our cultures than people tend to realize,” says Merry. “Painting on the body is a distinctly human experience; it creates a special connection to a person that other visual art forms have trouble accomplishing. This work has a heartbeat and a breath – it is dynamically alive. The ephemeral nature of body paint forces focus and reflects on the reality of existence, which is an incredible thought that I find myself reflecting on frequently while working.”

Share on Facebook


[ By SA Rogers in Art & Photography & Video. ]

[ WebUrbanist | Archives | Galleries | Privacy | TOS ]


WebUrbanist

 
Comments Off on Urban Camouflage: Nude Body-Painted Models Blend Into Built Environments

Posted in Creativity


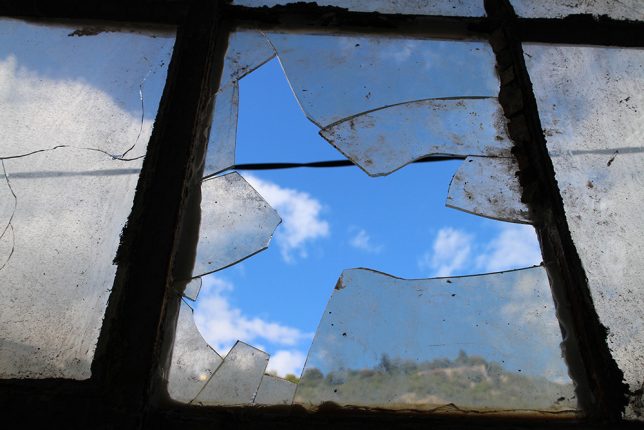
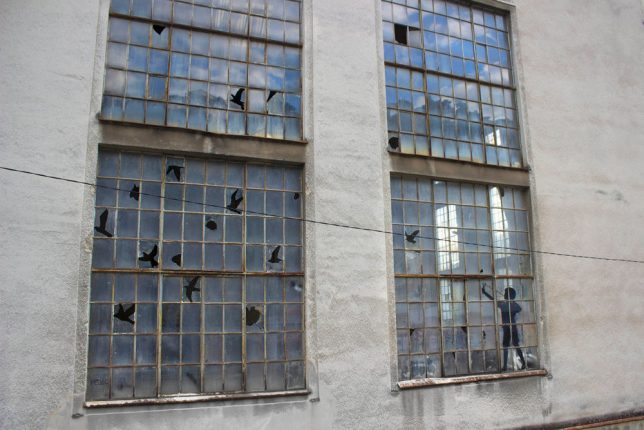
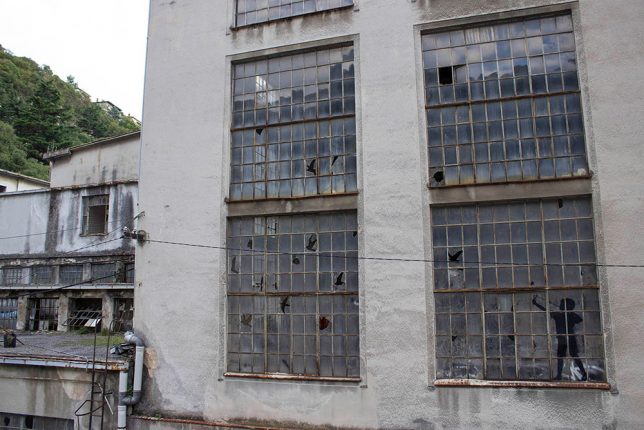
Art of Camouflage: Flying Bird Silhouettes Blend into Broken Window Voids

09 Nov

[ By WebUrbanist in Art & Installation & Sound. ]

cracked-glass-frame-art

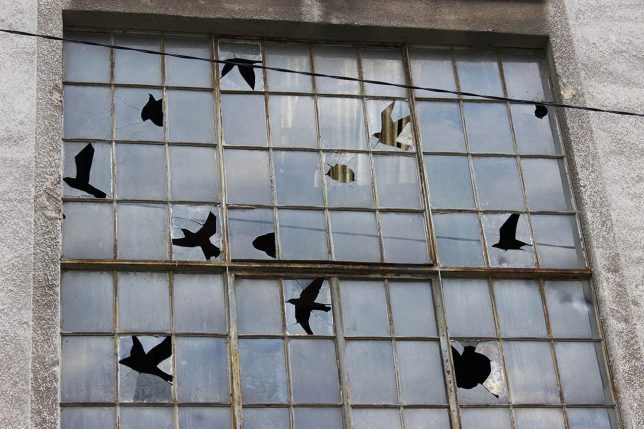
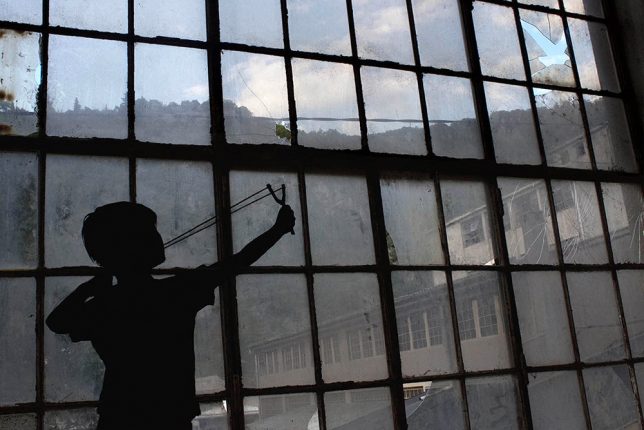
A boy aiming his slingshot into the sky seems to aim both at the broken windows of an abandoned building but also a series of birds that seem to appear in the gaps of cracked glass, transfixed in various stages of flight.

broken-glass-bird-art

Artist Pejac is well known for his negative-space interventions, from pealing back paint chips to carefully reveal brick beneath to other contextual installations. Much of the art is in the craft: a meticulous removal (or breaking) of materials to slowly reveal some new whole, much like a sculptor chips away at a marble edifice.

bird-window-boy-shooting

This latest piece was produced during his residency with the Museum of Modern and Contemporary Art in Rijeka, Croatia, where he spent multiple weeks crafting site-specific works.

bird-windows-power-plant

Camouflage (Tribute to René Magritte) is set in the huge windows of an old paper factory power plant, depicting a flock of birds that might be hard to spot were it not for the outline of a boy taking aim below them. His figure calls attention to the larger work, signalling a passer by the existence of something both large and subtle going on in the frame.

boy-taking-aim

painted-boy

The implied story is one about hunting and survival, the birds disguising themselves against a backdrop of broken window panes, making them harder for the child to spot. The boy, too complex a figure to render through even the most craftily broken glass, is painted over a series of panes (images by Sasha Bogojev).

Share on Facebook


[ By WebUrbanist in Art & Installation & Sound. ]

[ WebUrbanist | Archives | Galleries | Privacy | TOS ]


WebUrbanist

 
Comments Off on Art of Camouflage: Flying Bird Silhouettes Blend into Broken Window Voids

Posted in Creativity


Depth-Defying Art: 3D Chalk Characters Blend into City Streets

26 Apr

[ By WebUrbanist in Art & Street Art & Graffiti. ]

chalk hidden mouse

Bringing a certain subtly and sense of humor back to three-dimensional chalk art, David Zenn creates highly-contextual scenes using an array of animal characters, all interacting with urban environments.

crack dog rescue

For decades, he has used chalk and charcoal to feature pieces that tie into their surroundings, relating to anything from fallen flowers to cracks in the sidewalk.

interactive chalk figures copy

Rats, bears, lizards, dogs and other less-identifiable animalian hybrids can be found lounging around, floating balloons or hiding in imagined holes, like refugees from a wild children’s book.

trapped cat

chalk mouse warrior

chalk mouse player

wall mice

reading light

Over time, a cast of regular characters has evolved, appearing in different places, telling a story through each sequential work of art. Some of his archival prints are for sale, as well as his book Temporary Preserves (via Colossal).

Share on Facebook


[ By WebUrbanist in Art & Street Art & Graffiti. ]

[ WebUrbanist | Archives | Galleries | Privacy | TOS ]


WebUrbanist

 
Comments Off on Depth-Defying Art: 3D Chalk Characters Blend into City Streets

Posted in Creativity


How to Blend in Adjustments Using Layer Masking in Photoshop

26 Apr

In a recent article called: Getting Started with Layer Masks in Photoshop – a Beginners Tutorial, I showed you the basics of layer masks and why they are such powerful tools. Layer masks are essentially what gives Photoshop layers much of their power. They allow you to tell Photoshop exactly where you want your changes applied, and to what degree.

In that article, I also showed you how to use layer masks in pictures where you had a defined edge to the areas you wanted to change. Photoshop has a lot of great tools that allow you to make selections, which you can then use to define the mask.
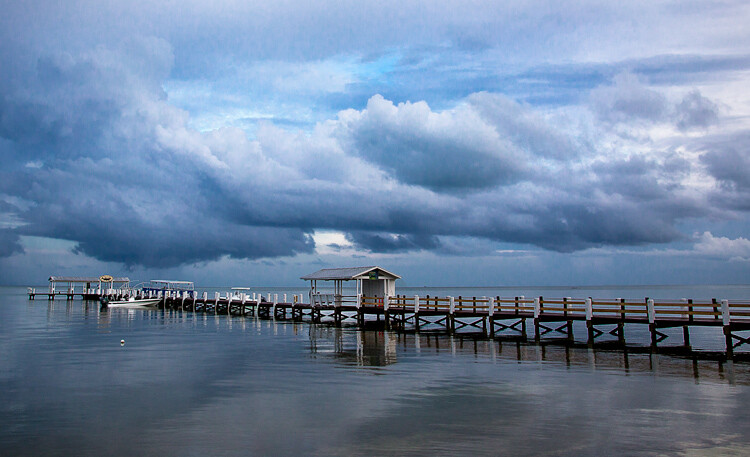
Here is a picture I took in Florida where I used layer masks and to accentuate parts of the image without changing other parts.

Here is a picture I took in Florida where I used layer masks and blending, to accentuate parts of the image without changing other parts.

But what about pictures where you have a soft edge? Or where you want to blend in the effect gradually? That’s what I will cover in this article. It will pick up where the prior article left off, so if you haven’t seen that one yet, check it out. Once you have reviewed the basics of layer masks in that article, come back here and we will get started.

Step 1: Create an Adjustment Layer

The first thing to do is make the changes you want to the image, which will then be blended into the selected areas later. To make those changes, I am going to create a Curves adjustment layer. As mentioned in the prior article, Curves adjustment layers are one of the most powerful tools in Photoshop. They allow you to selectively effect brightness, contrast, and/or color. To create one, just select Layer > New Adjustment Layer > Curves. You can also click on the Curves icon in the adjustment layer panel. Don’t worry though – we are not going to do anything complicated with the Curves Adjustment layer.
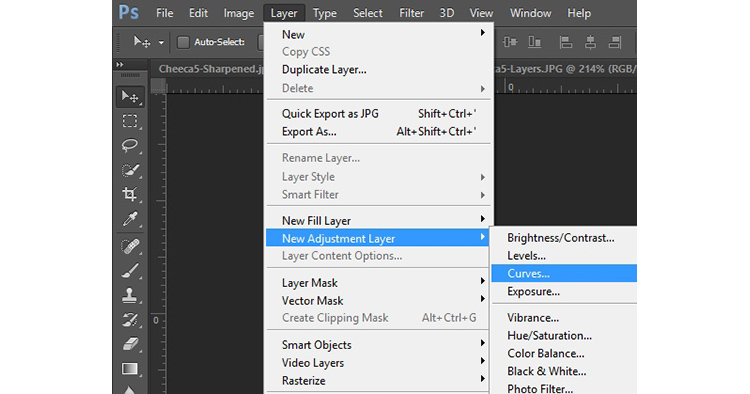
Graphic9-NewAdjustmentLayer

Of course, you don’t have to use a Curves adjustment layer to make adjustments to your picture, you can use any of the adjustment layers offered by Photoshop. If you are more comfortable with Levels, use that. If you want to change the brightness levels, there are Exposure and Brightness/Contrast adjustment layers. If you want to make changes to color, you can use the Hue/Saturation or Vibrance adjustment layers. I consider Curves to be one of the most powerful tools in Photoshop, so that is what I use, but you can use whichever one you want, or you are most comfortable using.

Step 2: Add in the Effect

Once your Curves adjustment layer is created, just add the effect that you want. Remember that a white mask is automatically applied to all adjustment layers – so it reveals everything – but we will change that in a second.

I want to add contrast, therefore I will just scoot in the endpoints of my curves adjustment layer. You can also drag the line up or down in places. The idea is to steepen the curve where you have a lot of pixels. Doing so adds contrast, which is what we want.

You don’t need to do anything fancy here. Go ahead and add the effect to a greater extent than you will want it in your picture. In other words, overdo it. Don’t worry if the picture doesn’t look quite right.

Graphic1-Curves

In addition, don’t worry that the effect is occurring across the entire picture at this point. We will make the changes apply selectively in just a second. For now, just look at the area of the picture where you want the effect to be applied and add it in accordingly. For example, in this picture below, my change is added to the entire picture, even though it results in effects I don’t want (like blowing out the sky on the right). We will fix that in the next step.
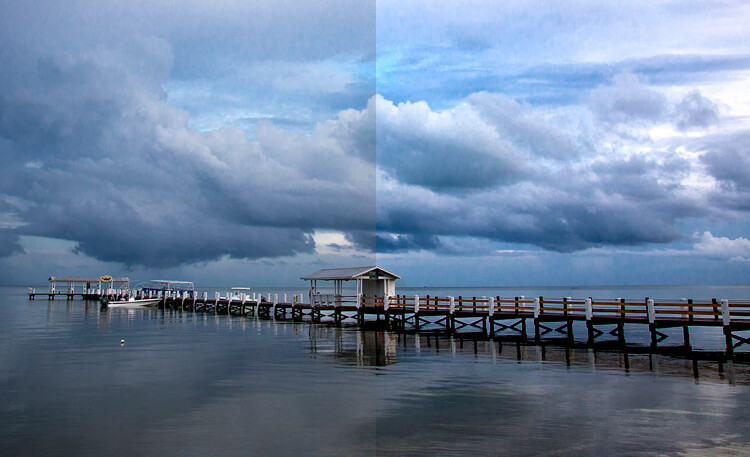
Graphic2-InitialChanges

The left side of this image shows the original image, the right side shows it after the application of the curves adjustment layer. Notice the far right portion of the sky is blown out, but we’ll remedy that by limiting where the effect applies in the next step.

Step 3: Brush it in

Now comes the part when you limit the areas where your changes apply to the image.

Start by masking off the entire image, just press CTRL/CMD+I to do so. You will notice that two things happen. First, the effect you just added to your picture is hidden, it’s as if you never made any changes (don’t worry, the changes are still there, they’re just hidden). Second, the box next to the adjustment layer you created turned black. The box represents the layer mask. As we discussed in the last article, a white layer mask means the changes show through to the image (which is why you saw the effect of the changes when the layer mask was white). A black layer mask means the effect does not show up on the picture. Since our layer mask is now black, the effect does not apply anywhere in the picture.

Graphic3-BlackLayerMask

Now we can begin the process of adding the effect in gradually. To do so, we will use the Brush tool. You can select it from the list of tools on the left side of your screen (tool panel), or you can just press B to call it up. While you are at it, go ahead and press the D key on your keyboard. This will ensure that the brush is set to its default foreground color, which is white, which is what you want since you will be adding the effect to the picture.

If you just left the brush as is, when you used it to paint in your picture, it would add the effect 100%. That is not what you want here. You want to add the effect in gradually, so it blends in. Therefore, go to the top of your screen and find Opacity. Pull the Opacity to the left until it is in the range of 5% to 15%. In my case I will use 10% (you can also just type 15 on your keyboard and it will apply to the opacity of the brush while that tool is selected). The lower the opacity, the less the effect gets added with each brush stroke – and the more gradual the change. If you have the patience to keep the Opacity very low (some people go as low as 2-3%), you will be rewarded with very gradual changes.

Graphic4-BrushTool

Now you will just paint in the effect. Before you do so, also make sure that the hardness of your brush is set to 0%. You want as soft a transition as possible. In addition, use as large a brush as your picture allows. The larger the brush, the softer the transition. The easiest way to change the size of your brush is with the square bracket keys. The left bracket [ makes the brush smaller while the right bracket ] makes it larger.

Now just click in the areas where you want the effect applied. You will have to do this multiple times because you have the opacity set very low. That is okay though, be patient. By doing it this way you are ensuring that it’s blended in gradually. You can also add the effect more in some places and less in others. Just click a few more times where you want the effect to be the most visible.
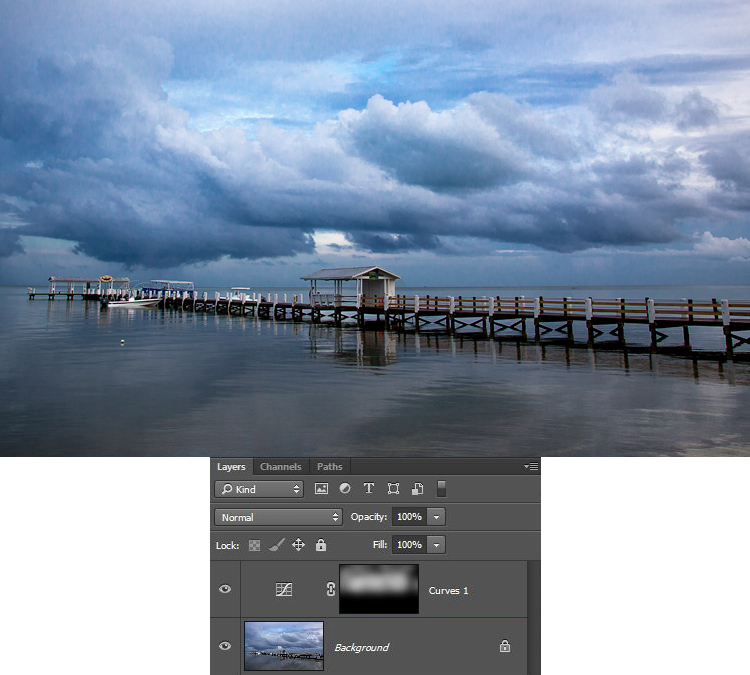
Graphic5-BrushingIn

Step 4: Check Your Work and Adjust

You can check your work by clicking the eyeball next to the layer. When you turn off the layer, Photoshop will show your image without your effect added. Click the eyeball again to see your progress and turn the layer back on.
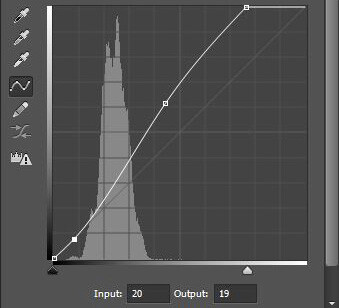
Here is the histogram after using the brush tool to paint in white. It shows only the pixels that were selected via the brush.

Here is the histogram after using the brush tool to paint in white. It shows only the pixels that were selected via the brush.

If you found you overdid the effect, you can always back it off. You do so by turning the color of your brush from white to black. Remember that white reveals the adjustments, black hides them. You could undo the effect by stepping backward (Edit > Step Backward), but the easiest way to do so is just press the X key (that switches the foreground and background colors so you now have black on top). Now when you use your brush it will be removing the adjustment you created. Remember that your opacity percentage applies whether your brush is painting with white or black. When you are done removing the adjustment, press the X key to go back to a white brush and continue adding the effect where you want it.

You can also go back and adjust your Curve after you have brushed it in. In fact, you should get in the habit of checking the curve your originally set. Once you have used your brush tool, the histogram will show only those pixels within the selected area (where you painted white). In general, you will want to make sure that the steepest part of the curve corresponds with the part of the histogram where you have the most pixels. Make a tweak to your curve to make sure it looks how you want.

Step 5: Repeat

Another great thing about this technique is that you can do it over and over again. It’s not uncommon to see photographers with a long list of layers, where they have made adjustments to specific parts of the image. You can use this technique to change the brightness values of the picture, making parts lighter or darker. You can also change the contrast, as we did above. You can even change the colors by going into the individual color channels of the Curves adjustment layer. Of course you could also use the brushing techniques above on a Hue/Saturation adjustment layer.

Here I used the same process that was set forth above to brighten the water. I created another Curves adjustment layer, turned the layer mask black, and then brushed in the effect with brush set to white at low opacity.
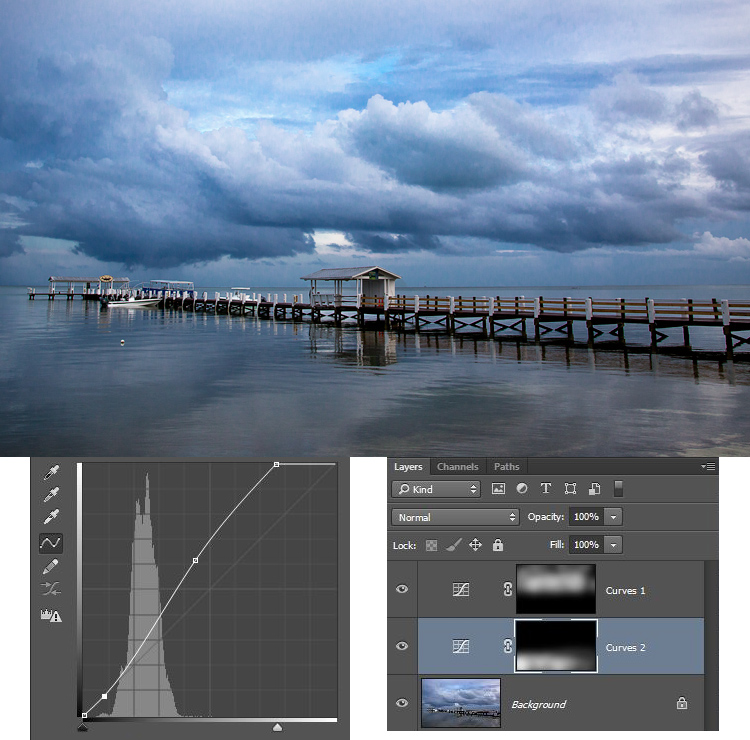
Graphic7-WaterAdjustmentToo

Other Changes to Your Image

In this particular image, I also wanted to sharpen the pier without sharpening the rest of the image. To do this, I will use the High Pass Filter (which is a remarkably powerful sharpening tool) and apply a layer mask to limit the effect to the pier. This will demonstrate the use of this layer masking technique outside the context of adjustment layers, which we have been using so far.

First, let’s quickly walk through the use of the High Pass filter. To sharpen with the High Pass filter, first duplicate the layer (CTRL + J). Then change the blending mode to Overlay (don’t worry about how this makes your image look). After that, call up the High Pass filter (Filter > Other > High Pass). This will result in a small dialog box where you set the amount. Here I will go with an amount of about 4, which I find is pretty typical. Press ok and the effect will be applied to the entire image. This is a pretty handy sharpening technique, but we’ll make it better by applying it only to a specific area (the pier).

To do this, we’ll add a layer mask and use the same brushing technique. Since we are not starting with an adjustment layer, we will need to add a layer mask. Just click on Layer > Layer Mask > Hide All, which will create a black layer mask. After that, select your brush (press B), set the color to white (press D for default), and set your opacity. Whereas you had been using a very low opacity earlier, in this case you can use a much higher Opacity. Brush in the effect just on the pier and watch it become sharper.
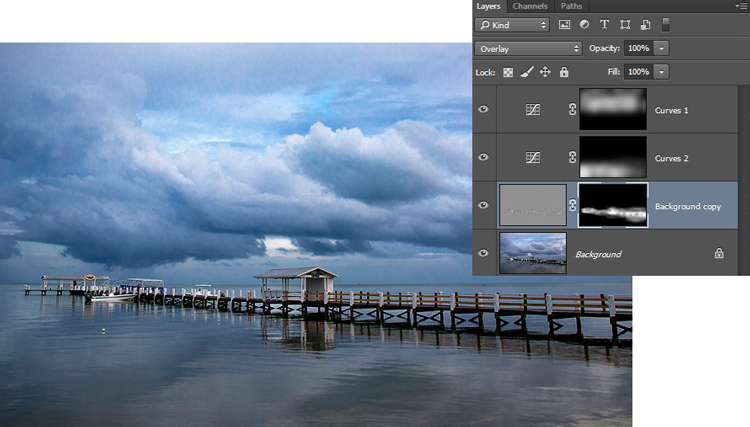
Graphic8-Sharpening

Conclusion

Although this technique is fairly simple, it is a pro move. I know photographers that edit their photos with nothing but a series of Curves adjustment layers where they blend in the effect in this manner. Give it a shot on some of your photos and I believe you will like the results.

googletag.cmd.push(function() {
tablet_slots.push( googletag.defineSlot( “/1005424/_dPSv4_tab-all-article-bottom_(300×250)”, [300, 250], “pb-ad-78623” ).addService( googletag.pubads() ) ); } );

googletag.cmd.push(function() {
mobile_slots.push( googletag.defineSlot( “/1005424/_dPSv4_mob-all-article-bottom_(300×250)”, [300, 250], “pb-ad-78158” ).addService( googletag.pubads() ) ); } );

The post How to Blend in Adjustments Using Layer Masking in Photoshop by Jim Hamel appeared first on Digital Photography School.


Digital Photography School

 
Comments Off on How to Blend in Adjustments Using Layer Masking in Photoshop

Posted in Photography


5 Tips for Using the Blend If Feature in Photoshop

18 Oct

In this video Blake Rudis, from EverydayHDR, shows five really useful tips for using the Blend If feature, which is available in Photoshop when working with layers.

The five methods for using Blend If:

  1. Adding sharpness to your image
  2. Removing noise
  3. Adding saturation
  4. Vignetting
  5. Adding a texture to your photo

Get the downloads he mentions in the video here:

Using the Blend If sliders allow you to really control where you want the affects to apply, without complicated masking and brushing in and out details. Give it a try, it may save you a ton of time editing!

googletag.cmd.push(function() {
tablet_slots.push( googletag.defineSlot( “/1005424/_dPSv4_tab-all-article-bottom_(300×250)”, [300, 250], “pb-ad-78623” ).addService( googletag.pubads() ) ); } );

googletag.cmd.push(function() {
mobile_slots.push( googletag.defineSlot( “/1005424/_dPSv4_mob-all-article-bottom_(300×250)”, [300, 250], “pb-ad-78158” ).addService( googletag.pubads() ) ); } );

The post 5 Tips for Using the Blend If Feature in Photoshop by Darlene Hildebrandt appeared first on Digital Photography School.


Digital Photography School

 
Comments Off on 5 Tips for Using the Blend If Feature in Photoshop

Posted in Photography


The First 3 Photoshop Blend Modes You Need to Understand

07 Jul

Photoshop can be extremely intimidating to learn, but once you start to get a grasp on some of the tools it has to offer, you’ll wonder how you ever processed photographs without it. If there’s one area of Photoshop that is both extremely confusing, and yet, extremely powerful when harnessed properly, it’s got to be the collection of blend modes. While this article won’t cover all of the options available within Photoshop, it should give you a good place to start your journey into using Photoshop blend modes.

Photoshop blend modes: a few basics to get you startedphotoshopblendmodes

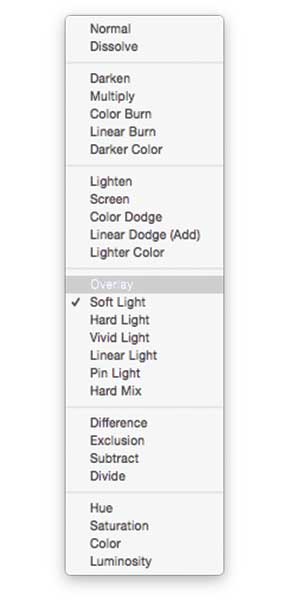
  • Photoshop blend modes are found in a drop down menu at the top of the layers panel (it defaults to “Normal”)
  • There are 27 different options to choose from, including the default “Normal” blend mode.
  • Adobe has organized these 27 blend modes into six different categories
    • Normal – Contains blend modes that don’t actually blend the layer being selected. (Normal shows the layer, and the dissolve layer essentially just removes pixels from the top layer as you reduce the opacity this effect is increased).
    • Darken – These blend modes use 100% white as a neutral, they have an overall darkening effect on images.
    • Lighten – Here Photoshop is using 100% black as a neutral, they have an overall lightening effect on images.
    • Overlay – In the Overlay mode Photoshop is blending the top layer and bottom layer together in a way that adds contrast. The effect of this changes based on the opacity of the layer, and the type of blend mode selected.
    • Difference – The difference set can be referred to as the inversion group, as these blend mode options are often used to either cancel colors of the layer below it, or to invert them.
    • Hue – Here Photoshop allows you to get very creative with the HSL of the layers in question.
  • When you apply a blend mode to a layer, it takes the effect of the given blend mode and it is applied to the layer directly below it within Photoshop.

To simplify the process of trying to learn all 27 blend modes at once below, let’s learn about the three most versatile blend modes Photoshop has to offer.

The first three Blend Modes you need to learn

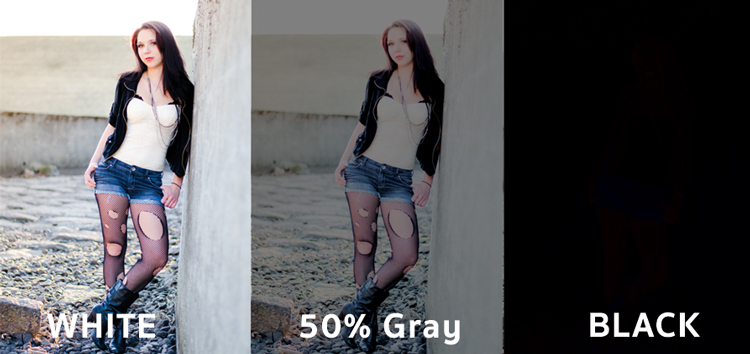
In all the example photographs below I’ll be using two layers to demonstrate the different effects of each of the three blend modes. The top layer is simply a white, gray, black layer and the bottom layer is the same image placed under those three colors.

3-tones

White, gray, black layer.

Multiply Blend Mode

This blend mode falls within the “Darken” group and therefore it is considering 100% white a neutral. The basic math behind how this blend mode works is that the dark pixels of the background layer are multiplied with those of the foreground layer and combined. Therefore the result you end up with is an overall darkening of the image, as the dark pixels within both layers become more significant while the light pixels are essentially removed.

blend-modes-multiply


As you can see in the 50% gray layer, the darker pixels from the gray foreground layer are helping to darken the layer below it.

This blend mode is great for creating shadows or removing bright pixels from an underlying layer. It can be used in conjunction with a curves adjustment layer to add additional darkness to a layer. By effecting the dark end of the curve this can become really handy when trying to emphasize shadows, or darken an image.

Screen Blend Mode

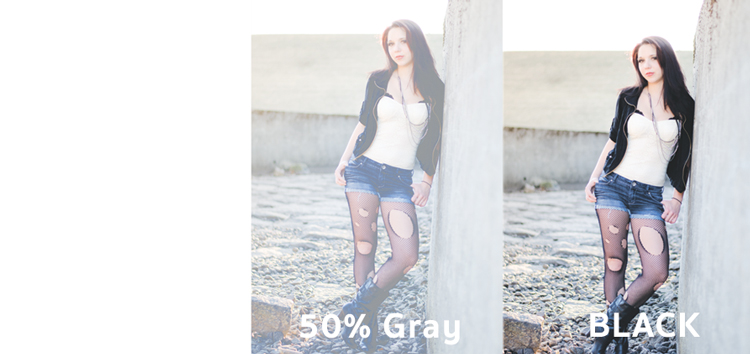
As mentioned above, the lighten group sets black as neutral and therefore when we use the screen blend mode the black layer has no effect, 100% white stays as white and the 50% gray is somewhere in the middle.

blend-modes-screen


In a similar mathematical method to the Multiply blend mode the screen blend mode is multiplying the light pixels of both the foreground and background layers to achieve the final blend. As you can see in the above example, at 50% gray the light pixels are made even lighter as the bright pixels of the gray layer are multiplied with those of the layer below it.

The Screen blend mode is therefore great for removing darkness from an image or can even be used to create soft glow effects around a subject.

Soft Light Blend Mode

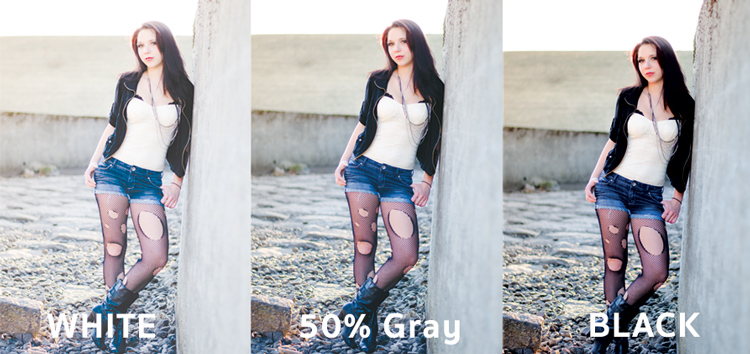
Here the formula used by Photoshop is essentially both that of the Multiply and Screen blend modes, then that effect is divided by two. What this means is that you’ll be darkening the dark pixels and lightening the light pixels, and then dividing the end result by two (or 50% of full strength). What ends up happening is an overall increase in contrast of the image

As a result, the Soft Light blend mode, is a great way to add a bit of contrast to an image. For an even stronger effect – use the Overlay blend mode.

blend-modes-softlight


One of the best techniques for using this technique is to duplicate your layer and apply the Soft Light blend mode to that layer. You’ll se an instant increase in contrast which can then be fine tuned with the opacity slider of your duplicated layer.

An example of Photoshop blend modes in action

photoshopblendmodes1

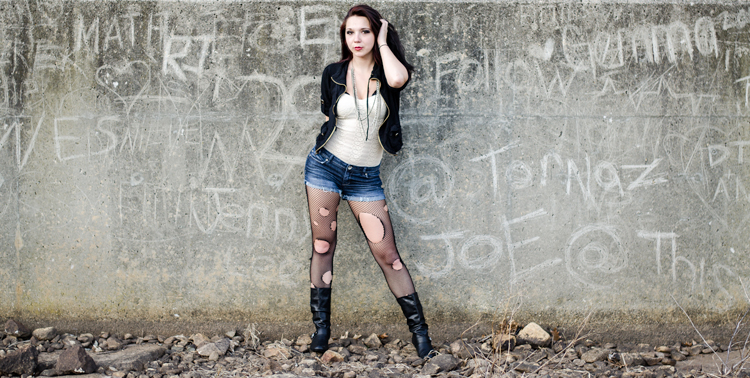
Original – (placed as Full Size 750 x 378)

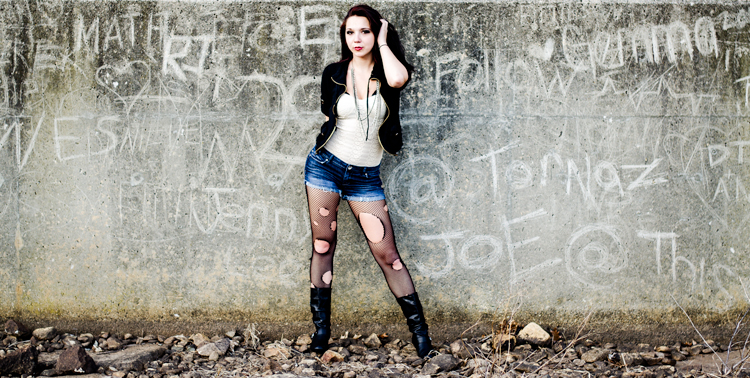
The original image was a bit on the flat side, so by duplicating this layer, and changing it Soft Light blend mode, you’ll notice an increase in contrast. This higher contrast look works well with the rocks, and graffiti wall behind the model.

photoshopblendmodes2

Duplicated with Soft Light blend mode

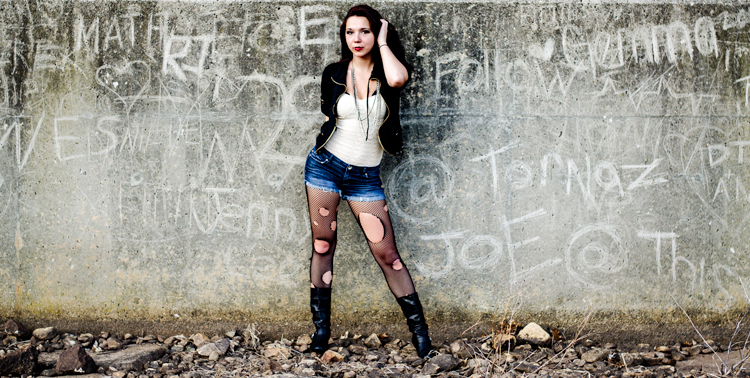
To take it a step further, a Curves Adjustment Layer was added above the duplicate layer and the blend mode was set to multiply. A layer mask was then applied to this Curves layer to reveal it only over the model’s upper body and face. By applying this small adjustment you’ll notice a bit more definition in the face and shadows.

photoshopblendmodes3

Curves adjustment + Multiply blend mode added to model’s face and upper torso to add definition and shadow detail.

These three Photoshop Blend modes are just the beginning, but the key to learning a program the size and depth of Photoshop, is to take it in bite sized pieces or you’ll get frustrated and give up quickly. I hope that by focusing your attention to just these three blend modes you’ll be able to digest the program a bit easier.

googletag.cmd.push(function() {
tablet_slots.push( googletag.defineSlot( “/1005424/_dPSv4_tab-all-article-bottom_(300×250)”, [300, 250], “pb-ad-78623” ).addService( googletag.pubads() ) ); } );

googletag.cmd.push(function() {
mobile_slots.push( googletag.defineSlot( “/1005424/_dPSv4_mob-all-article-bottom_(300×250)”, [300, 250], “pb-ad-78158” ).addService( googletag.pubads() ) ); } );

The post The First 3 Photoshop Blend Modes You Need to Understand by John Davenport appeared first on Digital Photography School.


Digital Photography School

 
Comments Off on The First 3 Photoshop Blend Modes You Need to Understand

Posted in Photography


Photoshop Tips – Using the Blend If Feature

12 Dec

blendif_opener_alt

The Blend If feature in Photoshop blends one layer into another based on the content of either of the two layers. It can be used, for example, to replace a sky by making it easy for you to knock out the blue sky without having to make a complex selection.

In this article, you’ll learn some Photoshop tips on how to use Blend If to replace a sky.

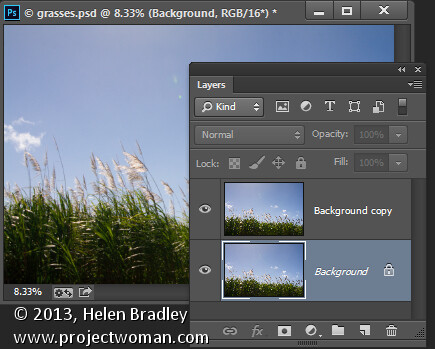
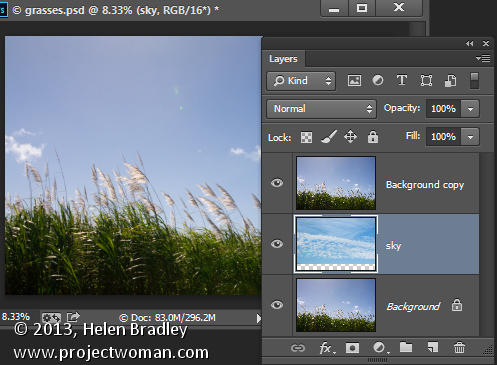
Start by opening an image such as the one shown here. Right click on the background layer and choose Duplicate Layer to make a second copy (keyboard shortcut is “command/control + J”). You now have two layers with the same content.

using the "blend if" feature in Photoshop

Make a duplicate layer

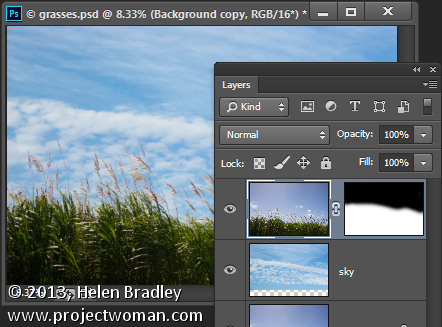
Open an image with good sky. Choose Select > All and then Edit >Copy. Click on the main image and choose Edit > Paste. Drag the sky layer between the two image layers. Size the sky layer, if necessary, so it is big enough to replace the unwanted sky in the original image. Alternately you can use File>Place to choose the new image, and Photoshop will automatically add it as a layer and make it a Smart Object (so it can be resized without any quality loss).

blendif_2

Put the layer of the new sky in between the other two

Target the top layer, click the Add Layer Style icon (fx)at the foot of the Layers palette and click Blending Options to open the Layer Style dialog box (see below).

blendif_3

The Blend If sliders and channel selector are at the foot of this dialog. To start, you will choose the channel to use. The Gray channel is the luminance channel so it lets you make your adjustment based on the lightness/darkness of either the image layer or the layer below. If you choose Red, Green or Blue you’ll be using that channel as the basis for your blending.

blendif_4

The layer underneath the current layer contains the sky that we want to use. So you will use the sliders called This Layer to remove the existing sky, to be able see through to the sky underneath. If we were to select the Gray channel we won’t be able to make the selection very easily because both the sky and the grasses have similar luminosity or lightness values.

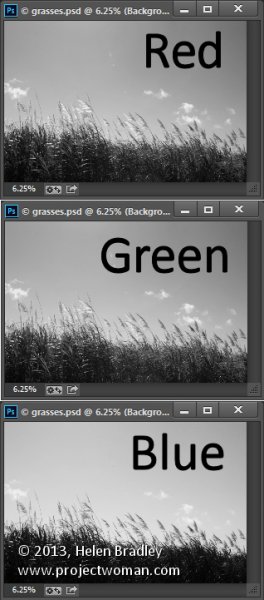
However if you exit this dialog for a minute and take a look at the individual channels in the image, you may find one where there is plenty of contrast between the area you are seeking to hide (the blue sky) and the areas you want to keep (the grasses).

To do this close the dialog box temporarily, choose Window > Channels and click on the Red, Blue, and Green channels in turn to view them.

In this case the Blue channel displays the sky as a lighter tone than the grasses, which are darker. This channel has the most contrast in the area we are interested in so it will be a good one to use.

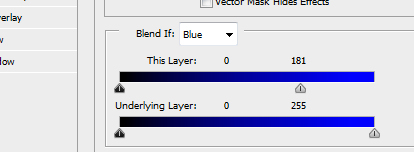
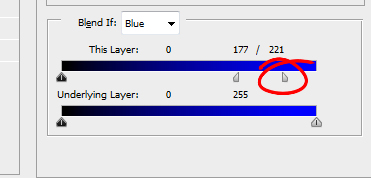
Select the RGB channel again before you leave the Channels palette. Return to the Layers palette and target the top most layer again. Display the Blending Options dialog again and choose the Blue channel in the Blend If pull down.

Drag the right most slider in the This Layer area to the left. As you do so, the lighter blue areas will disappear and you will see through to the sky layer underneath.

Blendif_5a

Pull the right slider for “This Layer” to the left

Blendif_5b

The result is the the layer below will start to appear, but the transition is not smooth

To smooth out the transition between the area being removed and the area which remains, break the slider in two. You do this by holding the Alt key (Option on a Mac) and drag half of the slider away from the other half.

The rightmost half of the slider indicates the point at which the blending effect is fully impacting the image. So pixels which have a value greater than the value indicated by this slider will be fully transparent. The left half of this slider controls the point at which the blending ceases. Any values in the blue channel that are smaller than the value indicated by this slider will be fully opaque. Pixels which have values in the blue channel that match the values between the two sliders are partially transparent.

blendif_6

For some images you may get better results by combining multiple channels. So you might use the blue and the red channels but use the rightmost slider on the blue channel and the leftmost slider on the red channel. You’ll need to experiment to see what works for your image. When you have a good result click Ok.

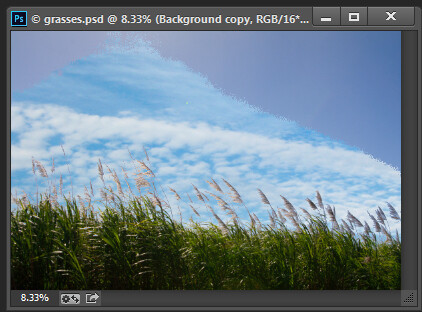
In a perfect world you’ll be able to fully remove the unwanted sky with just this adjustment. Chances are your results will be less than perfect! Mine certainly are, see below.

blendif_7

If this is the case, make sure that the Blend If adjustment gives you the best results in the area that would require you to make a complex selection. For me that is where the grass meets the sky. Selecting around the grass would be a big job so I want the Blend If results to be good in this area. That it doesn’t get rid of the rest of the sky is just fine – that it is easy to get rid of manually.

Target the top layer and click the Add Layer Mask icon at the foot of the Layers palette. Target the mask by clicking on it. Choose a soft round brush and paint using black over the mask to hide the remainder of the sky. Using a soft brush (0% Hardness) will ensure you get a seamless transition between the original image and the new sky.

blendif_8

Problems elsewhere

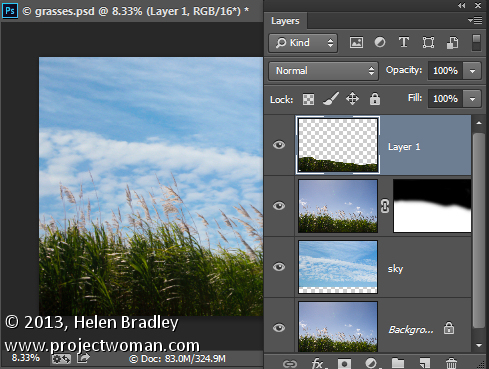
Occasionally you will find that using the Blend If sliders to remove the sky also results in some unwanted transparency appearing elsewhere in the image. If this occurs you can use content from the background layer to fill the transparent areas.

Make a selection over the area to fix, click on the Background layer to target it and choose Layer > New > Layer via Copy. Drag this layer to the top of the image and it will cover the areas that were made transparent.

Although this wasn’t a problem with this image, this is what the layer stack might look like if you do need to fix some transparency appearing elsewhere in the image.

blendif_9

The Blend If sliders are a useful way to blend layers without needing to make complex selections. You can make even better use of these sliders when you use the channel data as a guide to determine which channels to use for your blending.

Post originally from: Digital Photography Tips.

Check out our more Photography Tips at Photography Tips for Beginners, Portrait Photography Tips and Wedding Photography Tips.

Photoshop Tips – Using the Blend If Feature

The post Photoshop Tips – Using the Blend If Feature by Helen Bradley appeared first on Digital Photography School.


Digital Photography School

 
Comments Off on Photoshop Tips – Using the Blend If Feature

Posted in Photography


An Introduction to Blend Modes in Photoshop

30 Sep

This week I had a number of readers email to ask about the topic of ‘blend modes’ in Photoshop. So I thought I’d see what our friends at Phlearn have on the topic with their great videos. Here’s a great introduction to the different types of blend modes in Photoshop:

Enjoy this video? Check out the tutorials Phlearn have created on their website.

Post originally from: Digital Photography Tips.

Check out our more Photography Tips at Photography Tips for Beginners, Portrait Photography Tips and Wedding Photography Tips.

An Introduction to Blend Modes in Photoshop


Digital Photography School

 
Comments Off on An Introduction to Blend Modes in Photoshop

Posted in Photography


How to Blend Exposures to Enhance Your Composition

07 Jun

Exposure blending is a popular technique often used to create high dynamic range photography.

This article is about using the same technique but for the purposes of creating an image that contains all of the elements of a scene that you might not have been able to capture in one exposure.

Of course, we would all like to capture what is in our mind’s eye in one exposure and we strive to do so to reduce the amount of time we spend post-processing. But that doesn’t always work out and blending exposures can be a quick and easy way of creating the image you want.

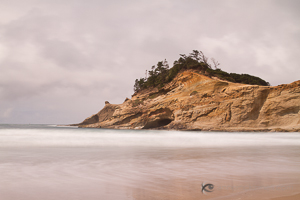
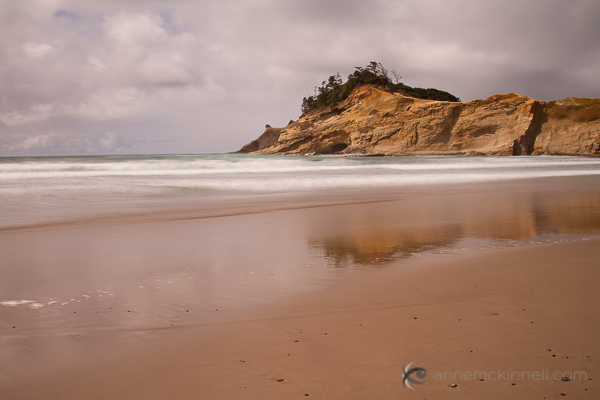
Here’s an example. I was recently visiting Cape Kiwanda on the Oregon coast and I wanted to make a long exposure image that would show the motion of the water rushing back out into the sea before each incoming wave.

Cape Kiwanda, Oregon, by Anne McKinnell
I started out by taking some fast exposures to discover the composition I would ultimately use. This is what the scene looked like when I first got to the location — in fact, this is my first frame.

I quickly decided on the long exposure technique so I put on my 10 stop neutral density filter which would allow me to make a 4 second exposure in the middle of a sunny afternoon.

The difficulty was that the wave had to be just right and I had to open the shutter at exactly the right moment to get the effect I was after.

Cape Kiwanda, Oregon, by Anne McKinnell
This attempt turned out okay but it wasn’t as dramatic as what I hoped for.

After making this image, I decided that I wanted more foreground in my composition so I used a wider focal length and tilted my camera down a bit.

I made a number of images that were close to what I wanted but the foreground was not exactly as I had hoped.

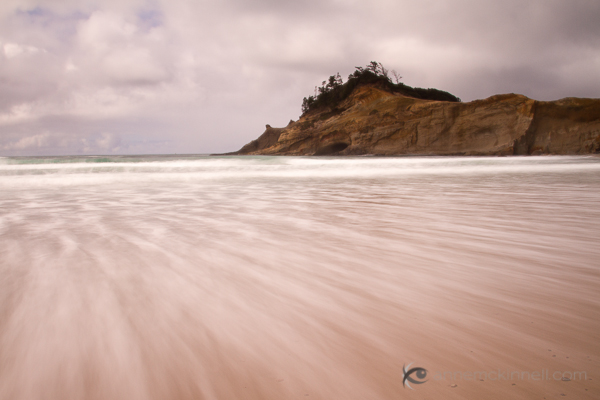
Then, I finally got the big wave I was waiting for!

Unfortunately the wave was too big and even though I had pushed my tripod down in the sand the amount of water caused my tripod to sink a little while the shutter was open. That wasn’t a problem for the foreground, since it was blurred anyway, but the background was blurred in that image as well.

I spent half an hour making images at this location trying to get exactly what I wanted in camera. That is not a particularly long period of time — often I spend much longer in one location. But since I had the components I needed to make my final image, I decided to move on to other subjects.

These are the two images I ended up combining for the final product.

Cape Kiwanda, Oregon, by Anne McKinnell

Cape Kiwanda, Oregon, by Anne McKinnell

You can see how the rock in the image above is out of focus due to my tripod sinking in the sand.

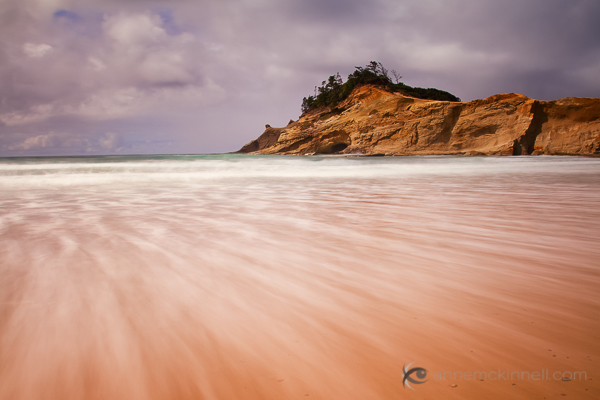
In post processing, I took both of the above images and opened them in Photoshop Elements. I selected the one with the foreground I wanted, copied it, and pasted it on top of the other image so each image was on it’s own layer. Then I created a layer mask and used the gradient tool to blend the two images together.

Watch this video to see me blend these two images together in Photoshop Elements.

After blending the exposures, I made some final adjustments to contrast and colour to create the final image:

Cape Kiwanda, Oregon, by Anne McKinnell

Remember, photography is an art and you have the artistic license to do whatever you want whether that is documenting a scene exactly as you see it in front of you, or creating something that is different than what you saw with your own eyes using any technique you see fit.

Post originally from: Digital Photography Tips.

Check out our more Photography Tips at Photography Tips for Beginners, Portrait Photography Tips and Wedding Photography Tips.

How to Blend Exposures to Enhance Your Composition


Digital Photography School

 
Comments Off on How to Blend Exposures to Enhance Your Composition

Posted in Photography