It seems that clients are becoming more and more knowledgeable every day regarding the various facets of what we do as professional photographers. Maybe it’s because we live and work in the most highly tech-savvy society ever, or maybe it’s because anyone with a smart phone and a few good photo apps can turn out amazing results (for which I applaud them, by the way). High-quality DSLRs, mirrorless cameras, and fast lenses are available and well within the reach of the average photographic consumer. Even those not necessarily interested in taking their own photos still know all the buzzwords. “Excuse me– Is that a full-frame camera?” Or there is always that old refrain, “We don’t want albums or prints. We just want the RAW files.” Our clients are learning our language, even if they don’t always completely understand it.
One concept they still don’t seem to grasp, however, is aspect ratio. And with good reason– we’re not doing a very good job of educating them on the subject. Even photographers will often get that glassed-over look in their eyes when their clients ask why what looks great as a 5×7 makes an awful 8×10. This is not a blanket statement about all photographers. When pressed, though, many are only able to offer a partial explanation. They know that it has something to do with proportions– that a 5×7 doesn’t look the same as an 8×10, for instance– but they don’t know why.
Aspect ratio is nothing more than a size relationship between the long and short sides of a photo. The most common aspect ratio in DSLRs today is 2:3, which is based on that of 35mm film. A 35mm negative is actually 24mm x 36mm. Simplified, this becomes 2×3, or 2:3 when expressed as a ratio. Several print sizes can be made from the 2:3 aspect ratio without any cropping of the image (e.g., 4×6, 8×12, 10×15, 12×18, 16×24, 20×30, etc.). Many of the most popular print sizes, however, cannot be simplified the same way. That is why 5×7, 8×10, and 11×14 all require a crop of the original 2:3 photograph. This results in a loss of part of the image, from either the long or short side, depending on the image and the crop.
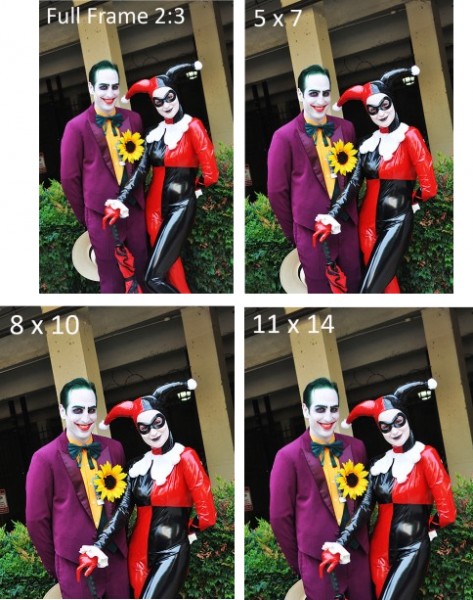
In the examples above/below I retained the top edge of the photo in all four aspect ratios in order to illustrate the dramatic effect that each crop can have, relative to the original 2:3. Remember that everything you see in the full frame image will appear in a 4×6, 8×12, etc. But when we start cropping with ratios that can’t be simplified or reconciled with the 2:3, we see an obvious loss along the bottom edge of the frame. There is not at much of a difference between the 8×10 and the 11×14 relative to each other, but it is clear that you can lose a significant portion of your image when it’s time to order prints if you aren’t careful with your composition.

By using either the Joker’s hat or Harley Quinn’s knee as reference points, you can see for yourself just how important it is to not only compose your photos based on your own personal aesthetic, but also with an eye towards how you or the client might intend to print and eventually display the image. The simplest solution is to compose your shot and then either zoom back out (or take a step or two back if using primes) before you actually press the button. Shooting a little bit loose will give you more options when it’s time to order prints.
Aspect ratio is a basic concept which can have some pretty significant ramifications if you don’t properly plan your shot. Make sure to give yourself enough room in the frame that you don’t have to worry later about whether the client wants an 8×12 or an 11×14. After all, it will be much easier to give them the sizes they want, rather than explain to them why you can’t.
Post originally from: Digital Photography Tips.
Check out our more Photography Tips at Photography Tips for Beginners, Portrait Photography Tips and Wedding Photography Tips.
Understanding Aspect Ratio
The post Understanding Aspect Ratio by Jeff Guyer appeared first on Digital Photography School.
You must be logged in to post a comment.