RSS
 

Posts Tagged ‘Aspect’

Photography Aspect Ratio: What Is It and Why Does It Matter?

12 May

The post Photography Aspect Ratio: What Is It and Why Does It Matter? appeared first on Digital Photography School. It was authored by Andrew S. Gibson.

photography aspect ratio a quick guide

What are aspect ratios in photography? How does an aspect ratio affect your images? And how can you change the aspect ratio once you’ve taken a photo?

In this article, I’m going to give you a quick introduction to photography aspect ratios – so that, by the time you’ve finished, you’ll understand what they are and how you can use them to improve your own images.

Let’s get started.

photography aspect ratio comparison

What is a photography aspect ratio?

An aspect ratio is the dimensions of an image expressed in a ratio form. You determine the aspect ratio by comparing an image’s width and height, then writing it as a width:height ratio (such as 3:2 or 4:5).

The aspect ratio of your images is initially determined by the dimensions of your camera’s sensor. Because sensor dimensions are fixed, it’s easy to take the aspect ratio of your images for granted.

But it is important to think about the aspect ratio when taking photos. Your camera aspect ratio has compositional implications – and I highly recommend you consider this when out with your camera.

Also, a quick note: While your camera aspect ratio is technically fixed, many newer digital cameras allow you to change the aspect ratio in the camera’s menu. Plus, you have the option of adjusting an image’s aspect ratio in post-processing, so it’s more flexible than you might think!

Why does aspect ratio matter?

Different aspect ratios will produce different types of compositions.

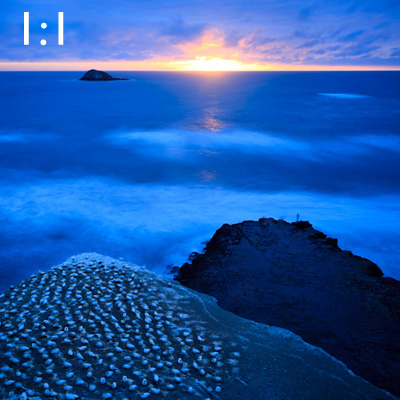
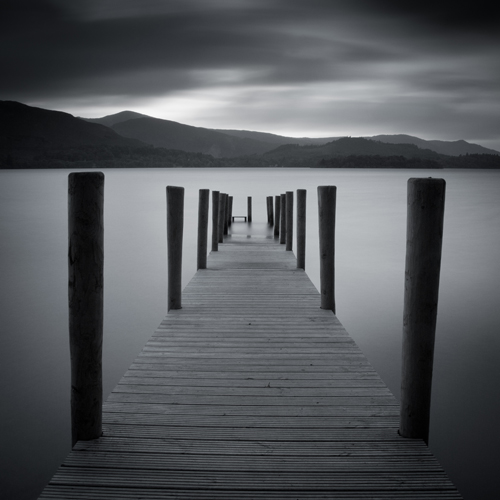
For instance, a square, 1:1 aspect ratio tends to produce very balanced, often confined images.

A 4:5 or a 3:2 aspect ratio offers a bit more space within the frame.

And a 16:9 aspect ratio gives a lot of room for expansion along the image edges.

Of course, the effect of the aspect ratio depends somewhat on the type of scene you’re photographing, and certain scenes naturally lend themselves to certain aspect ratios. That’s why it’s essential to think carefully about the aspect ratio before pressing the shutter button; different aspect ratio choices can dramatically affect the composition.

Common camera aspect ratios

Virtually every camera sensor offers one of two aspect ratios:
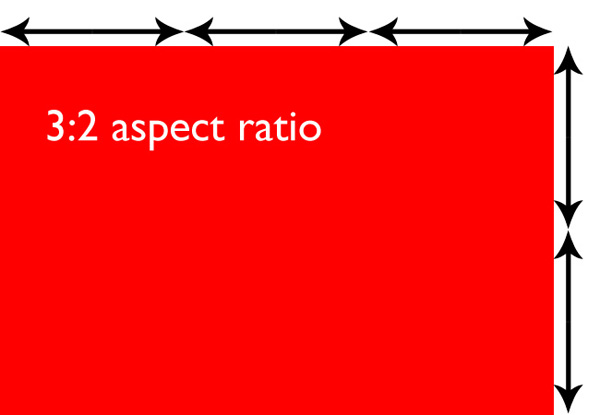
3:2 aspect ratio

A 3:2 aspect ratio is used by 35mm crop-sensor and full-frame DSLRs, some Leica medium format cameras, most mirrorless cameras, high-end compact cameras, and most 35mm film cameras. This aspect ratio has been with us ever since Leica made the first 35mm film cameras in the early 20th century.

3:2 aspect ratio

Now, a full-frame 35mm sensor measures 36 mm x 24 mm. You can express this figure as a ratio: 36:24. Mathematicians always like to simplify ratios so the relationship between the two numbers is easy to visualize, and in this case, you can divide both dimensions by twelve.

That gives you 3:2.

As you’re likely aware, crop-sensor cameras have smaller sensors, measuring approximately 22.5 mm x 15 mm (though the exact measurements vary depending on the brand and model). Despite the different sensor sizes, the ratio between the width and the height remains the same, conforming to a 3:2 aspect ratio.

4:3 aspect ratio

The 4:3 aspect ratio is used by Micro Four Thirds cameras, many compact cameras, some medium format digital cameras, as well as medium format film cameras using the 6 cm x 4.5 cm format.

4:3 aspect ratio

3:2 vs 4:3 aspect ratio

Now let’s compare the two common camera aspect ratios. In the diagram below, you can see the 4:2 aspect ratio (left), plus the additional space included by a 3:2 sensor:

4:3 vs 3:2 aspect ratio

Clearly, the 3:2 aspect ratio used by most DSLRs and mirrorless cameras is slightly longer than the 4:3 aspect ratio used by Micro Four Thirds cameras. The difference may not seem like much, but it has a major effect on the composition. Take a look at the following images to see why.

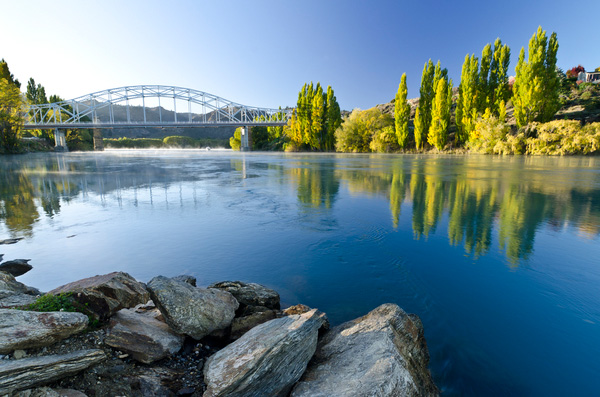
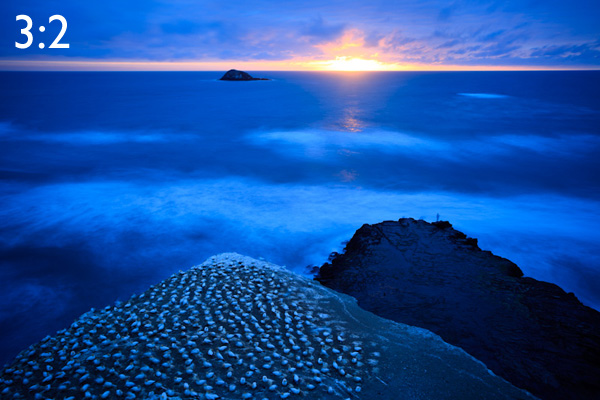
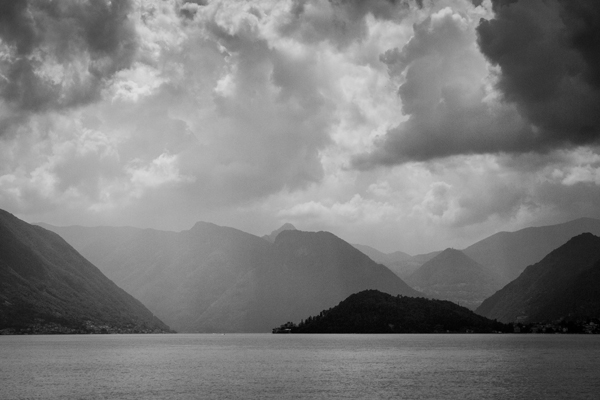
Here’s the original shot, taken with a 3:2 aspect ratio:

3:2 camera aspect ratio

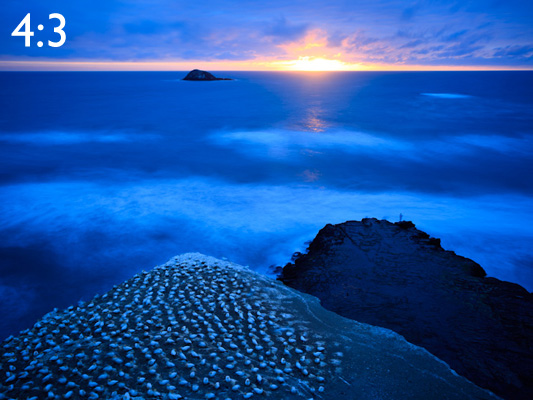
And here’s the same image, but cropped to the 4:3 aspect ratio, as if it had been taken with a Micro Four Thirds camera:

4:3 camera aspect ratio

Do you see the difference? It’s subtle, but it’s there. The 35mm frame is longer.

And that can be challenging when it comes to composition because you have to find a way to effectively fill that length.

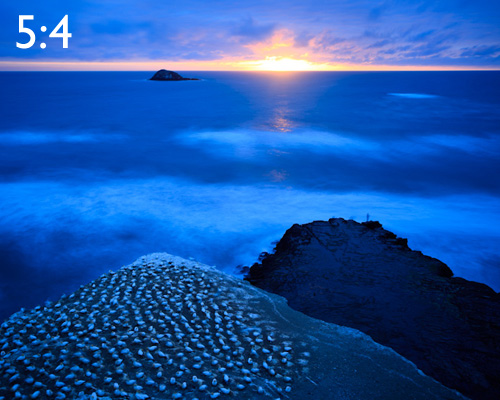
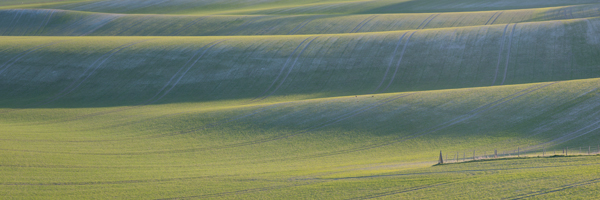
Landscape photography, in particular, often benefits from a compressed frame, and that’s one of the reasons for the popularity of 7:6 medium format cameras and 5:4 view cameras among landscape film photographers.

Here’s what the same landscape would look like cropped to these formats:

5:4 photography aspect ratio
7:6 photography aspect ratio

For me, the 7:6 aspect ratio is too short, but 5:4 is a very pleasing aspect ratio to work in.

Aspect ratio examples

Now, after seeing the photos above, you might be thinking that the difference between aspect ratios is not a big deal. And often, when you are shooting in the landscape format (i.e., with the camera positioned so that the frame is horizontal), the difference is minimal. It’s not so difficult to work with any of the aspect ratios I’ve presented above.

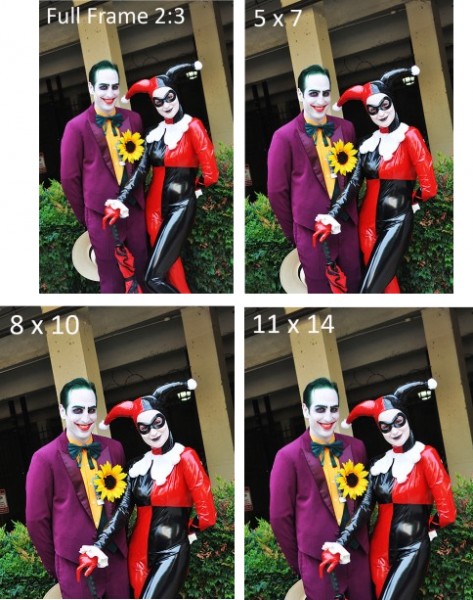
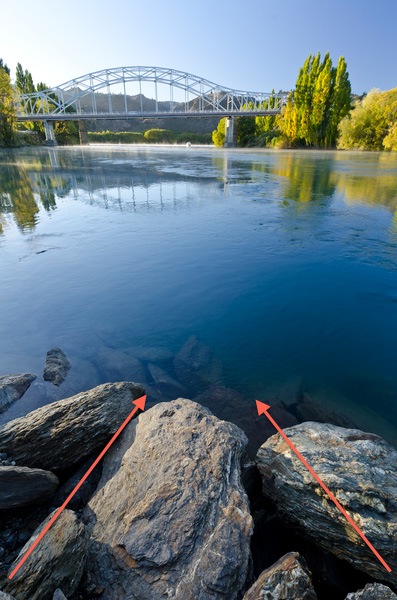
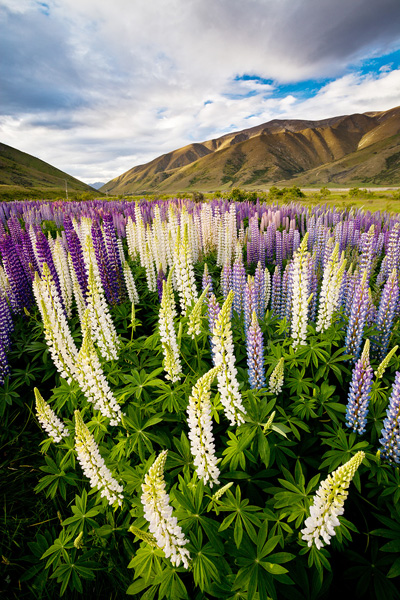
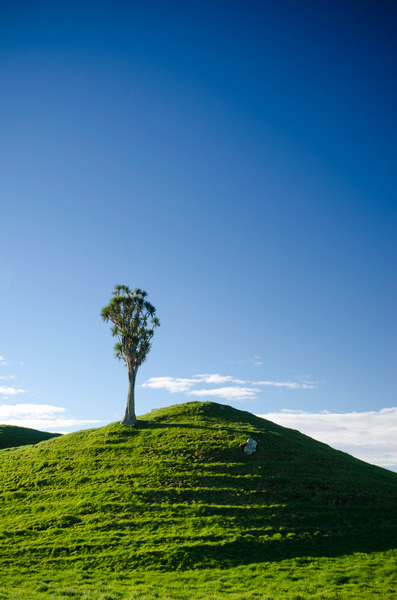
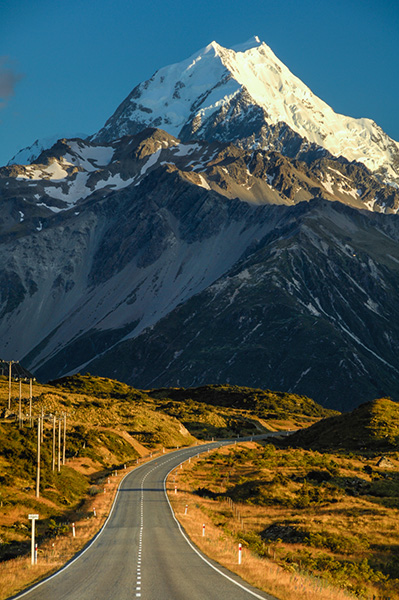
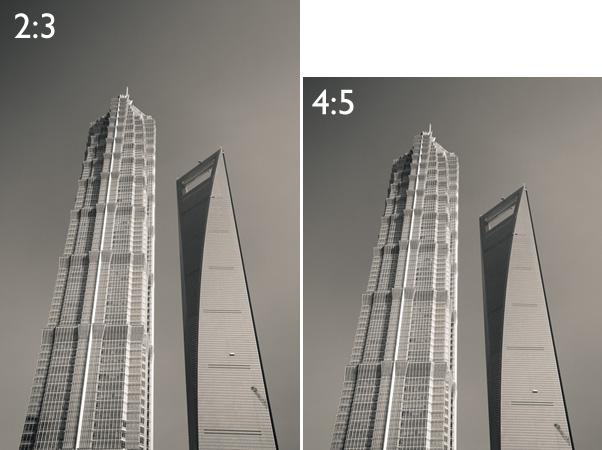
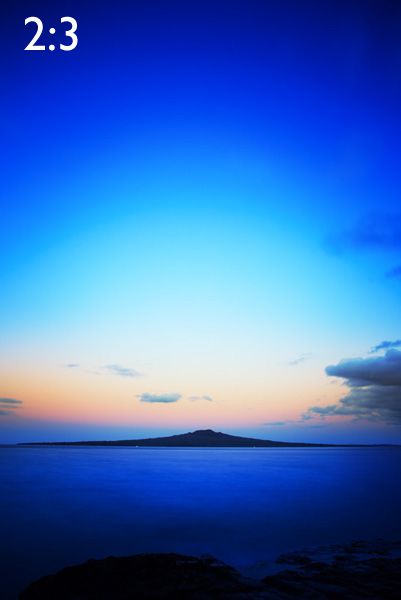
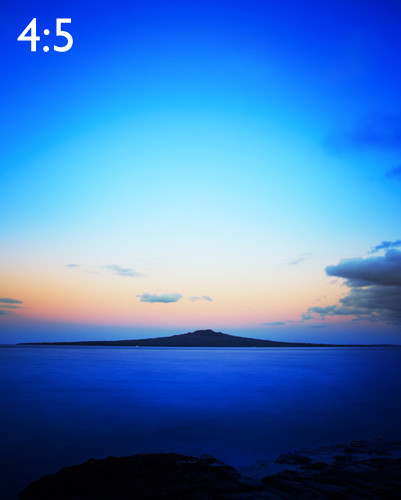
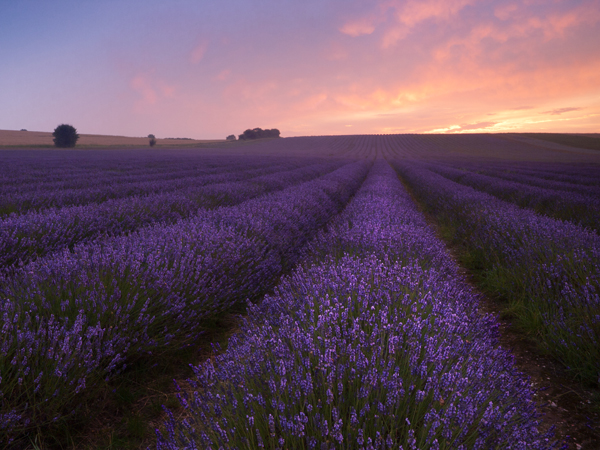
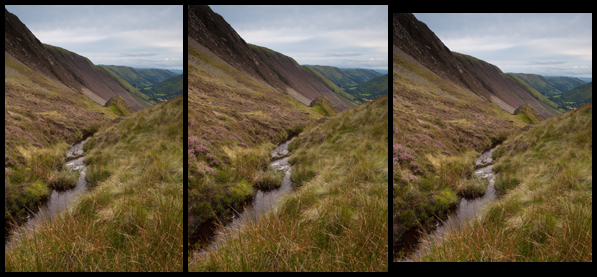
But if you switch to the portrait format (i.e., with a vertical frame), it’s a different story. A 3:2 frame suddenly becomes a lot harder to fill effectively, and the composition often benefits from cropping to a shorter rectangle. Here are some examples to show you what I mean:

2:3 aspect ratio example
3:4 aspect ratio example
4:5 aspect ratio example

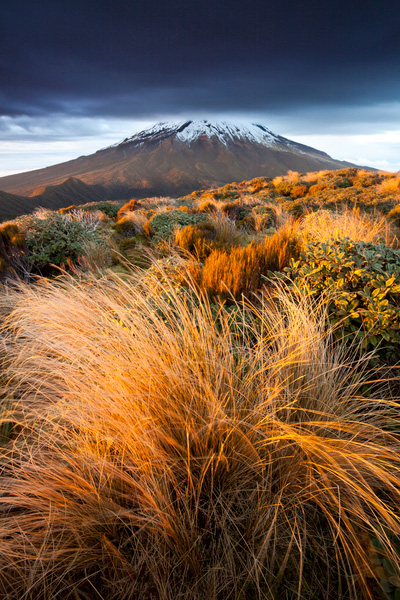
The difficulty I had with the landscape above is that there was too much empty sky in the original image. I solved the problem by cropping off the top, and the final 4:5 aspect ratio seems to work nicely.

Of course, not all images will benefit from this type of crop. But if you find yourself struggling to fill the frame, especially if you have a 35mm camera with a 3:2 frame, you may want to try a different aspect ratio.

By the way, here is the first image cropped to a couple more common aspect ratios.

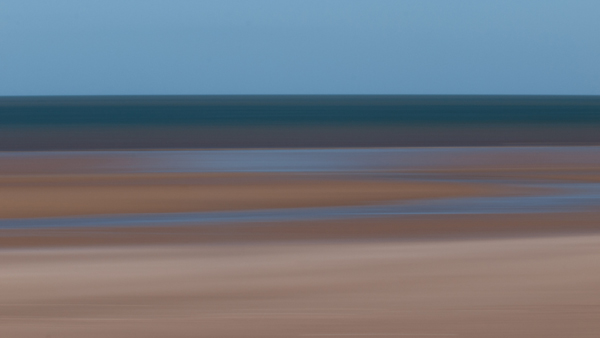
The panoramic format (16:9):

16:9 aspect ratio example

And the square format (1:1):

1:1 aspect ratio example

Adjusting the aspect ratio in-camera

As I mentioned above, many digital cameras let you adjust the aspect ratio in the camera menu. And if you have a camera with an electronic viewfinder, you may see the cropped image in the viewfinder itself.

If your camera doesn’t have an electronic viewfinder, you’ll need to use Live View to take advantage of the aspect ratio function. The camera will display the cropped image on the rear LCD screen.

But there’s a major caveat:

If you use a non-native aspect ratio while shooting in JPEG, your camera will crop the image when you take the photo, and there’s no way to resurrect the edges of the frame. So if you later decide that you want a 3:2 aspect ratio instead of a 1:1 aspect ratio, you’re out of luck.

However, if you use a non-native aspect ratio while shooting in RAW, the camera will save the entire image in the original aspect ratio, and you can change your mind about the crop in post-processing.

Cropping in post-processing

It’s often easier to crop in post-processing than in the field. Plus, if your camera doesn’t have an aspect ratio function, cropping during editing is the only way to adjust the aspect ratio.

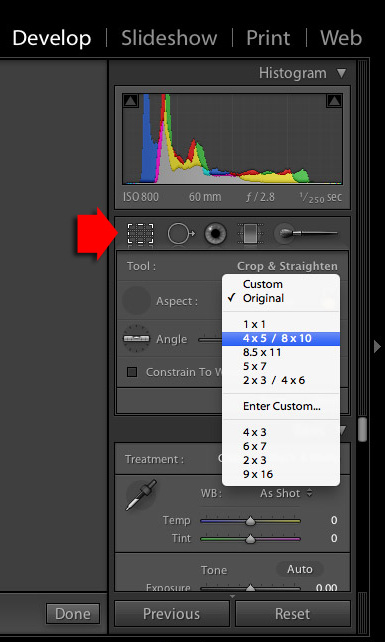
In pretty much every dedicated editing program, cropping is easy.

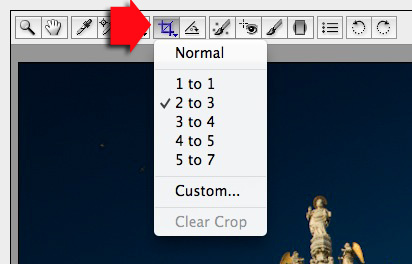
For instance, in Lightroom, just click the Crop icon, then select an aspect ratio from the Aspect menu:

adjusting the aspect ratio in Lightroom

Photography aspect ratio: conclusion

As you now know, aspect ratio is a big deal. It’s always a good idea to think about aspect ratios while shooting – and then, if necessary, adjust the aspect ratio in post-processing.

Now over to you:

What’s your favorite aspect ratio? And do you think about aspect ratio while taking photos? Share your thoughts in the comments below!

Which aspect ratio is best?

There is no one best aspect ratio – it all depends on the look you’re after! Some scenes benefit from square (1:1) aspect ratios, whereas others look great with a 4:3 or a 5:4 aspect ratio. I’d recommend playing around in a program like Adobe Lightroom.

What aspect ratio do professional photographers use?

That depends on the photo. As discussed in the article, landscape shooters tend to favor squarer aspect ratios such as 4:5, though if you’re a panorama photographer, a 16:9 frame (or wider!) might be preferable. Portrait photographers tend to avoid narrow aspect ratios, but there are times when a portrait looks good as a 9:16 composition.

What is the aspect ratio of 8×10 photos?

8×10 photos have a 4:5 aspect ratio.

The post Photography Aspect Ratio: What Is It and Why Does It Matter? appeared first on Digital Photography School. It was authored by Andrew S. Gibson.


Digital Photography School

 
Comments Off on Photography Aspect Ratio: What Is It and Why Does It Matter?

Posted in Photography


Aspect Ratios in Landscape Photography

22 Nov

The post Aspect Ratios in Landscape Photography appeared first on Digital Photography School. It was authored by Elliot Hook.

Composition is often the difference between a good landscape photograph and a great landscape photograph. There are oft-quoted rules that we all try to adhere to and break in equal measure (the rule of thirds, leading lines, golden spiral, etc.), yet when considering what we are trying to capture, we don’t always think about the frame itself.

The aspect ratio of a photograph can make or break the composition by either emphasizing the subject and removing distractions, or by putting the whole scene off-balance. When looking through the viewfinder, about to press the shutter, it’s a good idea to try and envisage the final shot, including the aspect ratio, in order to optimize your composition. Too often, the aspect ratio is an afterthought, applied during post-processing to correct for poor compositional choice.

But how does each aspect ratio impact compositions in landscape photography?

That’s where this article comes in. I’m going to discuss a few common aspect ratios (with examples). I’ll show the benefits and drawbacks for each, and explain where each aspect ratio may be applied.

Note that there is an argument for cropping your photo without sticking to a defined ratio; in other words, that you should give an image a custom ratio based on your subject matter. But that can make printing and framing awkward, so I will therefore be sticking to well-defined ratios that most should be familiar with.

1:1 – Square format

The square format can often be used to simplify an image and give your subject a striking presence at the center of the frame. 

By keeping the width equal to the height, the way in which we read the photograph changes, as there is less of a need to move from left to right through the frame. 

The square format also offers a good opportunity to break the rules we so often follow; place the horizon along the center of the image or place a subject in the center of the frame, and the composition may only get stronger. 

You’ll often see a 1:1 aspect ratio used to emphasize minimalism (again, it’s the theme of simplification).

Derwent Water, Lake District, UK presented in a 1:1 aspect ratio

4:3 – Four thirds format

This format is the default aspect ratio of cameras that use Four Thirds sensors. 

An image with a 4:3 aspect ratio is wider than it is tall, meaning that the eye naturally wants to move left to right through the image. However, given that the image is still fairly tall in relation to the width, this ratio is perfect for drawing the eye into the scene through leading lines. 

The relative height of a 4:3 image encourages the use of wide-angle focal lengths to capture the depth of a scene, without including excess details at the edge of the frame.

Lavender field at sunrise presented in a 4:3 aspect ratio

6:4 – 35mm format (also called 3:2)

This is the default aspect ratio for 35mm film, and therefore for full-frame and APS-C sensors used in most Nikon and Canon cameras. 

With a 6:4 image, the width is significantly wider than the height. This encourages viewing the image from left to right, meaning diagonal leading lines can work quite well.

A limitation of this aspect ratio is that the height is that much shorter in relation to the width. So capturing foreground detail using a wide-angle lens becomes more difficult due to the limited vertical space with which you can work. A 6:4 aspect ratio can even cause the subjects within the frame to become too disparate and therefore lose impact. 

The 6:4 ratio can, however, be suited to capturing scenes where there is little to no foreground interest, especially if you’re using midrange focal lengths (e.g., 35mm).

Rain over Lake Como presented in a 6:4 aspect ratio

16:9 – Widescreen panoramic

The widescreen panoramic format was supported in film by the Advanced Photo System (APS) upon its introduction, and has recently become more popular due to the prevalence of 16:9 aspect ratio displays in the home on TVs, computer monitors, and mobile devices. 

With this format, the width of the image is dominant, so leading the viewer in from the foreground is difficult.

But the format is ideally suited to presenting portions of landscape scenes captured with longer focal lengths (e.g., zoom lenses) from a distance.

Beach abstraction presented in a 16:9 format

12:6 or 18:6 – Panoramic (also called 2:1 or 3:1)

I’ve chosen to adopt 12:6 or 18:6 as the panoramic format here for a few reasons.

First, both 2:1 and 3:1 seem to be fairly well supported in that panoramic picture frame options are typically either 2:1 or 3:1. 2:1 is a panoramic format supported by a number of medium format film cameras and 3:1 was supported by the APS. 

Typically, panoramic ratios will be used to present the result of stitching two or more images together; it’s quite challenging to capture a 3:1 aspect ratio image in one frame and still be able to print at any meaningful size.

Often, frames to be stitched will have been captured using a longer focal length in order to pick out distant details in the landscape. There is no real option to include foreground detail here.

Chalkfields at sunrise presented in a 3:1 aspect ratio

Portrait mode

I’m aware that I’ve discussed a number of different aspect ratios in “landscape” format, and not in “portrait” format.

But that is because I believe the options for the successful presentation of landscapes in “portrait” format are much fewer in number. For a landscape to work, you need to balance the composition throughout the frame, and aspect ratios such as 6:4 make that very difficult, due to the image being too tall relative to its width. 

For “portrait” landscapes to work, fatter rectangles, such as 4:3, 7:6, or 5:4, are ideal. In fact, 5:4 is heavily used by professional landscape photographers with medium and large format cameras. This aspect ratio allows the eye to be taken through the image from left to right, without having an excess amount of sky knocking the frame off-balance.

Bwlch Y Groes, Wales, UK presented in three different portrait formats

Conclusion

While I have tried to describe specific uses of certain aspect ratios, I am aware that not all scenes will follow the suggestions I’ve made. Some images may work well with a certain ratio that’s contrary to what I’ve suggested.

However, I’m hoping this introduction to aspect ratios will encourage you to think about them when composing your shot, before pressing the shutter. It isn’t always ideal to fill the frame with the landscape in front of you.

And knowing that the aspect ratio you choose is not dictated by which camera you use means that you may be able to use aspect ratios effectively to boost the impact of your landscape photographs.

The post Aspect Ratios in Landscape Photography appeared first on Digital Photography School. It was authored by Elliot Hook.


Digital Photography School

 
Comments Off on Aspect Ratios in Landscape Photography

Posted in Photography


Mastering Aspect Ratios in Photography

18 Mar

The post Mastering Aspect Ratios in Photography appeared first on Digital Photography School. It was authored by Tim Gilbreath.

mastering aspect ratios in photography featured image

Aspect ratio is a phrase that you’d normally expect to hear when discussing movies or televisions, but as it is a measurement of image proportions, it’s also important in photography. It is also one of those things that is always there, even if you don’t think about it.

Aspect ratio in photography is a description of an image’s vertical and horizontal proportions expressed as two numbers separated by a colon, and composed of similar units of measurement, whether it be inches, centimeters, or feet.

You’ve seen these numbers before, such as 16:9, which is commonly known as widescreen format, and used to describe many TV’s and computer monitors.

16:9 would be an image (or in the case of a TV or monitor, a screen) that is 16 units wide and 9 units tall. Aspect ratio doesn’t describe actual size, as a 16:9 ratio could be 16 inches wide by 9 inches tall, or 16 feet wide and 9 feet tall. The numbers only describe the proportions.

aspect ratios in photography graphic

Although it’s not in the scope of this article, movies and film sometimes also use what’s known as cinema terminology to express aspect ratios, such as 1.85:1 (cinema standard widescreen) and 2.39:1 (anamorphic widescreen).

Although you can convert these expressions to standard ratios, for our purposes, we’ll only stick with standard x:y expressions that relate to camera sensors or photographic images.

So why are aspect ratios important to photography?

Primarily, they are important because every image we shoot, as well as every camera we shoot with, has a base aspect ratio. Our camera bases the aspect ratio on the proportions of the sensor, which you cannot change.

However, you can change the resulting image’s aspect ratio, and most importantly, you can change it for creative reasons.

There are actually two types of aspect ratio in photography we need to familiarize ourselves with; the aspect ratio of the camera we’re shooting with, and more importantly, the final aspect ratio we will present our image in.

We, of course, can change the latter in post-processing, for whatever reason we decide.

Some cameras also have settings that allow you to change aspect ratio in-camera before shooting, but this is made possible by the camera software cropping. It’s always better to change the ratio yourself and crop later in post-processing.

Why would we want to change the aspect ratio of a photo?

The main reason – composition.

Changing the aspect ratio in Photoshop or Lightroom is essentially cropping the image to a specific proportion that makes the photo more pleasing to the eye. A wide, sweeping shot of a beach and sky will not look as wide and sweeping in a standard 3:2 presentation as it would in a 16:9 widescreen format. Composing the image in widescreen proportions gives the scene a more open, cinematic feel.

Let’s take a look at the most popular aspect ratios in photography, and what they are commonly used for.

Breakdown of aspect ratios in photography

3:2 ratio

The 3:2 ratio is probably the most commonly used aspect ratio in photography, due to the fact that it is the standard proportions used with modern DSLR camera sensors.

The reason for this is because it is also the ratio used by classic 35mm film cameras. Digital camera sensors were originally designed to replicate that ratio.

aspect ratios in photography
An image captured with a DSLR in native 3:2 format. Modern DSLR cameras usually capture images in this format.
EXIF: Canon 60D, EF 50mm 1.8 II, 50mm, f/8, 1/100 sec, 800 ISO, Manual Mode

Before photography, artists generally used a set of proportions similar to this because of its visual appeal. The 3:2 format is a great general use ratio, and allows for a fairly wide feel while still capturing vertical elements of a scene.

4:3 ratio

The 4:3 ratio is a classic format that has its roots in digital point and shoot cameras, which were developed to basically match the proportions of video monitors of the time.

The format is used in point and shoots, many compact cameras, and micro four-thirds systems.

Aspect ratio in photography - mushroom image in 4:3 format.
The 4:3 format allows for more vertical space and can better focus attention in on a specific area of a scene. Here we’ve used the 4:3 ratio to remove distracting portions of the scene and isolating the flower and mushroom.
EXIF: Canon 60D, EF 50mm 1.8 II, 50mm, f/8, 1/100 sec, 800 ISO, Manual Mode

Just as with old TV and video monitors, the 4:3 format has a taller, slimmer look that appears more square to the eye. It is a good creative choice when you need to capture vertical elements of a scene.

16:9 ratio

The 16:9 ratio is more commonly known as the “widescreen” format.

It was developed as a replacement for the old 4:3 ratio during the advent and implementation of HDTV. Most TV’s and monitors now are created with this format in mind.

The longer, more horizontal format is great for displaying landscapes and other vistas, and creates a cinematic look and feel when used in photography.

aspect ratios in photography - empty beach scene
This image is expansive in native 3:2 format, and contains too much empty space.
EXIF: Canon 60D, EFS 24mm 2.8 STM, 24mm, f/8, 1/320 sec, 250 ISO, Manual Mode
Aspect ratio in photography - beach scene in 16:9 format.
Adjusting the aspect ratio to 16:9 allows for a much more flowing, cinematic look and feel. This format is especially good for displaying wide fields of view.
EXIF: Canon 60D, EFS 24mm 2.8 STM, 24mm, f/8, 1/320 sec, 250 ISO, Manual Mode

1:1 ratio

The 1:1 ratio, or square format, might be mistaken as a newer format, as it is well-known for its use on the Instagram platform (although photos are no longer forced in that format with the service). However, square images are also the usual ratio for medium-format cameras, as well as a few toy cameras.

This format is a good choice for cropping close and isolating a subject or a scene that doesn’t involve an expansive landscape.

Aspect ratio in photography - mushroom image in 1:1 (square) format.
Returning to our mushroom photo, the 1:1 (or square) format lets us crop in close to a particular subject and remove any distracting elements. Here, we are focusing on the mushroom itself, and nothing else.
EXIF: Canon 60D, EF 50mm 1.8 II, 50mm, f/8, 1/100 sec, 800 ISO, Manual Mode

5:4 ratio

The 5:4 ratio formatted images are primarily used in large-format photography, as many of those cameras use sheet film with dimensions of 5×4 inches.

From a creative standpoint, images using this ratio are almost as tall as they are wide, and are great for capturing vertical elements of a scene.

Aspect ratio in photography - mushroom image in 5:4 format.
The 5:4 ratio is very similar to the 4:3. Again, we can use it to remove distracting elements on the sides of a scene.
EXIF: Canon 60D, EF 50mm 1.8 II, 50mm, f/8, 1/100 sec, 800 ISO, Manual Mode

2:3 ratio

Finally, the 2:3 ratio is a specialty aspect ratio that is used for images in vertical or portrait orientation.

It is primarily used for portraiture, when elements of the scene (in most cases, a person), align in a vertical orientation.

You can also use vertical formats like 2:3 for landscape photography to capture tall elements within the frame, such as trees and mountains.

aspect ratios in photography - a forest full of trees in the 2:3 ratio
This image was framed and captured vertically, and later cropped in post-production to 2:3 format, to accentuate the height of the trees and the vertical expansiveness in the scene.
EXIF: Canon 60D, EFS 24mm 2.8 STM, 24mm, f/8, 1/80, 400 ISO, Manual Mode

Creative cropping

Before the advent of digital photography and software, aspect ratios of the camera being used generally dictated what ratio the image would be in.

In the digital age, however, we have the ability to simply and quickly crop in whatever photo software we’re using.

Changing aspect ratio in Adobe Lightroom.
Changing aspect ratio of an image in Adobe Lightroom. Not only are several presets available to you, but you can enter a custom ratio as well.

Conclusion

Instead of being bound to a specific format, you can change it. Therefore, changing the look and feel of an image for creative reasons, even after pressing the shutter and recording the image on the sensor.

So now you know a little more about aspect ratios in photography, and why it’s important. What formats do you find yourself using? Do you alter the aspect ratio during post-production? Leave us your comments below!

The post Mastering Aspect Ratios in Photography appeared first on Digital Photography School. It was authored by Tim Gilbreath.


Digital Photography School

 
Comments Off on Mastering Aspect Ratios in Photography

Posted in Photography


LumaFusion 2.1 video editing app adds external drive support, new aspect ratios and more

24 Oct

Mobile video editing app LumaFusion has been updated to version 2.1 to take advantage of new iOS 13 and iPadOS features. With LumaFusion 2.1, users can import and export media from external drives, including SD cards, flash drives, and portable HDDs/SSDs. In addition, the updated app also adds support for the iOS 13 system font selector, 27 new blend modes, aspect ratios and resolutions for the latest iPad and iPhone models, and an improved iOS 13 Dark Mode.

In addition to the new features, LumaFusion 2.1 brings a number of improvements, including dozens of UI ‘refinements,’ the ability play and pause previews with a single tap, rapid clip previewing using two-finger swipes, default ‘recommended’ export settings, improved project package format and exporting process, and the ability to long-press to quickly remove Network Drive servers.

Users can also expect general stability and performance improvements, as well as fixes for the level meters and the addition of text and color markers in library search. LumaFusion is available for iPad and iPhone from the App Store now for $ 29.99.

Articles: Digital Photography Review (dpreview.com)

 
Comments Off on LumaFusion 2.1 video editing app adds external drive support, new aspect ratios and more

Posted in Uncategorized


Free online tool helps photographers visualize and compare aspect ratios

27 Nov

Developer and photographer Christopher Kalafarski has created a free tool that enables users to compare and preview various aspect ratios with their own images. Unlike comparisons in an application like Lightroom, Kalafarski points out that his ratio.party tool is simple to use and offers a wide range of sample ratios.

Users can add their own image to the tool by dragging and dropping them onto the Web page. Ratio.party features an input format box at the bottom, which can be clicked to cycle through multiple format options. Users can enable and disable horizontal and vertical lines, and click lines to crop the image at them.

Though the tool works on mobile devices, Kalafarski explained in a Reddit post that he designed ratio.party for desktop browsers. The tool operates locally in the browser, meaning user images are not uploaded to a server.

Articles: Digital Photography Review (dpreview.com)

 
Comments Off on Free online tool helps photographers visualize and compare aspect ratios

Posted in Uncategorized


Understanding Aspect Ratio

15 Oct

apect-ratio

It seems that clients are becoming more and more knowledgeable every day regarding the various facets of what we do as professional photographers. Maybe it’s because we live and work in the most highly tech-savvy society ever, or maybe it’s because anyone with a smart phone and a few good photo apps can turn out amazing results (for which I applaud them, by the way). High-quality DSLRs, mirrorless cameras, and fast lenses are available and well within the reach of  the average photographic consumer. Even those not necessarily interested in taking their own photos still know all the buzzwords. “Excuse me– Is that a full-frame camera?”  Or there is always that old refrain, “We don’t want albums or prints. We just want the RAW files.”  Our clients are learning our language, even if they don’t always completely understand it.

One concept they still don’t seem to grasp, however, is aspect ratio. And with good reason– we’re not doing a very good job of educating them on the subject. Even photographers will often get that glassed-over look in their eyes when their clients ask why what looks great as a 5×7 makes an awful 8×10. This is not a blanket statement about all photographers. When pressed, though, many are only able to offer a partial explanation. They know that it has something to do with proportions– that a 5×7 doesn’t look the same as an 8×10, for instance– but they don’t know why.

Aspect ratio is nothing more than a size relationship between the long and short sides of a photo. The most common aspect ratio in DSLRs today is 2:3, which is based on that of 35mm film. A 35mm negative is actually 24mm x 36mm. Simplified, this becomes 2×3, or 2:3 when expressed as a ratio. Several print sizes can be made from the 2:3 aspect ratio without any cropping of the image (e.g., 4×6, 8×12, 10×15, 12×18, 16×24, 20×30, etc.).  Many of the most popular print sizes, however, cannot be simplified the same way. That is why 5×7, 8×10, and 11×14 all require a crop of the original 2:3 photograph. This results in a loss of part of the image, from either the long or short side, depending on the image and the crop.

In the examples above/below I retained the top edge of the photo in all four aspect ratios in order to illustrate the dramatic effect that each crop can have, relative to the original 2:3. Remember that everything you see in the full frame image will appear in a 4×6, 8×12, etc. But when we start cropping with ratios that can’t be simplified or reconciled with the 2:3, we see an obvious loss along the bottom edge of the frame. There is not at much of a difference between the 8×10 and the 11×14 relative to each other, but it is clear that you can lose a significant portion of your image when it’s time to order prints if you aren’t careful with your composition.

apect-ratio

By using either the Joker’s hat or Harley Quinn’s knee as reference points, you can see for yourself just how important it is to not only compose your photos based on your own personal aesthetic, but also with an eye towards how you or the client might intend to print and eventually display the image.  The simplest solution is to compose your shot and then either zoom back out (or take a step or two back if using primes) before you actually press the button. Shooting a little bit loose will give you more options when it’s time to order prints.

Aspect ratio is a basic concept which can have some pretty significant ramifications if you don’t properly plan your shot. Make sure to give yourself enough room in the frame that you don’t have to worry later about whether the client wants an 8×12 or an 11×14. After all, it will be much easier to give them the sizes they want, rather than explain to them why you can’t.

Post originally from: Digital Photography Tips.

Check out our more Photography Tips at Photography Tips for Beginners, Portrait Photography Tips and Wedding Photography Tips.

Understanding Aspect Ratio

The post Understanding Aspect Ratio by Jeff Guyer appeared first on Digital Photography School.


Digital Photography School

 
Comments Off on Understanding Aspect Ratio

Posted in Photography


3 Reasons to Shoot Vertical Aspect Landscapes and 6 Tips on How to Shoot Them

08 Aug

A Guest Contribution by Todd Sisson – author of our brand new Landscape Photography eBook (currently 33% off for 7 more days only).

The majority of landscape images are photographed in the horizontal aspect. I guess this because the horizontal format approximates the way in which we perceive ‘reality.’ However landscapes look stunning in the vertical format and often the unique characteristics of the upright format suit a scene better than a horizontal* composition. I am guilty of undershooting verticals these days, primarily for commercial reasons, but in any given shooting situation I try to remind myself to seek both a vertical and a horizontal composition from a scene.

Here’s why I think you should photograph vertically and some quick tips for successful upright image making.

Reason One: Verticals are Easy to Learn

Vertical composition using a wide angle or ultra-wide lens is the fast track to making interesting landscape images. My first successful landscapes were all vertical compositions where I found a moderately photogenic foreground object and used this to lead into the greater scene. To this day I find it easier to frame up an interesting sunset in the vertical format. I use rocks, grasses, flowers – just about anything with form to introduce the viewer’s eye to the scene.

Moraine Lake, Alberta Canada (1997).  Nikon F601, Nikkor 24mm, f/16, (shutter speed unknown), Fuji Velvia and most importantly, Lee 3 stop GND filter.  This was the first image that I ever made that actually turned out how I thought it would!  Note that foreground elements don't have to be spectacular to work, they just have to be well arranged in the frame and complement the rest of the scene.  When I was learning, I found it easier to eliminate foreground distractions and make a 'tight' composition in the vertical format. As a result, I shot far too many verticals in my early days and very few good horizontal images...

Moraine Lake, Alberta Canada (1997). Nikon F601, Nikkor 24mm, f/16, (shutter speed unknown), Fuji Velvia and most importantly, Lee 3 stop GND filter. This was the first image that I ever made that actually turned out how I thought it would! Note that foreground elements don’t have to be spectacular to work, they just have to be well arranged in the frame and complement the rest of the scene. When I was learning, I found it easier to eliminate foreground distractions and make a ‘tight’ composition in the vertical format. As a result, I shot far too many verticals in my early days and very few good horizontal images…

Reason Two: Vertical Compositions can be more Dynamic

In this dPS blog post, I explained the principles of ‘dynamic landscape compositions’. What I didn’t reveal in that article (for some inexplicable reason) was that vertical compositions can often accentuate the dynamic qualities of an image – particularly when using an ultra-wide lens.

The Clutha River at Alexandra (it's not wonky, the bridge slopes downhill...).  Nikon D7000, Nikkor 12-24mm f/4 DX, Marumi Polarizer. 12 mm, f/11, 1/13th, ISO100.  The vertical format accentuated the leading lines present in the foreground rocks.  Getting low and tilting down on an ultra-wide lens distorts and extends the perceived length of leading lines in the foreground.

The Clutha River at Alexandra (it’s not wonky, the bridge slopes downhill…). Nikon D7000, Nikkor 12-24mm f/4 DX, Marumi Polarizer. 12 mm, f/11, 1/13th, ISO100. The vertical format accentuated the leading lines present in the foreground rocks. Getting low and tilting down on an ultra-wide lens distorts and extends the perceived length of leading lines in the foreground.

The Clutha River at Alexandra (the bridge still slopes downhill – I promise!).  Nikon D7000, Nikkor 12-24mm f/4 DX, Marumi Polarizer. 12 mm, f/11, 1/13th, ISO100.  When shooting horizontally, the bridge and trees would not be in frame if we used the same camera angles and proximity that were applied in the vertical format. In this case I had to step back and recompose to include everything, which reduced the dynamic impact of the rocks.

The Clutha River at Alexandra (the bridge still slopes downhill – I promise!). Nikon D7000, Nikkor 12-24mm f/4 DX, Marumi Polarizer. 12 mm, f/11, 1/13th, ISO100. When shooting horizontally, the bridge and trees would not be in frame if we used the same camera angles and proximity that were applied in the vertical format. In this case I had to step back and recompose to include everything, which reduced the dynamic impact of the rocks.

Reason Three: Verticals Sell Well

In the introduction I polluted the artistic sanctity of the article by mentioning ‘commercial reasons’. Five years ago we made most of our living from selling postcards of our images – horizontal postcards vastly outsell vertical postcards, and they fit better on a display stand, so I found myself inadvertently locked into a horizontal mindset (as I mentioned last week, deep thought and self-awareness are not my strong point). This sales trend is definitely mirrored in our website where the bulk of our print sales are horizontal.

However, In the past year we have ramped up our stock photography activity and this is one area where vertical images sell extremely well – especially for editorial usage and magazine covers where the format works beautifully with the vertical layout of printed media. Consequently, we are shooting a lot more vertical images. You may not be a full-time photographer but there are myriad ways to earn money from your photographic hobby these days, don’t leave money on the table – shoot verticals along with your horizontal compositions.

Vertical Shooting Tip 1: Get Low and Close

As I noted in the previous image, getting low and close accentuates the visual power of leading lines and dramatically increases the visual weight of foreground features. To go low you will need to use a tripod that has no centre column in order to get super close to the ground, I have detailed our tripod advice here which may be of interest if you are perplexed by the ins and outs of the tripod purchasing process.

Mount Egmont New Zealand. Canon 5d mkii, Canon 17-40mm f/4 ultra-wide, Marumi polarizer. 17 mm, f/16, 1 sec, ISO100. By getting implausibly close to the foreground grass in this scene I have eliminated other distracting elements, increased the visual weight of the grasses and accentuated the leading lines in the bottom right of shot. As well as being close, I was also very low to the ground while making this image.

Mount Egmont New Zealand. Canon 5d mkii, Canon 17-40mm f/4 ultra-wide, Marumi polarizer. 17 mm, f/16, 1 sec, ISO100. By getting implausibly close to the foreground grass in this scene I have eliminated other distracting elements, increased the visual weight of the grasses and accentuated the leading lines in the bottom right of shot. As well as being close, I was also very low to the ground while making this image.

Vertical Shooting Tip 2: Get High and Close

When using an ultra-wide lens it is possible to include the full sweep of a scene and accentuate the visual dynamics of the image by getting above the foreground elements and composing vertically. To achieve this you will need a tripod that extends well above the height of your subject matter and then angle the camera downwards.

Lupine flowers, Mackenzie basin New Zealand (by Sarah Sisson). Canon 5d mkii, Canon 17-40mm f/4 ultra-wide, Marumi polarizer. 17 mm, f/16, 1/8th sec, ISO100. Sarah had to fully extend her tripod and stand on a box in order to get the camera above these chest high lupin flowers.  The high perspective meant that all of the meadow is visible  and accentuated the space between flowers in the foreground.

Lupine flowers, Mackenzie basin New Zealand (by Sarah Sisson). Canon 5d mkii, Canon 17-40mm f/4 ultra-wide, Marumi polarizer. 17 mm, f/16, 1/8th sec, ISO100. Sarah had to fully extend her tripod and stand on a box in order to get the camera above these chest high lupin flowers. The high perspective meant that all of the meadow is visible and accentuated the space between flowers in the foreground.

Vertical Shooting Tip 3: Break down the Composition

When composing strong verticals I tend to ‘break down’ the scene into foreground, midground and background (the same thinking helps with horizontal images of course). A good composition will contain interest in all three of these visual zones – which roughly approximates the rule of thirds compositional guidelines.

Lake Pukaki New Zealand.  Nikon D800e, Nikkor 17-35mm f/2.8 ultra-wide lens, Marumi Polarizer and Singh Ray 3 stop GND filter. This image has layers of visual interest in the foreground (gravel bar and rocks) mid-ground (reflected color & mountains) and the background (the sky). Note that the terms foreground, mid-ground and background align loosely with the principles of the rule of third – I find that I shoot more in sync with the rule of thirds for verticals than horizontals.

Lake Pukaki New Zealand. Nikon D800e, Nikkor 17-35mm f/2.8 ultra-wide lens, Marumi Polarizer and Singh Ray 3 stop GND filter. This image has layers of visual interest in the foreground (gravel bar and rocks) mid-ground (reflected color & mountains) and the background (the sky). Note that the terms foreground, mid-ground and background align loosely with the principles of the rule of third – I find that I shoot more in sync with the rule of thirds for verticals than horizontals.

Vertical Shooting Tip 4: – Leave some Space

Having just referred to the dreaded rule of thirds, I feel it my duty to throw a spanner into the works. Try messing with your vertical compositions by leaving ‘too much’ empty space. Dead space can look cool and graphic designers love it for dropping text into (sales tip).

Lone cabbage tree, Taranaki New Zealand.  Nikon D7000, Nikkor 16-85mm DX, Marumi Polarizer. 35 mm, f/11, 1/20h, ISO100.  I think that vertical images often look great with plenty of empty real estate (I am a gleeful recidivist breaker of the rule of thirds). This image has sold several times as an interior page with text dropped over the sky portion.

Lone cabbage tree, Taranaki New Zealand. Nikon D7000, Nikkor 16-85mm DX, Marumi Polarizer. 35 mm, f/11, 1/20h, ISO100. I think that vertical images often look great with plenty of empty real estate (I am a gleeful recidivist breaker of the rule of thirds). This image has sold several times as an interior page with text dropped over the sky portion.

Vertical Shooting Tip 5: Try Telephoto Verticals

Telephoto verticals are a particularly attractive compositional option, particularly around mountains. Because the long edge is oriented top to bottom you can exploit telephoto compression more effectively (by allowing more foreground into the frame at longer focal lengths and emphasizing the height differential across the scene).

The road to Mount Cook New Zealand.  Nikon D7000, Nikkor 70-200mm f/2.8 Vrii, Marumi Polarizer. 135 mm (202mm 35mm equivalent), f/11, 1/15h, ISO100. The vertical aspect exaggerates the effects of telephoto compression in scenes like this.

The road to Mount Cook New Zealand. Nikon D7000, Nikkor 70-200mm f/2.8 Vrii, Marumi Polarizer. 135 mm (202mm 35mm equivalent), f/11, 1/15h, ISO100. The vertical aspect exaggerates the effects of telephoto compression in scenes like this.

Vertical Shooting Tip 6: Invest in an L-Bracket

An L-bracket or ‘L-plate’ is an L­-shaped (surprise, surprise!) tripod mounting plate that wraps around your camera body. This allows you to effortlessly mount your camera in the vertical orientation without having to flop the ballhead’s mounting point over on it’s side. Never again will you have to fight gravity and adjust tripod legs in order to get the camera leveled when shooting vertically – genius!

You will find a bit more information on the benefits of L-plates here on our website.

*I use the terms vertical or horizontal because the commonly used ‘portrait’ and ‘landscape’ terminology makes me abnormally irascible and grumpy. These terms are a nonsensical hangover derived from a Windows 95 printer options dialog box (maybe this riles my inner Mac Veteran). After all, a portrait can be photographed vertically or horizontally and likewise a landscape…..

Todd & Sarah Sisson are full-time landscape photographers based in Central Otago New Zealand. They are the authors of our new eBook Living Landscapes: A Guide to Stunning Landscape Photography.

Their work can be found as fine art prints & canvas prints at www.sisson.co.nz  They can be found on Facebook, Google Plus and Twitter.

Post originally from: Digital Photography Tips.

Check out our more Photography Tips at Photography Tips for Beginners, Portrait Photography Tips and Wedding Photography Tips.

3 Reasons to Shoot Vertical Aspect Landscapes and 6 Tips on How to Shoot Them


Digital Photography School

 
Comments Off on 3 Reasons to Shoot Vertical Aspect Landscapes and 6 Tips on How to Shoot Them

Posted in Photography


Aspect Ratio: What it is and Why it Matters

16 Jul

Aspect ratio

This article is written by Andrew S. Gibson, the author of Square, on sale now at Snap N Deals for a limited time.

Today I’d like to draw your attention to an area of composition that you might not have given much thought to: aspect ratio.

Aspect ratio is the term used to describe the dimensions of an image by comparing the width to the height and expressing it in ratio form.

The aspect ratio of your images is primarily determined by the dimensions of your camera’s sensor (or the film type plus camera design with film cameras). As these physical aspects are fixed, it is easy to take the aspect ratio of your images for granted, and to not consider the implications of the aspect ratio you are using in relation to composition.

Camera makers have realised that sometimes photographers like to work in different aspect ratios, and most recent digital cameras let you change the aspect ratio using the camera’s menu. You can also crop an image to a different aspect ratio in post-processing.

Why aspect ratio matters

Why does aspect ratio matter? It’s all to do with the relationship of the main subject to the sides of the frame, and the amount of empty space you end up with around the subject.

An awareness of the characteristics of the aspect ratio of your particular camera can help you compose better images. It also helps you recognise when cropping to a different aspect ratio will improve the composition of your image.

What is aspect ratio?

Aspect ratio describes the relationship between the width and height of an image. It’s written as a figure, in this form – width:height (width always comes first).

Virtually every digital camera comes with a sensor of one of two aspect ratios:

3:2

Aspect ratio

An aspect ratio used by 35mm crop sensor and full-frame SLRs, some Leica medium format cameras, mirrorless cameras, high end compacts and most 35mm film cameras. This aspect ratio has been with us ever since Leica made the first 35mm film cameras early last century.

35mm crop sensor and full-frame SLRs have an aspect ratio of 3:2. The sensor is 1.5 times as wide as it is high.

A full-frame 35mm sensor measures 36 x 24mm. You can express this figure as a ratio: 36:24. Mathematicians always like to simplify ratios so that the relationship between the two numbers is easy to visualise. In this case, you can divide both dimensions by twelve. That gives you 3:2.

Crop sensor cameras have smaller sensors, measuring approximately 22.5 x 15mm (the exact measurements vary, depending on brand and model). These figures conform to the 3:2 aspect ratio of the full-frame sensor.

4:3

Aspect ratio

This aspect ratio is used by micro four-thirds cameras, many compact cameras, some medium format digital cameras plus medium format film cameras using the 6 x 4.5cm format.

Let’s compare the two:

Aspect ratio

You can see that the 3:2 aspect ratio used by most digital SLRs is slightly longer than the 4:3 micro four-thirds frame. This may not seem like much, but it has great implications for composition. Take a look at the following images to see why. Here’s the original, 35mm version with a 3:2 aspect ratio:

Aspect ratio

And here’s the same image cropped to the 4:3 aspect ratio, as if it had been taken with a micro four-thirds camera:

Aspect ratio

Do you see the difference? It’s subtle but it’s there. The 35mm frame is longer. And that can be challenging when it comes to composition, because you have to find a way of filling that length effectively. Landscape photography in particular often benefits from a shorter frame, and that’s one of the reasons for the popularity of the 6x7cm medium format (7:6 aspect ratio) and 5×4 view cameras (5:4 aspect ratio) amongst landscape photographers that use film cameras. Here’s what the same landscape would look like cropped to these formats:

Aspect ratio

Aspect ratio

For me, the 7:6 aspect ratio is too short, but 5:4 is a very pleasing aspect ratio to work in.

Now, so far you may be thinking that the difference between aspect ratios is not a big deal. And often, when you are using the landscape format (ie. the camera positioned so that the frame is horizontal), the difference is minimal. It’s not so difficult to work within any of the above aspect ratios.

But change to the portrait format (a vertical frame) and it’s a different story. The 35mm frame suddenly becomes a lot harder to fill effectively, and the composition often benefits from cropping to a shorter rectangle. Here are some examples to show you what I mean:

Aspect ratio

Aspect ratio

Aspect ratio

The difficulty that I had with this landscape is that there was too much empty sky in the original image. I solved the problem by cropping to a shorter rectangle. The 4:5 aspect ratio seems to work nicely.

Of course, not all images will benefit from a crop to a shorter rectangle. But if you find yourself struggling to fill the frame, especially if you have a 35mm camera with the 3:2 aspect ratio, then it may be a sign that you would benefit from using a different aspect ratio.

Adventure and landscape photographer Bruce Percy has written an interesting article on this topic.

Out of interest, here is the first image cropped to a couple more common aspect ratios. They are the panoramic format (16:9) and the square format (1:1)

Aspect ratio

Aspect ratio

Adjusting aspect ratio in-camera

Many recent digital cameras give you the option of adjusting the aspect ratio using the camera’s menu. If you have a camera with an electronic viewfinder, it may be able to display the cropped image in the viewfinder.

If your camera doesn’t have an electronic viewfinder, you will need to use Live View mode in order to take advantage of the aspect ratio function. The camera will display the cropped image on the camera’s LCD screen.

Whichever option your camera has, you should be aware that if you use the JPEG format, the camera will crop the image. You won’t be able to retrieve the cropped part of the image. If you use Raw, the camera will save the image as captured by the entire sensor, and you can change your mind about the crop in post-processing. Check your camera’s manual for details if you have any doubts.

Cropping in post-processing

It’s often easier to crop in post-processing than in the field. If your camera doesn’t have an aspect ratio function it’s the only way you can do it. Another benefit is that you can go back to old images to see if they would benefit from cropping.

If you have Lightroom, cropping is easy. Just click the Crop icon and select an aspect ratio from the list provided:

Aspect ratio

If you have Photoshop CS/CC, the Crop Tool in ACR works in a similar way:

Aspect ratio

Square

Aspect ratio

My ebook Square explores the square format from the digital photographer’s perspective. It shows you how to use the square format on your camera, and how to make the most out of what I think of as the fine art photographer’s format.It’s available now at Snap N Deals for a special price for a limited period.


Post originally from: Digital Photography Tips.

Check out our more Photography Tips at Photography Tips for Beginners, Portrait Photography Tips and Wedding Photography Tips.

Aspect Ratio: What it is and Why it Matters


Digital Photography School

 
Comments Off on Aspect Ratio: What it is and Why it Matters

Posted in Photography


Aspect Ratios in Landscape Photography

31 Oct

Composition is often the key to the difference between a good landscape photograph and a great landscape photograph.  There are oft quoted rules that we all try to adhere to and break in equal measure (rule of thirds, leading lines, golden spiral etc.) yet when considering what we are trying to capture within the frame, we don’t always consider the frame itself.

The aspect ratio of the photograph can make or break the composition by both emphasising the subject and removing distractions, or by putting the whole scene off-balance.  When looking through the viewfinder, about to press the shutter, it’s a good idea to try and envisage the final shot, including the aspect ratio, in order to optimise your composition (too often the aspect ratio is an after-thought, being edited and applied during post-processing to correct for poor compositional choice).

But how does each aspect ratio impact our composition?  Hopefully, that’s where this article comes in.  I’m going to discuss a few common aspect ratios, with examples, and show the benefits and draw backs for each, considering where each one may be applied.

(Note, there is an argument for cropping your photo without sticking to a defined ratio to give an image a custom ratio based on your subject matter.  I believe that can make printing/framing awkward so will therefore be sticking to well-defined ratios that most should be familiar with).

1:1 –Square format

The square format can often be used to simplify an image and give a subject a striking presence at the centre of the frame.  By keeping the width equal to the height, the way in which we read the photograph changes, as there is less of a need to move left-to-right through the frame.  The square format lends a good opportunity to break the rules we so often follow – place the horizon along the centre of the image or place a subject in centre of the frame, and the composition may only get stronger.  You’ll often see a 1:1 aspect ratio used to emphasise minimalism (again, along the theme of simplification).

Derwent Water, Lake District, UK presented in a 1:1 aspect ratio

A 1:1 aspect ratio used to add to the simplicity of this image

4:3 – Four-thirds format

This format is the default aspect ratio of cameras that use four-thirds sensors.  The image is wider than it is tall, meaning that the eye naturally wants to move left-to-right through the image.  However, given that the image is still fairly tall, in relation to the width, this ratio is perfect for leading the eye into the scene through leading lines from foreground interest.  The relative height of the image encourages the use of wide-angle focal lengths to capture the depth of a scene within an image, without capturing excess details at the edge of each frame.

Lavender field at sunrise presented in a 4:3 format

A 4:3 format allows for capturing close foreground detail and leading lines to draw the eye into the image

6:4 – 35 mm format (also called 3:2)

This is the default aspect ratio for 35 mm film, and therefore for full frame and APS-C sensors used in most Nikon/Canon cameras.  The width of the image is significantly wider than the height that, again, encourages reading through the image from left-to-right, meaning diagonal leading lines can work a treat.  A limitation of this aspect ratio is that the height is that much shorter in relation to the width, meaning that capturing foreground detail using a wide-angle lens becomes more difficult due to the limited vertical space with which to work.  It can cause the subjects within the frame to become too disparate and therefore lose impact.  The 6:4 ratio can however be a format that is suited to capturing scenes where there is little to no foreground interest, with mid-range focal lengths (e.g. 35 mm).

Rain over Lake Como presented in a 6:4 aspect ratio

A 6:4 aspect ratio is used here as no close foreground detail is being captured, yet the scene still benefits from a wide aspect

16:9 – widescreen panoramic

This format was supported in film by the advanced photo system (APS) on its introduction and has recently become more popular due to the prevalence of 16:9 aspect ratio displays in the home – tvs, computer monitors, mobile devices.  With this format, the width of the image is dominant, meaning leading the viewer in from the foreground is difficult, but the format is ideally suited to presenting portions of landscape scenes captured with longer focal lengths (i.e. zoom lenses) from a distance.

Beach abstraction presented in a 16:9 format

A wide and narrow 16:9 format was used here to emphasise the horizontal bands of colour

12:6 or 18:6 – panoramic (also called 2:1 or 3:1)

I’ve chosen to adopt 12:6 or 18:6 as the panoramic format here for a few reasons.  Both 2:1 and 3:1 seem to be fairly well supported in that panoramic picture frame options are typically either 2:1 or 3:1.  2:1 is a panoramic format supported by a number of medium format film cameras and 3:1 was supported by the APS.  Typically, panoramic ratios will be used to present the result of stitching 2 or more images together – it’s quite challenging to capture a 3:1 aspect ratio image from one frame and it sill be large enough to print at any meaningful size – and often frames to be stitched will have been captured using a longer focal length in order to pick out details distant in the landscape.  There is no real option of including foreground detail here.

Chalkfields at sunrise presented in a 3:1 aspect ratio

An ultra-wide 18:6 (3:1) aspect ratio was used to present this panorama of 7 stitched images, captured using a focal length of approx. 140 mm

‘Portrait’ mode

I’m aware that I’ve discussed a number of different aspect ratios in the ‘landscape’ format and not in ‘portrait’ format.  That is because I believe the options for successful presentation of landscapes in ‘portrait’ format to be much fewer in number.  For a landscape to work, you need to balance the composition throughout a frame and aspect ratios such as 6;4 make that very difficult due to the image being too tall, relative to its width.  For ‘portrait’ landscapes to work, fatter rectangles such as 4:3, 7:6 or 5:4 are ideal, 5:4 being heavily used by professional landscape photographers using medium and large format cameras.  These formats allow the eye to be taken through an image, still from-left-to-right, without having an excess amount of sky putting the frame off-balance.

Bwlch Y Groes, Wales, UK presented in three different portrait formats

From left to right: 6:4, 4:3, 5:4. Which one looks best?

Conclusion

Whilst I have tried to describe specific uses to certain aspect ratios, I am aware that not all scenes will follow the suggestions I’ve made, and some images may well work in one ratio, not another, contrary to what I’ve suggested.

However, I’m hoping this introduction to aspect ratios will encourage you to think about them when composing your shot, before pressing the shutter.  It isn’t always ideal to fill the frame of your camera with the landscape in front of you, and knowing that the aspect ratio you choose is not dictated by which camera you use means you may be able to use them effectively to boost the impact of your landscape photographs.

Post originally from: Digital Photography Tips.

Check out our more Photography Tips at Photography Tips for Beginners, Portrait Photography Tips and Wedding Photography Tips.

Aspect Ratios in Landscape Photography


Digital Photography School

 
Comments Off on Aspect Ratios in Landscape Photography

Posted in Photography