RSS
 

Posts Tagged ‘winning’

Interview with three-time Oscar winning cinematographer Emmanuel Lubezki

16 Mar

Cinematographer Emmanuel Lubezki films actor Forrest Goodluck in The Revenant, for which he won the 2016 Academy Award for Best Cinematography. Lubezki shot The Revenant entirely with natural light.

Photo: Kimberly French

On February 28 Emmanuel Lubezki won his third consecutive Oscar for Best Cinematography for The Revenant, starring Leonardo DiCaprio. That’s an impressive feat, but even more so when you consider that he also took home the Oscar in the same category in 2015 (for Birdman) and in 2014 (for Gravity), and has been nominated a total of eight times, making him the first cinematographer to win three Academy Awards in a row and establishing his place as one of the preeminent cinematographers of our day.

Lubezki is known for creating immersive, organic experiences that draw viewers into the story, often embracing wide angle lenses and long continuous shots to achieve this effect. His work has variously led audiences through sensory experiences that have evoked strong emotion, a sense of exploration and freedom, magic, beauty, authenticity and, at times, even discomfort.  Many will remember the twelve-minute opening scene in Gravity as well as the famous (and rather tense) uninterrupted four-minute car chase in Children of Men.

A few days before the Oscars, Lubezki, who also happens to be an enthusiastic photographer, joined DPReview editors Dale Baskin and Rishi Sanyal to share his thoughts on a variety of topics ranging from artistic to technical. Of particular interest to DPReview readers, he discusses the impact of digital technology on filmmaking, how he selects and tests his gear, and why he chose to shoot The Revenant entirely on digital cameras using only natural light. Additionally, he explains his excitement about InVisage QuantumFilm, a technology we’ve covered before, and why it excited him enough that in November of 2015 he joined InVisage’s Advisory Board to provide expert and artistic insight to help guide the company.

After our 2-page interview, be sure to visit page 3 for our Editor’s Note that dives deep into some of the technical ground covered. And to get a more personal view of Lubezki’s work you can follow him on Instagram @chivexp.


DPReview: Hi, Emmanuel. Thanks for taking some time to meet with us. Everyone here at DPReview is really excited about the chance to talk with you!

Emmanuel Lubezki: Sure! I know DPReview. Every time I’m going to buy a camera I check you guys out! I’m a photographer and I’ve been shooting movies for close to thirty years. I love shooting movies and taking still photos.

DPR: You’re an inspiration to many of us because of your artistic vision and your use of technology to achieve it. How do you choose the technology you use for your projects? 

EL: You know, one thing I can tell you is that I’m the worst geek in the world! Sometimes I don’t even know how to turn on the camera. [Laughs, obviously joking] But from an instinctive, craftsman point of view, whenever I’m going to start a movie or buy a camera or start a project, I do a lot of tests. All these test help inform me of how I want to shoot the movie, which equipment I’m going to use, how I’m going to mix equipment and so on. Like how my Nikon D810 works. After testing it and comparing it to other cameras I know what that camera can do for me as opposed to other cameras.

DPR: You definitely picked the right camera with the D810. It has the most dynamic range of any camera we’ve tested. 

EL: That’s exactly why I picked it. One of the most important characteristics for any equipment that I’m going to use is how well it can capture high dynamic range. I’m an old cinematographer, so I was used to the high dynamic range of film. If you consider the high dynamic range of Kodak [negative] film, especially in the latest years, to be like the 88 keys of a piano, that was what I needed to go out and capture the highlights, the sky, the shadows in the subject’s hair, and so on. 

Then suddenly film started to collapse and disappear. It happened too early and it happened too fast. It was a result of the studios and the exhibitors going into digital exhibition, so suddenly there was no business for printing. That was the biggest businesses for the labs, so the labs started to close down. It became very hard to shoot film. 

Unfortunately, the transition happened too early and the cameras weren’t ready. The digital cameras that came out in the beginning (around 15 years ago) were not even close to the high dynamic range of film. I worked with a few directors, including Michael Mann, to do tests with digital video imaging. For certain things, we liked and used it, but it was primitive and it wasn’t ready to take over and become the main technology for capturing images.

I think now we’re in a very good place where the digital cameras are allowing us to do many things we couldn’t do with film. But it’s still the dynamic range – the high dynamic range – where digital cameras, as amazing as they are at capturing shadows and not having any noise, don’t allow you to capture those 88 keys of the piano I was used to. And movies get hurt by that.  

For example, the last movie I did [we were shooting] in the forest, and when looking at the sky I wasn’t able to capture the little round ball of the sun and also capture the face of the actor. It’s stressful for a cinematographer. So the idea of new sensor technology, like what InVisage has demonstrated in their QuantumFilm technology, that will allow us to go back to 88 keys of dynamic range or more is incredibly exciting.

Shooting The Revenant in all natural light pushed the limits of dynamic range on the digital cameras used for the production.

Photo: Kimberly French

DPR: You’ve worked with InVisage, the company behind QuantumFilm, and seem very enthusiastic about what that technology can do for filmmakers and photographers. Why?

When InVisage approached me and showed me their sensor technology I got very, very excited. As people would say, it’s music to my ears. Actually, it’s music to my eyes what they are doing! What they’re attempting to do is everything I’ve been looking for, and that’s why I’m so excited to work with them.

The first thing I’m excited about is the high dynamic range of QuantumFilm, but the other thing that’s important is a camera that has a global shutter as opposed to a rolling shutter. That’s something that we suffered with a bit during Gravity. When you’re doing a lot of digital effects and stitching things together, not having global shutter can become a big issue, as you guys know.

DPR: You’ve mentioned the incredible dynamic range we’re starting to see with technologies like QuantumFilm and from cameras like the Nikon D810. How does digital fit into your workflow now? And have you found that you need to have a different method and philosophy for exposure when shooting with digital as compared to film?

EL: Absolutely. Very different. When I signed on to do The Revenant, I wanted to do all the day scenes on film, just because of the high dynamic range, and I wanted to do all the dusk and night scenes with a digital camera. That’s because the digital cameras are more sensitive to light. They can see more in the shadows, and you can push them a bit. For example, let’s say that Arri says their camera is ISO 800 native. You can shoot it at IS0 1600 and there’s still no noise. You’re able to shoot scenes at night with firelight, and you can capture the stars and the Aurora Borealis in the night sky – things that film couldn’t do.

I started doing a lot of tests while we were rehearsing the movie, and every time I went back to the lab to see the results, the images I was capturing with the digital cameras were more interesting to me because they had less noise or no noise at all. It was like opening a window for the audience to get them immersed in this world, whereas film still had that poetic or romantic look, and the grain and texture was making the world of The Revenant look more romanticized. It wasn’t really allowing me to get immersed into the world of these trappers the way the digital cameras did.

Little by little I realized that I didn’t want to shoot the movie on film. For a middle-aged cinematographer who’s been shooting for so many years – that’s a very hard call. It’s like suddenly saying to a musician “You know, forget about your incredible piano, you’re going to play this concert with a Minimoog.” It’s heart-breaking, but the images spoke for themselves. We sent all the film cameras and film back to Los Angeles and started shooting the rest of the tests with the digital cameras. What I learned really fast is that, as opposed to film, you expose differently. You can overexpose film, and for many years I overexposed film because I liked the way you could still see the highlights, and by overexposing I was able to bring up a little bit of information in the shadows.

DPR: Because the film rolls off in the highlights, you can give it that extra light?

EL: Yes, exactly, which would then give you a little bit of extra latitude in the shadows. You would add a little noise by doing this, or grain in the highlights, but it was just a little bit and it allowed me to capture the whole ’88 keys’ [of the piano].

DPR: With digital it’s a very different philosophy, right? Because digital clips highlights abruptly as a result of being a largely a linear capture medium, and there isn’t that roll off. 

EL: Yes, it’s very different. You have to underexpose.

DPR: One of the things we discuss on our site a lot is that with digital you need to expose for the highlights and brighten the shadows afterward because they’re so clean.

EL: That’s exactly what you find when you start to test. And that testing tells you how much you can underexpose before you start to lose the shadows.

Unfortunately, as I was telling you before, we’re at a moment where the cameras and the chips are just not ready enough. Let’s say they are ready, but they don’t have the high dynamic range that we would like to have. This was a very good movie to do this test because I wasn’t using extra light or artificial light, so I sometimes had to make a call and say “OK, do I lose Leo’s face or detail in his hair? Or do I lose a cloud that is front-lit and many, many stops brighter than what this camera could capture?”

So what I would do much of the time is go for Leo’s face, because he’s the star of the movie, and then I would do a second pass and capture the sky, hoping that later I could replace the sky in the scene. But obviously that’s very expensive and you can’t do it over and over. The camera is handheld and it’s moving, so tracking it [in post to overlay the two exposures] would become very hard. In still photography I do that a lot. You know, you take a portrait of somebody and if the background is way too overexposed you shoot a couple more shots.

Before filming The Revenant Lubezki did extensive tests with his cameras in order to understand the dynamic range they were capable of handling and taking advantage of clean shadow detail to expose for the highlights.

Photo: Kimberly French

DPR: Of course, when you underexpose, the shadows in the image become really dark in the the electronic viewfinder or LCD screen. Have you found Log gamma modes help you with digital capture as you underexpose? 

EL: Yes. Not in still photography, but what I do when shooting cinema is I create lookup tables [LUTs] that allow me to see how much information I still have in the shadows if I’m underexposed. They’re very easy to create if you shoot tests and then make 2D or 3D LUTs in order to see the shadows. I haven’t been able to do it in still photography because I would probably need to get into the camera and mess with the monitor.

DPR: Would it be a bit like your D810 when using the ‘Flat’ Picture Control that raises the shadows and rolls off the highlights?

EL: Exactly. That gives you a little bit of an impression, but I’ve had a couple of hiccups where I think I still have enough detail, and then you open up the images in Photoshop and the shadows in the hair are already so underexposed that you don’t see detail. I take photos more like a hobbyist than a great professional that has an assistant with a laptop. I just have my camera and shoot.

DPR: It’s very interesting to hear all of this from someone who many people know as ‘a film guy’. 

EL: I was the ‘film guy’. What I gained by shooting digital makes me much happier. That’s why I sent the film cameras back to Los Angeles. The digital cameras were giving me something I could never have done on film – because of the sensitivity, because of the immediacy, and because Alejandro [Director Alejandro Iñárritu] was able to watch everything on large monitors. Sometimes when you have 400 extras you want to watch a playback and see what all those extras are doing and things like that. Things that film doesn’t give us.

On The Revenant I was shooting at high latitudes – we were in Canada, north of Calgary, in the winter. Shooting in that part of the world, the sun is very low to the horizon and goes behind the mountains very early. By shooting with digital cameras I was able to add one or two hours of shooting to our very short days. That’s a lot of extra time for a big production. It’s millions of dollars that you don’t lose by not being able to shoot. It was also during the time of day that’s very mysterious and magical [the ‘golden’ or ‘magic’ hour], and by having the digital cameras I was able to capture things I couldn’t do on film. 

DPR: Hearing you say that you’re mostly experiencing advantages when shooting digital is compelling. Where does film fit into the picture at this point?

EL: I’m not trying to tell young filmmakers or any director to not shoot film. The ideal world would be a world where we have all these different tools – where you have film, where you have QuantumFilm sensors, where you have tiny digital cameras that have very little latitude – where you have all these paintbrushes that allow you to communicate and allow you to express different things. 

It will be very sad to see film go away because we have 100+ years of film history and it would be a big loss if we couldn’t print these movies anymore. You know, movies like Carol, or a movie like the Coen Brothers movie that just came out that is an homage to filmmaking – it was a good call by the filmmakers to make these movies on film. So it would be great to still have film, and it’s fantastic to be able to combine things. But in general, I feel much more comfortable shooting digital.

At the start of production, Lubezki planned to shoot daylight scenes on film due to its high dynamic range, but after extensive testing sent all the film and film cameras back to Los Angeles and shot entirely on digital.

“It was like opening a window for the audience to get them immersed in this world, whereas film still had that poetic or romantic look… It wasn’t really allowing me to get immersed into the world of these trappers the way the digital cameras did.”

Photo: Kimberly French

DPR: Is that comfort partly because you’ve had this realization that the formats need to be exposed differently, using underexposure on digital and tone-mapping the footage later?

EL: Absolutely! 

DPR: Does everyone else in the industry understand that? 

EL: I think so. I think in general professional cinematographers working in the industry know that, and if not you learn it very fast. The first day of testing you realize that you’re gaining a lot information by doing that.

DPR: Many stills photographers may not appreciate the different approaches to exposing digital and film, but you guys are doing your own tests so it makes sense that you can take advantage of the formats by using them optimally.

EL: Right now we’re talking about professionals. But imagine – hopefully in the short future – if we had QuantumFilm in our phones, what amazing things we could do with them. How many millions or billions of photographs do we see everyday where the skies are clipped? Sometimes it doesn’t matter, but a lot of times it does because you’re losing a great amount of information about the environment or the highlights in somebody’s face.

DPR: One of the first things that struck us while watching The Revenant was the realism of the image – not only due to the lack of noise, but also because you can see everything from the blues in the sky, to the warm tones in your flares and sunstars, while still clearly seeing the subject’s face naturally, not artificially, lit. And the subject’s face isn’t noisy or a plugged shadow. It made for compelling imagery.

EL: I’m very happy to hear that because it’s something that I really wanted to show to the audience! Although you’re specialists and are able to see it like that, I think even people that don’t see it the way you’re seeing it… their subconscious is telling them “This is different,” and that it’s not artificially lit [to work around the capture medium’s limitations], and that it’s the real thing.

Using digital cameras allowed Lubezki, shooting in extreme northern latitudes in the winter, to add an hour or two of filming each day during the magic hours when the sun was low to the horizon.

Photo: Kimberly French

DPR: Is that why you choose to do long takes and wide angle perspectives? To enhance the realism and create an immersive experience?

EL: Yes. It’s exactly those two things. We wanted the movie to be as naturalistic and immersive as possible. The long takes, the digital equipment, and the way it was exposed… all these things together worked really well.

DPR: All this technical discussion brings up an interesting question. In the digital age does a cinematographer need to be as much of an expert on the science and technology of their imaging equipment as they are an artist in order to achieve their vision?

EL: I think you have to know a little bit about your equipment, at least in the way I do, in an intuitive way. You need to be able to test it and you need to know what you can do with it. I don’t know if you necessarily need to know that the chip is connected with 27 cables into… I don’t know if that’s imperative. I wish I could learn it. I haven’t had the time and the passion to open up a camera and go through exactly how it works, but I didn’t do that on film either. To me the results were more important. What was I getting and how was it connected to the story and mood, and what I was trying to tell the audience?

Articles: Digital Photography Review (dpreview.com)
 
Comments Off on Interview with three-time Oscar winning cinematographer Emmanuel Lubezki

Posted in Uncategorized


Wonder of nature: Eight winning photos from the 9th International Garden Photographer of the Year competition

22 Feb

$ (document).ready(function() { SampleGalleryV2({“containerId”:”embeddedSampleGallery_0735964398″,”galleryId”:”0735964398″,”isEmbeddedWidget”:true,”standalone”:false,”selectedImageIndex”:0,”startInCommentsView”:false,”isMobile”:false}) });

A photographer from the UK has collected £7500 along with the title International Garden Photographer of the Year as the results of the ninth competition have been announced. Richard Bloom took the first prize with a picture of a field of lupins he came across while in the South Island of New Zealand in the summer of 2015. Bloom commented ‘The landscape was already amazing, scattered with drifts of naturalised lupins, which gave it an almost psychedelic, wonderland feel.’

The competition has eight main categories along with additional prizes for portfolios, projects and photographers under the age of 16. The competition culminates in an exhibition at the Royal Botanic Gardens, in Kew, London, and a book is produced of the winning entries and those commended. On request judges also offer feedback on entries once the winners are announced.

The 2016 competition is already open for entries, and is open to photographers around the globe, with a deadline of October 31st. Entry costs from £10 for adults.

To see more of the winning entries visit the International Garden Photographer of the Year website.

Articles: Digital Photography Review (dpreview.com)
 
Comments Off on Wonder of nature: Eight winning photos from the 9th International Garden Photographer of the Year competition

Posted in Uncategorized


How to Improve Your Chances of Winning a Photography Contest

23 Aug

My name is Andrew Suryono and I’m an amateur travel photographer. When you read the title, you may feel funny that an amateur photographer like me is writing this article. “Shouldn’t winning a photography contest be reserved only for the professionals?” you may ask.

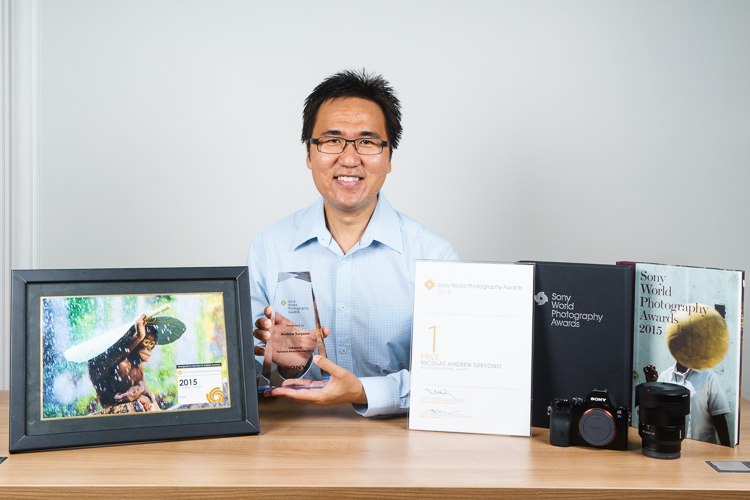
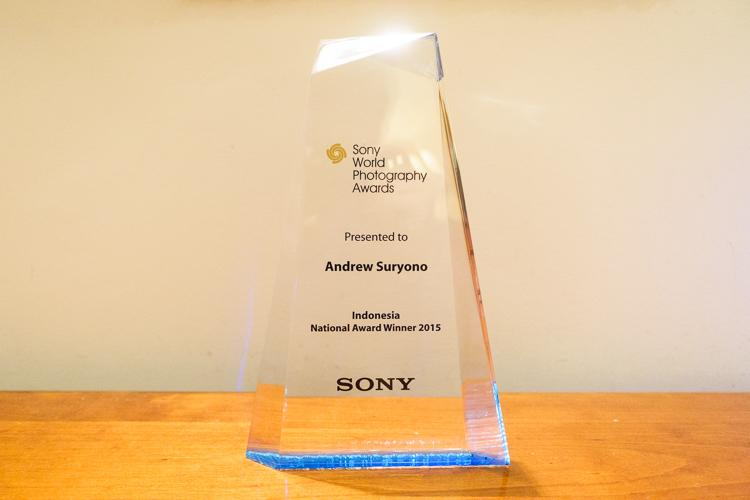
Well, speaking from my experience, the answer is no. I’m one of many amateur photographers in the world that have won photography contests. This year is special for me because I won first place in the world’s largest photography competition, the Sony World Photography Award (Indonesia National Category).

Image 1 andrew suryono trophy

I’m writing this article to share my experience and give my personal tips to you on how to increase your chance in winning a photography competition. Yes, YOU can win in a photography contest!

Why enter photo contests?

Before we start though, let’s look at some of the benefits of joining a photo contest.

Get exposure

The first benefit of joining a photography competition is you can get exposure for your work quickly. The bigger the photography competition, the quicker and the more exposure you’ll get. By submitting your photos to a contest, you give easy access to people all over the world to view your work. If you’re struggling to get people to look at your photography website or portfolio, try joining a photography competition.

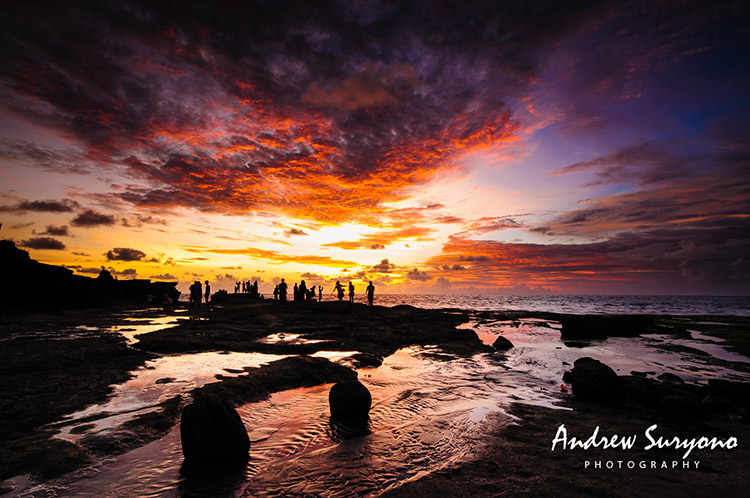
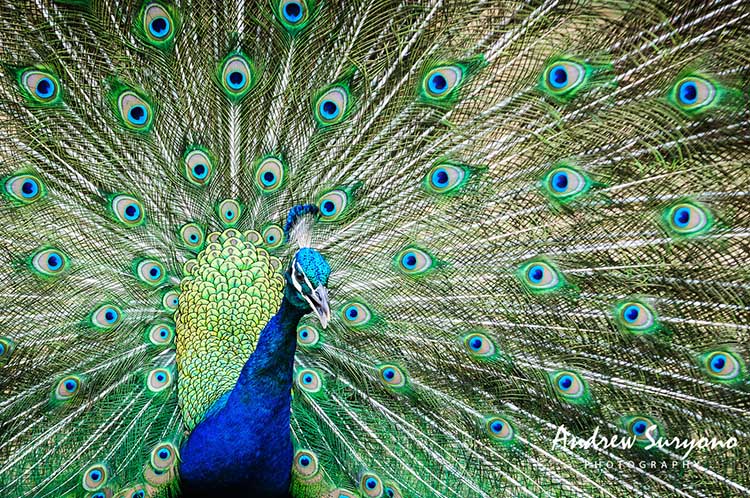
andrewsuryono-peacock

This image appeared in Bryan Peterson’s newsletter

Market your work

By giving yourself lots of exposure, you also increase your chance to market your work. If people are interested in your work, they might contact you to buy some prints or strike licensing deals. After joining several photo competitions, I got contacted by many people who wanted to do licensing deals for books, magazines, greeting cards and many other things. To my surprise, my work not only attracted small publishers, but also big ones like National Geographic.

You really never know who is looking at and interested in your work!

Measure your work against others

A photo competition is a good way to measure your work against other photographers’ work. You’ll have a chance to look at other their images and see how your works compares. It’s important that you don’t judge your work too harshly when you do this. See what you
find interesting from other people’s work, like how they use of composition or color, and learn from it.

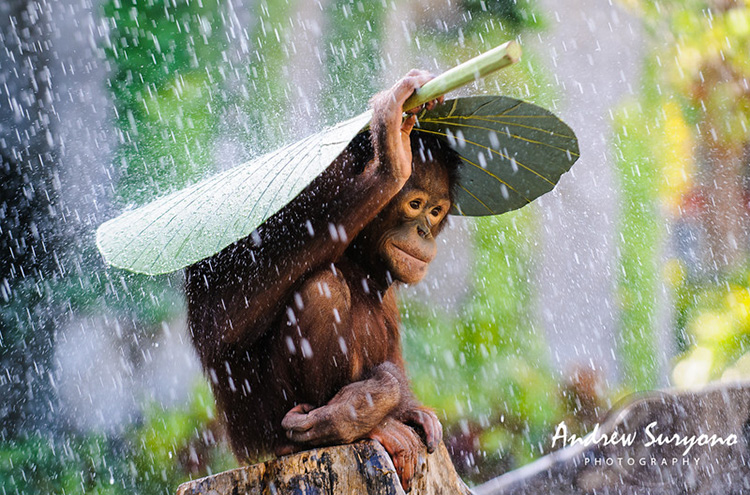
Image 2 andrew suryono orangutan in the rain

Winning image!

Make new friends

Finally, a photo competition is a good way to make new friends and connections. Through photo competitions, I’ve gotten many like-minded friends who I enjoy speaking to, and sharing my work with regularly. We even went on to create a private Facebook group where we share our work to get each other’s feedback, helpful online tips that we find, and many more.

Are you already feeling excited? Great!

How to increase your chances of winning

Now that you know all the benefits of joining a photo competition, let’s look at some ways to increase your chance of winning one.

The first and the most important thing that you should do before joining a photo contest is spend some time to know the rules inside out. Here are some things that you should pay attention to:

Copyright ownership

I decide whether I enter a photo contest or not based on this information alone. Make sure you retain full rights and ownership of your photos before joining in any contests. Personally, I would avoid any photo contests that want me to give any rights to them. I want to keep all rights to myself and they must ask me for permission if they want to use my photos for anything.

Appeared in Bryan Peterson's newsletter

Appeared in Bryan Peterson’s newsletter

Image dimensions

Pay attention to the image dimension that they require you to submit. Typically, a lot of photo contests are bombarded with image submissions
from all over the world, so they only require you to submit a small resolution version of your image. Make sure to resize your image according to their specification. Some photo contests are so strict that they’ll immediately disqualify your image if it’s not submitted according to their specifications.

Submission deadline

This is pretty explanatory, but still worth mentioning. Make sure you pay attention to the submission deadline. Photo contests won’t let you
submit images once the deadline has passed. Mark your calendar and set reminders!

Research

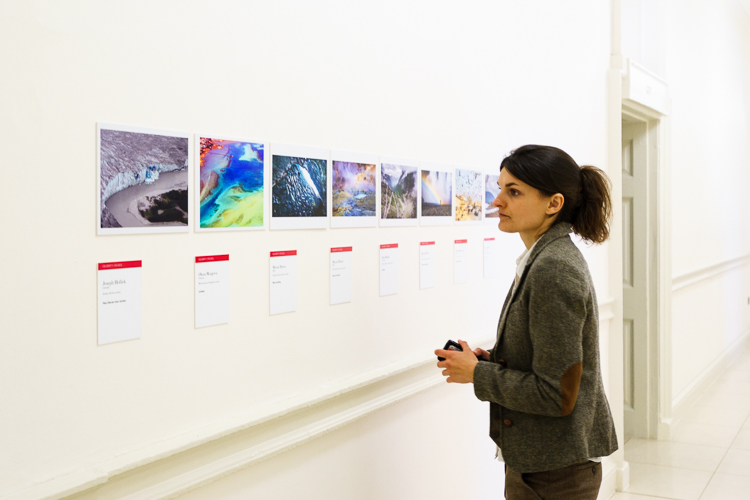
After you’re done going through all the contests’ rules and regulations, it’s time to do some research. You’ll need to research and study previous winners’ work, and the judges’ work if you want to increase your chance of winning in the competition.

Image 3 study judges work

By looking through the previous winners’ work, you’ll get a sense of how they won the contest. Pay attention to the composition, color and most importantly the message that they’re conveying through their photos. Pay close attention to their post-processing work, and look at how it strengthen their images.

Photography contests are judged by humans. It’s subjective by nature. By looking at the judges’ work, you’ll get a sense of their style and what kind of works they like to see. For example, if you find that most judges in the contest love strong black and white images, you’d better think twice about sending images with bright, saturated, and punchy colors.

Image selection

After you’re done with your research on the previous winners and the judges’ work, you’ll need to select images for submission based on your findings.

Go through your portfolio of images and see which images stand a chance of winning the competition. Be very selective with your own work. I know it’s hard criticizing and selecting your own work, but doing this will dramatically increase your chance of winning a photo contest.

Pick photos that you personally think are better than the previous winners’ photos, match with the judges’ style, and strongly show
your unique photography style. Then, submit your images, cross your fingers, and wait for good things to happen!

Image 4 andrew suryono pictures trophy

Remember that I can’t guarantee you win will any photo competition, but at the very least, I have given you some tips that you can use to increase your chances.

Don’t get discouraged if you submit an image and it doesn’t win. Remember that a photography competition is always subjective by nature. If one image doesn’t win in one competition, it doesn’t mean it won’t win in another. Also, there are also plenty of benefits that you can get by joining a photo contest, even though you didn’t win it.

Follow the guidelines above, enter as many photography contests as you possibly can, and hopefully you get to win in some of them. It’s a number’s game!

Keep shooting and don’t forget to have fun!

googletag.cmd.push(function() {
tablet_slots.push( googletag.defineSlot( “/1005424/_dPSv4_tab-all-article-bottom_(300×250)”, [300, 250], “pb-ad-78623” ).addService( googletag.pubads() ) ); } );

googletag.cmd.push(function() {
mobile_slots.push( googletag.defineSlot( “/1005424/_dPSv4_mob-all-article-bottom_(300×250)”, [300, 250], “pb-ad-78158” ).addService( googletag.pubads() ) ); } );

The post How to Improve Your Chances of Winning a Photography Contest by Andrew Suryono appeared first on Digital Photography School.


Digital Photography School

 
Comments Off on How to Improve Your Chances of Winning a Photography Contest

Posted in Photography


Adding an Off-Camera Flash to Create a Winning Image

07 Jul

Star_gazers

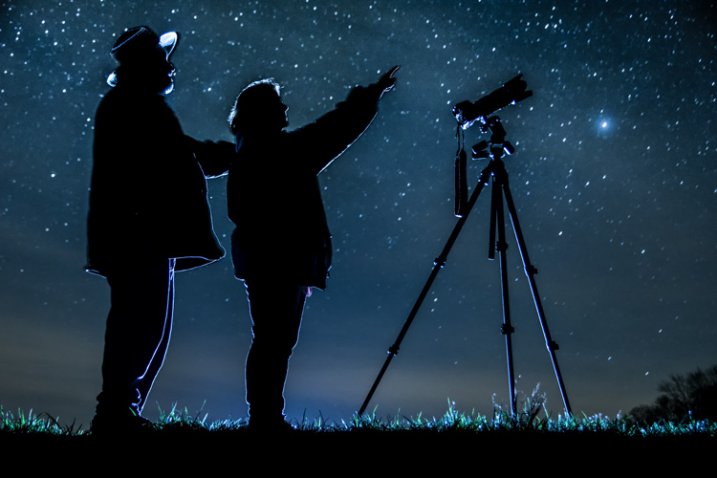
This image, titled “Star Gazers”, won Grand Prizes at the 2015 Shoot the Hills photo competition. Held in the Hocking Hills region near Logan, Ohio, this competition takes place the 3rd weekend every April. 160 photographers from several states participated this year.

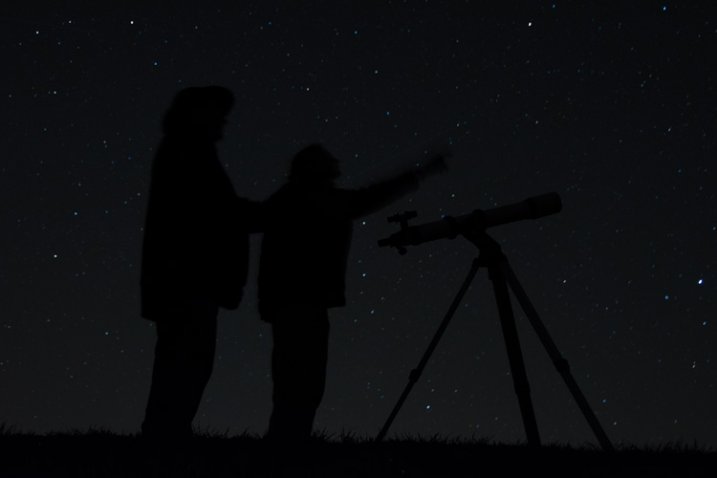
I initially came up with the idea for this shot over a year earlier, but my first attempt at the image failed miserably. (see below)

DSC_3387

What mistakes did I make?

If I would have checked the histogram I would have seen that all of the image was extremely under-exposed with all the data pushed up against the left side of the histogram.

If I had checked the histogram I would have noticed that the image was extremely under-exposed with all the data pushed up against the left side of the histogram.

  1. The image was under-exposed, because I failed to check the histogram. In the dark the image looked great on the LCD on the back of the camera!
  2. With the long exposure (30 seconds) there was no way for the subjects in the image to remain still enough to avoid blurring.

The Solutions

  1. The solution for the exposure was simple. First I turned down the brightness of the camera’s LCD screen. Then I used the histogram to determine my exposure.
  2. The length of exposure time was the main problem I had with this first attempt at capturing the image I had planned. It is nearly impossible for a live model to stand still for 30 seconds to prevent blurring. An off-camera flash was added behind the models to create the rim lighting in order to freeze their movement. Adding this flash was the major difference-maker from my earlier attempt of this image.

Other Factors to Consider

Sometimes it takes some trial and error to achieve the results you are looking for in an image. Improvisation may be required when unforeseen issues change shooting conditions. Many factors need to fall together for it to be possible to create an image such as this one. After waiting until 2 a.m. for the clouds to clear, it was finally time to capture the image I had pre-visualized nearly a year earlier.  Because the cloud cover remained near the horizon, it became necessary to change the angle of view to capture the higher, clearer sky. This adjustment also made it necessary to change the focal length from the 18mm I had planned to 50mm. One of the rules of the Shoot the Hills photo competition is that all images must be submitted straight out of the camera, so getting everything right in the camera is a must. Here are some additional factors required to capture such an image:

The Weather

  • Clear starry night – Probably the single most important factor to create this image is a clear starry night.
  • Dark sky – Find a dark sky, away from the lights of the city. There are dark sky maps on the internet.
  • Moonless night (or after the moon has set) – The light from the moon will fade out (overpower) many of the dimmer stars.

The Exposure

Histogram for the final winning. Notice how the histogram stretches back almost into the mid-tones, with a little info clear back into the highlights which is the stars and the rim lighting.

Histogram for the final winning shot. Notice how the histogram stretches back almost into the mid-tones, with a little info clear back into the highlights, which represent the stars and rim lighting.

I wanted to keep the shutter speed at 30 seconds for two reasons. First, that is the longest shutter speed most cameras allow without having to set them to bulb, and manually doing a timed exposure. Secondly, I didn’t want the stars to become extremely blurry. Using the histogram, I determined my exposure with my focal length at 50mm to be;  aperture at f/5 and ISO set to 2000, which I had predetermined was the highest ISO I could use, and still be able to minimize the amount of digital noise. As mentioned earlier, do not rely on the camera’s LED screen to determine exposure. In fact, in the dark the LED screen will look really bright when the image is actually extremely underexposed. To remedy this problem, turn the brightness down on you LED screen, if this setting is available. But always use the histogram to get the best exposure setting. If the histogram is all pushed over to the left side, the image is going to be underexposed.

Remote Triggers

Since I was also one of the subjects in the images, I used one remote to begin the exposure, and another to trigger the flash.

White Balance

After experimenting with several preset white balances I decided to set a custom white balance of 2560 Kelvin, to give the image a cool blue colored sky.

Focusing

Focusing a camera in the dark is one of the most challenging parts of creating a night shot under the stars. Here are some tips to set focus for night images:

  • Pre-focus before it gets dark. This is the easiest way to focus for a night shot, and after the focus is set, turn off the auto-focus so it doesn’t change.
  • Shine a bright flash light on the subject to allow the camera to focus, and as in the method above, after attaining focus, turn off the auto-focus.
  • Use live view to focus manually on a light.
  • Use back button focusing to preset focus

For this image I used back button focusing, and a flash light to set my focus.

The Logistics

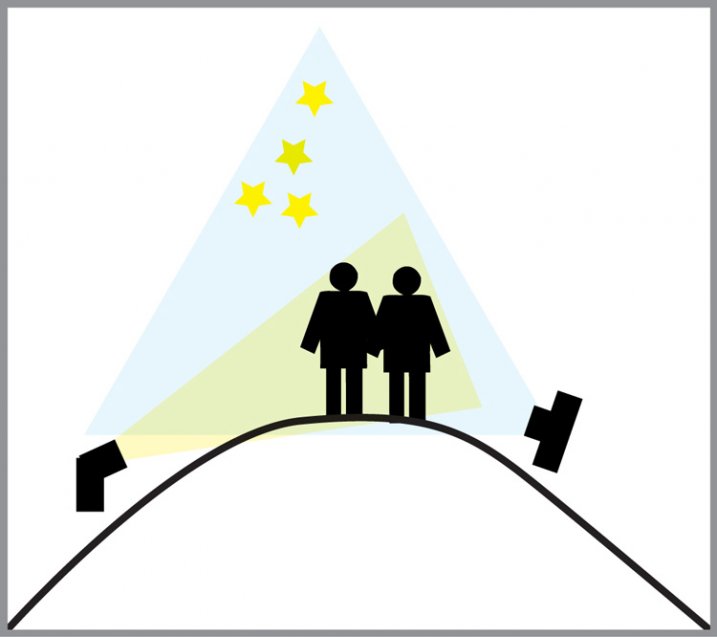
The setup for this shot was at the top of a steep hill which came to a point. With the subjects at the very top, the camera was placed on a tripod below, and aimed upward at the subjects and the starry sky in the background. The off-camera flash was placed on a tripod on the other side of the hill and aimed upward at the subjects. The flash and tripod had to be placed low enough on other side of the hill, so that the actual flash did not show in the image.

layout

Conclusion

Henry Ford once said that “Failure is the opportunity to begin again more intelligently.”  When an image idea fails, take a look at what went wrong and then look for solutions to improve the image, return to the scenario and try it again. From my first unsuccessful attempt to capture star-gazers, the need to freeze the subjects and prevent the blurring, led me to try the off-camera flash technique. The back-lighting and a year’s experience made all the difference between a failed shot and a winner!

googletag.cmd.push(function() {
tablet_slots.push( googletag.defineSlot( “/1005424/_dPSv4_tab-all-article-bottom_(300×250)”, [300, 250], “pb-ad-78623” ).addService( googletag.pubads() ) ); } );

googletag.cmd.push(function() {
mobile_slots.push( googletag.defineSlot( “/1005424/_dPSv4_mob-all-article-bottom_(300×250)”, [300, 250], “pb-ad-78158” ).addService( googletag.pubads() ) ); } );

The post Adding an Off-Camera Flash to Create a Winning Image by Bruce Wunderlich appeared first on Digital Photography School.


Digital Photography School

 
Comments Off on Adding an Off-Camera Flash to Create a Winning Image

Posted in Photography


Guide to Winning Guest Blogging for Photographers

25 Oct

Guest blogging is one of the marketing techniques that many bloggers and site owners make use of and serves at least two purposes. Firstly, it’s great exposure for the guest blogger, and secondly, it’s a new post for the site owner that they haven’t had to spend any time creating. You may be a brilliant blogger with huge experience and Continue Reading

The post Guide to Winning Guest Blogging for Photographers appeared first on Photodoto.


Photodoto

 
Comments Off on Guide to Winning Guest Blogging for Photographers

Posted in Photography


How I Took This Award Winning Night Sky Group Photo

17 Jul

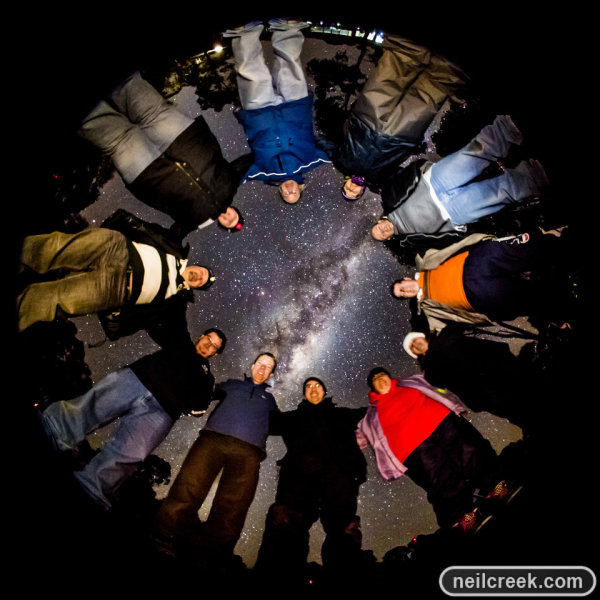
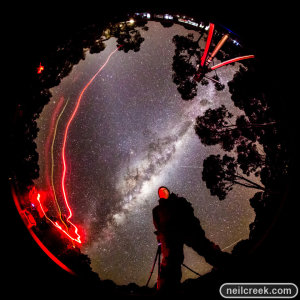
Last weekend one of my photos was selected as a category winner in the national night sky photography competition, the David Malin Awards. The category was “People and Sky”, and Darren asked if I could write a post describing how the photo was created.

creek-120812-012-X2

I assist friend and colleague Phil Hart with regular night sky photography workshops under the beautiful dark skies of country Victoria (Australia). Knowing my love of fisheye photography, Phil had an idea for a photo to help promote the course: A group photo under the stars by fisheye lens.

I immediately had a vision in my head of the photo and knew it would look cool, so I set myself to working out how to achieve the difficult task of composition and balancing light. Once night fell and we made sure the students were all confident with their new skills and happily taking photos of the night sky, I put my Sigma 8mm f4 circular fisheye on my full-frame Canon 5D MkIII. To achieve this effect you will need a circular fisheye lens and a full-frame camera, or a fisheye lens designed to give a circular image on a cropped sensor. A diagonal fisheye will not capture the whole hemispherical field of view needed to image the whole sky.

Testing the setup and lighting.

Testing the setup and lighting.

From experience shooting the night sky with this lens, I knew that I would be shooting at the widest aperture of f4 and the full 30 seconds shutter speed. Balancing noise and sufficient exposure I chose an ISO of 8000. These settings give me a good exposure of the night sky and particularly the milky way, which would feature in the shot. This is incredibly faint! My main problem was how to light the faces of the students to approximately the same brightness of the Milky Way.

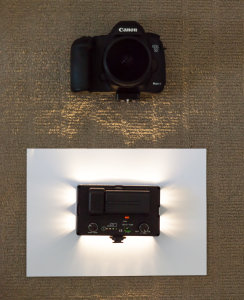
At first I considered using a flash, but even at the lowest setting, even with significant diffusion, the exposure was too difficult to control. The other problem is that I’d need the light to be omnidirectional so that all of the people in the shot would be evenly lit. Ultimately the solution I came up with was to use my LED video light, dialed down to its lowest power setting and laid face down on the ground on a piece of white paper. Only a little bit of light leaked out from around the edges, but it was even and spread out in all directions. Due to the relatively warm white balance of the Milky Way I adjusted the light’s white balance to be warm to match.

A recreation (in my office) of the setup I used. The video light is pointing straight down into the paper.

A recreation (in my office) of the setup I used. The video light is pointing straight down into the paper.

I took a few test shots to make sure the exposure, focus, white balance and everything else was working just right, and when the galaxy had risen to it’s highest point and was nearly directly overhead we called everyone together. We formed a circle and put our arms over each others’ shoulders to ensure even spacing, and tried to keep where the camera would be in the centre. Linking arms also helped us all to stand as still as possible for the 30 seconds of the exposure. Once we were all ready, I set the camera to 10 second self timer mode and placed it on the ground pointing directly up.

There were a couple of confused comments as people tried to work out how it would look, and jokes about how we all must have looked to anybody watching us from the outside. But once we got a look on the back of the screen, everyone was convinced. This was a truly unique group photo.

Join me on Facebook to learn more and see new photos daily: http://facebook.com/neilcreekphoto.

Post originally from: Digital Photography Tips.

Check out our more Photography Tips at Photography Tips for Beginners, Portrait Photography Tips and Wedding Photography Tips.

How I Took This Award Winning Night Sky Group Photo


Digital Photography School

 
Comments Off on How I Took This Award Winning Night Sky Group Photo

Posted in Photography


6 Winning Ways to Work Wide

20 May

Today Joe Decker shares some tips on wide angle photography.

One of the first lens purchases aspiring landscape photographers typically made is a wide or super-wide lens, anything (in full-frame 35mm terms) from 24mm on down, and with good reason, wides offer photographers the ability to capture the sweeping vistas of the natural landscape. But they can also be a challenge to use effectively, it’s all to easy to end up with a wide-angle shot that lacks the power and grandeur we felt when we were shooting. In this article, I’ll explain why that’s so often the case, and provide a few tips for working around those challenges, showing you how to use wide-angle lenses to create dramatic, effective images.

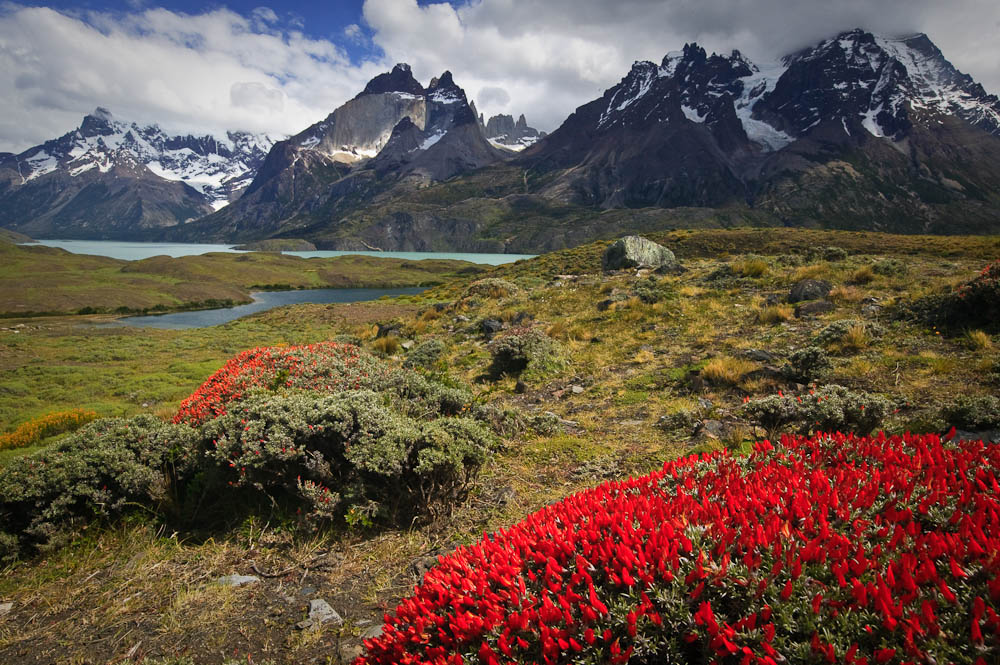
Nordenskjöld Lake, Torres Del Paine National Park, Chile. Image Copyright Joe Decker

Nordenskjöld Lake, Torres Del Paine National Park, Chile. Image Copyright Joe Decker

1. Get Close!

Because wide-angle lenses take in a bigger angle-of-view than other lenses, using a wide-angle lens at the same distance from your subject will render that subject smaller than it would otherwise. To compensate for this, you’ll have to move closer to your subject. Don’t be bashful about getting close, particularly with super-wides&mash;it’s almost impossible to get “too close” to your subject with a 14mm lens. This emphasis in size that wide-angle lenses give nearby objects means that …

2. It’s All about the Foreground

Contrary to what you might expect, this means that the most important element of your wide-angle landscapes is the foreground. While wide-angle lenses do capture the wider landscape, they also (almost inevitably, because of their wide field-of-view) capture quite a bit of foreground as well, and this foreground is emphasized by the wide-angle perspective. As a result, if your foreground isn’t interesting, your photograph won’t be interesting. This leads us naturally to the Josef Muench idea of the near-far composition, an image which uses a wide-angle lens to not only show a broad vista, but also to show one detail of that landscape in an up-close, intimate way. When you’re photographing wide, be sure to spend some time looking for the most interesting foreground available to combine with your grand vista.  (If there isn’t an interesting foreground, you might want to consider using a longer lens to leave out that less interesting foreground.)

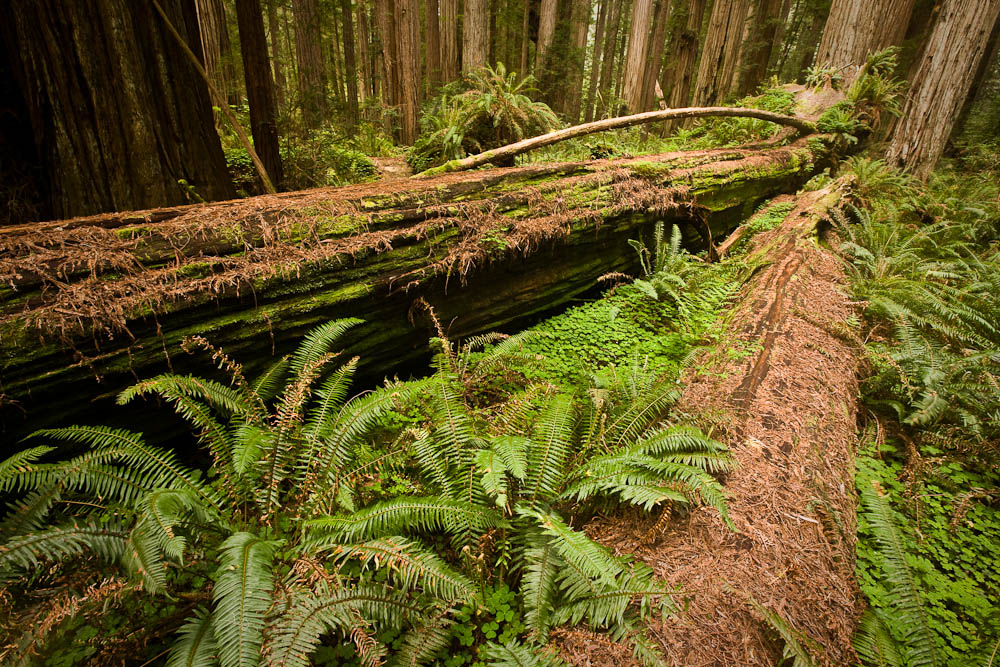
 Fallen Redwoods, Stout Grove, Jedediah Smith State Park, California.  Image Copyright Joe Decker

Fallen Redwoods, Stout Grove, Jedediah Smith State Park, California. Image Copyright Joe Decker

3. Watch those Verticals!

Wide-angle lenses tend to bend and distort verticals, as you can see in the tree trunks near the top of Fallen Redwoods. Now, you might decide you like that effect, or that you hate it, but it’s important to be aware of it and to make a conscious decision about it. For some images it’s fun to embrace, but more often I find myself having to work to avoid it or correct it later.  Avoiding it can be as simple a matter as composing so that there’s only a single obvious vertical (and that that’s vertical), alternatively, using shift movements with a tilt-shift lens can correct some of this distortion in-camera. Post-exposure, Photoshop’s “Lens Distort” filter can also save the day.

4. Leading Lines

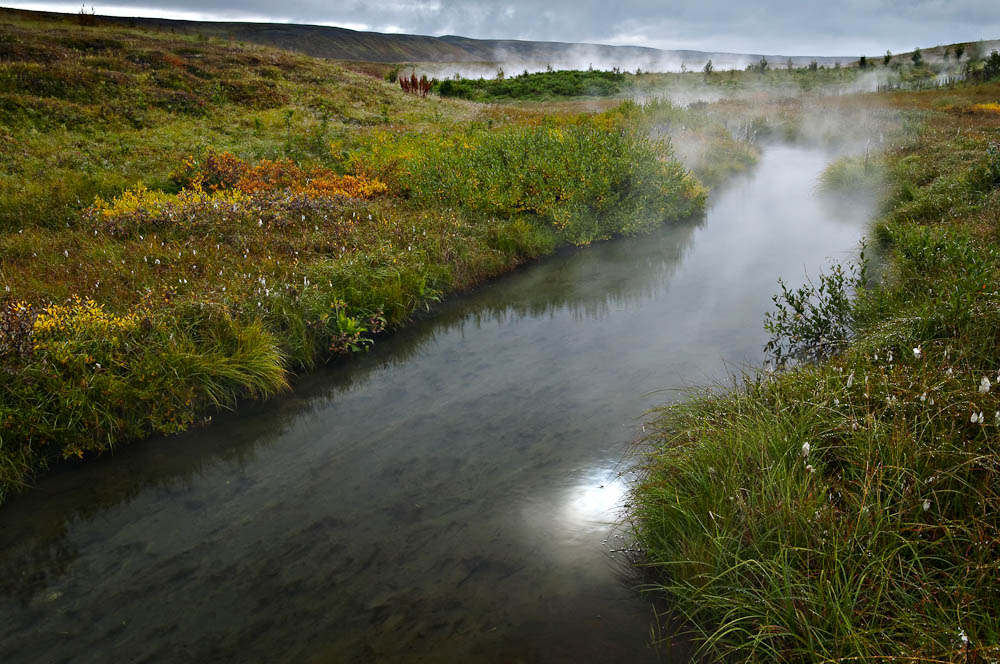
Compositionally, lines (such as streams or railway tracks) leading from the bottom corners of an image towards the center often have a particular magic for guiding the viewers eye through the picture, making for strong images, and this is particularly the case for wide-angle images. Hot Stream is a great example of this, the viewers eye tends to wander from the corner  back through the image along the stream. As the stream moves back into the image, the stream gets smaller (in terms of inches on the printed page) quickly due the wide perspective. This quick fade (in width) into the distance creates a real sense of depth in the image.

Hot Stream, Húsavík, Iceland.   Image Copyright Joe Decker

Hot Stream, Húsavík, Iceland. Image Copyright Joe Decker

5. Filter Woes

Shooting wide creates two problems for those of us who use filters. Polarizers are a specific problem, the effect of a polarizer on a blue sky varies across the sky so greatly that wide-angle images including the sky are left horribly unnatural, so leave off the polarizer unless you know there’s no blue sky in your scene. Screw-in filters are a separate problem, it’s all too easy for the filter edges, particularly if you’re stacking more than one filter on the same lens. Filter systems, such Cokin’s P-series filters (with the wide-angle filter holder), can help you avoid these problems if you must use filters.

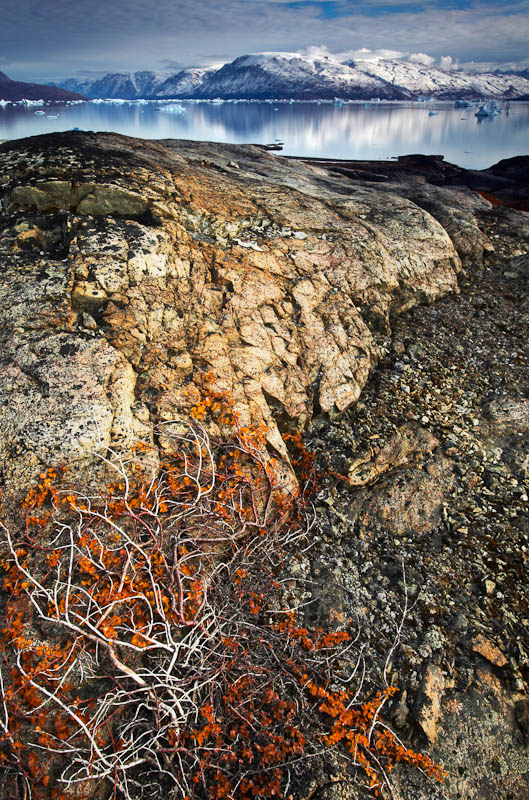
Dwarf Arctic Birch, C. Hofmann Peninusla, Greenland.  Image Copyright Joe Decker

Dwarf Arctic Birch, C. Hofmann Peninusla, Greenland. Image Copyright Joe Decker

6. Focusing

One of the things I enjoy most about working with wide-angle lenses is the ease of focusing them. As you move to wider and wider focal lengths, the depth-of-field at a particular aperture gets deeper and deeper. This allows you to make great use of the concept of hyperfocal distance, that is, the nearest distance you can focus a particular lens at a particular aperture and get “good focus”. At 24mm, by focusing about six feet out from the camera you’ll capture everything from about three feet to infinity in focus—even at f/11. At 17mm, focusing at the right point at f/11 will get you everything from infinity down to 17 inches away. Find (using a web site like this or any of a number of other sites, software tools or printed tables) and write down the hyperfocal distance for a couple of your widest lenses at a couple of your favorite apertures, and you’ll have an easy way of bringing the entire scene of near-far compositions into critical focus.

Using wide-angle lenses can certainly be tricky, but I love them all the same. Used well they can allow the photographer to create images that immerse us in a world with both small, intimate details and bold, dramatic vistas.

Joe Decker is a professional nature photographer and writer for Photocrati’s Photography Blog He also offers nature photography workshops and coaching around the western United States.

Post originally from: Digital Photography Tips.

Check out our more Photography Tips at Photography Tips for Beginners, Portrait Photography Tips and Wedding Photography Tips.

6 Winning Ways to Work Wide


Digital Photography School

 
Comments Off on 6 Winning Ways to Work Wide

Posted in Photography


Oh, Sleeper “Children Of Fire” Guitar Tablature Contest ENTRY (WINNING VIDEO)

16 Dec

This is my entry for the “Oh, Sleeper ‘Children Of Fire’ Tablature Contest.” Killer album by OS. Best to date. Go out and BUY it! EDIT: Well, turns out that I won the competition and the Jackson Warrior! Thanks for everyone’s very kind words! Thanks for watching 😉 Gear Used: Borrowed JACKSON JS-1 (busted headstock and only 22 frets!) with EMG 81/85 Borrowed AxeFX Ultra (Das Metal) Borrowed Nikon D7000 Trial of Sony Vegas Pro 10 Ibanez BTB (tuned up to C standard) POD X3 (Bulb’s Bass Patch) www.solidstaterecords.com
Video Rating: 4 / 5

CLICK HERE TO SIGN UP FOR MY MONTHLY NEWS LETTER: eepurl.com Pick up an “OH SNAP” T-Shirt! kreativevuetv.spreadshirt.com Follow me on these social outlets: www.un-WIREDTV.com http www.twitter.com www.instagram.com KreativeTechLA.blogspot.com http ================================================= Part1: Today’s video tutorial we’ll talk about the different file shooting formats available on your DSLR — RAW and Jpeg. There is much debate amongst photographers, amateurs and professionals alike, as to which format is better to shoot with. Well, this choice is very subjective and is based upon what you’re shooting. Consideration must be given to the amount of post production work you’ll be doing, as well as the venue. There are plenty of scenarios that call for JPEG and there are some that demand RAW. Ultimately, you’ll have to decided if you have the computing power and storage to go ballistic and shoot RAW for everything. I hope to provide some clarity on what these two sides are constantly battling over. Thanks for watching!
Video Rating: 4 / 5


Academy Award Winning Movie Trailer

25 Nov

Every Best Picture Nomination Ever. Director of Photography: Matt McBrayer Cast: Alex Anfanger Liz Apple Max Ash Dustin Chambers Michael Feinberg Emily Feinstein Jessy Hodges Emma Koenig Aria Mcmanus Grant O’Brien Daniel Platzman Al Thompson Kyle Williams Ramy Youssef Greg Zajac Original music by Daniel Platzman

 
Comments Off on Academy Award Winning Movie Trailer

Posted in Photography Videos


BF3 101 – Tips For Winning Firefights (Gameplay/Commentary)

22 Oct

www.youtube.com Click here to watch BF3 101: Chopper Pilot Badass School with Wrath (Battlefield 3 Gameplay/Commentary) BF3 101: Tips For Winning Firefights (Battlefield 3 Gameplay/Commentary) Sometimes you can learn more from a loss than a win. DIRECTOR’S CHANNEL: www.youtube.com Visit the NEW Inside Gaming Blog bit.ly – – – – – – – – – – – – – – – – – – – – – – – – – – – – – – – – – – – – – – This Respawn video will show you: How to shoot faces How to be ready like a ninja at all times How to cover your bro How to love Wrath How to play Battlefield 3 – – – – – – – – – – – – – – – – – – – – – – – – – – – – – – – – – – – – – – FOR MORE MACHINIMA, GO TO: www.youtube.com FOR MORE GAMEPLAY, GO TO: www.youtube.com FOR MORE SPORTS GAMEPLAY, GO TO: www.youtube.com FOR MORE MMO & RPG GAMEPLAY, GO TO: www.youtube.com FOR MORE ANIMATIONS & SHORTS, GO TO: www.youtube.com FOR MORE TRAILERS, GO TO: www.youtube.com
Video Rating: 4 / 5

A heart felt goodbye. Oh and Dead to Rights: Retribution along with Saturn Apartments, the first volume! One last dose of Manga Minutes! Manga Entertainment, a Starz Company, is the premiere entertainment source for anime enthusiasts worldwide. We specialize in the production and distribution of state-of-the-art animation for theatrical, television, Internet, DVD and home video release. For video channels, contests, up-to-date release information, trailers, and breaking anime news, visit www.manga.com today! Manga,Anime,OVA,Games,Japanime,Mecha,Monster,Samurai,Otaku,Saturn Apartments,Dead To Rights Retribution

 
Comments Off on BF3 101 – Tips For Winning Firefights (Gameplay/Commentary)

Posted in Animation Videos