RSS
 

Posts Tagged ‘Wildlife’

6 Tips for Capturing Action in Your Wildlife Photos

29 Nov

Even with the fastest lenses and top-end DSLR cameras, catching fast movement in your wildlife photos can be tricky. The physical speed of your autofocus may not be able to keep up with and track a moving subject. Away from the limitations of your equipment, you may find that you miss a flutter of wings or fight between two animals.

action-wildlife-photos-6

Luckily, there are some things you can do to overcome both problems. Here are my top tips for successfully capturing action in your wildlife photos.

#1 Pay Attention to Behavioural Cues

Animals are great at giving away information about what they are going to do next. If you pay real attention to the subjects you a photographing, then chances are you’ll be able to predict the future and have a better chance at capturing something awesome on camera. You can often apply a general rule to a class of animals, rather than having to learn hundreds of different cues from all sorts of different species. For example, when a bird is about to fly off, most will first lean forwards and appear “twitchy” before taking flight.

When photographing this greenshank, I saw it bathing in a puddle in a field. From my experience, I know that birds will fluff their  feathers or shake off water after bathing and preening. I composed the image properly then sat in wait with the subject in focus and my finger on the trigger. Eventually, probably after about 20 minutes of waiting, the bird stretched out its wings and I clicked the shutter.

wildlife photos

Being able to anticipate this behaviour made catching this moment possible. If I had tried to jump into action having seen the stretch, the action would have been over before I could even focus the camera. The same principle applied to the following image. I saw a black-headed gull dipping its head underwater washing itself. Soon after it finished, it threw droplets up into the air. Waiting in position made it possible.

action-wildlife-photos-7

#2 Don’t Use Live View

The live view mode on your DSLR camera shouldn’t be touched with wildlife photos. It makes tracking very difficult, and whenever you engage autofocus the live view goes off as the mirror flips down. Because of the way you end up holding the camera, things become unstable too. Instead, stick to using your viewfinder. It is so much easier to react quickly and track your subject that way.

Two hooded crows engaged in a scrap.

Two hooded crows engaged in a scrap.

#3 Use a Sufficient Shutter Speed

It goes without saying that if you have enough available light, then you should use a fast shutter speed to freeze movement. A general rule to avoid camera shake is 1 over the focal length of your camera. For example, a 400mm lens should have a shutter speed of at least 1/400th second to avoid camera blur.

However, this rule may not give you a shutter speed fast enough to freeze the subject. Animals often move quickly, so adjust it as required. 1/1000th second or more is a good bet for fast running or flying creatures. It’ll depend on what you are photographing, and how exactly you are shooting it, as to what shutter speed you should go for.

action-wildlife-photos-5

1/2000th, f/4, ISO 320

A good tip is to review your images, when possible, to check that your shutter speed is fast enough. Zoom in on the LCD and look for motion blur. If you spot any, then just increase your shutter speed.

#4 Don’t Stick to Your Tripod

If you are comfortable with handholding, then maybe you can ditch your tripod. Some tripod heads, like ball heads, can make things restrictive when you’re trying to follow a moving subject that stops and starts. Having to undo knobs to be able to move the camera slows you down.

Releasing your camera from the grips of your tripod will allow you to move freely. If you have it, then engage vibration reduction on your lens. This will help to get rid of camera shake, but you should be using a fast shutter speed so that shouldn’t prove a problem at all.

A lesser black-backed gull pins down an Atlantic puffin and steals its catch of sandeels.

A lesser black-backed gull pins down an Atlantic puffin and steals its catch of sand eels.

#5 Use Continuous Focus

Switch your camera to continuous focus mode so that you can track focus with a moving subject. If you continually have to refocus manually because your camera locks onto a spot once it achieves focus, then you’ll probably find you’re always one step behind the animal. Continuous focus mode will keep the plane of focus shifting.

Be sure to dive into your camera’s menu and find the setting which chooses whether achieving focus or pressing the shutter gets priority. Set it to the shutter, and then you can ensure you are able to fire off frames at the opportune moments.

#6 Lay in Wait

If you find that your equipment’s focusing motors are too slow and you can’t keep up with a moving animal, then you should change your approach. Look for patterns of behaviour, such as a route an animal may take regularly. Chances are there will be places where they pause. Focus there, and point your camera straight at it. Lay in wait, and once the animal moves into view, fire the shutter.

An Atlantic puffin (Fratercula arctica) coming into land at its burrow on the Farne Islands, Northumberland.

An Atlantic puffin (Fratercula arctica) coming in to land at its burrow on the Farne Islands, Northumberland.

If you’re following a bird in flight, try setting your focus to a plane the bird will pass through. Pan along with the animal (you’ll need to be in manual focus by this point), and hold down the shutter to utilise burst mode as it passes you. Hopefully, one of the shots will be in focus if you’ve timed it right. You’ll need to do this a number of times to adjust the focal plane to the optimum distance, and then have a bit of luck on your side!

googletag.cmd.push(function() {
tablet_slots.push( googletag.defineSlot( “/1005424/_dPSv4_tab-all-article-bottom_(300×250)”, [300, 250], “pb-ad-78623” ).addService( googletag.pubads() ) ); } );

googletag.cmd.push(function() {
mobile_slots.push( googletag.defineSlot( “/1005424/_dPSv4_mob-all-article-bottom_(300×250)”, [300, 250], “pb-ad-78158” ).addService( googletag.pubads() ) ); } );

The post 6 Tips for Capturing Action in Your Wildlife Photos by Will Nicholls appeared first on Digital Photography School.


Digital Photography School

 
Comments Off on 6 Tips for Capturing Action in Your Wildlife Photos

Posted in Photography


How to Expose Correctly for High Contrast Wildlife

25 Oct

Photographing wildlife of deeply contrasting colors, such as black bears or white waterfowl, can present certain challenges setting up shots that are properly exposed for the wildlife and also the surroundings. Harsh lighting also makes exposing for these subjects especially difficult. The hurdle to overcome in these cases is to expose for the subject animal(s) properly and still capture a scene that is pleasing to the viewer. What often results are images where the exposure is correct for the surroundings, but the creature is either under or overexposed.

Getting the subject wildlife exposed correctly is a more important aspect because the background can be dealt with later in post-production. In some cases, the background just doesn’t really matter in comparison to the photo capture of the often elusive wildlife in the scene.What follows are methods to use in stark color-contrasting situations. One is for dark colored wildlife such as black bears or ravens, and another for light colored wildlife such as egrets or swans.

What follows are methods to use in stark color-contrasting situations. One is for dark colored wildlife such as black bears or ravens, and another for light colored wildlife such as egrets or swans.

Exposure Details

A reality of photographing wildlife is that when things happen, they happen fast. Lighting may change very quickly and there may not always be time to make adjustments while shooting the action of the wildlife in view.

Most experienced photographers want control of all camera settings and don’t generally choose to shoot in auto modes for shutter speed and aperture in order to control movement and depth of field. So is there was a way to set the shutter speed and aperture and still get the correct exposure without the hassle of continually changing settings as the light changes?

There are many ways of shooting wildlife resulting in a desirable exposure, but probably one of the most overlooked ways is using the Auto ISO setting in Manual mode. To use this method, set the camera in Manual mode, adjust shutter speed and aperture to the settings desired, and then set the ISO to auto-ISO. Most cameras will allow you to set a maximum ISO, so it’s helpful to know at what ISO the images become unacceptably grainy with your camera. However, this still doesn’t entirely solve the problem of correctly exposing for those dark and light animal subjects. To solve these problems you can fine-tune the exposure by using exposure compensation.

Correcting the background in post-production

As in any image, if editing is planned it is important that the image be shot in RAW mode. When opening an image in Adobe Raw Converter (ARC) (or Lightroom) and if the exposure for the animal is correct in camera, then only the background may benefit from corrections in post. In most cases for wildlife images, the background hues are green, yellow or blue. To enhance or balance these colors in ARC, go to HSL/Grayscale panel and simply darken or lighten the luminance for green, yellow or blue until the background exposure appears to match the exposure of the animal. A little saturation may also be added. If a little punch or contrast would improve any background flatness, one may use an adjustment brush to add some contrast and clarity to the background. It’s that simple!

Dark Colored Wildlife

In this image the correct exposure for the black bear over-exposes the green background.

The luminance of the green has been adjusted to decrease the background exposure.

The dark hues of some wildlife will absorb more light than the scene around them, so it becomes necessary to increase the light taken in by the camera by using exposure compensation as mentioned above. For wildlife with dark colored coats or feathers, use exposure compensation and adjust by adding light (+value). This will suffice in most cases, depending on the amount of natural light available.

Keep in mind that the wild subject is the most important component in the image, so if any aspect of the image should be sacrificed in the moment, make it the background. For really dark creatures, such as bears, start out by using a compensation of +1. Remember, don’t worry about the background. The animal is the important exposure!

The exposure is correct for the black bird, but the background is washed out and boring.

Again, the luminance of the green has been adjusted. Then an adjustment brush has been used to add contrast, creating a vibrant background.

Light Colored Wildlife

Conversely, for light colored animals, use exposure compensation and adjust by subtracting light (- value). The whiter color of many beautiful creatures will reflect much more light than the background will, so it helps to decrease the light the camera takes in so as not to overexpose the animal.

In keeping the white egret from being overexposed, the background appears dull and dark.

The green and yellow hues were adjusted to add life to the background. Notice that in every case the exposure of the subject is unchanged.

Why can’t I just correct the exposure of the wildlife in post-production?

Of course, this is an option. But there at least two reasons for not correcting the exposure of the subject later on the computer.

  1. Any time a major exposure correction is undertaken, there is a certain amount of digital data of the image that is lost. Therefore, it is best to get the main subject of the image captured as closely as possible in camera. (This is true of any image, not only wildlife subjects.)
  2. When photographing extremely light colored animals, if the white is over-exposed to absolute white there is nothing that can be done in post-production to pull out any detail. Darkening the subject will not bring back any nuance in the creatures coloring, and the image will lose desirable texture. Again, conversely, if the black-coated bear or bird is underexposed to absolute black there is no way to lighten the subject and pull out interesting details from the fur or feathers.

What about the Eagle?

Some animals are doubly challenging as in the case of the American Bald Eagle, with its white head and dark body. These magnificent creatures are almost impossible to photograph in harsh light. If choosing which end of your histogram to sacrifice, my opinion is to expose for the white head.  Again, avoid harsh lighting if at all possible.

Conclusion

Remember, when you’re faced with a choice of settings for an extreme exposure while photographing wildlife, never sacrifice your subject. Whether a light or dark-coated bird or animal, intentionally set up the shot to capture the creature and its distinctive features and keep the background as a secondary consideration. To make sure the subject will be correctly exposed, use a 3-shot bracketed exposure, with an exposure one stop over and another exposure one stop under the setting.

Do you have any wildlife exposure tips? Please leave them in the comments below.

googletag.cmd.push(function() {
tablet_slots.push( googletag.defineSlot( “/1005424/_dPSv4_tab-all-article-bottom_(300×250)”, [300, 250], “pb-ad-78623” ).addService( googletag.pubads() ) ); } );

googletag.cmd.push(function() {
mobile_slots.push( googletag.defineSlot( “/1005424/_dPSv4_mob-all-article-bottom_(300×250)”, [300, 250], “pb-ad-78158” ).addService( googletag.pubads() ) ); } );

The post How to Expose Correctly for High Contrast Wildlife by Bruce Wunderlich appeared first on Digital Photography School.


Digital Photography School

 
Comments Off on How to Expose Correctly for High Contrast Wildlife

Posted in Photography


Wildlife Photographer of the Year 2016 winners announced

23 Oct

Wildlife Photographer of the Year 2016 winners announced

Entwined lives. Tim Laman, USA, Winner, Wildlife Photographer of the Year 2016

When we heard that the winners of the 2016 Wildlife Photographer of the Year competition had been announced, we were all ears. The shortlisted images released not long ago were incredibly striking, so we were eager to see which ones took the top prizes. The photo above by Tim Laman is the grand title winner, captured with a GoPro HERO4 Black, is a classic case of having your camera in the right spot at the right time. Keep reading to learn more about how his image was created and see other winning images from this year’s competition. 

Wildlife Photographer of the Year is developed and produced by the Natural History Museum, London.

Wildlife Photographer of the Year 2016 winners announced

Entwined lives. Tim Laman, USA / Wildlife Photographer of the Year
Winner, Wildlife Photographer of the Year 2016

GoPro HERO4 Black; 1/30 sec at f2.8; ISO 231

A young male orangutan makes the 30-metre (100-foot) climb up the thickest root of the strangler fig that has entwined itself around a tree emerging high above the canopy. The backdrop is the rich rainforest of the Gunung Palung National Park, in West Kalimantan, one of the few protected orangutan strongholds in Indonesian Borneo. The orangutan has returned to feast on the crop of figs. He has a mental map of the likely fruiting trees in his huge range, and he has already feasted here.

Tim knew he would return and, more important, that there was no way to reach the top – no route through the canopy – other than up the tree. But he had to do three days of climbing up and down himself, by rope, to place in position several GoPro cameras that he could trigger remotely to give him a chance of not only a wide?angle view of the forest below but also a view of the orangutan’s face from above. This shot was the one he had long visualized, looking down on the orangutan within its forest home. 

Wildlife Photographer of the Year 2016 winners announced

The moon and the crow. Gideon Knight, UK / Wildlife Photographer of the Year
Winner, Young Wildlife Photographer of the Year 2016

Canon EOS 7D Mark I + 400mm f5.6 lens; 1/250 sec at f6.3; ISO 500

A crow in a tree in a park: a common enough scene. It was one that Gideon had seen many times near his home in London’s Valentines Park, which he visits regularly to take photographs. But as the blue light of dusk crept in and the full moon rose, the scene transformed. The spindly twigs of the sycamore tree silhouetted against the sky ‘made it feel almost supernatural, like something out of a fairy tale,’ says Gideon. Positioning himself on a slope opposite, he tried to capture the perfect composition. But the crow kept moving along the branch and turning its head away, and so getting a silhouette of it with the moon in the frame meant Gideon had to keep moving, too. Then, just as the light was about to fade beyond the point that photography was possible, his wish came true, and an ordinary London scene turned into something magical. 

Wildlife Photographer of the Year 2016 winners announced

Eviction attempt, Ganesh H Shankar, India / Wildlife Photographer of the Year
Winner, Birds

Nikon D810 + 200mm f2 lens; 1/500 sec at f5; ISO 400; Gitzo 5540LS tripod + Sachtler 0707 FSB-8 fluid head

These Indian rose-ringed parakeets were not happy. They had returned to their roosting and nesting hole high up in a tree in India’s Keoladeo National Park (also known as Bharatpur Bird Sanctuary) to find that a Bengal monitor lizard had taken up residence. The birds immediately set about trying to evict the squatter. They bit the monitor lizard’s tail, hanging on for a couple of seconds at a time, until it retreated into the hole. They would then harass it when it tried to come out to bask. This went on for two days. But the action only lasted a couple of seconds at a time and was fast-moving. The branch was also high up, and Ganesh had to shoot against the light. Eventually the parakeets gave up and left, presumably to try to find another place to rear their young.

These Indian birds are highly adaptable, and escaped captive parakeets have founded populations in many countries. In Europe, where they are known as ring-necked parakeets, they are accused of competing for nest holes with some native species, such as nuthatches, and even bats, but in turn, other birds such as starlings are quite capable of evicting the parakeets from their nest holes.

Wildlife Photographer of the Year 2016 winners announced

Wind composition, Valter Binotto, Italy / Wildlife Photographer of the Year
Winner, Plants and Fungi

Nikon D4 + 200mm f4 lens; 1/80 sec at f10; ISO 200; remote shutter release; Gitzo tripod + Benro head; reflector

With every gust of wind, showers of pollen were released, lit up by the winter sunshine. The hazel tree was near Valter’s home in northern Italy, and to create the dark background, he positioned himself to backlight the flowers. Hazel has both male and female flowers on the same tree, though the pollen must be transferred between trees for fertilization.

Each catkin comprises an average of 240 male flowers, while the female flower is a small bud-like structure with a red-tufted stigma. The pollen-producing catkins open early in the year, before the leaves are out, and release huge amounts of pollen to be carried away by the wind. And now recent research suggests that bees may also play a role. The catkins are an important source of pollen for early bees and have a bee?friendly structure, while the red colour of the female flowers may entice insects to land on them.

‘The hardest part was capturing the female flowers motionless while the catkins were moving,’ explains Valter. ‘I searched for flowers on a short branch that was more stable.’ Using a long exposure to capture the pollen’s flight and a reflector to highlight the catkins, he took many pictures before the wind finally delivered the composition he had in mind. 

Wildlife Photographer of the Year 2016 winners announced

Nayan Khanolkar, India / Wildlife Photographer of the Year
Winner, Urban

Nikon D7000 + 18–105mm f3.5–5.6 lens at 21mm; 1/20 sec at f7.1; three Nikon flashes; Trailmaster infrared triggers; custom-made housing

At night, in the Aarey Milk Colony in a suburb of Mumbai bordering Sanjay Gandhi National Park, leopards slip ghost-like through the maze of alleys, looking for food (especially stray dogs). The Warli people living in the area respect the big cats. Despite close encounters and occasional attacks (a particular spate coinciding with the relocation of leopards from other areas into the park), the cats are an accepted part of their lives and their culture, seen in the traditional paintings that decorate the walls of their homes. The leopard is not only the most versatile of the world’s big cats but possibly the most persecuted. With growing human-leopard conflicts elsewhere grabbing the headlines, Nayan was determined to use his pictures to show how things can be different with tolerance and planning.

Once he had convinced the Warli people of his plan, they supplied him with valuable information, as well as keeping an eye on his equipment. Positioning his flashes to mimic the alley’s usual lighting and his camera so that a passing cat would not dominate the frame, he finally – after four months – got the shot he wanted. With a fleeting look of enquiry in the direction of the camera click, a leopard went about its business alongside people’s homes. Nayan hopes that those living in Mumbai’s new high-rise developments now impinging on the park will learn from the Warli how to co?exist with the original inhabitants of the land.

Wildlife Photographer of the Year 2016 winners announced

Playing pangolin, Lance van de Vyver, New Zealand/South Africa / Wildlife Photographer of the Year
Finalist, Black & White

Canon EOS 5DS R + 500mm f4 lens; 1/1600 sec at f4; ISO 1600

Lance had tracked the pride for several hours before they stopped to rest by a waterhole, but their attention was not on drinking. The lions (in South Africa’s Tswalu Kalahari Private Game Reserve) had discovered a Temminck’s ground pangolin. This nocturnal, ant-eating mammal is armour-plated with scales made of fused hair, and it curls up into an almost impregnable ball when threatened. Pangolins usually escape unscathed from big cats (though not from humans, whose exploitation of them for the traditional medicine trade is causing their severe decline).

But these lions just wouldn’t give up. ‘They rolled it around like a soccer ball,’ says Lance. ‘Every time they lost interest, the pangolin uncurled and tried to retreat, attracting their attention again.’ Spotting a young lion holding the pangolin ball on a termite mound close to the vehicle, Lance focused in on the lion’s claws and the pangolin’s scratched scales, choosing black and white to help simplify the composition. It was14 hours before the pride finally moved off to hunt. The pangolin did not appear to be injured, but it died shortly after, probably not just from the stress of capture but also from being out in the heat all day. 

Wildlife Photographer of the Year 2016 winners announced

Snapper party, Tony Wu, USA / Wildlife Photographer of the Year
Winner, Underwater

Canon EOS 5D Mark III + 15mm f2.8 lens; 1/200 sec at f9; ISO 640; Zillion housing; Pro One optical dome port

For several days each month (in tandem with the full moon), thousands of two?spot red snappers gather to spawn around Palau in the western Pacific Ocean. The action is intense as the fish fill the water with sperm and eggs, and predators arrive to take advantage of the bounty. Having read about the drama, Tony couldn’t understand why there were so few photos of it – until he hit the water there for the first time, in 2012. The currents were unrelenting – ideal for eggs to be swept swiftly away but a struggle for him to keep up with the fast?moving fish. Also, the light was low, and the water was clouded with sperm and eggs. That first attempt failed, but he has returned every year to try to capture the event.

Noticing that the spawning ran ‘like a chain reaction up and down the mass of fish’, his success finally came when he positioned himself so that the action came to him. Rewarded with a grandstand view, he was intrigued to see that the fish rapidly changed colour during mating from their standard red to a multitude of hues and patterns. Even their characteristic two white spots, close to the dorsal fin on their back, seemed to fade and reappear. On this occasion, with perfect anticipation, he managed to capture a dynamic arc of spawning fish amid clouds of eggs in the oblique morning light. Still obsessed by the dynamics and magnitude of this natural wonder, he will be returning to Palau next April to witness once again the spectacular snapper party. 

Wildlife Photographer of the Year 2016 winners announced

The aftermath, Simon Stafford, UK / Wildlife Photographer of the Year
Winner, Mammals

Nikon D810 + 800mm f5.6 lens; 1/500 sec at f5.6; ISO 400; beanbag

Eerie silence and a mound of lifeless bodies: the contrast with the mayhem of the previous day couldn’t have been starker. And the stench was already dreadful. The day before, thousands of wildebeest on migration through Kenya’s Maasai Mara National Reserve had massed at the Mara River, nervous of the crossing ahead and of the huge Nile crocodiles lying in wait. Once one made the leap, they all surged forward and the river became a maelstrom of flailing hooves and crocodiles. In their frantic efforts to get out, they carved gullies in the riverbank, and in over an hour, as the gullies became deeper and deeper, more and more wildebeest slipped back down and died under the hooves of the ones coming out of the river.

Simon returned at first light, knowing that scavengers would gather at the site of the carnage. ‘It was a sinister scene,’ he says. ‘There must have been 50 or more carcasses, piled two or three deep.’ Spotted hyenas were already feeding, and hippos and crocodiles had gathered in the river below. As Simon watched from the other side of the wide river, one hyena left the feast and stood, as if standing sentry, at the river’s edge watching the gathering of crocodiles in the water below.

Wildlife Photographer of the Year 2016 winners announced

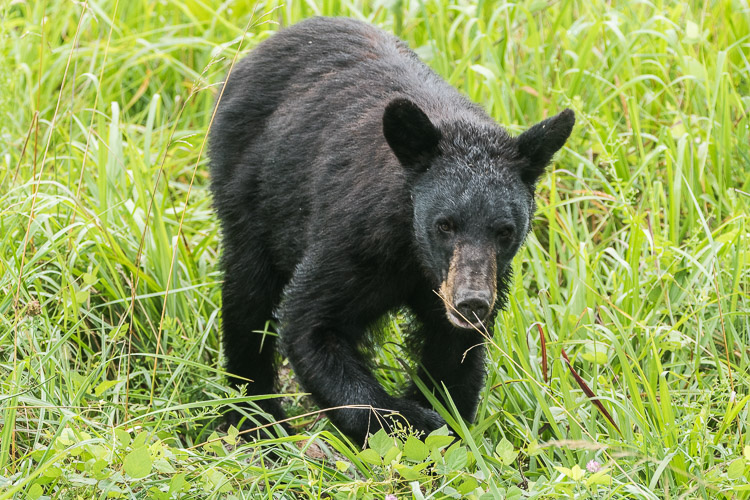
Wild West stand-off, Charlie Hamilton James, UK / Wildlife Photographer of the Year
Finalist, Mammals

Nikon D7100 + 10–24mm lens at 24mm; 1/2500 sec at f5.6; ISO 1600; Trailmaster TM550 passive infrared monitor

A grizzly bear charges at ravens trying to grab a piece of the feast. The bison is a road-kill that rangers have moved to a spot they use for carrion to avoid contact between predators and tourists. The location is Grand Teton National Park, part of the Greater Yellowstone ecosystem in the western US, where grizzlies still roam. ‘Approaching a bear’s lunch is a dangerous thing to do,’ says Charlie. So there were strict protocols for getting out of his vehicle every time he went to check his camera trap. Over nearly five months, he had thousands of images of ravens and vultures, but only a few of wolves or bears, and none were up to the high standards he set himself, until this one.

‘The moment I saw it, I was so excited. It had taken nearly five months to get a decent image out of the set-up. It’s rare that I like my images, but I really like this one – though I still get annoyed that the top raven is positioned right over the Grand Teton mountain.’ The Yellowstone grizzly population has been protected since the 1970s, but now that numbers are recovering, it is proposed that the population is removed from the federal list of protected species, allowing hunting outside the two parks. This has raised concerns not only about the grizzlies’ fate but also about the knock-on effect on the ecology.

Wildlife Photographer of the Year 2016 winners announced

The pangolin pit, Paul Hilton, UK/Australia / Wildlife Photographer of the Year
Winner, The Wildlife Photojournalist Award: Single image

Canon EOS 5D Mark III + 16–35mm f2.8 lens at 21mm; 1/800 sec at f8; Manfrotto tripod

Nothing prepared Paul for what he saw: some 4,000 defrosting pangolins (5 tons) from one of the largest seizures of the animals on record. They were destined for China and Vietnam for the exotic?meat trade or for traditional medicine (their scales are thought, wrongly, to treat a variety of ailments). Pangolins have become the world’s most trafficked animals, with all eight species targeted. This illegal trade, along with habitat loss and local hunting, means that the four Asian species are now endangered or critically endangered, and Africa’s four species are heading that way.

These Asian victims, mostly Sunda pangolins, were part of a huge seizure – a joint operation between Indonesia’s police and the World Conservation Society – found hidden in a shipping container behind a façade of frozen fish, ready for export from the major port of Belawan in Sumatra. Also seized were 96 live pangolins (destined to be force-fed to increase their size), along with 100 kilos (220 pounds) of pangolin scales (formed from keratin, the same substance in fingernails and rhino horn) worth some $ 1.8 million on the black market, and 24 bear paws. All had come from northern Sumatra. The dead pangolins were driven to a specially dug pit and then incinerated. The live ones were taken north and released in the rainforest. ‘Wildlife crime is big business,’ says Paul. ‘It will stop only when the demand stops.’

Articles: Digital Photography Review (dpreview.com)

 
Comments Off on Wildlife Photographer of the Year 2016 winners announced

Posted in Uncategorized


Take a peek at some of the contenders for Wildlife Photographer of the Year 2016

03 Sep

First Wildlife Photographer of the Year 2016 images

Splitting the catch. Audun Rikardsen / Wildlife Photographer of the Year

A 40 minute, 104°F wait for a hornbill to toss a termite. Hours in cold water waiting for a crowd of giant cuttlefish to strike the right pose. If there’s a lesson to be learned from this year’s Wildlife Photographer of the Year finalists, it’s the importance of patience in wildlife photography.

Now in its 51st year, the Natural History Museum’s Wildlife Photographer of the Year competition attracts entries from all over the world. Winning images will go on display at the London museum starting October 21st, but you can get an early preview of some of the finalists here. They’ve been selected from nearly 50,000 entries coming in from 95 countries. If the early results are any indication, we’re in for a treat when all of the winners are revealed.

Wildlife Photographer of the Year is developed and produced by the Natural History Museum, London.

First Wildlife Photographer of the Year 2016 images

Splitting the catch. Audun Rikardsen / Wildlife Photographer of the Year

Sometimes it’s the fishing boats that look for the killer whales and humpbacks, hoping to locate the shoals of herring that migrate to these Arctic Norwegian waters. But in recent winters, the whales have also started to follow the boats.

Here a large male killer whale feeds on herring that have been squeezed out of the boat’s closing fishing net. He has learnt the sound that this type of boat makes when it retrieves its gear and homed in on it. The relationship would seem to be a win-win one, but not always. Whales sometimes try to steal the fish, causing damage to the gear, and they can also become entangled in the nets, sometimes fatally, especially in the case of humpbacks. The search for solutions is under-way, including better systems for releasing any whales that get trapped.

Having grown up in a small coastal fishing community in northern Norway, Audun has always been fascinated by the relationship between humans and wildlife. And for several years, he has been trying to document the interactions between whales and fishermen. A specially designed, homemade underwater camera housing allows him take split?level pictures in low light. But he needs to get close to a whale, though not close enough to disturb it or be dragged under a boat’s side propeller. So having the fishermen’s permission to snorkel by their boats has been as important as being tolerated by the whales.

Canon EOS 5D Mark III + 11– 24mm f4 lens at 11mm + 1.2 Lee filter; 1/200 sec at f6.3; ISO 640; custom-made housing.

First Wildlife Photographer of the Year 2016 images

Termite tossing. Willem Kruger / Wildlife Photographer of the Year

Termite after termite after termite – using the tip of its massive beak-like forceps to pick them up, the hornbill would flick them in the air and then swallow them. Foraging beside a track in South Africa’s semi-arid Kgalagadi Transfrontier Park, the southern yellow-billed hornbill was so deeply absorbed in termite snacking that it gradually worked its way to within 6 metres (19 feet) of where Willem sat watching from his vehicle.

Though widespread, this southern African hornbill can be shy, and as it feeds on the ground – mainly on termites, beetles, grasshoppers and caterpillars – it can be difficult for a photographer to get a clear shot among the scrub. The bird feeds this way because its tongue isn’t long enough to pick up insects as, say, a woodpecker might, and though its huge bill restricts its field of vision, it can still see the bill’s tip and so can pick up insects with precision. What Willem was after, though, was the hornbill’s precision toss, which he caught, after a 40-minute, 40°C (104°F) wait.

Nikon D3S + 600mm f4 lens; 1/5000 at f4; ISO 800; Kirk WM-2 window mount + Benro GH-2 Gimbal tripod head.

First Wildlife Photographer of the Year 2016 images

Golden relic. Dhyey Shah / Wildlife Photographer of the Year

With fewer than 2,500 mature adults left in the wild, in fragmented pockets of forest in northeastern India (Assam) and Bhutan, Gee’s golden langurs are endangered. Living high in the trees, they are also difficult to observe. But, on the tiny man-made island of Umananda, in Assam’s Brahmaputra River, you are guaranteed to see one.

Site of a temple dedicated to the Hindu god Shiva, the island is equally famous for its introduced golden langurs. Within moments of stepping off the boat, Dhyey spotted the golden coat of a langur high up in a tree. The monkey briefly made eye contact and then slipped away. Today, there are just six left on the island, and, with much of the vegetation having been cleared, the leaf-eating monkeys are forced to depend mainly on junk food from visitors.

Canon EOS 500D + 55–250mm f5.6 lens; 1/250 sec at f5.6; ISO 1250.

First Wildlife Photographer of the Year 2016 images

Nosy neighbour. Sam Hobson / Wildlife Photographer of the Year

Sam knew exactly who to expect when he set his camera on the wall one summer’s evening in a suburban street in Bristol, the UK’s famous fox city. He wanted to capture the inquisitive nature of the urban red fox in a way that would pique the curiosity of its human neighbours about the wildlife around them.

This was the culmination of weeks of scouting for the ideal location – a quiet, well?lit neighbourhood, where the foxes were used to people (several residents fed them regularly) – and the right fox. For several hours every night, Sam sat in one fox family’s territory, gradually gaining their trust until they ignored his presence. One of the cubs was always investigating new things – his weeping left eye the result of a scratch from a cat he got too close to. ‘I discovered a wall that he liked to sit on in the early evening,’ says Sam. ‘He would poke his head over for a quick look before hopping up.’ Setting his focus very close to the lens, Sam stood back and waited. He was rewarded when the youngster peeked over and, apart from a flick of his ear, stayed motionless for long enough to create this intimate portrait.

Nikon D800 + 17–35mm f2.8 lens at 17mm; 1/6 sec at f4.5; ISO 800; Nikon SB-700 + SB-800 flashes; PocketWizard Plus III remote release; Manfrotto tripod.

First Wildlife Photographer of the Year 2016 images

The disappearing fish. Iago Leonardo / Wildlife Photographer of the Year

In the open ocean, there’s nowhere to hide, but the lookdown fish – a name it probably gets from the steep profile of its head, with mouth set low and large eyes high – is a master of camouflage.

Recent research suggests that it uses special platelets in its skin cells to reflect polarized light (light moving in a single plane), making itself almost invisible to predators and potential prey. The platelets scatter polarized light depending on the angle of the sun and the fish, doing a better job than simply reflecting it like a mirror. This clever camouflage works particularly well when viewed from positions of likely attack or pursuit.

What is not yet clear is whether the fish can increase its camouflage by moving the platelets or its body for maximum effect in the ocean’s fluctuating light. The lookdowns’ disappearing act impressed Iago, who was free-diving with special permission around Contoy Island, near Cancun, Mexico. Using only natural light, he framed them against a shoal of grey grunt to highlight the contrast between them.

Canon EOS 5D + 20mm f2.8 lens; 1/320 sec at f11; ISO 400; Ikelite housing.

First Wildlife Photographer of the Year 2016 images

Blast furnace. Alexandre Hec / Wildlife Photographer of the Year

When the lava flow from Kilauea on Hawaii’s Big Island periodically enters the ocean, the sight is spectacular, but on this occasion Alexandre was in for a special treat.

Kilauea (meaning ‘spewing’ or ‘much spreading’) is one of the world’s most active volcanoes, in constant eruption since 1983. As red-hot lava at more than 1,000°C (1,832?F) flows into the sea, vast plumes of steam hiss up, condensing to produce salty, acidic mist or rain. Alexandre witnessed the action and returned in an inflatable the following evening to find that a new crater had formed close to the shore.

Capturing the furious action in a rough sea was no easy task. From 100 metres (328 feet) away, he was blasted with heat and noise – ‘like a jet taking off’. In a moment of visibility, his perseverance paid off, with a dramatic image of glowing lava being tossed some 30 metres (98 feet) into the air against the night sky.

Nikon D300 + 70–200mm f2.8 lens at 70mm; 1/350 sec at f4; ISO 800.

First Wildlife Photographer of the Year 2016 images

Playing pangolin. Lance van de Vyver / Wildlife Photographer of the Year

Lance had tracked the pride for several hours before they stopped to rest by a waterhole, but their attention was not on drinking. The lions (in South Africa’s Tswalu Kalahari Private Game Reserve) had discovered a Temminck’s ground pangolin. This nocturnal, ant-eating mammal is armour-plated with scales made of fused hair, and it curls up into an almost impregnable ball when threatened.

Pangolins usually escape unscathed from big cats (though not from humans, whose exploitation of them for the traditional medicine trade is causing their severe decline). But these lions just wouldn’t give up. ‘They rolled it around like a soccer ball,’ says Lance. ‘Every time they lost interest, the pangolin uncurled and tried to retreat, attracting their attention again.’

Spotting a young lion holding the pangolin ball on a termite mound close to the vehicle, Lance focused in on the lion’s claws and the pangolin’s scratched scales, choosing black and white to help simplify the composition. It was 14 hours before the pride finally moved off to hunt. The pangolin did not appear to be injured, but it died shortly after, probably not just from the stress of capture but also from being out in the heat all day.

Canon EOS 5DS R + 500mm f4 lens; 1/1600 sec at f4; ISO 1600.

First Wildlife Photographer of the Year 2016 images

Thistle-plucker. Isaac Aylward / Wildlife Photographer of the Year

Try keeping a flying linnet in sight while scrambling down rocky embankments holding a telephoto lens. Isaac did, for 20 minutes. He was determined to keep pace with the linnet that he spotted while hiking in Bulgaria’s Rila Mountains, finally catching up with the tiny bird when it settled to feed on a thistle flowerhead.

From the florets that were ripening, it pulled out the little seed parachutes one by one, deftly nipped off the seeds and discarded the feathery down. Isaac composed this alpine-meadow tableau with the sea of soft purple knapweed behind, accentuating the clashing red of the linnet’s plumage.

Canon EOS 1200D + 75–300mm f5.6 lens; 1/640 sec at f5.6; ISO 400.

First Wildlife Photographer of the Year 2016 images

Collective courtship. Scott Portelli / Wildlife Photographer of the Year

Thousands of giant cuttlefish gather each winter in the shallow waters of South Australia’s Upper Spencer Gulf for their once-in-a-lifetime spawning. Males compete for territories that have the best crevices for egg?laying and then attract females with mesmerizing displays of changing skin colour, texture and pattern.

Rivalry among the world’s largest cuttlefish – up to a metre (3.3 feet) long – is fierce, as males outnumber females by up to eleven to one. A successful, usually large, male grabs the smaller female with his tentacles, turns her to face him (as here) and uses a specialized tentacle to insert sperm sacs into an opening near her mouth. He then guards her until she lays the eggs. The preoccupied cuttlefish (the male on the right) completely ignored Scott, allowing him to get close.

A line of suitors was poised in the background, waiting for a chance to mate with the female (sometimes smaller males camouflage themselves as females to sneak past the male). Scott’s hours in the cold water were finally rewarded when the onlookers momentarily faced the same way, and he framed the ideal composition.

Canon EOS 5D Mark III + 15mm f2.8 lens; 1/200 sec at f18; ISO 320; Seacam housing; two Ikelite DS161 strobes.

First Wildlife Photographer of the Year 2016 images

Swarming under the stars. Imre Potyo? / Wildlife Photographer of the Year

Imre was captivated by the chaotic swarming of mayflies on Hungary’s River Rába and dreamt of photographing the spectacle beneath a starlit sky. For a few days each year (at the end of July or beginning of August), vast numbers of the adult insects emerge from the Danube tributary, where they developed as larvae. On this occasion, the insects emerged just after sunset.

At first, they stayed close to the water, but once they had mated, the females gained altitude. They filled the air with millions of silken wings, smothering Imre and his equipment in their race upstream to lay their eggs on the water’s surface. Then they died, exhausted, after just a few hours. This ‘compensatory flight’ – sometimes as far as several kilometres upstream – is crucial to make up for the subsequent downstream drift of the eggs and nymphs, and luckily for Imre, it was happening under a clear sky.

To capture both the mayflies and the stars, he created an in-camera double exposure, adjusting the settings as the exposure happened. A flashlight added the finishing touch, tracing the movement of the females on their frantic mission.

Nikon D90 + Sigma 17–70mm f2.8–4.5 lens at 17mm; double exposure 1.3 sec at f14 and 30 sec at f3.2; ISO 800; in?camera flash; flashlight; Manfrotto tripod + Uniqball head.

Articles: Digital Photography Review (dpreview.com)

 
Comments Off on Take a peek at some of the contenders for Wildlife Photographer of the Year 2016

Posted in Uncategorized


Why Semi-automatic Mode is the Best Choice for Wildlife Photography

14 Aug

There is a mindset that a lot of photographers seem to have around anything but manual mode is cheating. Not only does this frustrate me as a statement, but it’s just bad advice, that hinders the photographic progress of others. I would argue that there’s no cheating in photography, and that using your camera in fully manual modes actually makes it harder to achieve the photo you’re looking for – so let’s take a look at why semi-automatic modes are a good choice for wildlife photography.

Tracking this puffin in flight, I'd never be able to change the settings quick enough if I was in full manual mode.

Tracking this puffin in flight, I’d never be able to change the settings quick enough if I was in full manual mode.

Now I’d never recommend anyone use full automatic modes. They are a pain in the backside, to be frank. The camera focuses wherever it sees fit, seemingly changing its mind on a day to day basis. The setting are often wrong, since you have no bearing over how the exposure triangle is balanced (other than a little bit of exposure compensation). For wildlife photographers, this is a pretty poor choice of mode.

However, what I do recommend is that you run with a semi-automatic mode. Because with wildlife, everything is so unpredictable that there is little chance you can spin the wheels, and react to changing conditions fast enough in manual mode. Picture this: you’re photographing an eagle swooping down from the sky to catch a fish from the water. It’s moving through many different ambient light conditions, from looking up towards the sky, all the way down to the water, and away again. You can’t accurately change the settings quick enough.

semi-automatic modes

Northern Gannet

So what can you do? Use a semi-automatic mode. It’s definitely not cheating, and is a choice favoured by almost all wildlife photographers in the industry. It’s not to say that we can’t run the camera in manual mode – and that’s definitely something you should learn to do – but rather that there is no point putting such a simple task as adjusting the shutter speed, in the way of you composing a stunning wildlife image.

Choosing a semi-automatic mode

There are a few choices you can make here when it comes to semi-auto modes. Let’s take a look at the best choices.

Aperture Priority Mode

This is my personal favourite. Aperture priority mode allows you to set the aperture you require, leaving the camera to adjust the shutter speed automatically, in order to balance the exposure. You can increase your ISO should the light become a limiting factor, letting the camera increase the shutter speed as a result. But you still have total control really, because all you need to do is adjust your exposure compensation to fine-tune the resulting photo.

DSC_2260

Exposure compensation allows you to retain control and properly expose a photo, even in a partly automatic mode.

A wide aperture often favours wildlife photographs, as it allows for a nice, soft bokeh, that isolates the subject from the background. This is what often gives a wildlife image a sense of quality, although I am a big believer in breaking the rules and actually including the background in your shots. For this reason, aperture priority often makes sense as you are able to control the setting that can make or break a photo.

Shutter Priority Mode

This is definitely not the mode you want to be in, if you’re going to involved in wildlife photography. Chances are you’ll be setting your shutter speed high – and probably too high at that. Wildlife is most active at dawn and dusk, and while you may find it relatively easy to see, it is surprising how little light is available to the camera, especially if you’re shooting with a lens slower than f/2.8. With a shutter speed dialed down, the camera only has so far it can go in increasing the aperture before the photo starts to become underexposed. Conversely, with aperture priority mode there is no real limit to how fast or slow the shutter speed can go – the worst thing that may happen is you get a blurred image, although this can sometimes come off artistically.

Note: Stay away from shutter priority mode for wildlife photography!

Two hooded crows engaged in a scrap.

Two hooded crows engaged in a scrap.

Manual Mode with Auto ISO

This is a popular choice amongst wildlife photographers too, although I have yet to use it myself. By sticking the camera into manual mode, but leaving the ISO set to automatic, you retain control over both aperture and shutter speed, allowing the camera to adjust the ISO to balance the exposure. Personally, I like to have control over the ISO, as I feel this can ruin an image.

This mode does allow you to ensure you have the desired aperture and shutter speed for proper effect, but consequently you may not notice that your ISO is increasing quickly as light conditions drop. The worst thing to find is a photo that looks fantastic on your camera’s LCD, until you return to your studio and find it is peppered with digital noise.

Even so, getting into a good habit of checking the ISO settings periodically during a shoot, will mean this is no longer a problem. With experience you’ll learn what the limits tend to be for certain ambient conditions, before the ISO gets ramped up.

semi-automatic modes

You still have full control in semi-automatic modes, allowing you to achieve more unusual images.

You also still retain the ability to use exposure compensation while ISO is set to auto. This allows you to fine-tune the exposure, just like with aperture and shutter priority modes.

So which mode should you use?

Now we’ve looked at three different semi-automatic modes you’re probably wondering which you should go for? Well, you know what I think about shutter priority mode. Other than that, it’s essentially up to you. If you want to be entirely confident in your aperture and shutter speed, then opt for manual with auto ISO.

Thanks to a semi-automatic mode, I was ready for action when this woolly monkey surprised me in the Amazon rainforest. Manually mode would have rendered my efforts useless in such a fleeting moment.

Thanks to a semi-automatic mode, I was ready for action when this woolly monkey surprised me in the Amazon rainforest. Manual mode would have rendered my efforts useless in such a fleeting moment.

If, like me, you find the prospect of an unacceptably high ISO speed creeping up on you, then stick to aperture priority mode. Professionals use both modes, and either can result in great success with the right photographer behind it. It’s just getting used to the mode of choice, and playing to the relative advantages each one brings with it.

You’re going to feel the limitations of either mode as light drops, but I always say that a slightly blurred image (or risk of one from a slow shutter speed) is better than a photo rendered unusable thanks to digital noise.

googletag.cmd.push(function() {
tablet_slots.push( googletag.defineSlot( “/1005424/_dPSv4_tab-all-article-bottom_(300×250)”, [300, 250], “pb-ad-78623” ).addService( googletag.pubads() ) ); } );

googletag.cmd.push(function() {
mobile_slots.push( googletag.defineSlot( “/1005424/_dPSv4_mob-all-article-bottom_(300×250)”, [300, 250], “pb-ad-78158” ).addService( googletag.pubads() ) ); } );

The post Why Semi-automatic Mode is the Best Choice for Wildlife Photography by Will Nicholls appeared first on Digital Photography School.


Digital Photography School

 
Comments Off on Why Semi-automatic Mode is the Best Choice for Wildlife Photography

Posted in Photography


5 Tips for Getting Started with Wildlife Photography for Beginners

26 Jul

There is just something about the natural world that seems to touch us humans to the very core of our being, especially when it involves wildlife of any form. When we hear the words “wildlife photography”, wide open planes of the African Savannah with herds of zebras, wildebeests and antelope come to mind.

But that is just one part of the natural world pie! Don’t get me wrong, visiting Africa and going on safari are really high on my bucket list of places to visit and things to photograph, but I get equally excited when I am hiking in a national park that is frequented by bears, bison, eagles and pronghorn deer. There are several brilliant wildlife photographers out there, and every image they produce has a jaw-dropping reaction from most of their fans and followers. If you spend some time and really study their work, you will notice a consistent method to their approach. There are some simple basic guidelines that budding wildlife photographers can follow to creating their own Kodak moments!

Here are a few things to keep in mind for a safe, productive, and exciting wildlife photography trip.

1 – Research and planning

Memorable Jaunts Getting started with wildlife photography-5

I spent three hours of the afternoon exploring the wonderful forest lodge at Jim Corbett National Park in India because the park roads closed in the afternoon hours to allow animals to move about freely in the jungle without the noise created by countless jeep safaris – something that is not mentioned in most guide books.

Traveling itself is one of those tasks that needs an incredible amount of planning and research. So it is no surprise that when you are planning a wildlife photography expedition, you need to add a lot more to the mix. Scope out the best places to photograph animals, the best time of day, travel times to and from, as well as any permits and paperwork needed, well ahead to time to avoid any disappointments once you get to the location.

Memorable Jaunts Getting started with wildlife photography-15

Once we were back in the park on our safari, I was able to see this juvenile elephant walk across the path on his way to the deep jungle.

2 – Selecting the right gear

This is a very important part of any photographic expedition and quite possibly an article in itself. Choosing the right gear for your wildlife excursions is key. A lot of factors will determine what lens and cameras you need to carry with you.

Are you primary going to be traveling in a car? If so, you could bring more than one camera, and a long telephoto lens. Are you going hiking/camping, and will you be constantly on the move while looking for animals? If so, then maybe you’ll need to limit yourself to one camera, and a medium telephoto lens to reduce your load. Is there a possibility for you to get up-close and personal with the animals? Then, carry a smaller focal length like an 85mm or 50mm lens.

Are you planning on photographing landscapes too? You may need a wide angle lens if so. Will you have access to your computer frequently? If not, you may need a portable external hard drive to backup your images. How many batteries do you need?

As you can tell, having a plan for where, and what you are looking to photograph, is really critical in determining what gear you pack.

Memorable Jaunts Getting started with wildlife photography-3

Driving around in Yellowstone National Park one December morning found me face to face with this coyote (above) – who was simply enjoying his morning run. I was too surprised to remember the appropriate lens choice, camera setting, etc. I just took the snap, and while it may not be technically perfect, it is one of my favorite images. Just look at the trot in his paws.

Memorable Jaunts Getting started with wildlife photography-8

On the other hand, a photographic expedition into Yellowstone National Park a few days later gave me a chance to use a 400mm super telephoto lens to capture this moose feeding along the hillside.

3 – Safety

When doing wildlife photography, it is very important to keep safely in mind. It doesn’t matter if you are going on safari, or hiking alone in national parks. Wild animals by nature are unpredictable, and it would behoove us to remember that we are in their space, and we need to be respectful of that.

Rules and guidelines in wilderness areas are there for a reason – your safety and security. Make sure you follow them so that you, or others around you, don’t get hurt or injured. Whenever possible, travel in a group, or at least with one other person. There is security in numbers, and that can work to your advantage.

Seek help from experts who have made the journey before you and listen to their advice. Hiking a nesting area or denning area is never a good idea, for a reason! Take care of your gear. Especially if you are away in remote locations, you don’t want to be careless and risk your gear malfunctioning just when you need it. Dust and dirt are difficult to clean when you are out in the field.

Memorable Jaunts Getting started with wildlife photography-10

On a 10 mile alpine hike in Glacier National Park in Montana, USA, the only gear I could comfortably carry was my 24-70mm lens and I was able to snap this picture. Not the closeup I really wanted, but this conveys a message unlike any closeup shot I could have gotten. Bonus points for spotting what everyone was looking at!

4 – Practice and patience

Wildlife photography, like most other genres, needs a lot of practice, and an even greater amount of patience. People spend hours and hours to get the perfect shot – often in less than perfect conditions like the cold, rain, and even overnight in a bind waiting for the sunrise shot. So depending on what you are looking to photograph, be prepared to be patient and wait it out.

Practicing is a little harder to accomplish unless you happen to live close to a national park or wildlife frequented area. A good alternative may be to spend time at the local zoo and try to capture photographs of animals there. A lower cost alternative to testing out your gear as well as playing around with settings.

You could also try this – Guide to Attracting Critters to Your Garden for Backyard Wildlife Photography

Memorable Jaunts Getting started with wildlife photography-12

A pond close to my house is a watering hole for many birds during the spring and summer months. I am always out there practicing trying to get a clear shot of these cranes feeding. Perhaps one of these days, lady luck will be on my side!

5 – Enjoy the experience beyond the camera LCD

I don’t know about you, but I absolutely hate experiencing my vacation through the back of my camera. My life is quite busy and hectic with kids, family, and a full time business. Vacations are always a welcome, and much needed break to get away from it all, and time to do the things we all enjoy.

Yes, I absolutely want to capture moments through my camera, but I also want to be physically, and emotionally present with my family. I am just as happy seeing that exotic bird or that elusive wild animal with my own eyes, as I am getting a shot of it – I don’t need to prove it to the world!

Memorable Jaunts Getting started with wildlife photography-9

While we were hiking in Glacier National Park in Montana, we saw a wolverine – yes, we truly did! About 10 minutes after this photo was taken, the path turned really narrow with a steep incline, so I did the most sensible thing I could do, and put the camera away. A few minutes after that, we saw a brown patch of fur run along the path! A ranger later confirmed that a wolverine was frequenting the area we had just hiked. Yes, I have no photographs to prove it, but I have the most wonderful memory of seeing one of the rarest (to see) animals in the wild! Wolverines are a shy species, so don’t expect to see one out in the wild. They live in dens made out of snow tunnels, rocks and boulders and can be found in remote forests and tundra.

What are some of the most interesting wild animals you have photographed? Share your experiences in the comments below.

googletag.cmd.push(function() {
tablet_slots.push( googletag.defineSlot( “/1005424/_dPSv4_tab-all-article-bottom_(300×250)”, [300, 250], “pb-ad-78623” ).addService( googletag.pubads() ) ); } );

googletag.cmd.push(function() {
mobile_slots.push( googletag.defineSlot( “/1005424/_dPSv4_mob-all-article-bottom_(300×250)”, [300, 250], “pb-ad-78158” ).addService( googletag.pubads() ) ); } );

The post 5 Tips for Getting Started with Wildlife Photography for Beginners by Karthika Gupta appeared first on Digital Photography School.


Digital Photography School

 
Comments Off on 5 Tips for Getting Started with Wildlife Photography for Beginners

Posted in Photography


7 Tips for Better Marine Wildlife Photography

19 Jul

I’m an ocean girl. To me, there is no better way to spend a summer day than to get out on the water and explore the mystery that is the deep blue sea, and hopefully experience some of the majestic creatures that live in it and on it.

Whether you are photographing on shore or from a boat, there are a few tips that will help you improve your marine wildlife photography. Underwater photography, though, is an entirely different thing, with a different set of techniques, that are not covered in this article.

Humpback whale breaching near Campbell River, British Columbia

Humpback whale breaching near Campbell River, British Columbia

The photos in this article were all made in the cool waters off the west coast of North America, but the same tips apply to marine photography all over the world.

1 – Explore the Shore

Let’s start with the shore where you’ll find all sorts of sea creatures. Check the tide tables, and if you can find a rocky beach at low tide. You’ll discover all the animals that live in the shallow tide pools such as urchins, sea anemones, starfish, mollusks and crabs.

Mollusks in a Tide Pool in Big Sur, California

Mollusks in a Tide Pool in Big Sur, California

Except for the crabs, they don’t seem to mind your presence one bit, so you can get some practice photographing the creatures that don’t notice you. Crabs sometimes pay attention, but if you don’t get too close, you may find they come out of the tide pools, and out from under rocks, and sometimes put on a bit of a show. I photographed this crab in Big Sur, California, where it came out from a crack in the rocks, and proceeded to make all sorts of bubbles as it began molting.

Crab at Big Sur, California

Crab at Big Sur, California

Close to shore, you may also be able to photograph sea otters and river otters (which are also found in salt water). Like other animals, given enough space and time to get used to you, they will go about their daily tasks in your presence, even looking directly at you (and your camera) allowing you to make images that feel intimate.

River Otters, Redwood National Park, California

River Otters, Redwood National Park, California

You’ll also find all kinds of sea birds to photograph such as gulls, geese, ducks, cormorants, and eagles.

2 – Get Out in the Deep

My favourite way to photograph marine wildlife is to get out in a boat. Whether you kayak, row, paddle, sail or use a power boat, there’s nothing like the freedom a boat gives you when it comes to exploring the ocean and finding wildlife. If you don’t have access to a boat, consider renting one. Or, try a whale watching tour, which are well worth the money for the photo opportunities they provide including whales, dolphins, seals, and sea lions.

Orcas and commercial fishing boats near San Juan Island, Washington.

Orcas and commercial fishing boats near San Juan Island, Washington.

Weather makes all the difference between an enjoyable day on the water, and those days that make you feel a little on the green side. Check the weather forecast before choosing your day, and once you are out there, keep an eye on changing conditions to stay safe.

If you are driving the boat yourself, and you expect some choppy seas, you should keep your camera safe and dry while underway. I store mine in a Pelican case, which is shockproof and waterproof, so I don’t have to worry about my camera while driving the boat. When shooting, try not to get splashed because salt water can do a lot of damage to your camera.

Sea lions basking on rocks near Vancouver Island, British Columbia.

Sea lions basking on rocks near Vancouver Island, British Columbia.

3 – Shoot Handheld

For marine wildlife photography, shooting handheld gives you the freedom to move quickly, as the animals do. Unless you are photographing animals that don’t move very much in the tide pools, a tripod or monopod can slow you down and you’ll likely miss the shot. They are also not very practical on boats.

Instead, use a high ISO, a fast shutter speed, and shoot handheld. Remember to turn your image stabilization on to prevent any camera shake blur. I usually start out with ISO 400 and a shutter speed of 1/1,000th of a second, then make changes based on lighting conditions and the speed the animals are moving. For dolphins and whales, an even faster shutter speed may be required.

Pacific White Sided Dolphin in Johnstone Strait, British Columbia

Pacific White Sided Dolphin in Johnstone Strait, British Columbia

4 – To Polarize or Not?

When shooting in tide pools, a polarizing filter can be helpful to cut through the glare of light reflecting off the surface of the water, and allow you to see through to the creatures that are underwater. Aside from that however, I don’t generally use a polarizing filter because the cost of doing so is about one stop of light. If I’m not trying to see through the water, I would rather have that stop of light for a faster shutter speed, or a lower ISO for better image quality.

5 – Lenses

You’ll need a variety of lenses for shooting marine wildlife. If you are shooting birds and whales, you’ll need a long telephoto lens to get you close enough to make an image with impact. I like to use a 70-300mm zoom lens or a 400mm prime lens for most of my marine wildlife photography.

Dolphins, on the other hand, will require a wide angle lens because they tend to get very close to the boat. My favourite lens for dolphins is my 11-35mm. So bring a variety of lenses along, and just make there is no salt water spraying around when you switch lenses.

Bald Eagle in Campbell River, British Columbia.

Bald Eagle in Campbell River, British Columbia.

6 – Focus Modes

When photographing the creatures that don’t move too much, one shot auto focus or even manual focus is fine. But when shooting animals that move fast, you’re better off using continuous autofocus mode because it locks on to your subject and tracks its movement, increasing your chances of getting a sharp image. It’s not easy though. Getting focus fast enough to capture the moment is probably the biggest challenge in this type of photography.

7 – Respect the Animals

When you are so close that your presence changes the animal’s behaviour, you are too close. Respect their space by using a longer lens, instead of getting too close. Don’t forget, in most areas there are rules about how close you can get to marine wildlife, especially whales. Usually it is around 100 meters or 100 yards, so check the rules (laws) in your area before heading out.

Cormorants on Middlenatch Island, British Columbia.

Cormorants on Middlenatch Island, British Columbia.

I hope these tips help you capture the sometimes elusive, but majestic creatures of the sea, the next time you explore the shoreline or go on a boating adventure.

This week we are doing a series of articles to help you do better nature photography. See previous articles here:

  • 3 Habits Every Outdoor Photographer Should Develop to Avoid Missing Shots
  • 5 Tips for Better Nature Photography
  • 27 Serene Images of the Natural World
  • Weekly Photography Challenge – Nature
  • 10 Ideas for Photographing Nature in your Backyard
  • 6 Tips for Capturing Character and Personality in Wildlife Photography
  • 5 Tips for Setting the Focus in Your Landscape Photography

googletag.cmd.push(function() {
tablet_slots.push( googletag.defineSlot( “/1005424/_dPSv4_tab-all-article-bottom_(300×250)”, [300, 250], “pb-ad-78623” ).addService( googletag.pubads() ) ); } );

googletag.cmd.push(function() {
mobile_slots.push( googletag.defineSlot( “/1005424/_dPSv4_mob-all-article-bottom_(300×250)”, [300, 250], “pb-ad-78158” ).addService( googletag.pubads() ) ); } );

The post 7 Tips for Better Marine Wildlife Photography by Anne McKinnell appeared first on Digital Photography School.


Digital Photography School

 
Comments Off on 7 Tips for Better Marine Wildlife Photography

Posted in Photography


6 Tips for Capturing Character and Personality in Wildlife Photography

18 Jul

If you want to take your wildlife photography to the next level, then you need to look at capturing the character and personality of an animal. This makes for a much more appealing image, rather than simply a bird on a stick. A photo always needs to tell a story, but I think many photographers don’t realize that this applies to wildlife photography too.

Even though we can’t directly relate to most wild animals, it is still possible to document a story through a single image, or a sequence of images.

Tufted Capuchin

Tufted Capuchin

Without anthropomorphising animals, many do have their own personalities. I am doubtful this applies to something like an ant, but mammals in particular can be observed to have particular traits and habits. Some may be bold and investigate new things, whereas others may retreat and shy away from disturbances. This can be seen as the animal’s personality, and it is up to us as wildlife photographers to capture this on camera.

It’s definitely not easy though, as stills photography captures one moment in time and freezes it forever. Working with video makes it far easier to convey character, but it’s not impossible to do it in a single frame. Here are some tips to help you get character in your wildlife photography.

#1 – Behaviour

As a zoologist, I am fascinated by animal behaviour. Some behaviours we see as normal and predictable, whereas others shock and surprise us. Did you know that fish swallow small stones to aid digestion?

It’s capturing these interesting behaviours on camera that properly conveys the essence of a particular species. When you’re behind the camera, it’s easy to stare through the viewfinder and get tunnel vision. But if you step back and study an animal, reading up about it beforehand, you’ll learn what you need to look out for. Many animals have giveaway moves that warn you of an impending display – which is the case with great skuas, a seabird found in the northern hemisphere.

great skua

Great Skua, photographed in Scotland (Stercorarius skua)

In this particular case, the skua was preening its feathers continuously. This is a typical thing for birds to do before flapping their wings or displaying. It’s almost like a big stretch and yawn. I waited patiently for 15 minutes while the bird preened, knowing that I would probably be rewarded with such a display afterwards (image above).

Confrontations between two animals are commonplace. If you see one animal, even if it’s of a different species, approaching another, then chances are you’ll see some sort of interaction. Take these white-tailed eagles, for example. I was pretty sure that they’d both have a disagreement over who had rights to the tasty fish laying on the ice. With my focus nailed, I kept the shutter half-pressed and fired as soon as they lifted their wings.

white tailed eagles

White-tailed Eagles, photographed in Hungary.

#2 – Humour

While animals won’t inherently try to be funny, they often do things that make us chuckle. These are usually opportunistic photos that you can’t prepare for, but being poised and ready at all moments is key to capturing them.

When I lead workshops, one of the main things I try to get my clients to realize is that as soon as you drop your camera down, you’re risking missing the shot. If your subject is in front of you, then you’ve done the hard bit of waiting for an appearance – keep your eye to the viewfinder and remain at the ready, almost like a sniper training his eye on a target.

red squirrel

Eurasian red squirrel (Sciurus vulgaris), photographed in England.

A quick scratch from a squirrel lasting just a couple of seconds was possible to catch on camera, because I was already following its progress along the branch through the viewfinder.

Red deer

A red deer stag in the Scottish Highlands.

I had been looking to capture a stag peering through the trees, and while this wasn’t my intended outcome, I couldn’t help but click away when this stag stuck its tongue out round the tree. It’s little things like this that bring a smile to the viewer, and bring in personality and character to your wildlife photos. Although they make some chuckle more than others…

atlantic seals

#3 – Tight in the Frame

All the images I’ve shared so far in this article are fairly tight in the frame. This is a particularly useful composition technique you can use to bring the focus solely to the animal. The bokeh also helps, isolating the subject against the background – this is done using a wide aperture (and subsequently a shallow depth of field), most often successfully with a telephoto lens.

red squirrel

Eurasian red squirrel (Sciurus vulgaris).

When the attention of the viewer is trained on the animal alone, without distracting background elements to tear the eye away, then they feel more interacted with the animal in the image. It perhaps sounds a little cliché, but it is true. In this image of a squirrel, you can see that eye contact, along with a catchlight in the eye, really makes the photo pop.

When doing tight compositions like this, be careful not to chop limbs off half way down their length. It’s all or nothing, I always say!

#4 – Family Ties

If there’s anything humans can relate to with animals, it’s the bond between parents and offspring. Not all animals care for their young, of course, but those that do can be seen to care and work endlessly to raise their young. Take these two gannets – a male and a female – courting to reaffirm their bond each time the other returns to the nest from gathering fish.

gannet

Northern gannets (Morris bassanus).

If you can capture the parents feeding their young, even better. It doesn’t have to be a feeding behaviour though, and in particular playful shots between a family will give your shots the aww factor. Obviously, you have to be in the right place at the right time, and these particular kinds of shots require a lot of dedication and time to achieve, due to their rare nature.

barn swallow

Barn swallows feeding fledglings in British countryside.

#5 Try Something Different

Experimenting is something you’ve probably been told to do again and again – but it works. I am a particular fan of the high-key style of photography for wildlife, isolating the subject against the background by blowing out the highlights in an image. This mountain hare was grooming its fur, but as it bowed its head it looked rather solemn. The white background makes it almost look like a painting, and personally I think this is a rather intimate portrait.

Mountain Hare

Be prepared to step outside your comfort zone. That is where the photos are, that set you apart from the endless bird on a stick shots we see day to day. At first it’ll probably all go wrong, but that’s okay! You know all those rules you’ve been told? Rule of thirds, golden triangle, etc., break them, and see what happens.

#6 – Light

Ooh, it’s that scary unknown again. Light. It’s a maker or breaker for photography, and that doesn’t change when you step into nature photography either. Backlighting is particularly effective for conveying mystery and magic in an image. I used this to my advantage when photographing Peruvian spider monkeys – a primate that is unfortunately on the endangered list. Even so, the backlighting breaking through the rainforest canopy makes this image appear magical.

A backlit Peruvian spider monkey in the Amazon Rainforest in Manu, Peru.

A backlit Peruvian spider monkey in the Amazon Rainforest in Manu, Peru.

If you see interesting light like this, then be careful about your exposure. It’s important not to blow the highlights rim-lighting the animal, while at the same time keeping the individual exposed properly too. But when it works, it really works.

I feel that to end an article about character and personality, it is only right to use primates as an example. We can really relate to them, more than any other animal, due to our close relations. They’re curious, intelligent, and a clear example of an animal capable of emotions.

A male and female black-faced spider monkey stick together in the Peruvian Amazon Rainforest. These two individuals are displaying courting behaviour.

A male and female black-faced spider monkey stick together in the Peruvian Amazon Rainforest. These two individuals are displaying courting behaviour.

So keep clicking the shutter each time something of interest happens. Don’t wait and savour space on your memory card, because you might just miss something amazing.

This week we are doing a series of articles to help you do better nature photography. See previous articles here:

  • 3 Habits Every Outdoor Photographer Should Develop to Avoid Missing Shots
  • 5 Tips for Better Nature Photography
  • 27 Serene Images of the Natural World
  • Weekly Photography Challenge – Nature
  • 10 Ideas for Photographing Nature in your Backyard

googletag.cmd.push(function() {
tablet_slots.push( googletag.defineSlot( “/1005424/_dPSv4_tab-all-article-bottom_(300×250)”, [300, 250], “pb-ad-78623” ).addService( googletag.pubads() ) ); } );

googletag.cmd.push(function() {
mobile_slots.push( googletag.defineSlot( “/1005424/_dPSv4_mob-all-article-bottom_(300×250)”, [300, 250], “pb-ad-78158” ).addService( googletag.pubads() ) ); } );

The post 6 Tips for Capturing Character and Personality in Wildlife Photography by Will Nicholls appeared first on Digital Photography School.


Digital Photography School

 
Comments Off on 6 Tips for Capturing Character and Personality in Wildlife Photography

Posted in Photography


5 Tricks from Professionals to Help You Do Better Wildlife Photography

17 Jun

Whether professional or an amateur, most photographers who enjoy wildlife photography do it because we love being outside in nature, and we love to share our experiences of the world’s wild creatures. Carrying our cameras, and making images along the way, helps us to truly see and appreciate what nature has to offer.

Orca, also known as killer whales, hunting seals by Anne McKinnell

But there’s more to making a captivating wildlife photograph than simply having an animal in the frame. If you just snap a shot when an animal is in front of you, you may find that your photograph lacks the impact you were after.

Next time you are out in the wild, try out these five tricks that professional wildlife photographers use to capture the world’s wild creatures at their best.

1. Watch and Learn

Every one of the world’s many species of animals are different. You cannot photograph them all the same way. But, if you spend some time observing your creature’s behaviour, you’ll be better equipped to click the shutter at exactly the right moment.

Two bald eagles by Anne McKinnell

It’s all about that special moment when the animal is doing something – whether it’s flying, walking, making eye contact, or interacting with another animal. Like spending time with friends, you come to know when they are going to do a particular thing and what triggers a reaction. Once you observe and understand their behaviour, be patient, be quiet, and wait for the right moment.

We often think of wildlife photography as being exciting, but more often than not, better images are made when it is a quiet, contemplative experience.

2. Use Faster Shutter Speeds

Many a great wildlife photograph has been ruined when an animal moves faster than the photographer anticipated, resulting in a slightly blurry image. It has happened to us all. Try not to let that happen by increasing your camera’s ISO, which will allow you faster shutter speeds.

Pacific White Sided Dolphins by Anne McKinnell

Even when your subject is absolutely still, you never know when they’ll decide to move, and that could be the magic moment you’ve been waiting for. Be ready by using a shutter speed of at least 1/500th of a second.

3. Carry Two Camera Bodies

The most important thing is to capture that special moment, so don’t miss it by changing lenses. It’s better to pick two lenses to work with, and have each mounted on its own camera body. Then, when you need to switch, you simply put down one camera, pick up the other, and you’ll be ready to shoot in less than one second. I usually use one camera with a 70-300mm lens, and the other with a 400mm lens.

Two elephants playing in Serengeti National Park, Tanzania by Anne McKinnell

4. Don’t Get Rusty

You don’t have to wait until you have an exotic animal to work with! Keep your skills sharp by practicing with whatever animals are nearby. You might surprise yourself and come up with some of your favourite shots. Practicing with seagulls and geese, will ultimately improve your photos of cranes and spoonbills when you have the opportunity to shoot them.

Seagull looking at underwater sockeye salmon by Anne McKinnell

Try setting up a bird feeder outside your window and you can practice on the birds that come right to you.

5. Vary Your Compositions

Usually when we photograph wildlife, we want the animal to fill as much of the frame as possible. But once you get that shot, don’t keep making the same shot over and over. Try some different compositions, such as getting super close to just part of the animal. You can shoot just the eye, or zoom in on an interesting detail.

The tail feathers of a peacock by Anne McKinnell

Then try zooming out and photographing the animal and its environment. Also try to change your perspective. Get on eye level with your subject or try making an image from a lower angle.

By understanding your subject, having good techniques under your belt, and lots of practice, you’ll be well on your way to making more captivating wildlife photographs. If you have any other tips of tricks for wildlife photography please share them, and your images in the comments below.

googletag.cmd.push(function() {
tablet_slots.push( googletag.defineSlot( “/1005424/_dPSv4_tab-all-article-bottom_(300×250)”, [300, 250], “pb-ad-78623” ).addService( googletag.pubads() ) ); } );

googletag.cmd.push(function() {
mobile_slots.push( googletag.defineSlot( “/1005424/_dPSv4_mob-all-article-bottom_(300×250)”, [300, 250], “pb-ad-78158” ).addService( googletag.pubads() ) ); } );

The post 5 Tricks from Professionals to Help You Do Better Wildlife Photography by Anne McKinnell appeared first on Digital Photography School.


Digital Photography School

 
Comments Off on 5 Tricks from Professionals to Help You Do Better Wildlife Photography

Posted in Photography


Using a Wide-angle Lens with Wildlife for a New Perspective

18 May

With more and more budget telephoto lenses hitting the market, wildlife photography is becoming increasingly accessible. Consequently, you don’t have to look very far to see beautiful wildlife portraits, shot with a clean bokeh using a long lens. Close-ups like this definitely have their place, but this traditional form of wildlife photography is perhaps harder to achieve stand-out photos within nowadays.

But who said you had to use a telephoto lens for captivating wildlife photos? In nature photography, wide-angle lenses are traditionally associated with landscape photography. But by using a wide-angle lens with wildlife, you can incorporate the environment, and habitat of a species, into your photo. This is will add an entirely new perspective to your images, and it’s a really enjoyable technique to play with.

How Do You Do

Equipment you’ll need

While you can do wide-angle shots of wildlife using a camera trap system, I’m going to be looking at firing the shutter manually. So here are some pieces of equipment you’ll want to get hold of.

Joby Gorillapod

These three bendy tripods are extremely versatile, and allow you to position your camera in all sorts of places, whether that be wrapped around a tree, or precariously positioned on a rocky beach. This will help you to position your camera low to the ground, in the ideal position. Tripods rarely let you go to ground level, as they often have a neck or centre column. Plus, they’re very large when spread out to the ground. But make sure you buy the more heavy-duty of Joby’s offerings, as the cheaper versions will not cope with the weight of a DSLR.

Joby

Wireless release

You’ll definitely need some form of wireless trigger for your camera. You can’t press the shutter directly, as no animal will come near your camera if you’re sitting right behind it. Instead, get hold of some wireless releases from YongNuo. They are about $ 40 and work perfectly well. They are a radio based system, which do not require line of sight, and have they a range of up to 100 meters (supposedly).

Yongnuo

Setting up for the shot

You need to think about what you’re trying to convey in your photo. The best part about a wide-angle lens is the ability to include the habitat of your subject, so think about what are its key features. For me, red squirrels are a great subject for wide-angle photography. They live in British woodlands, so the obvious backdrop is a collection of trees.

Remotesquirrel2

Position the camera as low to the ground as possible; you want to make sure you are at or below eye-level of the animal. This really shifts the perspective of the shot. Remember that because you’re shooting wide (perhaps even as wide as 14mm), you’ll need to ensure your subject comes close enough to the lens, or it will appear too small.

To do this, you can use some form of bait. I will stress right away that live baiting is seen as extremely unethical in wildlife photography, and I strongly suggest you do not take this approach in any form of wildlife photography. If your subject is a carnivore, then you can collect road kill or other already dead animals to use as bait. But for me, squirrels are omnivores and they are very happy with a few hazelnuts to bring them close to the camera.

Remote High

Put your camera into aperture priority mode. Make sure you have your exposure compensation set to expose the scene properly, and any changes in light should be adjusted for by the camera automatically. Set your focus manually, predicting where the animal will turn up, and make sure to switch the camera’s autofocus off (otherwise it will attempt to refocus when you fire the shutter).

Now you can sit back and wait. Make sure you’re in range, but stay hidden. You can use a pop-up photography blind for this, and just be patient. Once an animal begins to approach, fire a test shot while it is still at a distance. This will help the animal get used to the sound of the shutter. For some animals a test shot won’t be appropriate, such as with birds that may fly away. If you’re lucky, your subject will realize that the camera means no harm, and happily sit and pose for your shot.

Things to be aware of

You should never put your photograph before the welfare of an animal. Period. There are no exceptions here, and to do otherwise is strongly condemned in the wildlife photography field. It therefore goes without saying that you should not perform this type of photography at the breeding site of an animal. If you shove a camera outside a bird’s nest, it will likely abandon it, and any chick in the nest will die. Disturbance like this never ends well.

Wide-angle photography handheld

There are some situations where you can hand-hold your camera and take wide-angle shots of wildlife. This is often the case for seabirds which nest on islands and cliff tops. These usually reside in wildlife reserves, and it is the case in the UK that you can walk around these reserves. Consequently, the animals are used to people and are completely unafraid. It’s therefore possible to get close enough. As long as your subject doesn’t show any signs of stress, then you are probably okay to approach.

Juvenile Shags

In conclusion

Wide-angle photography is great fun with wildlife. It feels just like Christmas, not knowing what you’re going to get until you go back and check the camera. Sometimes you’ll be bitterly disappointed at an out-of-focus image that had potential, but eventually you’ll come away with something you can be proud of.

googletag.cmd.push(function() {
tablet_slots.push( googletag.defineSlot( “/1005424/_dPSv4_tab-all-article-bottom_(300×250)”, [300, 250], “pb-ad-78623” ).addService( googletag.pubads() ) ); } );

googletag.cmd.push(function() {
mobile_slots.push( googletag.defineSlot( “/1005424/_dPSv4_mob-all-article-bottom_(300×250)”, [300, 250], “pb-ad-78158” ).addService( googletag.pubads() ) ); } );

The post Using a Wide-angle Lens with Wildlife for a New Perspective by Will Nicholls appeared first on Digital Photography School.


Digital Photography School

 
Comments Off on Using a Wide-angle Lens with Wildlife for a New Perspective

Posted in Photography