RSS
 

Posts Tagged ‘weight’

Parrot Anafi Thermal drone brings FLIR camera, lighter weight and higher price

16 Apr

Drone company Parrot has announced Anafi Thermal, an updated version of the Anafi folding quadcopter it launched last year. The new Parrot Anafi Thermal features a 4K HDR camera with a 21MP Sony sensor alongside a FLIR Lepton thermal sensor, enabling operators to capture both RGB and thermal images. The drone can be used with the Pix4DModel app to generate 3D images from the thermal data.

The newly added FLIR camera features a 160 x 120 resolution and the ability to detect a temperature range from 14F / -10C to 752F / 400C. The thermal sensor is embedded with the 4K RGB camera on a three-axis stabilized gimbal. Drone operators can use the thermal camera and FreeFlight 6 app to detect heat loss and isolate subjects, according to Parrot, making the drone useful for industrial use and rescue missions.

The aforementioned FreeFlight 6 app can be used to merge both RGB and thermal images; ‘visual representations’ of temperature contrasts and thermal leaks are superimposed on the final image. The cameras also offer 3x digital zoom.

The Anafi Thermal drone weighs 315g / 11.1oz, which is 10 grams lighter than the 2018 model. The quadcopter can handle wind speeds up to 50km/h / 31mph and it has a top flight speed of 55km/h / 34mph. Operators can utilize three batteries that offer a cumulative flight time of 78 minutes (26 minutes per battery); the power cells support recharging from any source using USB-C.

$ (document).ready(function() { SampleGalleryV2({“containerId”:”embeddedSampleGallery_4938417913″,”galleryId”:”4938417913″,”isEmbeddedWidget”:true,”selectedImageIndex”:0,”isMobile”:false}) });

The companion Parrot Skycontroller 3 remote control operates over WiFi with a range of 2km / 1.2mi. Built-in sensors enable the drone to operate on autopilot. Operators can set flight parameters that include altitude, geofences, and custom FlightPlan routes.

The Parrot Anafi Thermal drone will be available starting in May. According to The Verge, this model will have a $ 1,900 price tag, which is substantially higher than the non-thermal model’s $ 700 cost.

Articles: Digital Photography Review (dpreview.com)

 
Comments Off on Parrot Anafi Thermal drone brings FLIR camera, lighter weight and higher price

Posted in Uncategorized


Powerful Body weight Decline Supplements

14 Mar

To possess extra weight and reside with it’s not an easy endeavor. Folks check out anything to lose weight but numerous situations they’re unsuccessful in accomplishing so. To shed pounds just one have to exercise continuously and you will discover lots of people who like to use choice techniques for dropping pounds. One this sort of system would be the http://pastillasparabajardepesorapido.com.mx/orlistat-lee-esto-antes-de-tomarlas/  decline capsules.

The extra fat burning capsules make you decrease weight without having any physically demanding work out or demanding dieting. There’s numerous types of supplements offered on the market. The pills can assist you shed weight, but just before getting them you’ve got for being quite mindful. You must browse the instructions of each and every pill diligently. You will also really have to consult your medical professional prior to getting any capsule.

One these types of form of body fat burning tablets aid to boost your rate of metabolism. If your metabolic process is not proper then you really will get pounds, so it’ll be very best for you personally to pick out a bodyweight decline tablet which has alpha lipoic acid, “L-Canitine,” and eco-friendly tea extracts which act as a fast metabolic rate products. All these ingredients endorse body weight decline due to an elevated rate of metabolism.

A further sort of excess weight decline tablets is individuals which suppress appetites. They don’t cause you to feel hungry and act as hunger suppressants. They curb your urge for food therefore you possess a tiny food. Once you consider these capsules you do not hold the urge to acquire treats between. Your stomach will always come to feel comprehensive therefore you will try to eat much less.

There are numerous other sorts of unwanted fat burning drugs such as calorie stoppers, metabolic enhancers, and drinking water retention products. So the pills are different and also to have a greater result you may have to mix it that has a good physical exercise program.

Lots of individuals just take these pills that have many positive aspects. The first edge is you are motivated to carry out a thing regarding your body weight. With these products you could recover from the pain of getting overweight. Any time you have experimented with many of the approaches to lose fat with no any accomplishment, you’ll discover the load reduction drugs to become the most effective option for burning fats.

There are many different types of these pills. Each of the capsules have distinct mixtures and various sorts of components. Some have organic parts like Hoodia or Acai Berry to guarantee that there is no damaging chemical component. Lots of products also have hormone modulators. Several hormonal adjustments come about while in the overall body with age and these hormonal variations bring on decreased the metabolic amount and forestall the correct absorption of food stuff taken. Therefore the hormone modulators strengthen the metabolic process on the overall body and a person has a tendency to drop some weight following that.

But, the most crucial position here is that the bodyweight reduction tablets have side results so it is greater to consider them only right after consulting a doctor and on his advice. For numerous people these supplements get the job done to be a motivator and the moment they slim down, they stay with their food plan and diet and their physical exercise plan and in order that they never get excess weight.

The post Powerful Body weight Decline Supplements appeared first on Photonovice.

Photonovice

 
Comments Off on Powerful Body weight Decline Supplements

Posted in Equipment


Worth the Weight: Ultralight backpacking photography with the Olympus PEN-F

13 Aug
Mount Rainier from Grand Park ISO 200 | 21mm | F3.5 | 1/80th

One of the things that I love the most about my Olympus PEN-F camera is its chameleon-like nature. One minute it can be a tourist snapshot camera, the next a rugged backwoods professional shooting rig. Once I was even chastised for ‘still shooting film’ by a millennial.

This past summer I decided to take my PEN-F with me on my annual ultra-light hike to Mt. Rainier National Park. Those of you familiar with the concept of ultra-light hiking will immediately notice the irony of my statement. Ultra-light hiking requires that only essential items are included in one’s pack. Adding over two and a half pounds of photo gear doesn’t really fit the motif.

The Set Up

I have hiked with cameras for decades, but I have never really been satisfied with my set up.

Simple neck straps—no matter how wide—are out because of the interference with pack straps, croakies, and now hydration systems. Kuban-hitches are just too much mental origami to deal with. Similarly, hip slings can’t be used because they inevitably overlap with the main hip belt of the pack rendering them inaccessible.

It was a bit of a difficult challenge, but I was able to locate a great belt strap clip that was both strong enough securely hold my PEN-F and also small enough to fit on the limited space exposed on the hip belt of my Osprey Aether 60 AG pack. This was the key component of my set up. (IMZ’s DSLR Camera Hanger Belt Clip / 3 oz.)

In addition to the belt clip, I wanted much more gripping security on the camera body itself, so I added a couple elements there.

First was a fingertip grip by Haoge that both gives the body some more heft as well as adding some good security to the three dimensional grip and finger purchase of the body (Haoge HG-PENF QR quick release plate camera bracket holder hand grip for Olympus Pen-F / 4 oz.).

I am fairly pleased with this grip, but I’m still searching for one with even more positive fingertip connections. For one-handed, damp, unstable shooting situations, I love the feel of the PEN-F with this grip on it. Solid.

K Spire from Elysian Fields Camp, Mt. Rainier ISO 200 | 32mm | -0.3 EV | F10 | 1/800th

The other item I added was a wrist strap (Prost Leather Hand Strap / 2 oz.). Here I only minimally succeeded with my choice (not that I could find a better one). I wanted the ability to slip my hand into a strap that would keep the camera very close to the palm even if my grip was relaxed.

Such a strap would have to go from the eyelet on the camera body near the shutter release to a spot on the base near the tripod mounting port. The best I could do was a strap that simply ran down the side of the camera from the eyelet to the base. It provided some security, but not everything I was looking for.

It did, however, provide a nice bit of padding for the camera that paid off in some tight squeezes between rocks and downed trees.

Shooting Process

The wonderful thing about the clip is that the camera attaches to the harness with a ball shaped brass connector. This allows the camera to hang easily below the hip belt of the pack with the lens following the natural crease in my hip. Even in steep climbing the camera was both out of the way and completely accessible to me.

There were so many times when I was winded enough that if I had had to futz with a case or a Kuban-hitch I would have simply skipped the shot. Because I am a bit worrisome about my gear, I always clicked the locking pin into position when the camera was seated in the clip. This meant that releasing the camera was always a 2-handed process. The throat on the clip is deep enough that I believe there are many instances where the locking pin could be dismissed without any downside, but I kept it locked on.

Descending from Spray Park, Mt. Rainier ISO 200 | 12mm | F6.3 | 1/320th

In this configuration, the camera did not swing freely (desirable). It did pivot evenly against my hip and while I thought that this pivoting might create some abrasion or wear on the camera body of lens barrel, there are no visible battle scars on the camera from this adventure. Also, I shot entirely with the eyepiece, leaving the LCD screen folded away for protection against scratches and trail dust.

I took only one lens with me, the Olympus M. Zuiko Pro 12-40 f 1:2.8 zoom (17 oz.). For both protection and effect I had 2 filters on the lens at all times: a simple Rokinon UV filter and also an Altura omni-directional polarizing filter. I nearly always shot in Program mode, frequently with one to two thirds of an f-stop of decreased exposure in order to compensate for the dark foregrounds which had a tendency to washout the scenic backgrounds.

Early sun enters Ohanapecosh Valley ISO 200 | 38mm | -0.3 EV | F5.6 | 1/320th

Across the period of 7 days of hiking I shot 440 images onto a 32GB SanDisk Ultra card with tons of room to spare. While I had 2 back-up batteries at the ready, the battery that I started with lasted for the entire journey.

For those of you familiar with the Pacific Northwest and specifically Mt. Rainier, our trip started at Mowich Lake and ended at Steven’s Creek (Grove of the Patriarchs) with camps at Spray Park, Lake James, Grand Park, Frying Pan Creek, Summerland, and Ohanapecosh.

Ghost Fir, Ohanapecosh, Mt. Rainier ISO 200 | 12mm | F5.6 | 1/200th

I did have two mishaps with my clip, both user error but worth noting. First was on a training hike (and gear check). The small brass clip knob that attaches to the tripod mount worked its way all the way out and dropped the camera, luckily onto soft dirt and bushes. That camera drop nearly stopped my heart. For the long trip I made sure it was much more tightly attached and checked it regularly.

Second, while on the Rainier trip, there was a time when the right side of the clip itself worked free from the hip strap. This is possible and resulted in a dangle rather than a drop. Making sure the straps were in the correct position, unfolded, and flat against the other straps became part of my routine.

I love the process of shooting considered photographs. I am generally pleased with the results. And even though it added an additional 2.8 pounds to my total carry (that’s 6%!) it was totally worth the weight.

Mount Rainier from upper Spray Park ISO 200 | 12mm | F5.6 | 1/250th

Specifications:

  • Lens: 1 lb, 1 oz.
  • Strap: 2 oz.
  • Grip: 4 oz.
  • Camera Body: 1 lb.
  • 2 extra batteries: 3 oz. (unused) Belt clip: 3 oz.

Total Weight: 2 lbs, 13 oz.


Ben Bauermeister has been an amateur photographer his entire life and is currently also a social impact entrepreneur living in the small Puget Sound town of Port Townsend where he enjoys cycling, hiking, kayaking, as well as unnatural acts of community stewardship. His community mentoring website can be found at www.skillmation.org, or you can follow him on Instagram @bbauerm.

Articles: Digital Photography Review (dpreview.com)

 
Comments Off on Worth the Weight: Ultralight backpacking photography with the Olympus PEN-F

Posted in Uncategorized


How to Understand and Use Visual Weight in Composition

04 Aug

Visual weight is the term given to compositional elements within an image and how much visual impact they have. Some things will feel heavier or more present within the image in comparison to other elements. As a photographer, it is your role to understand this and use it to your advantage when setting up your composition.

How to Understand and Use Visual Weight in Composition

How can visual weight affect an image?

  • Light colored elements = a light feel
  • Dark colored elements = a heavy feel
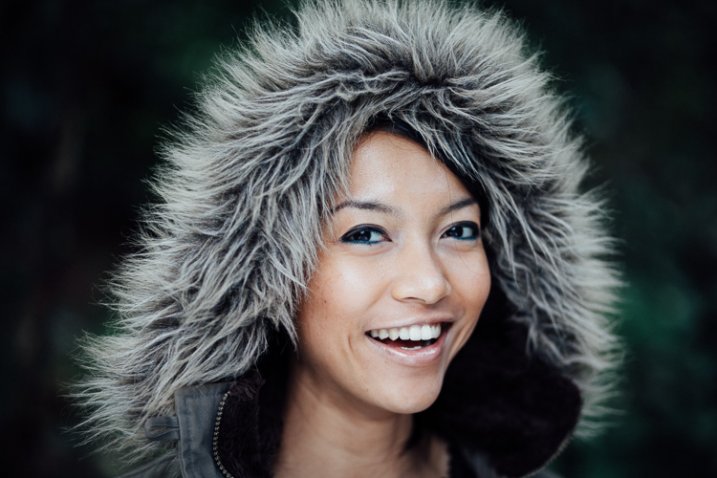
  • Eyes/faces = heavy
  • Text = heavy
  • Negative space = light
  • Focus = can be heavy or light depending on what you are focusing on
  • Image placement within the frame = can choose to make something heavier or lighter
  • Scale = can affect the weight of an element
  • Balance = can affect the weight of an element or the feel of the overall image
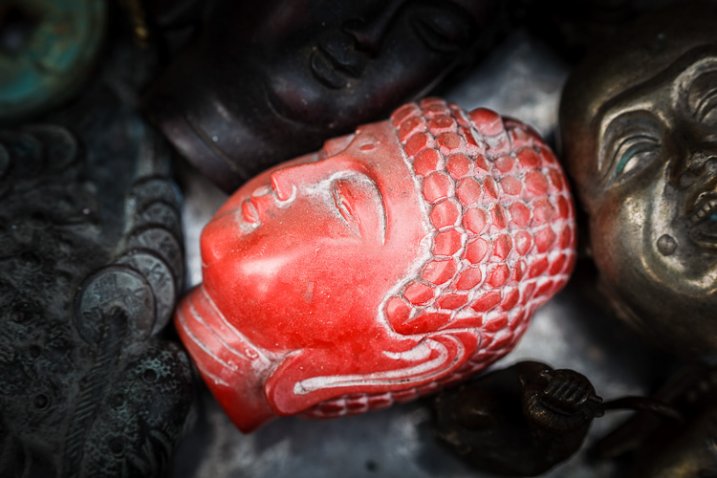
  • Color = a pop of unexpected color is heavier than its surroundings

Examples and Discussion

Light or even toned images and feel

This macro shot of red clover is tonally quite similar over the entire image, with a shallow depth of field and a soft focus. The color tones are also soft so the overall feeling to this image visually is quite light – there isn’t really anywhere for the eye to settle and engage with the image.

How to Understand and Use Visual Weight in Composition

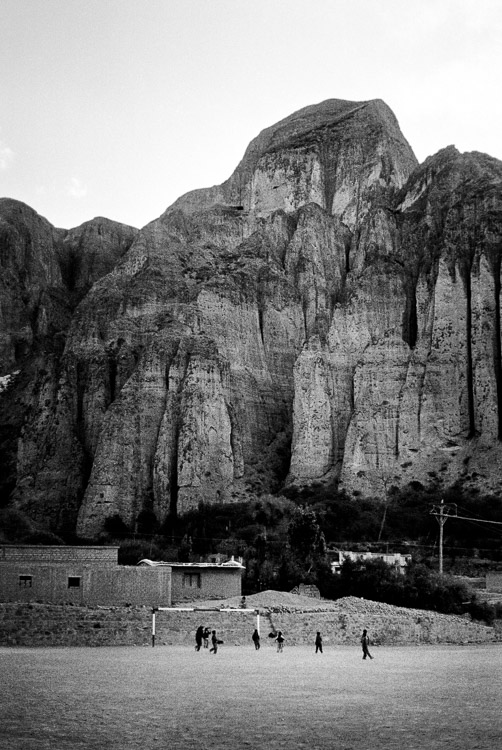
Compare it with another image that is tonally quite similar, color tones are muted with soft blurry cloud elements. However, in the image below there is a distinct contrast between the white and black points in this image. The black rocks have distinct visual weight and there is a definite point for the eye to rest on and travel around the image.

How to Understand and Use Visual Weight in Composition

Image with large dark areas

In the case of dark moody shots with a lot of black background showing, you would think that the black would overpower the whole image. However, When the subject is well lit and positioned in a sculptural shape like the gerbera below, the subject carries the visual weight of the image and the black recedes into the background to support it.

How to Understand and Use Visual Weight in Composition

The landscape below is deliberately underexposed to add drama to the sky and show off the subtle light beams through the clouds. This meant the dark rocks are particularly underexposed and so they carry the visual weight of the image, almost slightly too heavy towards the bottom as a result.

How to Understand and Use Visual Weight in Composition

Color against a neutral background

A bright pop of color in an otherwise neutral tone background carries all the visual weight in the following two images.

How to Understand and Use Visual Weight in Composition

How to Understand and Use Visual Weight in Composition

Additionally, in the image of the New Zealand native wood pigeon below, the sharp eye holds the visual weight, with extra emphasis due to the bright red color of the eye and the beak. This is where your eye is drawn first.

How to Understand and Use Visual Weight in Composition

Balance and scale

Balance and scale are also important factors. In the lighthouse image below, the bright white of the lighthouse holds the eye and the attention, but the horizon line of the sky against the sea gives the necessary scale to balance the overall compostion of the image.

How to Understand and Use Visual Weight in Composition

This floating swimming platform has the visual weight in this image, balancing the landscape on the left of the frame, which in turn provides the scale to understand the platform in the overall image context. Being closer to the camera also gives the platform more weight in this composition as well.

Balance of light and dark

In the horseshoe image below, it has been deliberately shot to enhance both the dark shadows, The white spiderwebs and add textural details, while the shadows add supporting visual weight to the shapes of the horseshoes.

How to Understand and Use Visual Weight in Composition

Below is a similar black and white image, with shadow detail supporting textural elements. But this image is more about the lighter areas, which take up most of the large central area within the image, so they carries more of the visual weight of the image.

How to Understand and Use Visual Weight in Composition

Color and balance

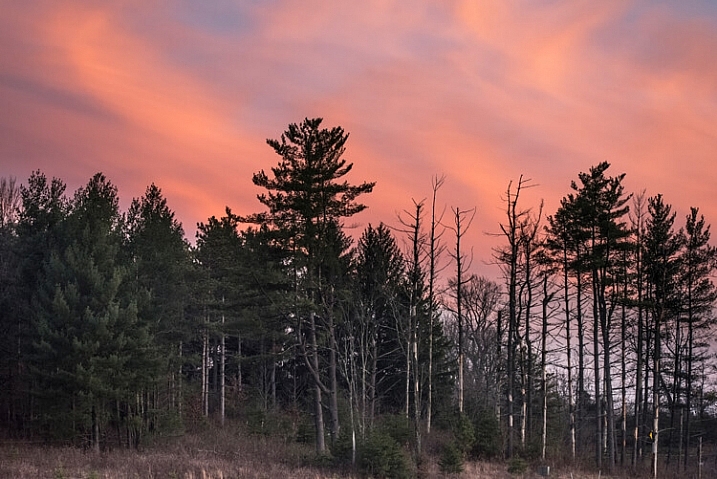
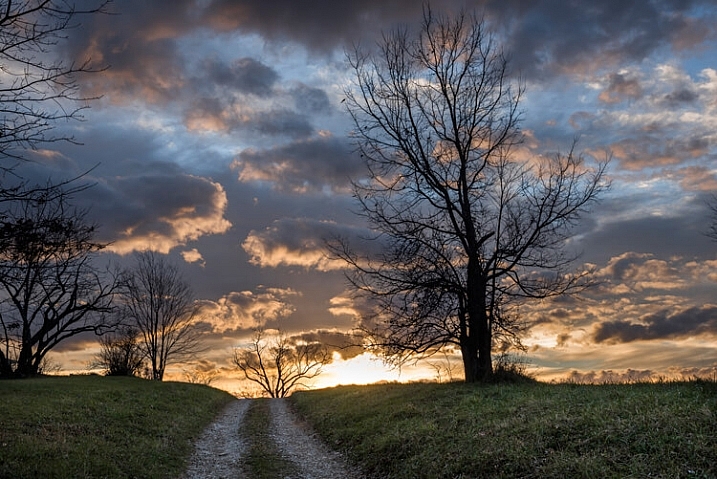
Use of colour within an image can have significant impact. In the image of a sunset below, with the rich red clouds and the dark silhouetted tree line at the bottom, you might thing the dark trees carry the visual weight, but they instead balance out the large red cloud area nicely. The darkest or brightest element is not always the visually heaviest.

How to Understand and Use Visual Weight in Composition

Tonally the image below is very even, with the dark sea cliffs being balanced out by the bright sunrise of the sea haze. But the surprise in this image is that the visual weight is carried by the single seagull in flight across the ocean.

Another sunrise, quite dark toned, but here the white froth of the waves taken as a long exposure to capture the movement has the visual weight within this image.

How to Understand and Use Visual Weight in Composition

Assessing visual weight within a composition

The image of a leafy stream below has a nice balance of light and dark. The stream travels diagonally through the image, drawing the eye. While there is quite a heavy visual weight in the bottom left-hand corner, it still has enough light to have texture and detail and be part of the image. There are enough brighter areas above it and through the water as well so that the overall composition doesn’t feel overwhelmed by the darker areas. Our brains can accept that it is an image taken within a forest, so there will be light and dark areas.

How to Understand and Use Visual Weight in Composition

Visual weight working against the image

Wild Kookaburra on a tree branch (below). In processing, this image has been deliberately overexposed as the original image was taken in shade and was quite dark. This has changed the tonal balance quite a lot, especially in the background. The branch closest to the camera has all the visual weight in this image, weighing it down and making it heavy on the right side. The bird’s dark eye and the feather detail on the wing do counteract the branch a bit, but not enough.

How to Understand and Use Visual Weight in Composition

Still life with a feather – an experiment shot while learning still life and food photography. An another example of how visual weight needs to be taken into account in your composition. Here the feather is too light in tone, too small in scale and too soft in structure to balance out the darkness of the basket of eggs in the background. Even though the feather is in sharp focus, the egg basket has all the visual weight in this image.

How to Understand and Use Visual Weight in Composition

Visual weight working for the image

Negative space works really well here with the macro flower shot below. The flower only takes up a small part of the overall image, but because that one element is in sharp focus and the rest is very blurred and becomes part of the background, the flower has all the visual weight in this image. Notice how at the very bottom of the frame, the stem of flowers that is in partial focus also contributes to the weight of the image.

How to Understand and Use Visual Weight in Composition

Framing and placement of the gerbera flowers (below) relate directly to the visual weight of them within the image. The diagonal line bisects the image in half, but adds a dynamic angle that engages the eye. The selective focus at the front of the petals combined with the dark stem visually balance out the rest of the negative space in this image. The two other flowers are further away and out of focus so support the subject visually but due to their softness, do not overwhelm the image.

How to Understand and Use Visual Weight in Composition

Summary

Visual weight is a more advanced composition concept, one that may be difficult to grasp initially. Understanding how it can impact your final image is important because thinking about it as part of the overall composition is necessary. Obviously with things like landscapes, macro, flowers, food photography and other staged or stationary situations you have more time to think and adjust your composition. With street, event, wedding, sport or other changeable situations, you may not get time to consider all your options.

As can be seen from the examples above, both good and bad, visual weight can and does make a difference to the final image. Learning to see compositionally and frame your shot up with intent and forethought will improve your photography more than anything else, in my opinion.

Because visual weight is affected by other elements of the composition – like tone, focus, light/dark, balance and scale – if you are thinking about those, then visual weight becomes part of the overall composition equation. It is still useful to think about it as a separate element, if you have time to do so, and of course, if you remember. Do you use visual weight as a compositional element for your images?

The post How to Understand and Use Visual Weight in Composition by Stacey Hill appeared first on Digital Photography School.


Digital Photography School

 
Comments Off on How to Understand and Use Visual Weight in Composition

Posted in Photography


Camera Lift-Strap eases camera weight by clipping to a backpack handle

07 Jul

A unique camera strap from PONTE Leather Co. called Camera Lift-Strap has surfaced on crowdfunding website Kickstarter, and it aims to ease the discomfort of carrying heavy cameras around the neck. Camera-Lift Strap features a clasp that is positioned behind the wearer’s neck. When a photographer is also wearing a backpack, the camera strap can be clasped to the backpack’s handle, moving the camera’s weight off the wearer’s neck and distributing it onto his or her shoulders.

The Camera Lift-Strap is presented in two varieties: the Canvas Camera Strap, which is made of weather-treated nylon, and the Leather Camera Strap, which is made from ‘top grain leather,’ according to PONTE Leather Co. The strap’s metal components are made of brass with an oxide finish. The company plans to offer two attachment types, as well as a custom steel ring for securing all types of cameras to the strap. 

PONTE Leather Co. is currently seeking funding for the product on Kickstarter where remaining pledge options include a canvas Camera Lift-Strap for $ 26, an early bird leather Camera Lift-Strap for $ 35, and various multi-strap bundle options at higher price points. The company anticipates shipping the straps to backers in November 2016.

Via: Kickstarter

Articles: Digital Photography Review (dpreview.com)

 
Comments Off on Camera Lift-Strap eases camera weight by clipping to a backpack handle

Posted in Uncategorized


Is it Time to go Full Frame? Weight These Pros and Cons Before You Decide

24 Jan

Has anyone ever said to you, “That’s a nice photo, you must have an expensive camera!”?

According to photography legend Ansel Adams, “The single most important component of a camera is the twelve inches behind it!”  

Your camera is simply a tool, that you use to create your vision of the scene in front of you. A camera can only do what you tell it, so it’s not going to capture that “nice photo” all by itself. But, what if the camera doesn’t perform up to your expectations? Then, it may be time for an upgrade.


Captured at ISO 6400 this image shows great tonal range with very acceptable noise levels.

Captured at ISO 6400 on a Nikon D750 full frame, this image shows great tonal range with very acceptable noise levels.

I recently made the jump from a cropped-sensor camera to a full frame body (a Nikon D750, used in all the images below). For the purpose of this article I am not going to get into a technical discussion about the differences between a crop sensor (APS-C), and full frame camera (the main one being is that the full frame has a larger sensor, the size of a frame of 35mm film).

But how do you know if, and when, upgrading to a full frame camera is desirable? What follows are some points to consider if you’re on the fence.

Advantages of full frame

  • Improved low light performance: Because of the larger sensor size, a full frame camera is able to capture more light, which allows it to attain focus in darker environments.
  • Higher ISO performance: The larger sensor of a full frame has larger pixels, which creates less digital noise at higher ISOs. In most cases you will get a one or two stop improvement in high ISO noise, over crop sensor cameras, though many new models of APS-C models have a much improved performance in noise reduction.
  • More control over depth of field: This is a commonly misunderstood benefit of full frame, because the larger sensor does not really affect the depth of field of an image. However, with the larger sensor of a full frame, you can move closer to the subject which causes the depth of field to become smaller. This, in turn, creates a smoother bokeh.
  • Improved dynamic range and color depth:  A full frame sensor can record more tonal range within shadows and highlights. Detail and color are much improved at both ends of the spectrum.

Disadvantages of full frame

Bird in fight was captured here at high ISO to achieve fast shutter speed to capture a very sharp image.

This heron in flight was captured at high ISO to achieve the fast shutter speed needed to get a sharp wildlife image.

  • Expense: Not only is the cost of the full frame DSLR higher than a crop sensor, you will most likely need to make additional investment in compatible lenses.
  • Size and weight: Not only are the sensors larger in a full frame DSLR, the overall size and weight are as well. Also, the lenses have more glass elements, and are also larger and heavier. This may not matter to many photographers, but when carrying gear for long distances it could be a factor to consider.
  • No crop factor: The telephoto reach of a full frame DSLR is lessened by not having a crop sensor. For example: a 200mm lens on full frame doesn’t have the reach of the approximate focal length on a cropped sensor  camera (about 300mm).
  • Slow frame rate in burst mode: Because a full frame DSLR has a larger sensor, there is more information to record to the memory card. Therefore, it will take longer to save images to the card, resulting in fewer frames per second when you are shooting in burst mode.

So, how do you know if you are ready to make the jump to a full frame camera? Ask yourself these questions:

How much will it cost?

As mentioned above, the cost of buying a full frame camera is significantly more expensive than a crop sensor one, plus new lenses will most likely need to be purchased. There isn’t much use in changing to full frame if you are not going use high quantity lenses designed for full frame cameras. If you plan to make the jump to full frame, you may want to begin by upgrading lenses to those compatible with full frame DSLRs.

Choosing a smaller aperture of f/22 gave enough depth of field to keep both the boys and the waterfalls in focus.

Choosing a smaller aperture of f/22 produced enough depth of field to keep both the boys and the waterfalls in focus using a full frame Nikon D750.

What type of photography do you enjoy shooting?

Full frames have advantages and disadvantages for different types of photography.

  • Landscape: Low light performance, more detail and improved ISO performance are all great advantages of full frame for landscape photography. The only possible drawback here is the effectively shallower depth of field, but this can be compensated for by using a smaller f-stop.
  • Portraits: The larger sensor size of a full frame will result in a shallower depth of field. For portraiture this means the backgrounds can feature more blur and make the subjects stand out better.
  • Wildlife: A full frame camera loses the telephoto reach that a crop sensor has. Nevertheless, a lot of wildlife photography is shot in low light situations, where a full frame gives a much improved advantage.
  • Sports: As in wildlife photography, limited reach and low light factors apply to sports photography. Shooting with a full frame, the improved focusing in low light is a helpful benefit for sports. However, the slower frame rates of a full frame can be a drawback in photographing a fast moving sport.

If you are a portrait or landscape shooter, there are many benefits that might convince you to make the switch to full frame.

This scene was captured with at 24mm on full frame Nikon D750. The white line shows how much of this image would be captured on a crop sensor from the same location.

This scene was captured at 24mm on a full frame Nikon D750. The white line shows how much of this image would be captured on a crop sensor from the same shooting location.

This image was captured at 600mm with a Nikon D750. The white line shows the extra reach that a crop sensor camera would give you. This image was also captured in low light conditions with ISO of 2000 with very acceptable noise level.

This image was captured at 600mm with a full frame. The white line shows the extra reach advantage that a crop sensor camera would provide. Still, capturing this image in low light conditions with an ISO of 2000 results in a desirable noise level.

Is your current camera holding you back?

Every camera has a limited number of shutter releases, so if your camera is nearing the end of its life cycle, it might be time to consider an upgrade. If your older crop sensor DSLR is limiting your results in low light, and you are constantly frustrated by high levels of noise, you might benefit from an upgrade to full frame.

Keep in mind that it’s convenient to blame a camera for taking poor images, but it may not be the camera holding you back. Many times photographers don’t get the results they expect by underutilizing high-end equipment. No matter what type of camera you shoot with, get to know it, and how all of its features work, before moving on to a different one.

shooting here in low light, this shot was able to be captured in low light by increasing the ISO without adding digital noise to the image.

This cityscape was captured with a full frame in low light by increasing the ISO, without adding digital noise.

What is your level of photography experience?

A full frame camera is probably not the best one to use as a beginner. Start shooting with a more entry level DSLR, and work up to a full frame model. If you are looking for a camera to take photos of family and friends, a crop sensor DSLR is a very satisfactory choice. Having a good handle on the exposure triangle (aperture, shutter speed and ISO) and how they work together is a must if you’re going to take advantage of all the benefits of full frame. You must be comfortable with shooting in manual mode. If you earn any part of your income from photography, you may benefit from switching to a full frame camera.

Do you make large prints?

A full frame sensor has a larger pixel size, which will capture more light and detail, which results in sharper images that are conducive to making large prints. If you never make any prints larger than 8×10″, then a full frame DSLR may not be of benefit to you.

Here this sunrise shot has a nice range of tones without any noise in the shadows that you might get with some crop sensor cameras.

Captured with full frame Nikon D750, this sunrise image reveals a nice range of tones, without any of the digital noise in the shadows likely to be present with some crop sensor cameras.

Will purchasing a full frame make you a better photographer?

You may have heard this quote, “Skill in photography is acquired by practice, not by purchase.”

Do you need a full frame camera to capture great images? No, of course not! Most new crop sensor cameras on the market today are engineered to take beautiful images! But if you are an experienced photographer who makes money with your camera, you may gain an advantage by switching to full frame.

The bottom line

If you are thinking of upgrading from a crop sensor camera, be sure to consider the price, lens compatibility, and type of photography you do, before you make the change to full frame. Jumping to full frame can be quite a leap! But if you are ready for that big step, the results can be rewarding.

Are you ready to go full frame? Please leave your comments below.

googletag.cmd.push(function() {
tablet_slots.push( googletag.defineSlot( “/1005424/_dPSv4_tab-all-article-bottom_(300×250)”, [300, 250], “pb-ad-78623” ).addService( googletag.pubads() ) ); } );

googletag.cmd.push(function() {
mobile_slots.push( googletag.defineSlot( “/1005424/_dPSv4_mob-all-article-bottom_(300×250)”, [300, 250], “pb-ad-78158” ).addService( googletag.pubads() ) ); } );

The post Is it Time to go Full Frame? Weight These Pros and Cons Before You Decide by Bruce Wunderlich appeared first on Digital Photography School.


Digital Photography School

 
Comments Off on Is it Time to go Full Frame? Weight These Pros and Cons Before You Decide

Posted in Photography


Updated Tamron 18-200mm F3.5-6.3 lens gains stabilization, sheds weight

07 Aug

Tamron has updated its 18-200mm all-in-one lens. The 18-200mm F3.5-6.3 Di II VC introduces image stabilization and is the lightest lens in its high-zoom class. Designed for Canon, Nikon, and Sony APS-C camera bodies, it covers a 28-310mm equivalent range. Read more

Articles: Digital Photography Review (dpreview.com)

 
Comments Off on Updated Tamron 18-200mm F3.5-6.3 lens gains stabilization, sheds weight

Posted in Uncategorized


6 Tips Using Visual Weight to Improve Your Composition

19 Jun

Andrew’s newest ebook Mastering Composition is now on special for a limited time only at Snapndeals.

Visual weight (also called visual mass) is the principle that some elements of the photo pull the eye more than others.

Take a look at the portrait below. Where does your eye go? It should go straight to the eyes, because they have the most visual weight. They are the element exerting the greatest pull.

Visual weight and composition

Notice that the model’s eyes are not positioned on the traditional intersection points created by the rule of thirds. That doesn’t stop them from pulling the eye, although it could be argued that their visual weight would be strengthened by placing them on a third.

Let’s look at the principles of visual weight (or visual mass) that you can use to improve the composition of your photos.

1. Light tones

Light tones and highlights pull the eye more than dark ones (the basis of tonal contrast). There is a strong contrast in the portrait above between the model’s skin and hair, and the dark background. It is easier to see in a black and white version of the same photo.

Visual weight and composition

2. People

Curiosity about other people is part of the human condition. Our eye goes straight to any human figure that is present in a photo. Recognixable faces exert a stronger pull, while the eyes (the window to the soul) have the strongest visual weight of all.

This explains why you can use people, small in the frame, to give scale and context. It works because our eyes go straight to those figures, as long as they stand out from the background (gestalt theory in action).

The people in the photo below are small, yet the eye goes straight to them. The inclusion of the human figures helps give the scene scale, and emphasizes the size of the mountain behind them.

Visual weight and composition

3. Visual weight and size

The larger the element of a photo, the more it pulls the viewer’s eye. This principle works in harmony with the others discussed in this section. A small human figure, for example, can have much more pull than a large, inanimate object. A small splash of red can also pull the eye very strongly. But for objects of similar texture and colour, the larger one has the stronger pull.

For example, the dials in this photo are virtually identical in terms of shape and design. The one on the right has the most visual weight because it is the largest of the two.

Visual weight and composition

4. Sharp or recognizable elements

Objects that are sharp or easy to recognize pull the eye more than ones that aren’t. According to gestalt theory, the mind looks for patterns and shapes that helps it make sense of chaotic scenes. Once something is identified, it gains significance in the frame compared to those that aren’t.

The most obvious example of this is a portrait taken against a strongly blurred background. The visual weight of the background is reduced because it is no longer sharp, and no longer recognizable. The use of negative space also comes into play.

Visual weight and composition

5. High contrast

High contrast subjects have more visual weight than low contrast ones. This is a good principle to apply in post-processing as well as the photo taking stage. Instead of increasing contrast universally across the image, try increasing it more in the areas where you want the viewer’s eye to travel. Lightroom’s Clarity slider is an excellent tool for this.

In this example I used the Clarity slider to emphasise the texture of the old car and help draw the eye to it.

Visual weight and composition

6. Visual weight and colour

Bright, saturated colours draw the eye. But not all colours are equal. Warm hues have more visual weight than cool ones. Red is the strongest colour of all.

Simplifying the composition makes the relationship between the colours in the photo easier to see. A technique you can use, if your subject is brightly coloured, is to position it against a background comprised subdued, less powerful hues like grey, green and brown.

Simplifying works for all aspects of visual weight. Eliminate everything that isn’t necessary. Keep the background as simple as you can. Once you’ve done this, look at the remaining elements and think about how the eye will move around between them, according to the principles of visual weight. The relationships between them become clearer as the composition is simplified.

The red figurine in the centre of the photo below has the most visual weight. I emphasised this in post-processing by using the Clarity slider to increase its contrast and adding a vignette to darken the background.

Visual weight and composition


Mastering CompositionMastering Composition

My new ebook Mastering Composition will help you learn to see and compose photos better. It takes you on a journey beyond the rule of thirds, exploring the principles of composition you need to understand in order to make beautiful images. It’s on special for a limited time only at Snapndeals.

googletag.cmd.push(function() {
tablet_slots.push( googletag.defineSlot( “/1005424/_dPSv4_tab-all-article-bottom_(300×250)”, [300, 250], “pb-ad-78623” ).addService( googletag.pubads() ) ); } );

googletag.cmd.push(function() {
mobile_slots.push( googletag.defineSlot( “/1005424/_dPSv4_mob-all-article-bottom_(300×250)”, [300, 250], “pb-ad-78158” ).addService( googletag.pubads() ) ); } );

The post 6 Tips Using Visual Weight to Improve Your Composition by Andrew S. Gibson appeared first on Digital Photography School.


Digital Photography School

 
Comments Off on 6 Tips Using Visual Weight to Improve Your Composition

Posted in Photography


SNOOKI lost weight with PHOTOSHOP Tutorial ( MAKEOVER )

21 Oct

The process of digital enhancing a picture with Photoshop (makeover) , in this case a Snooki’s picture.
Video Rating: 3 / 5

 
Comments Off on SNOOKI lost weight with PHOTOSHOP Tutorial ( MAKEOVER )

Posted in Retouching in Photoshop


Maya Skin Weight Tutorial

08 Jul

Maya Skin Weight Tutorial
Video Rating: 4 / 5

a sample of chinese painting animation!