RSS
 

Posts Tagged ‘used’

Sigma Mount Converter MC-11 experiences focus bug when used with Sony a9

31 May

Sigma has warned that the use of its Mount Converter MC-11 and certain Sigma zoom lenses with the Sony a9 may result in missed focus. According to a notice recently published by Sigma, the issue may arise ‘occasionally’ when using AF-S mode and while shooting ‘in the telephoto range.’

The phenomenon, according to Sigma, affects both the EF-E and SA-E versions of the MC-11. The company says it is investigating the issue and that it will publish an update ‘shortly,’ presumably with a software fix in the pipeline.

Via: Sigma Photo

Articles: Digital Photography Review (dpreview.com)

 
Comments Off on Sigma Mount Converter MC-11 experiences focus bug when used with Sony a9

Posted in Uncategorized


Nokia Lumia 1020 used as microscope in low-cost DNA sequencer

20 Jan

The Nokia Lumia 1020 was launched back in 2013, but with its large 41MP sensor and innovative down-scaling algorithms is by many still regarded as one of the best smartphone cameras today. 

Now, a team of researchers from the University of California, Sweden’s Stockholm University and Uppsala University has used exactly that camera to design a smartphone-based low-cost DNA sequencer and molecular analyzer. A $ 500 3D-printed attachment turns the Lumia camera into a microscope that can then be used by health workers in developing nations and remote locations to find genetic mutations that cause diseases without analyzing samples in a lab. Usually, the equipment needed for this task costs tens of thousands of dollars. 

When testing, tissue samples are placed in a small container. The Lumia and optical attachment are then used to record multi-color fluorescence and bright-field images. The captured image data is fed into an algorithm for analysis in order to find any possible mutations. The teams says the design can detect even a small amount of cancer cells or other genetic mutations within a large amount of normal cells. 

Given the Lumia 1020 has been out of production for quite some time it’s good news that the optical attachment can be adapted to work with more recent smartphone models. 

Articles: Digital Photography Review (dpreview.com)

 
Comments Off on Nokia Lumia 1020 used as microscope in low-cost DNA sequencer

Posted in Uncategorized


5 Tried and True Landscape Photography Tips used by the Pros

02 Oct

Have you ever found yourself wondering how do the professionals (pros) consistently turn out amazing photos day after day, year after year and what are some of their secrets? So besides knowing their camera like their best friend, what are some of the things that the pros do? Here are some tried and true landscape photography tips used by the pros.

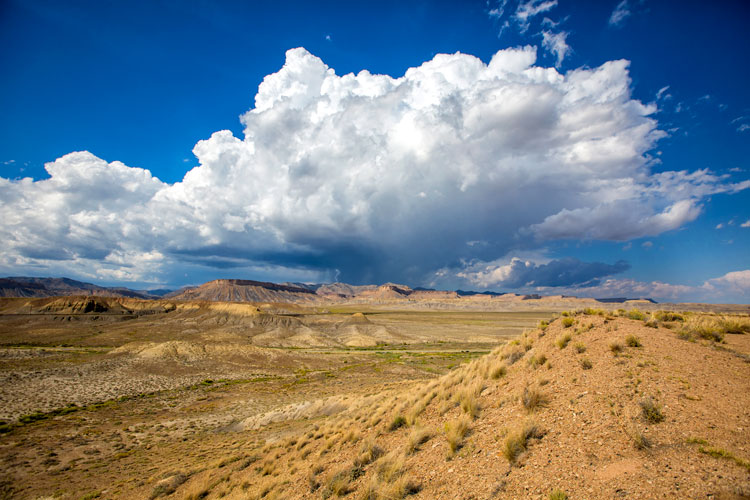
DesertStorm Landscape Photography Tips used by the Pros

1. Experimentation

Experimenting is one of the best ways to shake yourself up out of the doldrums and yes even pros use it to get their creative juices flowing.

Try photographing something totally outside your comfort zone or even a different subcategory within your preferred genre. If landscape photography is your thing, you are probably already a master of the golden hours (sunrise and sunset). So experimentation can start with shooting a nightscape or even a long exposure in the middle of the day.

Note: I would highly advise against experimenting at someone’s wedding!

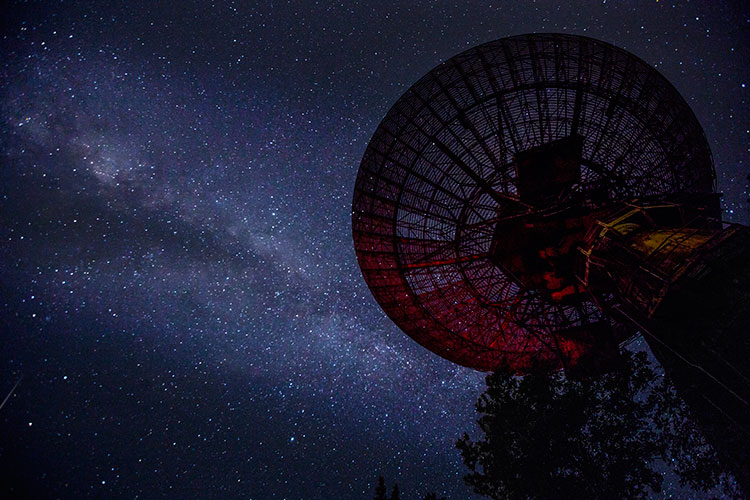
Night Sky Landscape Photography Tips used by the Pros

How about introducing a human element into your landscape and allowing them to be a part of the story? Experimenting keeps you on the learning path and when you learn, you grow as a photographer. It is about challenging yourself to do something different and pushing your boundaries.

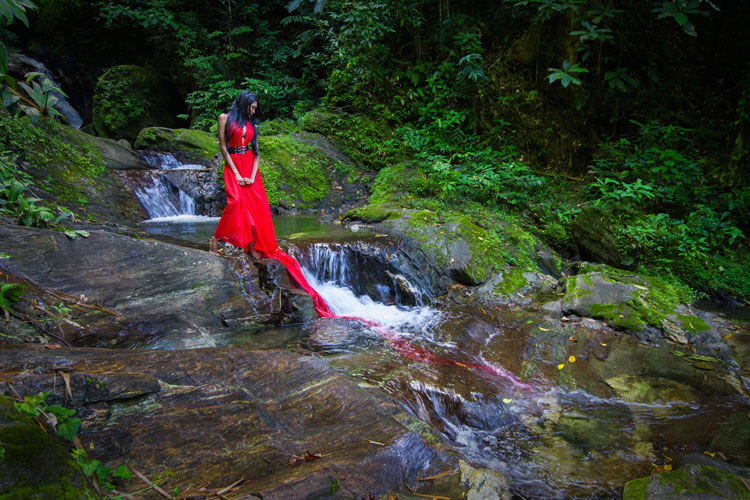
Landscape Model Landscape Photography Tips used by the Pros

2. Making it your own

Many places on your photography list have already been captured hundreds of times. That thought can make you throw your hands up in the air and decide you may as well just recreate it. Before you think of recreating, try to showcase it differently. What else can you do? Is there another foreground element you can add or take away? One of the things that make pro’s work stand out from the rest, is their perspective and ability to make a place seem like you are seeing it for the first time.

Maracas Bay, Trinidad - landscape photography tips from the pros

While it’s not always easy to create something unique and new, your originality is one of the things that will set you apart. Can you get a different angle, add or detract an element when composing, or shoot it differently (e.g. with light trails or multiple exposures)? How about getting off the trail and the popular view areas and charting your own course to find another perspective? There is no problem in finding inspiration in someone else’s work, but at all times keep in mind that you want your work to stand out

There is no problem in finding inspiration in someone else’s work. But keep in mind that you want your work to stand out, as your own.

Guardians - landscape photography tips from the pros

3. Tell a story

Someone said that “being a good photographer does not necessarily translate into being a good storyteller.” Being able to evoke the emotions of your audience should always be a goal, though. Keep in mind that the purpose of your photo story is to interest, instruct, or amuse your audience.

Decide how you want the image to affect them and then how to achieve that goal. Is your story going to be in black and white or infrared? Is it going to be realistic or abstract? Pros use different styles of photography to keep producing interesting stories consistently.

Boat Friends - landscape photography tips from pros

4. Less can be more

In landscape photography, being more selective with the views you present tells a more effective story, so pros understand the power of good composition (a vast topic all on its own). One of the rules of good composition is that your image should contain just enough detail. In landscape photography you do not have the luxury of physically moving things around, so you must arrange the elements of an image by changing your position. This also helps with finding the most flattering view, or one that tells a different story.

Ocean Sunrise landscape photography tips from pros

Choosing the important elements in your photo to highlight helps you decide what to include in the frame and what to leave out. Make your subject dominate by accentuating it with one or few related elements, remembering to declutter as much as you can. As a general rule, if an element in your image doesn’t enhance the subject, it may be detracting from it.

Lily Pond - landscape photography tips from pros

 5. Know your post-processing

Ideally, you want to get the shot right in-camera and eliminate or minimize your post-processing. With so many features and settings on DSLRs now, it is possible to produce the image you want. If this does not materialize, then you need the ability to do basic adjustments. These include changes to color and contrast, exposure adjustments, straightening, and cropping.

Check out these dPS articles for tips on processing:

  • How Cropping in Post-Production Can Improve Composition
  • 4 Key Lightroom Sliders That Will Supercharge Your Photos
  • How to Enhance Urban Night Photographs Using Luminosity Masks in Photoshop
  • 3 Fun Ways to Enhance Your Landscape Images in Photoshop

Glass Bottomed Boat -  landscape photography tips from pros

Pros know the importance of post-processing. That is one of the main reasons they shoot in RAW to capture all the uncompressed image data, which leads to higher quality images in the end.

Post-processing can also add that unique element of you. Decide if the shot you took is what you wanted to achieve or you can choose to adjust elements until you get the image you want to present. Digital photography has made it easier to post-process than the dark rooms of yesteryear but it also makes it easier to  go overboard easily. So determine your vision for the final image and learn to execute it properly so you produce an image that represents you.

South Beach -  landscape photography tips from pros

Conclusion

These are just a few of the things to keep in the back of your mind when you are creating images. Staying consistent means staying creative or constantly challenging yourself to try something different or learn something new. When you get to your location, think about how you can make the image your own. There is nothing more amazing than producing a piece that someone can identify as yours even before they confirm you did it. Share with us how else you stay consistent when shooting.

When you get to your location, think about how you can make the image your own. There is nothing more amazing than producing a piece that someone can identify as yours even before they confirm you did it. Share with us how else you stay consistent when shooting and any other landscape photography tips you have learned.

googletag.cmd.push(function() {
tablet_slots.push( googletag.defineSlot( “/1005424/_dPSv4_tab-all-article-bottom_(300×250)”, [300, 250], “pb-ad-78623” ).addService( googletag.pubads() ) ); } );

googletag.cmd.push(function() {
mobile_slots.push( googletag.defineSlot( “/1005424/_dPSv4_mob-all-article-bottom_(300×250)”, [300, 250], “pb-ad-78158” ).addService( googletag.pubads() ) ); } );

The post 5 Tried and True Landscape Photography Tips used by the Pros by Nisha Ramroop appeared first on Digital Photography School.


Digital Photography School

 
Comments Off on 5 Tried and True Landscape Photography Tips used by the Pros

Posted in Photography


Why Asking What Camera Settings Were Used is Not as Helpful as You Think

10 Mar

When you view an image that you love, do you find yourself asking, “What camera settings did the photographer use?” This is a common question, that overlooks other important aspects which would have helped to create that image, such as the lighting conditions, and any post-processing techniques involved. As you become more experienced, and progress in your journey as a photographer, you may begin to realize that the things you originally obsessed over, may not be as important as you once thought.
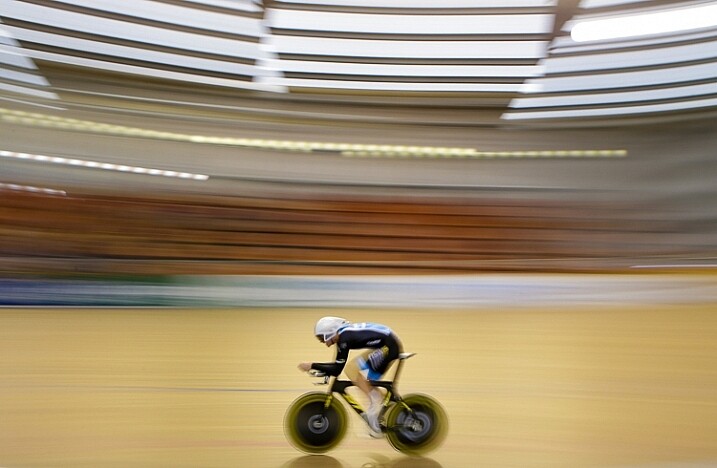
Fig 4

For this image I used a shutter speed of 1/5th, as this would blur out the background quite nicely, as I panned with the rider to make him pop out more. This meant I had to increase my aperture to f/10, and could also decrease my ISO to ISO 320, too. © Daniel Smith / Getty Images.

A topic that many photographers are caught up in, is knowing which camera settings were used; more specifically, aperture, shutter speed and ISO. Any photographer will tell you that these three elements of exposure are very important in creating the desired image. If you use the wrong combination of these in any given environment, you could very well end up with undesired results. Keeping that in mind, it is completely understandable why new photographers obsess over knowing exactly which camera settings were used.

In theory, this should help you to recreate that particular image, right? Unfortunately this may not be the case. Images are created from much more than just the correct combination of aperture, shutter speed and ISO. These three fundamentals do more than just control the exposure; they also give us a creative language to use in our images.

Fig 2

In this image, I wanted to show some motion in the gymnast’s movements, rather than taking another frozen frame. To do this I lowered my shutter speed from 1/1000th to 1/15th. This reduction meant I could also lower my ISO from ISO 3200 to ISO 500 and increase my aperture to f/7.1.

But before diving into this further, let’s explore the two different perspectives of this question; firstly from the point of view of a beginner, who would hope to replicate this imagine. They may assume that by knowing the exact camera settings, and dialling them into the camera, that they will somehow magically achieve the same result. Looking at this from an experienced photographer’s perspective, they may ask this question but with a different scope in mind. It may be when they are perplexed as to the techniques behind a particular image, or in relation to a very specific genre in photography, such as astrophotography, where knowing the settings may help provide a breakthrough.

So why is the question unhelpful?

This question will not always equip you with the knowledge you need, to recreate that image, or with your endeavours of becoming a more successful photographer. There is a lot more to creating an image than just the camera settings. By focussing on camera settings alone, you are missing out on a lot more information as to why those settings were used.

Settings are only a small part of what makes up that image. Lighting conditions, post-processing and the outcome the photographer wants to achieve, are just some of the factors that will dictate what settings the photographer uses. It’s akin to having the correct ingredients for a cake, but not knowing the method behind making it, or the reasons behind that method. Relying on camera settings alone does not tell you anything about the environment the image was taken in, nor does it give you an indication of what the lighting conditions were like.
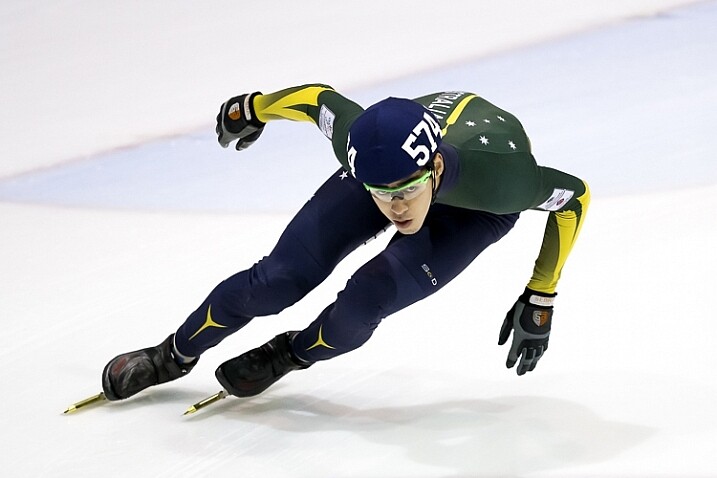
To freeze the action here I used a shutter speed of 1/1000sec. To keep my ISO as low as possible, but still have a little more depth of field than what /2.8 would offer, I used an aperture of f/3.5. I then set my ISO to ISO 3200 to give me the correct exposure. Being indoors, the ISO is a little higher. © Daniel Smith / Getty Images.

To freeze the action here I used a shutter speed of 1/1000th. To keep my ISO as low as possible, but still have a little more depth of field than what f/2.8 would offer, I used an aperture of f/3.5. I then set my ISO to 3200 to give me the correct exposure. Being indoors, with low light conditions, the ISO is a little higher. © Daniel Smith / Getty Images.

Deciding what camera settings to use is a result of knowing how you want the image to look. For the above image, if I told you that I used a shutter speed of 1/1000, aperture f/3.5 and ISO 3200, and you were to go out and dial in the same settings, it would be highly unlikely that you will get the same result. Why? Because the chances of the lighting in your environment, compared to where this image was taken, being the same is highly unlikely.

The reason I chose these particular settings was simple; I needed a fast shutter speed to freeze the action, so I used 1/1000th of a second. I also wanted to use a wider aperture that would allow me to isolate the subject more. A bi-product of this, is that it allows me to maintain a fast shutter speed, but also helps me use a lower ISO. I then use whatever ISO needed to create the correct exposure – in this case it was ISO 3200. The settings you that you require could be 1/2000th, f/4 and ISO 800. The exposure may come out the same, but the settings used are different, and tailored to the specific lighting conditions.
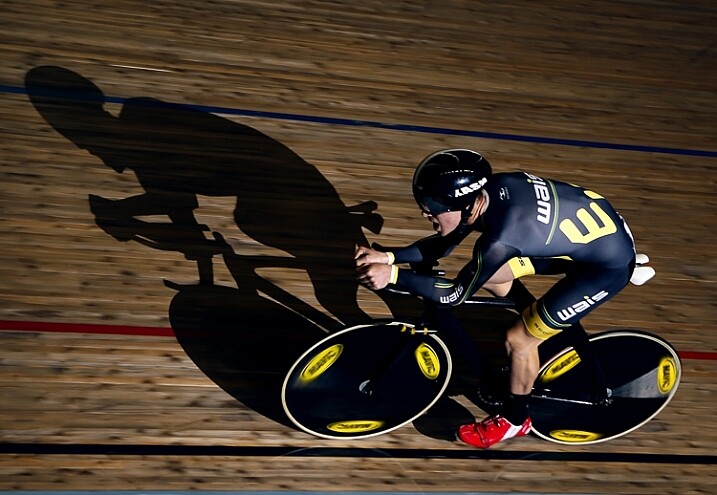
1/160, f/2.8 ISO 100 © Daniel Smith / Getty Images.

1/160th, f/2.8 ISO 100 © Daniel Smith / Getty Images.

Consider the image above. If you ask me what the camera settings for this image were, I will gladly tell you that this was shot at 1/160th, f/2.8 and ISO 100. But what this doesn’t tell you is that I had a speedlight on the ground, off to camera right, at full power. The majority of the light in this image is coming from the flash, with very little ambient (available light) influencing this image at all. Knowing just the settings will not help you to understand how this image was made. There is more to the image than just the camera settings.

The camera settings here are geared more toward the speedlight, as it is quite a distance from the rider. The slower shutter speed is just below sync-speed, which allows for more power of the flash to affect the image (high-speed sync decreases the flash output range) and it also adds a slight blur to the wheels, which gives a nice sense of speed to the image. I used f/2.8 again to aid in the power of the flash, because my ISO was low to reduce the amount of ambient light. The flash is also freezing the majority of the action here.

Knowing why those settings were used, is far more important than just knowing the settings by themselves. It’s knowing the why, that will help you in your journey as a photographer. As the saying goes, “Give a man a fish and you feed him for a day; teach a man to fish and you feed him for a lifetime.” The same principle is at work in photography. Even if I was with you, and told you the settings to use, what will you do when you are alone? You need to understand why those settings have been used.

Reading an image

When looking at an image, understanding what and why you like it, will be of great benefit to you. This is something that you will develop more and more, as you mature as a photographer. Just a hint, it’s not the camera settings that made an image great. It could be the location, the lighting (time of day is very important), composition, perspective, focal length, any editing techniques used, etc., that all worked together to make the final piece. Each one of these is no more or less important than the next, and they all need to be considered.

For me, moving from obsessing over camera settings, to these other factors that influence a photo, was somewhat of an epiphany for me, and made me realize that photography may not be as simple as I once thought it was!

With this image, I used 1/160sec, f/4 and ISO 400. I also have two flashes fired remotely; one camera-right just behind the model giving the rim light on her front side and arms etc. I also have my key light placed at camera left and at ~ 45-degree angle facing the model. Both lights are un-modified (bare-head, or bare-bulb).

With this image, I used 1/160th, f/4 and ISO 400. I also have two flashes fired remotely; one camera-right just behind the model, creatng the rim light on her front side and arms. I also have my key light placed at camera left and at approximately a 45-degree angle, facing the model. Both lights are un-modified (bare-head, or bare-bulb).

As you advance in photography, you will slowly develop a skill that is often referred to as reading an image. This is were you look at an image, and begin to work out how it was created.

For instance you will be able to have a rough idea of the position of the camera, any lighting setups that were used, etc. This is something that you will build upon as you become more experienced. Unfortunately, this is where the magic of photography seems to end. At first, you are in awe of what you captured, when you didn’t quite know how you got it; it all seemed to work like magic. But as you begin to read images, and dissect how they were crafted, that magic can seemingly disappear.

Here I used 1/1000sec to freeze the action, f/3.5 to give less depth of field and ISO 6400 to fill in the exposure gap. The ISO is quite high as this is at a night game. © Daniel Smith / Getty Images.

Here I used 1/1000th to freeze the action, f/3.5 to give less depth of field, and ISO 6400 to fill in the exposure gap. The ISO is quite high as this was a night game. © Daniel Smith / Getty Images.

But before you being to to read photos, you must first be very comfortable with not only the three exposure elements (aperture, shutter speed and ISO), but also how they visually affect images. Once you fully understand each element, you will be able to look at an image and say, “They’ve used a fast shutter speed for this” or, “The aperture used was very wide”.

You may not be able to determine the exact camera settings, but you will be able to put yourself in a much better starting point than when you first begun, when you had no idea where to begin! This illustration gives a very quick visual representation of how shutter speed, aperture and ISO affect the look of an image.
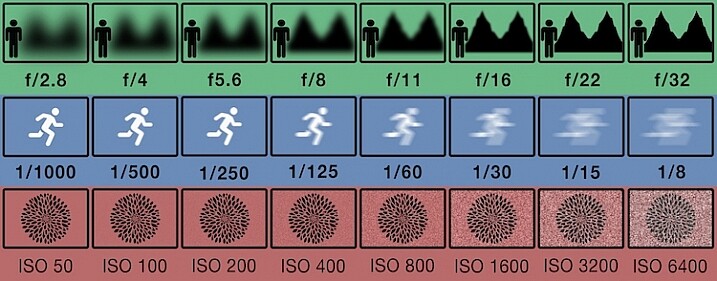
This illustration gives a visual guide to how aperture, shutter speed, and ISO affect an image. *this is just an illustration and does not necessarily give exact representation for each.

This illustration gives a visual guide to how aperture, shutter speed, and ISO affect an image. *Note: this is just an illustration and does not necessarily give exact representation for each.

Conclusion

So you now know why asking, “What camera setting did you use?” is not the most helpful. But rather than leave you there, let’s look at some alternative questions you can ask, while you develop your image reading skills, and get some education under your belt:

  • How did you create this image?
  • What post-processing methods did you use?
  • How did you achieve (whatever part you are most intrigued about)?
  • What camera/lens combination did you use?
  • Why did you use that specific camera/lens combination?
  • Why did you use those particular settings?
  • What was the lighting like?

Now you are armed with some alternative questions to ask that will give you a better insight to how it was made, when you see an image you like.

With this in mind, what questions would you ask about this image? Would you still ask for the camera settings, or how this image was created?
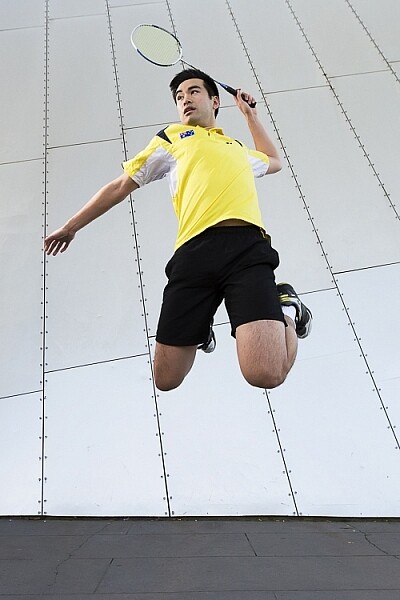
Fig 9

googletag.cmd.push(function() {
tablet_slots.push( googletag.defineSlot( “/1005424/_dPSv4_tab-all-article-bottom_(300×250)”, [300, 250], “pb-ad-78623” ).addService( googletag.pubads() ) ); } );

googletag.cmd.push(function() {
mobile_slots.push( googletag.defineSlot( “/1005424/_dPSv4_mob-all-article-bottom_(300×250)”, [300, 250], “pb-ad-78158” ).addService( googletag.pubads() ) ); } );

The post Why Asking What Camera Settings Were Used is Not as Helpful as You Think by Daniel appeared first on Digital Photography School.


Digital Photography School

 
Comments Off on Why Asking What Camera Settings Were Used is Not as Helpful as You Think

Posted in Photography


‘We want to make lenses that can be used forever’: Sony engineer discusses G Master lenses

10 Feb

‘We want to make lenses that can be used forever,’ says a senior engineer behind Sony’s new G master lenses. At the launch of the ‘G Master’ range of high end lenses, we spoke to Motoyuki Ohtake, Distinguished Engineer in Sony’s Lens Design Department about the process and the philosophy behind the latest lenses.

The development process series involved re-thinking several parts of the design and manufacturing process, he says.

Motoyuji Ohtake, Distinguished Engineer, Opto Design Department, Core Technology Division, Digital Imaging Business Group at Sony.

To understand how the lenses came about, he explained the usual process of lens development. ‘Sometimes we propose a new lens but often it comes from the product planning department [the marketing department that assesses potential requirements and demands]. We then make a series of rough designs, some are big, with high optical performance, others are more compact but maybe not so optically strong. We discuss which design to proceed with, based on what we think is the optimal balance or cost, performance and size to make the perfect product.’

After deciding which of the initial designs to pursue, there’s a great deal of collaboration between teams, he explains: ‘we work with the mechanical team, the lens motor team, the lens control team, the lens element team and maybe the equipment team who will have to prepare the manufacturing process.’ Each of these team feeds its expertise into the design. ‘Maybe the optical team proposes a new lens design and the motor team tells us which motor is best. Or warn us if the focus will be too slow. They feed back about the mechanical aspects,’ he says.

The G Master series required many of these teams to re-think their parts of the process, from design to manufacture.

Re-thinking basic assumptions

‘For the G Master lenses we decided we would assess the spatial frequency at 50 lines per mm,’ says Ohtake: ‘Usually lens makers, including ourselves, evaluate lenses at 10 and 30 lpmm (or 10, 20 and 40 for Carl Zeiss-branded optics).’

‘At the start of the process we all agreed we should change the spacial frequency [to a more challenging target],’ he says: ’but which is best to get good performance? We could design for 100 lpmm but the lens would become very bulky and long – which might not be a very practical lens. A balance of the size and the optical performance was very important.’

The target of 50 lpmm wasn’t dictated by the company’s 40MP camera or 4K video, he says. ’All our FE lenses were designed for at least 40MP. Because we have an image sensor team within Sony, we get to see the sensor roadmap, so we’ve been designing for this all along with FE. With the G Master we’d like to make lenses that can be used forever.’

A focus on bokeh

But it’s not just the more stringent frequency assessment that was developed for the G Master lenses, Ohtake explains: ‘We had to discuss what good bokeh means. We have some designers from Minolta who understand that the spirit of the ‘G’ lenses was good bokeh in the background but we had no way to evaluate that.

‘We looked at what is considered good bokeh and how it affects not just the background rendering but also the transition from perfectly sharp to out-of-focus regions. We developed a way to evaluate bokeh and were able to make a simulation. This meant we didn’t have to build a lens to see how it performed, we could now computer model it before taking a design too far.’

This is a significant change, Sony says, as it means bokeh can be one of the primary design considerations, rather than being something that can only be adjusted later in the process, once the main aspects of the design have been settled upon.

Another piece of the puzzle – shape and smoothness

This analysis of the factors that affect bokeh showed that both the precision of the lens molding and the smoothness of the lens surface could have an effect.

‘Traditionally it was very hard to achieve both: current technology gives a roughness on the scale of 20-30nm on the aspheric surface. Improving this usually involved polishing, which can then lead to the lens element being slightly unevenly shaped.’

‘We developed a new way of making the lens element and a new molding process, including a new machine. Now we can get roughness down to around 10nm and get a more accurate shape to the aspherical surface.’

AF technologies

Ohtake wouldn’t budge when we asked which his favorite lens was, but immediately reached for the 85mm F1.4 when we took this group shot.

The first three G Master lenses use three different AF motor technologies between them – emphasizing Ohtake’s point that different technologies work better in different contexts.

The 24-70mm F2.8 uses a Direct Drive SSM system (piezoelectric element). This is very fast, very quiet and very precise. We used a linear motor for the 24-70mm F4 but this lens has a heavier focus element, so direct drive was a better choice.

The focus element in the 85mm F1.4 was even heavier, however. ‘For the 85mm we use a ring type focus motor. This is very good for heavy lens elements and our lens software team developed a good algorithm so that it works well with contrast-detection autofocus’ (a traditional weakness for ring-type designs).

Finally, the 70-200mm uses a combination of a linear actuator and a ring-type focus motor. ‘The focus group had become too heavy so we separated the two focusing lenses. One is very heavy, so we used a ring type motor for that one, then used a linear motor for the other. The ring type is used to quickly achieve approximate focus and the linear motor is used for the high precision aspect.’

Still correct to optically correct

Discussing the idea that bokeh and sharpness have previously been in conflict, we asked Ohtake about other trade-offs. We’ve been told that the ability to correct lateral chromatic aberration in software makes lens design easier, since you don’t have to correct it optically, which can quickly complicate the lens design and detract from other parameters.

Not for G Master lenses, he explains. ‘Light doesn’t separate nicely into red, green and blue’ (the color channels that most cameras capture, and which can be adjusted, relative to one another, to correct lateral CA). It’s a continuum with each wavelength being displaced slightly differently. ‘To get the really high contrast we wanted in G Master, we had to suppress it in the lens.’

The future of APS-C

We also asked Ohtake about Sony’s APS-C lenses for E-mount. His team likes designing APS-C lenses, he says: ‘The focus elements are light, so it’s easier to design. We have all these focus motor technologies in-house and we’d like to try them in APS-C lenses if that’s what the Product Planning team says is required.’

Articles: Digital Photography Review (dpreview.com)

 
Comments Off on ‘We want to make lenses that can be used forever’: Sony engineer discusses G Master lenses

Posted in Uncategorized


‘We want to make lenses that can be used forever’: Sony engineer discusses G Master lenses

05 Feb

‘We want to make lenses that can be used forever,’ says a senior engineer behind Sony’s new G master lenses. At the launch of the ‘G Master’ range of high end lenses, we spoke to Motoyuki Ohtake, Distinguished Engineer in Sony’s Lens Design Department about the process and the philosophy behind the latest lenses.

The development process series involved re-thinking several parts of the design and manufacturing process, he says.

Motoyuji Ohtake, Distinguished Engineer, Opto Design Department, Core Technology Division, Digital Imaging Business Group at Sony.

To understand how the lenses came about, he explained the usual process of lens development. ‘Sometimes we propose a new lens but often it comes from the product planning department [the marketing department that assesses potential requirements and demands]. We then make a series of rough designs, some are big, with high optical performance, others are more compact but maybe not so optically strong. We discuss which design to proceed with, based on what we think is the optimal balance or cost, performance and size to make the perfect product.’

After deciding which of the initial designs to pursue, there’s a great deal of collaboration between teams, he explains: ‘we work with the mechanical team, the lens motor team, the lens control team, the lens element team and maybe the equipment team who will have to prepare the manufacturing process.’ Each of these team feeds its expertise into the design. ‘Maybe the optical team proposes a new lens design and the motor team tells us which motor is best. Or warn us if the focus will be too slow. They feed back about the mechanical aspects,’ he says.

The G Master series required many of these teams to re-think their parts of the process, from design to manufacture.

Re-thinking basic assumptions

‘For the G Master lenses we decided we would assess the spatial frequency at 50 lines per mm,’ says Ohtake: ‘Usually lens makers, including ourselves, evaluate lenses at 10 and 30 lpmm (or 10, 20 and 40 for Carl Zeiss-branded optics).’

‘At the start of the process we all agreed we should change the spacial frequency [to a more challenging target],’ he says: ’but which is best to get good performance? We could design for 100 lpmm but the lens would become very bulky and long – which might not be a very practical lens. A balance of the size and the optical performance was very important.’

The target of 50 lpmm wasn’t dictated by the company’s 40MP camera or 4K video, he says. ’All our FE lenses were designed for at least 40MP. Because we have an image sensor team within Sony, we get to see the sensor roadmap, so we’ve been designing for this all along with FE. With the G Master we’d like to make lenses that can be used forever.’

A focus on bokeh

But it’s not just the more stringent frequency assessment that was developed for the G Master lenses, Ohtake explains: ‘We had to discuss what good bokeh means. We have some designers from Minolta who understand that the spirit of the ‘G’ lenses was good bokeh in the background but we had no way to evaluate that.

‘We looked at what is considered good bokeh and how it affects not just the background rendering but also the transition from perfectly sharp to out-of-focus regions. We developed a way to evaluate bokeh and were able to make a simulation. This meant we didn’t have to build a lens to see how it performed, we could now computer model it before taking a design too far.’

This is a significant change, Sony says, as it means bokeh can be one of the primary design considerations, rather than being something that can only be adjusted later in the process, once the main aspects of the design have been settled upon.

Another piece of the puzzle – shape and smoothness

This analysis of the factors that affect bokeh showed that both the precision of the lens molding and the smoothness of the lens surface could have an effect.

‘Traditionally it was very hard to achieve both: current technology gives a roughness on the scale of 20-30nm on the aspheric surface. Improving this usually involved polishing, which can then lead to the lens element being slightly unevenly shaped.’

‘We developed a new way of making the lens element and a new molding process, including a new machine. Now we can get roughness down to around 10nm and get a more accurate shape to the aspherical surface.’

AF technologies

Ohtake wouldn’t budge when we asked which his favorite lens was, but immediately reached for the 85mm F1.4 when we took this group shot.

The first three G Master lenses use three different AF motor technologies between them – emphasizing Ohtake’s point that different technologies work better in different contexts.

The 24-70mm F2.8 uses a Direct Drive SSM system (piezoelectric element). This is very fast, very quiet and very precise. We used a linear motor for the 24-70mm F4 but this lens has a heavier focus element, so direct drive was a better choice.

The focus element in the 85mm F1.4 was even heavier, however. ‘For the 85mm we use a ring type focus motor. This is very good for heavy lens elements and our lens software team developed a good algorithm so that it works well with contrast-detection autofocus’ (a traditional weakness for ring-type designs).

Finally, the 70-200mm uses a combination of a linear actuator and a ring-type focus motor. ‘The focus group had become too heavy so we separated the two focusing lenses. One is very heavy, so we used a ring type motor for that one, then used a linear motor for the other. The ring type is used to quickly achieve approximate focus and the linear motor is used for the high precision aspect.’

Still correct to optically correct

Discussing the idea that bokeh and sharpness have previously been in conflict, we asked Ohtake about other trade-offs. We’ve been told that the ability to correct lateral chromatic aberration in software makes lens design easier, since you don’t have to correct it optically, which can quickly complicate the lens design and detract from other parameters.

Not for G Master lenses, he explains. ‘Light doesn’t separate nicely into red, green and blue’ (the color channels that most cameras capture, and which can be adjusted, relative to one another, to correct lateral CA). It’s a continuum with each wavelength being displaced slightly differently. ‘To get the really high contrast we wanted in G Master, we had to suppress it in the lens.’

The future of APS-C

We also asked Ohtake about Sony’s APS-C lenses for E-mount. His team likes designing APS-C lenses, he says: ‘The focus elements are light, so it’s easier to design. We have all these focus motor technologies in-house and we’d like to try them in APS-C lenses if that’s what the Product Planning team says is required.’

Articles: Digital Photography Review (dpreview.com)

 
Comments Off on ‘We want to make lenses that can be used forever’: Sony engineer discusses G Master lenses

Posted in Uncategorized


Epson announces mass production of 4.41m dot LCD likely used in Leica SL

11 Dec

Epson has announced its latest electronic viewfinder panel: a 4.41m dot SXGA+ display, a spec that may sound familiar to anyone who’s been reading about Leica’s SL full-frame mirrorless camera. Epson had shown a mockup of the panel at CP+ back in February 2015, and says the unit is now in mass production.

The 4.41m dot unit offers an SXGA+ display: 1,400 x 1,050 pixels. This equates to 1.87x as many pixels as the existing XGA viewfinders used in most high-end mirrorless cameras: a 36% increase in linear resolution. Everyone who’s used it at DPReview has been very impressed by the level of detail shown by the SL’s 4.41m dot viewfinder.

Leica has previously offered Epson-based EVFs as accessory finders for its X1 and X2 models, but these were likely to have been brought in from Olympus, given the similar styling and cross-compatibility with Olympus units. Considering the dot count and panel size (0.66″), it seems very probable that this is the LCD panel in the SL.

The Leica SL, as seen from behind

At present, most high-end EVFs we’ve seen are XGA 2.36m dot displays, using either LCD or OLED technologies. Olympus used LCD panels in its earlier OM-D cameras but has shifted towards OLED in its latest generation. Likewise, Fujfilm used LCDs in its X-Pro1 and X100 series models, only to embrace OLED across the rest of its range. Despite this shift, we’d be surprised if we didn’t start seeing this LCD panel in some of the higher-end mirrorless cameras over the coming year or so, especially given the greater longevity of LCD panels that Leica mentioned as its reason for choosing the technology.

That said, the 0.66″ panel size could limit its usage, since this is considerably larger than the 0.48″ LCD and 0.5″ OLEDs currently in use.

Articles: Digital Photography Review (dpreview.com)

 
Comments Off on Epson announces mass production of 4.41m dot LCD likely used in Leica SL

Posted in Uncategorized


World’s Littlest Skyscraper Scam: Con Man Used Inches, Not Feet

23 Aug

[ By WebUrbanist in Culture & History & Travel. ]

world smallest high rise

Perhaps the greatest cons of all time are those that manage to hold up in court, like the case of the world’s smallest skyscraper, a building sold to investors at 480 inches tall on a blueprint that did not convert those units back into feet.

worlds smallest skyscraper texas

Built during an oil boom in Wichita Falls, Texas, the Newby-McMahon Building measures just 40 feet tall, 18 feet deep and 10 feet wide, initially featuring neither stairs nor elevators, forcing occupants to climb ladders to access upper floors. Completed in 1919, the structure was the brainchild of J.D. McMahon, petroleum landman and structural engineer, who collected $ 200,000 of investments (over $ 2 million in today’s dollars) to build a skyscraper in an area of rapid regional growth in great need of highrise office space.

plaque smallest skyscraper

The subtle genius that won his defense in the ensuing lawsuit: his floor plans, sections and elevations were all drawn to scale and clearly labeled in inches rather than feet, resulting in a building that was precisely one twelfth what its investors were expecting on all sides. McMahon began construction and before long the other stakeholders realized they were being swindled but found they had no recourse, having explicitly signed off on the drawings. The company responsible for installing an elevator backed out when they realized they were part of the scam, leaving the building without any means of transit between floors as well.

worlds littlest skyscraper con

Despite it being a folly in the eyes of its investors and being boarded up for years during the Great Depression, the structure was saved time and time again from demolition by local activists and has since housed a series of businesses within its modest-sized walls. Today it remains a historic landmark, though due to its size it does not meet classification criteria as even a highrise, let alone an atual skyscraper. Images by Chuck Coker, Nicolas Henderson and Solomon Chaim.

Share on Facebook


[ By WebUrbanist in Culture & History & Travel. ]

[ WebUrbanist | Archives | Galleries | Privacy | TOS ]


WebUrbanist

 
Comments Off on World’s Littlest Skyscraper Scam: Con Man Used Inches, Not Feet

Posted in Creativity


Royal Family expresses concerns over alarming measures used by paparazzi seeking photos of Prince George

15 Aug

The Duke and Duchess of Cambridge have expressed concerns with some of the recent tactics used by paparazzi trying to photograph their two-year-old son. The letter details some of the methods photographers have used to try and get their shots, including hiding in sand dunes and using other children to lure Prince George into view at playgrounds. Read more

Articles: Digital Photography Review (dpreview.com)

 
Comments Off on Royal Family expresses concerns over alarming measures used by paparazzi seeking photos of Prince George

Posted in Uncategorized


War Rigs: The tech used to shoot Mad Max: Fury Road

14 Aug

One of this summer’s biggest hits is undoubtedly ‘Mad Max: Fury Road’. Its narrative is built around an extended car chase, brought to life through physical stunts and visual effects work. We spoke with a few of the film’s visual effects supervisors about the gear used to shoot the film (from an Arri Alexa to an iPhone 6) and the impact it had on their work. Read more

Articles: Digital Photography Review (dpreview.com)

 
Comments Off on War Rigs: The tech used to shoot Mad Max: Fury Road

Posted in Uncategorized