Photoshop can be extremely intimidating to learn, but once you start to get a grasp on some of the tools it has to offer, you’ll wonder how you ever processed photographs without it. If there’s one area of Photoshop that is both extremely confusing, and yet, extremely powerful when harnessed properly, it’s got to be the collection of blend modes. While this article won’t cover all of the options available within Photoshop, it should give you a good place to start your journey into using Photoshop blend modes.
Photoshop blend modes: a few basics to get you started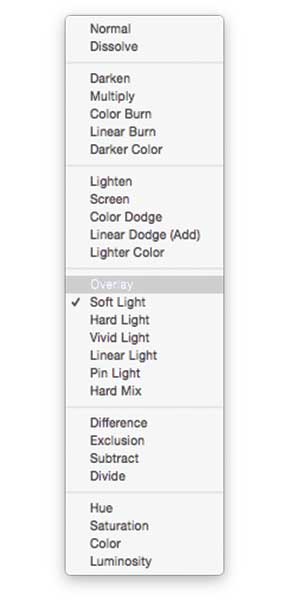
- Photoshop blend modes are found in a drop down menu at the top of the layers panel (it defaults to “Normal”)
- There are 27 different options to choose from, including the default “Normal” blend mode.
- Adobe has organized these 27 blend modes into six different categories
- Normal – Contains blend modes that don’t actually blend the layer being selected. (Normal shows the layer, and the dissolve layer essentially just removes pixels from the top layer as you reduce the opacity this effect is increased).
- Darken – These blend modes use 100% white as a neutral, they have an overall darkening effect on images.
- Lighten – Here Photoshop is using 100% black as a neutral, they have an overall lightening effect on images.
- Overlay – In the Overlay mode Photoshop is blending the top layer and bottom layer together in a way that adds contrast. The effect of this changes based on the opacity of the layer, and the type of blend mode selected.
- Difference – The difference set can be referred to as the inversion group, as these blend mode options are often used to either cancel colors of the layer below it, or to invert them.
- Hue – Here Photoshop allows you to get very creative with the HSL of the layers in question.
- When you apply a blend mode to a layer, it takes the effect of the given blend mode and it is applied to the layer directly below it within Photoshop.
To simplify the process of trying to learn all 27 blend modes at once below, let’s learn about the three most versatile blend modes Photoshop has to offer.
The first three Blend Modes you need to learn
In all the example photographs below I’ll be using two layers to demonstrate the different effects of each of the three blend modes. The top layer is simply a white, gray, black layer and the bottom layer is the same image placed under those three colors.

White, gray, black layer.
Multiply Blend Mode
This blend mode falls within the “Darken” group and therefore it is considering 100% white a neutral. The basic math behind how this blend mode works is that the dark pixels of the background layer are multiplied with those of the foreground layer and combined. Therefore the result you end up with is an overall darkening of the image, as the dark pixels within both layers become more significant while the light pixels are essentially removed.
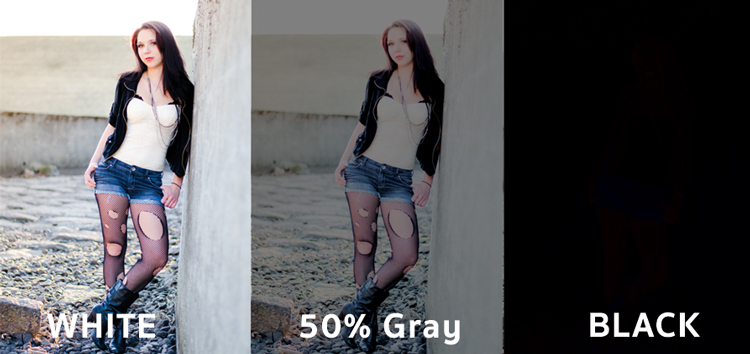
As you can see in the 50% gray layer, the darker pixels from the gray foreground layer are helping to darken the layer below it.
This blend mode is great for creating shadows or removing bright pixels from an underlying layer. It can be used in conjunction with a curves adjustment layer to add additional darkness to a layer. By effecting the dark end of the curve this can become really handy when trying to emphasize shadows, or darken an image.
Screen Blend Mode
As mentioned above, the lighten group sets black as neutral and therefore when we use the screen blend mode the black layer has no effect, 100% white stays as white and the 50% gray is somewhere in the middle.
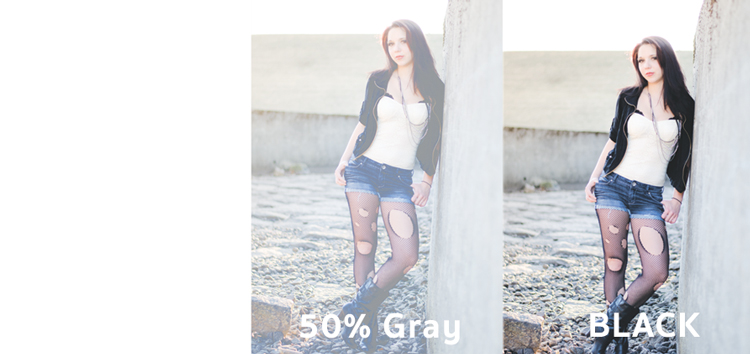
In a similar mathematical method to the Multiply blend mode the screen blend mode is multiplying the light pixels of both the foreground and background layers to achieve the final blend. As you can see in the above example, at 50% gray the light pixels are made even lighter as the bright pixels of the gray layer are multiplied with those of the layer below it.
The Screen blend mode is therefore great for removing darkness from an image or can even be used to create soft glow effects around a subject.
Soft Light Blend Mode
Here the formula used by Photoshop is essentially both that of the Multiply and Screen blend modes, then that effect is divided by two. What this means is that you’ll be darkening the dark pixels and lightening the light pixels, and then dividing the end result by two (or 50% of full strength). What ends up happening is an overall increase in contrast of the image
As a result, the Soft Light blend mode, is a great way to add a bit of contrast to an image. For an even stronger effect – use the Overlay blend mode.
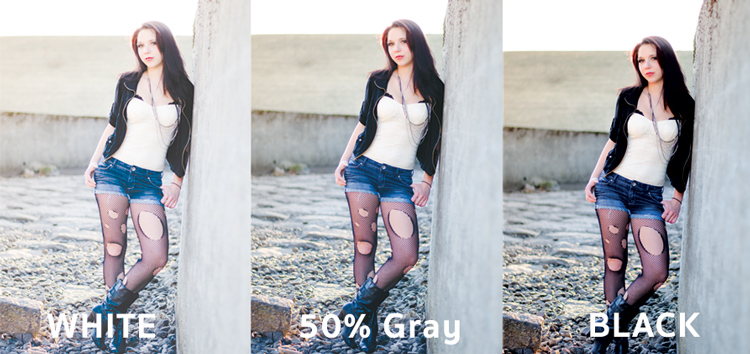
One of the best techniques for using this technique is to duplicate your layer and apply the Soft Light blend mode to that layer. You’ll se an instant increase in contrast which can then be fine tuned with the opacity slider of your duplicated layer.
An example of Photoshop blend modes in action
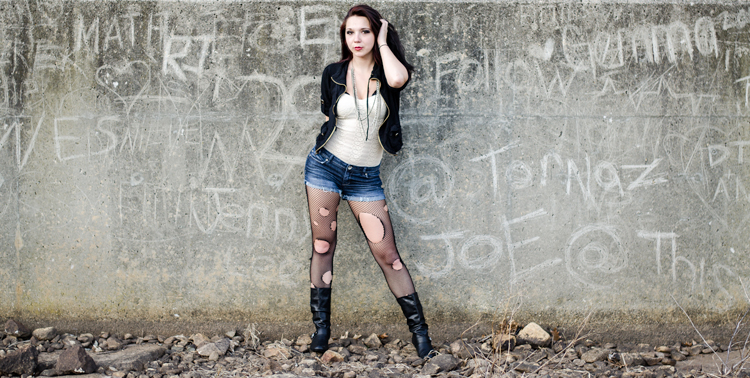
Original – (placed as Full Size 750 x 378)
The original image was a bit on the flat side, so by duplicating this layer, and changing it Soft Light blend mode, you’ll notice an increase in contrast. This higher contrast look works well with the rocks, and graffiti wall behind the model.

Duplicated with Soft Light blend mode
To take it a step further, a Curves Adjustment Layer was added above the duplicate layer and the blend mode was set to multiply. A layer mask was then applied to this Curves layer to reveal it only over the model’s upper body and face. By applying this small adjustment you’ll notice a bit more definition in the face and shadows.

Curves adjustment + Multiply blend mode added to model’s face and upper torso to add definition and shadow detail.
These three Photoshop Blend modes are just the beginning, but the key to learning a program the size and depth of Photoshop, is to take it in bite sized pieces or you’ll get frustrated and give up quickly. I hope that by focusing your attention to just these three blend modes you’ll be able to digest the program a bit easier.
googletag.cmd.push(function() {
tablet_slots.push( googletag.defineSlot( “/1005424/_dPSv4_tab-all-article-bottom_(300×250)”, [300, 250], “pb-ad-78623” ).addService( googletag.pubads() ) ); } );
googletag.cmd.push(function() {
mobile_slots.push( googletag.defineSlot( “/1005424/_dPSv4_mob-all-article-bottom_(300×250)”, [300, 250], “pb-ad-78158” ).addService( googletag.pubads() ) ); } );
The post The First 3 Photoshop Blend Modes You Need to Understand by John Davenport appeared first on Digital Photography School.
 There are countless Photography books and classes that explain exposure, yet after reading or attending them, your photos may not have improved because…well, let’s be honest… some of us Right-Brainers aren’t super technical!





You must be logged in to post a comment.