RSS
 

Posts Tagged ‘Triangle’

Triangle Composition in Photography: A Quick Guide (Plus Tips)

13 Apr

The post Triangle Composition in Photography: A Quick Guide (Plus Tips) appeared first on Digital Photography School. It was authored by Megan Kennedy.

triangle composition in photography a quick guide

Speaking about triangle composition, artist Wassily Kandinsky once said, “The impact of the acute angle of a triangle on a circle produces an effect no less powerful than the finger of God touching the finger of Adam in Michelangelo.”

Recognizing the momentum within a triangular shape, painters have regularly capitalized on the visual drama of triangular structures. But painters aren’t the only ones to utilize triangles; photographers have also made extensive use of the shape to add impact, lead the eye, and emphasize spirited angles unfolding within the photographic frame.

In this article, we’ll take a look at the dynamics of triangles in photographic composition.

What is triangle composition in photography?

Triangle composition relies on the use of triangular shapes or concepts to create a better image.

Triangles can be found everywhere. Signs, architecture, geography, sailboats, food, arrows, aviation, wallpaper, optical illusions (see the Penrose triangle); the list goes on!

Why are triangles useful?

Triangles are useful in composition for many reasons. Perhaps one of the most obvious selling points of triangles is their striking versatility.

For instance, triangles can represent direction and orientation; they can signal stasis or momentum. A triangle that recedes into the horizon creates the impression of perspective and depth. Off-kilter triangles paired with vivid colors create impactful shapes that express energy and dynamism. And depending on whether a triangle is facing left or right, it can represent progress, forward motion, or backtracking (just think of the symbols on a TV remote!).

Triangles in composition can also create order in chaos. That’s why triangles can be helpful in planning a photograph or figuring out why an image works the way it does.

Over time, artists have developed different compositional concepts to help create appealing imagery. The golden triangle is a visualization that divides the frame into four triangles, like this:

A diagram of the golden triangle composition rule

The golden triangle suggests one of three approaches:

  1. Fill one of the triangles with a main subject.
  2. Align some diagonal subject matter with at least one of the diagonal golden triangle lines.
  3. Line up a significant point in the composition with a point of intersection.
A web with the golden triangle composition rule overlay
Canon 5D Mark IV | Canon EF 50mm f/1.8 II with extension tubes | f/2.5 | 1/50s | ISO 100

Triangles found in both the natural and modern landscape can visually unite or disrupt a photograph.

And by incorporating triangles or the golden triangle overlay into a photographic composition, you can control the energy and focus of an image.

Common triangle types

There are several types of triangles you should know:

Self-contained triangles can be found throughout the natural and urban environment. These distinct shapes can command attention and often serve as a key component or structural element within a photograph.

(Interestingly, some triangles do extend beyond the frame, thus becoming more indirect triangular compositions.)

Other triangular formats include triangles with rounded edges, which deliver a softened visual effect.

Triangle composition leaves in the rain
Triangular patterns found in nature.
Canon 5D Mark IV | Canon EF 24-105mm f/4L IS USM | f/5 | 1/160s | ISO 100

Implied triangles are more subtle arrangements of subject matter that can generate the impression of a triangle composition. Implied triangles aren’t a single specific triangular subject. Instead, they borrow from different elements in an image to form a triangle-like arrangement.

Out of focus lights arranged in triangle patterns
Implied triangles formed from points of light.
Canon 5D Mark IV | Canon EF 24-105mm f/4L IS USM | f/4 | 1/100s | ISO 250

The type and behavior of triangles can significantly impact a photograph.

To create stability or instability within an image, triangles can teeter on a point or rest firmly on a vertical line. Symmetrical triangles can signal equilibrium whereas asymmetrical triangles can represent an object to overcome or act as a symbol of intensification.

A triangle pointing at the sky can represent the peak of a goal or journey toward success. A triangle pointing at the ground can represent direction, a downfall, or a lessening of intensity.

Other triangles can point to specific subjects or even represent the main subject.

Tips for working with triangles

Triangles are intriguing shapes, and working with them doesn’t have to be hard.

Here are a few tips for creating beautiful triangle compositions in photography:

1. Use variety

Triangles come in many shapes and forms. To add variety to your photos, include different triangle sizes, types, and orientations (this will also help you develop an eye for the shape).

triangles on a sidewalk
Triangles can disrupt patterns and direct the viewer.
Canon 5D Mark II | Canon EF 24-105mm f/4L IS USM | f/8 | 1/125s | ISO 100

2. Try the golden triangle rule

As I explained earlier, the golden triangle is a visual device used to help create harmonious compositions.

While the golden triangle takes practice to visualize (see the overlay displayed above), it encourages you to make the most of the available subject matter. The rule also draws attention to areas in a composition that might otherwise be ignored.

3. Rules can be broken

Although triangle composition is an engaging approach to photography, compositional rules can be bent and broken.

The golden triangle serves as a guide or exercise rather than a definitive rule – and can therefore be manipulated or ignored.

And using triangular subject matter in a composition is pretty flexible. For example, rounded points or points that extend off the edge of the photograph can still suggest engaging and cohesive triangle-based compositions.

Triangle composition in photography: final thoughts

Over the centuries, triangles and triangle composition have come to represent strength, vitality, energy, and momentum.

By incorporating triangles (and the golden triangle rule) into your compositions, you can create dynamic, eye-catching photos.

So the next time you’re out with your camera, look for triangles – and create some powerful compositions!

A utility pole with triangle composition
Canon 5D Mark IV | Canon EF 24-105mm f/4L IS USM | f/9 | 1/250s | ISO 100

Triangle composition FAQ

What is triangle composition?

Triangle composition is either the incorporation of triangular shapes into photographic work or adherence to the golden triangle compositional rule.

What is the golden triangle?

The golden triangle is a compositional device. By mentally dividing an image into triangular sections, you can arrange elements to create beautiful compositions.

Where can I photograph triangles?

Triangles make up our world in many ways. Triangles can be found in the urban landscape as well as the natural environment. Once you start looking, you’ll find plenty of opportunities to photograph triangles.

How can I use triangle composition?

There are several ways to incorporate triangular compositions into a photograph. The most obvious ways involve photographing triangular shapes themselves and using the golden triangle rule to guide your compositions. You can also use implied triangles to loosely organize subjects in a triangular format.

The post Triangle Composition in Photography: A Quick Guide (Plus Tips) appeared first on Digital Photography School. It was authored by Megan Kennedy.


Digital Photography School

 
Comments Off on Triangle Composition in Photography: A Quick Guide (Plus Tips)

Posted in Photography


Learning about Exposure – The Exposure Triangle

15 Dec

The post Learning about Exposure – The Exposure Triangle appeared first on Digital Photography School. It was authored by Darren Rowse.

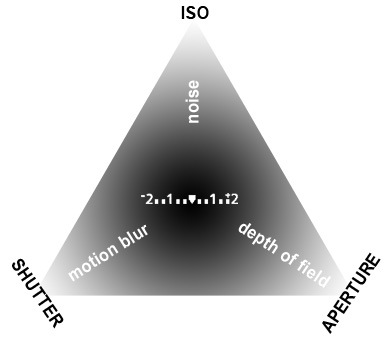
the exposure triangle

Bryan Peterson has written a book entitled Understanding Exposure. I highly recommend you read it if you want to venture off of your digital camera’s Auto mode and start experimenting with its manual settings.

In Understanding Exposure, Bryan illustrates the three main elements that need to be considered when setting your exposure. He calls them the “exposure triangle.”

Each of the three aspects of the triangle relates to light and how it enters and interacts with your camera.

So if you’re ready to become an expert in exposure…

…read on!

The three elements of the exposure triangle

The exposure triangle has three corners:

  1. ISO – the measure of a digital camera sensor’s sensitivity to light
  2. Aperture – the size of the opening in the lens when a picture is taken
  3. Shutter speed – the amount of time that the shutter is open

It is at the intersection of these three elements that an image’s exposure is determined.

Now, exposure refers to the overall brightness of an image.

So depending on your camera settings, you might end up with an exposure like this, which is too bright:

learning about the exposure triangle overexposed rose

Or an exposure like this, which is too dark:

learning about the exposure triangle underexposed rose

Or an exposure like this, which is just right:

learning about the exposure triangle well-exposed rose

Here’s the most important thing to remember:

A change in one of the elements will impact the others.

This means you can never really isolate just one part of the exposure triangle. You need to always have each corner of the exposure triangle in the back of your mind.

3 metaphors for understanding the digital photography exposure triangle

Many people describe the relationship between ISO, aperture, and shutter speed using different, easy-to-follow metaphors. And in the next section, I’ll share with you three of those metaphors.

A quick word of warning first, though:

Like most metaphors, these are far from perfect and are just for illustrative purposes. So learn from them, but make sure you don’t take them too seriously.

The window

Imagine your camera is like a window with shutters that open and close.

The aperture is the size of the window. If the window is bigger, then more light gets through and the room is brighter.

Shutter speed is the amount of time that the shutters of the window are open. The longer you leave the shutters open, the more light that comes in.

Now imagine you’re inside the room and are wearing sunglasses (hopefully this isn’t too much of a stretch!). The sunglasses desensitize your eyes to the light that comes in, and this represents a low ISO.

There are a number of ways to increase the amount of apparent light in the room. You could increase the time that the shutters are open (i.e., decrease the shutter speed), you could increase the size of the window (i.e., increase aperture), or you could take off your sunglasses (i.e., increase the ISO).

It’s not a perfect illustration, but you get the idea.

Tanning

Another way to think about exposure in photography is to think about taking a photo as getting a suntan.

Now, a suntan is something I always wanted when I was growing up. But unfortunately, because I was very fair-skinned, it was something that I never really achieved. All I did was get burned when I went out into the sun. In a sense, skin sensitivity is like an ISO rating, because some people are more sensitive to the sun than others.

Shutter speed, in this metaphor, is the length of time you spend outside. The longer you stay in the sun, the higher your chances of getting a tan (of course, spending too long in the sun can mean being overexposed!).

Aperture is like sunscreen that you apply to your skin. Sunscreen blocks the sun at different rates, depending on its strength.

Apply a high-strength sunscreen, and you decrease the amount of sunlight that gets through. As a result, even a person with highly sensitive skin can spend more time in the sun. (In photography terms: Decrease the aperture, and you can slow down the shutter speed and/or increase the ISO).

The garden hose

A third metaphor I’ve heard used is the garden hose.

Here, the circumference of the hose nozzle is the aperture, the time that the hose is left on is the shutter speed, and the pressure of the water is ISO.

If you increase the circumference of the nozzle, increase the length of time the hose is left on, and increase the water pressure, then your garden is going to get really wet (i.e., it’ll get overexposed). But if you decrease the circumference of the nozzle, shorten the time the hose is left on, or decrease the water pressure, your garden will stay relatively dry (i.e., it’ll get underexposed).

The key is to find a nice balance of nozzle size, length of time, and water pressure; that way, you can have a perfectly-watered (i.e., well-exposed!) garden.

As I’ve said, none of the metaphors are perfect. But they all illustrate the interconnectedness of shutter speed, aperture, and ISO on your digital camera.

Bringing it all together

Mastering the art of exposure is something that takes a lot of practice. In many ways, it’s a juggling act, and even the most experienced photographers experiment and tweak their settings as they go.

Keep in mind that changing each element doesn’t just impact the exposure of the image. Each exposure element influences other aspects of your photo, as well.

Changing the aperture changes the depth of field; changing the ISO changes the graininess of the shot; changing the shutter speed impacts how motion is captured.

The great thing about digital cameras is that they’re ideal for learning about exposure. You can take as many shots as you like at no cost. Plus, digital cameras generally have semi-automatic modes like Aperture Priority and Shutter Priority, which allow you to make decisions about one or two elements of the exposure triangle while the camera handles the rest.

learning about the exposure triangle swans on a pond

The exposure triangle: conclusion

A lot more can be said about each of the three elements in the exposure triangle. So check out these articles, which cover each point of the triangle in greater depth:

  1. ISO Settings in Digital Photography
  2. Introduction to Aperture in Photography
  3. Introduction to Shutter Speed in Digital Photography

The post Learning about Exposure – The Exposure Triangle appeared first on Digital Photography School. It was authored by Darren Rowse.


Digital Photography School

 
Comments Off on Learning about Exposure – The Exposure Triangle

Posted in Photography


Making Sense of the Exposure Triangle – ISO, Aperture, and Shutterspeed Made Simple

26 Feb

The post Making Sense of the Exposure Triangle – ISO, Aperture, and Shutterspeed Made Simple appeared first on Digital Photography School. It was authored by Jackie Lamas.

making-sense-of-the-exposure-triangle

Ever hear other photographers talking about shooting in manual mode, and using terms like ISO, aperture, and shutter speed and have no idea what they’re talking about? Then this article is for you. While making sense of the Exposure Triangle may seem overwhelming, you’ll learn everything there is to know so that you can get shooting in manual mode quicker!

Image: Canon 6D, 28mm, f/5.6, 1/250, ISO 400

Canon 6D, 28mm, f/5.6, 1/250, ISO 400

Everything in photography has to do with light

All three settings, ISO, aperture and shutter speed are collectively called the Exposure Triangle. They work together to allow more or less light to enter the camera depending on the light that you see with your eye in a given situation.

making-sense-of-the-exposure-triangle

For example, the brighter the light outside, the less you need to enter your camera to record the image. The less light around you, the more light you’ll need the camera to capture in order to make the image visible.

Each part of the Exposure Triangle works together to create a good exposure while controlling the camera fully to suit your creative direction.

What is ISO?

When making sense of the exposure triangle, you first need to understand ISO. ISO is the light sensitivity of the camera’s sensor.

So, think of this as your eye. When it’s really bright outside, your eyes tend to be less sensitive and need to strain less to focus, see, and look at the world around.

Image: When it’s particularly bright outside, like in this photo, use a lower number ISO.  Cam...

When it’s particularly bright outside, like in this photo, use a lower number ISO.  Camera settings: f/5.0, 1/800, ISO 200, 85mm shot on Canon 6D.

On the other hand, when you’re in a dark location with little to no light, your eyes strain and become more sensitive to any lights in the scene, helping you see better at night as well.

The same thing happens to a camera’s sensor. The more sensitive, the more light you’ll be able to pick up. The less sensitive, less light will enter the camera.

making-sense-of-the-exposure-triangle

ISO is measured in numbers ranging from 50 to 25,600 on some models. There is usually a button on your camera that is labeled ISO. This is where you’ll be able to change the ISO depending on the lighting situation.

Image: Here, we used auto mode to get an idea of the exposure we would need to take a photo of these...

Here, we used auto mode to get an idea of the exposure we would need to take a photo of these stuffed animals setting the ISO at 100.

The ISO also affects the quality of the image, so be careful when you’re using higher ISO numbers. They tend to record a lot of digital noise (or grain points) that you see when zoomed in.

Image: As you can see in this photo, using a high ISO added more light than we needed.

As you can see in this photo, using a high ISO added more light than we needed.

Using a higher ISO can help you in low light situations when you want to keep a relatively fast shutter speed to avoid camera shake. However, you need that boost in light to help expose correctly.

Image: When you use a high ISO, your camera is more sensitive to light and causes digital noise – li...

When you use a high ISO, your camera is more sensitive to light and causes digital noise – little points on your image that make it look grainy.

Aperture

When making sense of the exposure triangle, you need to understand aperture next. Aperture, is the opening and closing of the lens. Measured in F-numbers, it affects both the amount of light entering the camera, and the depth of field in your image.

making-sense-of-the-exposure-triangle

Camera settings f/2.5, 1/100, IS0 400, 50mm. In order to get the baby’s hand in focus and nothing else, we had to use an open aperture of f/2.5.

The depth of field is how much is in focus from foreground to background. A lower f-number will open your lens and let more light in, but it will also give you a narrower focus range (a shallow, or small depth of field). While a higher f-number will close your lens, and lessen the light entering, it will give you a wider focus range (a wide, or large depth of field).

making-sense-of-the-exposure-triangle

This is especially important to keep in mind when taking portraits so that you can determine how much you want in focus.

For an individual portrait, any f-number between f/2.8 and f/5.6 works great. You still have your subject in focus but you do get some bokeh (blurry background due to a low f/number).

making-sense-of-the-exposure-triangle

Here we have a more open aperture and therefore less is in focus.

For groups of people, you’ll want a high f-number like f/8 or f/11 because, at a lower f/number, you have less depth of field. This means your plane of focus is narrower. If you have people standing outside the plane of focus, they will be blurry. Therefore, in order to have everyone in focus, a high f/number is best because it gives you a wider plane of focus.

making-sense-of-the-exposure-triangle

Here we are using a closed aperture, allowing more to be in focus.

Again, opening and closing of the lens affects how much light enters the camera. Eventually, in manual, you’ll have to compensate with one of the other two settings to make up for the lack of light or excess of light entering your camera.

Image: To capture the bird and the landscape surrounding it, we used an aperture of f/9. Other camer...

To capture the bird and the landscape surrounding it, we used an aperture of f/9. Other camera settings are ISO 400, 1/250, at 28mm.

Use Av or A mode on your camera to play with aperture. The camera will set the shutter speed for you to maintain correct exposure. However, you’ll be able to see a noticeable difference in your depth of field and in light entering your camera.

Shutter speed

When making sense of the exposure triangle, shutter speed is the next thing you need to know. Shutter speed dictates the length of time that the shutter is open.

Image: To get a silhouette, you’ll need a fast shutter speed. This image has a shutter speed o...

To get a silhouette, you’ll need a fast shutter speed. This image has a shutter speed of 1/1000, f/16, ISO 400, 28mm.

Shutter speed is measured from seconds to fractions of a second (slow to fast shutter speeds). The slower the shutter speed, the longer it stays open to capture light. The faster it opens and closes, the less light is captured to make your photo.

making-sense-of-the-exposure-triangle

For example, on a really bright afternoon, use faster shutter speed in order to create a good exposure. In a low light situation, like a nighttime scene or a dark cafe, a slower shutter speed can help capture enough light to make the photo.

making-sense-of-the-exposure-triangle

In these two photos, we only changed the shutter speed and kept the other camera settings the same. You can see a significant difference in light.

Keep in mind, the slower the shutter speed, the more chance of camera shake occurring. Camera shake is an accidental blur due to the camera shaking, either in your hands, or due to some other force.

At slower shutter speeds, usually 1/125th of second or slower you are more likely to get camera shake. At faster shutter speeds this isn’t a problem as the camera opens and closes too quickly to register the shake.

making-sense-of-the-exposure-triangle

Using a slow shutter speed can give you interesting images with movement. Camera settings f/6.3, 1/13, ISO 400, 50mm.

Shutter speed also allows you to show movement in your photos or freezes moments. Slow shutter speed will show more movement, for example, a child running or playing. While a faster shutter speed will freeze the moment or action that you’re capturing.

Manual Mode

Manual mode is where you have to set all three adjustments manually, therefore, giving you complete control of the light and look of your photo.

Think of these three as a pulley system, all working together. When one is moved, one or both of the other settings must also adjust and compensate.

making-sense-of-the-exposure-triangle

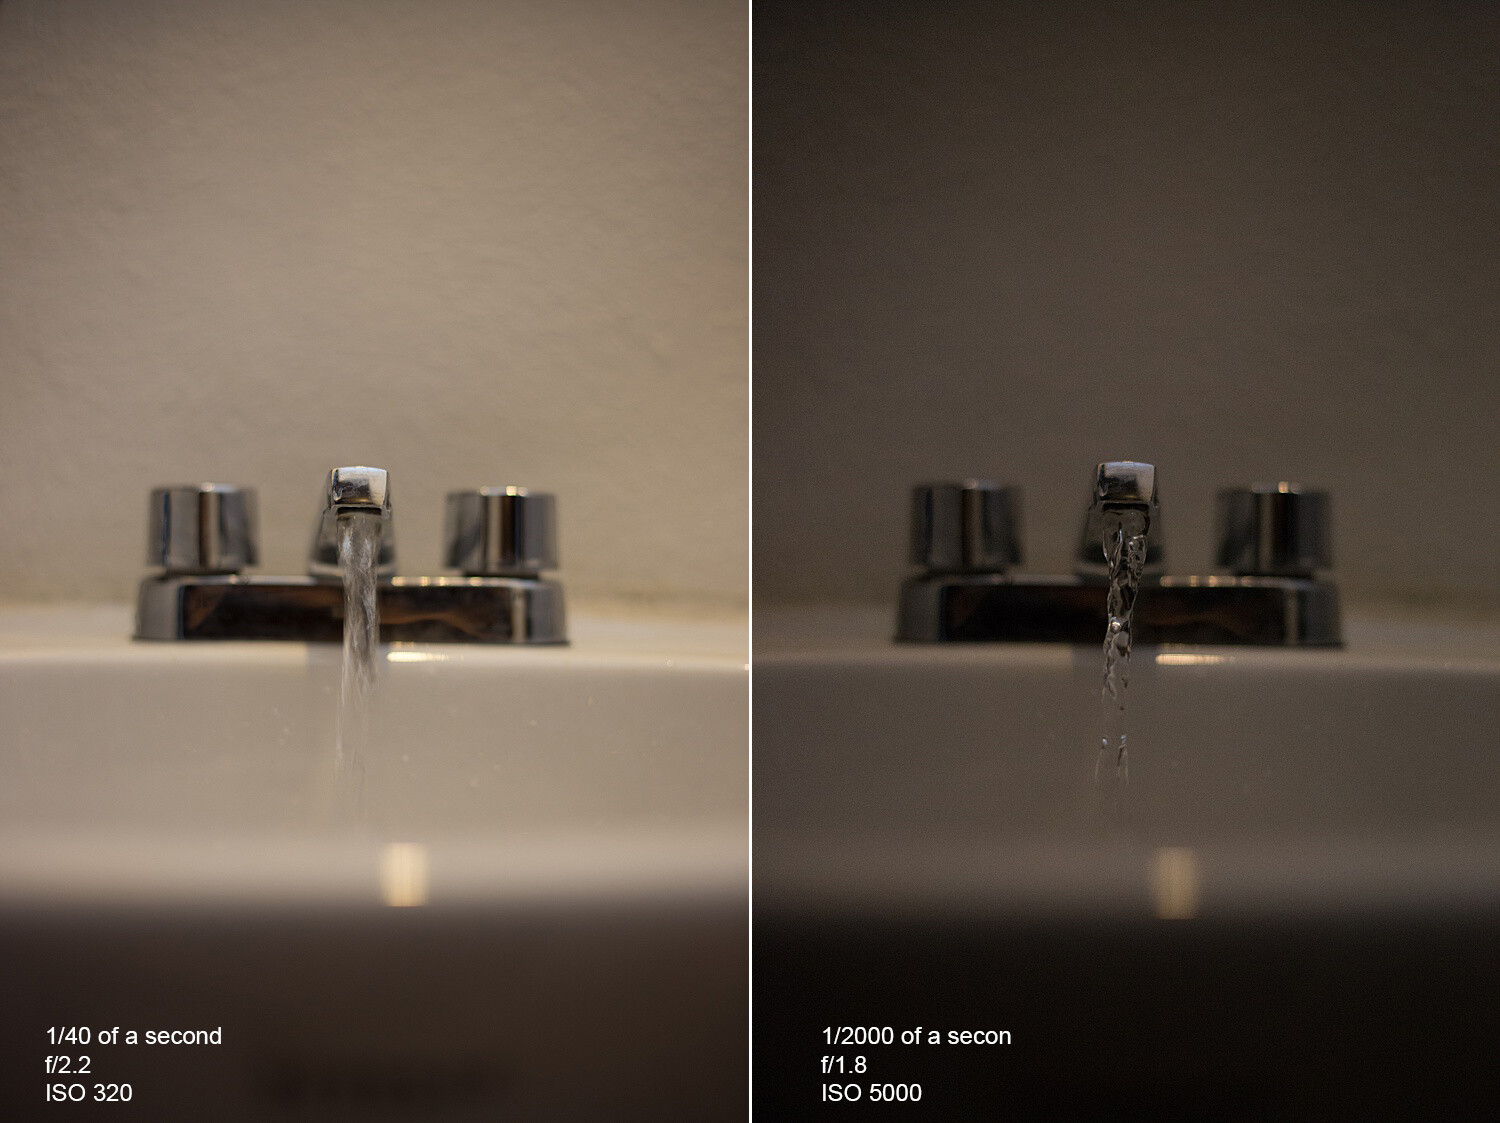
The photo on the left has a slow shutter speed, an open aperture, and low ISO. The slow shutter speed and open aperture help light enter. It also allows the camera to pick up the movement of the water.

In the photo on the right, we get more of an action shot of the water. This is because we have now changed the ISO to 1/2000 sec – a pretty fast shutter speed. With this fast shutter speed, we had to compensate for the loss of light from the fast shutter speed. So, we added light by using a higher ISO and a more open aperture. Even so, it wasn’t enough to get a correct exposure as the photo is a little dark.

The best way to get started in manual mode is to think about what kind of photo you want to make. Are you shooting still life? Is there enough light? Do you want to control your focus range? Is this a portrait? All of these things can help you to determine where to start.

making-sense-of-the-exposure-triangle

For example, you’re taking photos of your kid’s soccer game in the early evening, and there is still a lot of light left, but it’s not harsh. You want to freeze the action of the game, and so you’d start by setting a fast shutter speed first.

If you’re taking a portrait of someone, then you’d start with the aperture in order to control your depth of field. Then you’d adjust the other two settings accordingly.

Image: Camera settings f/5.6, 1/100, IS0 400, 53mm.

Camera settings f/5.6, 1/100, IS0 400, 53mm.

For landscapes, you’d likely start with aperture and shutter speed. You may need a small aperture (eg f/11) to capture a wide plane of focus. Depending on whether there is water in your landscape, you may want to freeze the water or give it a silky look by slowing your shutter speed right down.

Knowing what you’re shooting and type of light will give you a starting point

Also, in manual mode, there is a built-in light meter. This meter looks like a tiny ruler either at the bottom of the live view or inside the viewfinder. It helps you determine if your photo is too bright (metering to the right), or too dark (metering to the left).

When the line is in the middle, or at zero, you’ve got what the camera considers a perfectly-exposed photo.

making-sense-of-the-exposure-triangle

The ruler at the bottom of the live view, or through the viewfinder, can help you expose your photos correctly. To the right of the ruler your photo will be brighter, and to the left, it will be darker.

Aim to keep it in the middle as you practice in manual mode. Sett one of the adjustments and then move the other two to add or take away light accordingly until the meter is in the middle.

It’s all about practice and really getting to know what each setting does on its own before switching to full manual. This can feel overwhelming, so try using one of the other modes, like Tv/S or Av/A modes first. Doing so may give you a better understanding of the settings and more control over your photos.

making-sense-of-the-exposure-triangle

Camera settings f/22, 30 seconds, ISO 200, 28mm.


Image: Camera settings f/10, 1/640, ISO 400, 50mm.

Camera settings f/10, 1/640, ISO 400, 50mm.

Conclusion

The technical side of photography can sometimes seem overwhelming and it seems like there is always something new to learn before feeling confident. Making sense of the exposure triangle will set your creativity free and give you full control of your camera.

The post Making Sense of the Exposure Triangle – ISO, Aperture, and Shutterspeed Made Simple appeared first on Digital Photography School. It was authored by Jackie Lamas.


Digital Photography School

 
Comments Off on Making Sense of the Exposure Triangle – ISO, Aperture, and Shutterspeed Made Simple

Posted in Photography


ISO Invariance: The End of the Exposure Triangle?

22 Apr

Since the beginning of photography, there have been three basic elements that need to be taken into consideration when making an image; the size of the aperture on your lens, the speed of the shutter, and how sensitive your film (or, in modern times, the digital image sensor) is to light. Indeed almost all of photography boils down to an understanding of how those three variables affect the overall exposure of your image. Like death, taxes, and the morning sunrise – they are immutable and must be considered no matter the type of camera you have or the subject you are shooting.

Some photographers prefer to shoot in manual and control each of these elements individually, while others prefer the full Auto route. Still others find themselves somewhere in between by letting the camera make some decisions while they control one or two of the parameters themselves.

But at the end of the day the aperture, shutter, and ISO always work together to help you get the photos you want. Until now. Sort of…

ISO Invariance: The End of the Exposure Triangle?

This squirrel was astonished that I could take an underexposed picture of him at ISO 100 and turn it into a completely usable photograph in Lightroom.

Two constants – aperture and shutter speed

Two of the three elements of the Exposure Triangle are, and will always be, limited by physics. Changing the size of the aperture on your camera lens determines not only how much light will be let in, but other parameters as well such as the depth of field. Using a fast shutter speed will always be necessary to freeze motion, particularly with fast-moving subjects. Conversely, a slow shutter speed is an unchangeable requirement for capturing light trails and other types of  long exposure photography.

ISO is different

But ISO is not nearly the limiting factor it once was and on some newer cameras is almost irrelevant. Almost!

There are many analogies to help you understand ISO, but one of my favorites is that of a microphone. If you have the gain turned down low you will need to speak very loudly for your voice to be heard. But this gives you the benefit of cutting out low hums and other noises that might otherwise be picked up, such as a desk fan or overhead ventilation unit. Turn the gain up high and you won’t have to speak as loudly, but along with your voice, a myriad of other background sounds will be picked up as well. Once those other sounds are recorded, it’s almost impossible to get rid of them!

In similar fashion, shooting with a low ISO of 100 or 200 means your camera sensor is not very sensitive to light. So you will need a lot of incoming light in order to take an image. This is accomplished through either a large aperture, slower shutter speed, or combination of the two. The benefit is that ISO 100 results in a picture that is free of digital noise that often looks like colored static – the kind you might see on an old tube-style television set.

ISO Invariance: The End of the Exposure Triangle?

Nikon D7100, 50mm, f/1.8, 1/90 second, ISO 100 (pushed 3 stops in Lightroom)

Raise the ISO

If you don’t have much incoming light, there has always been a simple solution – raise the ISO. (In the days of film the solution was similar but not as easy. It required the photographer to physically remove the film in the camera and put in another roll of 400 or 800 ASA film that was more sensitive to light.) Like I mentioned earlier, though, photography is all about tradeoffs. Shooting at a high ISO of 3200 or 6400 can help you get the shot you want, but will often result in a picture that is far more noisy and grainy than you might prefer.

What’s a photographer to do?

ISO Invariance: The End of the Exposure Triangle?

Nikon D750, 35mm, f/4, 1/1000 second, ISO 100. No need to adjust exposure in post-processing.

Thanks to incredible advances in modern sensor technology, shooting at ISO 3200 or 6400 on a new camera like a Canon 5D Mark IV or a Nikon D7200 results in images that are far more usable than their counterparts from five or 10 years ago. But there’s another solution that’s gaining prominence as well.

Some camera sensors today are so good they are essentially what’s known as ISO Invariant, which is a fancy way of saying the ISO doesn’t really matter. Not in a practical sense, anyway. Shooting with a camera that is ISO Invariant means that you will get roughly the same results if you shoot at a low ISO of 100 or 200, and then change the exposure in post-production, as you would from shooting a higher ISO (like 1600) in the first place.

Explaining ISO Invariance

Allow me to illustrate what this means with the help of some visual aids. The following two images look fairly similar, but a closer look reveals something a bit deeper under the surface. They were both taken with the same camera using the same exposure settings, with one key difference – the ISO.

ISO Invariance: The End of the Exposure Triangle?

Nikon D750, 50mm, f/2.8, 1/60th of a second, ISO 3200

The above photo looks decent, but the sun was almost down and I had to shoot at ISO 3200 in order to let in enough light…or did I?

ISO Invariance: The End of the Exposure Triangle?

Nikon D750, 50mm, f/2.8, 1/60th, ISO 100 (pushed 5-stops in Lightroom – to effectively ISO 3200)

Here is the same image except this one was shot at ISO 100, then in Lightroom, I pushed the exposure up by five whole stops. Five stops! That’s a lot of adjustment, yet the final image looks almost identical to the one shot at ISO 3200. Just for the sake of comparison, here is the original ISO 100 image before any editing in Lightroom.

ISO Invariance: The End of the Exposure Triangle?

Nikon D750, 50mm, f/2.8, 1/60th, ISO 100 (no editing in Lightroom)

Whoa – what?!

I’m not kidding here – the original image was almost entirely black. If you look closely you can just barely make out the roof of the bird house and a bit of color in the sky. Yet so much data was captured by the sensor at ISO 100 that I was able to create a file that was not only usable but in my opinion, superior to its ISO 3200 counterpart. Even doing a bit of pixel-peeping reveals little difference in terms of the noise levels between the two images.

Not only are the two images quite similar, I would go so far as to argue that the one shot at ISO 100 and boosted 5-stops has richer colors and better noise levels than its high-ISO counterpart. This is, in a nutshell, what ISO invariance is all about. It gives you the ability to shoot at virtually any ISO value and still get a usable image, assuming you shoot in RAW and have the ability to adjust the photo in post-processing software. ISO, then, no longer becomes much of a determining factor in the overall exposure.

Is it the end of the ISO as we know it?

Modern camera sensors are getting so good at picking up luminance and color data from incoming light. So the idea of a photographer needing to manually adjust the sensitivity of the image sensor is becoming almost moot. Note that I’m hedging my bets here, as I have throughout this whole article. I will stop short of saying that ISO is not a factor to be considered anymore. Far from it!

The fact is that camera sensors are getting so good that they are significantly outperforming their counterparts from a few years ago in all areas, not just ISO invariance. ISO 3200 or 6400 on many cameras today, in general, results in images that are perfectly usable. Whereas the same settings on a digital camera from yesteryear would yield an image so muddy it might have been well-nigh unusable. This has also resulted in the same sensors being able to capture significantly more details at low ISO that can, if desired, be used to edit an image ex post facto.

ISO Invariance: The End of the Exposure Triangle?

Nikon D750, 200mm, f/5.6, 1/350 second, ISO 100. Using a low ISO allowed me to pull out lots of color detail in post-production on this image.

Down on the upside

Of course, not all is sunshine and roses in the land of ISO invariance. It’s important to note that not all cameras are even capable of such a feat. The Nikon D750 is a 24-megapixel full-frame camera. So its individual pixels are physically larger, and therefore much more sensitive to light than a 24-megapixel crop-sensor camera like a Canon Rebel T6 or Nikon D3300.

Only a handful cameras today can actually be described as ISO Invariant. Whereas most cameras still follow the same rules about using ISO in tandem with aperture and shutter speed that have been the foundations of photography since its inception.

A demonstration

To illustrate, here’s another series of images taken with a Nikon D7100. It’s a few years old but quite similar to many cameras today in terms of its imaging prowess.

ISO Invariance: The End of the Exposure Triangle?

Nikon D7100, 50mm, f/4, 1/60 second, ISO 3200.

Now take a look at a similar photo taken at much lower ISO:

ISO Invariance: The End of the Exposure Triangle?

Nikon D7100, 50mm, f/4, 1/60 second, ISO 100.

Whoops! That’s the unedited version in which you can barely tell that there’s a picture at all. Here’s the same image with the exposure bumped up by five stops in Lightroom.

Nikon D7100, 50mm, f/4, 1/60 second, ISO 100 (pushed 5-stops in Lightroom)

Even on these smaller web-sized photos, you can see some key differences. The colors are not as natural, the darker portions are muddier, and there is significant banding in the shadows. “Wait a sec,” you might be saying right about now. “What’s banding in the shadows?” Follow the advice of Rafiki from The Lion King and look harder…

Here you can clearly see that the ISO 3200 image is superior. All throughout the ISO 100 picture, there are horizontal lines crossing through the image, which is a phenomenon known as banding. It often happens when you try to recover details from darker portions of an image. Add this to the fact that the colors are harsh and the whole thing required such a significant amount of processing and you start to see why ISO still matters. It matters quite a great deal.

Limitations

There are also some significant limitations to take into account when looking at ISO invariance:

  • It only matters if you shoot in RAW, which allows you to have as much data from your camera’s image sensor as possible. RAW file sizes are huge and must be processed by a program like Lightroom before they can be shared or printed.
  • Processing takes time. Many photographers, myself included, like to get the exposure right in camera if at all possible.
  • In almost every situation you won’t get better results from shooting at low ISO values and then raising the exposure afterward. Most of the time you will get results that are roughly equal to what you would have achieved with just raising the ISO, to begin with.
ISO Invariance: The End of the Exposure Triangle?

Nikon D750, 50mm, f/8, 1/200 second, ISO 1250.

Conclusion

I like to think of ISO invariance as a backup tool to use when I really need it, not something on which I can rely for everyday shooting. Who among us hasn’t come back from a photo session only to find out that some key pictures were horribly underexposed by accident? (Raise your hand if this is you. Go on, I’ll wait.) I know I have, and it’s nice knowing I can still get a usable photo in these situations as long as I have not blown out the highlights.

We’re still years, perhaps decades, away from a point at which ISO is no longer a practical consideration, and it’s possible we will never get there entirely. However, if you look at where we have been and where we are now in terms of camera sensor technology, it’s easy to draw a line to a point in the future when ISO might not matter nearly as much as it does now.

In the meantime, my suggestion for most photographers remains the same; use all three elements of the exposure triangle to get the shot you want. And if you’re worried that using a fast shutter speed will result in a photo that is underexposed, just raise your ISO as you are shooting instead of fiddling with sliders back at your computer. You’ll learn more about photography by doing so, and you will probably have more fun since you’ll be taking pictures instead of being hunched over your laptop.

The post ISO Invariance: The End of the Exposure Triangle? by Simon Ringsmuth appeared first on Digital Photography School.


Digital Photography School

 
Comments Off on ISO Invariance: The End of the Exposure Triangle?

Posted in Photography


Mastering the Exposure Triangle for Newbies

03 Dec

When I first got my digital camera, words like Aperture and ISO were foreign to me, and it took me a couple of weeks of reading and studying a lot before the lightbulb turned on in my head. You might be feeling a little confused, and you may even feel like you will never get your camera out of Auto mode, because it’s just too hard to understand.

exposure-triangle.jpg

So, if you are unfamiliar with your camera, or just starting out, you might appreciate a little explanation of the basics. Sometimes reading about these things in slightly different words helps something new to click each time.

Introducing the Exposure Triangle: Aperture, Shutter Speed, and ISO

These three things work together to expose your picture perfectly, and after experimenting for a while, you may even find that you can use your knowledge of these three things to manipulate your picture for different effects.

APERTURE

The aperture or f-stop is how wide open your lens is. Imagine a hole: if it’s open just a teeny bit, there won’t be very much light coming through. If it’s a big hole, lots of light will come through. The tricky thing with aperture is that often confusing numbering system.

  • SMALL numbers (like f/1.8) = wide open aperture (large opening).
  • BIG numbers (like f/22) = small aperture (teeny opening).

That confused the heck out of me at first, but now it’s second nature. It will become second nature to you too, after some practice!

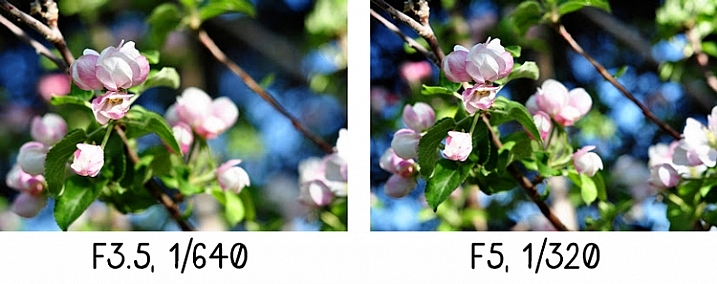
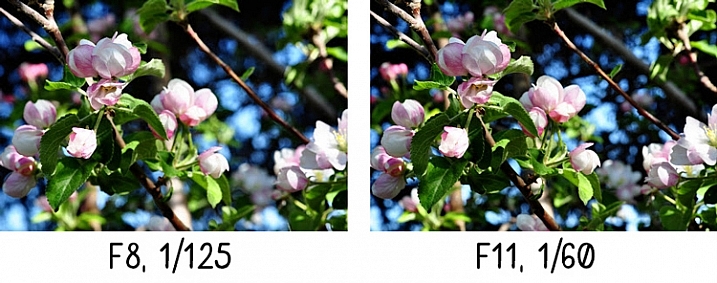
Another thing that can be affected by aperture is depth of field, or how much of your picture is in sharp focus. A wide open aperture (small number) will make less in focus, and a closed down aperture (big number) will make more in focus. Let’s look at some photos that demonstrate depth of field:

aperture-1

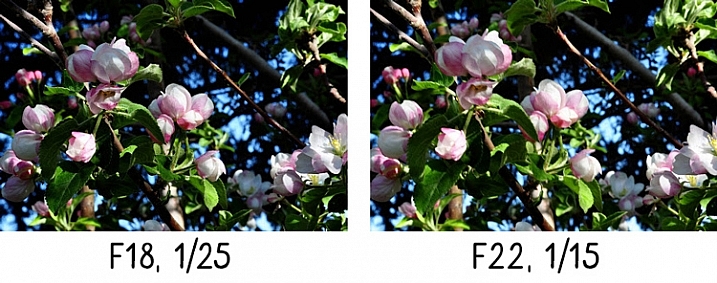
With the aperture set to f/3.5 on the left, you have a blurrier background (my favorite). Also notice that the shutter speed (1/640th) is fairly HIGH, we’ll get to this later.

aperture-2

A little bit smaller aperture (bigger number), makes the background come into focus a bit more, and the shutter speed is slowed down.

aperture-3

See what I mean? If you want to play around with Aperture, try putting your camera in Aperture Priority mode (A on Nikon, Av on Canon – if you have a different camera, check your manual).

Now, remember that all three parts work together? You probably started seeing how if you noticed the shutter speed changing with each of those different aperture values in the pictures above.

SHUTTER SPEED

The shutter speed is how fast the shutter opens and closes. If the shutter is open longer, more light is let into the camera. If it opens and closes really fast, less light is let in.

If you have a wide open aperture, your shutter speed will need to be faster, because you’re already letting a lot of light in the lens opening. If your aperture is small, your shutter will need to move slower, so there is more time for light to get to the sensor.

If you want to freeze the action, or hand-hold your camera, then a faster shutter speed is needed. If you want to create blur, then you need a slower shutter speed. For example:

Shutter-Speed

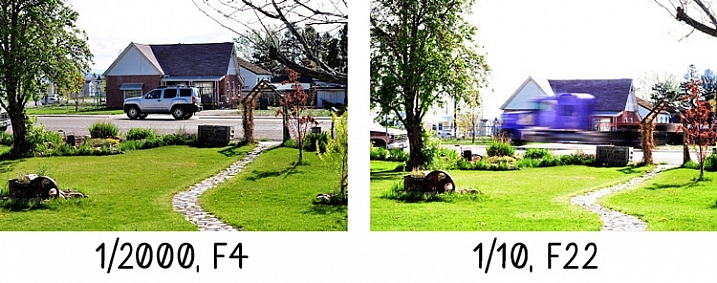
The vehicle in the photo on the left was driving past my house quite fast, but since I had the shutter speed set to 1/2000th of a second, it froze the action. It looks like the vehicle could be sitting still in the middle of the road.

The truck on the right is a blur going past, but everything else is still. 1/10th of a second was slow enough to blur the truck as it sped past. Notice the f-stop. Since the shutter was open for so long, the opening in the lens needed to be smaller to balance the exposure.

Try putting your camera in Shutter Priority mode (S on Nikon, Tv (time value) on Canon) to experiment with different shutter speeds. As you play with these different priority modes, notice what the camera chooses for the rest of your settings. The more you pay attention to these things, the more knowledge you’ll have to be able to set everything yourself in the future.

Okay, so now you’re probably asking, how does ISO fit into all of this?

ISO

The ISO is your camera’s mood. It can be all uptight and picky, or it can be easy-going and laid back. If you have the ISO set to a low number (100) your camera will want light, and plenty of it, because it’s going to take a smooth, crisp picture, and this requires perfect conditions. If you have your ISO set to a high number (3200) it can handle low light, because it’s not going to work as hard – a noisy (grainy) picture is good enough for Mr. High ISO.

So, how does this apply to your photography? Let’s say you wanted to take a picture in the evening, and you don’t want to use a flash. Just bump the ISO up, and it will allow you to have a faster shutter speed, or a smaller aperture (bigger number) and still accept the light conditions to expose correctly. Or, if you’re taking pictures at a sporting event, and you want to make sure you catch that action, but the light isn’t great, bump the ISO up. Or you may even want that moody grainy effect (it can be really cool)!

If you ever get frustrated because there’s just not enough light, and your pictures are blurry because the shutter speed isn’t fast enough, and you’re about to scream – just remember to bump the ISO. You could also leave this on Auto, but I usually don’t. My camera always seems to choose a higher ISO than I feel it needs. However, don’t forget to put it back down after you’re done. You don’t want to take a whole bunch of photos in the middle of the day at a 3200 ISO because you forgot to change it after your evening indoor party photos the night before.

Here’s a little demonstration:

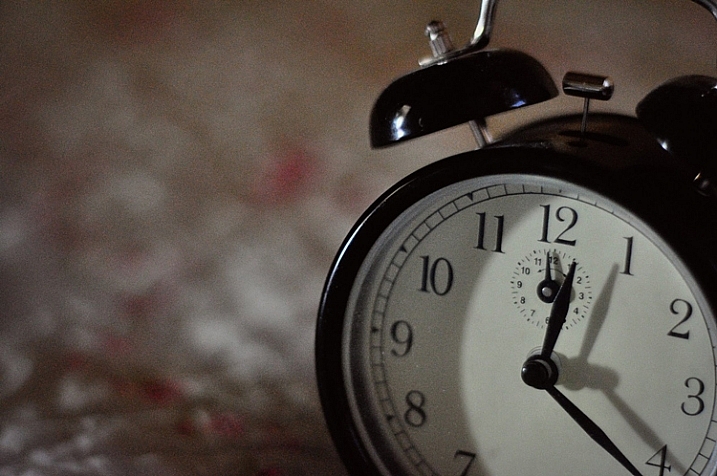
ISO3200clock

ISO 3200

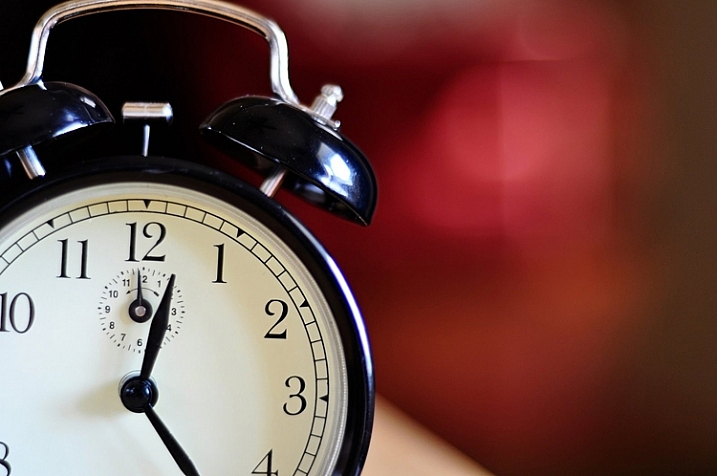
The photo above was taken in a very dimly lit room. Notice the digital noise?Notice the crispness of the photo below?

ISO100clock

ISO 100


Conclusion

Well, that’s the exposure triangle in a nutshell. I hope this helped, especially if these three exposure factors have been confusing to you in the past. Please ask any questions in the comments, and I’ll answer them the best I can.

googletag.cmd.push(function() {
tablet_slots.push( googletag.defineSlot( “/1005424/_dPSv4_tab-all-article-bottom_(300×250)”, [300, 250], “pb-ad-78623” ).addService( googletag.pubads() ) ); } );

googletag.cmd.push(function() {
mobile_slots.push( googletag.defineSlot( “/1005424/_dPSv4_mob-all-article-bottom_(300×250)”, [300, 250], “pb-ad-78158” ).addService( googletag.pubads() ) ); } );

The post Mastering the Exposure Triangle for Newbies by Melinda Smith appeared first on Digital Photography School.


Digital Photography School

 
Comments Off on Mastering the Exposure Triangle for Newbies

Posted in Photography


Triangle Tower Approved: First New Paris Skyscraper in 42 Years

03 Jul

[ By WebUrbanist in Architecture & Offices & Commercial. ]

paris new skyscraper tower

At nearly 600 feet (180 meters) tall, this structure was narrowly granted permission to be the first skyscraper to grace the Parisian skyline in nearly half a century. Designed by Herzog & De Meuron, the Tour Triangle will be the third tallest building in the city, shorter only than one other skyscraper and the Eiffel Tower.

paris new architecture skyscraper

The triangular tower (already nicknamed simply ‘Triangle’) is slightly pyramidal in shape, tapering toward the top on all sides but most dramatically along two of its facades. An affair of steel and glass, it is starkly modern with respect to its neighboring buildings. Perhaps like the Eiffel Tower, originally widely hated, or the Centre Pompidou, a structurally-inverted museum, it can become an icon within the city over time.

paris skyscraper city limits

Despite being located at 1 Place de la Porte de Versailles, right on the edge of the central ring road surrounding the innermost part of the city (and arguably reinforcing a key nexus point), critics are concerned about the building overshadowing the surrounding urban landscape. The measure to approve its construction barely passed.

paris tour triangle tower

Advocates are quick to point out that the building will create thousands of jobs both as it is constructed and once it is completed, as well as creating much-needed residential and office space in the city. For decades, the city limited new structures to around 100 feet, curbing development inside the city limits and forcing developers into suburban spaces.

Share on Facebook


[ By WebUrbanist in Architecture & Offices & Commercial. ]

[ WebUrbanist | Archives | Galleries | Privacy | TOS ]


WebUrbanist

 
Comments Off on Triangle Tower Approved: First New Paris Skyscraper in 42 Years

Posted in Creativity


Camera Basics 101 The Exposure Triangle

08 Jun

One of the first things you will want to get your head around in photography is understanding exposure. To do that you will need to learn some camera basics and master:

The Exposure Triangle

If this term has of yet eluded you, or you’re not quite ready to claim full mastery here are 3 video tutorials to help you understand the basics of the exposure triangle including:

  • ISO
  • Aperture
  • Shutter speed

In this first video the host Mark Wallace (with Adorama TV) goes through all three of these elements and explains each briefly, and how they work together:

Mark also mentions this book in the video as a good starting point for learning more about exposure.

Next up is Shoot in Manual Mode Pt. 1 – Aperture, Shutter Speed and ISO – by photographer Sean von Tagen

Lastly is this video by a host whose name I couldn’t find. If you can get past his really monotone voice, the information is really good and should be easy to understand and follow.

If you want more reading, try these:

  • Exposure Triangle – Not just about more/less light
  • Understand Exposure in Under 10 Minutes
  • Getting off Auto – Manual, Aperture and Shutter Priority modes explained
  • Photo Nuts and Bolts – Know your camera and take better photos – a dPS eBook

The post Camera Basics 101 The Exposure Triangle by Darlene Hildebrandt appeared first on Digital Photography School.


Digital Photography School

 
Comments Off on Camera Basics 101 The Exposure Triangle

Posted in Photography


The Triangle of Color Adjustments in Lightroom

11 Apr

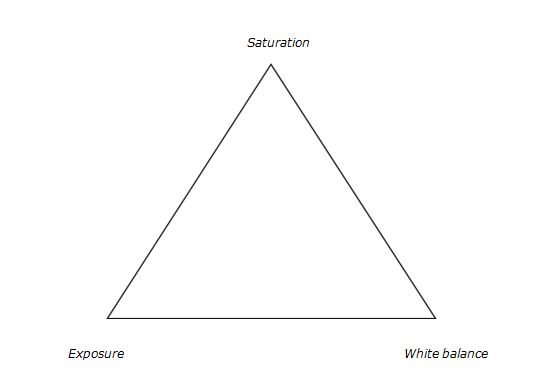
In digital photography, just like exposure, colors too have a triangle of their own.

3 Color correction triangle

Color adjustment triangle

The triangle of color adjustments in Lightroom. The three attributes that form the triangle are shown above, now let’s see how they affect the colors of an image.

Exposure

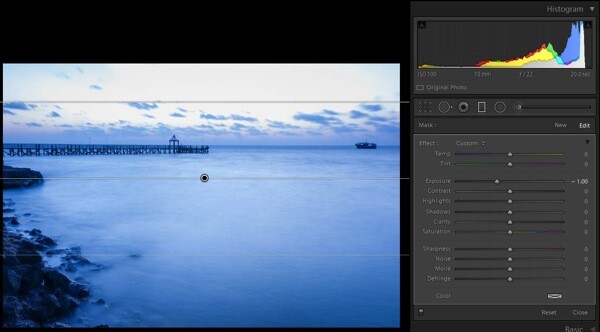
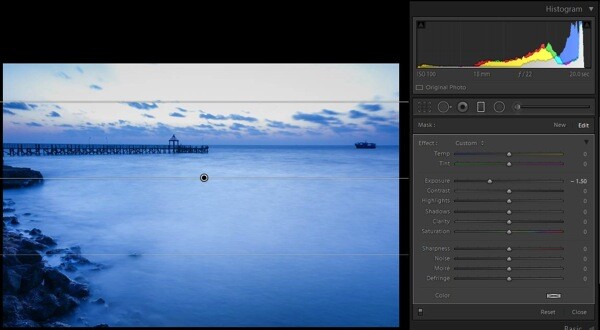
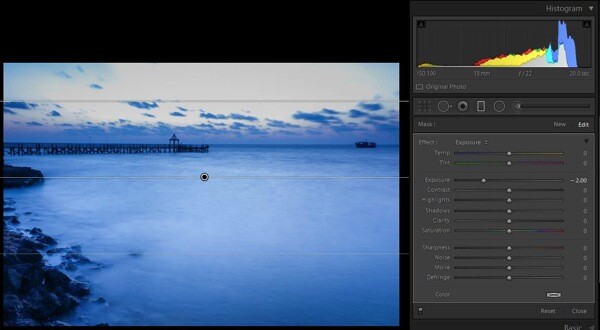
This attribute controls the brightness level of all the pixels that constitute an image. Whenever the brightness level of the pixel is altered, the color value too gets changed. You can easily identify this effect in a photograph of a landscape. Apply a Graduated Filter on the sky area with a value of -2.00 on the exposure slider and then take a look at the sky area. You will immediately notice that the blue color has become richer. You would do well to remember that you didn’t change any other value in that sky area except the exposure.

Let’s look at some examples of exposure adjustments and how it affects the color:

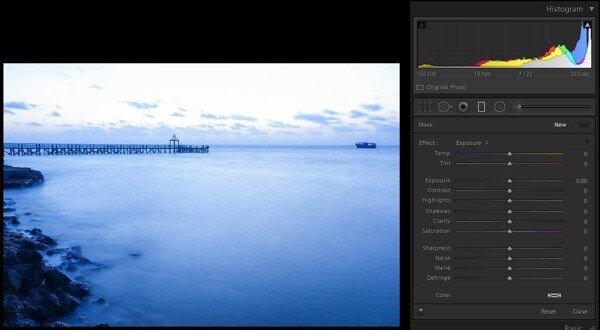
1 with nothing applied

No adjustments applied on graduated filter

2 EV minus 1

-1.0 stop exposure adjustment applied

2 EV minus 1 5 applied

-1.5 stop exposure adjustment applied

2c EV minus 2 applied

-2.0 stop exposure adjustment applied

Saturation

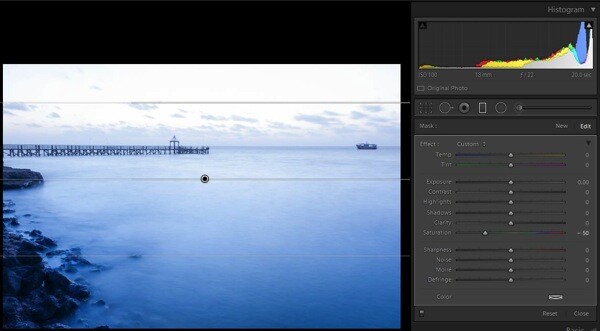
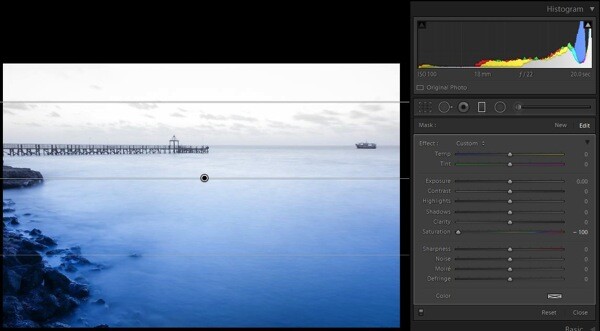
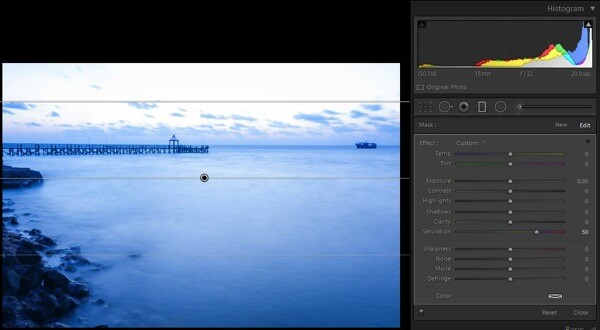
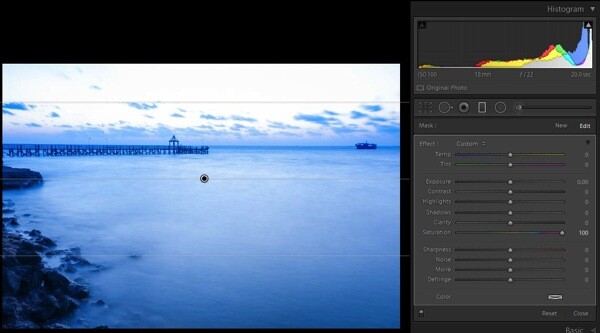
This attribute controls the intensity of all colors in all of the pixels that constitute an image. Since the effect of this tool is global, it needs to be used with caution; otherwise it is guaranteed that the picture will end up looking artificial. To check the effect of this tool, keep the same graduated filter applied and active, reset the exposure values by double clicking the exposure slider (or the word Effect), then move the saturation slider towards the right; you will notice the changes that are wrought in the sky area.

4a Sat minus 50

Saturation set to -50

4b Sat minus 100

Saturation set to -100

4c Sat plus 50

Saturation set to +50

4d Sat plus 100

Saturation set to +100

There is another tool called Vibrance, just above the saturation slider. I have considered this as part of saturation tool. It plays only with the less intense colors, one of the smartest tools in Lightroom (Note: this tool can be found only in the Basic Deveolop panel not in the Graduated Filter or any other local correction tools).

White balance

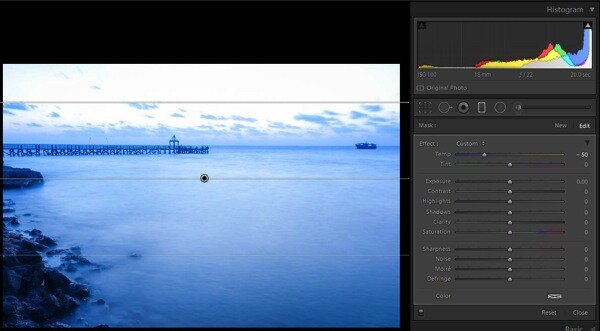
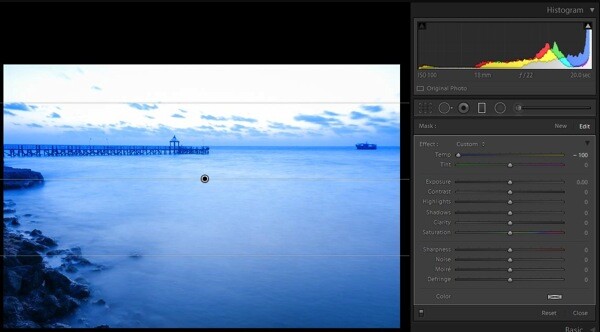
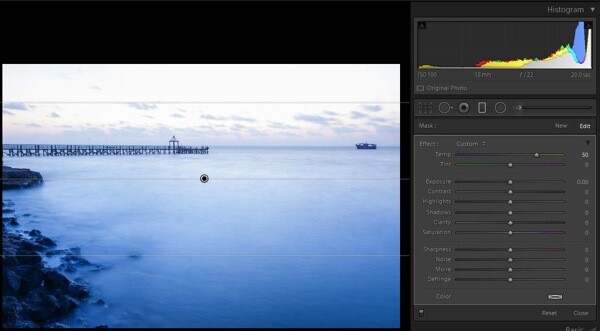
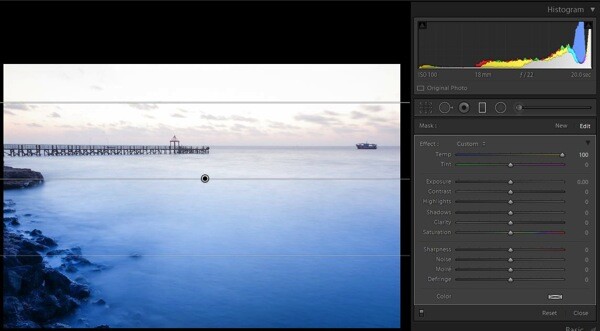
This is one of the most discussed topics in the internet. What white balance exactly does is to change all of the color values of all the pixels in the photograph; yes I mean all three RGB values of a pixel. When you move the White Balance slider towards the right the photograph gets warmer, specifically towards yellow side. When you move it towards the left, the photograph gets cooler, specifically towards blue side. (Note: this tool is at its full power when the image is captured in RAW format) To check this effect, reset the previous graduated filter and move the White Balance slider either way to see for yourself.

3a WB 50

White Balance adjustment made to -50

3b WB minus 100

White Balance adjustment made to -100

3c plus 50 WB

White Balance adjustment made to +50

3d plus 100 WB

White Balance adjustment made to +100

There is another tool below White Balance called tint, it is part of adjust the white balance. This tool needs to be used cautiously, as the name suggests the tool can be used to add or remove the tint primarily green or magenta in color, and mostly helps to bring out the real colors. If this tool is used carefully, it will help you to remove the color cast from your photograph if any.

Putting it all together

Now that you know how all three major tools control the colors in a photograph, the question is how to apply this knowledge. There is no universal prescription, and each photograph demands its own treatment. Understanding how all these tools work, and developing your skill by practicing on a few photographs, will make you so much better in visualizing and bringing out the colors in any given photograph.

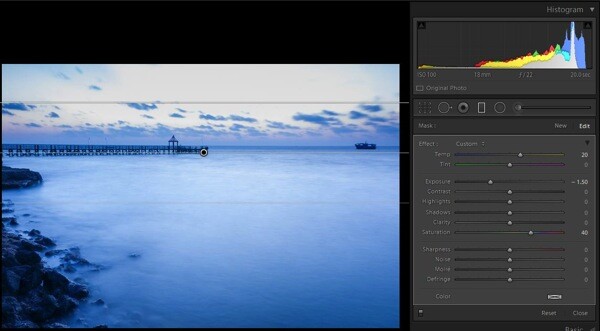
5a all 3 components applied

Graduated Filter all sliders applied

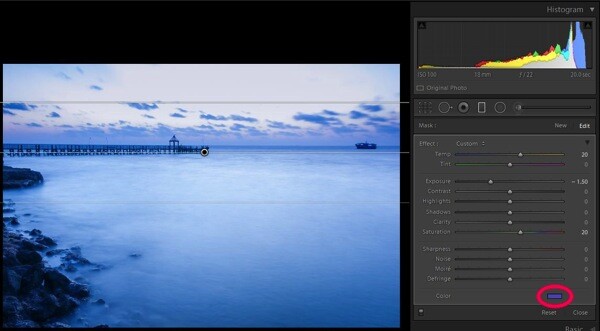
Now, you know the major tools controlling the colors in an image and how they are being applied on this sample image (see screen shot above) but I still felt something was missing in the sky region. So I applied a slight color tint from the color picker tool (see image below).

5b small colour tint used  balance

Graduated filter slider adjustments plus a color tint added, see red circle

Some photographs might be underexposed, whereas others might be under saturated to some extent. Remember RAW images tend to be less saturated, lower in contrast, and less sharpened. In some photographs a little adjustment to the White Balance slider may fix almost all the problems.

Final image

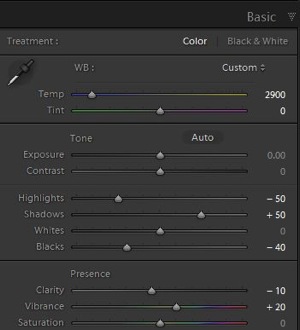
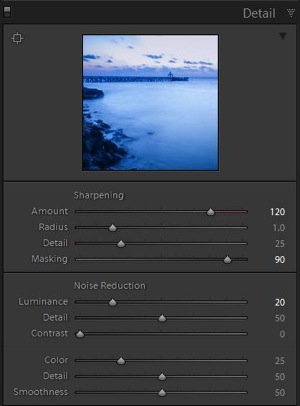
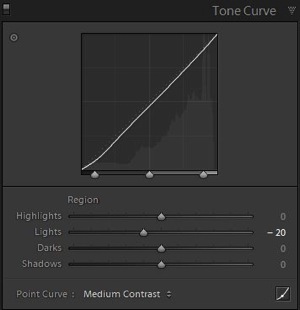
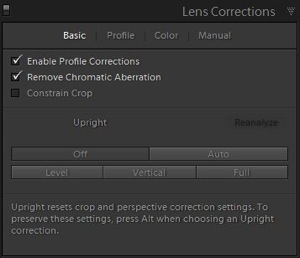
Here is a look at the sliders in all the panels used to produce the final image.

6a Global adjustments

Basic panel slider adjustments

6c Detail panel adjustments

Detail panel slider adjustments

6b adjustments Tone curve panel

Tone curve panel adjustments

6d Lens correction panel adjustments

Lens correction panel adjustments

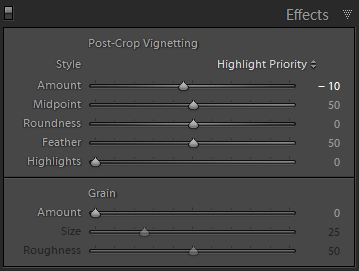
6e mild vignetting

Post-crop vignette added

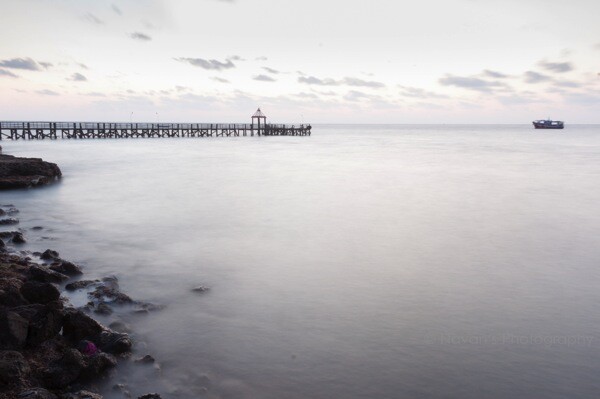
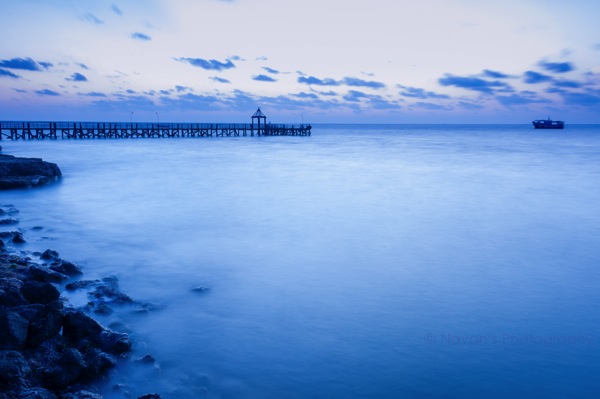
After using almost all the panels in Develop module here are the before and after photographs.

1 As shot

As shot right out of camera

2 Final image

Final image after all corrections have been applied

All said, you are the creator of your photograph. You have to decide which tool needs to be used and in what proportion with other tools, to give you the results you hoped for when you pressed the shutter button. Hope this article helps you make more beautiful photographs.

If you have any other Lightroom color adjustment tips of tricks please share with us in the comments below.

The post The Triangle of Color Adjustments in Lightroom by Navan Viswa appeared first on Digital Photography School.


Digital Photography School

 
Comments Off on The Triangle of Color Adjustments in Lightroom

Posted in Photography


Introducing the Creative Triangle

05 Feb

This is the first in a series of articles by Andrew S Gibson, the author of Understanding EOS: A Beginner’s Guide to Canon EOS cameras.

Creative triangle 01

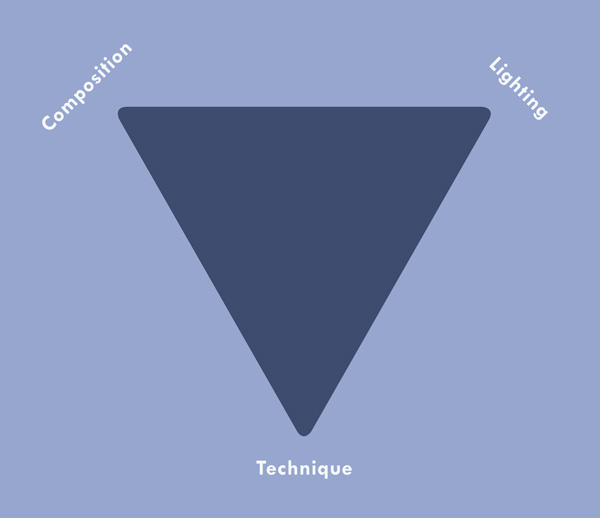
The ‘creative triangle’ is my term for the idea that great photos are made from a combination of good composition, an understanding of beautiful lighting and the technical ability to control your camera.

You could even think of this as another version of the rule-of-thirds. A good photo is comprised of one-third the composition, one-third the lighting and one-third the technical ability of the photographer.

Creative triangle 02

It’s not enough to learn what the various buttons, modes and functions on your camera do, important though that is. You also need to cultivate your eye for a good photo and an appreciation of the beauty of great lighting.

How can you do this? One way is to look at the work of your favourite photographers with a critical eye. It’s not enough just to say that you like particular photo. Go deeper. Why do you like it? What are the elements of composition and light that help make the photo? Why has the photographer chosen to use the camera settings that he has? What lens did he use? How can you apply these ideas to your own photos?

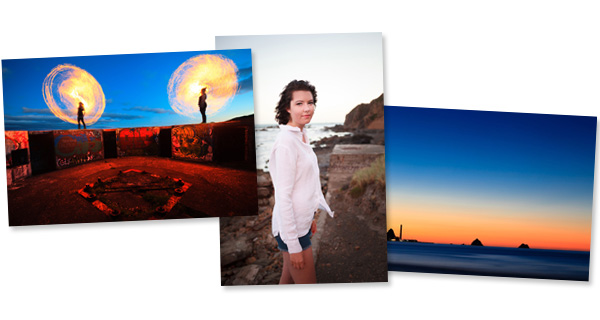
To help you out I’m going to take a deeper look at three of my own images:

Creative triangle 03

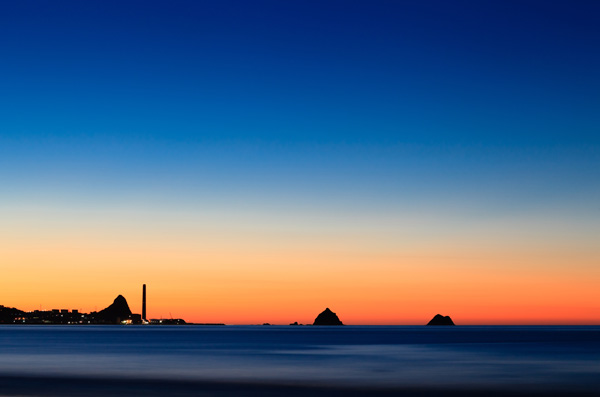
Image #1: New Plymouth Sunset

Camera: EOS 5D Mark II
Lens: Canon EF 85mm f1.8
Exposure: 219 seconds @ f11, ISO 200

Focal length. I was drawn to this scene by the silhouettes of the rock stacks and the chimney. I needed to use an 85mm lens to ensure that they were large enough to have impact. A wider focal length would have made the rocks and chimney too small.

Shutter speed. I used a shutter speed of 219 seconds. Mainly due to necessity – it was taken some time after sunset so light levels were low. I stopped down to f11 to ensure good depth-of-field and used a relatively low ISO for good image quality. The sea has recorded as a misty blur. This adds mood.

Light. I took the photo after the sun had set. If you try to take the photo with the sun above the horizon, the contrast is too high. It’s much easier to take photos after the sun has disappeared. The colours are often better and as the sky gets darker you may see some stars.

Colour contrast. The light from the sunset has split the image into three bands of colour. Blue and orange are contrasting colours and they give the photo impact. Colour temperature comes into play here. Blue light is cool, orange light is warm and the contrast between the two creates atmosphere.

Creative triangle 04

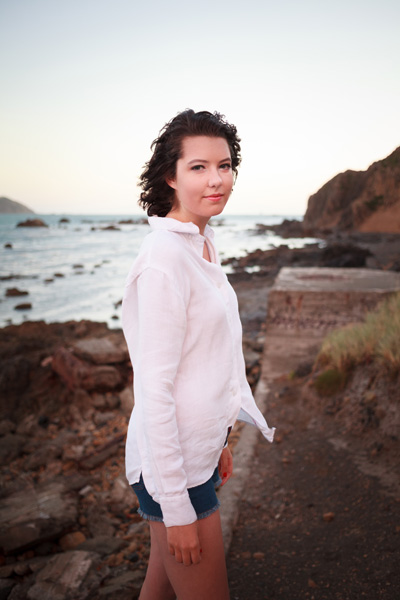
Image #2: Evening Portrait

Camera: EOS 5D Mark II
Lens: Canon EF 40mm f2.8
Exposure: 1/180 second @ f2.8, ISO 800

Focal length. I took this photo with my 40mm pancake lens. This lens is a moderate wide-angle on a full-frame camera. I like to use it for portraits, as the perspective is wide enough to include the background without too much distortion.

Aperture. I set the aperture to f2.8 (the widest on this lens) to throw the background out of focus. This helps concentrate attention on the model. A sharp background competes with the model, which may be useful if you are trying to tell a story in the way that photojournalists do, but can be a distraction with photos like this.

Light. This photo was taken late in the evening. The shoot was delayed so were were out later than I had intended, but I was rewarded with beautiful light. The sun had disappeared beneath the horizon, but the light still had a red glow and a beautiful, soft quality ideal for portraits.

Creative triangle 05

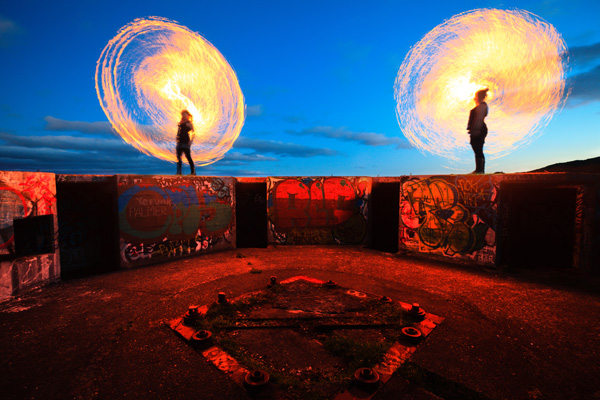
Image #3: Fire Spinning

Camera: EOS 5D Mark II
Lens: Canon EF 17-40mm f4L lens @ 17mm
Exposure: 6 seconds @ f5.6, ISO 400

Focal length. This photo is different from the other two because it is taken with an ultra wide-angle focal length of 17mm (equivalent to around 11mm on an APS-C camera). There is a real sense of distance between the metal bars set into the concrete in the foreground and the performers standing on the wall.

Unusual subject: The two women in the photo are fire performers. They are spinning kevlar whips dipped in flammable fuel and set alight.

By the way, don’t try this at home. These women are trained fire performers and know how to handle these whips safely. If you want to try something similar, find someone who knows what they are doing to spin the whips.

Shutter speed: I used a slow shutter speed of six seconds so that the spinning whips created circles of fire.

Composition: I opted for a symmetrical composition. I like the way there are two circles of fire, one on either side of the frame. I could have moved closer to take the photo, but I preferred to stay back and include more of the setting.

Light. I shot this photo at dusk. Partly from necessity – it’s easier to see the flames when it’s dark. I also wanted some colour in the sky. I didn’t want it to be completely black.

Colour contrast. The cool colour of the blue sky contrasts with the orange flames and the red glow in the foreground. This is colour temperature in action again. The sky is lit by the fading daylight, which has a deep blue colour. The light from the flames is orange, like the light from a tungsten bulb.

Conclusion

When it comes to evaluating photos, camera settings (aperture, shutter speed, Picture Style, white balance etc) are only part of the story. A camera is just a lightproof box that records light. It has no heart or soul. That comes from the photographer and their understanding of light and composition. Hopefully the way that I’ve analysed my own images in this article will help you understand how deconstructing photos taken by other photographers can help you take better photos.

This article is the first in a series. The next one will take a close-up look at your camera’s Mode Dial. Why are there so many exposure modes and do we need them all? I don’t think so – and I’ll tell you why.

Creative triangle 06

Understanding EOS

Andrew S Gibson is the author of Understanding EOS: A Beginner’s Guide to Canon EOS cameras. The creative triangle is one of many concepts discussed in the ebook.

Post originally from: Digital Photography Tips.

Check out our more Photography Tips at Photography Tips for Beginners, Portrait Photography Tips and Wedding Photography Tips.

Introducing the Creative Triangle


Digital Photography School

 
Comments Off on Introducing the Creative Triangle

Posted in Photography


“Triangle Walks” by Fever Ray

11 Dec

This unofficial video clip is our own interpretation of “Triangle Walks”, a great song by Fever Ray. It was done thanks to a creative collaboration between Pablo Calvillo, Cara Elizabeth, Angel Rizonyk and Pierre Relange. You can download a high res version from my website: pablo.maliarts.net
Video Rating: 4 / 5

 
Comments Off on “Triangle Walks” by Fever Ray

Posted in Nikon Videos