RSS
 

Posts Tagged ‘Transform’

Could your Canon camera transform video calls? We test EOS Webcam Utility

15 May
Looming. Yes, of course a Canon EOS-1D X Mark III will offer better image quality than the junk camera that’s built-in on my laptop. But for your sake, I hope you have a smaller compatible EOS camera laying around.

Canon recently announced the EOS Webcam Utility beta: software that will convert several of its recent cameras into webcams. All you need is a USB cable and a PC running Microsoft Windows 10. Since we’re all stuck inside right now, and our laptops all have horrible built-in webcams (and no, not even a shiny new Apple Macbook Pro includes anything at all decent), we figured we’d take a quick look at the software to see if it’s any good.

I happened to have Canon’s EOS-1D X Mark III handy, although I’ll be the first to admit it’s not the most practical camera for this type of use (my personal M100 isn’t supported, and as expected, didn’t work when I tried it). Still, in the end, I’m pleased to say the 1D worked pretty darn well.

The software installation went smoothly. After you run the installer, you just restart your computer, power on your camera, set your desired exposure, white balance and autofocus settings (you can’t control them from the computer), and then plug it in via USB. I expected to have to open a dedicated Canon app to check compatibility, but you only need to open your videoconferencing app of choice, go to video settings and select ‘EOS Webcam Utility Beta’ from a dropdown list where your existing webcam lives.

You may find, as I did, that the difference in image quality is pretty striking.

I think the fact that the internal webcam makes it look like I’ve shaved much more recently than I actually have is a mark in its favor. I guess I could slather some Vaseline onto the front element of the Canon lens for a similar effect, though then you wouldn’t be able to see my cat-themed mousepad in all its glory. 1D X III photo captured using a 24mm F2.8 lens at F2.8.

My test computer is my well-specced HP Envy 13 ultrabook with an 8th gen Intel i7 and a dedicated graphics processor, and so it’s clear that good core specs don’t mean you automatically get a good webcam. (And yes, I wiped off the lens before giving this a go.) For more flattering results I could definitely raise my laptop a fair bit and make sure that the lighting is better, but I’ll admit that I’m still impressed at the difference a ‘real’ camera makes.

In my testing, I was able to get the EOS-1D X III working with Zoom as well as Skype, though for some reason, I had to uninstall and reinstall Skype (downloaded from the actual Skype site) to get the camera to show up as an option. It still doesn’t work with our work videoconferencing service (Amazon Chime – full disclosure, DPReview is an editorially independent subsidiary of Amazon), and I haven’t been able to test Microsoft Teams yet.

After re-installing Skype on my computer, it worked great; Chime, not so much.

Canon’s software is still in beta, and I fully expect compatibility and reliability to improve in the coming weeks and months. I think the bigger question is, if you are so fortunate to be able to work remotely during the pandemic, how good do you really need your webcam to be?

As I mentioned in an image caption earlier, the level of detail the EOS-1D X III captures relative to my built-in webcam means I’ll need to shave a bit more regularly (this is probably a positive thing overall, I’ll admit). I’m also in the midst of moving house, so my workspace is messy and I don’t want that to be visible, though a different lens would help somewhat. Plus, some software (like Microsoft’s Teams) can blur backgrounds already, and Zoom lets you insert in a virtual background of your choosing.

If it’s important to you or you have a smaller-sensor Canon camera that won’t convincingly blur backgrounds, you can continue use your camera with Zoom’s ‘virtual background’ feature. Depending on your workplace, I recommend you use this feature with either caution or reckless abandon.

I will say that Canon’s Dual Pixel AF kept my face in perfect focus throughout my testing, so if you are into real bokeh more than the computational alternatives, using something like a 35mm F1.4 lens doesn’t mean your face will be a blur; just your surroundings. But the biggest barrier is likely to be just making sure you can work around the camera. In my case, that proved difficult.

For my current setup, I would have to move my desk away from the wall quite a bit or get a different mounting mechanism for the 1D X III to be a viable permanent webcam. Admittedly, I could get a compatible compact option like the Canon PowerShot G5 X II and a tiny Gorillapod and still get way better results than my laptop’s built-in camera (or I could even use a Sigma fp, which has a similar webcam feature). But at the end of the day, it’s all extra stuff to have on or around your desk. If your office area is anything like mine, it’s already pretty crowded.

Lastly, during a real-world test, a roughly 50-minute Zoom call drained more than 50% of the battery on the 1D X III I was using. Dedicated webcams that draw their power from your computer won’t have this issue, and other Canon cameras that charge over USB will presumably present less of a problem.

In the end, I have to applaud Canon for making the effort to create this software quickly enough to allow locked-down workers to take advantage of it. It’s free, it’s valuable, and it could really benefit a ton of people out there with minimal effort. It may not be the best solution for everyone, but for at-home workers that still need to keep up professional appearances, this is a fantastic option.

Editor’s note: An earlier version of this article mentioned that the EOS Webcam Utility beta was incompatible with Skype. Further experimentation showed this not to be true. The article has been updated and we regret the error.

Articles: Digital Photography Review (dpreview.com)

 
Comments Off on Could your Canon camera transform video calls? We test EOS Webcam Utility

Posted in Uncategorized


Sony to transform its Electronics Products & Solutions segment into new holding company

26 Mar

Sony has announced it is transforming its Electronics Products & Solutions (EP&S) segment into an intermediate holding company. Starting April 1, 2020, Sony’s Imaging Products & Solutions, Home Entertainment & Sound and Mobile Communications divisions, which made up its EP&S segment, will be known as Sony Electronics Corporation.

In a short statement on its public relations website, Sony Corporation says the creation of this new company ‘will not only accelerate the integrated operation of the EP&S businesses, but also aim to optimize its organizational structure, talent and business portfolio, while further enhancing competitiveness and creating new business.’

Sony has done multiple restructures in the past with little to no effect on consumers. It would appear that will be the case with this transition as well.

Articles: Digital Photography Review (dpreview.com)

 
Comments Off on Sony to transform its Electronics Products & Solutions segment into new holding company

Posted in Uncategorized


How to Use the Lightroom Transform Tool

02 Apr

The post How to Use the Lightroom Transform Tool appeared first on Digital Photography School. It was authored by Erin Fitzgibbon.

Lightroom has so many great tools we all use to edit our photographs. No wonder it’s an essential editing program for just about every photographer. Let’s take a look at the Transform Tool.

The Transform Tool can be used to adjust the perspective in your images. Most know that the tool is useful for straightening horizons or fixing those pesky leaning buildings, but it can do a lot more than that. The Transform Tool can help you to adjust other types of photographs. It has a convenient application, but it can also be used to edit your images to create more dramatic looks. You can also use it to help you create interesting artistic interpretations of your shots.

I used the transform tool to help me edit this image. I made several small adjustments to align the perspective with my creative vision.

Let’s start with the individual components of the transform tool before progressing to using them in more creative ways towards the end of the article.

The Auto Function

The Transform Tool comes with an automatic option. In this case, it’s pretty simple. Push the Auto button and let Lightroom make all the adjustments to your image. For those who are unfamiliar with how to use the other features of the Transform Tool this may be the simplest option. The problem is that Auto doesn’t always do the best job of adjusting your images. I find that if the adjustment is straightforward like straightening a horizon, then auto works well. However, it has difficulty adjusting the more complex perspective issues. This is meant to be a quick and dirty type of adjustment for minor perspective issues.

Here’s an example of the Auto tool in use on Tintern Abbey.

Vertical adjustments

The Vertical Tool automatically analyzes and then adjusts the vertical lines within your photograph. This type of adjustment is particularly useful if you’re trying to fix a leaning building or leaning trees in your landscape because you’re using a wide-angle lens. At the same time, you will find that automatic fixes don’t always work correctly and that Lightroom may over-adjust the verticals and give you something that doesn’t look quite right. So this may not be your best option for using the Transform tool.

In this case, the vertical tool didn’t do a very good job of adjusting the perspective.

Level Adjustments

The Level Tool automatically adjusts your horizontal lines. This tool seems to work reasonably well for most landscape shots. Issues with the Level Tool may arise when you are working with a horizon line along with diagonal lines. Sometimes this combination of lines fools the software. Lightroom may choose to adjust the diagonal lines and skew the rest of the image. Keep this in mind when using the automatic adjustment.

I find the level tool works great for landscape images but in this case, it needs manual adjustments.

Full Adjustments

The Full Adjustment option takes into account all vertical and horizontal lines plus the features of the auto option. This particular tool doesn’t adjust my images well. It tends to overcompensate. This tool rarely creates a look I want to use for my photographs. That doesn’t mean it won’t work for you; however, be aware that it tends to be aggressive.

Some may like the adjustments that a full perspective tool creates. If you do, remember to leave a lot of room around your subject. As you can see here, the crop that needs to occur is quite severe.

The Guided Adjustment option

The Guided Tool is probably the best way to adjust perspective within your images. The problem with the other options is that Lightroom chooses which vertical and horizontal lines it uses to adjust perspective. The reality is that these may not be the lines that need adjusting. This is where the Guided Tool comes into practice. As the editor of your work, you know which lines need straightening so you can guide Lightroom to adjust the proper verticals or horizontals. It’s still a quick and easy tool to use. You are guiding Lightroom by telling it where to focus its efforts.

The tool is straightforward to use. Just choose the line you wish to adjust and then use your mouse to define the line for Lightroom. Once two lines have been selected, Lightroom automatically adjusts your image based on your guidelines.

In this case, the Guided Tool straightens the lines I highlight but the required crop is rather extreme.

The guided tool worked really well with this simple adjustment.

Using the sliders

You can always adjust your images using the Manual Sliders located below the automatic options. Sometimes it works very well to use the Guided tool and then to make minor manual adjustments to the image as well.

Just move the sliders to adjust your work for the desired look. Each slider will adjust a different aspect of the image.

Level – tilts the image and creates an angle of sorts

Vertical – adjusts the image by tilting either forwards or to the back
Rotate – twists the image on an access point (adjusting horizon lines for the most part)
Aspect – stretches the image horizontally or compresses it horizontally
Scale – allows you to zoom in closer or further out on an image
X offset – moves the image on the x-axis to the left or right.
Y offset – move the image on the y-axis up or down.

Used on their own you may find that these sliders do not achieve much. However, when used in combination and subtle amounts, you can easily adjust the sliders to obtain the perspective you see in your mind’s eye.

In this screenshot, you can see how the aspect slider works to adjust an image.

Using the Transform Tool creatively

You can use the Transform Tool to help you adjust perspective to create more drama within an image. You can also use it to completely change the perspective of an image for a creative interpretation of the subject you originally photographed.

In the case of the following image, I made the adjustments to create something that highlighted the foreground more, thus drawing the viewers eyes towards that area.

I used the vertical slider to adjust the image so the foreground plays a bigger role in the image.

Here’s the completed photograph exported from Lightroom:

Compare this to the original perspective of the shot.

In the image below the foreground plays a less important role in the image. You can use the Transform Tool to help you make creative decisions about your photographs.

This is the unedited jpeg of the file above. Consider how the change of perspective affects the visual nature of the image.

It’s a versatile tool

You can use the Transform Tool in very subtle ways to adjust perspective. It can either be used to make an image seem more realistic and more accurate to our understanding of the way the landscape looks in reality or can be used to make some more open to interpretation. Remember, there are lots of options out there when editing work.

Be creative. Give the transform tool a whirl and see what you can do with it. You may surprise yourself and create something extraordinary.

I’ve included a few more photos edited using the Transform Tool to illustrate how you can use it both functionally and creatively.

The goal was to make the foreground more important in this photograph.

My goal was to capture my friend as she took photos of the incoming waves on the beach in Borth, Wales.

The post How to Use the Lightroom Transform Tool appeared first on Digital Photography School. It was authored by Erin Fitzgibbon.


Digital Photography School

 
Comments Off on How to Use the Lightroom Transform Tool

Posted in Photography


Two Ways to Transform Old Photography Magazines Into Coasters

22 Oct

Photography magazines are one thing I can’t seem to throw away. My fascination with photography has culminated in a library of magazines filled with beautifully dated galleries, equipment reviews, tutorials and advice. They accumulate on my bookshelves, and quickly migrate to desktops, the tops of fridges, assorted drawers and nightstands.

While having a cup of tea the other day, I realized I’d forgotten to put down a coaster. I quickly grabbed a magazine and rested my cup on it, sparing my furniture. And it got me thinking. Could I transform some of my magazines into coasters themselves? Surely the thousands of pages I’d accumulated could be put to use as an interactive dining accessory. After all, who wouldn’t want a cute photography-themed coaster to admire while having a cup of tea?

Here are two simple ways to create striking coasters out of your old photography magazines.

The cut and paste method

You will need

  • A photography magazine or two.
  • Some coasters to stick your magazine images to. (I used simple round cork coasters from IKEA.)
  • Mod Podge (a glue and sealant) available at art supplies stores.
  • A pen or pencil.
  • A brush.

Method

First, find an image you’d like to incorporate into your coaster design. The choice here is endless. You could focus on text, photographs or whatever catches your eye.

Once you’ve selected an image, trace a circle around it (using your coaster as a template) and carefully cut it out.

Next, apply a generous amount of Mod Podge to the coaster and spread it around evenly with the paintbrush. (I put some newspaper down for this bit to protect my work surface from spills.)

Place your image face up on the Mod Podged side of the coaster and smooth out any wrinkles.

Once your coaster has dried (allow an hour or two), you’ll need to seal it. Spread a layer of Mod Podge evenly over the image with the brush. (Don’t worry, it dries clear.)

Once it has dried (again, allow an hour or two), repeat this step four times. Make sure you let the coaster dry between coatings.

Once the last layer of Mod Podge has dried, your coasters is ready to use.

The coiling method

You will need

  • A magazine.
  • A ruler and scalpel (or a paper shredder).
  • Glue. (Mod Podge works well for this project too.)
  • A paintbrush.

Method

Tear out a few magazine pages – the more vibrant the better. Cut each page lengthways into 7mm strips. (If you have a strip-cut paper shredder, you can use it instead.) You’ll need to cut up at least six pages.

Once you’ve cut your strips, its time to start curling. Select one strip of paper and curl it over itself to create a coil. Once you’ve completely curled the first strip, add a dab of Mod Podge to the end and glue it down.

Now you need to add a new strip to build on the last. Add a dab of Mod Podge to the end of a new strip of paper, and press it Mod Podge side down onto the coil where the last strip ended. Wind the fresh strip around the coil, keeping the paper nice and taut. Once you’ve completely wound it on, add a dab of Mod Podge to the end of the strip and secure it to the coil.

Keep winding your strips of paper onto the coil. For every fifth strip, add a thin a layer of Mod Podge down its entire length and wind it Mod Podge-down, around the coil. This will keep the coil together as it grows.

Keep adding strips of paper until you’re happy with the size of your coil.

It may take you a couple of hours, but the results are striking. And it’s really fun to watch it grow.

Whichever method you choose, it’s a great way to get those stunning images out of the bookshelf and onto your coffee table.

The post Two Ways to Transform Old Photography Magazines Into Coasters appeared first on Digital Photography School.


Digital Photography School

 
Comments Off on Two Ways to Transform Old Photography Magazines Into Coasters

Posted in Photography


Super Simple Introduction to Manual Mode and How it Will Transform Your Photos

30 Jan

Super Simple Introduction to Manual Mode and How it Will Transform Your Photos

“There is only you and your camera. The limitations in your photography are in yourself, for what we see is what we are.” Ernst Haas

Do you ever ask yourself why the images you capture are not like the ones you see in your mind’s eye?

Do you ever wonder why your photos don’t look as good as a professional’s? What makes theirs look so great?

The answer is – probably because you are shooting in Auto!

Super Simple Introduction to Manual Mode and How it Will Transform Your Photos5 seconds, f/8.0, ISO 100

Get more creative with Manual Mode

A professional takes full creative control over every aspect of the photo and makes creative choices in the image creation process. Aperture, shutter speed and ISO are the base. If you don’t control these then you will be unable to create the best possible image.

Digital cameras nowadays make exposure so easy. There doesn’t seem to be a good reason to shoot on manual. But there is – it’s creativity. Specifically, creative exposures.

Super Simple Introduction to Manual Mode and How it Will Transform Your Photos1/200th, f/2.2, ISO 500

Take control of the process

If you want awesome photos, then shooting with control is the most important part of the creative journey with photography. With Manual Mode, you get full control. Total creativity.

I know a lot of people feel intimidated trying Manual, but I have taught hundreds of people to feel comfortable and confident with it so I know it’s totally possible for anyone to learn.

Even if you aren’t tech-minded, you can do this! All you need is the basic understanding of the process – and practice.

Super Simple Introduction to Manual Mode and How it Will Transform Your Photos30 seconds, f/10, ISO 200

The camera cannot (at least at the moment) make creative choices in the way that you can. You’ll often end up with un-dynamic exposures when the camera chooses for you.

How many well-exposed photos do you see on Facebook? The majority are shot using some Automatic Mode or another. They are all the same base density. Sure, they are properly exposed, but that base exposure is just the beginning when shooting with intent.

All those exposures start from the same base, zero. Many photographers just leave it there because it looks good, it looks “correct”. That is Auto.

Super Simple Introduction to Manual Mode and How it Will Transform Your Photos1.6 seconds, f/10, ISO 50

Exposure is part of photographic artistry. Don’t pass on it just because your photos look good….they can be so much better!

Here is the simple method I use to explain the process of shooting in Manual Mode.

The Exposure Triangle

Shooting in Manual Mode means controlling three fundamental settings in photography:

  1. ISO
  2. Aperture
  3. Shutter Speed

Together they are collectively known as “The Exposure Triangle”.

Super Simple Introduction to Manual Mode and How it Will Transform Your Photos13 seconds, f/9, ISO 250

What do these three controls do?

  • ISO is the camera’s sensitivity to light. Think of it this way – do you want the sensor to absorb light quickly, sacrificing detail and contrast (high ISO), or do you want to let the light in slowly absorbing every color, capturing every juicy detail (low ISO)?
  • Aperture controls the INTENSITY of the light flowing onto the sensor. Think of coming out of a Saturday afternoon matinee and how intense the light is after being in the dark for a few hours. You’re practically blinded for a moment (until your pupils adjust to the light and become smaller – the aperture opens and closes much the same way). That’s intensity!
  • Shutter Speed (SS) is a time value – in other words, how long is the exposure. The time is combined with the intensity of the light from your Aperture setting. Shutter speed is represented as 1/250th of a second, for example.

These three settings are all you need to know about making a manual exposure. That’s it. Now let talk about how to approach it.

Super Simple Introduction to Manual Mode and How it Will Transform Your Photos1/30th, f/2.2, ISO 3200

Think ISO first

When making a manual exposure ISO should always be your first consideration!

There are two questions you have to ask yourself before you start making exposures.

  1. How much light is on the subject?
    This is essentially a technical decision. (ISO)
  2. How can I make my subject look its best?
    This is essentially a creative decision. (Shutter speed and Aperture combination)

The answers to these questions are the key to the whole process. Once you have the answers, you can set your exposure.

Super Simple Introduction to Manual Mode and How it Will Transform Your Photos1/125, f/13, ISO 400

This is how I shoot in Manual Mode, explained in three easy steps.

Step #1 – How much light is on the subject?

Do I have:

  • Full daylight
  • A gloomy interior
  • A heavily shaded area between buildings
  • And so on…

Super Simple Introduction to Manual Mode and How it Will Transform Your Photos2 seconds, f/10, ISO 320

First off, I’ll set my ISO accordingly. I usually go for the lowest ISO I can get away with shooting handheld. If I have a tripod I’ll go even lower. You can go almost a whole day without needing to change your ISO much.

It’s the easiest thing to set and forget. But if you need to move it you can. This is not a big deal on modern cameras where image quality is amazing at almost any ISO.

ISO scale - Super Simple Introduction to Manual Mode and How it Will Transform Your Photos

TIP #1

Set your ISO and don’t think about it unless the light level changes a lot – like you go indoors, the sun sets, or you walk into a heavily shaded area, etc. You get the point.

TIP #2

Look at the light! Photography is a study of light, after all, so your first step is to learn to really see it, to observe what it is doing, its strength and quality. When you have a deep familiarity with light from willfully observing it, you grow to know it.

Being aware of light levels makes shooting in manual much easier. When you are out, be tuned in to the light.

Step #2 – I ask myself “What is my priority?”

How do I decide what is the priority for my shot?

Super Simple Introduction to Manual Mode and How it Will Transform Your Photos10 seconds, f/11, ISO 50

It all comes down to what I’m shooting – prioritizing shutter speed or aperture to whatever I think will make my subject look its best.

  • Am I shooting landscapes and want a wide depth of field? (select a small aperture like f/16).
  • Am I shooting portraits and so want a shallow depth of field? (aperture again, this time a wide setting like f/2.8).
  • Perhaps I am shooting sports or action, and want pin-sharp images of fast-moving subjects? (shutter speed this time – choose a fast one to freeze the subject like 1/2000th).

I’ll make my choice of shutter speed or aperture as my top priority. Now I have two points of the exposure triangle set. For the last setting, I adjust the exposure on the light meter scale.

Super Simple Introduction to Manual Mode and How it Will Transform Your Photos1/15th, f/4.5, ISO 12,800

Step #3 – Adjusting the exposure

Now is the time to look at the camera meter.

Use the light meter scale – get the marker near the center or thereabouts with the one remaining dial (in other words if you chose the aperture in step #2, the last one being set here is the shutter speed). On this -2 to +2 scale, where you place the exposure matters a lot! This is the essence of creative exposures. It dictates the mood of the photograph.

Being in the centre or “0” position is rarely the right exposure for me.

Light meter scale - Super Simple Introduction to Manual Mode and How it Will Transform Your PhotosLight Meter Scale

Remember, each point of the exposure triangle is NOT fixed. Each click or interval (usually in 1/3 increments) are equal, so 2 (+) clicks of ISO is equal to 2 (-) clicks of aperture or shutter speed. These are called reciprocating exposures and they are the key to shooting creatively.

So, if you find yourself in a situation where you would like a little faster shutter speed, then do it. But compensate with an equal but opposite amount of another setting. What choice you make at this point is completely creative, not technical.

Super Simple Introduction to Manual Mode and How it Will Transform Your Photos3.2 seconds, f/4.5, ISO 100

TIP # 3

Let’s say you are shooting a landscape with a good foreground, a large tree perhaps, You set your aperture to f/16 for good depth of field (priority), ISO is at 100 and you have a shutter speed of 1/60th. This is a classic landscape exposure – with a lot of Depth of Field.

For an alternative image of the same scene, you could think of the tree as a portrait photo and open up the aperture to f/4 (+4 stops) and adjust the shutter speed to 1/1000th (-4 stops) keeping the ISO at 100 and the exposure the same.

You would lose most of the Depth of Field, but gain a nice bokeh making the tree isolated, like a good portrait. Now you’ve created a different feel to a classic landscape using a reciprocating exposure. But wait, there is still more you can do!

Super Simple Introduction to Manual Mode and How it Will Transform Your Photos2.5 seconds @ f/4.0 ISO 100

Now, how about underexposing this scene by 1-1.5 stops to create a more low-key moody image. If the tree was in bright sun and the background shaded, I would instinctively underexpose to emphasize that contrast.

Putting it all into practice

You will miss a few exposures now and then. Everyone does, but don’t let it discourage you. I think a big part of the fear of shooting in Manual Mode is the, “I will miss the shot”echoing in people’s heads. Like I say, it happens to everyone.

Losing a few shots is still worth the wealth of knowledge and creativity you get from sticking with it and totally controlling your photography. Those missed shots will appear less and less as you improve, and your new found skill shooting in manual will reflect in your photos.

Super Simple Introduction to Manual Mode and How it Will Transform Your Photos2 seconds @ f/5.0 ISO 50

I recommend you shoot at least 1,000 images in your practice. If you really focus, you could nail Manual Mode over a weekend. There is no substitute for practice.

Slow down and have fun! It will be worth every bad shot you take.

Study your images in post-production

Once you have taken your images, it is a really good idea to study your images in post-processing. All of the information about exposure is stored in the metadata which you access in a program like Lightroom (you can filter and sort your images by ISO, Aperture, etc.).

Super Simple Introduction to Manual Mode and How it Will Transform Your Photos1/30th, f/8, ISO 50

A few more final words – and action steps!

Did you know that two of the best ways to fully learn something is to:

  1. Practice it
  2. Explain it or teach it to someone else

By practicing it over and over you are teaching it into your body, almost like muscle memory. You do it so many times you’ll end up with it being automatic like it is for me (and those with years of experience who make it look effortless).

Super Simple Introduction to Manual Mode and How it Will Transform Your Photos1/400th @ f/4.0 ISO 200
By explaining it, preferably a few times, to someone else, your brain starts to build new neural networks (which happens anytime you learn anything). So if you want to remember anything, you need to keep the neural networks alive, and by repeating it, explaining it, and practicing it over and over you’ll make that a solid memory in your brain.

So the short term work of repetition leads to remembering it long term. How cool is that?

I really, really hope this has helped you “get” Manual Mode. I love the creative possibilities of photography, and it makes all the difference when you feel comfortable with your tools. I would love to know if this has helped you – and if you’ll take the leap to practice shooting in manual.

The post Super Simple Introduction to Manual Mode and How it Will Transform Your Photos by Anthony Epes appeared first on Digital Photography School.


Digital Photography School

 
Comments Off on Super Simple Introduction to Manual Mode and How it Will Transform Your Photos

Posted in Photography


Transform Your Images with a Click – 62% off these Lightroom Presets Today

17 Dec

We’re at day 5 of our dPS 12 Days of Christmas and today we have one that we know many of you who use Lightroom will LOVE. It’s 62% off any of our Lightroom Presets bundles!

If you have ever looked at other people’s beautiful images and have wondered, “Why don’t mine look like that?” Then you’ll find todays deals perfect for you.

These beautiful presets have been created by some of our favourite photographers to save you a whole lot of processing time.

They will help you convert your photos from average to amazing with just one click.

Here’s the deal – 101 Lightroom Presets for just $ 19 USD:

Normally $ 49 – today you can pick up any one of these 101 presets packs for just $ 19 USD (62% off).

  • 101 Lightroom Presets by Cole Joseph – to take your landscapes and people photos from average to amazing… including 7 high quality collections
  • 101 LANDSCAPES Lightroom Presets by Todd and Sarah Sisson – for all scenery seasons including a bonus toolbox of stackable presets
  • 101 Lightroom PORTRAITS Presets by Rachel Devine – including 67 different presets and 36 different portrait brushes

These collections have been created exclusively for dPS by professional photographers to make your photos “pop” and save you time getting the look you want.

With these collections and a few clicks in Lightroom, people will be wondering why their images are not as stunning as yours!

Each one contains 101 presets – at just $ 19 USD that’s around 18 cents per preset. Whether you just grab the one pack or all three you’ll love todays deal.

Bonus Parter Offers

Anyone who picks up any of the offers during these 12 days of offers gets to take advantage of your exclusive DPS Christmas Deals Bonus Offers, like todays featured bonus where you can pick up Perfectly Clear Complete for just $ 89 USD.

Christmas Deals:
Bonus Offers

Bonus Offers

Brought to you by

ON1
Athentec Perfectly Clear
KelbyOne
New York Institute of Photography

The post Transform Your Images with a Click – 62% off these Lightroom Presets Today by Darren Rowse appeared first on Digital Photography School.


Digital Photography School

 
Comments Off on Transform Your Images with a Click – 62% off these Lightroom Presets Today

Posted in Photography


How to Use a Small Softbox With Your Flash to Transform Your Portraits

26 Aug

Typically I prefer to carry minimal photographic equipment when I am out to make a series of photos or portraits. If I’m on assignment for a client or creating new stock photos I will take more gear with me so as to better cover any challenging situations that may arise. One of my favorite accessories I have come to rely on is a small collapsible softbox for my flash.

How to Use a Small Softbox With Your Flash to Transform Your Portraits

Day time use of a small softbox can help to even out shadows on your model’s face.

Unmodified flash tends to be pretty harsh. A strong burst from a small light source produces some ugly shadows and extreme highlights. Whether your flash is on or off camera if the light is direct and unfiltered the results you see will be unnatural looking. I’ve experimented some with various small flash modifiers and not found any that produce pleasing light, mostly because of their size. They are too small to produce a reasonably even, soft light.

Pop-up Softbox

My pop-up softbox is just 60cm (about 2 feet) square, lightweight, and very portable. Having someone to assist with it is helpful, so it can be easily positioned just where you want, but I have often used it on location mounted on a light stand. Placing the flash in the mouth of the softbox effectively increases the output size of the light and softens it with two nylon diffusers. The light from your flash will be scattered, resulting in softer shadows and reduced highlights.

Night Portraits

How to Use a Small Softbox With Your Flash to Transform Your Portraits

Adding a soft light to night time portraits can create evenly lit photographs.

Photographing portraits at night can be challenging, especially if you have to rely on available light. Adding a light source you have some control over, will make night portraiture a much more enjoyable experience. Often at night, available light sources will not provide a pleasant, even light for your subject and direct flash will produce unflattering results. Using a softbox to spread and soften the light will avoid hard edged shadows and blown out highlights.

Often at night, available light sources will not provide a pleasant, even light for your subject and direct flash will produce unflattering results. Using a softbox to spread and soften the light will avoid hard edged shadows and blown out highlights.

Indoor Portraits

Looking down at a woman standing next to traditional northern Thai sausages at a market. How To Use A Small Soft Box With Your Flash To Transform Your Portraiture

Adding a soft light to one side of my model has helped brighten up the scene.

Likewise, when photographing indoors and relying on available light, it can be challenging to achieve pleasing results. By adding a soft light to your subject you are able to create natural looking images.

The slightly larger surface of the softbox throws light over a wider area so more of your subject is affected and also some of the surroundings will benefit from a little more illumination.

How to Use a Small Softbox With Your Flash to Transform Your Portraits

Careful flash output and exposure setting have enabled me to capture this traditional Thai new year blessing activity effectively.

Outdoor Daytime Portraits

Outdoors, during the day, is when I enjoy using this softbox the most. Having an additional light source that’s powerful enough without being too harsh can help you make portraits that look natural. Being able to reduce shadows by adding a soft fill light will produce a much more flattering result than if you are using an unmodified flash or relying only on available light.

Balance is the Key

I have found manually setting my flash output gives more consistent results than setting it on TTL or other automatic settings. Being in control of the output will allow you to balance the nice soft light from the softbox with the available light. This is important if you want to produce natural looking photos. If your flash produces too much or too little light it will overpower the ambient light or have little to no effect.

I used to use an external light meter to measure the ambient light and then set my flash so it was producing an equivalent output. Now it’s easy enough to just use the information your digital camera provides on the screen, the histogram and blinkies. With a little trial and error, it does not take long to find a setting that gives you a good exposure.

Asian woman taking a photograph - How To Use A Small Soft Box With Your Flash To Transform Your Portraiture

Using the flash and softbox to balance the back lit subject with just the right amount of filtered light.

Light Position and Background

At times you might want to balance the flash so that the background remains very bright and your subject is still pleasantly lit. Dialing in the flash output to slightly less than the value of the background illumination will achieve this when your camera’s exposure is set for your model’s skin, (which is being lit by your flash).

Think of your softened flash as a second light source. Position your model so the brightest ambient light source is behind them and place your softbox to one side in front of them. This can result in studio-like portraits. Again, in this situation, balance is the key. Too much or too little output from your flash will create an unbalanced light and an unnatural looking photograph.

How to Use a Small Softbox With Your Flash to Transform Your Portraits

Filling in with a strong, soft light when the light behind your subject is strong can provide very natural looking portraits.

The softbox was positioned to camera left for this shot.

Modify for Success!

Many of our students avoid using their flash, mostly because they have failed to achieve good results in the past. A small, direct light source is rarely going to provide pleasing light. Using a small softbox to modify the light from your flash and learning to balance that with the ambient light, will help transform your portraits.

As always, when you are trying some new technique with unfamiliar equipment make sure you can afford to make mistakes. Making mistakes is a great way to learn, but you don’t want to do that when you have someone relying on you for the photos. Practice when the only consequence of messing up is that you’ll learn from your experience and not let someone else down.

The post How to Use a Small Softbox With Your Flash to Transform Your Portraits by Kevin Landwer-Johan appeared first on Digital Photography School.


Digital Photography School

 
Comments Off on How to Use a Small Softbox With Your Flash to Transform Your Portraits

Posted in Photography


Save 96% On The Ultimate Photography Bundle – 41 Training Resources That Will Transform Your Photography

23 Feb

Unspecified

This is a post I’ve been looking forward to publishing for months now because it has the potential to transform your photography and take average photos to great!

googletag.cmd.push(function() {
mobile_slots.push( googletag.defineSlot( “/1005424/_dPSv5topic-rhs(300×250)”, [300, 250], “pb-ad-124310” ).addService( googletag.pubads() ) ); } );

googletag.cmd.push(function() {
mobile_slots.push( googletag.defineSlot( “/1005424/_dPSv5topic-rhs(300×250)”, [300, 250], “pb-ad-124309” ).addService( googletag.pubads() ) ); } );

Today dPS is proud to be part of putting together one of the most unbelievable bundles of photography teaching that has ever been assembled – it’s called the Ultimate Photography Bundle.

Now I don’t claim that this bundle is “unbelievable” lightly. When you see what’s included you’ll see what I mean.

It’s got so many photography training resources including 10 courses, 16 eBooks, 4 sets of video training and 11 interactive tools – all bundled together at 96% off the regular cost of buying them all individually.

This bundle is worth over $ 4100 but today you can grab it for just $ 147.
Here’s just some of the teaching you’ll get in this bundle:

  • Master Your DSLR by David Molnar (normally $ 297)
  • Family Session with Family Posing Guide by Angie Monson (normally $ 129)
  • Photograph the Everyday Understanding Light and Composition by Courtney Slazinik (normally $ 199)
  • Master Editing in Lightroom by David Molnar (normally $ 297)
  • Milky Way Mastery by Joshua Dunlop (normally $ 147)
  • 6 Weeks to 6 Figure Business Course by Zach and Jody Gary (normally $ 599)

And that’s just a few of the resources you’ll get – there’s so much more included, including our very own ‘Going Pro’ eBook (one of our most popular guides).

Check out the full list of included resources here.

But pleasez don’t wait – the Ultimate Photography Bundle is available for six days only – so grab it before it disappears.

PS: as with all the photography training we promote – this one comes with a 30-day happiness guarantee – so there’s no risk at all.

googletag.cmd.push(function() {
tablet_slots.push( googletag.defineSlot( “/1005424/_dPSv4_tab-all-article-bottom_(300×250)”, [300, 250], “pb-ad-78623” ).addService( googletag.pubads() ) ); } );

googletag.cmd.push(function() {
mobile_slots.push( googletag.defineSlot( “/1005424/_dPSv4_mob-all-article-bottom_(300×250)”, [300, 250], “pb-ad-78158” ).addService( googletag.pubads() ) ); } );

The post Save 96% On The Ultimate Photography Bundle – 41 Training Resources That Will Transform Your Photography by Darren Rowse appeared first on Digital Photography School.


Digital Photography School

 
Comments Off on Save 96% On The Ultimate Photography Bundle – 41 Training Resources That Will Transform Your Photography

Posted in Photography


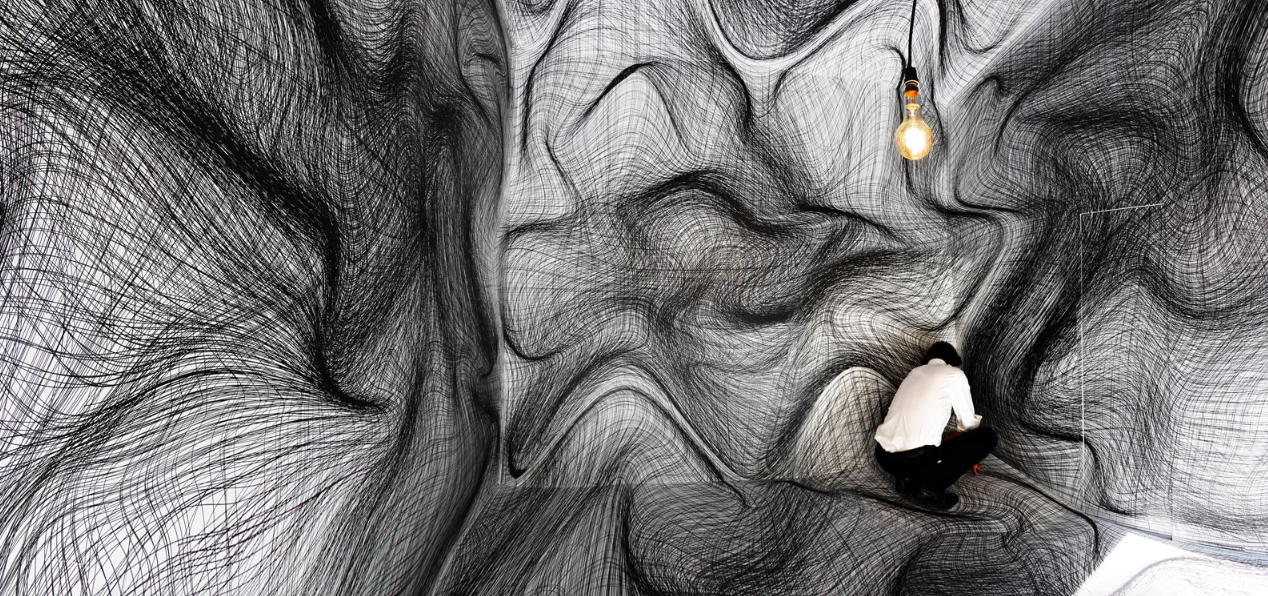
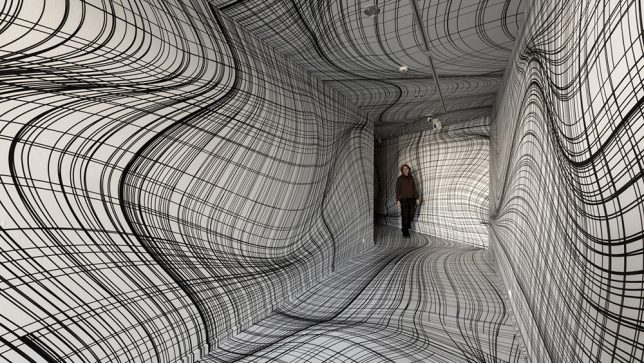
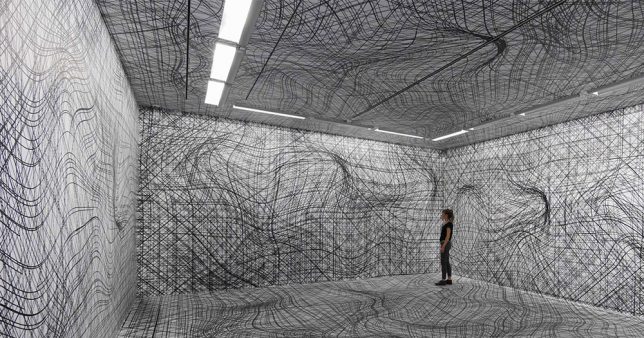
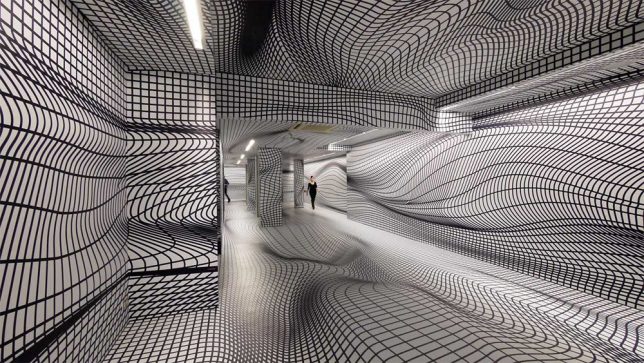
Vertigo Wallpaper: Warped 3D Room Illusions Transform Flat Gallery Surfaces

31 Dec

[ By SA Rogers in Art & Installation & Sound. ]

screen-shot-2016-12-30-at-9-51-20-am

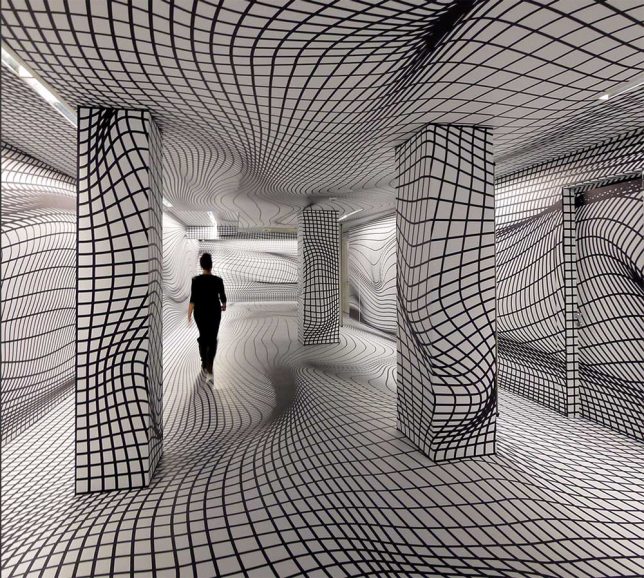
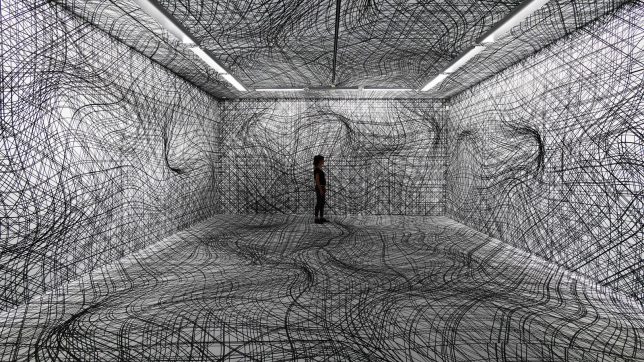
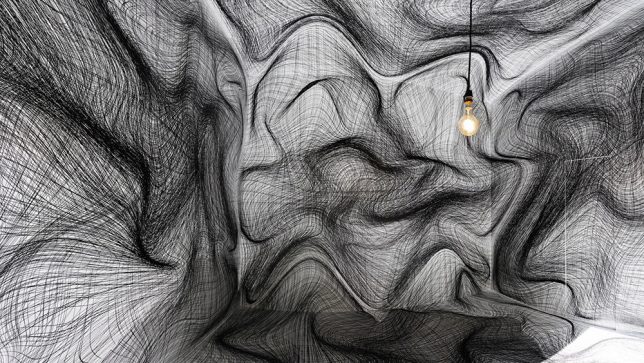
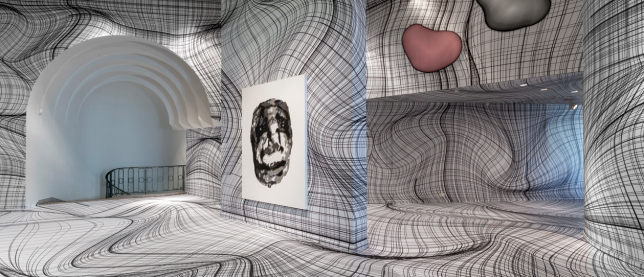
You could be forgiven for cautiously entering one of these rooms full of wavy sketched lines, stepping over obstacles that aren’t really there, uncertain whether parts of the walls are really projecting out toward you. Artist Peter Kogler creates spatial illusions that take over every surface of a gallery, turning it into a ‘virtual maze.’ A master of the large-scale print, he’s spent the last 30 years perfecting his techniques. The ones involving grids of lines pull off the most disorienting effects.
screen-shot-2016-12-30-at-9-50-55-am

vertigo-wallpaper-1

vertigo-wallpaper-2

Pictured here are installations from the last few years, including work displayed at the ING Art Center in Brussels this year, the Sigmund Freud Museum in Vienna in 2015 and the Galerie im Taxiplalais in 2014. His computer-generated works have even adorned the exterior walls of pavilions and museums, and often feature imagery of snakes, ants and pipes.

vertigo-wallpaper-3

vertigo-wallpaper-4

vertigo-wallpaper-6

According to his artist statement, “Kolger has been interested in new, innovative art practices, not only in the field of visual, but also in performative arts, sound and music. He continued his work by shifting the boundaries of artistic expression and developed a very impressive, emotionally and artistically convincing world, whose layered meanings open communication paths to the widest public.”

vertigo-wallpaper-7

vertigo-wallpaper-8

“After several years of research at the beginning of his artistic career, in painting, performance and experimental film, since 1984 Kogler has used computer technology. Heralding the future development of computer-generated art already in the ‘60s, in the spirit of that positivist-optimistic time, Michael Noll wrote: ‘The computer is an active medium the artist can interact with at a new level, liberated from many physical limitations of all former media. The artistic possibilities of this kind of creative medium as the artist’s helping device are truly exciting and challenging.”

Share on Facebook


[ By SA Rogers in Art & Installation & Sound. ]

[ WebUrbanist | Archives | Galleries | Privacy | TOS ]


WebUrbanist

 
Comments Off on Vertigo Wallpaper: Warped 3D Room Illusions Transform Flat Gallery Surfaces

Posted in Creativity


Using Lightroom’s Transform and Crop Tools to Improve Composition

30 Jul

Everybody loves to get it right in camera. But if you don’t, you have plenty of tools to help you make it right. Lightroom is one of the best available, and the easiest to use. In this article I’ll show you how you can use Lightroom’s Transform and Crop Tools to improve your composition.

The Transform Tab

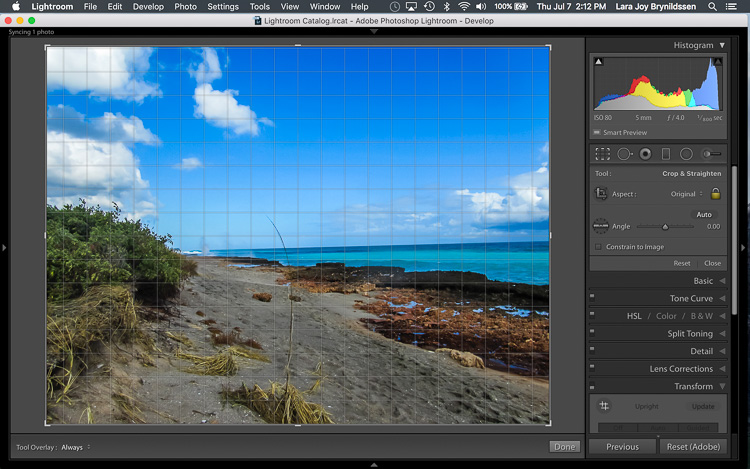
First, let’s talk about the Transform tab, in the Develop module. Transform is relatively new to Lightroom. It’s an improved version, split-off of the Lens Correction tab. Essentially, Transform helps you straighten crooked or skewed images.

IMAGE 1

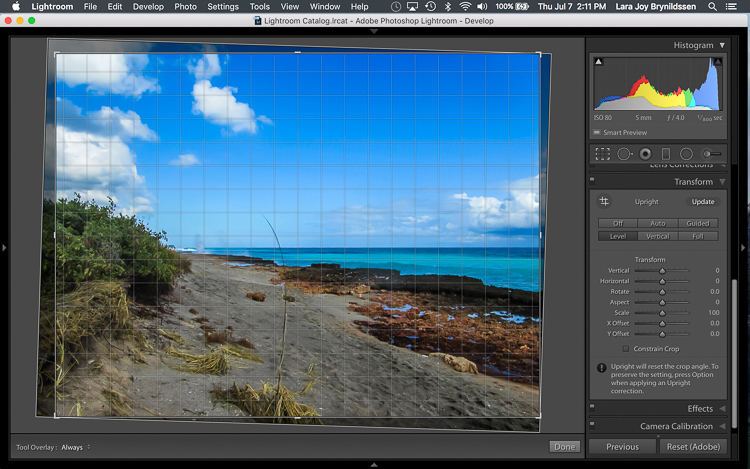
Here, in the first example above – a lovely seascape – there is a crooked horizon. Before opening the Transform tab, press the R key to activate the Crop Tool. Now press the O key (letter not number) to toggle the Grid overlay. With the Crop Tool still activated, click on the Transform tab in Lightroom and choose Level.

IMAGE 2

The Level option is perfect for images like this, when there are no strong vertical lines that need correction. It simply straightens the horizon so it no longer slopes crookedly. With the Grid overlay turned on, it’s easy to verify that the horizon is now straight. Here’s the image after the crop is applied.

IMAGE 3

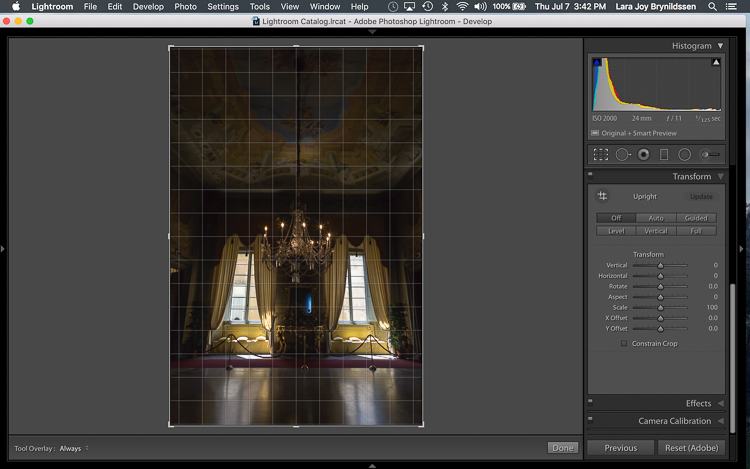
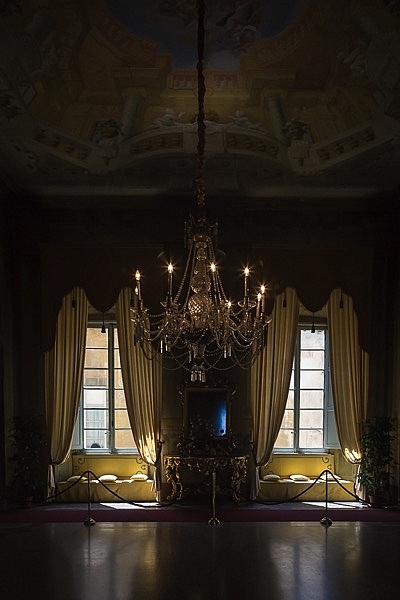
In this next example (below) – an interior image of an old Italian mansion – the windows are falling over backwards.

IMAGE 4

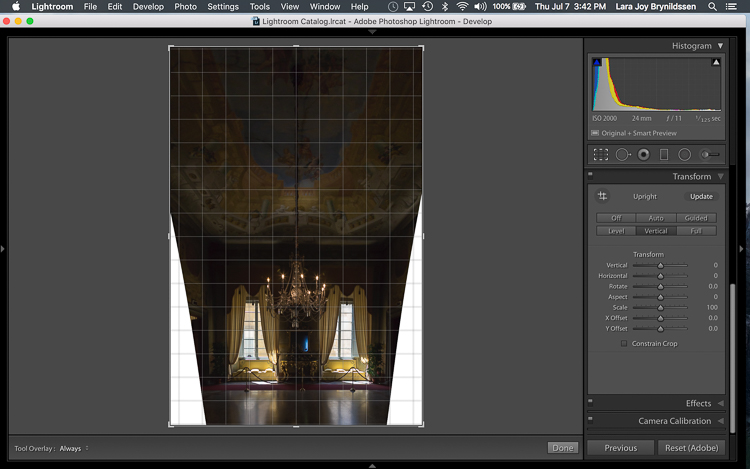
Here the Vertical option in the Transform tab does a great job of straightening the perspective. The windows align perfectly with the horizontal and vertical lines of the Grid overlay.

IMAGE 5

But as you can see, straightening the image has created a few problems. The image was so crooked (perspective distortion) that now there is a lot of white space to crop out. The good news is that when fixing these issues, composition can be improved too.

Composing with the Crop Tool in Lightroom

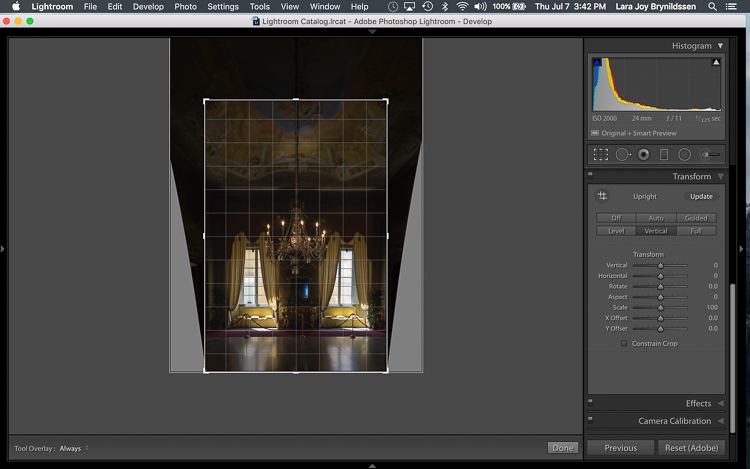
The white space can be eliminated, and the composition strengthened, by creatively using the Crop Tool in Lightroom. The next step is to adjust the composition with the Crop Tool by moving it around the image.

IMAGE 6

In this image, to eliminate all of the white space and direct the viewer’s focus to the chandelier and windows, grab the Crop Tool at the top centre point, and draw down. This eliminates both the unnecessary ceiling, and the white spaces on either side of the image.

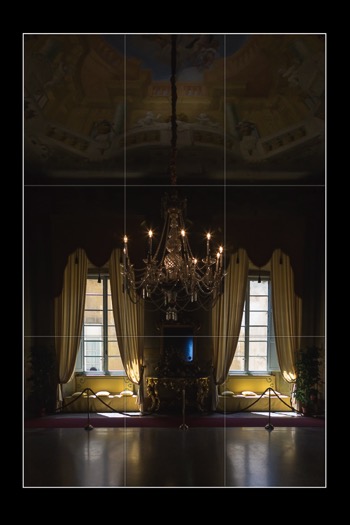
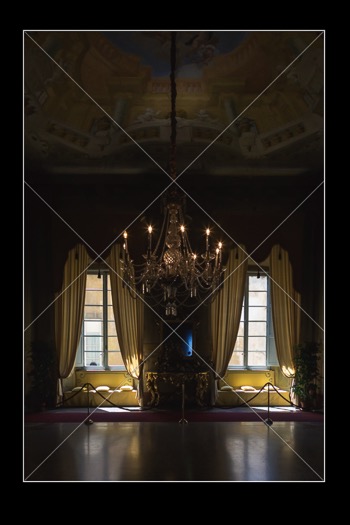
Now that the image is starting to look better, scroll through the Crop Tool overlays and review the newly cropped image to see which ones work. By reviewing your images with different Crop Tool overlays, you can strengthen your intuitive sense of strong composition.

To review each of the overlays, press the O (oh not zero)) key. You’ll toggle through the following:

  • Rule of Thirds (below left)
  • Diagonal (below right)
  • Golden Triangle
  • Golden Ratio (similar to the Rule of Thirds overlay)
  • Golden Spiral
  • Aspect Ratios
  • Grid
IMAGE 7 IMAGE 8

In the example images above, both the Rule of Thirds and the Diagonal overlays clearly show that the composition is strong.

Before

Before

IMAGE-9.jpg

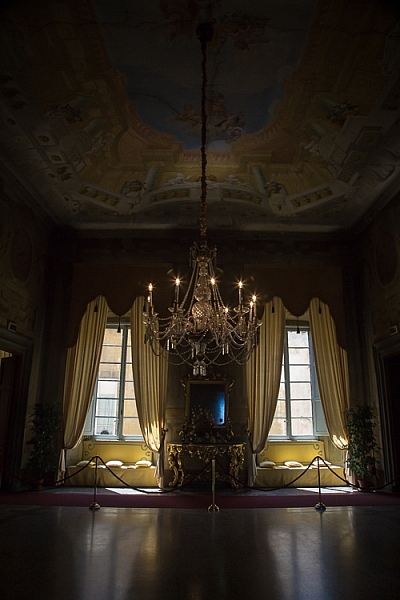
Final image.


Here’s the final image (before correction is above left, after is on the right). Now let’s take a quick peek at one more image, and one more feature in Lightroom.

Flipping the Golden Spiral and Golden Triangle Overlays

You’ve probably toggled through the overlays and disregarded both the Golden Triangle and the Golden Spiral because they just never work. Unlike most of the overlays, neither the Golden Spiral nor the Golden Triangle is symmetrical. That means that you need to flip the overlays around a few times to find the orientation that aligns with your image. By pressing the Shift key and the O key at the same time, you can change the orientation of both the Golden Spiral and the Golden Triangle. Changing the orientation makes those overlays a lot more useful.

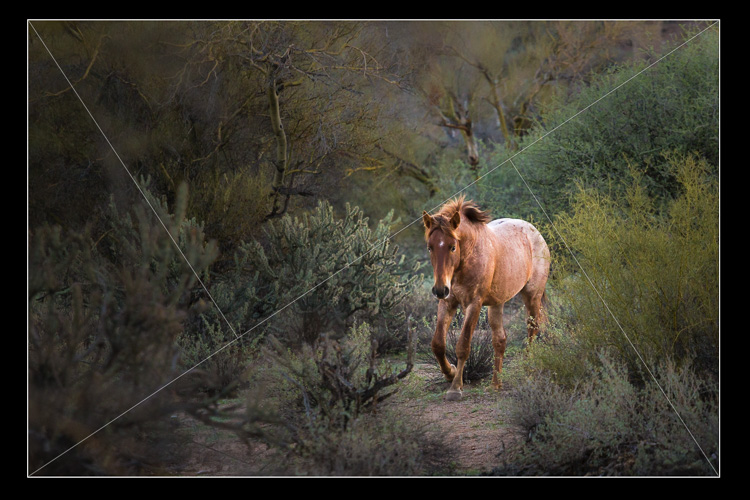
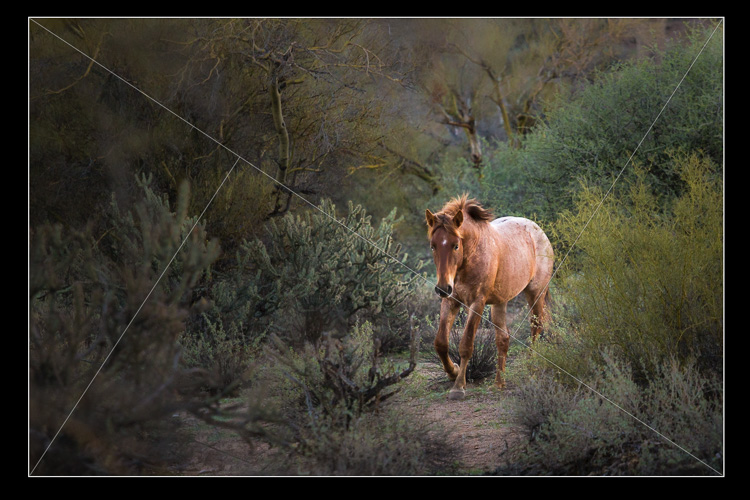
Here, in this image of a wild stallion (below), before flipping the Golden Triangle orientation, this overlay doesn’t work at all. Looking at it you might question whether or not the image had a strong enough composition to start with.

IMAGE 11

By pressing Shift plus the O key, and flipping the overlay orientation, the stallion fits neatly into his own triangle. His legs and nose are also no longer bisected by one of the diagonals. In addition, he’s positioned towards the back of the triangle. The top diagonal edge of the triangle that contains the stallion shows us that he is moving forward into the composition, towards the viewer, which is naturally pleasing to the eye. The other triangles neatly organize the foliage surrounding the stallion. Even the beam of sunlight highlighting the stallion falls within the main triangle, further confirming that this image is well composed.

IMAGE 12

With a little practice, some judicious use of the Transform tab and Crop Tool, you’ll master composition in no time. How do you use these tools to help you? Please share in the comments below.

googletag.cmd.push(function() {
tablet_slots.push( googletag.defineSlot( “/1005424/_dPSv4_tab-all-article-bottom_(300×250)”, [300, 250], “pb-ad-78623” ).addService( googletag.pubads() ) ); } );

googletag.cmd.push(function() {
mobile_slots.push( googletag.defineSlot( “/1005424/_dPSv4_mob-all-article-bottom_(300×250)”, [300, 250], “pb-ad-78158” ).addService( googletag.pubads() ) ); } );

The post Using Lightroom’s Transform and Crop Tools to Improve Composition by Lara Joy Brynildssen appeared first on Digital Photography School.


Digital Photography School

 
Comments Off on Using Lightroom’s Transform and Crop Tools to Improve Composition

Posted in Photography