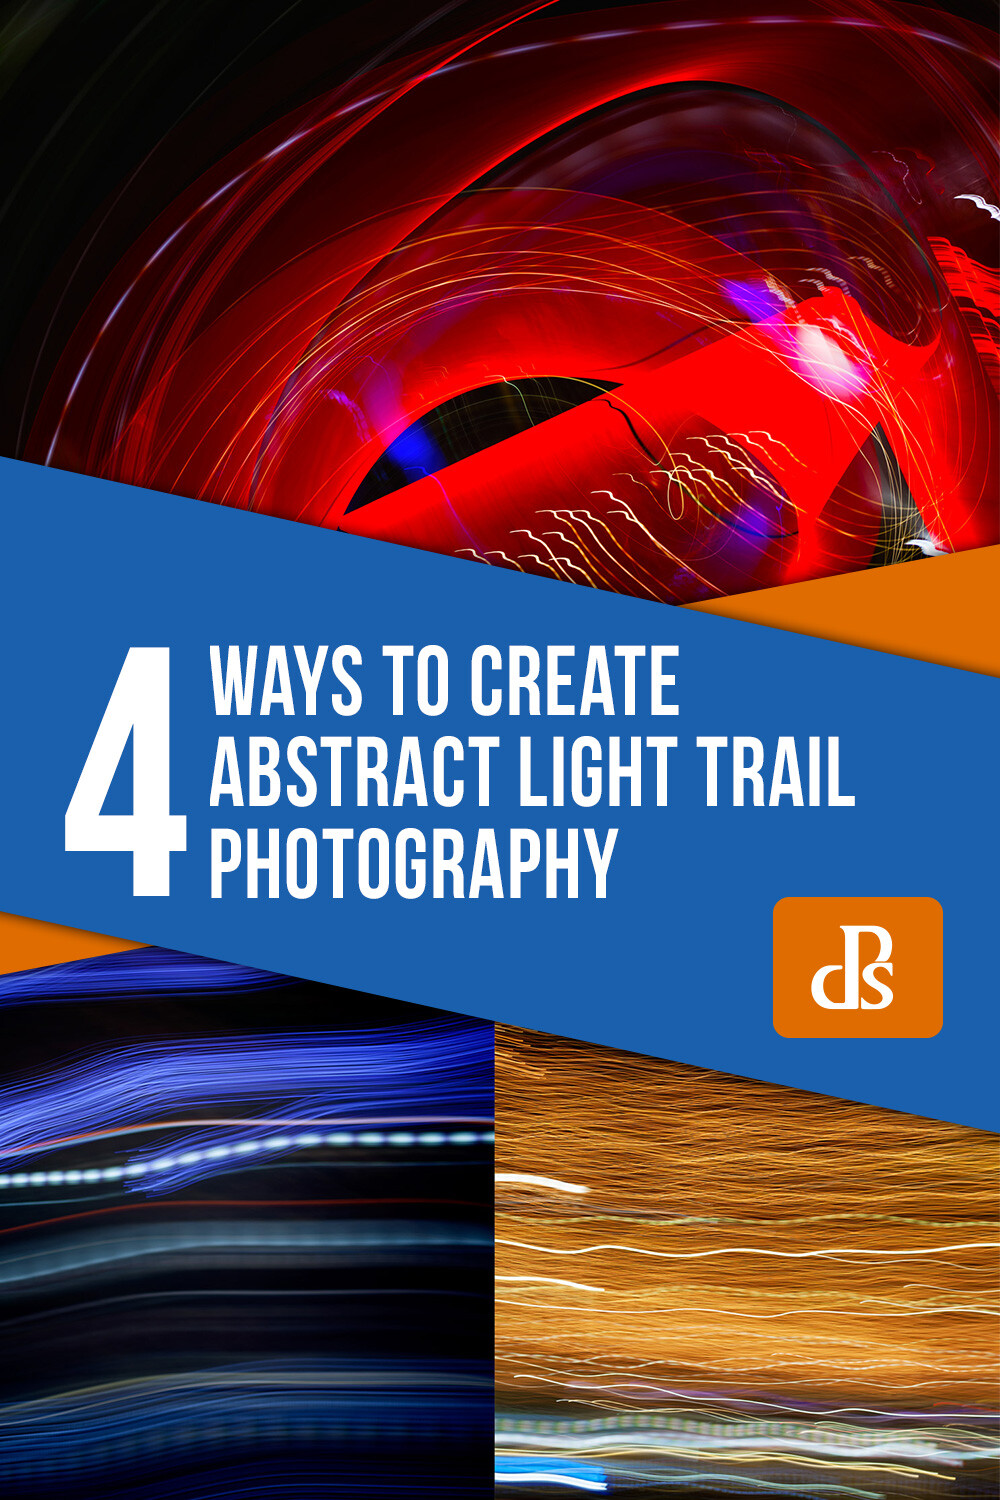
The post Get Moving – Four Ways to Create Abstract Light Trail Photography appeared first on Digital Photography School. It was authored by Megan Kennedy.
Light trail photography is a unique facet of photography. By combining slow shutter speeds with light and camera movement, fascinating abstract photography can be made. Here are four abstract light trail photography techniques to experiment with in your own photographic practice.

What is abstraction?
Before we get started, let’s talk about abstraction. Abstract photography (often called non-objective, experimental or conceptual photography) is photography that does not have an immediate association with the visual world. Instead, abstract photography uses aspects like color, light, texture, shape, and form to evoke an emotional response from a viewer.
Often, in light trail photography, light trails complement a scene or subject. However, in abstract light trail photography, it’s the light trails themselves that are the sole conveyor of meaning. By erasing any other context, the viewer relies solely on the nature of light and photography to read a photograph. This creates intriguing photography that captures and holds the attention of the viewer as they visually unpack the image before them.

When to make abstract light trails
Although it can be done in daylight, abstract light trail photography is best carried out in the evening, at night, or in a dark room indoors. This is to minimize distraction and enhance the efficacy of our chosen light source/s.
What to photograph for abstract light trails
Traffic lights, building lights, car lights, phone light, glow sticks, torches, neon signage… there is an abundance of light sources available to photograph at night. With the right camera settings and technique, almost any point of light can be used to create an interesting light trail.
Camera tossing
Abstract light trail photography rests on the nature of the light source/s (brightness, movement, color etc) and the behavior of the camera (exposure settings, camera movement etc). For example, during a long enough exposure, a set of car lights will leave a trail as they pass by, whereas a stationary light source requires camera movement to activate an abstract light trail. Camera tossing predominantly involves the latter, physically moving the camera to achieve interesting abstract light trail results.

Taken over two seconds at f/4 and ISO 100, this tangle of lights demonstrates the path of the camera as it is tossed in the air.
A disclaimer…
Camera-tossed abstract light trails involve the tossing of a camera into the air during an exposure. Purists argue that a true camera toss means that the camera is tossed without the use of a guiding hand or camera strap. This is why for this method, I strongly advise you to use an old, cheap camera. A compact camera works well. You can even use a phone with a durable case.
I wouldn’t recommend taking your DSLR out for some air-time (although I must admit I did use my 5D MKII with a 50mm lens for some camera tossing sessions). If you aren’t keen on risking your camera, (which is totally understandable) skip forward to camera swinging and keep an eye out for old tossable cameras on sale or in local charity shops.
How to camera toss
The first step to camera tossing is to find somewhere safe to toss. Camera tossing in a quiet location, over grass or carpet is a good idea.
Once you’ve found a good spot with an interesting light source or two, it’s time to organize your camera settings. I went with a shutter speed of one or two seconds to allow the camera movement to really gain traction. I then set my aperture to f/4 and my ISO to 100.

Set your focus to manual. Aim your camera lens at the light source/s and adjust your focus. You can aim for the sharp rendering of the light source/s, or take intentionally unfocused shots for softer light trails.
Depress the shutter button and quickly toss the camera in the air (10-30 cm is high enough, though you can go higher if you’re game). Catch the camera as gently as possible and have a look at your results. Make any amendments to your exposure and have another go.
When you are happy with your exposure and focus, start introducing different throwing methods. Try spinning the camera as you flick it into the air, or throwing it carefully so that the lens is orientated at a particular angle for the duration of the exposure. The results between different throwing techniques can be quite pronounced, so take some time to experiment a little.

Taken at f/8 at 1/4th of a second, I left my lens unfocused to introduce a soft quality to the resulting photograph.
Camera swinging
A variation on camera tossing, camera swinging involves swinging your camera by your (firmly secured) camera strap.
Find a light source and take a few photographs to determine exposure and focus. Just like camera tossing, you want a longer shutter speed to give the camera movement time to take shape. For camera swinging, I started with an exposure of two seconds at f/4 with an ISO of 100.
Once you’ve settled on an exposure, make certain that your camera strap is fastened to your camera. Double-knot, even triple-knot your strap to hold it in place. You really don’t want your camera to go flying once you start swinging.

Two examples of camera swinging. Different light sources make varying light trails.
When you’re ready, depress the shutter button and have a go at gently swinging your camera back and forward like a pendulum. When the exposure finishes, check your results and make adjustments to your camera settings or technique as required.
The possibilities for camera-swung imagery are endless. Each swing creates unrepeatable paths of light from one image to the next, so again, don’t be afraid to experiment a little. Try jumping while swinging your camera or spinning around in a circle with your camera fastened to your wrist.

Moving your body
Not all abstract light trail photography is based around swinging and tossing your camera. Light trails can also be created by moving your body with a camera in hand.
Locate an interesting light source and figure out your exposure with a few test shots. I found that the combination of a one-second exposure at f/4 with an ISO of 100 was a good starting point.
Depress the shutter button and start moving. Ever seen those inflatable tube men, dancing around in the wind? Well, you don’t have to go THAT crazy, but shifting your arms up and down, twirling around, doing a little dance or moving from a sitting position to a standing position are great examples of camera-body movement.
As long as the shutter is open, and the lens is pointed toward a light source, the movements you make will be recorded in the image, creating kinetic abstract imagery.

Moving subjects
As an alternative to moving yourself around, photographing a moving light source can create dynamic light trail imagery too.
Star trail photography is the photography of stars as they appear to transit the night sky. Though it is us that is rotating on earth, the star trails illustrate our perception of the celestial sphere as a moving body.
Car trail photography records the movement of car lights in darkness, revealing trails that trace the routes of traffic in a given setting. For a more abstracted image, isolate the car trails from the surrounding landscape.
Physiography is a method of light painting that can be done in your darkened living room. Suspend a light source on a string and let it swing over your camera during a long exposure. The results are often surprising and intricate, documenting the path of the light source as it swings through the air with diminishing momentum.

This physiogram traces the path a moving light source has taken while suspended over a camera
Burning steel wool photography is another form of recording light trails. Though it can be a little hazardous, the results are quite spectacular.

Burning steel wool leaves golden trails of light not dissimilar to this example of camera movement.
Conclusion
When the day turns to night, many pack up their photography gear and head home. But night time doesn’t necessarily mean that photography is over for the day.
Creating abstract imagery with light is an intriguing aspect of photography. Through the use of camera and/or subject movement you can create fascinating imagery that engages and intrigues an audience.
Go out and try these techniques for yourself, and share your abstract light trail photography with us in the comments below.
The post Get Moving – Four Ways to Create Abstract Light Trail Photography appeared first on Digital Photography School. It was authored by Megan Kennedy.

Digital Photography School


You must be logged in to post a comment.