RSS
 

Posts Tagged ‘Sweet’

How To Find Your Lens’ Sweet Spot: A Beginner’s Guide to Sharper Images

06 Oct

The post How To Find Your Lens’ Sweet Spot: A Beginner’s Guide to Sharper Images appeared first on Digital Photography School. It was authored by Dena Haines.

How To Find Your Lens' Sweet Spot: A Beginner's Guide to Sharper Images

Are you tired of blurry images?

It’s time to learn how to capture sharper images by finding your lens’s sweet spot. This will give you more confidence, save time, and help you take better photos.

In this article, you’ll learn:

  • How to find your lens’s sweet spot (for sharper images)
  • Why you should shoot in Aperture Priority mode (and how to use it)
  • How to perform a test to get the sharpest image every time
  • How important your lens’s sweet spot really is

Mid range aperture sharper than wide open

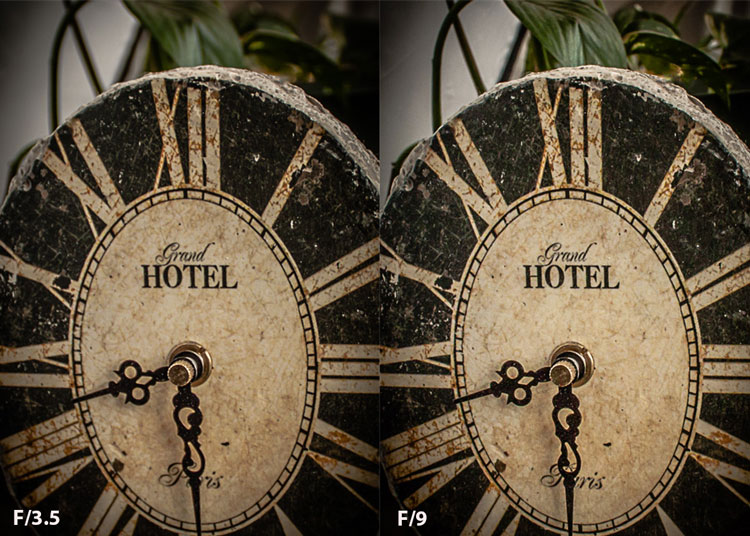
In the above images of the clock, the one on the right is sharper. Look closely at the words. The f/9 image is sharper throughout because it was shot using my lens’s sweet spot. The f/3.5 one was not.

First, take a look at your lens

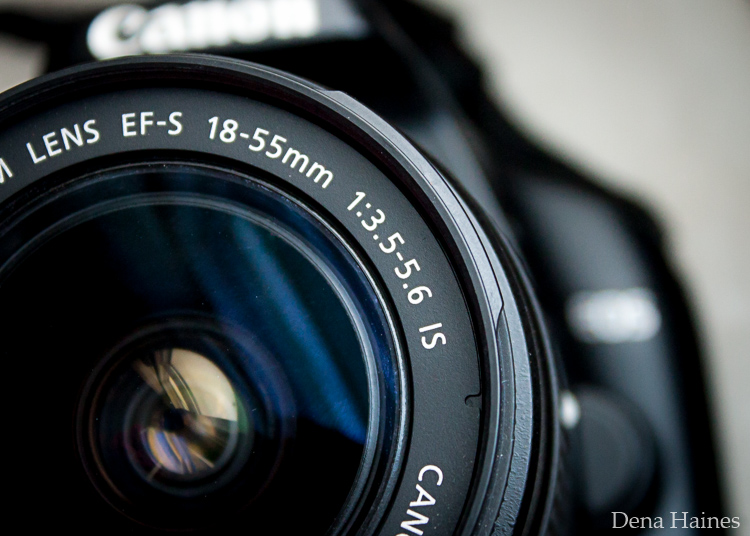
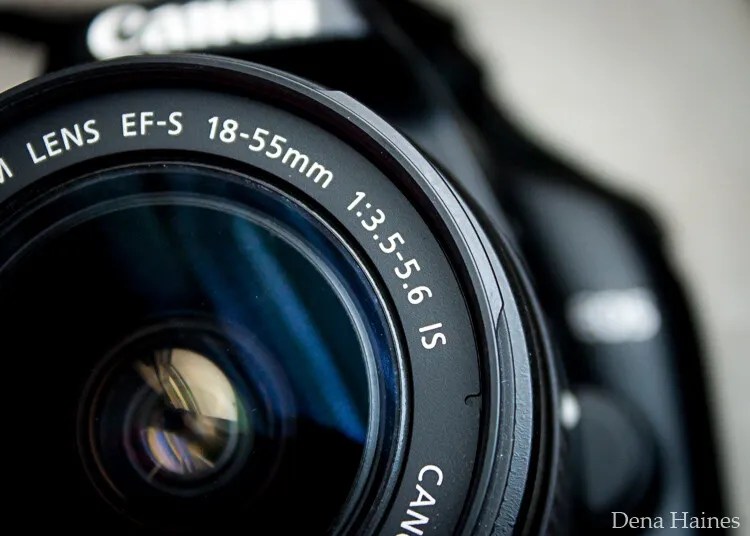
In this beginner’s guide, we’ll use an entry-level zoom lens as our example. Most kit lenses (the basic lens that comes with a DSLR) generally shoot their sharpest at a mid-range aperture setting. To determine the mid-range aperture of your lens, you’ll need to know its widest (or maximum) aperture setting. This is located on the side or end of the lens and will look something like 1:3.5-5.6.

For example, here it is on my Canon 18-55mm zoom lens:
Lens aperture range

This means that when my lens is zoomed all the way out to 18mm, its widest aperture is f/3.5. When zoomed all the way in to 55mm, its widest aperture is f/5.6.

The rule for finding that mid-range sweet spot is to count up two full f-stops (aperture settings are called f-stops) from the widest aperture. On my lens, the widest aperture is f/3.5. Two full stops from there would bring me to a sweet spot of around f/7.1.

Use this chart to count your f-stops:

Robin Parmar

By Robin Parmar

There is some wiggle room in what counts as mid-range, so anything from f/7.1 to f/10 will capture a sharp image. Once you know the mid-range aperture of your lens, you can do an easy test to get your sharpest image. To perform the test you’ll need to shoot in Aperture Priority mode.

Take control with Aperture Priority mode

Shooting in Aperture Priority allows you to choose the aperture setting you want, which gives you more creative control than Auto mode.

By controlling the aperture setting, it’s much easier to get a sharp image. And because your camera still chooses the ISO (if it’s set to Auto ISO) and the shutter speed automatically, it’s very easy to use.

You’ve probably heard that apertures like f/16 and f/22 are best for keeping everything in focus. While that can be true, focus does not always equal overall sharpness. Choosing a mid-range aperture will give you sharper images throughout. You can improve your photos even further by reducing camera shake by way of a tripod and a remote shutter release (or your camera’s self-timer).

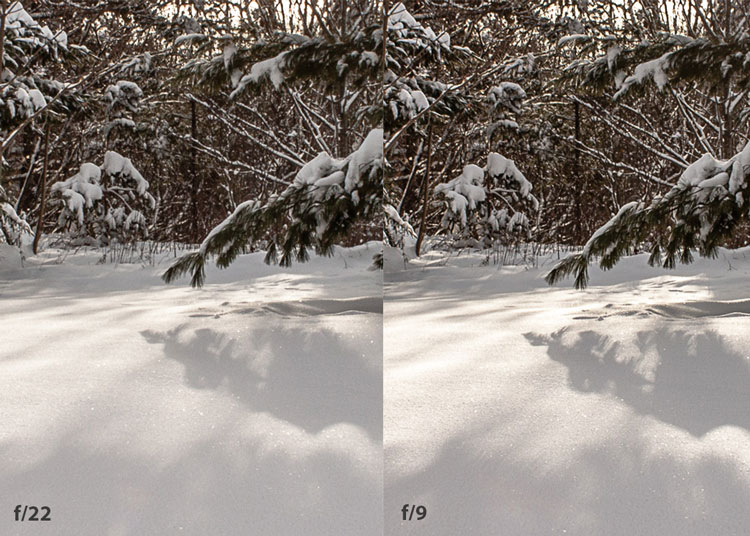
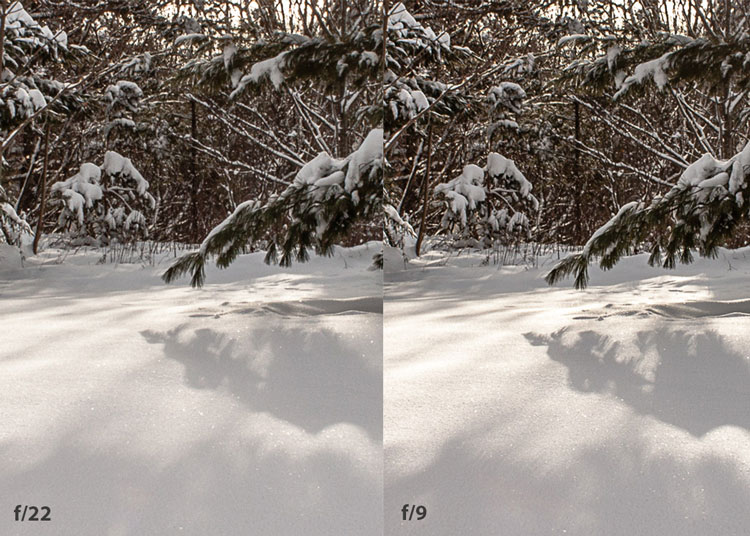
Here’s an example of how shooting in your lens’s sweet spot will give you sharper images:

Sharp images shot in lens sweet spot

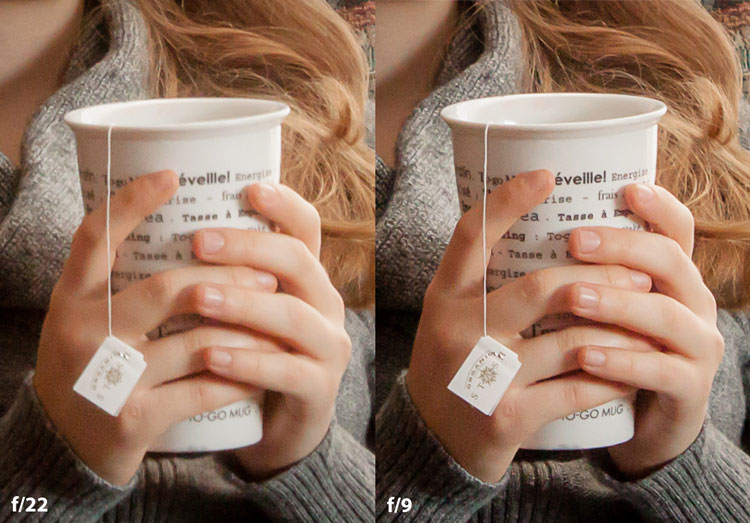
Mid range f stop sharper than small f stop

In the above image, the f/9 shot is sharper than the f/22 one. The needles and shadows are not as soft or blurry as in the f/22 shot (look at the crispness and sparkles in the snow, too).

Switching from Auto to Aperture Priority mode

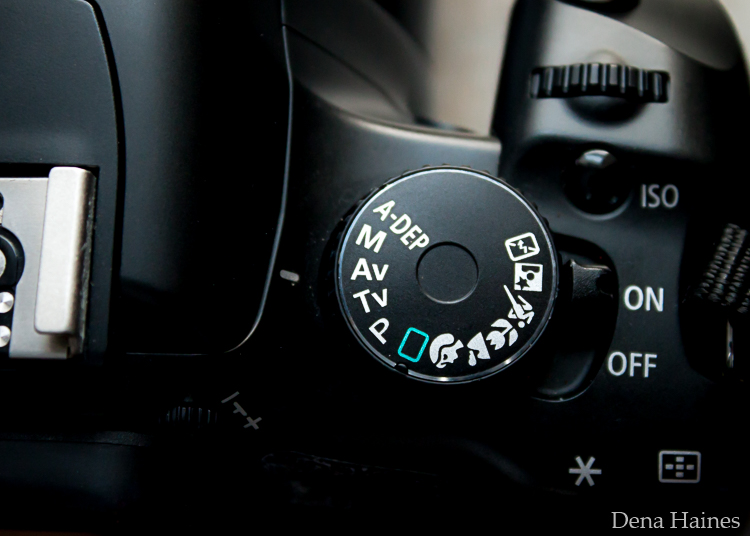
To take your camera off of Auto and put it in Aperture Priority, just turn the large mode dial to Aperture Priority. This is what that looks like on my Canon (on Nikon and other brands look for the “A”).

Aperture priority on canon mode dial

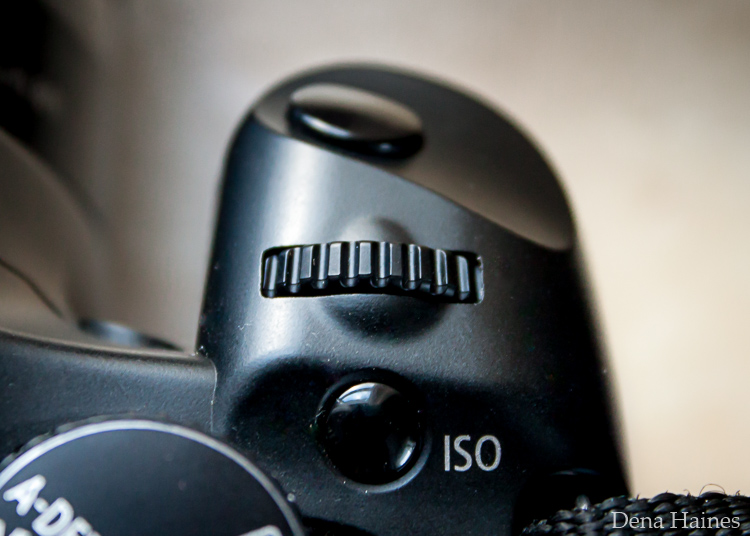
Auto mode is the green rectangle; Aperture Priority mode is the Av (or A on a Nikon). Once your camera is in Aperture Priority mode, turn the smaller main dial (shown here on the top of my Canon) to choose your f-stop.

Main dial canon

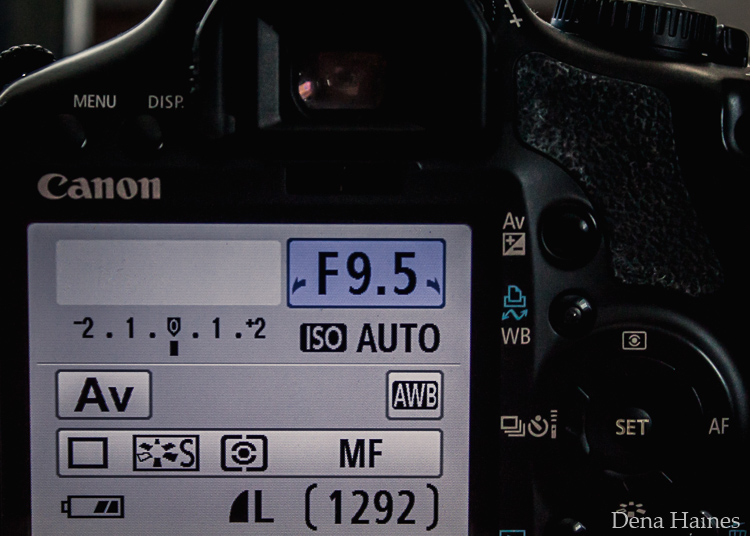
As you turn that dial, you’ll see the f-number changing on your screen. In the next picture, it’s set to f/9.5:

Aperture setting on canon LCD screen

Perform a lens sweet spot test

Once you have your camera set up on a tripod, performing a sweet spot test only takes a couple of minutes. To begin, put your camera in Aperture Priority mode, then compose your shot and take photos at varying apertures. Start with a shot at the widest aperture, then rotate that main dial a couple of times (to narrow the aperture) and take another shot. Keep doing that until you’ve taken seven or eight photos.

Upload your photos to your computer and zoom in. You’ll quickly see which aperture settings gave you the sharpest overall image.

This next photo of my daughter was shot using natural light. Shooting in my lens’s sweet spot gave me a pretty sharp image, even in this low light setting:

Mid range aperture sharp image low light

Find your lens sweet spot for sharper images

The close-up of the mug shows the advantage of shooting in the lens’s sweet spot. Whenever you want to make sure you get the sharpest capture possible, take a shot at each mid-range setting: f/7.1, f/8, f/9, and f/10.

Getting your sharpest images

Now that you know your lens’s sweet spot, it’s time to practice. I hope you’re as pleased with the results as I’ve been!

Mid range aperture for sharper images

I love shooting in natural light, and learning how to capture sharper images in low light has made me so much happier with my photos.

Tips for capturing the sharpest images

  • Shoot in Aperture Priority mode
  • Choose a mid-range aperture (usually f/7.1 to f/10)
  • Use a tripod and a remote shutter release (or your camera’s self-timer) to reduce camera shake
  • Take a series of shots at f/7.1 through f/10 when a sharp capture is especially important

But don’t stop there. Keep playing with settings in Aperture Priority mode. It’s awesome to get images that are sharp throughout, but there’s a lot more to aperture than that.

Learn more about aperture and depth of field here.

The post How To Find Your Lens’ Sweet Spot: A Beginner’s Guide to Sharper Images appeared first on Digital Photography School. It was authored by Dena Haines.


Digital Photography School

 
Comments Off on How To Find Your Lens’ Sweet Spot: A Beginner’s Guide to Sharper Images

Posted in Photography


DPReview TV: the Sony 400mm F2.8 is a pretty sweet lens

22 Jul
Sony’s new 400mm F2.8 G Master rounds out the company’s commitment to provide a complete range of pro-level lenses to photographers who use the Alpha system. In this week’s episode of DPReview TV, Chris and Jordan take this behemoth for a spin and share their first impressions of Sony’s exciting new telephoto.

Make sure to read our Sony FE 400mm F2.8 GM OSS first impressions article.

Read the Sony 400mm F2.8 first impressions article

Subscribe to our YouTube channel to get new episodes of DPReview TV every week.

Subscribe to our YouTube channel

Sample photos from this episode

$ (document).ready(function() { SampleGalleryV2({“containerId”:”embeddedSampleGallery_4427781710″,”galleryId”:”4427781710″,”isEmbeddedWidget”:true,”selectedImageIndex”:0,”isMobile”:false}) });

Sony FE 400mm F2.8 GM OSS sample gallery

$ (document).ready(function() { SampleGalleryV2({“containerId”:”embeddedSampleGallery_9152913946″,”galleryId”:”9152913946″,”isEmbeddedWidget”:true,”selectedImageIndex”:0,”isMobile”:false}) });
Articles: Digital Photography Review (dpreview.com)

 
Comments Off on DPReview TV: the Sony 400mm F2.8 is a pretty sweet lens

Posted in Uncategorized


Lensbaby unveils Creative Bokeh and Sweet 80 optics

21 Sep

Lensbaby just released two new “optics” for portrait photographer and other shooters who want to add a bit of creative flare to their photography. The first is the Sweet 80: an 80mm optic that gives portrait shooters that trademark Lensbaby ‘sweet spot’ of focus; the second is the Creative Bokeh optic: a 50mm single-element lens that comes with 11 drop in apertures in a variety of shapes.

You can see both optics in the gallery below:

Product Photos

$ (document).ready(function() { SampleGalleryV2({“containerId”:”embeddedSampleGallery_8408114371″,”galleryId”:”8408114371″,”isEmbeddedWidget”:true,”standalone”:false,”selectedImageIndex”:0,”startInCommentsView”:false,”isMobile”:false}) });

Both the Sweet 80 and Creative Bokeh optics join the so-called ‘Lensbaby Optic Swap System’ that allows you to pop different creative lenses onto your Composer Pro I or II Composer, Muse, Scout, and Control Freak.

Lensbaby Sweet 80 Optic

At its core, the Sweet 80 is an 80mm F2.8 selective focus optic with a 12-blade aperture that closes down to F22. As with Lensbaby’s other ‘Sweet’ optics, you select the size and location of your ‘sweet spot of focus’ by tilting the lens and adjusting the aperture.

Here are a few sample photos captured with the Sweet 80:

$ (document).ready(function() { SampleGalleryV2({“containerId”:”embeddedSampleGallery_9030360224″,”galleryId”:”9030360224″,”isEmbeddedWidget”:true,”standalone”:false,”selectedImageIndex”:0,”startInCommentsView”:false,”isMobile”:false}) });

Lensbaby Creative Bokeh Optic

As mentioned above, the Creative Bokeh optic is a 50mm, single-element lens that you attach to a Composer Pro II. Inside you’ll find a 12-blade aperture that ranges from F2.5 to F22, but the built-in aperture isn’t the main draw of this optic.

Instead, Lensbaby is including 11 magnetic drop-in aperture plates that will turn the out-of-focus points of light in your background into a variety of shapes, including: diamonds, dripsplat, slots, swirly, whirlpool, birds, sunburst, heart, star. There are also two blank disks so you can create your own.

Here are some sample images captured with the Creative Bokeh optic:

$ (document).ready(function() { SampleGalleryV2({“containerId”:”embeddedSampleGallery_6828106910″,”galleryId”:”6828106910″,”isEmbeddedWidget”:true,”standalone”:false,”selectedImageIndex”:0,”startInCommentsView”:false,”isMobile”:false}) });

Both of the new optics are available now from the Lensbaby store. The Sweet 80 is available by itself for $ 200 or in a kit with the Composer Pro II for $ 380, and the Creative Bokeh optic sells for $ 100.

To learn more, head over to the Lensbaby website.

Articles: Digital Photography Review (dpreview.com)

 
Comments Off on Lensbaby unveils Creative Bokeh and Sweet 80 optics

Posted in Uncategorized


50 Sweet Valentine Gifts for Photographers and Their Sweethearts

26 Jan

The season for love is here but finding a perfect gift for your lover isn’t easy. Whether you’re an amateur photographer or a real pro, you can give your sweetheart a photography Valentines gift that would be a winner for sure. I know you want to make this Valentine’s day unforgettable. Here I showcase 50 amazingly creative and romantic Valentine Continue Reading

The post 50 Sweet Valentine Gifts for Photographers and Their Sweethearts appeared first on Photodoto.


Photodoto

 
Comments Off on 50 Sweet Valentine Gifts for Photographers and Their Sweethearts

Posted in Photography


Fujifilm X70 User Review: Sweet for Street

25 Jul

Fujifilm x70 is the newest little beast in Fujifilm lineup of premium compact cameras. This camera is targeted towards enthusiast and professional photographers (thanks to retro styling and large APS-C sensor) who want to travel light and want image quality at the same time. Fuji x70 is a trade-off between the legendary Fujifilm x100T and more travel oriented point and Continue Reading

The post Fujifilm X70 User Review: Sweet for Street appeared first on Photodoto.


Photodoto

 
Comments Off on Fujifilm X70 User Review: Sweet for Street

Posted in Photography


Fujifilm X70 User Review: Sweet for Street

01 Jun

Fujifilm x70 is the newest little beast in Fujifilm lineup of premium compact cameras. This camera is targeted towards enthusiast and professional photographers (thanks to retro styling and large APS-C sensor) who want to travel light and want image quality at the same time. Fuji x70 is a trade-off between the legendary Fujifilm x100T and more travel oriented point and Continue Reading

The post Fujifilm X70 User Review: Sweet for Street appeared first on Photodoto.


Photodoto

 
Comments Off on Fujifilm X70 User Review: Sweet for Street

Posted in Photography


Sweet Spot: Panasonic Lumix DMC-GX85 Real World Samples

01 Jun

The Panasonic Lumix DMC-GX85 has the makings of one sweet camera. It uses a well-regarded 16MP Four Thirds sensor (with no AA filter), is 4K capable and features Panasonic’s depth from defocus AF system.

Packed inside a sleek, customizable body, the GX85 features a new shutter mechanism that appears to solve the thorny issue of shutter shock, a problem that plagued its big brother, the GX8. The GX85 also features a 3-axis stabilized sensor, that when combined with a Panasonic stabilized lens, offers 5-axis of stabilization, making it the most steady Panasonic Four Thirds camera to date.

DPReview writer Dan Bracaglia has been using the GX85 for a while, and as well as various locations around Seattle he also took it on a recent trip to New Jersey.

Articles: Digital Photography Review (dpreview.com)

 
Comments Off on Sweet Spot: Panasonic Lumix DMC-GX85 Real World Samples

Posted in Uncategorized


How To Find Your Lens’ Sweet Spot: A Beginner’s Guide to Sharper Images

03 Feb

Are you tired of blurry images?

It’s time to learn how to capture sharper images by finding your lens’ sweet spot. This will give you more confidence, save time, and help you take better photos.

In this article you’ll learn:

  • How to find your lens’ sweet spot (for sharper images)
  • Why you should shoot in Aperture Priority mode (and how to use it)
  • How to perform a test to get your sharpest image every time
  • How important is your lens’ sweet spot? Notice the difference

Mid range aperture sharper than wide open

In the above images of the clock, the one on the right is sharper. Look closely at the words and at the leaves behind the clock. The f/9 image is sharper throughout because it was shot in my lens’ sweet spot. The f/3.5 one was not.

First, take a look at your lens

In this beginner’s guide, we’ll use an entry level zoom lens as our example. Most kit lenses (the basic lens that comes with a DSLR) generally shoot their sharpest at the mid-range aperture settings. To determine the mid-range of your lens, you’ll need to know its widest (or maximum) aperture setting. It is located on the side, or end, of the lens and will look something like this 1:3.5-5.6.

For example, here it is on my Canon 18-55mm zoom lens.

Lens aperture range

This means that when my lens is zoomed all the way out, its widest aperture is f/3.5. When zoomed all the way in, its widest aperture is f/5.6.

The rule to finding that mid-range sweet spot, is to count up two full f-stops (aperture settings are called f-stops) from the widest aperture. On my lens, the widest aperture is f/3.5. Two full stops from there would bring me to a sweet spot of around f/7.

Use this chart to count your f-stops

Robin Parmar

By Robin Parmar

There is some wiggle room in the mid-range, so anything from f/7 to f/10 will capture a sharp image. Once you know the mid-range of your lens, you can do an easy test to get your sharpest image. To perform the test you’ll need to shoot in Aperture Priority mode.

Take control with Aperture Priority Mode

Shooting in Aperture Priority allows you to choose the aperture setting you want, which gives you more creative control than Automatic mode. By controlling the aperture setting, it’s much easier to get a sharp image, and because your camera still chooses the ISO (if you are set to Auto ISO) and shutter speed automatically, it’s very easy to use.

You’ve probably heard that apertures like f/16 and f/22 are best for keeping everything in focus. While that can be true, focus does not always equal overall sharpness. Choosing a mid-range aperture will give you sharper images throughout. You can improve them even further by reducing camera shake with a tripod and a remote shutter release (or your camera’s self-timer).

Here’s an example of how shooting in your lens’ sweet spot will give you sharper images.

Sharp images shot in lens sweet spot

Mid range f stop sharper than small f stop

In the above split-image, the f/9 image is sharper than the f/22 one. The needles and shadows are not as soft or blurry as in the f/22 shot (look at the crispness and sparkles in the snow too).

Switching from Automatic to Aperture Priority Mode

To take your camera out of Automatic and put it in Aperture Priority, just turn the large Mode Dial to Aperture Priority. This is what that looks like on my Canon (on Nikon and other brans look for the A).

Aperture priority on canon mode dial

Automatic mode is the green rectangle; Aperture Priority mode is the Av (or A on a Nikon). Once your camera is in Aperture Priority mode, turn the smaller Main Dial (shown here on the top of my Canon) to choose your f-stop.

Main dial canon

As you turn that dial, you’ll see the f-number changing on your screen. In the next picture, it’s set to f/9.5.

Aperture setting on canon LCD screen

Perform a Lens Sweet Spot Test

Once you have your camera set up on a tripod, performing a sweet spot test only takes a couple of minutes. To begin, put your camera in Aperture Priority mode, then compose your shot and take a photo at varying apertures. Start out with the widest, then click that main dial a couple of times (to the right) and take another. Keep doing that until you’ve taken seven or eight photos.

Upload your photos to your computer and zoom in on them. You’ll quickly see which aperture settings gave you the sharpest overall image.

This next photo of my daughter was shot using natural light. Shooting in my lens’ sweet spot gave me a pretty sharp image, even in this low light setting.

Mid range aperture sharp image low light

Find your lens sweet spot for sharper images

The close up of the mugs shows the advantage of shooting in the lens’ sweet spot. Whenever you want to make sure you get the sharpest capture possible, take a shot at each mid-range setting f/7, f/8, f/9, and f/10.

Getting Your Sharpest Images

Now that you know your lens’ sweet spot, it’s time to practice. I hope you’re as pleased with the results as I’ve been!

Mid range aperture for sharper images

I love shooting in natural light, and learning how to capture sharper images in low light has made me so much happier with my photos.

Tips for capturing your sharpest images:

  • Shoot in Aperture Priority mode
  • Choose a mid-range aperture (usually f/7 to f/10)
  • Use a tripod and a remote shutter release (or your camera’s self-timer) to reduce camera shake
  • Take a series of shots at f/7 through f/10 when a sharp capture is especially important

But don’t stop here. Keep playing with settings in Aperture priority mode. It’s awesome to get images that are sharp throughout, but there’s a lot more to aperture than that.

Learn more about aperture and depth of field here.

Do you have any lens sweet spot tips to share? Please do so by commenting below.

googletag.cmd.push(function() {
tablet_slots.push( googletag.defineSlot( “/1005424/_dPSv4_tab-all-article-bottom_(300×250)”, [300, 250], “pb-ad-78623” ).addService( googletag.pubads() ) ); } );

googletag.cmd.push(function() {
mobile_slots.push( googletag.defineSlot( “/1005424/_dPSv4_mob-all-article-bottom_(300×250)”, [300, 250], “pb-ad-78158” ).addService( googletag.pubads() ) ); } );

The post How To Find Your Lens’ Sweet Spot: A Beginner’s Guide to Sharper Images by Dena Haines appeared first on Digital Photography School.


Digital Photography School

 
Comments Off on How To Find Your Lens’ Sweet Spot: A Beginner’s Guide to Sharper Images

Posted in Photography


Baker’s Doesn’t: 13 Sweet Abandoned Donut Shops

26 Oct

[ By Steve in Abandoned Places & Architecture. ]

abandoned-mister-donut-mug-centralia
Sorry Homer (and countless men in blue), these closed and abandoned donut shops have served their last sprinkled, frosted and/or creme-filled delicacy. DOH!

abandoned-dunkin-donuts-shop-2

An abandoned donut shop in Crown Heights? That ain’t kosher… and maybe that was the problem. Flickr user Anthony Fine (pop archaeologist) snapped the sad state of this boarded-up former Dunkin Donuts store on May 19th, 2014. At least a tree grows in Brooklyn; donut shops, not so much.

Panned Out

abandoned-donut-shop-peter-pan-1a

abandoned-donut-shop-peter-pan-1c

abandoned-donut-shop-peter-pan-1b

How good was the food at Peter Pan Donuts & Restaurant? Since the owners put “Donuts” before “Restaurant” on their sign, you can probably draw your own conclusions. We’re sure Spinal Tap felt the same way after getting second-billing to a Puppet Show. Nice sign, though. Flickr users Randy Fox (congoeels) and Scott (scottamus) captured the abandoned and deteriorating Cleveland, Ohio “landmark” on various occasions between 2009 and 2013.

The King Is Dead

abandoned-donut-king-4

Winchell’s Donuts couldn’t make a go of it at this Norwalk, CA location so “Donut King Croissant – Muffin” took a stab at it… and saw history repeat. Don’t people learn from the mistakes of others? Mind you, offering the “wholesale” option was a stroke of genius. Mmmm, wholesale donuts. Flickr user ozfan22 snapped the deposed Donut King on March 29th of 2009.

Unhappy

abandoned-happy-donuts-11

Flickr user Lindsay Blair Brown Instagram captured Happy Donuts in all its abandoned glory on May 6th, 2012. She didn’t say where the colorful shop was but maybe sharp-eyed readers can make an educated guess based on its offerings: kolaches, croissants, biscuits, and breakfast tacos. Serving up these delicacies 7 days a week, how could this place ever close?

Next Page – Click Below to Read More:
Bakers Doesnt 13 Sweet Abandoned Donut Shops

Share on Facebook


[ By Steve in Abandoned Places & Architecture. ]

[ WebUrbanist | Archives | Galleries | Privacy | TOS ]


WebUrbanist

 
Comments Off on Baker’s Doesn’t: 13 Sweet Abandoned Donut Shops

Posted in Creativity


Sweet Transit: Japan’s Cute Fruit-Shaped Bus Stops

20 Sep

[ By Steve in Destinations & Sights & Travel. ]

fruit-bus-stops-strawberry-1a
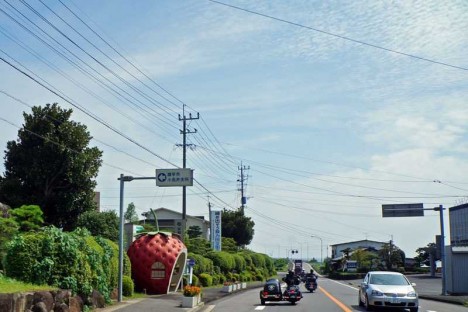
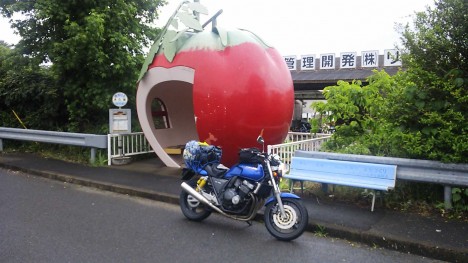
Originally built for a 1990 travel expo, these fruit-shaped bus stops from southern Japan still look as tasteful (and tasty!) as they did 25 years ago.

fruit-bus-stops-pair-1a

fruit-bus-stops-motorcycle-1a

fruit-bus-stops-motorcycle-1b

fruit-bus-stops-motorcycle-1c

EXPO ’90 (or the International Garden and Greenery Exposition; its formal title) was hosted by the city of Osaka from April through September of 1990. The fair attracted over 23,000,000 visitors over a six-month run, and a host of smaller fairs expressing related themes were held across Japan as well.

fruit-bus-stops-orange-2

fruit-bus-stops-tomato-1a

fruit-bus-stops-heroes

fruit-bus-stops-watermelon-1a

Konagai, a small town situated just east of Nagasaki, decided to jump aboard the bandwagon by hosting the little-known Nagasaki Journey exhibition. The only remaining relics of the fair are fourteen bus stops (some sources state the number to be 16) constructed in the form of hollowed-out oversized fruits!

fruit-bus-stops-map

naga_yama_bus02fru_bus_stop

The stops have held up remarkably well over the ensuing quarter-century… still functional and in splendid shape structurally, the bus stops erected along the 207 National Highway have become a tourist attraction in their own right.

Next Page – Click Below to Read More:
Sweet Transit Japans Cute Fruit Shaped Bus Stops

Share on Facebook


[ By Steve in Destinations & Sights & Travel. ]

[ WebUrbanist | Archives | Galleries | Privacy | TOS ]


WebUrbanist

 
Comments Off on Sweet Transit: Japan’s Cute Fruit-Shaped Bus Stops

Posted in Creativity