RSS
 

Posts Tagged ‘Sunlight’

How to Take Good Pictures in Bright Sunlight: 11 Easy Tips

07 Jun

The post How to Take Good Pictures in Bright Sunlight: 11 Easy Tips appeared first on Digital Photography School. It was authored by Darren Rowse.

how to take good photos in bright sunlight

How can you take good pictures in bright sunlight? As you may be aware, harsh lighting can lead to unwanted contrast, blown-out highlights, lens flare, and colors that look overly saturated. (If you’re shooting portraits, direct sunlight can also lead to the “squint factor.”)

So what’s a photographer to do?

It turns out there are simple methods of capturing stunning shots in bright light. You just have to choose your compositions and camera settings carefully – and at times, get a bit creative.

how to photograph in bright sunlight

So to discover 11 quick and simple tips for combating problems caused by bright sunlight, read on:

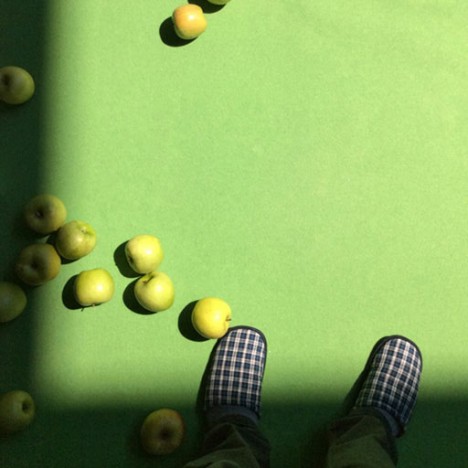
1. Move into the shade

The simplest way to take beautiful images in direct sunlight?

Just move into the shade.

Obviously, this isn’t always feasible – you certainly can’t move an entire seascape! – but with some subjects, heading into the shade is quick and easy. It’s a good solution when shooting portraits, assuming you’re not tied to a particular location.

After all, sometimes the simplest solutions are best!

2. Make your own shade

For small subjects that aren’t movable – for instance, a small flower in a field – create your own shade!

You have a few different options, some more convenient than others:

  • Block the light with your body
  • Ask an assistant to stand between the flower and the light
  • Hold a piece of cardboard or an umbrella above the flower
  • Use a pop-up diffuser

Note that some of these options will be more effective depending on the direction of the light (e.g., if the bright sun is directly overhead, it’ll be tough to block it with your own body).

And a diffuser, because it softens the light rather than blocks it, will give you the most balanced, flattering results.
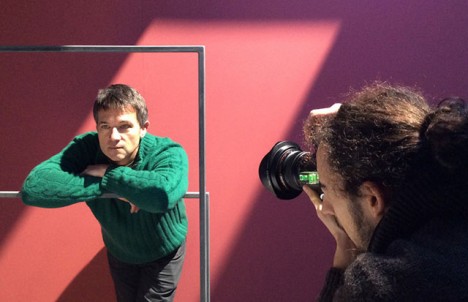
how to take good pictures in direct sunlight umbrellas

3. Use fill flash

One of the biggest problems with shooting in direct sunlight is the harsh shadows. For instance, portrait subjects will get unwanted shadows under the chin, flowers will get heavy shadows underneath the petals, and pets will get dark shadows under their head and body.

In general, these harsh shadows look bad, but there’s an easy solution:

Fill flash.

Simply point a flash toward the dark shadows and fire away! Make sure the flash is on a low power setting – after all, you don’t want to make the underside of your subject brighter than its top! – and experiment with different flash angles for the best results.

You also might try putting the sun behind your subject, then using the fill flash to brighten up your subject’s front. It can look really good, though watch out for lens flare.

4. Use a reflector

Want to fill in harsh shadows but don’t like using flash?

You have another easy option:

A reflector.

Reflectors are white or metallic items that bounce light back into darker areas, and they’re really easy to use. Simply point the reflector at the area you want to brighten up, then adjust it until you get some nice fill (by angling the reflector back and forth, you’ll see the reflected light change position, and you can use this “preview” to fine-tune the effect).

Note that you can also try the same tactic I mentioned in the previous section, where you position your subject in front of the sun and bounce light back onto their front. A reflector isn’t as powerful as a fill flash, so you’ll need to carefully angle it for maximum effect – but if you get it right, the results will be amazing.

portrait with backlight

5. Change your perspective

Sometimes, moving your subject into the shade isn’t possible – but moving around your subject can give the same effect.

For instance, if you’re shooting an interesting tree in the forest, you might move to the tree’s other side, you might find an interesting part of the tree that’s shrouded in shadow, or you might get low and shoot up.

bright sunlight looking up at trees

The idea is to observe your subject carefully, looking for ways to maximize shade and minimize bright highlights and annoying contrast.

6. Use a lens hood

Suffering from lens flare?

While flare can be artistic, it can also be very annoying, especially if you’re after a clean, straightforward image.

Fortunately, many lenses come with hoods, which block flare-causing light and keep your photos flare-free.

a lens hood

If you don’t have a lens hood, don’t fret; it’s not that difficult to construct a hood out of cardboard or to use your hand to shield your lens from the sun.

(Just make sure you keep your makeshift lens hood and your hand out of the shot – otherwise, you’ll be doing a lot of cropping in post-production!)

7. Consider using a filter

a filter

Unfortunately, filters don’t offer a magical solution for bright sunlight – there’s no “avoid direct sunlight” filter, at least not currently – but filters can be handy for direct sunlight photography.

For instance, a polarizing filter will help cut down on reflections, plus it’ll help you achieve vibrant colors (including a beautiful blue sky).

And a neutral density filter will reduce the light hitting your camera sensor, allowing for slower shutter speeds and smaller apertures at midday.

(Why might that be useful? Sometimes, you’ll want to shoot with a wide aperture for the shallow depth of field effect, or you’ll want a slow shutter speed to convey motion blur.)

8. Play with your white balance settings

These days, pretty much every digital camera lets you choose between different white balance settings (for instance, you can dial in a white balance preset, such as Cloudy or Daylight, or you can set a custom white balance based on your scene).

Now, you can adjust the white balance later on in post-processing, assuming you’re shooting in RAW. But if you shoot in JPEG, or you simply prefer to get things right in-camera, you’ll want to carefully set your white balance from the start.

How is this helpful for taking good pictures in bright sunlight?

Well, white balances can offer artistic effects that enhance the look of highlights and shadows. A cooler white balance, for instance, can give a neat effect to more monochrome images – while a warm white balance will make bright sunlight appear softer and more inviting.

9. Use spot metering for the best results

Harsh sunlight makes correct metering tricky. So here’s my advice:

Use spot metering. This will force your camera to expose based on a targeted portion of your scene; you can aim at your main subject, then dial in the recommended exposure settings.

woman in the bright sun

Alternatively, you can spot meter off a midtone in your shot – this will ensure the entire scene is exposed relatively well (as opposed to the former technique, which will ensure you expose for your subject).

After taking an image, check the back of your camera for a preview; you may need to adjust your technique depending on the result. Here, your histogram can be very handy, especially because it’s tough to accurately evaluate an LCD preview in bright sunlight.

Also, if you have the luxury of time, try metering off different parts of the scene while taking multiple shots – that way, you can choose the best option later on.

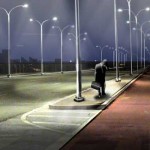
10. Carefully choose the time of day you shoot

Most of us don’t have the luxury of sitting around all day waiting for the perfect light.

But heading out an hour or two earlier or waiting until an hour or two later might be feasible – and if that’s manageable, I highly recommend you consider it.

You see, the time of day can dramatically impact your shot. Midday offers unpleasant, harsh light, but if you go out in the early morning or late afternoon, even direct sunlight starts to look good. You’ll lose the unwanted contrast, you’ll lose the ugly shadows, and you’ll get soft, golden light that’ll flatter your subjects.

Make sense?

camel silhouette

11. Shoot silhouettes

As the saying goes:

If you can’t beat ’em, join ’em!

And that applies when photographing subjects in bright sunlight. If the sun is causing you problems, just use it to your advantage; make your subject stand in front of the bright light, then capture stunning silhouettes all day long.

I recommend getting down low (so that you’re shooting against the bright sky). And compose so your subject is clearly defined against the background.

bright sunlight silhouette

How to take good pictures in bright sunlight: conclusion

Well, there you have it:

Eleven easy tips for shooting in bright sunlight.

Capturing beautiful photos in harsh light might seem difficult – but remember these tips, and your photos will turn out great!

Now over to you:

Do you struggle to shoot in bright sunlight? Do you have any tips or tricks for dealing with these issues? Share your thoughts (and images) in the comments below.

how to take good pictures in direct sunlight city at dusk

The post How to Take Good Pictures in Bright Sunlight: 11 Easy Tips appeared first on Digital Photography School. It was authored by Darren Rowse.


Digital Photography School

 
Comments Off on How to Take Good Pictures in Bright Sunlight: 11 Easy Tips

Posted in Photography


Tips to Take Better Photos in Direct Sunlight [video]

31 May

The post Tips to Take Better Photos in Direct Sunlight appeared first on Digital Photography School. It was authored by Caz Nowaczyk.

Sometimes, as photographers, we don’t always have the luxury of shooting in the lovely early morning/late afternoon light. We just have to shoot in the middle of the day where the harshest light of the direct sun exists.

In this video by Peter McKinnon, he shares his tricks on how to take better photos in direct sunlight so you don’t end up with a bunch of photos that are super-contrasty and leave your model with harsh shadows around their eyes etc.

?

Tips to Take Better Photos in Direct Sunlight

1. Bounce the light

You could use a reflector or bounce card. Consider using natural reflectors such as light-colored concrete. Concrete acts as a natural reflector for the sun.

2. Diffuse the light

Have someone hold a diffuser in the line of the light source coming from the sun. This will defuse the harshness of the direct sun and soften it on your subject’s face.

Find areas of shade and if

3. Use the shadows to your advantage

If you don’t have a diffuser or a friend to hold one for you and you just have to shoot in the direct sunlight, take advantage of the shadows.

Find great spots (like a staircase) that have interesting patterned shadows to create interesting effects on your subject.

4. Move your model around

Keep in mind the direction your model is facing. Have them move around, and watch how the sunlight hits their face. Have them move until you get the most flattering/even light.


You may also find the following helpful:

  • How to do Portrait Photography in Bright Midday Sun
  • How to Photograph in the Harsh Midday Sun
  • How to Beat the Midday Sun!
  • 5 Ways to Create Dramatic Landscape Photos at Midday
  • Review: Lastolite 6×4 Foot Panelite Collapsible Reflector with Translucent Diffuser
  • Side-by-side comparison between reflectors and diffusers for portraits

The post Tips to Take Better Photos in Direct Sunlight appeared first on Digital Photography School. It was authored by Caz Nowaczyk.


Digital Photography School

 
Comments Off on Tips to Take Better Photos in Direct Sunlight [video]

Posted in Photography


New Artificial Lighting Tricks Human Brain into Seeing Sunlight

18 Feb

[ By WebUrbanist in Design & Fixtures & Interiors. ]

skylight

Access to natural daylight has long been one of the biggest limiting factors in building design – some solutions involve reflecting real daylight from the outdoors, but until now no solution has been able to mimic natural refraction processes and fool our minds into thinking we are surrounded by actual sunlight.

artifical snlight interior image

Developed by CoeLux in Italy, this new form of artificial light is able to dupe humans, cameras and computers alike using a thin coating of nanoparticules to simulate Rayleigh scattering, a natural process that takes place in Earth’s atmosphere causing diffuse sky radiation. It was not enough to make the lights brighter or bluer – variegation and other elements were needed as well.

artficial skylight system design

light bring to market

The result is an effect that carries the same qualities we are used to experiencing outside, from color to light quality. The company also boasts that these photos are untouched and that their fake skylights in showrooms fool people in person just as effectively, appearing to have infinite depth just like one would expect looking up into the sky (James Turrell’s skyspaces and this work by Christo come to mind).

artificial light photo shoot

daylight light soucre innovation

The potential applications are effectively endless, from lighting deep indoor spaces to replacing natural light in places where winters drag on and daylight hours are short. The company sees opportunities in areas like healthcare facilities where it may not be possible to put patients near real windows for spatial or health reasons.

lux live winner award

light real simulation design

Currently, three lighting types are on offer to simulate various broad regions – Mediterranean, Tropical and Nordic – featuring various balances of light, shade, hue and contrast. They are also working on additional offerings, including simulated daytime sequences (sunrise through sunset) and color variations to reflect different kinds of weather conditions.

Share on Facebook


[ By WebUrbanist in Design & Fixtures & Interiors. ]

[ WebUrbanist | Archives | Galleries | Privacy | TOS ]


WebUrbanist

 
Comments Off on New Artificial Lighting Tricks Human Brain into Seeing Sunlight

Posted in Creativity


High Speed Sync Versus a Neutral Density Filter to Overcome Bright Sunlight in Portraits

11 Sep

ND3

For several years now I have used high speed sync (HSS) in order to light portraits in full sunlight at a wide aperture. If you’re unfamiliar with HSS, it allows you to shoot at shutter speeds that are higher than the native sync speed of your camera (usually 1/200 or 1/250 of a second, read your camera and flash manual to find yours) while still using speedlights. The reason this ability is so enticing is that you can shoot flash-lit images at wide open apertures in full sunlight, allowing for a shallow depth of field. Normally if you were using a flash, your maximum shutter speed would be at 1/200 or slower, meaning that you would need to close your aperture down in order to get a proper exposure in the sun.

ApertureOnly

Raw image shot at f/29

How HSS works is that the flash will begin pulsing light, just before the shutter opens, since the exposure is so short. The problem with this is that much of the output of the light is lost in the pulsing process, meaning that you need more flash units to achieve a decent output. For example, when I am shooting at 1/8000th of a second, I need to combine four flashes, on one stand, in order to light a subject that is about five feet away. And that is without any modifiers, like an umbrella or soft box. The other issue with HSS is that not just any flash and trigger system will do the trick. You need to have gear that will communicate information from the camera to the flash.

A couple systems that can do that are the PocketWizard Flex TT5 and Mini TT1, or the RadioPopper PX system. Since most photographers don’t already own one of these triggers systems, this means starting from scratch, which isn’t cheap. I personally opted for the RadioPopper system, since the PocketWizard Flex system for Canon was super glitchy. The RadioPopper system wasn’t perfect either. Just the amount of batteries alone, for four Canon Speedlites with triggers, including a ST-E2 transmitter for the camera, required 27 batteries. Even though they were mostly all rechargeable (the ST-E2 required the hard to find 2CR5 battery), imagine trying to troubleshoot a misfire. Did the batteries need changed in one of the transceivers or was the speedlite misaligned, obscuring the sensor? Or imagine that one of the speedlites’ batteries may be slightly more drained than another, causing only three of four lights to fire. This made the overall exposure fluctuate with every frame.

HSS1

Raw image unlit

HSS2

Raw image, 1/8000 @ f/2.8

I recently decided to compare HSS against using a variable neutral density (ND) filter. ND filters screw on to your lens and cut down the light that hits the sensor, thus allowing for a wider aperture in bright light. This allowed my shutter speed to stay at or below the sync speed cutoff, allowing the full strength of the Speedlite to light my subject. This meant that I wouldn’t need to transmit ETTL information (sell the RadioPoppers) and it meant that I would need fewer Speedlites (less batteries).

After setting my ISO as low as it would go (50), my shutter speed as high as was allowed (1/200th on the Canon 5D MarkII), and my Speedlites at their full output, I dialled down the variable ND until the ambient light perfectly balanced with the light from the flash.

ND1

Raw image unlit

ND2

Raw image, 1/200 @ f/4

Some people have pointed out that there could be the issue of a color cast with certain brands of ND filters. I have not experienced any issues with the ProMaster brand. However, it’s important to keep in mind that if you are shooting directly in to the sun, there will likely be glare in your image, causing a possible color cast or the image to appear washed out.

Note that this experiment was done using Canon 430EX Speedlites with RadioPopper PX triggers. I’ve since sold them all, opting for the cheaper, sturdier and more powerful LumoPro LP180 with PocketWizard PlusX triggers. Now with one bare bulb flash, and a variable ND filter, I can effectively cut the ambient light while fully lighting a subject at f/1.4 in full sunlight.

The post High Speed Sync Versus a Neutral Density Filter to Overcome Bright Sunlight in Portraits by Nick Fancher appeared first on Digital Photography School.


Digital Photography School

 
Comments Off on High Speed Sync Versus a Neutral Density Filter to Overcome Bright Sunlight in Portraits

Posted in Photography


Three Methods of Making Stunning Photographs in Bright Sunlight

26 May

Location Lighting Masterclass – The Art Of Shooting Into The Sun

Shooting directly into the sun may not be the first thing that pops into your mind when creating a photograph, but the effects it can have on your final image when done correctly can border on magical.

1

#2 The Dreamy Look

There are three primary looks that can be achieved by shooting into the sun.

  1. The first of these takes advantage of lens flare and aims to over-expose the image drastically, creating a ‘dreamy’, almost glowing look. (see image above)
  2. The second ignores the foreground entirely, exposing only for the brightly lit sky and creating foreground silhouettes.
  3. The third comes somewhere in between, exposing for the brightly lit sky and simultaneously using reflection or fill flash to overpower the foreground shadows.
The Silhouette Look

#2 The Silhouette Look

#3 The Balanced Look

#3 The Balanced Look

Let’s work through each of these in turn, how to make stunning photographs in bright sunlight.

#1 – the Dreamy Look

This is not a photographic style I typically aim to produce, however it is nonetheless popular with many photographers. The style aims to expose for the skin tones predominantly, allowing the background to become significantly overexposed; and in the process, create a soft glow around the subject. This style can also take advantage of lens flare (the rings of light that appear in your shot when you shoot directly at bright sunlight) and the varying types of lens flare that different lenses create. To achieve this look, ensure that you have spot metering selected on your camera and measure directly for the skin (you will need to be in aperture priority mode for this). It doesn’t matter if the background overexposes; the primary aim is to expose for the skin and facial features. The brightness of the background will typically create a haze across the rest of the image.

4

#2 – the Silhouette Look

Again, using the camera’s spot meter in Aperture Priority mode, you will need to meter and expose for the background. Select an area (not directly on the sun itself) of sky near to the sun. You can lock the exposure using the AE lock function (usually the “*” button on Canon cameras) to enable recomposition of the image. Alternatively, note the shutter speed reading where you metered on the sky, switch to manual mode and set the camera up with the given shutter speed and aperture manually. Here, the aim is to darken everything in the foreground so be sure to think about the kind of silhouette you’re creating. Less is usually more. Too much in the foreground just creates clutter and loses the focal point.

5

#3 – the Balanced Look

The final, and arguably the most powerful is partway in between, and utilizes flash to fill the image exposure correctly.
Just like the silhouette style, you should meter on the background sky. If you don’t use flash, you’d end up with another silhouette. Instead, crank up the power of the flash as far as it will go (it takes a fair amount of flash power to overcome direct sunlight). About 600w (watt seconds) is preferable, and ensure that the subject you want to light up remains relatively close (due to the inverse square law, light fall-off will very quickly erode the power of the flash). Some post-production boost to the shadows and recovery of the background highlights may be necessary to properly balance the exposure.

6

A few general hints to help with direct sunlight shooting:

1) Autofocus often struggles in direct sun. Try first shading the end of your lens with your hand, focussing on your subject, then switching off autofocus and taking the shot without shading the lens.

2) Colors and white balance can often be thrown by bright sunlight. Be sure to shoot in RAW so that you can true up any color differentials later on.

7

3) Use a polarizer or ND (neutral density) filter where you can. Really bright direct sunlight and long exposures are not good for your camera’s sensor over time, just as they are not good to stare at with your naked eye.

4) Think about the time of day – you want light to fall behind your subject, not on top of it. Therefore, early mornings and late afternoons are best for this type of photography. It is also when the sunlight is weakest, resulting in less overexposure and less risk of damage to the sensor.

8

5) Think about alternative fill light sources. Consider reflective windows, white walls, metallic surfaces – effectively anything that can bounce the direct sun back into the subject to naturally add fill light. This means you will need to have your back to the reflective source.

10

6) Consider some post-production magic, if too much flare is coming into the shot. Mount the camera on a tripod so that the image doesn’t shift, then take two shots of the same scene with the same exposure settings. For one shot, leave the image as is, but for the second, shade the end of the lens with your hand. It doesn’t matter if your hand appears in the image because during post production, you simply join the half from the shaded shot that doesn’t have your hand in it, with the bright half from the unshaded shot. This technique will leave the full effect of the flare around the sun, but enable you to remove the surplus flare from the rest of the image.

9

The post Three Methods of Making Stunning Photographs in Bright Sunlight by Leo Edwards appeared first on Digital Photography School.


Digital Photography School

 
Comments Off on Three Methods of Making Stunning Photographs in Bright Sunlight

Posted in Photography


Sunlight: Weekly Photography Challenge

29 Mar

16-05-10 Last Of The Summer (Wine)In the last week on dPS we’ve posted a couple of tutorials that focus upon the ‘Sun’ in different ways with our posts Using the Sun as a Compositional Element and How to Use Sunset Light to Light Portraits.

So – today I’m issuing you with a challenge that could allow you to practice those techniques (and a followup to last weeks Silhouette challenge). Your challenge is to take and share a photo that fits into the theme of ‘sunlight’.

Feel free to take the theme in any direction – it is intentionally broad. You may choose to take a portrait by sunlight, take advantage of the Golden Hour, shoot a sunset or sunrise, shoot in the midday sun or even experiment with capturing some artistic lens flare.

It is totally up to you.

Once you’ve taken your ‘Sunlight’ image and have upload it to your favourite photo sharing site either share a link to it or – embed it in the comments using the our new tool to do so.

If you tag your photos on Flickr, Instagram, Twitter or other sites with Tagging tag them as #DPSSUNLIGHT to help others find them. Linking back to this page might also help others know what you’re doing so that they can share in the fun.

Also – don’t forget to check out some of the images posted in our last challenge – Silhouette challenge where there were some great images submitted.

Post originally from: Digital Photography Tips.

Check out our more Photography Tips at Photography Tips for Beginners, Portrait Photography Tips and Wedding Photography Tips.

Sunlight: Weekly Photography Challenge


Digital Photography School

 
Comments Off on Sunlight: Weekly Photography Challenge

Posted in Photography


Creating Your Own Sunlight: You Keep Shooting with Bryan Peterson: Adorama Photography TV

29 Dec

www.adorama.com Adorama Photography TV Presents You Keep Shooting with Bryan Peterson. Join Bryan as he demonstrates how to overcompensate for when nature does not cooperate. Sometimes when you plan an outdoor photo shoot, mother nature may not be on the same schedule. Join Bryan as he overcomes a cloudy day and demonstrates how to create his own sunlight for his photo. AdoramaTV features talented hosts including Mark Wallace, Gavin Hoey, Joe McNally, Joe DiMaggio, Tamara Lackey, Bryan Peterson, and Rich Harrington. Related Products: Understanding Flash Photography, by Bryan Peterson www.adorama.com Understanding Photography Field Guide, by Bryan Peterson www.adorama.com Understanding Exposure by Bryan Peterson www.adorama.com Nikon SB-900 TTL AF Shoe Mount Speedlight www.adorama.com Harbor Digital Quick Spot Small 1/8″ Honeycomb Grid with Adapter and 6 Colored Gels for Nikon SB-900 Flash Model www.adorama.com Pocket-Wizard Plus II www.adorama.com If you have questions, share them with us at: adotv@adorama.com
Video Rating: 4 / 5