RSS
 

Posts Tagged ‘Successful’

What You Need to Know to do Successful Restaurant Photography

25 Oct

The post What You Need to Know to do Successful Restaurant Photography appeared first on Digital Photography School. It was authored by Darina Kopcok.

successful-restaurant-photography

If you want to be a food photographer, you’ll likely start your career shooting restaurant photography. This is how most food photographers get their start. Restaurants have smaller budgets, so they’re open to working with new photographers.

However, photographing for restaurants isn’t that easy. Not only do you have to be skilled at shooting food, but you also need to be able to shoot interiors and portraits of the chef and other staff.

Restaurant photography can be a lot of work, and there are a lot of ins-and-outs you should know to make sure you don’t end up getting burned by this very specific type of shoot.

What You Need to Know to do Successful Restaurant Photography

Ask for a shot list

Before you can give a potential client an estimate, you need to know what you’ll be photographing in order to estimate how long the shoot will take you. For example, beverages can take longer to photograph than a plate of food, as managing reflections in glass can take time and be challenging.

You should base your estimates on the project scope. If you can’t estimate how long the shoot will take you, you can’t price your services accordingly. Get a breakdown of how many food images will be required, how many drinks etc.

Some restaurants want you to bring in your own surfaces, dishes, linens etc. for a more magazine editorial feel. In this case, note that it will take longer to shoot this type of scene than it will shooting their own dishes on the restaurant tables.

Scout for the location and light

Check out the location beforehand so you know what you’ll be up against in terms of lighting. You’ll also need to figure out where to set up your equipment and workspace. This should be done with agreement from the manager or proprietor.

It’s important that if the restaurant is open when you shoot, that you’re as unobtrusive to the patrons as possible. See if the client can close off a section of the restaurant where you can work without bothering anyone, and vice versa. 

successful-restaurant-photography

Discuss styling the food

When shooting for restaurants, you should make clear on the outset that you’re not a food stylist and therefore are not responsible for how the food looks.

Food styling is a different occupation. It requires a separate skill set from photography. Your job is the lighting and image capture, not the plating of the food.

Of course, you should always be aware of garnishes and stray crumbs, and generally, make sure the food looks its best for the camera. I’ve been known to send back a sloppy looking burger or two.

The point is that clients need to make sure their chef is up to the task. Otherwise, they should hire a food stylist to guide them. A food stylist can be pricey and not feasible for an already tight budget. In the case that a client refuses to hire one, they should know that the look of the food on the plate ultimately falls on them.

Make sure you state this in your contract. You have a contract, right?

What You Need to Know to do Successful Restaurant Photography

Bring a food styling kit and some basic props

While you won’t be plating and styling the food, you should still bring along a basic food styling kit that includes items such as tweezers, cotton swabs, and small brushes to tame errant garnishes or clean unwanted crumbs and drips from the plate. You want to do the best job you can with what you’re given.

It’s a good idea to come prepared with some props as back up. Bring a stack of linens in various shapes, sizes, and colors, and maybe some cutlery. Sometimes clients want their own tables, flatware, and dishes shot as they are experienced by the patrons, but many have a branding direction in mind that requires a specific look or ambiance. 

For example, when clients wanted me to create dark and moody images for them, I bring in small, dark dishes and vintage cutlery – the opposite of the large, white dishes you see in most restaurants. 

successful-restaurant-photography

Use a tripod

If you shoot only in natural light, be aware that most restaurants are too dark for food photography.

You’ll need to shoot by a window and use a tripod so you can decrease your shutter speed and make a longer exposure. This won’t work for photographing people, however, as they will be blurry with a slow shutter speed.

If the images will only appear on the web or in social media, you can crank up the ISO and fix the noise in your images later in post-production.

When I scout the location, I try to take a few test shots and see how they look in Lightroom before making my lighting decisions.

successful-restaurant-photography

Shoot horizontally

Have a conversation with the client about how they would like the images shot. Most restaurants only need images for their website. Interactive web design often requires that images be shot in landscape orientation.

If the client will be printing some of the images on a menu, this may require a vertical format (and a higher resolution). Make sure to discuss the best picture orientation with the client. Make note that if they want both, it can take you up to twice as long to shoot the images, as not only will you have to adjust the camera, but you’ll have to recompose each image.

Shoot tethered 

I always hook up my camera to a laptop so the client can view the images captured by my camera. Shooting tethered allows you to see a larger, more accurate rendition of your shot than you can get from the screen on the back of your camera. You can use Lightroom or Capture One Pro for tethering. Make sure you have a high-quality tethering cord. 

What You Need to Know to do Successful Restaurant Photography

Work with the client

Ultimately, you want to produce good work that makes the client happy. For this, the client needs to be involved in the process. They must be present at the shoot to provide creative direction and approve the images that are captured. That way, they can’t come back and tell you they don’t like them, or that they don’t align with the branding or aesthetic they had in mind.

I have a clause in my contract stating that I will not begin a shoot without someone representing the restaurant present. Also that the client will forfeit the deposit if I need to pack up my things and leave. Believe me, you don’t want to get into this situation. 

Collaborate with the chef

Involve the chef in the process as much as possible. When you make an appointment to scout the location, ask if you could meet the chef.

Making the chef feel like an important part of the process can make a big difference in the outcome of your shoot. The shoots that end up being the most easy and fun are the ones where the chef is enthusiastic about working with you and making the food look its best for its moment in the spotlight.

What You Need to Know to do Successful Restaurant Photography

In conclusion

One more thing. Before you set foot in the restaurant with your camera, make sure you have liability insurance. Many restaurants won’t always think about this, but bigger clients will often ask for proof of liability insurance. If someone trips over an extension or tethering cord and decides to sue the restaurant, you can be included in that lawsuit. 

Shop around for the best insurance for you, and read the fine print carefully. You need insurance that is specific to the photography industry so you can make sure you’re covered in the types of situations you will be faced with.

You should also insure your equipment against theft, loss, and damage, including that from fire or flood.

Restaurant photography can be a great way to start building up your professional portfolio. Just make sure to do it right to avoid any headaches along the way, and to get your clients to hire you as their preferred photographer whenever they update their menu.

Do you have any other tips or experiences you’d like to share with us about Restaurant Photography? Do so in the comments!

The post What You Need to Know to do Successful Restaurant Photography appeared first on Digital Photography School. It was authored by Darina Kopcok.


Digital Photography School

 
Comments Off on What You Need to Know to do Successful Restaurant Photography

Posted in Photography


3 Tips for Becoming a Unique and Successful Photographer

02 Sep

The post 3 Tips for Becoming a Unique and Successful Photographer appeared first on Digital Photography School. It was authored by Kevin Landwer-Johan.

If you want to become a successful photographer, then there are a few things you absolutely must know.

That’s what you’re going to learn in this article:

Three key tips for becoming a truly masterful photographer.

successful photographer two people with bright clothing

© Kevin Landwer-Johan

Will it be a fast journey? Probably not.

But it doesn’t have to be difficult, either. If you enjoy photography, then you’ll have a ton of fun!

So if you’re ready to become a unique and successful photographer…

…then let’s get started.

Tip 1: Don’t get hung up on what you ‘should’ do

Many photographers read tutorials and watch videos. Then they try to mimic exactly what is being taught. They try to create the same photos the instructor is telling them to.

But if you learn photography this way, you’ll end up having photos that look like everyone else’s. You won’t discover a unique style of your own.

Sure, it’s good to study and learn from those who have more skill and understanding. But there is no formula for perfect photography. There is no absolutely correct way to make a picture.

Whether you’re taking a senior portrait or photographing products for a catalog, there are no hard and fast rules. There are guidelines. If you follow some of them you’ll make sharp, well-exposed photos that are well-composed. But if you try to rigidly stick to a method, you will not make creative photos.

Thai Model and Elephant

© Kevin Landwer-Johan

Every scene you photograph is different. Even if you photograph the same garden or building every day, things will change. The light will be different. It may be sunny one day and raining the next. Your subject may change over time.

So you must take what you’ve learned and adapt it to the situation. Apply photography techniques that best suit your subject and the current circumstances.

Inle Lake Fishermen

© Kevin Landwer-Johan

Obtain the skills and learn the rules. Know these things well, so your thoughts aren’t consumed by them each time you want to take a photograph.

But don’t apply a set of rules to your photography. Doing this may bring technically correct results. But often photography which is only technically correct is rather dull and boring.

You can find examples of very similar sets of images posted on social media and photo-sharing sites, and in all manner of ‘how to’ photography books. They all look repetitively similar because the photographer has only followed the rules.

Instead, apply your own creative thinking. Consider the rules, but don’t apply them unless they enhance your photo the way you want them to.

Tip 2: Put feeling into your photography for masterful images

If you want to be a truly great photographer, learn how to infuse your photography with feeling. Put something of yourself into your pictures.

This is what will make your photos unique. Nobody else has the same worldview you do.

This is not an easy concept for many photographers to grasp, but all you need to do is look at some of the best photos. The ones which attract you the most.

Ask yourself why you like them so much. Look at the greats. Admire the work of Irving Penn, Ansel Adams, Henri Cartier-Bresson, and the like. What is it about the way they have seen the world and photographed it that makes their photographs special?

boys in sunbeams

© Kevin Landwer-Johan

Look at favorite photos you have taken. What’s special about them? Are they only technically correct, or is there more to them? Do they capture a unique moment? Do they include feeling?

Photos which embody emotion are more powerful. Capturing the moment that conveys emotion, regardless of technical considerations, often results in the most compelling photographs.

Technical imperfection can even enhance the feeling in a photograph. A moment of laughter mistakenly overexposed can add to the spirited feeling. An underexposed photo of someone feeling sad will add to the expression of their despair.

portrait of a young girl

© Kevin Landwer-Johan

Here’s the bottom line:

If you can include feeling in your photos, if you can communicate something to viewers about your perspective, then you’ll be well on your way to being a truly successful photographer.

Tip 3: Study your craft and photograph often

Here’s the great thing about photography:

The more you pick up your camera, the faster you will develop as a photographer.

Your technical skills will improve, and your ability to see what makes a great photo will improve, too.

cultural abstract

I suggest you commit yourself to learning a new photography technique every month, or even every week. Get the new technique ingrained into your subconscious mind so you don’t have to concentrate on what camera settings to use. Then the settings will come to you automatically, even when you do choose to use Manual mode.

Reaching a high level of ability takes time. Like any artist, you have to start by mastering the essentials. Once you have, you will be free to express yourself.

Learning to play the piano or to dance well involves hours and hours of patient, determined practice. Photography is the same! The more you study and practice with your camera, the more expressive you will become with it. The less you have to think about the adjustments you need to make, the more focus you can give to being creative.

So engross yourself in your favorite genres of photography. Photograph often and with the desire to make improvements each time you do.

Over time your photographic skills will advance.

And, pretty soon, you’ll be a successful photographer.

Laughing Lady with umbrella

© Kevin Landwer-Johan

Conclusion

I believe we are all inherently creative. We are created to be creative.

This means that every one of us has the potential to be a great photographer.

You just have to work hard at your photography.

Eventually, you’ll be creating stunning, unique photos.

How to become a Unique and Successful Photographer Iron Bridge in Chiang Mai

The post 3 Tips for Becoming a Unique and Successful Photographer appeared first on Digital Photography School. It was authored by Kevin Landwer-Johan.


Digital Photography School

 
Comments Off on 3 Tips for Becoming a Unique and Successful Photographer

Posted in Photography


Capture a Successful Collection of Photographs with these 3 Tips

15 Oct

In a previous article, I discussed some helpful tips for preparing for a photo shoot. It’s important to be ready, but let’s be clear – you have to be able to perform on the day. So let’s talk about some helpful tips you can use to capture a successful collection of photographs on the big day.

I shot photographs for a band. The goal of the shoot was to create a collection of images they could use on social media. This one is pretty dark but it was processed this way on purpose. The band was playing a very moody venue and they liked the idea of a darker photograph.

Regardless of whether you’re shooting professionally or taking some photos for friends, these tips can help you to ensure you get the best pics. You may be taking photos of your child’s soccer game. Whatever the occasion there are some things you can do to get great photos.

1) Taking care of the people you photograph

This is the single most important thing you can do is take care of your clients. It sounds silly, but your job is to build their confidence, to direct them, to inspire and help them to pose for photos. Anyone with knowledge of camera settings and lighting can take an image that is sharp and well-lit. But to bring out the personality of those you photograph and to make meaningful images requires you to make a connection with the clients. They need to feel safe during the shoot. You’re the one who has to ensure each person involved feels secure.  It’s important to watch your models carefully. Are they comfortable? Are they fidgety?

The leader singer was a little apprehensive about me taking photographs. She told me when she sings she always looked like she was in pain. I took the time to shoot a lot of images hopefully capturing something she would like.

Consider the type of atmosphere you create during the shoot. Are you relaxed? Do you exude confidence in your abilities or are you nervous? If you’re feeling nervous, then so will the people you are photographing. It might be worth thinking of yourself as the father or mother of the folks you are photographing. Be that voice of calm amidst the chaos. Let them know you have their back.

I tried to include some shots of the action in between songs.

2) Think about the types of images you’re shooting

Depending on the event you’re shooting you need to consider several factors. The last thing you want to do is shoot a whole bunch of images that look the same. So you need to consider several things.

If you’re shooting a portrait session, then you need to think about posing and grouping individuals. How can you make the images look different? Do you change the setting or do you have people arrange themselves differently? You could have them grouped closely together or create a composition in which individuals are more spread out. Perhaps you have a mix of individuals either standing or sitting. There are lots of ways to pose people. If you’re the type of person who needs to sketch out diagrams and have a plan, then go ahead and do that, but remember variety is the key.

It was important to try and isolate two members of the band. A photograph of the married couple on stage together is an important keepsake.

If you’re shooting a child’s sporting event, you will want to mix in images that show both the whole playing surface as well as images that capture individual players. Maybe you choose to focus on facial expressions for a while. You can also capture intricate details like a pair of feet dribbling a ball, or the hands of player just before she shoots a 3 pointer. Just try to consider lots of different ways to portray the action.

3) Think about purpose

It’s so important to consider the point of taking these photographs. What do you hope to accomplish with this collection of images? Are you capturing precious family memories? Perhaps you’re documenting the growth of your son’s abilities to play soccer? Maybe the goal is to capture images of a beloved family pet that hasn’t got a whole lot of time left with the family. Whatever the reason, this purpose will guide you to create photographs.

Communicating an idea will dictate how you ask your family to pose. A photograph in which a dog is running happily after a toy or playing with small children will communicate a sense of family, but consider how a shot of an older dog sleeping next to your teenager on the couch may show a different stage of the life cycle.

A close up of the musicians and their instruments adds a nice variety.

All too often we jump in with the camera and forget that purpose can be more important than having the perfect exposure. So slow down, think purposefully as you shoot, and remember your goal is to create cohesion. You want a set of photographs that have a variety of compositions but also fit nicely together. Create interest in both the composition and the story told by your images.

Writing out your purpose might be helpful. Create a type of mission statement that you keep in the back of your mind as you shoot. Do whatever you need to do keep the purpose of your photographs front and centre. Don’t hesitate to post the purpose on a piece of paper somewhere. It might even help for the individuals involved in the shoot to see the purpose. If they are aware they can help to maintain the central idea through how they pose for photographs.

Including images of all the band members was important too. The focus on this shot is the sharpest but there’s a lot of emotion and effort in his face. That was important to capture.

So, no matter the subject matter or your photographic expertise, keep in mind how important it is to shoot photographs with a consciousness that accounts for all the factors listed above. It will be hard at first to remember all these different elements but eventually, you will become comfortable, and it will be more second nature to you.

If you’ve got some helpful tips, please share them with us. We want to hear about all the different types of steps you take when shooting a group of photographs. Let’s help each other out.

It’s also important to consider changing lenses. I used a wide angle lens for this shot.


The post Capture a Successful Collection of Photographs with these 3 Tips appeared first on Digital Photography School.


Digital Photography School

 
Comments Off on Capture a Successful Collection of Photographs with these 3 Tips

Posted in Photography


5 Mindset Shifts You Need to Be Successful in Photography

09 Oct

You love photography. You live it, you breathe it, and it’s all you can ever think of doing in your life. And you’re good – better than some of the other people you know who also love photography.

But despite all this you feel… stuck. You’re not booking jobs, getting clients or making money. And when you post your best work on social media all you hear are crickets.

So what’s the problem? Well, it may surprise you to hear it may not be a technical issue at all but rather an issue with your subconscious.Karthika Gupta Photography - mindset shifts to be successful in photography

Today I want to talk about how you can totally transform your life, your relationships and your work. It isn’t a course you can take or a YouTube video you can watch. It’s something that’s free, powerful, and completely within your control.

Changing your mindset.

Thinking differently can have a profound effect on your entire life. But here are five mindset shifts you need to be successful in photography.

1. Practice Makes Perfect

There really are no two ways about this. The best way to get better at something is to do it over and over again. The more you get out there and photograph, the more you’ll understand what you like, what makes you happy and what areas you need to improve in. Want to understand light and how it affects photos? Go out and photograph in different kinds of light. Want to photograph people? Set up shoots and practice photographing people. The more you do, the more you create and the better you become.

Karthika Gupta Photography - mindset shifts to be successful in photography 7

This was my client’s favorite photo from her photoshoot. It showcased her artwork in a unique way. The more you practice, the more you’ll start telling stories in your unique way.

One of the easiest ways to practice photography is to sign up for a 365 series, which is a commitment to create one photo every day for 365 days. You can use a DSLR, a point-and-shoot camera, or even a smartphone.

You can even take it a step further by joining one of the many online groups available. They’re created solely to encourage you to photograph and post a single photo every day for 365 days straight. They even provide photo prompts to help you stay on track so you’re constantly thinking of what to photograph.

Karthika Gupta Photography - mindset shifts to be successful in photography

Practice also makes you more confident. Now when I see a story play out, I’m not afraid to ask my clients or strangers to be actors in the story. A pub became a scene for some unique wedding photos for my clients.

One of my goals is to learn film photography. I have an old 35mm Canon AE-1, and I have run several rolls of film to try and get images that I love. The first time I used that camera, I didn’t even wind the film correctly. So I ended up sending a blank roll of film to be processed. That was $ 20 well spent.

2. Overnight Success is a Myth

This ties to the first point. You must be prepared to invest a lot of time and effort to get your work seen and acknowledged. It’s highly unlikely that you’ll be an overnight success with lots of clients and potential work  lining up. I’m not saying it’s impossible, but the probability is quite low. So instead of leaving your career to chance, why not take matters into your own hands and have a plan to do the work consistently? Learn all there is to learn about what you want to focus on in your photography and consistently put out good work.

Karthika Gupta Photography - mindset shifts to be successful in photography

It’s taken me several years and thousands of photos to train my brain to recognize light and create a story before I even click the shutter. This is one of my favorite photos that I call ‘Light and shadow: Ride and rider’. To me it shows the symbiosis between these two pairs.

3. Healthy Competition is a Good Thing

In any given industry there’s always competition. Sometimes the competition plays fair, and sometimes it doesn’t. I’m not pointing fingers at anyone or anything. I’m just stating the obvious.

Most people who picks up a camera intent on becoming a photographer do it for the money, the fame, or some combination of the two. Learn to play well with your competition. What sets you apart isn’t your skills or technique. Anyone can learn to do something if they put their mind and effort into it. What sets you apart is you. Your style, your aesthetic and the way you view something is unique. There will be clients who love what you do because of the way you do it, and there will be those who’d rather go with the other guy. That’s just part of the game. Accept it, and make friends with your competitors. It’s better to have friends in the industry you’re playing in than enemies.

Karthika Gupta Photography - mindset shifts to be successful in photography

I’d heard of double exposure before, but I never understood it until a friend and fellow photographer sat down with me and explained it step by step. Now it’s one of my favorite ways of creative photography, and my clients love it.

4. Go With the flow

I wish someone told me this when I first started my business. I was caught up in perfection – the perfect logo, the perfect website, the perfect portfolio, a printing vendor, business cards, etc. I spent so much time making sure all my ducks were in a row that I stalled the process more than I helped it along. Having a vision of what I wanted to do was getting lost in actually doing the project.

Sometimes it’s good to take a step back, figure out what the big picture is, and then keep moving along to achieving it. Perfection is a myth. Nothing is perfect, and it’s much better to get something done and accomplished than to wait until everything falls into place. Just keep moving along towards your goal.

Karthika Gupta Photography - mindset shifts to be successful in photography

Things always work out exactly how they’re meant to be in the end.

5. Have a Positive Attitude

Our life is a reflection of our attitude. Without even noticing, it’s easy to become negative and bitter towards the world and the photography industry. Why are some people more successful than us? Why do some photographers get all the jobs? Why can’t I book more clients? The questions can go on forever.

Not only does a negative attitude stop you from enjoying your life, it can also have a significant impact on your work and your craft. After all, you love this art form. That’s why you’re here, right? You want to learn, engage, and get better at it. The energy a person brings with them is contagious. We all have bad days, no matter how people portray themselves. Every time I feel angry or jealous of someone else’s success, I remind myself that just because I can see what they’ve accomplished doesn’t mean I know what they’ve gone through and sacrificed to get there. One of the best things you can do for your passion for photography is to have a positive attitude.

Karthika Gupta Photography - mindset shifts to be successful in photography

You’ll find that happy medium of working with people who really appreciate what you do and love your work. They are your ideal clients.

I hope some of these mindset shifts help you navigate the choppy photography waters. Remember, there’s no such thing as a free lunch! Success in any shape or form takes a lot of time and hard work. Roll up your sleeves, work your hardest, and you will get there.

The post 5 Mindset Shifts You Need to Be Successful in Photography appeared first on Digital Photography School.


Digital Photography School

 
Comments Off on 5 Mindset Shifts You Need to Be Successful in Photography

Posted in Photography


Tips for Selecting and Doing a Successful Photography Project

19 Jan

If you find yourself stuck in a rut, can’t find anything to shoot, or just need to get shooting – here are some videos to help you select an idea and get started doing a personal photography project.

The importance of doing a photography project

Photographer Matt Day talks about the importance of doing a personal photography project and gives you some ideas and direction to get started in this video.

5 Reasons why you should do a photography project

Adam from First Man Photography has five good reasons why you should start a photography project:

    1. Find direction – break out of a rut.
    2. Improve your photography.
    3. Build a social media following.
    4. Challenge yourself – get out of your comfort zone.
    5. It’s fun!

The most important ASPECT of doing a photography project

In this short video, COOPH founder Ulrich Grill shows you five things you need for a successful photo shoot or project. They follow the acronym A.S.P.E.C.T. – can you guess what they are? If not, go ahead and watch the video now.

  • A – atmosphere
  • S – shadows
  • P – positioning
  • E – energy
  • C – contrast
  • T – timing

Still need some help starting a photography project? Try these dPS articles for more tips.

  • 12 Creative Photography Project Ideas to Get You Motivated
  • How to do a Photography Alphabet Project
  • Tips for Doing a Successful Picture-a-Day Photography Project
  • How to Start and Finish a Photography Project
  • 6 Tips for How to Build a Story and Shoot a Photo Project
  • Tips for Creating a Personal Photography Project

The post Tips for Selecting and Doing a Successful Photography Project by Darlene Hildebrandt appeared first on Digital Photography School.


Digital Photography School

 
Comments Off on Tips for Selecting and Doing a Successful Photography Project

Posted in Photography


How to Create a Successful Local Marketing Strategy for your Photography Business

26 Aug

The internet has taken over most aspects of our daily lives. We can talk to the world at a moments notice, promote our services instantly, and sell anything we want day or night. However, in the quest to grow as many followers and fans as we can, it can become easy to forget about one of the most important opportunities that exist for your photography business. There is so much potential right outside your front door.

Think local

No photography business can afford to forget about their local community – so you need to create a complete marketing plan that addresses both the internet and your own local community.

Photography Business Marketing

You don’t need to reach an audience around the globe to receive a job from your neighbor down the street. How many people cross your path in a given day? How many of them know what you do or could potentially use your services? How many of them might be interested in what you have to offer?

Through local marketing, you want to create a daily strategy for your local connections to grow consistently.

Photography Business Marketing

Be informative not intrusive

You do not have to be overly intrusive about it. You do not have to sell to your friends, colleagues, or acquaintances directly. Have you ever had a friend that you haven’t seen in years suddenly contact you out of the blue asking to talk or to get together? Then you speak to them and realize that they have just gotten a job as a financial planner (or some other such thing) and are trying to sign you up as a client.

This is not what I mean by local marketing, but you do have to be effective at making people aware of what you do, whenever the situation presents itself. You want to intrigue people. When people ask what you do, help them understand your photography business. You are in a creative field, so make it sound as exciting as possible.

Photography Business Marketing

Just let people know what you do

If there is a crossover that might help the person, mention it. For instance, what type of photographer are you? What are the specific services that you provide? Depending on who the person is, tailor what you say to them or their situation.

Send out an official announcement letting everyone know about your photography business. Briefly, explain what your services are and how you might provide potential customers with assistance. When done correctly, this will not be intrusive but informative. People will congratulate you and celebrate your endeavor.

If you are trying to grow your family portrait or corporate business, the people you know will be a huge help. How many of your friends work for businesses or have families? I am assuming most of them. Why would these friends want to seek out a stranger to provide these services when they could work with someone they know? You can be that person.

Photography Business Marketing

Build relationships with other businesses

How many businesses do you frequent on a daily basis? From restaurants to law firms to local shops, there is a wealth of opportunity right under your nose. It is simple but can seem so daunting at the same time. Smile, talk to that business owner you have seen for years and tell them about your services and how they might benefit from them. Bring a brochure of your work.

For businesses that you do not have a prior relationship with, try to locate the person in the company who would be in charge of hiring out the type of work that you want to do. It can be much less effective to just walk in the door blind with the aim of speaking to the first person you see. Your prospective chances will improve significantly if you can make a pointed and direct contact with an influential person within a business.

Exhibit your work

Seek out gathering spaces, such as a coffee shop, a bar, or an event space to hold a show. This is good for their business as it provides art on their walls and a reason for people to enter their establishment. For you, it provides a fun space to show your work. If you live in a smaller community, where a lot of people who know you will come across the work, then this can be a great strategy. If you can draw people to the space to help show and sell your work, then that is a good thing. Many gallerists hold pop-up galleries in addition to their permanent spaces for just this purpose. Consider doing similar pop-up events of your work.

If you live in a smaller community, where a lot of people who know you will come across the work, then this can be a great strategy. If you can draw people to the space to help show and sell your work, that is a good thing. Many gallerists hold pop-up galleries in addition to their permanent spaces for just this purpose. Consider doing similar pop-up events of your work.

Photography Business Marketing

Make sure it’s on your terms

However, there are some pitfalls to this strategy. Providing your work to a business for an open-ended period of time at no cost doesn’t necessarily mean that your work will sell or that it will help you get noticed. I see artwork covering the walls of coffee shops all over New York, and most of it never moves. This is just giving the establishment free art with little or no benefit to you.

You need to select the correct establishment and have a way to draw people there with the specific purpose of seeing your art and hopefully purchasing it. Without that, this strategy can be as much of a drain on your time and resources as it can be a success. If these benefits are not there for you, the establishment should pay you for your work (or pay a rental fee) since you are providing a service to them. You are giving them an ambiance and improving the experience for their customers.

Photograph students at a local school

Another thing you could consider is contacting an acting or music teacher at a local school and offering to photograph the student’s headshots. If you do well, it will help build your portfolio and both the students and the teachers alike will tell others of your services. Hang an advertisement in a local business, do work for a local website, sell your work at a local fair; there are many creative ways to integrate what you do into your community.

Photography Business Marketing

There is an infamous and successful example of this type of strategy employed by a guitar teacher named Dan Smith in New York City. Beginning in the 1990s, Dan hung small ads in doorways and vestibules in businesses all over Manhattan. You could not walk into a diner or coffee shop without seeing one, and these ads persist today. He has built a business out of this single marketing strategy, and it lead him to be so ubiquitous that even The New York Times ran a profile of him.

The repetition is what worked for him, and it was not annoying; it was almost humorous and became a defining characteristic of growing up in the city. This is an example of the 80/20 rule, where 80 percent of your income can come from 20 percent of your marketing. Dan found a strategy that worked and pushed it to the extreme. It only worked because of the extreme measures that he took in plastering so much of the city with his ads. Other music teachers pasted their ads around the city, but none did it like Dan.

Conclusion

By working on a variety of local marketing strategies, these endeavors will combine to create an overall awareness of your business in the community. Some of the individual pieces might seem small, and all of this may seem tedious at first, but all together they can be very powerful.


For even more business help – join the Focus Summit 2017 Online Business and Marketing Conference for Photographers on Sept 26-28th 2017. We will cover marketing, business development, law, SEO, branding, blogging, and much more. Use the code “DPS” for a $ 50 discount.

The post How to Create a Successful Local Marketing Strategy for your Photography Business by James Maher appeared first on Digital Photography School.


Digital Photography School

 
Comments Off on How to Create a Successful Local Marketing Strategy for your Photography Business

Posted in Photography


Ten expert tips for successful macro photography

23 Jul

Thomas Shahan’s tips for successful macro photography

Thomas Shahan is a macro photographer and artist from Tulsa Oklahoma who specializes in entomology and traditional relief printmaking.

Thomas’s interest in macro photography began when he started watching jumping spiders in his backyard. After studying art at the University of Oklahoma, he left for Oregon to work in the Oregon Department of Agriculture’s entomology lab. There, he worked as a digital imaging specialist, taking high magnification focus-stacked photographs and SEM images of arthropods – good practice for macro photography.

In this article, Thomas shares advice for successful closeup photography of bugs, insects and small animals. Click through for his top tips, and be sure to check out the video we made with Thomas recently, embedded at the bottom of each page.

All images by Thomas Shahan, used with permission.

Tip #1: Bugs are everywhere

Wolf Spider – sp, hogna, shot in Norman, Oklahoma using a Pentax 50mm F1.7, reversed on tubes at ~F16 equiv.

You don’t need to travel to exotic locations to take pictures of bugs – they’re everywhere. A few minutes spent turning over stones and logs in your back yard, or local park will reveal plenty of creepy-crawlies.

Bugs are most active in the middle of the day but they can be found at any time, even at night.

Tip #2: Learn about your subjects

A jumping spider – sp. psecas, shot in Peru with a Vivitar 55mm F2.8 at ~F10 equiv, on a 2x teleconverter.

Sure, to begin with you might just explore your yard and see what you come across, but the more you know about bugs and insects, the more likely you’ll be able to find them, and get the shot that you want.

Perhaps you live in a part of the world where a certain species is particularly common. Perhaps the particular spider, or fly that you want to photograph only comes out at a certain time of the day, or likes to hang out in a particular kind of environment. The more you know, the better your chances of finding it, and getting a great shot.

Tip #3: You don’t need expensive gear

We were using the Fujifilm GFX 50S for our recent shoot in Idaho, but you don’t need such expensive equipment to get great macro shots. Thomas’s usual setup (pictured here) is centered around a midrange Pentax DSLR, and a collection of second-hand lenses and extenders.

A newer camera with a good live view mode and a dedicated macro lens will certainly make life easier, but they’re not essential to getting great shots.

Tip #4: Use diffused light

A bess beetle – sp. passalid, captured during our shoot at the Ketchum Bug Zoo, Idaho.

Many bugs, like this bess beetle are glossy, so try to shoot them under diffuse light, to avoid distracting ‘hot spots’ on their shells. Experiment with different kinds of diffusion material for both natural and flashlight.

Tip #5: Small apertures increase depth of field

A tarantula, captured during our shoot at the Ketchum Bug Zoo, Idaho.

Shooting at small apertures will give you more depth of field, meaning that more of your picture will be in focus. This is essential when taking pictures of very small insects and bugs, but also useful with larger animals, like this tarantula (shot at F10).

The downside of shooting at small apertures is that it cuts out a lot of light, so you should experiment with using flash as your main light source. A relatively low flash output should work in daylight and it won’t scare away your subject.

Tip #6: Shoot Raw, at low ISOs

A bearded dragon, captured during our shoot at the Ketchum Bug Zoo, Idaho.

Shooting in Raw mode will let you get the best possible resolution out of your camera, and keeping your ISO sensitivity as low as possible means that you won’t need to worry too much about noise levels. Shooting Raw also gives you a lot of scope for post-capture tonal adjustment.

Tip #7: Don’t be afraid to crop

A bess beetle – sp. passalid, captured during our shoot at the Ketchum Bug Zoo, Idaho.

Don’t worry if your lens can’t focus super close – if you’re working with a high megapixel camera, you can always crop in afterwards. This image of a bess beetle is a pretty heavy crop from the GFX 50S’s 50MP sensor, but the output resolution is still very good, at around 15MP.

Tip #8: Focus manually

A jumping spider – sp. Habronattus americanus, shot in Oregon with a Vivitar 55mm F2.8 at ~F16 equiv, on a 2x teleconverter.

If you are working at very close distances, turn off AF and focus manually, then bracket focus by moving your camera slightly back and forth.

Tip #9: Experiment with color and contrast

Madagascar hissing cockroach – sp. gromphadorhina, captured during our shoot at the Ketchum Bug Zoo, Idaho.

Experiment with color and contrast. Simple colored backgrounds can be very effective. Here, a bright red piece of cardboard contrasts with the warm tones in the carapace of a Madagascar hissing cockroach.

Tip #10: Take a lot of pictures!

Horsefly – sp. Tabanus, shot in Tulsa OK with a Vivitar 55mm F2.8 at ~F10 equiv, on a 2x teleconverter.

Macro photography is fun, but it’s tough – especially when it comes to flies and other small, fast-moving animals. Increase your odds of getting a great shot by taking lots of pictures!

Thomas Shahan’s tips for successful macro photography

We recently spent a couple of days with Thomas down in Ketchum Idaho, to get a feel for how he approaches one of the most challenging kinds of photography there is – macro shots of bugs and small animals.

Check out more of Thomas’s work on Flickr


This video is sponsored content, created in partnership with Fujifilm. What does this mean?

Articles: Digital Photography Review (dpreview.com)

 
Comments Off on Ten expert tips for successful macro photography

Posted in Uncategorized


Tips for Doing a Successful Picture-a-Day Photography Project

03 Jul

Sometimes, fitting quality photography time into an already busy schedule is a challenge in itself. Even over weekends, pressing matters mean that photography is often left by the wayside. I know I’m guilty of relying on a camera phone to capture images – compromising image quality and control. One way to get back on the proverbial creative saddle is to embark on a photography project. And although starting a photo-a day project may seem a little daunting at first, committing even a minute each day to composing a photograph with a dedicated camera can go a long way.

Tips for Doing a Successful Picture-a-Day Photography Project

The results of my own 30-day photography project challenge!

Make a game plan for your photography project

There are no hard and fast rules for photo-a-day projects or challenges. You might even want to take a photo weekly or monthly instead. It’s the regularity and the plan that forms the basis of the challenge. Any other rules are those you set for yourself.

How often do you plan to take a photograph, daily, or weekly? Will you need to stock up on film or memory cards? Is there a certain time of day or location you want to capture images? Do you need a new camera bag? Setting out a clear plan before embarking on your challenge will help you keep motivated and shape the outcome of your final body of work.

Tips for Doing a Successful Picture-a-Day Photography Project

Daily or regular photography projects can reveal many creative opportunities.

Set a goal for your project

Before starting out on your quest, consider what it is that you want to get from the photography project. Having a clear idea of your motivations will help guide you through your challenge more smoothly. Are you looking to expand on your technical skills? Or would you like to get to know your camera a little better? I find that writing down the desired outcome of a project is helpful. Plus, if your series does change course, it’s interesting to be able to look back at your notes and see how your project has grown.

Choose a theme

Choosing a theme for your photo-a-day project can help create a cohesive series overall. If you are keen to hone your technical skills, try a theme that utilizes new photographic techniques. Or take on a subject which is different than what you usually shoot. If you want to make more time for photography, you’ll be surprised at what a few minutes a day can achieve. If you aren’t sure where to start, there are an abundance of websites that supply free-printable lists of plans, themes and tasks for each day, week, month, or year.

However, if you feel constrained by the idea of a hard-and-fast theme, remember that choosing not to have a clear theme is a choice in itself! Relying on subjects that catch your eye will expand your ability to decipher creativity and meaning in any given environment.

Tips for Doing a Successful Picture-a-Day Photography Project

An abstract pattern I stumbled upon while walking home.

Set a time frame

Next, consider a time frame for your  project. Daily photographic challenges can last weeks, or even years. The time of day is a factor too – would you like to shoot your series during the day or the night? Maybe even both.

The time frame of the project relies on your goals and chosen theme. It also dictates the kind of equipment you’ll need. For example, documenting a landscape over the seasons requires a longer time frame than a series of self-contained photographs. Additionally, a project spanning over a longer time frame may only require a single photograph each week or per month, depending on the level of detail you prefer. If you want a consistent outcome from your series, consider using a tripod and a dedicated vantage point.

Tips for Doing a Successful Picture-a-Day Photography Project

Equipment

Selecting photographic equipment for the project will shape the aesthetic of the series and relate back to your initial goals and themes for the project. The beauty of daily or regular photography challenges is the opportunity to become more familiar with your photographic tools. It’s a perfect way to invest in developing your DSLR skills, or trying out a new lens. You may even want to use an analogue camera. Why not experiment with a different camera setting each day? Or focus on photography fundamentals such as shutter speed and aperture over the course of each week?

One of the requirements of taking on a photo-a-day challenge is keeping a camera on hand. This can be an issue in terms of additional carrying weight. Rather than resorting to the portability of a camera phone, pack your wallet, keys and phone into a camera bag instead. Your DPI will thank you later. And after a bit of adjustment, you’ll find that keeping your camera with you becomes so natural that you might feel naked without it.

Tips for Doing a Successful Picture-a-Day Photography Project

I’m not a regular on the selfie-circuit, but I couldn’t pass up the chance to capture this wobbly image for my daily project.

Ready to shoot!

Okay, so you have your goals set, your theme decided, your time frame sorted and your equipment at the ready… now what?

Start off simple by taking a few photographs around the house, or on your way to work. Keep in mind that not every image you take for the day will be perfect – and that’s okay! Sometimes it’s not the content that’s important, but the habit. Creative blocks are inevitable – just take a deep breath, snap a few photos for the day and come back to them later. The project is about learning and developing, not creating a masterpiece (although that is a possibility too!). Soon the exercise will become less of a chore, and more therapeutic.

Tips for Doing a Successful Picture-a-Day Photography Project

Setting a reminder on your phone is a good way to remember to take a photo each day.

Setting a reminder on a phone is a good way to remind yourself to take a photo – but don’t beat yourself up if you skip a day or two. A photo-a-day project is all about heightening your technical and creative skills -not shoving them down your own throat.

Having said that, there is a chance that over the course of the project you may begin to feel unmotivated or bored. You might even consider giving up. Making a blog, posting on Facebook, or creating a dedicated Instagram account to track your progress is a great way to stay on track. You’ll be able to easily view your own growth and share the results with others. An ongoing project helps you build up an online presence and a space to give and receive feedback from other photographers. Your friends might join in too.

Review your images

Along with posting material from your project online at regular intervals, take some time to reflect on your work. Take note of the direction that your series has taken, and where it is headed. Doing a weekly or monthly check-in with your series will reveal interesting trends and techniques in your own photographic practice.

Having a long-term body of work, even over the course of a few weeks, provides a great opportunity to identify and remedy errors and bad habits. You may even discover hidden strengths in subject-selection and technical proficiency that you never knew you had!

Tips for Doing a Successful Picture-a-Day Photography Project

Partaking in my own daily photography challenge gave me the opportunity and the motivation to photograph ideas that I have wanted to experiment with for a while.

Conclusion

Once you begin to actively seek out new  photographic opportunities, you’ll see the world around you in a whole different light. Daily and regular photography projects reveal opportunities everywhere, even in the ordinary. Having a camera with you to capture those opportunities is a rewarding challenge. And although your daily efforts alone may seem insignificant, your series will gather momentum faster than you realize. So what are you waiting for? Get out there and start your own photographic challenge!

Here are some images from my own project – please share yours in the comments below.

Tips for Doing a Successful Picture-a-Day Photography Project

catching up a bit of TV – a perfect photographic opportunity

The surreal light of a butcher’s window

Some radioactive looking sludge I encountered made an interesting abstract photo of the day

This cute little guy posed just long enough for my daily shot

The post Tips for Doing a Successful Picture-a-Day Photography Project by Megan Kennedy appeared first on Digital Photography School.


Digital Photography School

 
Comments Off on Tips for Doing a Successful Picture-a-Day Photography Project

Posted in Photography


How to Plan a Successful Sunset Portrait Session

02 May

In this article you will get some solid tips for planning and executing a sunset portrait session. Learn how to take the images that you and your subjects will love.

Planning sunset portrait session 01

Plan ahead for a successful sunset portrait

Many photographers feel overwhelmed when they start photographing portraits, professionally or for fun.

Where should I shoot? How should I pose people? What lens should I use? What settings should I be using? When should I move them to/from a great spot? What should I say to get great emotion?

A plan will give you confidence and help alleviate some of the immediate pressure of decision making. It’s not restrictive because often the best shots are unplanned, but rather something to give you confidence and a direction to fall back on when you aren’t feeling inspired.

Here is our rough plan for all of our sunset shoots, whether it be an engagement, part of a wedding, family portrait, maternity, or outdoor newborn session. Our sunset portrait sessions are always planned approximately one hour before sunset.

This plan’s purpose is twofold – it not only helps you have more confidence and direction, but will also help you make the most of your location and sunset lighting.

Planning sunset portrait session 04

STEP ONE: ARRIVE EARLY TO SCOUT

Plan to arrive at least 20-30 minutes early to scout a new location. You never know what amazing little lane or spot may be just around the corner, so it’s worth taking some extra time to explore. It’s also nice to arrive before your client so that you can make them feel welcome upon their arrival.

STEP TWO: ASSESS THE LOCATION

Start to assess the location by asking the following questions:

Where are some nice shady spots to begin? Shady spots are perfect to start off with while the sun is still bright and harsh.

What is the highest point at the location? If you are at a hilly location, this is where you will be able to capture the final moments of sunset and make the most of the golden light.

Where is the most impressive spot for sunset? This is where you want to end up – so it should be last on your route.

With these questions answered, you can very roughly map out a planned route. This means you’ll always have a direction to head and will be able to lead the clients confidently around the location.

Planning sunset portrait session 07

STEP THREE: SHOOT FOR THE BEST LIGHT

To make the absolute best of the sunset lighting, you can follow the same sort of pattern every shoot (in this order):

  1. Shade shots
  2. Filtered Light shots
  3. Silhouette shots
  4. Sunset shots
  5. Dusk shots

Let’s put your plan into practice, assuming sunset is 6 pm:

4:40 pm – Arrive, scout the area and assess the location.

5:00 pm – Your client arrives and is briefed about the fun time they are going to have!

5:10 pm – SHADE SHOOTING

Get straight into shooting in the nice shady spot you already found. We love to knock out some more formal shots like these here, as usually these are photos clients love, but don’t want big on the walls. Save the more impressive lighting for landscape shots.

Planning sunset portrait session 02

Planning sunset portrait session 03

5:25 pm – FILTERED LIGHT SHOOTING

You can then move on to any shots where you want the sun in the photo, but you can filter the light through the trees. (Read our past article on four different ways to filter sun flare in this article: How to Control Sun Flare in Your Photos). Photos such as these:

Planning sunset portrait session 05

Planning sunset portrait session 06

5:40 pm – SILHOUETTE SHOOTING

Roughly 10-20 minutes before sunset is usually the best time to try a silhouette. As silhouettes require you to shoot at a very low angle, you won’t be able to match up the height of the sun with the clients’ feet if you wait any longer. You can read our article on capturing silhouettes here.

Planning sunset portrait session 08

Planning sunset portrait session 09

Planning sunset portrait session 10

5:50 pm – SUNSET SHOOTING

At this point, the light will be golden – so you want to be at your final spot. Do all you can to make this most of the beautiful soft light – you can even position your clients out in the open if you know how to control sunflare. We try to take a variety of photos at this time – a landscape, waist-up, and close-ups. That way, we can create wall art sets that all have the same sunset colouring.

Planning sunset portrait session 11

Planning sunset portrait session 12

Planning sunset portrait session 13

6:00 pm – DUSK SHOOTING

The sun has set, but you still have a glorious window of 15 minutes where you can capture the gorgeous colours of dusk. Because the sun is no longer emitting harsh light, you can now use the whole other side of the location! Areas that were previously too lit by the sun can now be shot in the soft light of dusk.

Planning sunset portrait session 14

Planning sunset portrait session 15

Planning sunset portrait session 16

6:10 pm – DONE!

This plan is designed to give you some structure if you are lacking confidence and direction for your sunset portrait photo sessions. It will help you get the most from the sunlight, and effectively manage your time during the shoot. Of course, being photographers, we’re all for creativity, so breaking the rules is great once you have more confidence.

Please share your sunset portrait images in the comments below.

Planning sunset portrait session 17

The post How to Plan a Successful Sunset Portrait Session by Alana Orth appeared first on Digital Photography School.


Digital Photography School

 
Comments Off on How to Plan a Successful Sunset Portrait Session

Posted in Photography


Tips for Successful Star Trails Photography

06 Jul

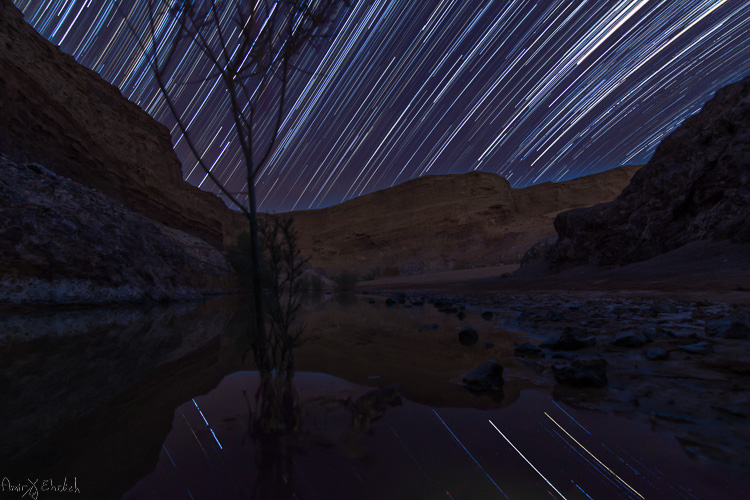
Star trail photography – not so difficult with the correct planning and appropriate gear

In this short article I will show you, the night sky enthusiastic, that by using the right gear and proper planning, you too can make beautiful star trail photo.

Actually, shooting the stars is not that much different from any other kind of photography, and a decent composition is the key to an outstanding photo. Here are some star trail photography tips to help you.

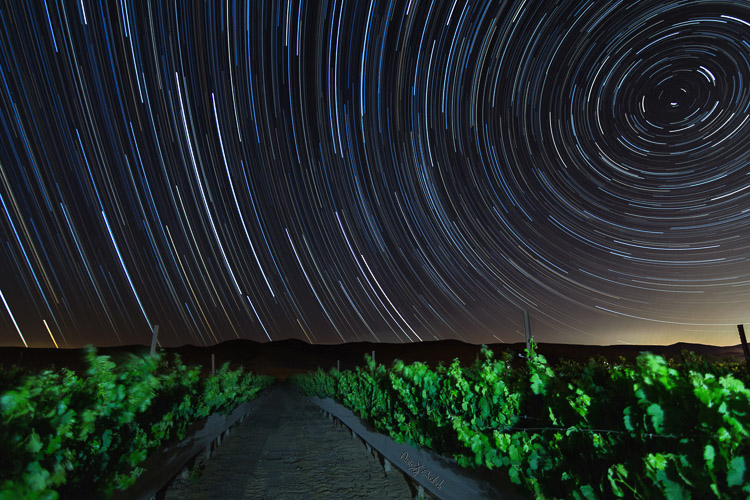
Camera pointed to NorthNorth West

Camera pointed to North/North-West with an artificially lit foreground.

Prepare your gear

  • A DSLR camera (or one that has Manual shooting mode) with fully charged battery.
  • Plenty of room on your memory card. I suggest shooting all in RAW as you’ll get better results later in post-processing.
  • A wide angle lens. Anything between 10-20mm will give you good results. You can shoot also with a longer focal length but the results will be less impressive. Using a wide aperture is also essential to allow lower ISO.
  • A strong, steady, tripod. When placing it, make sure nothing will cause it to shiver from a passing wind.
  • A remote control (preferably not wireless). If you have a way to program intervals in your camera, the remote is not necessary.
  • Stuff to help you pass the time – coffee set, snacks, a comfortable chair, etc.
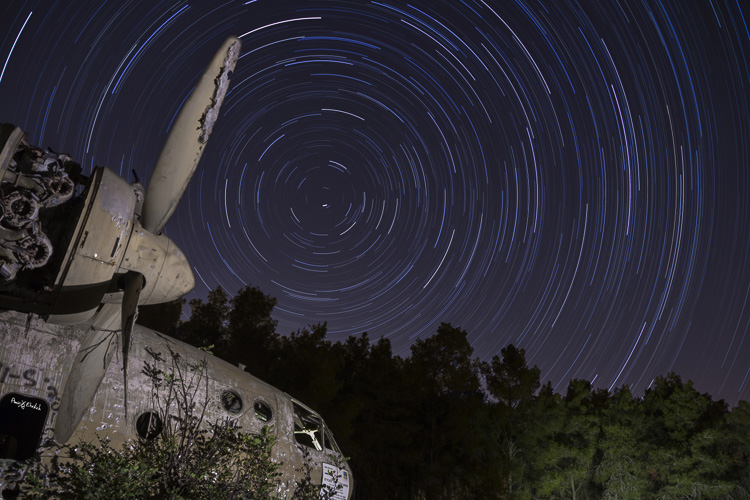
Camera pointed to North with an artificially lit foreground .

Camera pointed to North with an artificially lit foreground .

Planning ahead

Before going out there, you must consider there is some planning needed to be done.

  1. Choose your location carefully (there is no place for spontaneity). There are several things to consider, but most importantly you need a dark location, as far as possible from light polluted areas. Consider that city halos are visible at night for a very long distance, so get as far as possible from light sources. The darker the area you’re, the more stars you’ll see.
  2. Consider an interesting foreground item to be used as your anchor in the photo. It is not enough to shoot the stars, you want to have a nice foreground to make your photo interesting and unique. Find yourself a big tree, an interesting rock formation, a pier on a lake, or any other item to be used as your anchor.
  3. Learn about the weather and the moon phases – to get a good, clean shot you need a good, clear, dark sky. Choose that period of the month when the moon is not visible in the night sky (or is smaller like crescent moon), and make sure the forecast does not predict too many clouds. High humidity is also not good, as it may accumulate on your lens and result in blurry frames.
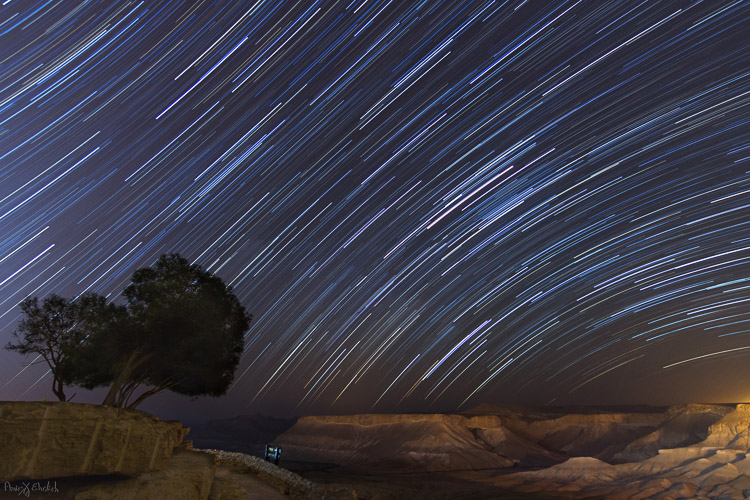
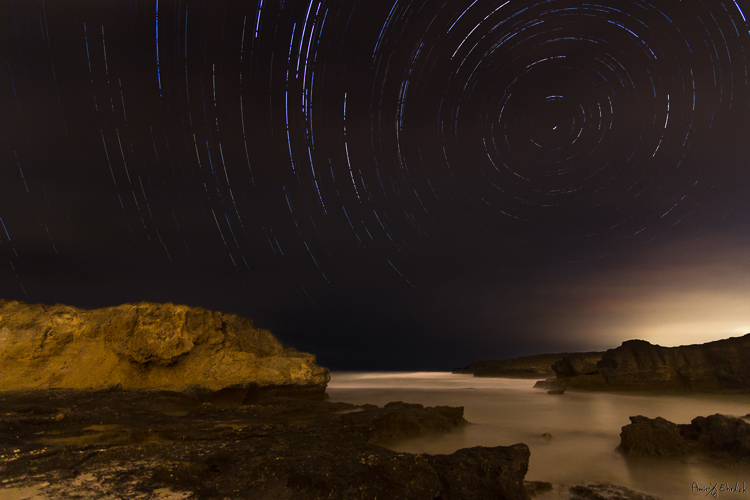
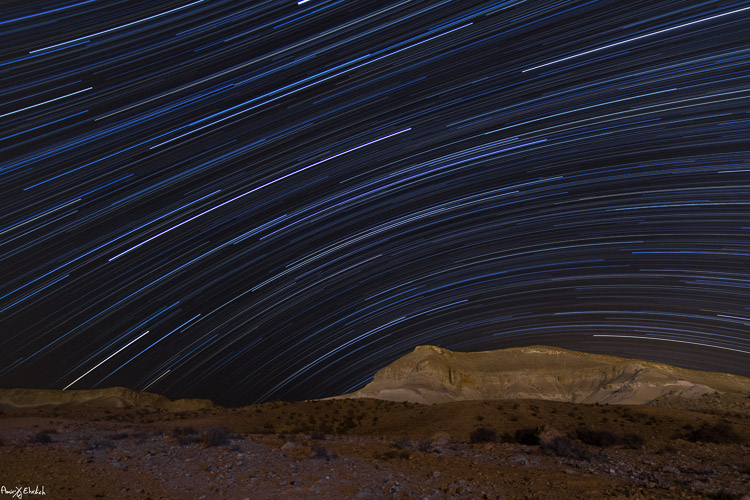
  4. Consider the rotation of the stars and the Earth, as this will determine the appearance of the final result. The best results (in my opinion) will be achieved by shooting to the North (photo above) or to the South-East (photo below). Since Earth and the North Star are moving in the same direction, at the same pace, it appears as if all stars are rotating around the North Star, so having it in your frame will result in getting circles of stars. Shooting to the South-East will grant you with an almost horizontal line, that is concave in one corner and convex in the opposite corner. The stars rotation speed is 15 degrees per hour around the North Star. That means that stars closer to the North Star will make a shorter distance in comparison to those further away (also, the longer you’ll shoot, the longer the lines will be).
Camera pointed to South East

Camera pointed to South-East with foreground lit by surrounding light pollution.

Getting started

#1 Pick a foreground anchor

Although you may want to show as much of the night sky as possible, it cannot stand alone. Your photo must rely on a “strong” anchor / foreground if you want your viewers to be really impressed.

#2 Get there before dark

In most cases, it will be quite difficult, to the verge of impossible, to build your composition at night, in total darkness. It is better to arrive before night falls and it gets too dark to see. The last minutes of the day are your best time to plan and build your composition.

#3 Compose your shot

This is now the moment you place your camera and composing your frame. Remember to consider not only the appearance of your foreground in the frame, but also the direction that the camera is facing (as explained above).

Camera pointed to North/North-West lit by surrounding light pollution. Trails looks fragrant due to passing clouds.

Camera pointed to North/North-West lit by surrounding light pollution. Trails looks fragmented due to passing clouds.

#4 Shoot for the foreground

Take the first shot which will be used as the foreground of the frame. If you want your foreground to be a silhouette then all is good. But, if you want details to be shown, you will need to have at least one frame lit up. This can be achieved if few ways

  • Shooting one frame during twilight
  • Use a high ISO and longer exposure
  • Using an outside light source such as flash (it is good to use a CTO gel for the right color temperature). Your goal here is to get one frame that has good detail of your chosen foreground. It is better to take few options using different ISO level / exposure time / lightning options to be able to choose the best result afterward. When satisfied, you can move on to do a test frame of the sky.

#5 Setup and test camera settings for the night sky

Change the settings of the camera to get the best result for the night sky, without interference of light pollution. You need to see as many stars as possible, and to make sure they are in focus. The camera needs to be in Manual mode (or Bulb if using intervals). White Balance needs to be decided by you, and not on Auto mode (preferably in Tungsten mode, it will give you more blue in your image). Aperture set as wide as possible and an exposure time of around 30 seconds (with intervals you can set it to longer, but not more than a minute, for the sake of your sensor – it gets too hot).

You can change the ISO to get lighter or darker sky as needed, but not too high to keep a smooth, clean frame. Once satisfied with the result, keep the settings and erase these test frames (just make sure to keep the foreground frames you did in step #4 above).

#6 Take a couple dark frames

Camera pointed to South-East with foreground lit by surrounding light pollution coming from behind.

Camera pointed to South-East with foreground lit by surrounding light pollution coming from behind.

Take one or two dark frames. This is done by putting on the lens cap, and shooting with the settings you chose in step #5 above. These frames will be used later in post-processing. Make sure you remove the cap once you’re done this part!

#7 Take your interval shots

Lock the shutter release controller or press start if doing intervals. Wait to see that it works properly, and a new exposure starts immediately after one ends. Now it’s time to let the camera work for as long as you decided, while you rest or go do something else, but make sure you keep a distance and are not adding light into your camera or composition. For a good result, it is advised to shoot for at least two hours, especially when shooting to the North.

#8 Take two more dark frames

Once your intervals are finished, before moving the camera, repeat on step 6 and take a couple more dark frames.

This is it, YOU made it! All is finished and you can go back home for the post-processing part.

Post-processing star trails

First, from the foreground frames, choose the one that looks the best and process it to your liking. In this frame you can ignore the look of the sky, and if possible, it’s even better to darken it. When you’re happy with it, convert to JPEG or TIFF.

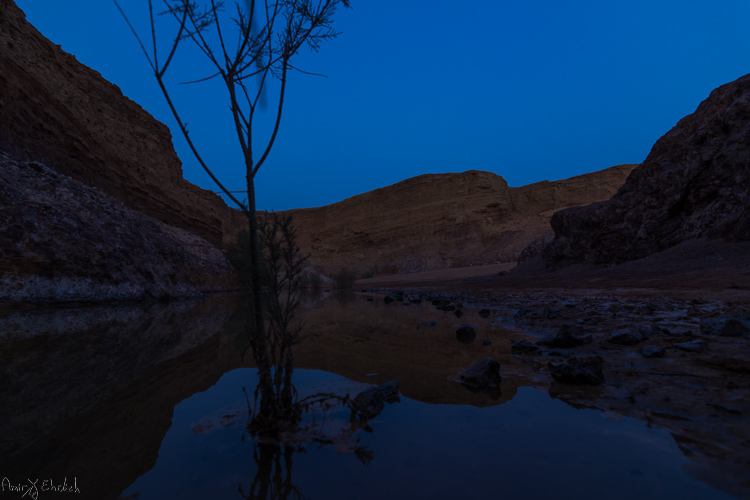
Foreground frame

A frame taken during blue hour to be used as foreground.

Next, move on to the sky frames. Process the first one to improve the appearance and visibility of the stars. In this frame you can ignore the look of the foreground, and if possible, it’s better to darken it. Synchronize your settings to the rest of the sky frames. Export or convert the files to JPEG or TIFF.

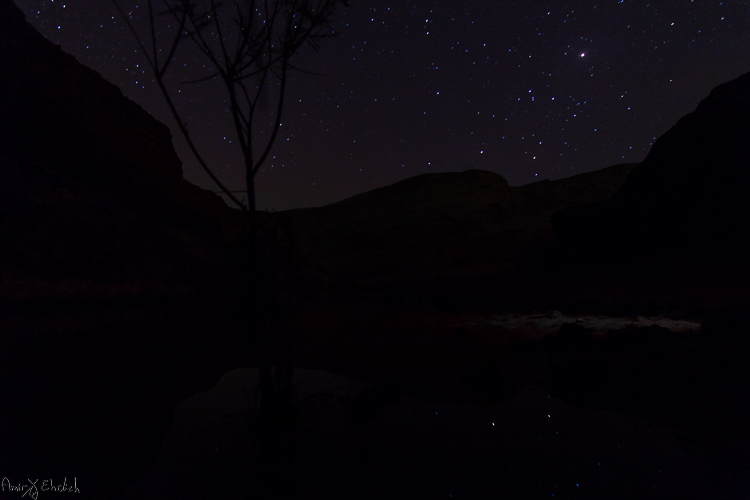
Sky frame

One of the frames taken for the stars.

If you did any lens corrections, apply them also to the dark frames, then convert them to the same format as the sky frames.

Move on to the software you use for combining the frames – you can choose StarStax (Mac and Windows) or Startrails (Windows only) which are both free, very easy, and efficient. Upload the frames to their dedicated location (dark frames goes separately – the software is using them to subtract burned pixels from the final result).

Stacked frame

The result of merging all the sky frames in Starstax.

The foreground frame can be handled in one of two ways – (a) placed together with all other sky frames or (b) left aside for merging it later to the final result, in Photoshop.

If you are working with StarStax, I recommend marking the Gap Filling option (in Startrails it is called: Lighten-screen-blend). It will make the processing time a bit longer, but the final result will be smoother.

If you chose to add the foreground image in when stacking the sky image, the result you’ll get is the final one and you may need only some fine-tuning to be done in Photoshop. Due to the time passed from the shooting of the foreground frame to the sky frames, you will notice a dot in front of every trail. These are the stars captured in the foreground frame. I see them as an interference in the overall look and erase them one by one.

If adding the foreground image in Photoshop later was your choice, then now is the time to put it all together. Load the foreground frame and the star trail frame as layers in Photoshop, and merge them into one using a layer mask. This option is better when the sky in the foreground frame is too bright.

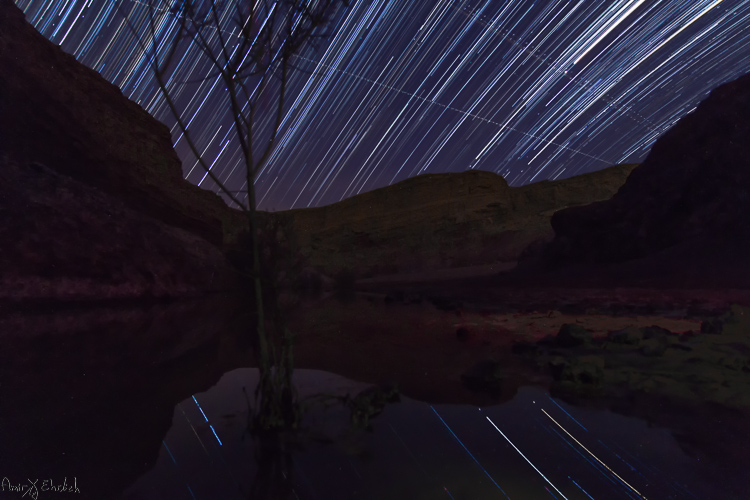
Final after merging and cleaning

The final frame after cleaning up any disturbing lights in the sky, and merging with the foreground.

googletag.cmd.push(function() {
tablet_slots.push( googletag.defineSlot( “/1005424/_dPSv4_tab-all-article-bottom_(300×250)”, [300, 250], “pb-ad-78623” ).addService( googletag.pubads() ) ); } );

googletag.cmd.push(function() {
mobile_slots.push( googletag.defineSlot( “/1005424/_dPSv4_mob-all-article-bottom_(300×250)”, [300, 250], “pb-ad-78158” ).addService( googletag.pubads() ) ); } );

The post Tips for Successful Star Trails Photography by Amir Ehrlich appeared first on Digital Photography School.


Digital Photography School

 
Comments Off on Tips for Successful Star Trails Photography

Posted in Photography