RSS
 

Posts Tagged ‘Stars’

Photographing Stars Using a Kit Lens

10 Apr

Pic 01 d5100 18mm f3 5 20sec iso1600

Looking at a starry sky while sitting in the open is always a soothing experience, but shooting those stars is a much better one. Have you seen those amazing starry skies and Milky Way photographs from professional photographers and wondered how to do this yourself but never tried it because you thought you did not have the proper equipment? Let me tell you, “You were wrong”.

If you own a normal DSLR camera and are interested in shooting stars (and the Milky Way), you can do this with your kit lens. I will explain the whole process step by step in the easiest possible way, so that even if you do not have much technical knowledge, you can understand and implement this method.

Basics of star photography

To get started, you need to have following points in mind:

  • A place away from the city lights. The less light pollution you have, the more chance of getting clear stars you will have.
  • A moonless night. Stars can also be shot on a full moon night, but the brighter the moon is, the more light pollution it creates, and the stars will not be as prominent.
  • A normal DSLR camera with a standard 18-55 mm kit lens.
  • A tripod

You can Google your surroundings for away from the city spots (Dark Sky) and moon phases at night. You should know beforehand in what direction, and at what time the moon is going to rise. That will help you a lot with composition of your images. A moonless night is always best to shoot stars.

Additionally, you can also use a compass app on your smartphone (for Android here) to locate the north star for star trails and you can also download an app called Star Chart (for iOS or for Android) or Google Sky just to give you an idea of which stars there are above you. Both of these apps also show you the direction of the Milky Way so you can directly shoot it and get amazing results.

These apps are pretty accurate, and with their help you can also see Mars, even with your naked eye (which I am sure you saw previously but were unable to differentiate it from stars). If you want to plan your shoot for future, or look for appropriate time sto shoot Milky Way in your location, you can download a desktop app Stellarium. Put in your coordinates and it will show you the direction of the Milky Way at a specific time, on a specific date of the year. Using this application, you can know exactly at what time of year, the brightest part of Milky Way will be above your location to shoot.
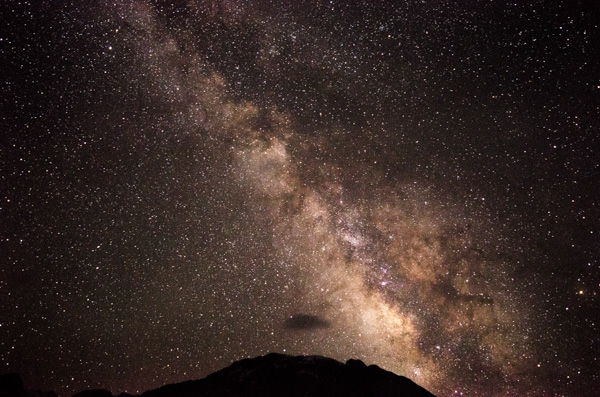
Pic 02 d5100 18mm f3 5 20sec iso1600

Camera settings

Now let’s get to the important part, camera settings. You will need to take control of your camera, keeping it in Manual mode. Change the mode to Manual and tune in the following settings.

Focal length: Set your focal length to the widest you have – e.g., 18 mm in the case of a kit lens. You can choose any focal length you want, but the more you zoom in (the longer the focal length is), the less stars you will be able to capture, and your optimum exposure time before star trails start to develop will also decrease (500 Rule).

Aperture: Setting your aperture to the widest option is key here – e.g., f/3.5 as in a kit lens. By using the widest the aperture, more light will enter through your lens giving you brighter stars and Milky Way.

Shutter speed: If you are only shooting stars and/or the Milky Way, set the shutter speed to 20 seconds or star trails will start to appear, giving the look of larger, unfocused stars. If you are wondering, why 20 seconds, here is the answer. Optimum exposure before you start getting star trails is calculated by dividing 500 by your focal length (also divide the answer by 1.5 if you are using cropped sensor.) So in the example of an 18mm lens on a cropped sensor – 500 divided by 18 = 27.78 divided by 1.5 = 18.52 (so roughly 20 seconds).
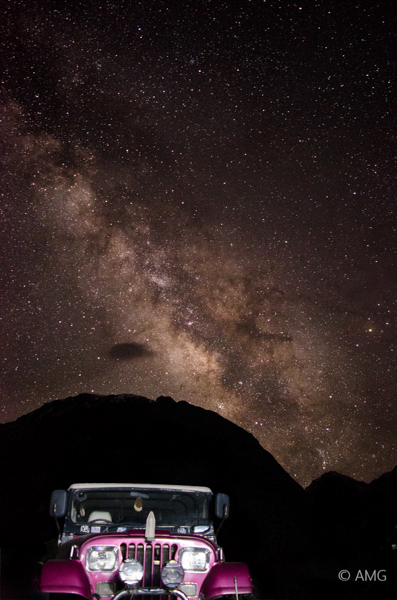
Pic 08 D5100 18mm f3 5 20sec ISO 1600 2

ISO: Start by keeping the ISO at 1600, and increase it later depending on your results. Keep in mind that greater the ISO, more noise there will be in your image. Although it does depend on signal to noise ratio of camera body you are using. High end or even new consumer camera bodies tend to produce less noise at higher ISOs, than do older ones, even three years old.

Shutter release: You need to have a shutter release (remote trigger) to avoid camera shake while shooting. If you don’t have a shutter release remote/cable, just use your camera;s 2-second or 10-second timer. That will minimize any blur in the picture due to camera shake.

It’s also best to switch OFF your “Vibration-Reduction” or “Image-Stabilization”, as the vibration of the motors can cause shake in the picture too.

Focusing the lens to infinity: Next, after putting up all these settings, the next most important thing left to do it focus your lens to infinity. As kit lens doesn’t have infinity marker on it, we will use hyper-focal distance values to focus the lens to infinity. Mount your camera and lens on a tripod, and focus it on any bright object far away at a distance of 20 feet or more. Point a flashlight towards camera from a distance of minimum 20 feet and focus on it if you are in the dark, and don’t have anything to focus. Once the lens is focused beyond 20 feet, its hyper-focal distance will project to infinity and your stars will be sharp. It will also help in getting anything in the foreground sharp too.

Don’t forget to switch your lens to M (Manual) after focusing, or else it will start to hunt for focus again when shutter is pressed.

If your lens is not focused to infinity, you will get the Milky Way but the stars will not be as sharp and will appear bigger. Same can happen if you go for a longer speed than required for not causing stars to produce trails. An example of these mistakes is here.
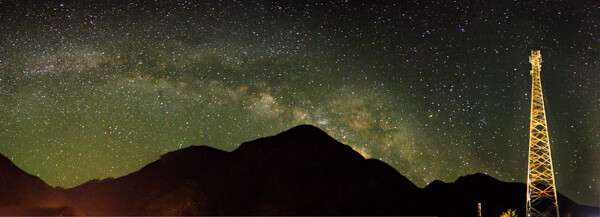
Pic 03 lens was not focused to infinity 2

Lens was not focused to infinity.

Pic 04 lens was not focused to infinity 2

Lens was not focused to infinity.

Pic 05 lens was not focused to infinity 2

Lens was not focused to infinity.

Recommendations:

It’s better to first sit in the dark for at least 15 minutes to let your eyes adjust with the surroundings. This will help you to see a lot of stars, and even the Milky Way with the naked eye and will also help you compose your images better. Enjoying your surroundings for a while is better than just starting to shoot as soon as you reach the site.

You are all set to shoot your own stars. With the help of kit lens you might not be able to get an award or feature your shot on 500px but yes, the shots will be very reasonable to make yourself happy, and impress your friends too. You could even try merging panoramas to get more of the Milky Way in your composition.
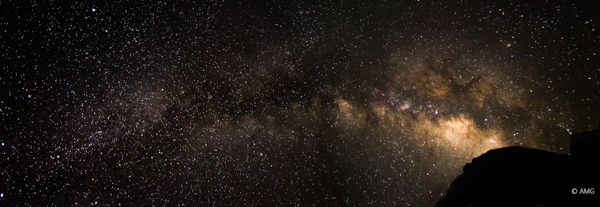
Pic 06 Panorama Stitch of 4shots 2

Post-processing:

The first part to better post-processing is RAW. Yes! always shoot in RAW as it will give you a lot of room for post-processing without affecting the quality. Secondly, some post-processing is always needed to get optimum results. You can find many tutorials on how to post process Milky Way images but the most elaborate one I found is from Hammad Iqbal Photography who also has a tutorial here on dPS on making star trails in Photoshop.

Star trails:

If you are satisfied with your shots, you can advance further to get star trails. Just locate the north star on the north pole using the Star Chart app and keep the north star (all stars rotate around this star) in your composition. For star trails, all camera settings will remain the same except that you can increase the shutter speed to 30 sec if you want.

You can go with faster shutter speeds (20 seconds or faster, if there are lights in the area and 30 seconds is overexposing). Keep the camera on continuous shooting mode and let it shoot as many exposures as it can shoot. The more pictures you will have, the more clear your star trails will be. Later, you can join all the exposures in Photoshop or use any star-trails software to create star trails. Alternately, you can take one stars shot and make star trails with it using HM Technique.
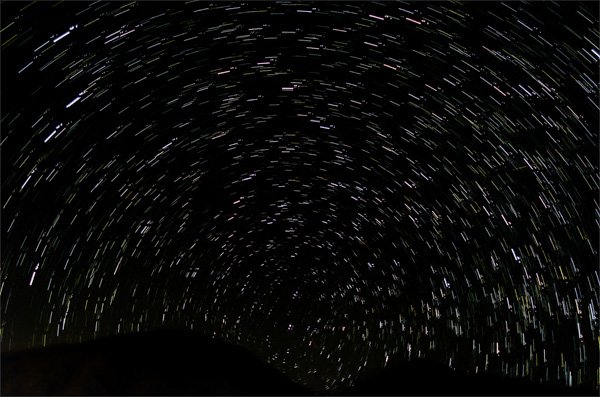
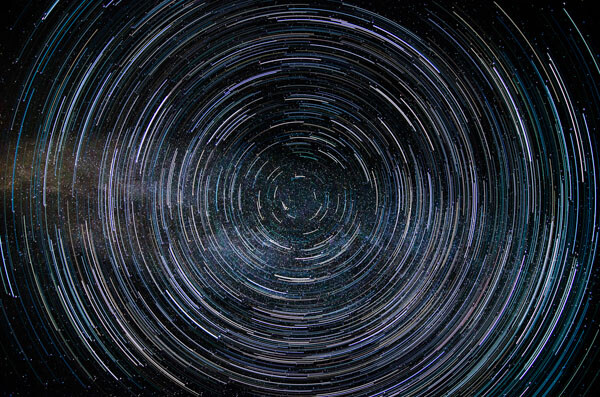
Pic 07 Star Trails A merge of 18 shots each at 30 sec

Pic 10 Star trail created in PS using HM Technique
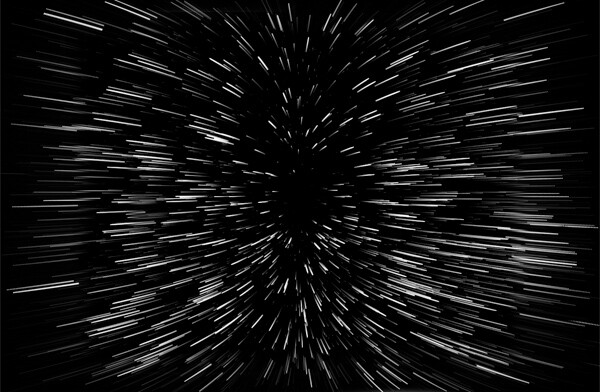
Star trail created in PS using HM Technique

Pic 11 Fun in PS

Fun in Photoshop

Once you have nailed the Milky Way, try including foreground objects for better compositions.
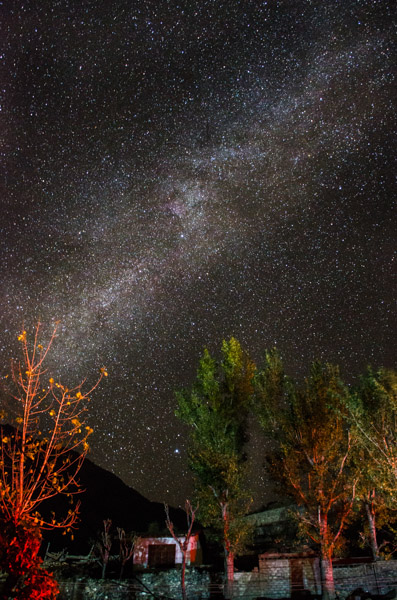
Pic 09 D7000 18mm f3 5 20sec ISO 1600

Happy shooting, and keep me updated with your results. Let me know if you need any help.

googletag.cmd.push(function() {
tablet_slots.push( googletag.defineSlot( “/1005424/_dPSv4_tab-all-article-bottom_(300×250)”, [300, 250], “pb-ad-78623” ).addService( googletag.pubads() ) ); } );

googletag.cmd.push(function() {
mobile_slots.push( googletag.defineSlot( “/1005424/_dPSv4_mob-all-article-bottom_(300×250)”, [300, 250], “pb-ad-78158” ).addService( googletag.pubads() ) ); } );

The post Photographing Stars Using a Kit Lens by Adeel Gondal appeared first on Digital Photography School.


Digital Photography School

 
Comments Off on Photographing Stars Using a Kit Lens

Posted in Photography


Nikon aims for the stars with the D810A, world’s first full-frame astrophotography camera

10 Feb

Nikon has announced the D810A: the first full-frame astrophotography-specific camera. This is the largest sensor to appear in a consumer astrophotography camera, bringing improved light capture capabilities to the discipline. It’s essentially a Nikon D810 with a modified IR-cut filter to ensure the camera can capture light emitted by nebulae and additional features to support long exposure photography. Read more

Articles: Digital Photography Review (dpreview.com)

 
Comments Off on Nikon aims for the stars with the D810A, world’s first full-frame astrophotography camera

Posted in Uncategorized


You’ve got stars in your eyes thanks to the Lensbaby Spark!

01 Oct

Extra photos for bloggers: 1, 2, 3

Your effort to add a little sparkle to your photos has left your friends more shocked than excited… confetti in the face!

Try the new special edition Lensbaby Spark Lens next time for magical glitter explosions in your pics without the real life problem of “confetti eye.”

This limited edition lens attaches to your DSLR and gives you more creative control with tilt shift style and 9 special shaped plates for cool bokeh effects in your pics and videos.

Turn bursts of natural and colorful light in your pics into explosions of glowing hearts, stars, flowers and more! Your photos (and video too) will be full of the dreamy shine and sparkle you’ve been looking for.

Put Away the Confetti and Grab the Spark
$ 129.95 at the Photojojo Shop


© Britta for Photojojo, 2014. |
Permalink |
No comment |
Add to
del.icio.us

Post tags:


Photojojo

 
Comments Off on You’ve got stars in your eyes thanks to the Lensbaby Spark!

Posted in Equipment


How To Photograph The Night Sky Part 2: The Stars

11 Nov

Well, I certainly hope you all enjoyed part 1 and have managed to take some stunning photographs of our Milky Way! Photographing stars offers the exact same concept as shooting the Milky Way, but with this, there are a lot of different principles that come into play. The Foreground Stars on their own are rather dull and don’t really make Continue Reading

The post How To Photograph The Night Sky Part 2: The Stars appeared first on Photodoto.


Photodoto

 
Comments Off on How To Photograph The Night Sky Part 2: The Stars

Posted in Photography


Sky Rock Under the Stars

24 Oct

Ancient petroglyphs are amazing to see, but one question that always comes to mind is, “What were their significance?”

In the case of Sky Rock I’ve often wondered if they reflected an interest in the stars, represented every day things, told a story, or were the musings of someone who was just passing the time. It is this curiosity coupled with their distinct artistic and historical qualities that make them so special to me.  Seeing these ancient petroglyphs under billions and billions of stars that make up the Milky Way was an awe-inspiring experience given both the immensity and timelessness of the scene. It’s grounding to take in a view that very likely was the same 8000 years ago when someone created these rock drawings as it was on the night I stood here taking this photo.

Photo Details

Canon 5D Mark III and Zeiss Distagon T* 2.8/15 ZE via BorrowLenses.com

ISO 6400, 30 sec at f/2.8

16 image panoramic with foreground lit via light painting

~180 degree field of view capturing both the entire Milky Way and Sky Rock petroglyph

Copyright Jim M. Goldstein, All Rights Reserved

Sky Rock Under the Stars

The post Sky Rock Under the Stars appeared first on JMG-Galleries – Landscape, Nature & Travel Photography.


Comments

  • I love this! 4D seeing 5D coming.. the old/past, & the … by Peggy Jackson
  • Amazing work Jim! Worth all the time you spent working on the … by latoga
  • Thanks! Fish-eye lenses introduce a large amount of distortion … by jimgoldstein
  • Jim, it’s beautiful.. the canopy of Milky Way sheltering the … by bartek_narozny

Related Stories

  • Sky Rock Under the Stars – Enclosure
  • Hunter’s Moon Rising
  • Hunter’s Moon Rising – Enclosure


JMG-Galleries

 
Comments Off on Sky Rock Under the Stars

Posted in Equipment


The Zen Guide to Photographing Stars Like the True Master You Are!

23 Aug

Our fascination with the stars has lasted for eons. So it is no surprise that so many photographers rotate their lens into a vertical postion to capture these natural wonders! But as many of you may have already found out, photographing stars can be a little tricky, as many factors come into play, and certainly the most irritating is that, Continue Reading

The post The Zen Guide to Photographing Stars Like the True Master You Are! appeared first on Photodoto.


Photodoto

 
Comments Off on The Zen Guide to Photographing Stars Like the True Master You Are!

Posted in Photography


Big Sur Stars

31 Jul

Big Sur Stars

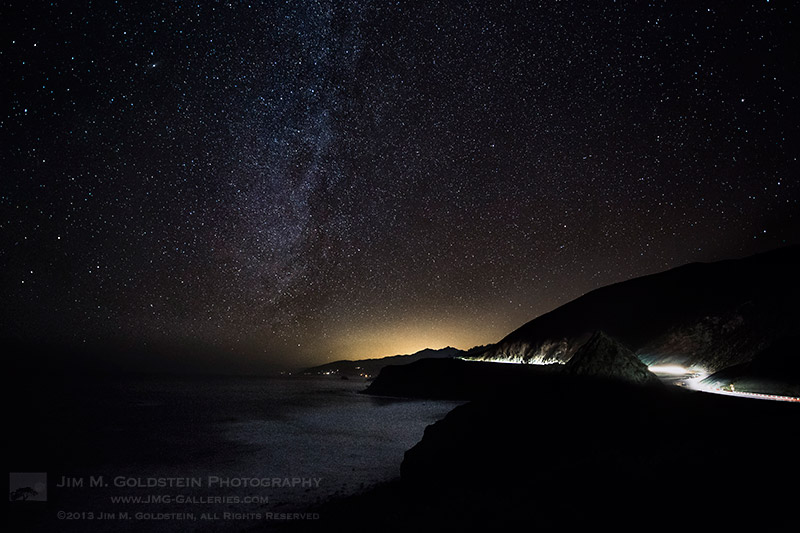
Earlier this year I had quite the late night adventure driving the Big Sur coastline and photographing the stars on a moonless night.  I had some time to enjoy the vastness of the night sky as I was shooting a time-lapse. While laying there in the dark, the combination of hearing crashing waves and watching the stars provided an interesting juxtaposition. Visually I could get lost scanning the stars, but the ocean seemed to keep me anchored so as to not completely escape into the ether. While I’ve photographed the Milky Way atop tall mountains, volcanos and the desert photographing it on the coast has been the most surreal simply because the role the ocean plays breaking the silence.

Copyright Jim M. Goldstein, All Rights Reserved

Big Sur Stars

The post Big Sur Stars appeared first on JMG-Galleries – Landscape, Nature & Travel Photography.


Related Stories

  • Milky Way Over Half Dome, Yosemite National Park
  • Milky Way Over Half Dome, Yosemite National Park – Enclosure
  • All That Glitters – Milky Way Above Yosemite Forest


JMG-Galleries

 
Comments Off on Big Sur Stars

Posted in Equipment


Big Sur Stars

19 Jul

Big Sur Stars

Earlier this year I had quite the late night adventure driving the Big Sur coastline and photographing the stars on a moonless night.  I had some time to enjoy the vastness of the night sky as I was shooting a time-lapse. While laying there in the dark, the combination of hearing crashing waves and watching the stars provided an interesting juxtaposition. Visually I could get lost scanning the stars, but the ocean seemed to keep me anchored so as to not completely escape into the ether. While I’ve photographed the Milky Way atop tall mountains, volcanos and the desert photographing it on the coast has been the most surreal simply because the role the ocean plays breaking the silence.

Copyright Jim M. Goldstein, All Rights Reserved

Big Sur Stars

The post Big Sur Stars appeared first on JMG-Galleries – Landscape, Nature & Travel Photography.


JMG-Galleries – Landscape, Nature & Travel Photography

 
Comments Off on Big Sur Stars

Posted in Equipment


Allison Harvard Scenes on ANTM Cycle 17 All Stars PART2

24 Jan

*LIKE our Page on Facebook: ANTM Favorite Quirky Weird Girls~ Allison Harvard, Nicole Fox & Ann Ward www.facebook.com Subscribe to my Youtube Channel for more up and coming edited ANTM videos of allison harvard, nicole fox and ann ward. www.youtube.com also on Facebook: John Robert Alfonso Photography www.facebook.com
Video Rating: 4 / 5


Video Stars

24 Dec

Some cool visual art images:

Video Stars
visual art
Image by Looking Glass
Visual Art, Design and Multimedia Department’s official opening at their new campus. Multimedia students using the Video and Sound studio

Spirals and Undulations – Doodle Drawing
visual art
Image by ArtProMotivate
Ink abstract doodle drawing by Newfoundland Visual Artist Graham Matthews. This artwork is based on themes of love, and togetherness.

Please visit Graham at:
ArtProMotivate – Sell Art and Promote Art Online
Graham Matthews Abstract Art

IMG_1785
visual art
Image by atto11
Image from the book SEATTLE STREET ART. A Visual Time Capsule Beyond Graffiti (Volume 3) By A. Tarantino ISBN-10: 0988272016 SeattleStreetArt.com

The Seattle Street Art Book Series contains over 300 original photos taken within city limits over many years to help preserve the mediums aesthetic in print.

 
Comments Off on Video Stars

Posted in Photographs