RSS
 

Posts Tagged ‘Stars’

Photographing Stars Using a Kit Lens

25 Oct

The post Photographing Stars Using a Kit Lens appeared first on Digital Photography School. It was authored by Adeel Gondal.

photographing stars the night sky
Nikon D5100 | 18mm | 20 sec | f/3.5 | ISO 1600

Have you seen those amazing starry sky and Milky Way photographs from professional photographers and wondered how to create similar results? Have you never tried because you thought you didn’t have the proper equipment?

Let me tell you, “You are wrong!”

If you own a normal DSLR or mirrorless camera, you can create stunning star photos with only a kit lens.

In this article, I will explain the whole process of photographing stars with your kit lens. I’ll give you step-by-step instructions in the easiest possible way – so that, even if you don’t have much technical knowledge, you can start capturing star photos like a pro.

Let’s dive right in.

The star photography basics

To get started, you need to have following points in mind:

  • You must shoot in a place away from the city lights. The less light pollution you have, the more chance you’ll have of getting clear stars.
  • You’ll want a moonless night. Stars can also be shot on a full-moon night, but the brighter the moon is, the more light pollution it creates, and the stars will not be as prominent.
  • You’ll need a normal DSLR or mirrorless camera with a standard 18-55mm kit lens (such as this Canon lens or this Nikon lens).
  • You’ll also want a tripod.

You can Google your surroundings to find locations that are far away from the city (check out Dark Sky for a helpful interactive map).

You should know beforehand in what direction, and at what time, the moon is going to rise. That will help you a lot with the composition of your images.

However, a moonless night is always best to shoot stars – so I recommend checking the current moon phase before heading out.

Additionally, you can use a compass app on your smartphone to locate the North Star for star trails. To get an idea of the stars above your location, you can download an app called Star Chart (for iOS or for Android) or Google Sky. Both of these apps also show you the direction of the Milky Way, so you can shoot it directly and get amazing results.

I also recommend checking out PhotoPills; this app offers an incredible suite of features for the beginner (or more advanced!) night sky photographer.

Anyway, these apps are pretty accurate. With their help, you can see Mars, even with your naked eye (I’m sure you’ve seen Mars before, but were likely unable to differentiate it from the surrounding stars).

If you want to plan a future shoot or look for an appropriate time to shoot the Milky Way in your location, you can download the desktop app Stellarium. Just pop in your coordinates, and it will show you the direction of the Milky Way at a specific date and time.

Thanks to Stellarium, you can know the exact time of year the brightest part of Milky Way will be above your location (so you can do some amazing star photography!).

stars over a mountain
Nikon D5100 | 18mm | 20 sec | f/3.5 | ISO 1600

Key camera settings for photographing stars

Now let’s get to the important part of photographing stars with a kit lens:

Camera settings.

You will need to take control of your camera, so you’ll want to keep it in Manual mode.

Change the shooting mode to Manual and adjust your setup to the following settings:

Focal length

Set your focal length to the widest possible option. In the case of a kit lens, this will often be 18mm.

While you can technically choose any focal length you want, the more you zoom in, the fewer stars you will be able to capture.

Plus, your optimum exposure time before star trails start to develop will decrease as you increase your focal length (see the 500 Rule, discussed in the shutter speed section below).

Aperture

Setting your aperture to the widest option is key here; for my kit lens, this is f/3.5.

By using the widest aperture your lens allows, more light will enter through your lens.

And this will result in brighter stars and a brighter Milky Way!

Shutter speed

If you are only shooting stars and the Milky Way, I recommend a shutter speed of 20 seconds.

Why 20 seconds?

Here’s the answer:

A shutter speed of under 20 seconds will result in less light reaching the camera sensor.

And a shutter speed of over 20 seconds will start to create star trails. In other words, the stars will move visibly across the sky.

In fact, there’s a handy equation for calculating your shutter speed, called the 500 Rule:

The optimum exposure before you start getting star trails is calculated by dividing 500 by your focal length (you’ll need to divide the answer once more, by around 1.5, if you are using a cropped sensor.)

So in the example of an 18mm lens on a cropped sensor, divide 500 by 18, for an answer of 27.78. Then divide this again, by 1.5, to get 18.52, which is roughly 20 seconds.

Make sense?

star photography with a car in the foreground
Nikon D5100 | 18mm | 20 sec | f/3.5 | ISO 1600

ISO

Start by keeping your ISO at 1600. You can then increase it later, depending on your results.

But keep in mind:

The greater the ISO, the more noise there will be in your image.

Now, this does depend on the signal-to-noise ratio of the camera body you are using; high-end cameras tend to offer the best high-ISO noise performance, and even modern consumer cameras feature decent results at high ISOs. But try to boost the ISO on an older camera, and you’ll end up with all sorts of unwanted noise.

Remote shutter release

You’ll want to have a remote shutter release to avoid camera shake from hitting the shutter button.

If you don’t have a shutter release, just use your camera’s 2-second or 10-second timer.

That will minimize any blur in the picture due to camera shake.

You should also switch off any “vibration reduction” or “image stabilization” technology included in your camera or lens, because this technology can actually increase blur during long-exposure images.

Focusing your lens to infinity

After dialing in all these settings, here’s the only important thing left to do:

Focus your lens to infinity.

Now, a kit lens doesn’t have an infinity marker on it, so you’ll need to use hyperfocal distance values to focus your lens.

Here’s what you do:

Mount your camera and lens on a tripod, and focus on any bright object at a distance of 20 feet or more.

(If you are in the dark and struggling to focus, you can point a flashlight toward your camera and use this as a point of focus.)

Once the lens is focused beyond 20 feet, its hyperfocal distance will project to infinity and your stars will be sharp. This will also help get everything in the foreground sharp, too.

Don’t forget to switch your lens to manual focus; otherwise, it will start to hunt for focus when the shutter is pressed.

You may be wondering:

Why is focusing to infinity so important?

If your lens is not focused to infinity, you will capture a Milky Way image. However, the stars will not be as sharp and they’ll appear bigger, like this:

example star photograph where lens was not focused to infinity
My lens was not focused to infinity.

And this:

Another example star photo where lens wasn't focused to infinity
My lens was not focused to infinity.

And this:

example photo where lens was not focused to infinity
My lens was not focused to infinity.

You’ll get a similar result if you use a too-long shutter speed and produce star trails.

So make sure you pay careful attention to both your settings and your point of focus.

A quick tip for photographing stars

Once you reach your location, it’s better to first sit in the dark for at least 15 minutes to let your eyes adjust to the surroundings. This will help you see a lot of stars (and even the Milky Way) with your naked eye. It will also help you compose your images better – because it’s easier to create beautiful compositions when you can see!

Plus, enjoying your surroundings for a while is better than simply shooting as soon as you reach the site.

Post-processing your star photos

When it comes to post-processing your star images, there are two things you should know:

First, always shoot in RAW. This will give you a lot of room for post-processing (that won’t affect the image quality).

Second, some post-processing is always needed to get optimum results. You can find many tutorials on how to post-process Milky Way images, including some here on dPS!

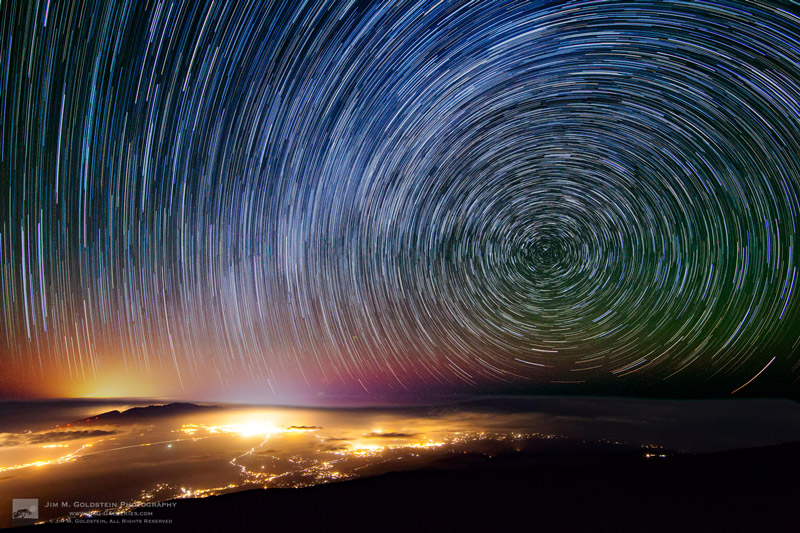
Capture stunning star trails

If you are satisfied with your shots, the next step is to capture star trails.

Simply locate the North Star using the Star Chart app discussed above.

Then keep the North Star in your composition, because this is the star that all other stars rotate around.

For star trails, all camera settings will remain the same, except that you can increase the shutter speed to 30 seconds.

Alternatively, you can go with faster shutter speeds (i.e., 20 seconds or faster, especially if there are lights in the area and 30 seconds results in overexposed images).

Keep your camera on its continuous shooting mode, and let it capture as many exposures as possible. The more pictures you have, the more clear your star trails will be. Of course, continuous shooting will only create a series of short star trails; later, you can join all the exposures in Photoshop or use special software to create full trails (such as StarStaX).

For instance, this shot is a combination of 18 separate exposures:

Star trails, a merge of 18 shots each at 30 sec

Alternatively, you can capture one shot of the stars and make star trails with it using the HM Technique:

Star trails via HM technique
Star trail created in Photoshop using the HM Technique

And you’re also free to have fun with Photoshop:

Zooming star trails
Fun in Photoshop!

Once you’ve nailed photographing the Milky Way, try including foreground objects for better compositions:

trees and the night sky
Nikon D7000 | 18mm | 20 sec | f/3.5 | ISO 1600

Photographing stars using a kit lens: conclusion

You’re all set to shoot your own stars!

With the help of a kit lens, you can create some beautiful star photography – the kind that’ll make you happy and impress your friends, too.

You could even try creating panoramas to get more of the Milky Way in your composition, like this:

Panorama Stitch of 4 shots of the night sky

So happy shooting, and keep me updated with your results! And if you need any help, let me know down in the comments.

The post Photographing Stars Using a Kit Lens appeared first on Digital Photography School. It was authored by Adeel Gondal.


Digital Photography School

 
Comments Off on Photographing Stars Using a Kit Lens

Posted in Photography


Lockdown forces stars to photograph themselves for lifestyle magazine covers and interviews

13 May

Model Naomi Campbell became a cover star, make-up artist and photographer for the latest issue of Essence magazine as lockdown measures prevented the team from traveling that was booked to work on the special issue cover. Just days before the shoot was due to take place, as part of the magazine’s 50th anniversary issue celebrations, the USA went into lockdown so the magazine asked Naomi if she would shoot the pictures herself.

Also celebrating a 50th anniversary, Campbell rose to the challenge and, with direction from the magazine’s creative team, set up and shot the pictures with her iPhone. Planning discussions went on from the team’s homes via video chat, and the actual shoot was styled and directed remotely on the day—and the pictures have turned out pretty well.

‘Naomi shot herself with an iPhone,’ says MoAna Luu, the Chief Content & Creative Officer of the magazine. ‘We couldn’t send a team so, she had to do her hair, her makeup and her styling herself. We were on late night calls trying to figure out how she was going to do the shoot with her phone in her hand. Then, we had to do a re-shoot because the photos didn’t come out how we imagined. So, there were technical challenges, there were human challenges; but Naomi did it all without asking any questions, she never quit. What’s amazed me the most about working with Naomi to do this cover shoot during the pandemic is the way that she embraces the fact that she truly controls her own narrative. She’s never waited for people to do for her; she’s created her own opportunities. She’s been a pioneer in so many ways and now she’s a pioneer in ESSENCE history because she’s completely and literally controlling her own narrative in this issue from the cover to the in-book story.’

Campbell isn’t the only one doing her own shoots during the global pandemic, as Batman actor Robert Pattinson had to take the pictures for an interview with him for GQ magazine. Pattinson had the good fortune to have a Nikon DSLR to shoot himself with rather than his phone, but perhaps a little less direction from the magazine. The pictures are pretty cool, and one shot in a mirror is used on the cover of this month’s magazine while another is being used as the header on the magazine’s social media channels.

Articles: Digital Photography Review (dpreview.com)

 
Comments Off on Lockdown forces stars to photograph themselves for lifestyle magazine covers and interviews

Posted in Uncategorized


Stars Above Maui

27 Jul
Stars Above Maui
Stars Above Maui

Circumpolar star trails high above Haleakala National Park in Maui, Hawaii

It’s an interesting feeling to be atop Haleakala, high above the South Pacific, with the feeling of being on top of the world. Atop Haleakala National Park you can see out for 50 miles in every direction when its cloud-free and you tower above the rest of Maui.  Yet when you take a star trail photo such as this you quickly realize that you were really on the side of our spinning globe. Star trail photos are always fun, but I’m particularly fond of this one because Polaris is so much closer to the horizon than I’m used to. One day it would be equally fun to head closer to the Arctic to see Polaris directly overhead.

Happy Shooting!

Photo Details
Canon 5D Mark II + Canon 14mm f/2.8L II USM
f/7.1, ISO 6400 at 90 min

The post Stars Above Maui appeared first on JMG-Galleries – Landscape, Nature & Travel Photography.


JMG-Galleries – Landscape, Nature & Travel Photography

 
Comments Off on Stars Above Maui

Posted in Equipment


Snapchat ‘sky filters’ use augmented reality to replace the sky with stars, sunsets and more

27 Sep

File this one under minor smartphone photography news: it seems Snapchat is using its augmented reality powers to expose non-photographers to the magic of dropping a new sky into your photos. The newly released feature—dubbed ‘sky filters’—can take a regular boring old blue sky and replace it with a colorful sunset, starry night scene, and more.

Sky Filters are already rolling out now to both iOS and Android users, and like their other AR features, this one will rotate daily so you can experience a variety of world-bending effects.

Articles: Digital Photography Review (dpreview.com)

 
Comments Off on Snapchat ‘sky filters’ use augmented reality to replace the sky with stars, sunsets and more

Posted in Uncategorized


Weekly Photography Challenge – Stars

14 Feb

Star gazing and the night sky was captured by these photographers.

Weekly Photography Challenge – Stars

By Karl Lindsay

To capture stars you may need to get out of the city if you live in, or near one. The sky needs to be dark, away from stray light and even a full moon. If you can do that you can capture the night sky and the stars in it.

Here are some tips to help you:

  • Better Star Trails Photographs with StarStaX
  • Tips for Successful Star Trails Photography
  • Tips for Shooting the Milky Way
  • How to Photograph the Full Band of the Milky Way
  • How to do Milky Way Photography – A Comprehensive Tutorial
  • Photographing Starry Skies for Nocturnal Landscape Without Breaking the Bank
  • Photographing Stars Using a Kit Lens

By Beau Rogers

By European Southern Observatory

By Jason Mrachina

Share your images below:

Simply upload your shot into the comment field (look for the little camera icon in the Disqus comments section) and they’ll get embedded for us all to see or if you’d prefer, upload them to your favorite photo-sharing site and leave the link to them. Show me your best images in this week’s challenge. Sometimes it takes a while for an image to appear so be patient and try not to post the same image twice.

Share in the dPS Facebook Group

You can also share your images on the dPS Facebook group as the challenge is posted there each week as well.


Recently we introduced our new Night Photography course by dPS writer Jim Hamel. Learn more about this brand new course here, so you can take stunning night photos too!

googletag.cmd.push(function() {
tablet_slots.push( googletag.defineSlot( “/1005424/_dPSv4_tab-all-article-bottom_(300×250)”, [300, 250], “pb-ad-78623” ).addService( googletag.pubads() ) ); } );

googletag.cmd.push(function() {
mobile_slots.push( googletag.defineSlot( “/1005424/_dPSv4_mob-all-article-bottom_(300×250)”, [300, 250], “pb-ad-78158” ).addService( googletag.pubads() ) ); } );

The post Weekly Photography Challenge – Stars by Darlene Hildebrandt appeared first on Digital Photography School.


Digital Photography School

 
Comments Off on Weekly Photography Challenge – Stars

Posted in Photography


Rangefinder magazine announces 30 rising stars of wedding photography for 2016

20 Dec

30 Rising Stars of Wedding Photography

Rangefinder magazine has announced selections for its fifth annual 30 Rising Stars of Wedding Photography for 2016, based on submissions by photographers from over 200 countries. Rangefinder is the official publication of the annual Wedding and Portrait Photographers International (WPPI) conference, and honorees will be featured in the December issue of Rangefinder, as well as on display at the WPPI Conference+Expo from Feb. 5-9 in Las Vegas, Nevada. 

We’ve highlighted a few of our favorite photos from this year’s selections, and you can find a complete online gallery here.

Above: Lato Photography/Laura&Tommy (Italy) “One of our favorite weddings of the last season. We were dealing with very difficult and shiny light, and we had to get the best from that situation so we captured this moment using a 45mm tilt-shift lens to create a softer background. The strength of this image comes from their hand positions creating a harmonious line, the delicate colors of their clothing matching with the background and, of course, the bride’s look.”

Lukas Piatek (Germany)

During a wedding day, I often try to take photos of small children. They are not disturbed by the camera at all and just do whatever they would do if I was not around. This little boy was basically running around the dance floor the entire evening, and at one point, I literally waited for him to do something special. I did not expect, however, that he would jump so perfectly, raising his arms in the air, looking into the light and being perfectly centered and framed on the dance floor. The shot was made two years ago and it was my favorite photo from that year.”

Jacob Loafman (USA)

“So, this couple’s ceremony and reception were held at their church. However, their church had recently built a brand new building, but they informed me they still had access to the old church. They wanted to know if I would like to do the main wedding party and bride/groom portraits there. I excitedly agreed and we headed that way. As soon as we walked in, I almost fell over from how amazing the building was inside. It was vacant. Completely vacant. This vacant space still featured the remnants of where the previously used cross hung on the wall. It was just beautiful.”

“I noticed there was still access to the balcony and wanted to do a full wedding party portrait from up there. My idea was to just have them arrange themselves randomly. I provided very little direction, as that’s what I wanted. My desire was to create a group portrait that felt more like an album cover, where the entire group was the focal point, but the vacancy and tattered old floors added an element of interest to the shot. After I released the shutter button a few times, I knew I had accomplished what I was going for.”

People Truelove Tellers (Spain)

“This was a very lucky one. We didn’t actually want to shoot it because we were running out of time and were on our way to another spot for portrait pictures. We were driving in a tiny, narrow and lonely road in the middle of nowhere outside of Madrid, and suddenly a full flock of sheep crossed the road. That was perfect because they ran away to the hill in the perfect direction of the sunset. I asked for the couple to follow them and the photo came!”

Tim and Laura Sullivan (USA)

“Chip and Karyn had a lot they wanted to do for their wedding (ranging from Prince impersonators to multiple live bands), but in the end, they chose an in-town elopement with just their two kiddos and us. Tim officiated, Laura took the ceremony photos, and we spent the day gallivanting around some of the most gorgeous spots in Seattle (we even organized a private chef in an industrial loft for them, because going above and beyond for our clients is our favorite thing). This shot is from the deck of their unfinished condo during their ceremony. Our florist came in and covered the construction dust with the most gorgeous arrangements, almost like their own little Wonderland. Their daughters were crying, we were crying—oh man, was it all memorable.”

Marko Marinkovic (Croatia)

“My editing process aims to resemble the colors of the visual artists from the 16th and 17th century as they, among others, struck a foundation for all of us. Each of the paintings I visit for inspiration gives me insight on the thought process a painter must go through in order to recreate 3D light on a two-dimensional surface. From framing the scene on the square canvas to choosing the color palette, it stays pretty much the same in photography today. Spoiled by the digital era we often overshoot and undermine the thought process behind the images we create.”

The Hendrys (Scotland)

“This was one of the most heartfelt weddings we’ve captured to date. The sun was out—when it was forecasted to rain heavily—emotions were running high and the couple and their guests exuded happiness throughout the whole day. At that moment, we thought to ourselves, is this really our job?! And from then on, we knew it was what we wanted to continue doing for as long as we possibly could.”

Lucy Spartalis (Australia)

“Working with Paul and his groomsmen was like spending a day on the set of Monty Python. LOOK at those mustaches; socks; sexual poses. My partner Alastair and I were wiping tears away between every shot. At one point, someone did a handstand and someone else started posing provocatively on the floor. I could’ve just shot them as they already were, but with a little zhuzhing (I checked that spelling, by the way—what a word)—positioning Paul between the spread legs of the groomsman behind him, asking another gent to kneel on one knee to create a mid-level point of interest, etc—we created a more balanced and dynamic composition. I don’t like to pose people too heavily in most cases, but when you’re onto a good thing, a little directorial tweaking can really take things to the next level.”

Heather Liddell (New Zealand)

“Spring weddings are something special. Julia was greeted by an ecstatic Graham and a sun shower when she reached the top of the aisle. The beads of water caught the light and created the most amazing effect. I crouched low so I could create an angle to get in a little sun flare and to make sure that the rain drops would be highlighted against the dark hedge.”

Pablo Beglez (Spain)

“A few minutes after Paula got out of her room to go directly to the altar, she had a problem with the dress. The designer was there with us and had to take a needle and thread and sew the dress right there. Those were some minutes of stress, but it finally was great.”

Jacob Murphy (USA)

“It was toward the end of the night and the dance party was reaching a crescendo, but I couldn’t help but notice this perfect vignette of everyone’s shoes. I love when details can tell a strong story too. I used an indirect tunnel flash technique to make this photo more interesting.”

Articles: Digital Photography Review (dpreview.com)

 
Comments Off on Rangefinder magazine announces 30 rising stars of wedding photography for 2016

Posted in Uncategorized


Stars Above Maui

15 Oct
Stars Above Maui
Stars Above Maui

Circumpolar star trails high above Haleakala National Park in Maui, Hawaii

It’s an interesting feeling to be atop Haleakala, high above the South Pacific, with the feeling of being on top of the world. Atop Haleakala National Park you can see out for 50 miles in every direction when its cloud-free and you tower above the rest of Maui.  Yet when you take a star trail photo such as this you quickly realize that you were really on the side of our spinning globe. Star trail photos are always fun, but I’m particularly fond of this one because Polaris is so much closer to the horizon than I’m used to. One day it would be equally fun to head closer to the Arctic to see Polaris directly overhead.

Happy Shooting!

Photo Details
Canon 5D Mark II + Canon 14mm f/2.8L II USM
f/7.1, ISO 6400 at 90 min

The post Stars Above Maui appeared first on JMG-Galleries – Landscape, Nature & Travel Photography.


JMG-Galleries – Landscape, Nature & Travel Photography

 
Comments Off on Stars Above Maui

Posted in Equipment


Weekly Photography Challenge – Stars

02 Jul

Night photography is something that goes beyond the average snapshot, something many beginners shy away from because it seems difficult. But the results of learning how to do night photography, especially of stars is well worth the time and effort required.

Olli Henze

By Olli Henze

Weekly Photography Challenge – Stars

If you need some help with night and astral photography here are some dPS articles to get you started:

  • Two Methods for Shooting Star Trails Made Easy
  • How to Shoot a Star Trails Selfie
  • Single Image Star Trails – a Powerful Technique to Create Star Trails in Minutes Using Photoshop
  • Photographing Stars Using a Kit Lens
  • How to do Milky Way Photography: A Comprehensive Tutorial
  • How to Photograph the Full Band of the Milky Way
  • Down and Dirty Guide to Milky Way Photography
  • How to Photograph the Stars
Howard Ignatius

By Howard Ignatius

DAVID MELCHOR DIAZ

By DAVID MELCHOR DIAZ

Jeff Krause

By Jeff Krause

Share your images below:

Simply upload your shot into the comment field (look for the little camera icon in the Disqus comments section) and they’ll get embedded for us all to see or if you’d prefer upload them to your favourite photo sharing site and leave the link to them. Show me your best images in this week’s challenge. Sometimes it takes a while for an image to appear so be patient and try not to post the same image twice.

Wayne Stadler

By Wayne Stadler

Alistair Nicol

By Alistair Nicol

googletag.cmd.push(function() {
tablet_slots.push( googletag.defineSlot( “/1005424/_dPSv4_tab-all-article-bottom_(300×250)”, [300, 250], “pb-ad-78623” ).addService( googletag.pubads() ) ); } );

googletag.cmd.push(function() {
mobile_slots.push( googletag.defineSlot( “/1005424/_dPSv4_mob-all-article-bottom_(300×250)”, [300, 250], “pb-ad-78158” ).addService( googletag.pubads() ) ); } );

The post Weekly Photography Challenge – Stars by Darlene Hildebrandt appeared first on Digital Photography School.


Digital Photography School

 
Comments Off on Weekly Photography Challenge – Stars

Posted in Photography


Rangefinder magazine honors its annual ’30 Rising Stars of Wedding Photography’

07 Nov

Rangefinder magazine has announced its annual list of top wedding photography newcomers, now in its fourth year, highlighting the work of 30 photographers to watch. See some of their work and learn more about the list. Read more

Articles: Digital Photography Review (dpreview.com)

 
Comments Off on Rangefinder magazine honors its annual ’30 Rising Stars of Wedding Photography’

Posted in Uncategorized


Shooting Stars

09 Jun

Summertime is prime time for astrophotography. Snapping shots of the milky way is tricky, but totally doable when armed with the right info and tools.

So, how about them tools and info, eh?

Tools:

  • DSLR or even a decent point ‘n shoot.
  • Tripod or any way to keep your camera rock steady.
  • Compass. Try an app! (Apple/Android)

Info:

  • Find a super dark area near you using this Dark Sky Finder.
  • Try to go either when the moon is hiding (before it rises or after it sets) or during a New Moon.
  • For a perfectly focused stars, don’t go over 30s shutter speed.
  • For light streaking stars, shoot at 30s or higher.
  • Use a remote shutter or set up a timer prior to each shot.

Even Moar Info:

Check out this write-up on astrophotography, it’s full of excellent tips and ideas.


Photo by Sarah & Colin’s Astrophotography


© Erin for Photojojo, 2015. |
Permalink |
No comment |
Add to
del.icio.us

Post tags:


Photojojo

 
Comments Off on Shooting Stars

Posted in Equipment