RSS
 

Posts Tagged ‘Stacking’

Stacking Light Trails for Night Photography Special Effects

18 Mar

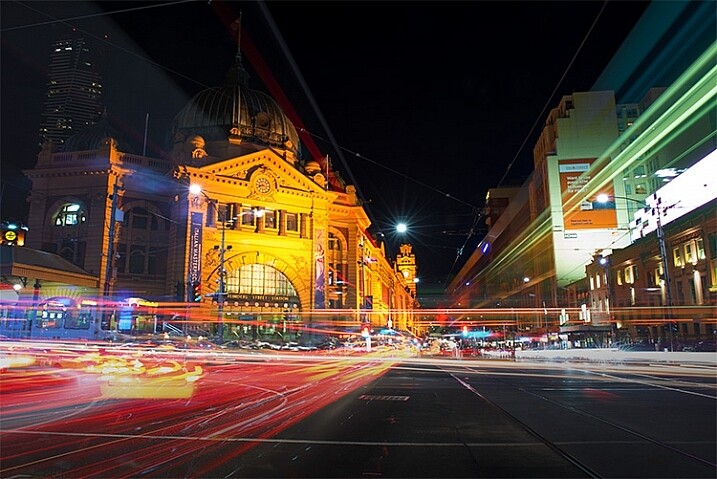
In Melbourne there is an intersection that’s iconic for taking light trails phtos. It is the corner of Flinders Street and Swanston Street, in front of Flinders Street Station.
15-Leanne-Cole-Light-Trails

Light Trails in front of Flinders Street Station. There are 23 images in this stacked light trail.

It isn’t a hard image to take, you just need a camera and a tripod. To get a really good photo, you want to pick a time when there is going to be a lot of traffic. You want the traffic to be moving, as cars caught in a traffic jam will not give you the light trails you’re after. The cars need to be moving constantly, and not standing still for too long.

Pick a place that you think will give you the best advantage. Set the camera up on the tripod, and try to take as long of an exposure as you can. To get the trails, you need to have exposures for several seconds, up to 30. You could do them for longer, but you would need other equipment (like a neutral density filter to cut the light). Most of the images shot for this article had an exposure of around eight to 10 seconds.

Sounds fairly easy, but there are many things that can make it hard. The time of year can inhibit you, as daylight savings will affect when the best time for traffic is, and how busy the roads are. If you go to a place on the weekend, you might find there aren’t as many cars as there would be during the week.

To get the light trails in front of Flinders Street Station, you need to be there at dusk, or after the sun has gone down. In summer that means not many cars or trams. However, there are ways to get around that.

Stacking Light Trails

One of the best ways to get light trails, is to stack many images together.

From the intersection that was mentioned previously, the corner in front of St Paul’s Cathedral is the most popular. There are other places, but that seems to be the one that most use. You will have to work out a great place to photograph them where you live.
14-Leanne-Cole-Light-Trails

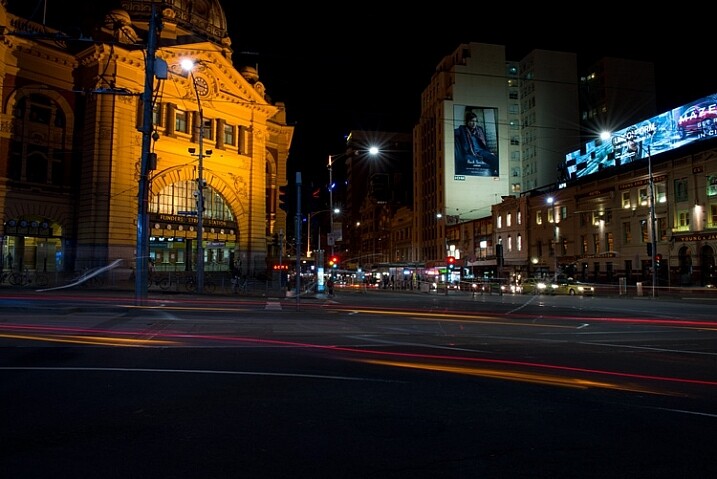
A single image, and as you can see there aren’t that many light trails.

Set your camera up on the tripod, this is necessary so you will get identical photos. Set the aperture to what you want. The ISO can be low, on 100 or 200, so you can get longer exposures. If you want longer, remember you can put your aperture to the smallest possible, like f/22.

Once you have a shutter speed that is several seconds, it is time to start taking your photos. Take one photo, then repeat until you have at least 10. You can do this with as many images as you like, however, Adobe Photoshop might not like you using too many. I’ve done it with four images, and as many as 23.

When you get home

Put all your photos onto your computer. You can use Lightroom to do this, but to do the actual stacking you will need Adobe Photoshop or any program that allows you to use layers.

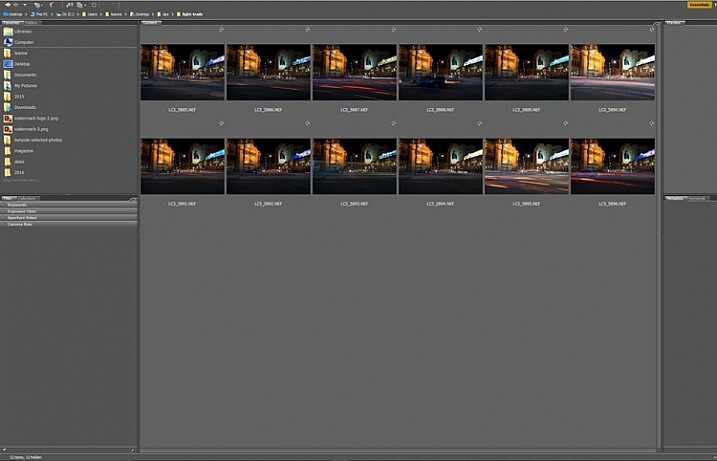
Once you have all the images ready to use, select all the ones you want. If you are using Lightroom to begin with, go to: Photo > Edit in > Open as Layers in Photoshop. In Photoshop open Bridge and select the images you want to use.  Go up to Tools > Photoshop > Load files into Photoshop Layers.
01-Leanne-Cole-Light-Trails

Select all the images you want to use for the light trails.

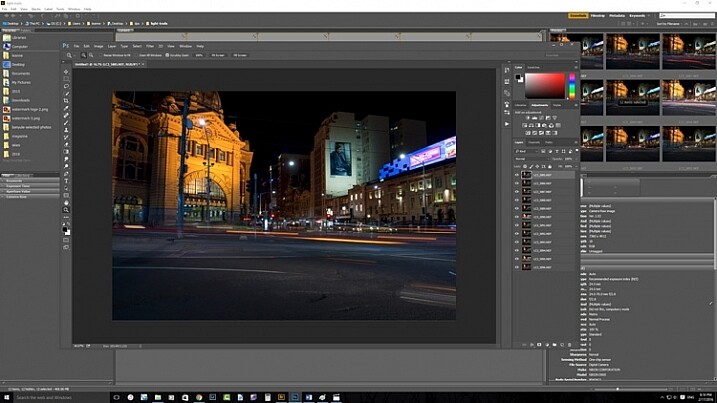
It can take some time for the layers to all open, especially if you are using raw files, and there are a lot of them.
02-Leanne-Cole-Light-Trails

All the layers are opened in Photoshop.

The magic happens

Once the layers are all loaded, you need to select them all. You can do this by selecting the bottom layer, then pressing the shift key and clicking on the top layer. This will select them all.
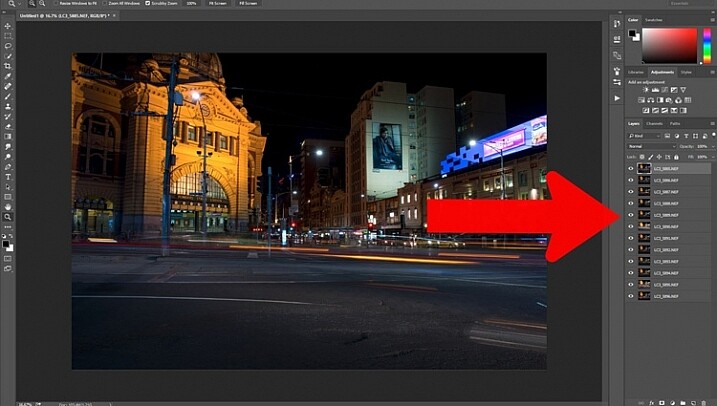
03-Leanne-Cole-Light-Trails

Select all the layers so they can be used.

Once selected, go to the Blending Mode Options in the Layers panel. The default setting is Normal. Click on it for the drop down menu, select Lighten, and click.
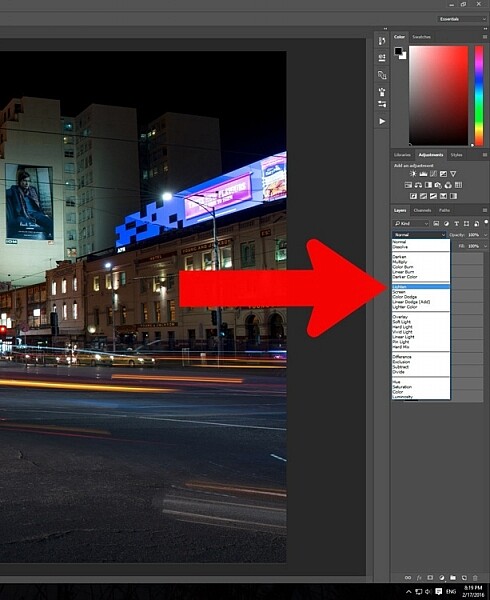
05-Leanne-Cole-Light-Trails

Select the lighten blend option.

You should notice that the image now has far more light trails. All the trails, from all of the images have come through now.
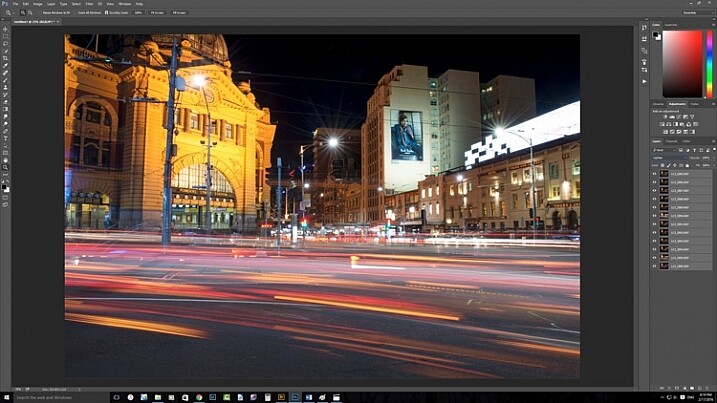
06-Leanne-Cole-Light-Trails

Lots more light trails apply.

You now have a stacked light trail image.

Getting rid of unwanted lights

Sometimes when you do this, it can change a lot more than just the light trails, it may lighten other buildings too much as well. You can correct this.

Select all the layers, except the bottom one, and put them into a group. You can do this by dragging them down to the group icon at the bottom of the panel, or right click on the select layers, and when the menu pops up click on Group from Layers.
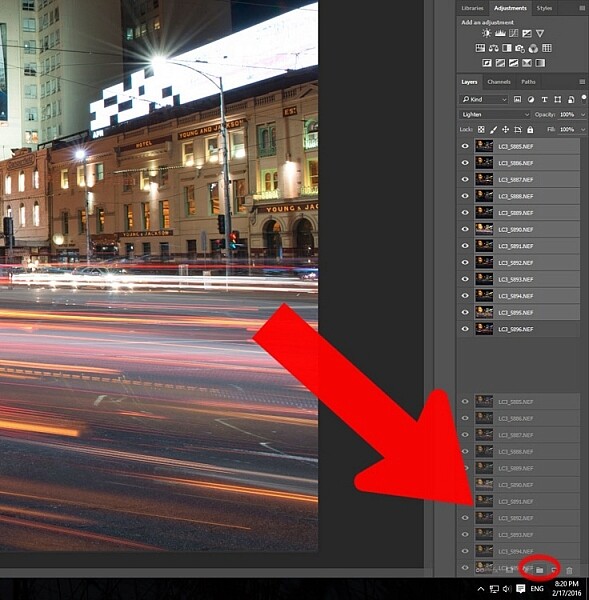
07-Leanne-Cole-Light-Trails

Put all the layers, except for the first one, into a group.

Add a mask to the group from the bottom of the Layers panel. Select the brush from the tools on the left, or press Ctrl b (just B on Mac). Make sure foreground colour is set to black. Making sure the mask is selected, paint over the areas where there is too much light to mask those areas.
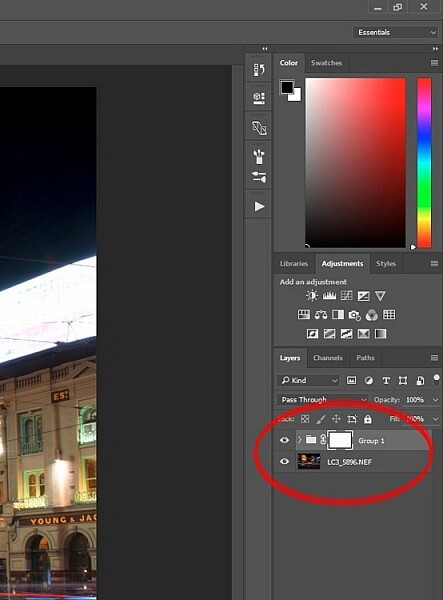
08-Leanne-Cole-Light-Trails

Once the mask is added you can use the brush to remove the unwanted lights.
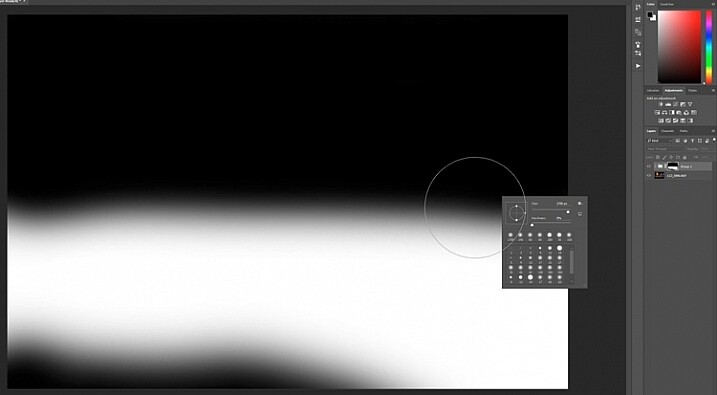
10-Leanne-Cole-Light-Trails

If you alt click on the mask you can see what you have done. The black is where you have removed the unwanted lights.

Finishing the image

The image is now completed, unless you want to do more to it. But, as far as the light trails go, you really don’t need to do any more.
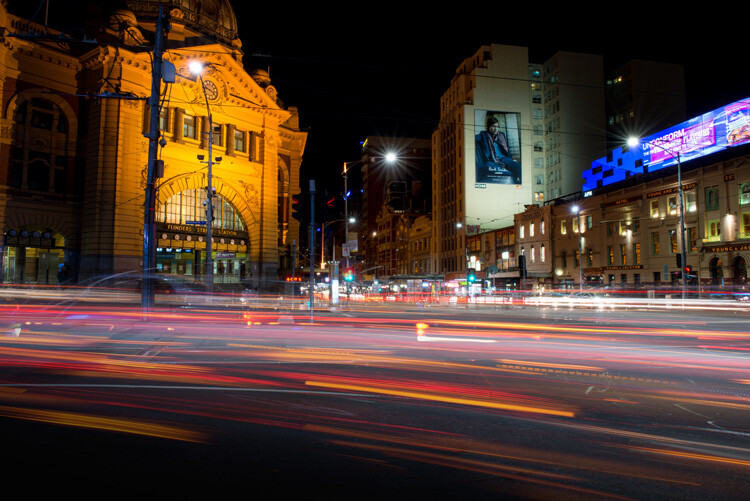
11-Leanne-Cole-Light-Trails

The final image.

This is a great technique which can be applied to many areas. You could use it for ships on the water, or trains going in and out of the city. It can also be used on waterfalls to make them seem fuller. Why don’t you try and see how else you can use this technique.

Here are some other images to give an idea of how to use this technique.
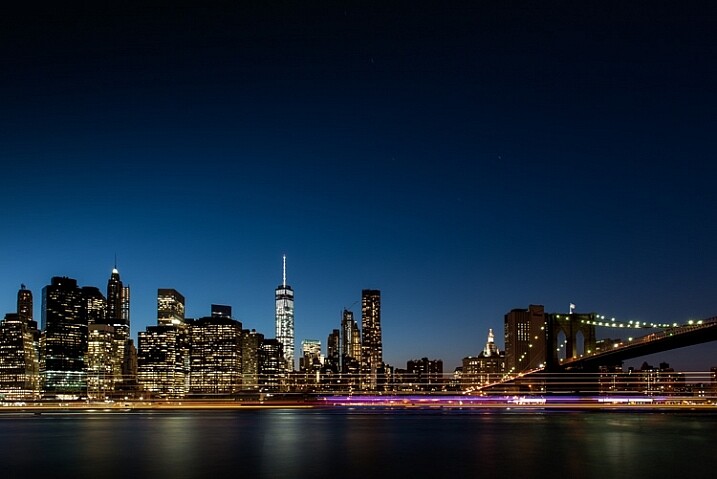
12-Leanne-Cole-Light-Trails

Boats on the water in the foreground of the Manhattan skyline. Four images.
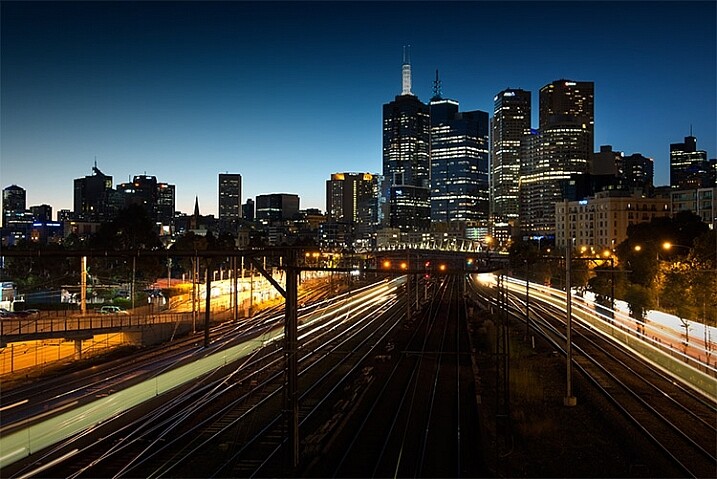
13-Leanne-Cole-Light-Trails

Trains coming into and out of the city. Three images.

This article is part of a series that we will be featuring this week on dPS all about special effects. Check out the others that have already been published here, and look for another new one every day:

  • How to Photograph the Full Band of the Milky Way
  • Fire Spinning with Steel Wool – A Special Effects Tutorial
  • Special Effect – How to Create Multiple Flash Exposures in a Single Frame

googletag.cmd.push(function() {
tablet_slots.push( googletag.defineSlot( “/1005424/_dPSv4_tab-all-article-bottom_(300×250)”, [300, 250], “pb-ad-78623” ).addService( googletag.pubads() ) ); } );

googletag.cmd.push(function() {
mobile_slots.push( googletag.defineSlot( “/1005424/_dPSv4_mob-all-article-bottom_(300×250)”, [300, 250], “pb-ad-78158” ).addService( googletag.pubads() ) ); } );

The post Stacking Light Trails for Night Photography Special Effects by Leanne Cole appeared first on Digital Photography School.
Digital Photography School

 
Comments Off on Stacking Light Trails for Night Photography Special Effects

Posted in Photography


How to Improve Your Long Exposure with Photo Stacking

06 Oct

Recently long exposure photography has been quite popular, mainly in the landscape photography arena. One of the reasons (among the others) is that through a long exposure it is possible to visualize a scene with much more softness and harmony in respect to a standard exposure.

Thanks to the rapid evolution of digital cameras, we are now able to take really long exposures without getting so much digital noise, due to sensor overheating. Moreover, the improvements in neutral density filter quality allow us to take pictures with almost no color cast, and no decrease in sharpness.

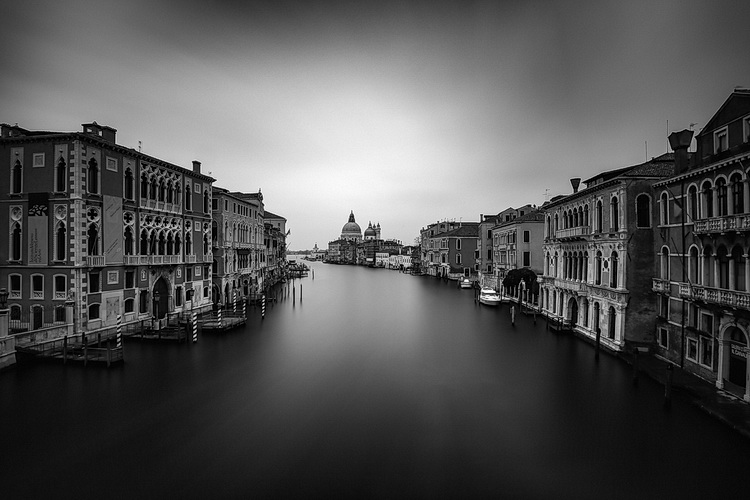
Dps les venezia

Venezia by Luca Libralato: stacking of 3 x 260s exposures for a total of 780s (13 minutes)

If you love long exposure photography and you would like to push the exposure time to the edge, this technique of long exposure photo stacking is for you.

Here is the quick explanation of the Long Exposure Stacking technique: by taking several pictures (usually at least 30 seconds each for the purpose of this technique) you can blend them to get a result the equivalent of a long exposure photo with a total exposure time equal (or almost equal) to the sum of the single exposure frames.

This technique is mostly useful, and recommended for landscape photography, but some of the benefits may also be used in other types of photography, where you need maximum quality with several minutes of exposure. The step by step guide will be focused on landscape photography.

The advantages of using this approach are several:

  • Increase the total exposure time.
  • Reduce digital noise and hot pixels (shorter exposure pictures have less digital noise and hot pixels).
  • Reduce vignetting (you will be using a lower ND power per shot with this technique, resulting in less vignetting).
  • Minimize the risk of wasting time and photos (tripod shocks, sudden light change, etc.).
  • Possibility to decide later on the strength of the long exposure effect.
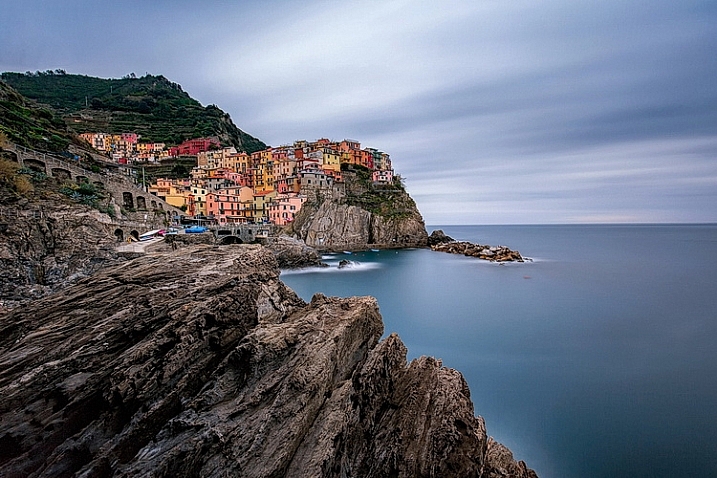
dps_les_manarola

Manarola by Luca Libralato: stacking of 3 x 260 second exposures for a total of 780 seconds (13 minutes)

The disadvantages are:

  • You don’t have a single exposure and this is something which some competitions/contests rules don’t like.
  • Some post-processing skills are required to blend the several exposures.
  • If you are a purist – you may not like this technique.

When this technique should be used:

  • If you want to push the exposure time to some really high values.
  • If your camera sensor is adding a lot of digital noise due to overheating.
  • If you are not sure about the final result of a very long exposure. Since this techniques is based on the sum of several short exposures, you can easily decide later how long the final exposure shall be (check also here for a similar approach: Long Exposure Photography Without a Tripod).
  • With hostile ambient/weather conditions, you can use this technique to minimize the risk of wasting exposure time.
  • If you want to maximize the probability to not miss the right moment in a fast changing light (the right moment can last few seconds, if you are exposing for several minutes, you can miss it for wrong exposure time for example).

Before going over the explanation of the technique, there are at least a couple of required skills you should have (apart from the basics for taking pictures with your camera):

  1. How to perform standard long exposure photography: you can check this awesome tutorial by Francesco Gola to improve your long exposure skills: Step-by-step Guide to Long Exposure Photography.
  2. Basic knowledge of Adobe Photoshop or similar photographic software which allows you to work on images using layers.

Let’s get on with the fun part: the implementation of Long Exposure Stacking!

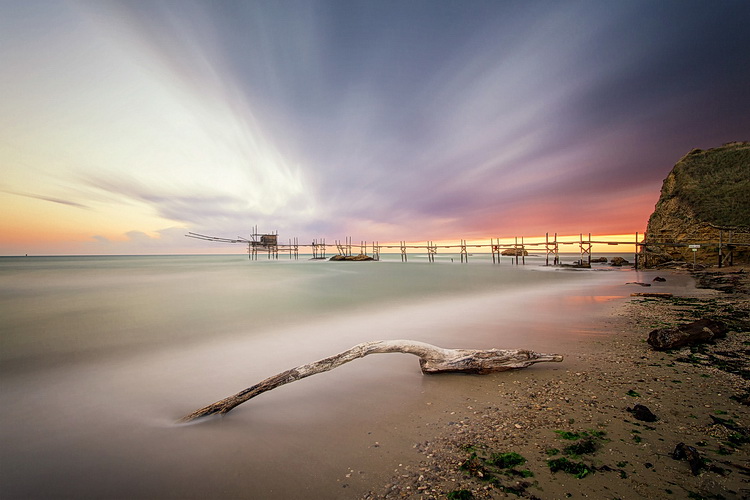
dps_les_punta_aderci

The Magic Of Punta Aderci by Luca Libralato: stacking of 2 x 260 second exposures for a total of 520 seconds (8:40 min)

Step 1: Gear

The photographic gear needed for this technique is luckily the same gear needed for taking long exposure photos. So if you are already familiar with long exposure photography, you are set. Otherwise here is a short list of all the tools:

  • Digital Camera (which allows long exposure) + Lens (which allows you to mount neutral density filters)
  • Tripod
  • Remote trigger (optional, but suggested)
  • Neutral density filters (optional if you shoot when it’s dark)

For further details about taking long exposure photography, you can check the related resources listed at the bottom of the article.

Step 2: Plan the shot

Never hit the shutter without having properly planned the photo. Of course there are a lot of variables involved, but planning can really play the most important part in a good photo. Do not underestimate the power of accurately planning a landscape photo – because luck can help you once, but planning your photography consistently, will increase the probability that you’ll be ready when the right conditions are present.

dps_les_santa_marinella

Rips Of Darkness by Luca Libralato: stacking of 5 x 120 second exposures for a total of 600 seconds (10 minutes)

Step 3: Take the shots

Once you have planned your photo and you are on location, you should then decide the two most important things in any photo (at least this kind of photo): composition and exposure (supposing you are taking landscape photography, depth of field should not be a variable in most cases). Composition is up to your taste, while exposure is a complex matter and depends upon different factors.

First thing every landscape photographer usually does before taking any picture, is metering the light to decide the exposure time. The final exposure time depends on several factors, such as strength of the wind, the movement of the clouds, water flow, and so on. The question at this point is, “How long shall I expose for?”.

If the light is changing suddenly, or there is a strong wind which can shake your camera/tripod during exposure, you may decide to avoid really long exposures (to avoid wasting shots or missing the right light). This is where this technique comes to your rescue.

Suppose you would like to have a total of eight minutes of exposure, instead of taking one single long exposure file you can split the total exposure time into four consecutive shots of two minutes each (for example). You can freely decide the final length of each exposure and the total number of shots, just keep in mind that you should keep the gap of time between the different photos to a minimum, if you are planning to do stacking. Needless to say that you should be careful in avoiding moving the tripod and the camera between each shot of the sequence. Once you have your consecutive shots, in the next step you will understand what to do in post-processing.

Before you start shooting: make sure you focused correctly and your tripod is stable (avoid sand or uneven floors where possible).

After the shot: make sure your histogram is fine and your picture is properly exposed, or exposed to the right.

Dps les 01 Dps les 02
Dps les 03 Dps les 04
Dps les 05 Dps les 06

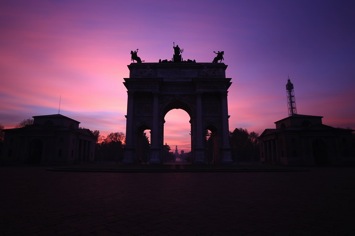
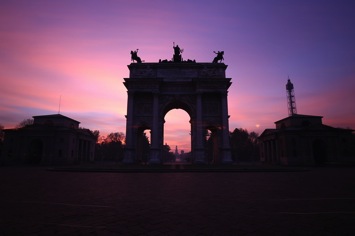
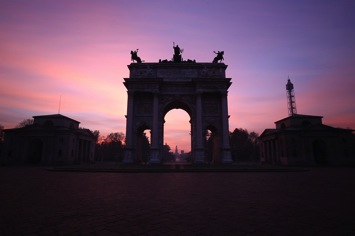
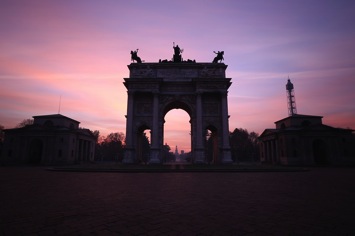
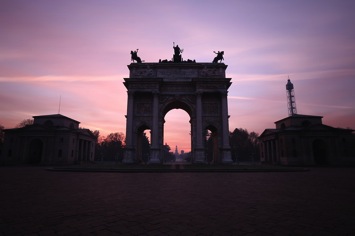
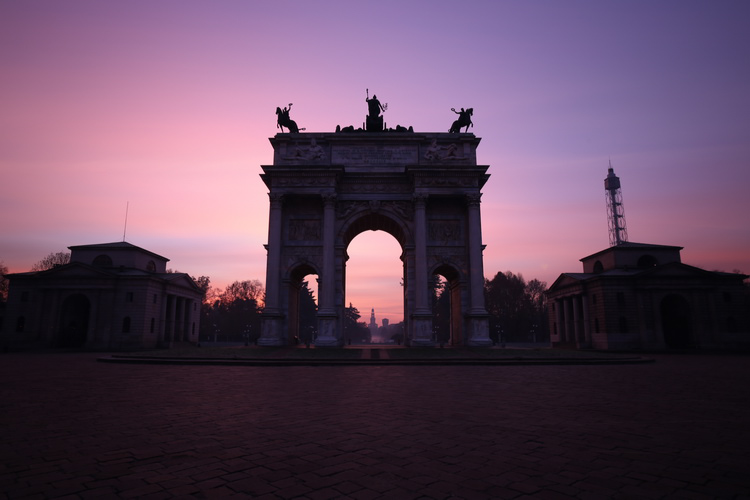
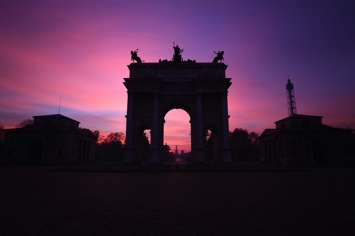
Arco Della Pace by Luca Libralato: 6 x 130 second exposures, for a total of 780 seconds (13 minutes)

Step 4: Image Stacking

You should now be at home, or in your favourite cafe/pub with your laptop, and hopefully a coffee/beer. You should have downloaded all of your shots and selected the ones you would like to stack.

The stacking process will be shown for Adobe Photoshop (almost any version supports the feature) but you can use any software of your choice, which allows the use of layers. In Photoshop there are two different methods that can be used to stack files, with the goal to merge them into a simulated longer exposure:

  1. Load files into stack function (Files > Scripts > Load Files into Stack)
  2. Manual stacking

4.1 Load files into a stack

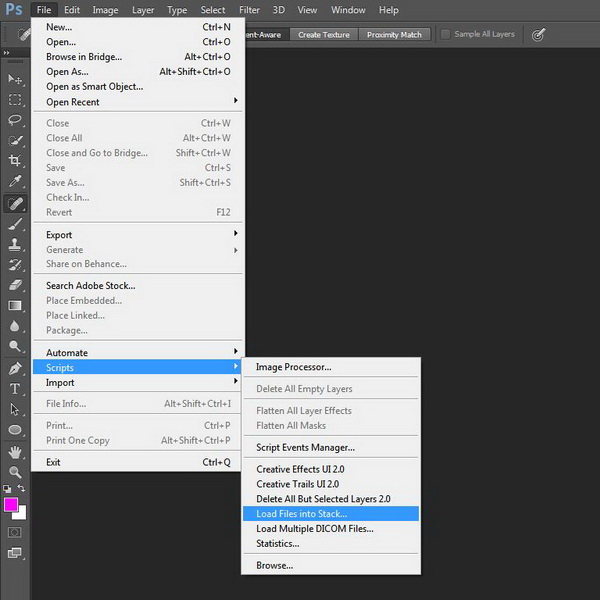
With the first method the procedure is semi automated, since you just need to go to Files > Scripts > Load Files into Stack

Dps les ps stack 01

Photoshop: Load Files into Stack

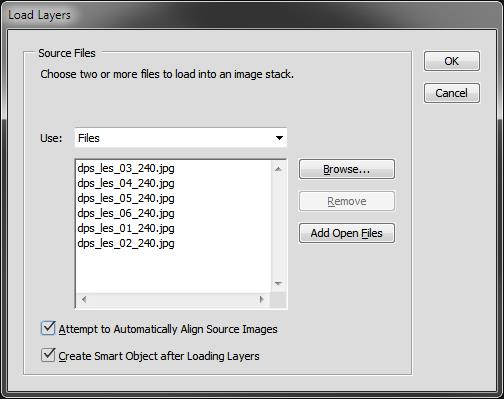
All you have to do is then select the single long exposure, flag the boxes to Automatic Align Source Images and Create Smart Object.

Dps les ps stack 02

Photoshop: Select files and create Smart Object

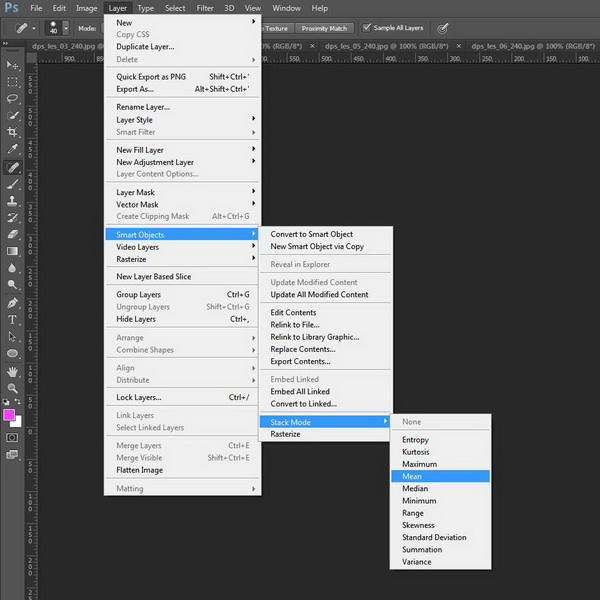
Once you have a new document with the Smart Object selected, all you have to do is go to menu Edit > Smart Objects > Stack Mode > Mean. This will weigh all images embedded into the Smart Object, rendering them as a new image which similar to what you would have obtained with a single long exposure of a total time equal to the sum of the single exposure.

Dps les ps stack 03

Photoshop: Set Stack Mode to Mean

You can check the result on the image below.

Dps les ps stack result

Photoshop: Result after stacking

4.2 Manual stacking

By using the second method (which I trust can be used with every software which allows layers) the blending process is manual. The rule is that you have to fine tune the opacity of each layer by decreasing it after each shot.

The mathematic rule is as follows: each shot should have an opacity equal to 1 divided by its position in the stack. Here is a table which shows the rule:

  • First photo (the one at the bottom) 100% (1/1)
  • Second photo 50% (1/2)
  • Third photo 33% (1/3)
  • Fourth photo 25% (1/4)
  • Fifth photo 20% (1/5)
  • Sixth photo 17% (1/6)
  • Nth photo 1/N

This process will exactly replicate the first method (the result will be identical to an automatic Stack in Mean mode).

Step 4: Post processing workflow

At this point, all you have to do is follow your typical post-processing workflow:

  • Clean dust spots, straighten the image, crop
  • Adjust dynamic range with other exposures (3 or 5 bracketing shots for static underexposed parts)
  • Adjust exposure and contrasts
  • Adjust colors
  • Add finishing touches to suit your taste
  • Export

Here is the final result of the example

Dps les arco della pace

Arco Della Pace by Luca Libralato: stacking of 6 x 130 second exposures for a total of 780 seconds (13 minutes)

Conclusions

This technique is very useful sometimes because of its flexibility. Moreover you should consider the benefit in increasing the final quality of your file because of the stacking. It has been proven that by stacking images you can benefit by reduction in random digital noise equal to the square root of the total photos used. So for example if you use four photos, you will have in static part of the photo a reduction by half of the total random digital noise, which is a great achievement especially for underexposed portions. This technique is used a lot (even if with some different variations and implications) in astrophotography or in other fields when increasing the exposure time of a single shot is not suitable.

Don’t hesitate to ask questions in the comments box below if you need help or further explanations.

Related Resources:

  • Step-by-step Guide to Long Exposure Photography by Francesco Gola
  • Long Exposure Photography Without a Tripod by Viktor Elizarov
  • How to do Long Exposure Photography and Light Trails at Night by Barry J Brady
  • 11 Accessories for Long Exposure Photography by Scott Wyden Kivowitz
  • 5 Tips for Better Long Exposure Landscape Photography by David Cleland
  • 8 Tips for Long Exposure Photography by Elliot Hook
  • 5 Tips for Getting Sharper Images When Doing Long Exposures by Kevin Choi

googletag.cmd.push(function() {
tablet_slots.push( googletag.defineSlot( “/1005424/_dPSv4_tab-all-article-bottom_(300×250)”, [300, 250], “pb-ad-78623” ).addService( googletag.pubads() ) ); } );

googletag.cmd.push(function() {
mobile_slots.push( googletag.defineSlot( “/1005424/_dPSv4_mob-all-article-bottom_(300×250)”, [300, 250], “pb-ad-78158” ).addService( googletag.pubads() ) ); } );

The post How to Improve Your Long Exposure with Photo Stacking by Luca Libralato appeared first on Digital Photography School.


Digital Photography School

 
Comments Off on How to Improve Your Long Exposure with Photo Stacking

Posted in Photography


Review of The Promote Control for Time Lapse and Focus Stacking

20 Aug

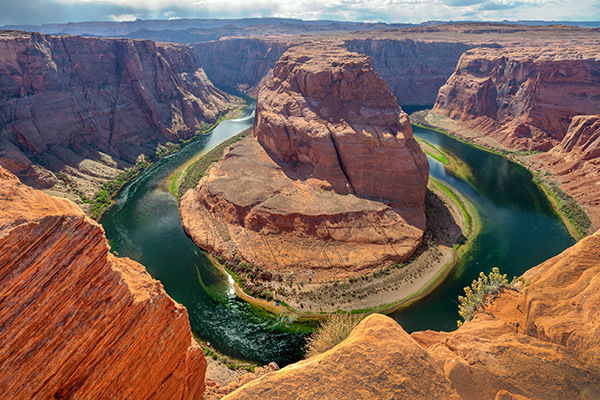
Want to take super sharp “focus stacked” photographs that boast corner to corner sharpness with perfect focus? Want to shoot spectacular ‘holy grail’ time lapse sequences that capture the change from day to night? How about advanced bracketing for HDR shooting? Do you fancy getting shots like this?

Horseshoe Bend Focus Stacked Gavin Hardcastle

The Promote Control from Promote Systems delivers very precise control over DSLR cameras to open up new creative possibilities. Here’s a list of things that the Promote Control can do:

  • Promote Control ReviewHyperfocal Distance Calculator
  • Remote Shutter (One Shot)
  • Time Lapse Intervalometer
  • HDR Bracketing
  • BulB HDR Bracketing
  • Bulb Ramping for Time Lapse
  • Focus Stacking
  • Video Control
  • Manual Shutter for long Bulb Exposures

This device is like a Swiss Army Knife for photographers who want to get the most out of their DSLR cameras. Currently priced at $ 299, it’s an accessory that will appeal to the more hardcore shooters, but for those photographers that regularly need advanced HDR bracketing, focus stacking or bulb ramping, the Promote Control is worth every penny.

Rather than go into every single function of the Promote Control, I’m going to highlight its three most powerful features, which I believe merit the asking price themselves.

Focus Stacking

As a landscape shooter, I mostly want corner to corner sharpness in my images and sometimes I’ll use focus stacking to achieve maximum sharpness throughout the frame. This really only works when your static subjects are perfectly still, with little to no breeze. If you’ve ever tried focus stacking the manual way, you’ll know that there is some margin for error and it can take practice to do it well. The Promote Control takes all the guess work out of focus stacking by incrementally adjusting your focus from start and end points that you specify.

Once you’ve done this a couple of times you’ll never be able to go back to doing it manually. When you see the results of your focus stacked image and the lack of weird looking artifacts that can sometimes result from inaccurate focus adjustments done manually, you’ll be hooked.

Macro and small product photographers will love this feature.

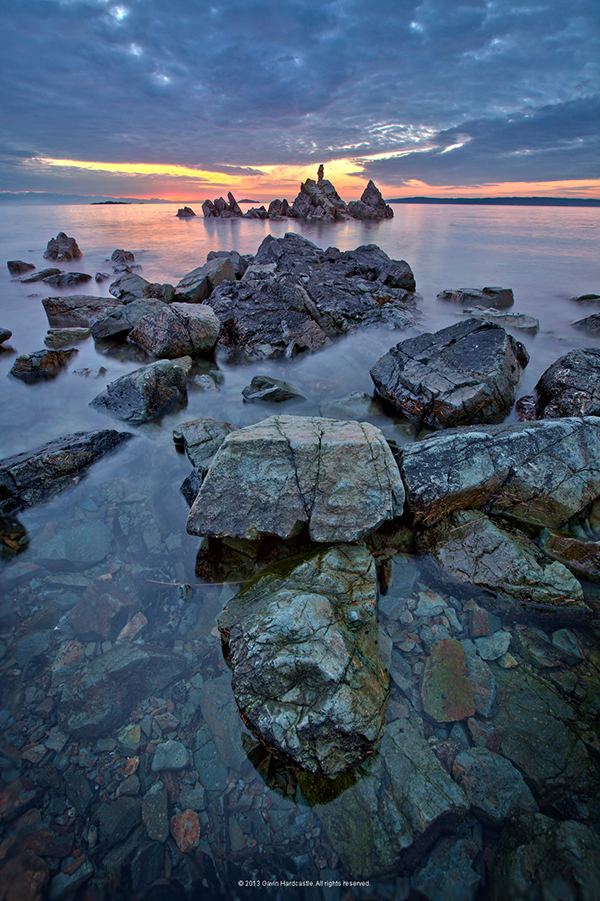
Here’s an example of a focus stacked shot with corner to corner focus using a mid range aperture.

Focus Stacking with the Promote Control

Here’s a video demonstrating how this works with the Promote Control.

Bulb Ramping for day to night Time Lapse

If you’ve ever tried to shoot a time lapse sequence of the setting sun, you’ll know that there are only two ways to capture the correct exposures as the light changes. You either adjust the shutter speed manually while shooting (which introduces terrible flicker) or you use a bulb ramping device that can gradually and smoothly alter your shutter speed over time.

This technique is known as Bulb Ramping, and there really aren’t that many devices out there that do a good job. The Promote Control has become something of a “go to” bulb ramping solution for quite some time now, because it simply does such an excellent job of adjusting your DSLR camera’s shutter speed in tiny increments, over a set period of time. You tell the Promote Control how long you’d like to shoot, and when you’d like it to begin increasing or decreasing the exposure time.

Of course, it can’t know exactly when the changes in light occur, you have to know in advance by casing your location the night before, and making a note of the sunset time. The Promote  Control simply does what you tell it to do, and it does it well. Here’s a video of Joel Schat explaining how to achieve bulb ramping with the Promote Control.

HDR Bracketing

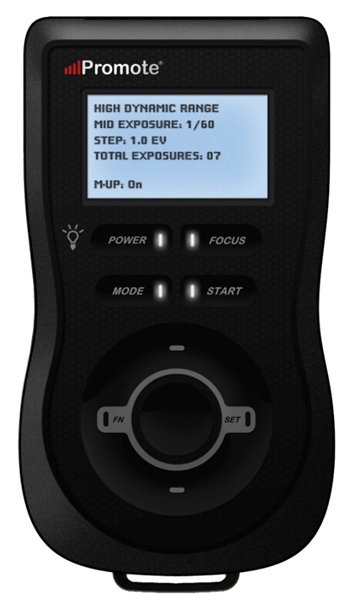
If three or five bracketed exposures simply aren’t enough to capture the dynamic range of your scene, how does 45 exposures sound? Simply tell the Promote Control what shutter speed to use for the middle (or correct) exposure, then tell it how many EV steps to use and the number of total exposures. The Promote Control will do the grunt work while you look around for the next shot.

A jack of all trades

Everything that the Promote Control does, it does well. I expect that most users will only use two to three of this device’s powerful features but at $ 299 it’s worth every penny.

Build quality

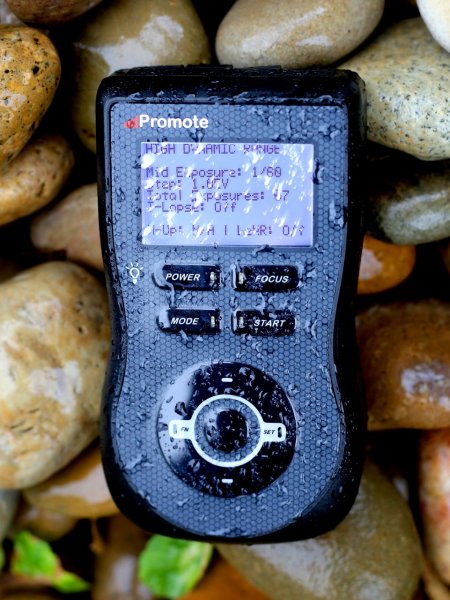
weather sealed promote control

The Promote Control is very well built. It’s a solid little unit that’s about the same size as a Smartphone, but is just under an inch thick. The backlit LCD screen is easy to read and there are only eight buttons on the entire unit. It’s small enough to pack into any mid-sized camera bag, and comes with a tidy little carry case. It even comes with a lifetime warranty for manufacturing and workmanship defects. How often do you see that?

The device is powered by two AA batteries which last a long time. You can also power the Promote Control with an external DC power jack for taking super long exposures, or lengthy time lapse shoots.

What I’d like to see in the next update

To me, there is one glaringly obvious function that is missing from this device. HDR Focus Stacking. Why not combine the advanced HDR bracketing feature and the focus stacking feature? When I focus stack manually, I often have to bracket in order to capture the dynamic range. I can’t imagine why this feature is not available with this device.

My only two complaints

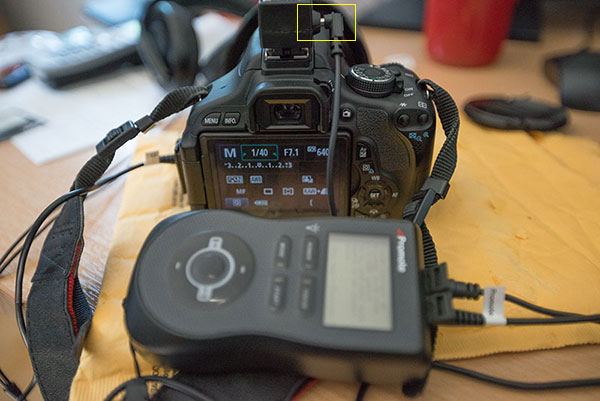
The Promote Control is such a simple little device that there’s not much to complain about, it either works or it doesn’t. My only gripe isn’t with the unit itself, but with the hotshoe attachment, required for bulb ramping when shooting time lapse sequences. I found that the cable fell out of the hotshoe attachment at the slightest nudge, not something I would trust out in the field when shooting a lengthy time lapse.

Hot Shoe Cable

I had problems with the cable that attaches to the hotshoe accessory.

My other complaint is that the Promote Control is not compatible with mirrorless cameras like my Sony A7R. Full compatibility only extends to Nikon and Canon, with limited compatibility for Sony and Sigma cameras. This is the only reason I decided not to buy the Promote Control. But if Promote Systems manages to catch up with the mirrorless movement, I’ll be unleashing the credit card.

I asked Promote Systems about it and this was their response:

We get a lot of requests for compatibility with the A7/A7R and we would love to support the cameras, but unfortunately Sony doesn’t make that possible. They implemented a tethering protocol on A7 cameras, but just as with earlier cameras, it refuses to save images on the card – you MUST pick them up and save them elsewhere, or all subsequent USB image acquisition commands will fail. Until Sony resolves the issues with not saving images on to the in-camera card when tethered, we can’t do much about it, unfortunately.

Why can’t my camera do all this?

When you look at what the Promote Control does and the results that it achieves, there’s obviously a demand for this level of functionality. There’s no reason why digital cameras can’t have all of this functionality built in, and with cameras like the Sony A7R able to run Apps that users install, it’s only a matter of time until all of this can be done in camera. Until then, Promote Systems are filling a gap in the market and they are doing it very well. I’m going to award the Promote Control 4 stars.

Would you buy this clever little device?

The post Review of The Promote Control for Time Lapse and Focus Stacking by Gavin Hardcastle appeared first on Digital Photography School.

Digital Photography School

 
Comments Off on Review of The Promote Control for Time Lapse and Focus Stacking

Posted in Photography


Getting Landscapes Sharp: Focus Stacking

07 May

A key aspect of successful landscape photography is image sharpness.  Usually, it is desirable to ensure that all elements of a scene, whether close or far, are captured in sharp focus.  This can prove to be challenging and, if not achieved with the click of the shutter, cannot be corrected later during post processing.

One approach that is often taken is to use the smallest aperture available, e.g. f/22, to obtain the largest depth of field.  Whilst maximising the depth of field is a good intent, using such a small aperture will actually result in softer images due to an effect known as diffraction.

Most lenses are at their sharpest when used at apertures between f/8 and f/11 and whilst hypefocal focussing may allow you to capture an entire scene acceptably sharp in one image using these apertures; it is always still a compromise between a number of factors and there will be times when you cannot generate enough depth of field to capture a whole scene at optimum sharpness.

That is where focus stacking comes in.

Focus stacking is the technique of stacking (or blending) a number of images that have been focussed at different points throughout a scene to give a final image that contains the sharpest portions of the originals, seamlessly blended into one.  It isn’t as laborious as it sounds and can give really good results, rendering scenes far sharper than possible in just one exposure.

Focus Stack Initial Image

The initial image, shot at f/8, lacked front-to-back sharpness as there was not sufficient depth of field. ISO100, f/8, 2 secs

In the field…

As you will be stacking the images into one, aside from the point of focus, you want the individual photographs to be identical in all other respects.  Therefore, it is best to have the camera positioned on a tripod and use a remote release.

Using your optimum aperture (can easily be determined for a given camera/lens combo using focus charts, however you will most likely find that f/8 is a good starting point), take the required number of images focussed at different points throughout the frame.

A minimum of two images are required, i.e. one focussed for the foreground and one focussed for the background, however an additional third image, focussed for the middle ground can also be a good idea.

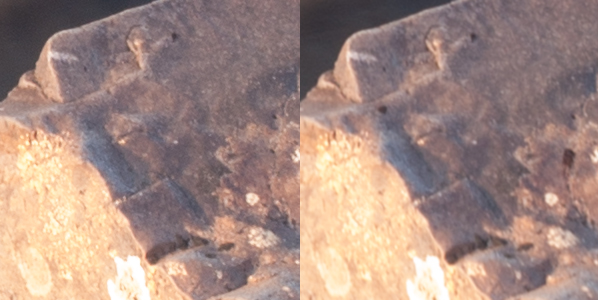
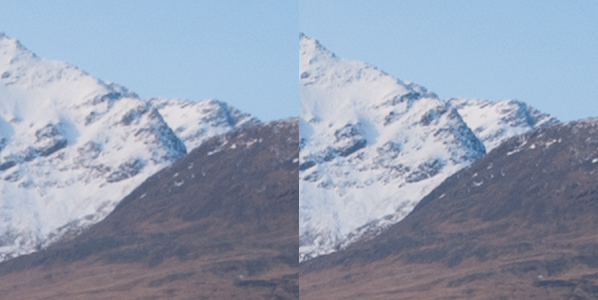
Focus stack comparison foreground

A comparison of a 100% crop of the foreground from two images, one focussed for the foreground (left) and one focussed for the background (right).  Both shot at ISO100, f/8, 2 secs.

Focus stack comparison background

A comparison of a 100% crop of the background from two images, one focussed for the foreground (left) and one focussed for the background (right).  Both shot at ISO100, f/8, 2 secs.

Back at home…

Open the two images in Photoshop and create a new file that contains both images as different layers, in the one file (to make life easier, name the layers accordingly, e.g. near, far).

Select both layers and go to Edit > Auto-Align Layers to ensure both images overlay perfectly.  Select the ‘Auto’ option, and deselect the ‘Vignette Removal’ and ‘Geometric Distortion’ options.

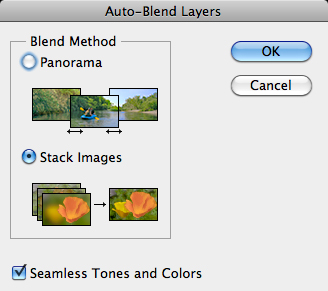
Then select Edit > Auto-Blend Layers, and choose ‘Stack Images’, ensuring ’Seamless Tones and Colours’ is selected.

Focus stack auto blend dialog box

The Auto-Blend dialog box

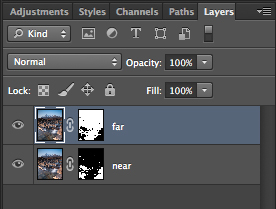
At this point, Photoshop will determine the sharpest portions of each image to incorporate into the final image, and apply a mask to each layer.  Below you can see the layer masks applied to the two images.  In this instance, you can see the rocks in the lower portion of the image are the main area selected by the layer mask for the ‘near’ layer whereas the rocks in the middle distance and the background mountains are incorporated from the ‘far’ layer.

Focus stacks layer masks

The automatically generated layer masks, applied to each layer, includes the sharpest portions of each layer (shown in white).

It is worth checking the image at 100% zoom to ensure that there are no strange artefacts caused by poor blending of any moving grasses or branches.  These can be fixed by manually painting white or black on to the relevant layer mask (remember: white reveals, black conceals).  For those using Elements, if you are only using 2 or 3 images, it is possible to do the blend manually using layer masks and white/black gradients.  In some instances, it actually gives better results, with fewer ‘blending artefacts’ to do the blend manually.

Once you are happy with the blend, merge the layers to give your final, focus stacked image.

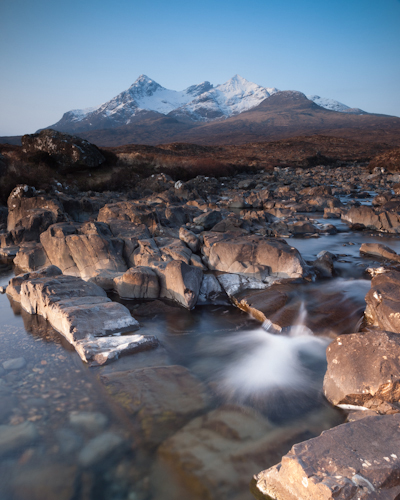
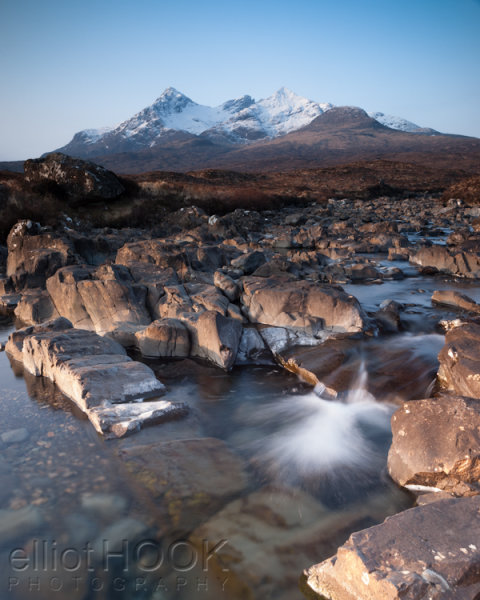
Focus Stack final image

The final image with good sharpness from the foreground rocks right through to the mountains in the background

It may not be immediately apparent when showing images at web resolutions, but the difference in the overall sharpness when using optimum apertures and focus stacking is astounding when printing images.  To be able to focus stack, it only takes a little more forethought when out capturing the scene, and a few short processing steps when back at your computer so why not give it a go the next time you are out photographing landscapes.

Post originally from: Digital Photography Tips.

Check out our more Photography Tips at Photography Tips for Beginners, Portrait Photography Tips and Wedding Photography Tips.

Getting Landscapes Sharp: Focus Stacking


Digital Photography School

 
Comments Off on Getting Landscapes Sharp: Focus Stacking

Posted in Photography


Erez Marom Explains Focus Stacking in Macro Photography

12 Apr

image_9.0.jpg

Macro photography can be extremely challenging, but very rewarding if you get it right. In this article – the latest in a series – Erez Marom explains how to use focus stacking to achieve deep depth of field for capturing tiny subjects with a macro lens. Click through for a link to the article ‘Focus Stacking in Macro Photography’.

News: Digital Photography Review (dpreview.com)

 
Comments Off on Erez Marom Explains Focus Stacking in Macro Photography

Posted in Uncategorized


The Amphimallon-Project – image stacking by “helicon focus” stacking software

19 Jan

Maximilian Weinzierl Junikäfer The Amphimallon Project – image stacking by helicon focus stacking software; see my insects www.alamy.com Kevin MacLeod incompetech.com “image stacking” we think no further words are necessary, just look. Focus Stacking Demonstration with Novoflex Einstellschlitten CASTEL-Q focusing rack castel Q, Nikon D700 AF-S Micro Nikkor 105/2.8 VR and Nikon TC 2.0 E III, broncolor studio light
Video Rating: 5 / 5


Focus Stacking – a macro photography technique

02 Sep

Here’s a short guide to shooting several photographs to make an ultra sharp close focus shot. Peter Bargh explains how to shoot, and then what software will combine the shots to give you ultra sharp results.
Video Rating: 4 / 5