RSS
 

Posts Tagged ‘Stacking’

How to: Shoot better macro photos using a slider and focus stacking

25 Sep
A Sony a6300 and an Edelkrone motorized slider: interesting marriage of technique and technology?

Like a lot of people, I’ve always had an interest in macro photography, which unfortunately never really developed into anything more than the odd shot of a flower or two. Then a couple of years ago I sold my seldom used 100mm F2.8 Sony macro lens when I moved from Sony A- to Sony E-mount. At the time I thought my macro shooting days were behind me.

But then I became interested in focus stacking, which is a technique used to blend several images focused at different points so that the depth of field can be increased beyond that of a single image. It can be used for multiple types of shots, but is typically used with close-ups or macro images.

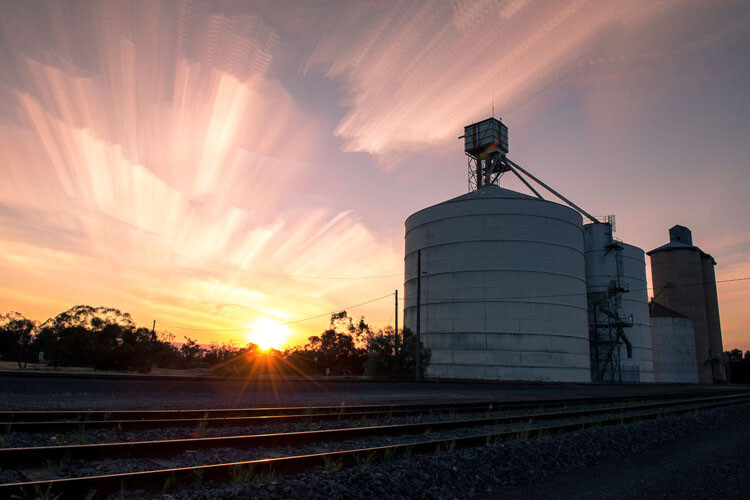
This watch shot was comprised of 50 images taken with a Sony a6300 and 18-55mm lens at F7.1. The camera was a set to 1/25th at ISO 100. The images were blended in Helicon Focus.

About 18 months ago I bought a set of budget Neewer extension tubes to use with my Sony a7 III and Sony a6300. While not really specifically meant for 1:1 macro work, they come in handy when shooting product shots as they let you focus a lot closer to the product (as opposed to without them).

This pile of screws was shot 1:1 with the 7 Artisans 60mm Macro ( F8 at 1/60th and ISO 800). The 30 frames were then blended in Helicon focus.

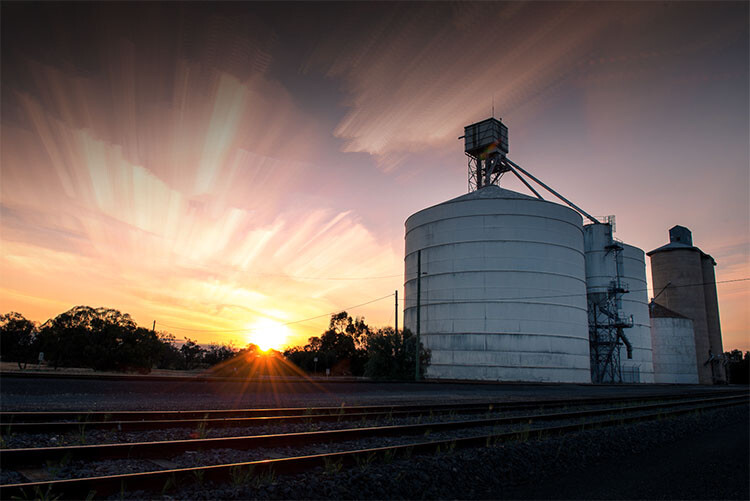
The other part of this equation is that I’ve been using Edelkrone equipment for a couple of years now and I’ve always been intrigued by the fact their small motorized slider (SliderOne V2 $ 499) has a minimum travel distance of 0.222 ?m. Could this be used for focus stacking in combination with a time lapse sequence?

Using a slider for focus stacking does present some potential problems. For starters, moving the entire camera could introduce errors with perspective and isometric distortion. However, I’m never one for the easy way out, so I decided to investigate further.

This stack of 30 images (55mm F8, 1/60th, ISO 800) was blended in Helicon Focus taken under constant LED lighting.

What type of equipment is used, typically?

Strictly speaking, focus stacking doesn’t require complicated equipment like a slider. Many digital cameras, including a variety of Olympus and Panasonic models, even offer the ability to do all the focus stacking internally by automatically re-focusing the lens and blending the images in-camera. But the slider and dedicated post-processing software allow for a far greater degree of control over the final image.

Additionally, if you’re not using those Olympus and Panasonic cameras, you don’t necessarily need to use a dedicated macro lens; a standard kit lens and some extension tubes can work very well to get you started. You do, however, need to manually refocus the image every time you take a shot so that at least part of the image is in focus each time. Your results can be a bit hit-or-miss if you do it this way, and the software to assemble the images can cost you some money.

Details of technique and equipment

I tried a few different setups for my images, but all of them included the slider and a Sony a6300. Initially I did try using the Sony 18-55mm F3.5-5.6 with a set of Neewer extension tubes (NW-S-AF3A, 10 and 16mm $ 49.99) and some of the images can be seen here. I had to be a little more careful with the lighting when using these tubes as they don’t have internal felt flocking and can cause some lack of contrast and flare if not used carefully, due to internal reflections.

Inexpensive extension tubes can give you extra options for close up photography

While the subject image was relatively large compared to the sensor, it wasn’t quite at a 1:1 ratio, it ended up being ~1:1.1 using both tubes at the closest focus for this lens. In all cases the lens was set to manual focus as was the camera, a careful juggling act was performed to get the right balance of light level, aperture, shutter speed and ISO. After a bit of experimentation I found that I needed to use an aperture of F8; this gave enough sharp areas of focus for each exposure without the need to increase the number of shots.

After a bit of experimentation I found that I needed to use an aperture of F8; this gave enough sharp areas of focus for each exposure without the need to increase the number of shots

I then decided it was time so see how a different macro would work with my setup, so I picked up the low cost 7 Artisans 60mm F2.8 ($ 159.00) to experiment with. This is a true 1:1 ratio lens with a de-clicked iris and manual focus-only. It’s incredibly well constructed with a metal body and allows a close-focus distance of 26cm (about 10.25 inches). It has no communication with the camera body so EXIF iris data is not available. It allows a working distance of 14cm and you can unscrew the lens hood to allow more light in if required.

This set of 30 images was shot with 2 flashes, at (F8, 1/100th, ISO 200) at 52mm with extension tubes.

Of course setting up the shot is 90% of the work – aligning the camera and making sure the axis of movement is exactly perpendicular to the center of the object can take some time when you have a lot of axes of adjustment. Distortion can be mostly corrected for in post-production, but it also takes time.

Trying to eliminate dust, or at least as much of it as possible is also a major part of this sort of photography. I don’t mind the fix it in post attitude but I’d rather try and reduce the amount of work required.

This is about the maximum depth of field I could achieve as the tip of the key is close to exiting the frame. Blended in Photoshop, 60 images at F8, 1/60th, ISO 400.

Lighting is also a key component. I always like to keep things simple so some of my photos were only lit with a single light, and some with up to three. The shot of the key is an example of where more light sources were needed to give more interesting reflections. The lighting of course is crucial and this also took significant time to get right. In the end, I settled on using constant LED lighting rather than flashes as I found they gave me more control.

In the end I settled on using constant LED lighting rather than flashes

After a bit of trial and error I settled on 30-60 shots for each set of exposures. The number of shots was based around the amount of movement of the slider; if you are only traveling a few millimeters then you can get away with 30 shots, but for other scenes – like the watch – I needed 60. Initially I tried 15 shots per move but when the focal planes were blended in software I found too many out of focus areas.

This slightly odd shot of styling gel on a CD is another 60 image stack (F8, 1/60th, ISO 320) processed in Helicon Focus.

Processing the images

For post-processing I decided to try two different solutions: Photoshop, i.e. something that most people are familiar with, and Helicon Focus, a dedicated piece of software. I also chose to work with Raw files. My PC setup for this was by no means high end, I used a self-built Windows 10 PC with 32GB of RAM and a Ryzen 1700X CPU and stored the photos on a 500GB SATA SSD.

For post-processing I decided to try two different solutions: Photoshop, i.e. something that most people are familiar with and Helicon Focus, a dedicated piece of software

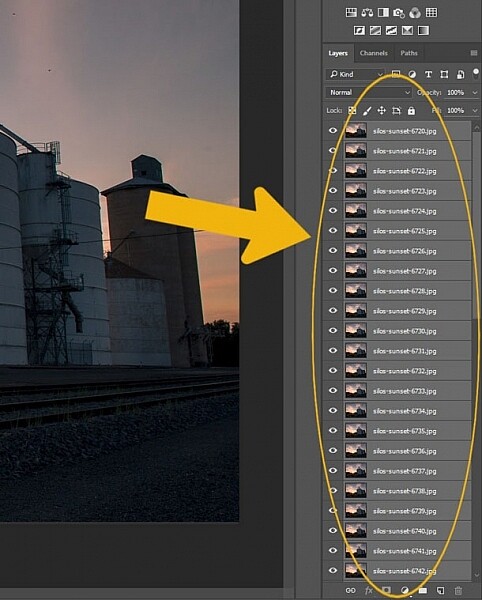
I started with Adobe Photoshop ($ 9.99 a month for a 12 month subscription). You can use Adobe Lightroom to apply adjustments to each Raw image globally and then import them as separate layers into Photoshop. I then aligned the images using the auto-align function and then I had to auto-blend all the layers into one. This was a few too many steps for my liking. It is possible to load Raw files directly as an image stack using the built-in script option, but then you still need to auto-blend the images and correct for any exposure changes you want to make.

It would take around 2-3 minutes to load 60 Raw images and align them it then took an additional 2-3 minutes to produce the final image. It was then possible to tweak layers that didn’t quite work by cloning data from layers above or below.

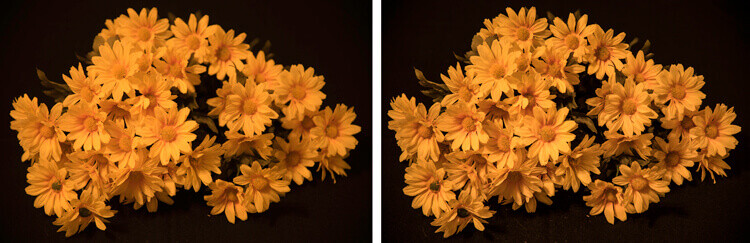
A set of 60 shots at F8, 1/160th at ISO 640 with the 7 Artisans 60mm 1:1 macro. The raw result from Photoshop, an uncropped image showing areas that couldn’t be blended without errors The Raw Helicon focus result – auto cropped by the software, although this can be turned off.

I also wanted to see what Helicon Focus could offer. The basic Lite package costs $ 30 per month or $ 115 for a lifetime license. It works a little differently than Photoshop. Loading the images can be done directly from the Raw files with basic development settings set up within Helicon Focus itself. I found that the time taken to load 30 Raw images was significantly reduced compared to Photoshop, around 5-10 seconds to load and 3-4 minutes to blend the final picture. After the initial compilation of the image it would then take only about 20-30 seconds to render any subsequent adjustments to the algorithms.

I found that the time taken to load 30 raw images into Helicon Focus was significantly reduced compared to PS

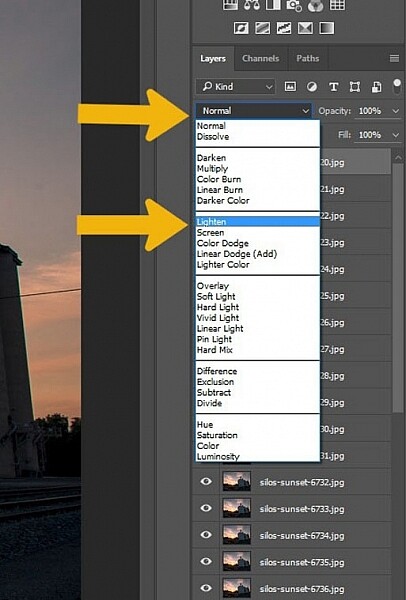
Helicon focus offers three ways of blending the images (weighted average, depth map and pyramid) and also a couple of sliders (radius and smoothing) to help tweak the final result. Helicon exposes to the user what it is doing as it draws a depth map from your images, something that was fascinating to watch, a bit like seeing images from a scanning electron microscope. Like Photoshop you can also clone data between image layers but I found that most of the time Helicon produced a better image or at least one that could be improved by adjusting the algorithm and some of the parameters without the need for cloning.

The depth map that Helicon Focus produces can be adjusted with the radius and smoothing sliders

It’s also very easy to compare the results from the three different algorithms as Helicon gives you a timeline at the bottom of the main window which allows you to look at your session history. You can then easily choose to view any of the versions you have created and see which one works best.

By default Helicon will automatically crop the final image (although this can be changed in the settings). Photoshop makes geometric adjustments and either leaves transparent areas of the image or gives you the option to content aware fill these areas.

Which software should you use? It comes down to what sort of photographer you are

Over all, I found that Helicon’s interpolation is better, and useful if you have fewer images – although it can’t work miracles. Although its Raw development options are limited, you can load images directly from Lightroom.

So which software should you use? I think it comes down to what sort of photographer you are. If you want to make minute adjustments to your image, then Helicon Focus is probably the tool for you, otherwise, Photoshop works fine.

General tips for success

The parts of the petals closest to the camera are causing blending problems here, that’s because they were never in focus.

As a whole, I found that I needed more setup time than I had originally thought. Working at this scale can introduce errors that I was not able to see initially in the viewfinder or on the rear LCD. My advice is to shoot a few frames and then process, to see what adjustments you might have to make, rather than shooting hundreds of images only to find that they won’t work. Below are five other tips from my adventure in macro photography:

  • Set up your slider for the farthest shot first as this will be the limiting factor to your framing.
  • Make sure you have a solid tripod and base for your subject. As you may end up with an exposure set that takes minutes to capture, any movement can ruin the resulting image.
  • Run at least two seconds between exposures, this gives time for the slider movement to settle down. If you plan to use flashes to light your subject you may need to increase this to allow for them to recycle. Use the silent shutter or electronic curtain if possible, this also reduces shake.
  • Set everything to manual, including white balance. Sometimes small shifts in white balance can cause issues when blending images.
  • Take more images than you think you need even if you don’t end up blending all of them. It can be very difficult to see what is in focus on your camera’s LCD even when using peaking or expanded focus.

How it worked and what I learned

The most important takeaway: shooting macro with a slider does work. It wasn’t perfect and I could definitely improve things, but it was a successful proof-of-concept.

Like anything, it takes time to get good results and this is achievable by careful setup combined with some experimentation. If you are thinking that focus stacking might be an area of interest for you, don’t think you need go off and purchase a motorized slider; manually changing your focus also works. However, you may find that the optical construction of some lenses (like the 7 Artisans 60mm) don’t allow manually re-focusing without the image size changing quite drastically thanks to focus breathing. If that is the case, a normal lens and some extension tubes may prove a better option.

As for me? I’ve been bitten by the macro bug again.

Chris’ macro gallery

$ (document).ready(function() { SampleGalleryV2({“containerId”:”embeddedSampleGallery_2283835564″,”galleryId”:”2283835564″,”isEmbeddedWidget”:true,”selectedImageIndex”:0,”isMobile”:false}) });
Articles: Digital Photography Review (dpreview.com)

 
Comments Off on How to: Shoot better macro photos using a slider and focus stacking

Posted in Uncategorized


A Beginner’s Guide to Focus Stacking

25 Aug

The post A Beginner’s Guide to Focus Stacking appeared first on Digital Photography School. It was authored by Bruce Wunderlich.

Other than for special effect, photographers generally do not want out-of-focus images. But sometimes, regardless of which camera settings are used, not every detail of an image can be captured tack sharp.

The depth of field (DOF) can be so shallow that interesting aspects of the photos are without sharpness. A smaller aperture may be used to increase DOF, but moving the aperture farther from a lens’s sweet spot introduces lens diffraction into the image, again resulting in some fuzziness. Also, if stopping down the camera’s aperture, the shutter speed will need to be increased and blurry images may result. Increasing ISO to help with the exposure will introduce digital noise to the image.

So how do you shoot with the best aperture and shutter speed combination and get sharp images from the front to the back of an image? A technique that can help resolve this problem is called focus stacking.

Here’s some helpful info about this technique.

13 image Focus Stack

A 13 image focus stack.

What You Need

  • A tripod.
  • A DSLR camera capable of shooting in manual mode. It is possible to use a point and shoot camera, but it must have a manual mode and manual focus capabilities.
  • A depth of field app (which is helpful but not required).
  • Photoshop or another focus stacking software.

How to Shoot for Focus Stacking

Focus stacking is similar in principle to HDR photography. However, with focus stacking, images are captured with different focus points and later combined in Photoshop; this is in order to create an image with more DOF than would be possible with a single exposure. Landscape and macro photography are two genres of photography that benefit most from using this procedure.

But be warned: Calm winds and reasonably stationary objects are a must!

Before beginning to shoot, it is always helpful to know a lens’s sweet spot, defined as the aperture at which the lens produces its sharpest image. (It is usually found about two to three stops from wide open.) Experiment until this important setting is determined.

6 image Focus Stack

Landscape

There are two basic scenarios when shooting landscapes that may benefit from focus stacking.

The first is when the subject is a close foreground object with an interesting background, and you want both these elements to be in sharp focus.

The second is when using a telephoto lens (which typically has a shallow depth of field) and the subject covers multiple distances that may be brought into sharper focus.

(FYI: If shooting a landscape with a wide-angle lens, the DOF may be deep enough to capture a sharp image that doesn’t require focus stacking.)

Here is a little trick to find out if focus stacking will benefit an image when photographing a scene or subject:

After composing the image, set the focus point about one third into the image. Then, using Live View, enlarge the image and check to see if the foreground and background are sharp or blurry. If either image isn’t in focus as sharply as desired, the image could benefit from focus stacking.

Steps for Shooting Landscapes for Focus Stacking

  1. Place the camera on a sturdy tripod; this is a must!
  2. Frame the subject and compose the shot.
  3. Determine exposure for the scene and set the camera to manual mode to ensure that the exposure is constant for every image.
  4. Set the camera to Live View and aim the focus point at the nearest object you want in focus. Use the camera’s zoom (the plus button, not zoom on the lens) to preview the focus through Live View. Then switch to manual focus and use the focus ring to fine-tune for sharpness if necessary.
  5. Take the first exposure.
  6. Without moving the camera or adjusting any settings, move the focus point to an object mid-way in the image and refocus.
  7. Take the second exposure.
  8. Again, without changing anything, refocus on an object at the farthest point of the intended image.
  9. Take the third exposure. To capture landscapes, three images are generally all that is necessary to create sharp focus stacking images, but it’s completely fine to take extra images to make sure that the entire scene is covered. A rule of thumb would be to add more images for longer focal lengths. Be aware that extra images will take longer to process in post-production. If available, check the DOF with a Smartphone app in order to figure out how many images will be necessary to get every aspect of the photo in focus.
Using three images focus stacking. The first image was focused on the fence, the second was focused mid-way into the image, and the third was focused on the front of the house.

The first image was focused on the fence, the second was focused midway into the image, and the third was focused on the front of the house.

Macro Photography

Macro photography can benefit from focus stacking more than any other type of photography, because a macro lens has an extremely shallow depth of field.

So here’s what you do:

  1. Place the camera on a sturdy tripod – a must!
  2. Frame the subject and compose the shot.
  3. Determine the exposure for the subject, and set the camera to manual mode to ensure that the exposure remains constant for each and every image.
  4. Set the camera to Live View and aim the focus point on the nearest object you want to be in focus. Use the camera’s zoom (the plus button, not a zoom on the lens) to preview the focus through Live View. Then switch to manual focus and use the focus ring to fine-tune for sharpness, if necessary.
  5. Take the first exposure.
  6. Without moving the camera or adjusting any settings, move the focus point to a distance slightly farther away from the lens. Remember that DOF in macro photography will be measured in fractions of an inch, instead of in feet (as in landscape photography).
  7. Repeat step 6 as many times as needed to cover every aspect of the subject’s DOF. This could range from as few as six images to 30+ images. Make sure the entire subject is covered or the results may be unusable. If available, check a DOF app on your smartphone to figure out how many images will be necessary to get every aspect of the photo in focus.
By focus stacking the flowers only and leaving the background out of focus makes the flowers stand out in the final image.

Focus stacking the flowers only makes the flowers stand out from the background.

Image on right is a single image capture at 85mm focal length. Image on right is a 12 image focus stacked image. Each image had a DOF of less than one inch.

The image on left is a single image capture at 85mm focal length. The image on right is a 12-image focus stack. Each image had a DOF of less than one inch. Note the additional detail in the image on the right compared to the single image.

Tip: Take a shot with your hand in front of the camera before and after each series of images. When working with the images later, this will make it easier to tell where each series starts and ends.

Use you hand to mark the beginning of each series of images, this will make processing you images much easier.

Use your hand to mark the beginning of each series of images. This will make processing your images easier.

Processing the Final Images

Processing the files to achieve the final image may seem like the most difficult part of creating a focus-stacked image, but it’s really very simple to do in Photoshop. Here’s how:

  1. Open Photoshop
  2. Get each image on a separate layer. Under File, choose Scripts and Load Files into Stack. Click Browse and select all the images.
  3. Check the Attempt to Automatically Align Source Images box.
  4. Click OK and each of the images will open into a new layer in Photoshop.
  5. Open the Layer palette and select all layers.
  6. Under Edit, select Auto-Blend Layers.
  7. Check the box for Stack Images and Seamless Tones and Colors. Optionally, select Content-Aware Fill Transparent Areas, which will fill any transparent areas generated by aligning images in step 3. (Be aware that this will increase processing time. Generally, I do not choose this option; rather, I just crop the image slightly later, if necessary.)
  8. Click OK
  9. Flatten the image by selecting Layer>Flatten Image and save.

Focus-stacking-1

Note: If you are using a Lightroom and Photoshop workflow, after importing your images into Lightroom, instead of following steps two through five, you can simply add all your images into Photoshop as layers. Just select all your images, then go to Photo>Edit In>Open as Layer In Photoshop.

This will open all the selected images as layers. You will then have to align your images by selecting all the layers in the layer palette, then go to Edit>Auto Align Layers. Finally, continue at step six above.

Summary

It is nearly every photographer’s intention to capture the sharpest images possible, and focus stacking can be another tool to help you achieve that goal. The trick to this whole process is to take enough focused images to create a final photo that is in focus from foreground to background.

The results can be amazing once you get the hang of it; make sure to give it a try!

The post A Beginner’s Guide to Focus Stacking appeared first on Digital Photography School. It was authored by Bruce Wunderlich.


Digital Photography School

 
Comments Off on A Beginner’s Guide to Focus Stacking

Posted in Photography


Photoshop Focus Stacking for Still Life and Product Photography

09 Dec

The post Photoshop Focus Stacking for Still Life and Product Photography appeared first on Digital Photography School. It was authored by Darina Kopcok.

1 - Photoshop Focus Stacking by Darina Kopcok for DPS

Still life and product photography often require that your entire subject be sharp.

This can be difficult to achieve in-camera because if you’re shooting up-close, you can’t always get a lot of your subject in focus.

Stopping down to a smaller aperture (higher F-stop number) will not necessarily help you get a sharper image.

Enter Photoshop and focus stacking.

Focus stacking is a post-production technique of blending several images with different focus points to create one image that is sharp and in focus throughout the entire subject.

It’s the ultimate way to get the sharpest images, and it’s a crucial technique to know for still life photography.

2 - Photoshop Focus Stacking by Darina Kopcok for DPS

Why you can’t get razor sharp photos

Your aperture, focal length and the distance from your subject all impact the sharpness of your image.

Shooting at a higher F-stop number like f/22 won’t help you get sharper images in still life photography because of lens diffraction.

Lens diffraction in a phenomenon of optical physics that occurs in the lens and camera sensor.

When you shoot at f/2.8 or f/4, a lot of light hits your camera sensor directly. At apertures like f/16, the light hits the subject less precisely and causes a loss of sharpness.

It doesn’t matter how good your lens is – your images will be less sharp at apertures of f/16 and higher due to this law of physics.

The more you stop down, the finer details will blur out further.

Lens diffraction tends to be worse in zoom lenses than prime lenses because zooms have several moving parts.

3 - Photoshop Focus Stacking by Darina Kopcok for DPS

The depth-of-field problem

In still life and product photography, you often need to get pretty close to your subject. This means a shallower depth-of-field.

If you’re shooting small objects like jewelry, or objects that need to fill the frame, you’re usually so close that its entire depth cannot be in focus.

Using a macro lens like a 100mm or 110mm will also give you a shallow depth-of-field.

This is great if you’re doing food photography and want that blurred out background that is sought after in that genre, but for other types of still life, it creates a problem.

4 - Photoshop Focus Stacking by Darina Kopcok for DPS

Shooting for focus stacking

In order to focus stack in Photoshop, you need to shoot in a certain way with certain tools.

First of all, you need a sturdy tripod because your subject must be in exactly the same position from shot to shot in order to be successfully blended later in Photoshop.

If you accidentally bump your tripod, you’ll need to start all over again.

A shutter release is recommended to activate the shutter. Pressing the shutter by hand will introduce a small vibration that can introduce camera shake into the image and cause them to be misaligned in Photoshop.

That being said, Photoshop does a good job with aligning layers that are slightly off.

Personally, I like to tether my camera to Lightroom or Capture One and activate the shutter from within the program.

To shoot for focus stacking, start off by composing your shots and determining your exposure. You should use manual mode so that your exposure is the same from shot to shot.

  • Choose a point on your subject to focus on and take a shot.
  • Focus on a different point on your subject without moving the camera or adjusting any setting
  • Choose the next point and take the final exposure.

Three images will often be enough to cover each area of depth-of-field but it will vary by image

5 - Photoshop Focus Stacking by Darina Kopcok for DPS

Focus stacking in Photoshop

To blend the images together in Photoshop, start off by exporting PSD files into a folder or onto your desktop where you can easily find them.

  • Open Photoshop.
  • Go to File and choose Scripts.
  • Select Load Files into Stack.
  • Click Browse and select all the images from where you saved them initially.
  • Check the Box for Attempt to Automatically Align Source Images.
  • Click OK. Each of the images will open as a new layer in Photoshop.
  • Hold down Shift and click on the top layer in the Layers panel to highlight all the layers.
  • Under Edit, select Auto Blend-Layers.
  • Check the box for Stack Images and also for Seamless Tones and Colors. DO NOT check ‘Content Aware.’ Click OK.
  • Save the final image.

If you have uploaded a lot of images, flatten the final image by selecting Layer -> Flatten Image -> Save.

6 - Photoshop Focus Stacking by Darina Kopcok for DPS

Conclusion

Focus stacking is necessary for product photography but also very useful for other types of still life photography – even food photography.

If you’re fairly new to Photoshop, don’t be intimidated.

Focus stacking is a lot easier than you might think and you will undoubtedly be pleased with your results.

Have you used photoshop focus stacking? If so, share with us your thoughts and images below.


The post Photoshop Focus Stacking for Still Life and Product Photography appeared first on Digital Photography School. It was authored by Darina Kopcok.


Digital Photography School

 
Comments Off on Photoshop Focus Stacking for Still Life and Product Photography

Posted in Photography


How to do Focus Stacking in Photoshop for a Seemingly Infinite Depth of Field

02 Oct

Whenever you do macro or close-up photography you usually have to choose very carefully what you want to keep in focus. This can also happen when you want to shoot a landscape and you want to include an element close to you but you end up with a blurry background.

So it seems that doesn’t matter if you go big or small you always have to make compromises regarding the depth of field. However, there is a post-production way around it, stay with me and I’ll show you how to do focus stacking!

Focus Stacking for an Infinite Depth of Field

First, what is depth of field?

Depth of field, commonly referred to as DoF, refers to the distance between the first and last object that appears in focus or sharp within an image. It covers the space in front of and behind the focal plane, in other words where you put your focus.

How broad this space or distance is can be determined by different factors: the aperture, the focal length of your lens and the physical distance between the camera and the subject.

Even if you have these three factors to move around in order to expand your depth of field, there are certain conditions that just won’t allow you to get as much DoF as you need. This is where Photoshop comes in, when you need to achieve an impossible or seemingly infinite depth of field.

While this is a post-production process, you need to consider and get it at the shooting stage as it’s not something you can achieve by fixing your photo later. You need to prepare several photos that you’ll stack together in order to create one fully focused image.

So basically what you need to do is shoot the image with different parts in focus. Everything else needs to remain the same, this means the same framing and settings and you ONLY adjust your focus in each shot.

Focus Stacking for an Infinite Depth of Field - source images

A few tricks for shooting images for focus stacking

  • For best results in the post-production, it’s better to have good material to work with so I recommend using a tripod so that the framing is exactly the same in each image.
  • Adjust the focus manually and in order (like from closest to farthest) so that you don’t lose track and have a shot where every area of the photo wasn’t sharp at some point during the shooting. Think of it as bracketing the focus.
  • The more photos you take the better so that Photoshop will have enough information to form your final image.

Getting Started

Okay once you’re back at home base, download your photos to the computer. The first thing you need to do is open them all into the same file in Photoshop. You can do this by going to Menu > File > Scripts > Load Files into Stacks.

In the pop-up window, set it to use Files and then with the Browse button choose the set of photos you took. Check off the option “Attempt to Automatically Align Source Images”, especially if you didn’t use a tripod. But even if you did it’s useful to keep it checked to compensate for the focus breathing which is the change in scale when you re-adjusted the focus for each photo.

Focus Stacking for an Infinite Depth of Field - load images into a stack

Once you have them all, just click Open and Photoshop will load them in the same file, each on a separate layer. The filenames will become the name of each of the layers.

Note: If you forgot to check the Attempt to Automatically Align Source Images in the step before, you can always do this by selecting the layers and going to Menu > Edit > Auto-Align.

Focus Stacking for an Infinite Depth of Field - layers

Blending the layers

Now, select all of your layers. You can do this by clicking on the first one, then holding Shift+Click and click on the last layer. That way everything in between will get selected too. Now go to Menu > Auto-Blend Layers. A pop-up window will appear, check the “Stack Images” option and leave the Seamless Tones and Colors checked as well.

Focus Stacking for an Infinite Depth of Field - auto blend

From there Photoshop will do all the work so you just have to be patient.

Focus Stacking for an Infinite Depth of Field

I recommend that you zoom in and check the edges as you can find some problem areas that may require you to copy paste from the original files for fine-tuning, like this:

Focus Stacking for an Infinite Depth of Field

Once Photoshop has your image pasted together, you can go to Menu > Layer > Flatten Image to compress all the layers into one. Finally, make any adjustments you need to the exposure or contrast to get your final result.

Focus Stacking for an Infinite Depth of Field

This is the best way of doing focus stacking in Photoshop. However, if you find yourself outside the studio, without a tripod and unprepared, you can still give it a go. Just try to stay as steady as possible or you won’t achieve the required result.

For example, I took two photos, one where the small sculpture of the head in the foreground was focused and one where the background was focused. It was done without a tripod or any care about it leaving all for Photoshop to fix and as you can see it wasn’t able to align them.

Focus Stacking for an Infinite Depth of Field

However, in these examples, I also used only two pictures and no tripod but I was very careful and did my best not to move at all except for my two fingers turning the focusing ring. Of course, it’s impossible to actually do that but it was good enough for Photoshop to do an acceptable result on my images.

So it’s not ideal but it can be done, never prevent yourself from trying!

Focus Stacking for an Infinite Depth of Field

The post How to do Focus Stacking in Photoshop for a Seemingly Infinite Depth of Field appeared first on Digital Photography School.


Digital Photography School

 
Comments Off on How to do Focus Stacking in Photoshop for a Seemingly Infinite Depth of Field

Posted in Photography


Kandao Raw+ is an automated image stacking tool for Raw files

17 Jul

Kandao, a maker of professional-grade 360° cameras has launched a new software product called Kandao Raw+. The tool was designed to boost image quality of the company’s own camera models Obsidian and QooCam, but also works with most DSLRs and other Raw-capable cameras that are supported by Adobe Camera Raw.

Kandao Raw+ uses computational photography techniques, similar to what we are seeing in many high-end smartphones, to create images with increased detail and dynamic range, as well as lower noise levels. To achieve that it combines a burst of Raw images into one single DNG file that can then be further edited with a Raw converter of your choice.

The software aligns shots automatically which means there is no need for shooting on a tripod. It is also capable of minimizing blur on any moving subjects in the scene. You can import up to 16 frames images of a burst into Kandao Raw+. You then pick one image as a reference for the auto-alignment.

The rest of the process is fully automated and will get you a DNG file with a 16-bit color depth and dynamic range that (theoretically) has been increased by almost 4EV, offering much more latitude in post-processing.

Best of all, Kandao Raw+ is free to download and use. You can find more information, technical detail and download links on the Kandao website.

Articles: Digital Photography Review (dpreview.com)

 
Comments Off on Kandao Raw+ is an automated image stacking tool for Raw files

Posted in Uncategorized


How to Reduce Digital Noise in Astrophotography Using Exposure Stacking

09 Jun

Astrophotography has become increasingly popular in recent years, with good reason. There’s something about the night sky, stars, and The Milky Way that are fascinating to us. They remind us of how small we are and how huge the universe we live in really is. Photographing them can make for some pretty spectacular images.

How to Reduce Digital Noise in Astrophotography Using Exposure Stacking - night photo with Milky Way visible

Digital Noise in Astrophotography

As camera technology has advanced, photographing the night sky has become possible for photographers of all levels and budgets. Low-light performance continues to improve, allowing us to photograph the stars at higher and higher ISOs. However, digital noise continues to be one of the biggest challenges for astrophotographers.

There are a number of different approaches to dealing with digital noise in your astrophotography, from your camera settings to the way you process them in post-production.

Digital noise is caused by a couple of things. Firstly, the camera sensor heats up as it exposes an image, causing an increase in noise. Secondly, an increase in sensor sensitivity, or ISO, can lead to more digital noise in your images. As both high ISO values and long exposures are going to lead to more digital noise, you’re going to need a strategy to deal with it in your astrophotography.

path to the ocean with Milky Way in the night sky - How to Reduce Digital Noise in Astrophotography Using Exposure Stacking

Exposure Stacking

There is a technique called exposure stacking that is very effective in reducing the digital noise in your photos. You take multiple exposures with the same settings, stack them into layers inside Photoshop, align the stack, then Photoshop will create an image based on the median of all the stacked exposures. The final image will show the parts of your exposures that are consistent through each layer, like the stars. Because digital noise is random, and changes from one exposure to the next, it will not be visible in the final stacked image.

If you’re still following me, great. It sounds complicated, but I’m going to walk you through exposure stacking step-by-step and you’ll see it’s really not that difficult. It can take a little time to get right, but it’s totally worth it when you see the difference it can make in your night sky photos.

Milky Way beach photo - How to Reduce Digital Noise in Astrophotography Using Exposure Stacking

Capturing the Stars In-Camera

There are plenty of other articles that will teach you in detail how to take great astrophotography, so I won’t go into it here. However, there are a few considerations that are required to get the exposures correct in order to be able to use the exposure stacking technique later.

1. You need multiple exposures with the same camera settings. You can take as many shots as you want, but I would suggest using a minimum of 10. Try to capture them as close together as possible to minimize movement of the stars between each exposure. The more time that lapses from the first exposure to the last, the more work will be required to stack them properly.

2. Turn off Long Exposure Noise Reduction. This is probably called something like “Long Exposure NR” in your camera. It will cause each exposure to take twice as long when it’s turned on, meaning there will be twice as much movement of the stars between exposures. It also means you’ll be double-processing your images, causing a reduction in image quality.

3. Make sure the stars in your photos are pinpoint. They need to be sharp and have as little streaking as possible. You can work out the maximum exposure time to create pinpoint stars based on the focal length of your lens using this tool.

Import and Develop in Lightroom

Again, there is a wealth of information about how to process astrophotography in Adobe Lightroom. All I do in Lightroom is check each exposure to eliminate any images that are unusable due to camera movement, do a basic edit, then open my selected images to Photoshop as layers.

How to Reduce Digital Noise in Astrophotography Using Exposure Stacking

Use “Open as Layers in Photoshop” to do exposure stacking. Go to: File > Edit In > Open as Layers in Photoshop.

The main things to remember here are that you make sure to sync your edits with all the exposures that you’ll be using and to avoid over-processing the images in Lightroom. Avoid sharpening and noise reduction at this stage of the process. Also take it easy on contrast, clarity, and dehaze. You can perform more creative edits on the final stacked image.

Aligning and Stacking Exposures in Photoshop

Ensuring your images are all aligned correctly is vital when doing exposure stacking. If they are not, you will end up with blurry stars. There are a couple of ways to align exposures. Try the auto-alignment method first and if it doesn’t do a good job you’ll need to use the manual method.

Auto Alignment

  1. Select all layers.
  2. Select Edit > Auto-Align Layers…
  3. Select Auto. Click OK.

How to Reduce Digital Noise in Astrophotography Using Exposure Stacking - auto-align layers

Manual Alignment

    1. Make only the bottom two layers visible.
    2. Select the second layer and change its blend mode to Difference. You’ll see the image go mostly black with white specks. The white areas represent the parts of the two visible images that are not aligned correctly.

How to Reduce Digital Noise in Astrophotography Using Exposure Stacking

  1. Click Edit > Free Transform.

How to Reduce Digital Noise in Astrophotography Using Exposure Stacking - free transform

  1. Click View and make sure Snap is unchecked.
  2. Zoom in on a corner, hold down command/control and move the corner box around until you see the white parts of the image line up and turn black. It will take some trial and error.

How to Reduce Digital Noise in Astrophotography Using Exposure Stacking

    1. Repeat with each corner of the image. You may need to go back to readjust a corner that you’ve already moved. It won’t be perfect, but try to get it as close as possible.
    2. Press return to exit Free Transform mode, then change the blend mode back to Normal.
    3. Make the layer you’ve just adjusted invisible and the next one up visible.
    4. Repeat with every layer, aligning each one with the base layer until they’re all aligned as well as possible.

Stacking Layers

  1. Make sure all layers are visible and selected.
  2. Right-click on one of the layers and click Convert To Smart Object.

How to Reduce Digital Noise in Astrophotography Using Exposure Stacking

  1. Click Layer > Smart Objects > Stack Mode > Median.

<ol> <li>

Finish up

When Photoshop has finished working its magic, you should end up with an image that’s much cleaner with significantly less noise than you started with. Your stars probably won’t look quite as sharp when zoomed into 100%, especially if the alignment wasn’t quite right, but you’ll be the only person who looks that closely. Don’t forget to crop the edges that have moved during the alignment process.

Now you can apply any other creative edits you might like to your image. You can either do this while still in Photoshop or save the image and apply the adjustments back in Lightroom.

This may seem like a complicated process, but once you’ve done it once or twice you’ll get much quicker. If you’re anything like me, you’ll find the effort is worth it for the lovely, clean, noise-free astrophotography images it gives you.

The post How to Reduce Digital Noise in Astrophotography Using Exposure Stacking appeared first on Digital Photography School.


Digital Photography School

 
Comments Off on How to Reduce Digital Noise in Astrophotography Using Exposure Stacking

Posted in Photography


How to Photograph the Images Needed For Focus Stacking

28 Apr

This tutorial will help make it much easier for you to take the photographs needed for focus stacking. This is the best and the easiest way to achieve the results you want. There are a few details along the way, but the bonus is that there are also other photographic situations where you will be able to apply the same technique.

How to Photograph the Images Needed For Focus Stacking

What is focus stacking and why is it needed?

When your camera is really close to the subject, depth of field will be very shallow. For example, if you are using a 100mm lens, at a distance of 50cm (nearly 10 inches from your subject) with an aperture as small as f/16, the area which is acceptably sharp is just 1.9 cm (about 3/4 of an inch). Reduce the distance to subject to only 25cm (less than 5 inches) and the depth of field reduces to only 0.36 cm (1/6th of an inch).

How to Photograph the Images Needed For Focus Stacking
The only way to conquer this issue in order to get a greater depth of acceptable sharpness in a final photograph is with computational photography. That means using software to blend together a number of photographs which have been taken with different points of focus. This computational process is called focus stacking.

Input

The recommendation made in this article is an application of the old computer acronym of GIGO. Garbage In, Garbage Out. If you input rubbish, the output will be rubbish. To achieve the best results with focus stacking, you need to produce the photographs which are technically the most suitable for the focus stacking process.

How to Photograph the Images Needed For Focus Stacking

Processing

A while back, I decided that I wanted to make some images that would look good in a home or workplace, which would reflect the Filipino environment. With various adjustments, the five photographs shown in color above were combined to produce the image below (and a lot more like it!).

How to Photograph the Images Needed For Focus Stacking

If you like the idea of producing something like this, with sharp focus through the whole frame, it needs a little attention to start. This soon becomes quite easy, and you may find that it is actually a lot of fun. Find your own subject, then follow along with this method for producing your focus stacking images.

The actual processing of the images is a sequence of steps, and I would be happy to go through my approach for you at another time. Although there are other specialist programs for producing a focus stacked image, you will most likely use Photoshop. Of course, there are tutorials on how to do this here on dPS; A Beginner’s Guide to Focus Stacking.

How to Photograph the Images Needed For Focus Stacking

The Method – Part One – It is a Surprise

At this point in most focus stacking tutorials, you will see somebody holding a set of focusing rails. Forget it! No further expense is required here. They might then talk to you about focusing manually. Forget that too! No need for any delicate touch with this method. You do not even need a cable release. This is absolutely all you need.

How to Photograph the Images Needed For Focus Stacking
In the past, I had not even bothered to install Canon’s software offerings. Yes, the surprise news might just be that it is Canon EOS Utility which will serve you best for shooting focus stacking images.

As far as I have been able to determine, Nikon users will find that Nikon Capture includes a Camera Control component. I do not have the facility to put that to the test, but I imagine it works just as well. If you shoot Nikon and give this a try, do tell us how it worked for you in the comments section below.

The magic trick – the secret sauce – the silver bullet, for making images for focus stacking is the Canon EOS Utility program. It allows total remote control of the settings of your camera when shooting tethered to your computer.

How to Photograph the Images Needed For Focus Stacking

Plug and play!

Once you have your shot set up, you can control everything from your computer. If that happens to be an adjacent laptop, that will work the best. However, the photographs which follow below were produced with everything controlled from a computer in another room, fully 10 meters, more than 30 feet away from the set.

The Method – Part Two – The Mechanics

This type of photography, which I think of as “constructed photography”, does take a little while to set up. Follow these steps:

  • Put your camera on a tripod.
  • Compose your shot.
How to Photograph the Images Needed For Focus Stacking

You need to make two measurements.

  • Measure from the focal plane of the camera (the mark indicated above) to the front of the object which you are photographing (A), as shown above.
How to Photograph the Images Needed For Focus Stacking

The circle with a line through it indicates the focus plane – this is where your lens focuses the image onto the sensor.

  • Measure the depth of the object, from the point which is nearest to the camera, to the point farthest away. I have found that a steel rule or tape measure works well enough for these tasks.

Standard issue.

  • Now take a test shot.
  • Use a small aperture, like f/10, then check the exposure. I tend to look at the LCD screen which gives the RGB histograms. This allows you to judge the exposure, exposing to the right if you like, but also to check that none of the individual colour channels is overloaded. That is prone to happen in photographs which have one subject filling the major part of the screen. At this stage, exposure is not critical, you are only trying to achieve a guide shot.
  • Make a note of the settings which have given a reasonable exposure.
  • Cover the viewfinder to prevent possible light leakage.
  • Switch off image stabilization, it is always the best practice to do so when your camera is on a tripod.
  • It is not essential, but you might choose to put your camera into manual focus.
How to Photograph the Images Needed For Focus Stacking

Manual focus, stabilizer off.

  • Again, not essential, but you might choose to put your camera in Manual shooting mode.
How to Photograph the Images Needed For Focus Stacking

Switch to Manual Mode

Now the magic begins, the bit which makes me smile at how brilliant and easy it is.

The Method – Part Three – Computing

Connect your camera to your personal computer using Wi-Fi, a USB or Ethernet cable, whatever works best for your setup. I like cables, so I use a USB cord.

Run the EOS Utility software. Your camera should be discovered quite easily.

How to Photograph the Images Needed For Focus Stacking

The EOS Utility dashboard.

Choose “Remote shooting” and the screen below will appear.

How to Photograph the Images Needed For Focus Stacking

You are in control

From the comfort of your computer, you can release the shutter, the ultimate cable release, and do pretty much whatever else you like. As advised, you can switch off autofocus, and switch to Manual Mode without even touching the camera. In fact, adjustments can be made to all the usual camera settings for shooting. Most importantly for this exercise, you can switch to Live View shooting. Do so, and you will see a screen like this.

How to Photograph the Images Needed For Focus Stacking

The Remote Live View window. This is where the fine focusing happens.

The first thing to do is to fine tune the exposure. Controlling your camera from EOS Utility soon becomes quite easy, and intuitive. You can actually learn a lot about exposure by experimenting with the exposure triangle of ISO, shutter speed, and aperture all from your computer, with the benefit of Live View in grand scale.

One extra benefit of shooting in Live View is that you will have locked the mirror up, and removed any chance of vibrations from that source.

How to Photograph the Images Needed For Focus Stacking

You can click on the screen arrows, even use the scroll wheel on your mouse to make adjustments.

Take a shot and it will soon appear on your screen. This is not an article on ETTR (Exposing To The Right), but there is a good one here; Exposing to the Right. You can now adjust the exposure to try and get as much data onto your sensor as possible (the premise of ETTR). Take your time and take as many shots as you like. Check the histogram, check what you can see on the screen, and get the exposure exactly to your liking.

I do tend to prefer a shorter exposure. In the interests of sharpness, if I can get a compromise between ISO, and aperture which gives me an exposure of less than 1-second, I believe that is a good step in the direction of sharper photographs.

For this particular exercise, there are all sorts of detailed decisions, but the most important part of this screen is the Focus Adjustment and the Zoom View.

How to Photograph the Images Needed For Focus Stacking

Double clicking on the area highlighted, shown towards the bottom of the screen capture of the Remote Zoom View window (shown above), will bring you to this window below.

How to Photograph the Images Needed For Focus Stacking

Zoom View – allow you to easily get the nearest point of the image sharp as possible.

You now have turbocharged, hyper control of your focus. Not until you take the plunge and try this method, and find out that you can focus to the width of a hair, will you realize how brilliant it is. There is even the facility to zoom in further still.

I believe you will find the focus adjustment intuitive. There are three different levels for adjusting focus in either direction, “<<< / << / <” and “> / >> / >>>”. This is very useful in a way that no focus rails or manual adjustment could ever be. The bonus is that you will have no physical contact with the camera whatsoever.

The Method – Part Four – Finally

Martin Bailey is a photographer who goes into admirable detail. He is of the opinion that if you start photographing to the rear of the object, and work forward, Photoshop handles the process better. I do not see the evidence so clearly but, experience tells me, he is very likely right.

Another piece of advice would be to shoot a little wider, do not frame as tightly as you might usually. It gives you a little more room for maneuvering if you need to make adjustments.

How to Photograph the Images Needed For Focus Stacking

You now need a Depth of Field (DoF) calculator. There’s a wide choice, there are many that are readily available for your computer, phone, and for use online. I happen to use, Simple DoF (iOS only, see Android options here), as shown in the screenshots. Let’s apply it to a situation.

How to Photograph the Images Needed For Focus Stacking

The depth of field required for this scene is about 20cm (8 inches) To determine what you need, measure from the part of the object nearest the camera to the point furthest away. Divide that by the Depth of Field of 3.39cm (let’s call it 3.4cm), which tells us we will need 5.88 images. That means that we will need to take six evenly spaced images from the back to the front, in order to get every part of the image in focus. Here they are!

How to Photograph the Images Needed For Focus Stacking

Focused at the rear, on the plastic case of the ruler.

How to Photograph the Images Needed For Focus Stacking

Moving forward, picking a point about 3cms (just over an inch) closer each time.

How to Photograph the Images Needed For Focus Stacking

Focused between 6 and 7 inches.

How to Photograph the Images Needed For Focus Stacking

Shot 4.

How to Photograph the Images Needed For Focus Stacking

Coming forward.

How to Photograph the Images Needed For Focus Stacking

Focus closer 3cm, about an 1 inch, each time.

How to Photograph the Images Needed For Focus Stacking

Finally, focused sharply on the front edge of the ruler.

You can go to whatever lengths of precision you like. Experience allows me to trust my judgment of distance, and I am happy to err on the side of taking too many shots. If I reached the front edge of the saucer and found that I had taken eight shots I would be perfectly happy with that. As it happens, it seems that I took seven.

Here is the image produced from all the above by following the focus stacking processing routine in Photoshop.

How to Photograph the Images Needed For Focus Stacking

The final focus stacked image.

You should always be looking for ways to improve. As I have said, better results from less effort is a good thing.

Next

I think that to be certain of producing the highest quality product, the next time I do a project like this, I would refine my technique a little further.

I would actually put a rule next to the object but, unlike this time, do so temporarily. In this specific example, I would decide to take 3cm as my Depth of Field. I would then focus a shot on the 0cm mark of the ruler. I would then use the focus controls in EOS Utility to nudge the focus to 3cm and see how many clicks of the “>”, “>>” or “>>>” buttons it took to move the point of focus 3cm. It might, for example, be three clicks of the “>>>” button. Again, sticking with this example, I would then know that I needed to take seven shots. I would then take a shot focused on the back edge, click “>>>” three times, take another shot, click “>>>” three times again … and so on. As I said at the start, what could be easier?

Summary

This leaf was 10cm, that is 4 inches from front to rear. I do not think there is a way to produce this final image without using the technique of focus stacking. What you have read above is the best, and the easiest way to produce the shots.

How to Photograph the Images Needed For Focus Stacking

Waving goodbye?

I am all for spontaneous, shooting on the run, shots. However, if you want to shoot in a more controlled way, I think you might find the control offered by Canon EOS Utility to be a lot of fun. I do!

Once you have been introduced to it and learn some of the power of the software, you may well find yourself using it for other projects. This last week, I have used Canon’s EOS Utility to produce some product shots. The proof is in using it, and I hope you can see that it is something you can try if you want to do focus stacking.

The post How to Photograph the Images Needed For Focus Stacking by Richard Messsenger appeared first on Digital Photography School.


Digital Photography School

 
Comments Off on How to Photograph the Images Needed For Focus Stacking

Posted in Photography


Step by Step How to do Cloud Stacking

31 May

The effect of the clouds streaking across the sky is a very popular look now, but not everyone has ND filters and can get those photos. However, there are other ways of getting similar results. Cloud stacking can give a similar look. The process is much like what you do for stacking car light trails. You have to be more careful with how you take the original images, but you can get some wonderful results if you follow these steps.

LeanneCole-cloud-stack-original

One of the original images.

You need a lot of photos for cloud stacking, and the best way to get them is by doing time lapse photography. Take a series of images over time, then try stacking them to see if they will work. Unfortunately, you don’t always get enough movement in the sky to get a good cloud stacking image, but others will be fantastic.

How to do Time Lapse Photography to get the images for stacking

Time lapse is about taking a series of images, one after another with a break in between, to capture the movement of a scene. Normally, once they are taken, you would put them on your computer and make a video from them to show that movement, however for cloud stacking you will be doing something else.

There are several ways of capturing your photos for a time lapse sequence. Many Nikon cameras come with a feature that allows you to do some, called Time Lapse Interval. You can set it up so that it will take the images at certain intervals, how many shots to take each time, and the final number of images you want. Basically, you can tell your camera to take a photo every 5 seconds, and to stop when you have 300 images.

LeanneCole-cloud-stacking-camerasetting

The Interval Timer Shooting on a Nikon Camera

If you have an intervalometer it will do the same sort of thing. Set what the interval will be, and how many shots to take. If you have neither of those options you can still do them, but it will mean you will have to keep an eye on the time and remember to press the shutter button at the intervals.

LeanneCole-cloud-stacking-intervalometer

The Nikon Intervalometer, but you can also purchase other ones as well, get the one that works with your camera.

Usually what you do first is determine what the interval (time between shots) needs to be. Look at the sky and see how fast the clouds are moving. If they are moving fast, then the interval in between shots might need to be shorter. If the clouds are slower moving, then longer times will be needed. It does take experience, and the more you do it the better you get at figuring out the time between the shots you need.

The images for this tutorial were done at sunset, and the clouds were moving moderately fast. The camera was set to take an image every 10 seconds. A total of 122 photos were taken, but only 54 frames were used for the final image.

Direction of the Clouds

Cloud stacking seems to work best if the clouds are moving towards or away from you. Look for the clouds that appear to flow in a V shape. The base of the V is on the horizon and the arms come out over the top.

Using the photos

Once you have the photos on your computer, you need to work out which ones to use. The photos do need to be loaded into Adobe Photoshop as layers, the first consideration has to be the size of the images. If they are raw files they are likely to be too large to do this, so they will need to made smaller.

You can process the images in Lightroom first. Do a basic edit, and then sync, so that all the images have been treated the same. Resize the images when you export them from Lightroom, saving as smaller jpegs. (As this was going to be a tutorial for dPS the images were resized so the long side was 1500 pixels – if you want to print your image make sure you size appropriately, but do a test smaller first.)

Loading the images

For this tutorial I used Adobe Bridge, but you can also do it in Lightroom.

LeanneCole-cloud-stack-1

All the images to be used for the cloud stacking.

Select all the images you want to stack, using either Ctrl+A, or click on the first one, press the Shift key and hold, and click on the final image. Load all the images into Photoshop as layers. Select Tools > Photoshop > Load Files into Photoshop Layers (in Lightroom right click and select Edit in > Open as layers in Photoshop).

LeanneCole-cloud-stack-2

Select all the images and open them as layers in Photoshop.

This can take a while, depending on how many images you are using, and how large the files are. Once they are loaded select all again. Click on the top layer, hold the shift key down, then click on the bottom layer and it should select them all.

LeanneCole-cloud-stack-3

In Photoshop select all the layers.

Stacking the clouds

Go to the layer blending options, at the top of the layers panel and select Lighten.

LeanneCole-cloud-stack-4

Go to the Blending options and select Lighten.

You should notice a difference straight away.

LeanneCole-cloudstack-first stack

The image after the stacking process.

You could leave the image there and be happy with your stack, but for this tutorial I’ve added some extra ideas on processing . They are relevant to this image, but you can try some ,or all of these ideas for your own image.

Some Additional Processing Tips

There are no hard and fast rules with what you can do when processing an image, it is up to you how you want to go. Here are some ideas to get you started.

Select all the layers, except for the bottom one, and put them into a group. This will make it easier to process the images. In this image it was windy, and the trees moved around, so in the final image they look blurry. By adding a mask to the groups you can carefully use the brush tool, painting with black, to go over the trees so only one is seen and they appear sharper.

LeanneCole-cloud-stack-6

Add a mask to the Group layer and remove anything unwanted, like the trees in this image so only layer one is seen.

The silos appear a bit too dark, and lightening them up a bit would make them stand out a little more as well.

Select the Lasso Tool, and draw a line just inside the silos. Press Shift F6 to get the feather tool. For this image a small amount of feathering was chosen as it is a small image, but on larger sized ones you may prefer to use a feathering of around 200 pixels.

LeanneCole-cloud-stack-7

Use lasso tool to draw a selection, and then feather it.

Go to the Adjustments above the layers panel and click on Curves. Try to always use these ones as they do the adjustment as a layer, and if you decide you don’t like it later you can simply edit it, lower the opacity of the layer, or delete the layer (this is non-destructive editing).

Add some light or dark depending on what the image needs. For this one the silos were made brighter.

LeanneCole-cloud-stack-8

For this selection curves was used to lighten up the silos.

The final bit of processing will be to add a little vignetting or gradient. Add a blank layer to the image, click on the symbol at the bottom of the layers panel, it is the one next to the rubbish bin. Make sure it is selected, then select the gradient tool from the toolbar.

LeanneCole-cloud-stack-11

Use the gradient tool to add some darkness to the sky.

At the top under the menu bar you will see the options for the gradient tool. Make sure the tool selected is the Foreground to Transparent is the one you are using (make sure the foreground color is set to black).

LeanneCole-cloud-stack-12

Make sure you have the right tool option for what you want to do.

You don’t want this to be 100%, it’s best to use it at around 50%. You can build it up, but start with that. You can change that by going to the tool options and changing the 100 to 50.

LeanneCole-cloud-stack-13

Add some gradient to the sky to darken it slightly.

To use the tool, click and hold outside the image then move inside the image and release. It will do a gradual lightening of the colour, so the darkest area is where you did the first click.

If you want it darker you can repeat until you get the desired effect. The image here it was done twice.

LeanneCole-cloud-stack-final

The final image

That is a very basic edit on this image, but is enough for now. The image is fine as it is, but, as with all images, the only thing stopping what you can do, is your imagination.


googletag.cmd.push(function() {
tablet_slots.push( googletag.defineSlot( “/1005424/_dPSv4_tab-all-article-bottom_(300×250)”, [300, 250], “pb-ad-78623” ).addService( googletag.pubads() ) ); } );

googletag.cmd.push(function() {
mobile_slots.push( googletag.defineSlot( “/1005424/_dPSv4_mob-all-article-bottom_(300×250)”, [300, 250], “pb-ad-78158” ).addService( googletag.pubads() ) ); } );

The post Step by Step How to do Cloud Stacking by Leanne Cole appeared first on Digital Photography School.


Digital Photography School

 
Comments Off on Step by Step How to do Cloud Stacking

Posted in Photography


Looking Sharp: A focus stacking tutorial

29 May

This was taken in the deserts of Southern Utah at Snow Canyon State Park near St. George, Utah. 

 Photo: Chris Williams Exploration Photography

Background: Understanding the Process

One of the questions that I receive quite often from beginner photographers is “How do I produce tack sharp images from front to back in challenging shooting conditions or in cases where the foreground fills up nearly half the frame?” The answer in short is to utilize a process known as focus stacking. The answer is simple but the process can be very labor intensive from a shooting and processing standpoint.

Even when working with a large depth of field there may be occasions where you still have to take more than one image due to low light, wind and or large foreground subjects. Most technique books will tell you that this is easily accomplished by stopping down to a very small aperture such as F22, focusing on a set focal point at about 1/3 of the way into the frame or determining the spot from your hyperfocal distance (the distance between a camera lens and the closest object that is in focus when the lens is focused at infinity), focus at that spot and take your image.

Here’s one of the images that I used during focus stacking.  This was shot at 35mm and at f/2.8 due to conditions at the time of shooting.  As you can see it was impossible to achieve sharp focus throughout the image.

In principle this sounds like a very quick and easy fix to a somewhat complex problem that plagues most landscape photographers. In practice, however, it comes with a couple of big issues. Not only can using an aperture this small decrease image quality due to diffraction, it doesn’t actually deliver the maximum possible depth of field. That’s where stacking comes in. In the digital age we can now improve upon this technique and produce higher quality, tack sharp images from the front to the very back of the frame.

Before diving into this process I should mention that you may not always need to use this technique and this process is really up for interpretation in regard to what you define as a ‘sharp image’. The lens quality and aperture play a huge role in whether or not you wish to go through the work of focus stacking an image. In general, I always use this process now as I want my images to look tack sharp even when printed at very large sizes.

Selecting the Aperture

Choosing the aperture is an important first step to this process. I always try to choose an aperture in the ‘sweet spot’ of the lens. This is a bit of a loaded term; you have to decide whether you are after maximum resolving power or greater overall focus in your image. These differences may be subtle in some cases, but regardless I always try to choose optimal sharpness over depth of field in an individual image, bearing in mind that I’m going to be stacking multiple images. I would rather take a few extra shots to ensure that the RAW files are of the highest quality I can achieve given the conditions.

Generally speaking, the sweet spot of a lens is about 2.5 to 3-stops from the maximum aperture. This does vary from lens to lens however; for example, I normally shoot between f/8 and f/11 when possible on my Canon 16-35mm f/2.8L ii to achieve the sharpest results possible (which I know is a few stops greater). The bottom line is to get to know your lens! You can even run it through an aperture progression and compare the images to find that coveted lens ‘sweet spot’.

Behind the Lens

Focus stacking can be very tricky when you’re out in the field. I use the following steps to ensure that I don’t miss a focus point and to make adjustments on the fly in changing conditions such as light, wind and rain.

  • Find your desired composition and make sure that your tripod is in safe position that won’t allow for any movement or shifting while you’re performing the in camera focus stacking.
  • Place your camera on your tripod, turn on live view, switch your lens to manual mode, make sure that your camera is set to manual and dial in your composition.
  •  Once you have the composition dialed in lock your camera down on your tripod and make sure that your ball-head or camera mount is completely locked down so no movement can occur during this process (if some movement does occur you can try to correct this using Auto-Align in Photoshop, but I always try to avoid this to the best of my ability).
  • Use either your camera’s in camera timer (set for 2-10 seconds) or use a remote shutter trigger to avoid any camera movement issues.
  • Once you are 100% sure that you’re happy with the composition it’s time to adjust your settings; I always fire a few test shots to ensure that I can freeze the foreground subject (flowers etc.) and to see what I can get away with in regard to ISO/Aperture/Shutter-speed while still yielding an acceptable result with respect to proper exposure and the signal to noise ratio.
  • This may sound trivial but play with your settings a bit to find the right exposure/sharpness balance; aim to keep the ISO at base and the aperture as close to the ‘sweet spot’ as possible (f/8-f/11 in most cases) this may not be possible depending upon conditions, so make adjustments as you see fit.
  • Adjust your CPL or lens filter (ND etc.), if you’re using one, to give the foreground more pop etc.

The Progression

Now comes the fun part: how do you make sure that you have everything in focus and that you don’t miss a focus point? There’s definitely more than one way to go about doing this, but I generally focus on the foreground elements that are closest to the lens; normally near the bottom 1/3 of the frame in live-view.

I normally zoom in to my area of interest in Live-View and dial in my focus point using manual focus.  After taking the image I repeat the process for my next focus point.
  • While in live-view, zoom in to the bottom most portion of your foreground subject and manually adjust the focus until everything is sharp and adjust your settings depending upon conditions (wind etc.)
  • To find your next focus point stay in live-view, zoom in to the same area you just photographed and move up in the frame to find your next focus point
  • Repeat this process until you reach the background elements in your image and take your final exposure.
  • You may want to bracket your last exposure to keep the highlights and shadows from clipping or to catch a sunstar; if you’re shooting on a camera that has a great deal of dynamic range (like a Sony a7r/ii or Nikon D810) then you may be able to do this with one exposure; it’s completely up to you

The toughest thing about focus stacking in the field is dealing with changing conditions such as wind, rain and light. When wind is an issue I always run through at least two or three focus stacking progressions to ensure that I have a sharp frame at each focus point. Even in perfect conditions I still run through a focus point progression at least twice to ensure that I haven’t missed a point. There’s nothing worse then getting home after a long day of shooting only to find that you completely missed a focus point.

Once you take your camera off of your tripod or move your tripod, it will be a huge pain to get everything lined up again and you may not even be able to in most cases. Double and triple check your exposures to ensure that you’ve got all of your focus points nailed down before moving your camera and packing up your gear.

Articles: Digital Photography Review (dpreview.com)

 
Comments Off on Looking Sharp: A focus stacking tutorial

Posted in Uncategorized


A Beginner’s Guide to Focus Stacking

23 Mar

Other than for special effect, photographers generally do not want out-of-focus images. But sometimes, regardless of which camera settings are used, not every detail of an image can be captured tack sharp. Depth of field (DOF) can be so shallow, that interesting aspects of the photos are without sharpness. Setting to a smaller aperture may be used to increase DOF, but moving the aperture farther from a lens’s sweet spot introduces lens diffraction into the image, again resulting in some fuzziness. Also, if stopping down the camera’s aperture, shutter speed will need to be increased and blurry images may result. Increasing ISO to help with the exposure will introduce digital noise to the image.

So, how do you shoot with the best aperture and shutter speed combination, and get sharp images from front to back of an image? A technique that can help resolve this problem is called focus stacking. Here’s some helpful info about this technique.

13 image Focus Stack

13 image focus stack

What You Need

  • A tripod.
  • A DSLR camera, capable of shooting in manual mode. It is possible to use a point and shoot camera, but it must have manual mode and manual focus capabilities.
  • Depth of Field iPhone app (helpful but not required).
  • Photoshop or another focus stacking software.

How to Shoot for Focus Stacking

Focus stacking is similar in principle to HDR. However, with focus stacking, images are captured with different focus points, and later combined in Photoshop, to create an image with more DOF than would be possible with a single exposure. Landscape and macro photography are two genres of photography that benefit most from using this procedure. Be warned – calm winds and reasonably stationary objects are a must!

Before beginning to shoot, it is always helpful to know a lens’s sweet spot, defined as the aperture that the lens produces its sharpest image. (It is usually found about two to three stops from wide open.) Experiment until this important setting is determined.

6 image Focus Stack

Landscape

There are two basic scenarios when shooting landscapes, that may benefit from focus stacking. The first is when the subject is a close foreground object, with an interesting background, both desirable aspects to be in sharp focus. The second, is when using a telephoto lens (which typically has a shallow depth of field) and the subject covers multiple distances, that may be brought into sharper focus. (FYI: If shooting a landscape with a wide angle lens, the DOF may be adequate enough to capture a sharp image that has no benefit in being processed by focus stacking.)

Tip: Here is a little trick to find out if focus stacking will benefit an image when photographing a scene or subject. After composing the image, set the focus point about one third into the image. Then, using Live View, enlarge the image and check to see if the foreground and background are sharp or blurry. If either or neither are in focus as sharply as desired, the image could benefit from focus stacking.

Steps for Shooting Landscapes for Focus Stacking

  1. Place the camera on a sturdy tripod – a must!
  2. Frame the subject and compose the shot.
  3. Determine exposure for the scene, and set the camera to manual mode, to ensure that the exposure is constant for every image.
  4. Set the camera to Live View and aim the focus point on the nearest object desired to be in focus. Use the camera’s zoom (+ button, not zoom on the lens) to preview the focus through Live View. Then switch to manual focus and use the focus ring to fine tune for sharpness if necessary.
  5. Take the first exposure.
  6. Without moving the camera or adjusting any settings, move the focus point to an object mid-way in the image and refocus.
  7. Take the second exposure.
  8. Again, without changing anything, refocus on an object at the farthest point of the intended image.
  9. Take the third exposure.
    To capture landscapes, three images are generally all that is necessary to create sharp focus stacking images, but it’s completely fine to take extra images to make sure that the entire scenee is covered. A rule of thumb would be to add more images for longer focal lengths. Be aware that extra images will take longer to process in post-production. If available, check the DOF with a Smartphone app, in order to figure out how many images will be necessary, to get every aspect of the photo in focus.
Using three images focus stacking. The first image was focused on the fence, the second was focused mid-way into the image, and the third was focused on the front of the house.

The first image was focused on the fence, the second was focused mid-way into the image, and the third was focused on the front of the house.

Macro Photography

Macro photography can benefit from focus stacking more than any other type of photography, because a macro lens has an extremely shallow depth of field.

  1. Place the camera on a sturdy tripod – a must!
  2. Frame the subject and compose the shot.
  3. Determine the exposure for the subject, and set the camera to manual mode to ensure that the exposure remains constant for each and every image.
  4. Set the camera to Live View and aim the focus point on the nearest object desired to be in focus. Use the camera’s zoom (+ button, not zoom on the lens) to preview the focus through Live View. Then switch to manual focus and use the focus ring to fine tune for sharpness if necessary.
  5. Take the first exposure.
  6. Without moving the camera or adjusting any settings, move the focus point to a distance slightly farther away from the lens. Remember that DOF in macro will be measured in fractions of an inch, instead of feet, as in landscape photography.
  7. Repeat step 6 as many times as needed to cover every aspect of the subject’s DOF. This could range from as few as six images to 30+ images. Make sure the entire subject is covered or the results may be unusable. If available, check the DOF with the iPhone app (www.setmycamera.com), in order to figure out how many images will be necessary to get every aspect of the photo in focus.
By focus stacking the flowers only and leaving the background out of focus makes the flowers stand out in the final image.

Focus stacking the flowers only makes the flowers stand out from the background.

Image on right is a single image capture at 85mm focal length. Image on right is a 12 image focus stacked image. Each image had a DOF of less than one inch.

The image on right is a single image capture at 85mm focal length. The image on right is a 12 image focus stack. Each image had a DOF of less than one inch. Note the additional detail in the image on the right, compared to the single image.

Tip: As often used when capturing HDR images, take a shot with your hand in front of the camera before and after each series of images. When working with the images later, this will make it easier to tell where each series starts and ends.

Use you hand to mark the beginning of each series of images, this will make processing you images much easier.

Use your hand to mark the beginning of each series of images. This will make processing your images easier.

Processing the Final Images

Processing the files to accomplish the final image may seem like the most difficult part of creating a focus stacked image, but it’s really very simple to do in Photoshop. Here’s how:

  1. Open Photoshop
  2. Get each image on a separate layer: Under File, choose Scripts and Load files into stack. Click Browse and select all the images.
  3. Check the box for Attempts to Automatically Align Source Images.
  4. Click OK and each of the images will open into a new layer in Photoshop.
  5. Open the Layer palette and select All Layers.
  6. Under Edit, select Auto-Blend Layers.
  7. Check the box for Stack Images and Seamless Tones and Colors. Optionally, select Content Aware Fill Transparent Areas, which will fill any transparent areas generated by aligning images in step 3. (Be aware this will increase processing time. Generally, I do not choose this option; rather, I just crop the image slightly later, if necessary.)
  8. Click OK
  9. Flatten the image by selecting Layer/Flatten image and save.

Focus-stacking-1

Note: If you are using a Lightroom and Photoshop workflow, after importing your images into Lightroom, instead of following steps 2 through 5, you can simply add all your images into Photoshop layers by selecting all your images, then go to Photo/Edit in/Open as Layer In Photoshop. This will open all the selected images as layers. You will then have to Align your images by selecting all the layers in the layer palette, then go to Edit/Auto Align Layers. Then continue at step 6 above.

Summary

It is nearly every photographer’s intention to capture the sharpest images possible, and focus stacking can be another tool to help you achieve this goal. The trick to this whole process is to take enough focused images, to create a final photo that is in focus from foreground to background. The results can be amazing once you get the hang of it! Give it a try and post your results and any questions you have here.

googletag.cmd.push(function() {
tablet_slots.push( googletag.defineSlot( “/1005424/_dPSv4_tab-all-article-bottom_(300×250)”, [300, 250], “pb-ad-78623” ).addService( googletag.pubads() ) ); } );

googletag.cmd.push(function() {
mobile_slots.push( googletag.defineSlot( “/1005424/_dPSv4_mob-all-article-bottom_(300×250)”, [300, 250], “pb-ad-78158” ).addService( googletag.pubads() ) ); } );

The post A Beginner’s Guide to Focus Stacking by Bruce Wunderlich appeared first on Digital Photography School.


Digital Photography School

 
Comments Off on A Beginner’s Guide to Focus Stacking

Posted in Photography