RSS
 

Posts Tagged ‘Spots’

Video: Adobe Lightroom trick makes it easy to search images for sensor spots

04 Jan

Professional photographer Anthony Morganti of ‘I Am Mr Photographer’ has published a new video that shows viewers how to systematically search for sensor spots (or water droplets and other unwanted specks) in an image using Adobe Lightroom Classic. The method is very simple and relies on a few keyboard shortcuts, as Morganti explains in his video.

Using this method, Lightroom users zoom in on the image and set the zoom box to the upper left-hand side of the image. From there, Morganti simply uses his computer’s Page Down function to scan through zoomed portions of the image in columns. The video includes instructions for viewers using Mac and viewers whose keyboards lack dedicated shortcut keys, among other things.

Articles: Digital Photography Review (dpreview.com)

 
Comments Off on Video: Adobe Lightroom trick makes it easy to search images for sensor spots

Posted in Uncategorized


Photography Hot Spots – Love ‘em or Hate ‘em?

16 Nov

I hear much maligning the days about photography hot spots. You know them, they are the places photographers seem to flock to: Mesa Arch, Tunnel View, Horseshoe Bend, Kjeragbolten (that rock wedged between two other rocks in Norway), etc… The list goes on an on and they tend to be natural wonders. Although, cityscapes are certainly included (e.g. New York’s Manhattanhenge).

Photography Hot Spots - Delicate Arch

But do those photography hot spots deserve their increasingly bad reputation? I asked some fellow photographers to give their perspective on the love and hate of shooting at photographic hot spots.

On The Side Of Love

The Sheer Beauty

Let’s face it; these places are popular for a reason. They are gorgeous! Maybe not when there is a crowd (even the Mona Lisa is hard to enjoy from four rows back in a packed crowd), but there is a reason these locations draw people, with or without cameras.

For instance, we see a picture of symmetry and grandeur of the Taj Mahal and we are drawn in.

Photography Hot Spots - Taj Mahal

And all those photography hot spots in National Parks around the world? Those parks were set up to protect and preserve the often astonishing and sublime beauty we humans are lucky enough to share with this world.

Photography Hot Spots - Machu Picchu

Good Practice And A Chance To Learn

The hard part of photography can be finding subjects. For outdoor and landscape photographers, in particular, more effort is put into researching, getting to and finding the right location than actually shooting.

Hot spots make the learning more readily accessible when the pain is taken out of the hunting process. These days almost any hotspot can be found online with direction or precise coordinates on a map. It is a chance to get out and shoot more and an opportunity to learn from other photographers at the hot spot.

Photography Hot Spots - Seattle

Camaraderie And Socializing

Photographer Eileen Descallar Ringwald explains what she enjoys about the social aspect of hot spots.

While I value getting away from crowds, I do see advantages to be had when in groups. Once in Yosemite on a climbing-focused trip, a photographer I met by chance in the El Cap picnic area told me the elusive moonbow conditions were going to occur that night. I went out at night to the Lower Yosemite Falls Bridge and was at first shocked to see just how many photographers and even non-photographers were there. However, everyone was very polite. People made way for tripods and shared long exposure settings throughout the night. One photographer even shared where he normally went to shoot the Upper Falls. I had a fun time and got some decent shots as well. This was an experience I would have missed if I hadn’t decided to ‘follow the crowd’.

When you get in with the right group, the benefits can multiply. It can lead you in directions you would not have discovered on your own.

Photography Hot Spots - Socializing

Gateway Drug To Other Offerings In The Area

Landscape photographer and instructor Gary Crabbe spends a lot of his time outdoors with this camera. He has used photography hot spots as a means to an end.

The lure of great iconic photo locations should not be ignored or dismissed on the pathway to developing our own personal vision. I always recommend that once you’ve nailed a certain shot, dare to explore further afield or venture off the regularly traveled path. This will allow you to seek out more unique or personal compositions. Regardless of what primary area my travels take me, I always like to find one or two nearby lesser-known locations that fuel a bit more of the journey with an eye toward photographic discovery and adventure.

Photography Hot Spots - Mesa Arch, Utah

I shot Mesa Arch at sunrise (pictured above) because it makes for a beautiful image. I visited the park with my friend Michael Riffle. As we were spending three days in Arches and Canyonlands National Parks, he suggested a location nearby that I hadn’t previously explored.

It was Dead Horse Point State Park and at sunrise in October, it looked like this:

Photography Hot Spots - Dead Horse Point

While Mesa Arch and the ‘Big 5’ National Parks of Utah are a big draw, there are so many other unique and interesting sites to explore. While I wouldn’t have planned a trip to Dead Horse Point if I were alone, it, and many other sites, are valuable add-ons made possible by first hitting the Gateway Hot Spots.

It’s Never The Same Place Twice

Sure, you’ve seen the photos and you might have even been to that photography hot spot. But times and weather change. Different light means a different mode. Fewer people, more people. A chance encounter with wildlife.

It all makes hot spots different for everyone on each occasion. They are an easy way to grow as a photographer because they teach us not to be complacent and accept that, “Well, I shot that already. It never changes.”

For instance, another day at the Taj Mahal can bring a new feeling. Maybe the shot works better with people? Maybe the light isn’t as crisp? Take the opportunity to learn from them.

Photography Hot Spots - Taj Mahal

On The Side Of Hate

Crowds

Photographer and tour operator, Genevieve Hathaway, knows a thing or two about crowds.

Crowds at locations can provide challenges for photographers. Especially iconic travel locations can be very crowded making clean compositions tough, making it hard to find spots to shoot. It’s also hard to try and capture more authentic, idyllic scenes. It’s great that so many people are traveling, but this provides photographers with new challenges in composing our shots and even in competing with other photographers for the coveted angles. I think these challenges can push us to be creative. They are opportunities to find new angles at favorite sites, wake up early to beat the crowds and to even discover more off the beaten path locations to shoot.

Photography Hot Spots - Crowds

Rude Photographers More Interested In Getting ‘The Shot’ Rather Than Ethical Or Polite Behavior

We’ve all met them: rude photographers. They seem to care only about themselves and getting ‘the shot.’ I asked Canadian photographer Michael Russell for his take.

I have to wonder if the photographers who yell and scream, push people out of the way, damage plant life and infrastructure, or otherwise act to disrupt others, have any understanding as to why a great view at an iconic location is special? Even when the light isn’t great or there are too many tourists on the trail in front of their camera; do they feel anything? A photographer who acts out because something went wrong while hunting for a preconceived trophy is at best missing the gift of visiting these places. At worst, ruining the visit for everyone else who does.

Photography Hot Spots - Rude Photographers

Uninspired Execution

Pam Boling, a talented, multi-faceted photographer from Las Vegas, sees a lack of effort and originality as a common outcome.

I am most inspired when I am shooting portraits or landscapes. My most lucrative client, however, is the commercial client. Commercial content rarely inspires me. Getting the exposure right in commercial environments can sometimes be the most challenging: I am often faced with window light, fluorescent lights, OCF, harsh backlight, and sometimes reflective surfaces. I think the photographic process – whatever the subject – eventually becomes the driving force once the toolbox is worn around the edges. Some photographers don’t go beyond the normal tools and the results are uninspired.

Photography Hot Spots - uninspired

False Impression That Photographers Are Great When Copying

Freelance writer and photographer Peter Tellone put it most succinctly when it comes to copying others.

Copying greatness does not make you a Chef, it makes you a Cook. The entire point in this madness that is art is to be the Chef.

If you don’t expand your vision, if you don’t break out of the mold of others, you are nothing more than a fancy copy machine.

These hot spots make it easy to take a great photo because the scene, in and of itself, is already amazing. You just need some decent light to get a decent photo. To be great you need to build, expand and reinterpret what others have done, and what the scene gives you.

Photography Hot Spots - No so great

Conclusion

I have tried presenting both sides to the controversy of iconic photography hot spots. Honestly, I can see both sides of the story. Some positive aspects and some negative.

What do you think? Do you love or hate photography hot spots?

The post Photography Hot Spots – Love ‘em or Hate ‘em? appeared first on Digital Photography School.


Digital Photography School

 
Comments Off on Photography Hot Spots – Love ‘em or Hate ‘em?

Posted in Photography


How to Search Potential Cityscape Photography Spots Online Before Traveling

03 Jul

As an avid cityscape photography enthusiast (primarily shooting at the blue hour), I always spend quite a number of hours studying potential cityscape shooting spots before traveling to a new destination. Knowing everything from what to shoot, where to shoot from and how to get to those locations before departure will save you a ton of time and hassle, especially if your stay is rather short.

Hk 0106 - How to Search Potential Cityscape Photography Spots Online Before Traveling

Thanks to my pre-departure study online, I was able to locate this vantage point along Lugard Road at Victoria Peak (Hong Kong) without any hassle.

Hk 0173 - How to Search Potential Cityscape Photography Spots Online Before Traveling

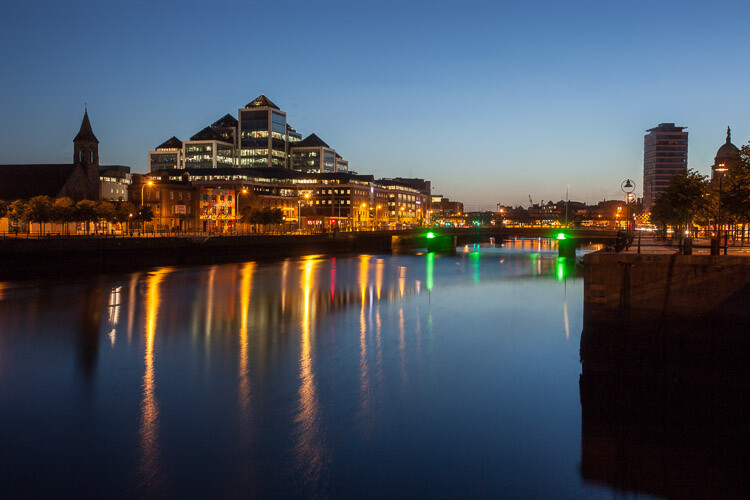
Hong Kong skyline shot from Convention and Exhibition Centre. Another location that I successfully scouted online before traveling.

You can always start this location study with the obvious (Google!), but there are also other resources that help you find photography spots. Those are Flickr, 500px, stock photography websites, and photography forums to name but a few.

Personally, Flickr is my go-to resource, as there are more than 10 billion photos (according to their 2015 stats) and numerous groups dedicated to many big and small cities around the world. You can ask questions and possibly get answered by local photographers.

Finding what to shoot is a piece of cake. 10 minutes browsing Flickr gives you a number of potential locations. You may argue that those places are over-photographed or that you’re just copying what others have already photographed. But as a first-time visitor, I’m happy to start with the most popular locations because they are over-photographed for a reason.

Flickr - How to Search Potential Cityscape Photography Spots Online Before Traveling

With more than 10 billion photos available, Flickr is my go-to resource when searching potential cityscape photography spots.

Finding Out Where a Photo Was Shot

The next up is finding where to shoot from (i.e. The exact spot where the photo was shot) but this can be much harder. Sometimes the photo has a clue in itself, such as a name of the building (e.g. hotel name). Then, just get onto Google Maps and do a virtual walk around the area using Street View.

Let’s use Hong Kong, the city that never stops fascinating me with its amazing cityscapes, as a case study for this article. For the photo below, I shot from a footbridge on Connaught Road Central, finding the name of the building on the left (International Finance Centre) eventually led me to locate the exact shooting spot (see on Google Maps) after virtual-walking around a lot on Google Street View.

Hk 0171 - How to Search Potential Cityscape Photography Spots Online Before Traveling

Shot from a footbridge on Connaught Road Central (Hong Kong).

Try Your Luck Asking Photographers Directly

On other occasions, this crucial piece of info (the shooting location where the photo was taken) can be found in the title or description of the photo. If not, check through the comments to see whether anyone has already asked this particular question.

What I’ve found interesting is that there are photographers who normally reply to comments but somehow don’t respond to this type of question asking where it was shot. It might be because they are not really happy to share that information with a complete stranger trying to shortcut their way to an epic shooting spot they discovered by themselves (possibly by walking around for hours).

That said, there is no harm in asking. The worst thing that could happen is that you receive no response.

Author’s note: If you ask me about cityscape shooting spots in Singapore (where I live), I won’t hold anything back. I’m happy to provide all the info you need!

Asking in Flickr Groups

In case you’re hesitant about asking the photographer directly, you can also try asking in a Flickr group. Once I found a nice Hong Kong street photo with a street name included in the description. So I got onto Google Street View and moved up and down the street, but couldn’t locate exactly where the photo was shot.

As I saw this particular photographer not responding to any comments at all, I went into a Hong Kong group within Flickr and asked whether anyone knows the exact location by including the street photo in my question. Then, a fellow photographer kindly responded with the answer, which led me to shoot the photo below (shot from a footbridge over Paterson Street Tram Station, see on Google Maps).

Hk 0144 - How to Search Potential Cityscape Photography Spots Online Before Traveling

Hong Kong street view from Yee Wo Street.

Use Google Maps to Find Directions from Your Hotel

Lastly, let’s talk about how to get to those newly found amazing locations. Accessing directions have never been easier these days, thanks to Google Maps.

Prior to the trip, get onto Google Maps and find the directions starting from your hotel. To record the route, take a screenshot or copy the link from your browser’s address bar so that you will be able to revisit the page using hotel’s WiFi later.

This may not be commonly known, but Google Maps also lets you save a short URL of the directional map. Just go to “Menu”, then click “Share or embed map” and check “Short URL”. You can also save maps for offline use as well if you don’t want to incur roaming charges and can’t access any WiFi.

Google map - How to Search Potential Cityscape Photography Spots Online Before Traveling

Saving a directional map using “Short URL” feature on Google Maps.

List Photography Spots in Order of Priority

Let’s say I’m traveling for a 5-day, 4-night stay. Then, I’ll make a list of four cityscape photography spots to shoot at dusk. Plus I’ll add one or two backup spots just in case any of the original choices are unexpectedly unavailable due to a special event taking place or something. I select only one spot per day, as I’m only interested in shooting cityscapes during evening blue hour and try to gather as much information as possible before traveling.

It’s also important to list them in order of priority so that you know which place to drop if you can’t shoot on the first evening due to heavy rain, for example. In fact, such a situation often happens, so you should establish a clear order of priority for your shot list in advance.

Consider Revisiting: You Learn Something New Every Time You Go Back

Up until this point, I’ve talked about the importance of pre-departure preparations such as knowing where to shoot from. However, it’s also true that a single visit may not be enough to let you go home with best possible photos unless you’re staying for weeks. If you’re only staying for 4-5 days like I typically do, you may get unlucky with the weather and not be able to capture any photos that you’re happy with.

If that’s the case, consider revisiting the destination! The great thing about revisiting the same place is that you learn something new every time you go back, such as discovering lesser-known photography spots, finding a faster way to move around, etc. Besides, you can try new restaurants and coffee shops alike, and after a few visits, you’ll be able to walk around the city like a local!

Hk 0182 - How to Search Potential Cityscape Photography Spots Online Before Traveling

On my second visit to Hong Kong, I found this lookout point on Stubbs Road through a bus window on the way to Victoria Peak. So the next day I dedicated one evening to shoot at this spot. This is a good example of learning something new every time you go back.

Hk 0029 - How to Search Potential Cityscape Photography Spots Online Before Traveling

I planned to go back to Lugard Road lookout point at Victoria Peak to shoot Hong Kong skyline again, then accidentally diverted from the road to find this spot behind Peak Tower, so changed my plan to shoot here, instead.

Conclusion

I hope this helps you with your pre-departure search on what to shoot, where to shoot from, and how to get to those locations. These tips are quite basic, but it’s almost a prerequisite in order not to waste your precious (but limited) time at the destination, especially for those of us traveling only for a few days.

If you have any other cityscape photography tips to share, please do so in the comments below.

The post How to Search Potential Cityscape Photography Spots Online Before Traveling appeared first on Digital Photography School.


Digital Photography School

 
Comments Off on How to Search Potential Cityscape Photography Spots Online Before Traveling

Posted in Photography


Adobe AI spots tampered images by focusing on noise and artifacts

26 Jun

Adobe researchers have developed a neural network that can identify Photoshopped images. The technology was detailed in a newly published study [PDF], which points out that it is often difficult for humans to notice altered parts of an image. However, differences between the original image and edited elements typically persist despite any attempts to obfuscate them, such as applying a Gaussian blur, and machines can be trained to spot those discrepancies.

Various differences may exist between original and edited image elements, such as different noise patterns and contrast levels. Manual adjustments to these edited elements can make them virtually indistinguishable to the human eye. Adobe’s neural network, however, can not only identify these changes, but also determine the type of tampering technique used to edit the image.

The system involves a two-stream Faster R-CNN network with end-to-end training in identifying manipulated images. The first, called an RGB stream, looks for various tampering artifacts, including big contrast differences and altered boundaries. The second, called a noise stream, looks for inconsistencies in the image’s noise to identify edited elements.

In the study, researchers explain:

We then fuse features from the two streams through a bilinear pooling layer to further incorporate spatial co-occurrence of these two modalities. Experiments on four standard image manipulation datasets demonstrate that our two-stream framework outperforms each individual stream, and also achieves state-of-the-art performance compared to alternative methods with robustness to resizing and compression.

Such technology could prove useful for verifying the authenticity of images used in photojournalism, photography contests, and similar situations.

Via: CNET

Articles: Digital Photography Review (dpreview.com)

 
Comments Off on Adobe AI spots tampered images by focusing on noise and artifacts

Posted in Uncategorized


PIXEO is a crowdsourced collection of the best photo spots around the world

08 May

Whether you’re looking for new spots in town or looking for the best photo locations while on vacation, a new app called PIXEO is here to help.

Made exclusively for iOS (for now), PIXEO is a paid photo scouting app that relies on crowdsourced information to show the best photo spots in a given area. It currently features more than 10,000 locations, provided by more than 200 paid subscribers.

Beyond location, the pins across the map include photos that have been taking there, the current weather at a chosen location, directions to get there and notes from other photographers on whether or not the location is worth your time.

Using the app is simple. After downloading PIXEO from the iOS App Store, you’re presented with the opportunity to subscribe monthly or annually for $ 3 per month or $ 25 per year, respectively. Don’t worry, though. There’s a 30-day free trial to test the waters and see if it works for you.

Once in the app, it’s just a matter of finding an area you want to scout for locations. After you select a location and find a pin that another photographer has contributed, you can just save it to your favorites and hit the road.

PIXEO was only launched two weeks ago, so don’t worry if there’s nothing nearby. It has been featured in the ‘Best of What’s New’ section in the iOS App Store in multiple countries and is continually gaining new locations.

You can take PIXEO for a spin by downloading it from the iOS App Store.

Articles: Digital Photography Review (dpreview.com)

 
Comments Off on PIXEO is a crowdsourced collection of the best photo spots around the world

Posted in Uncategorized


Idaho in the spring: 9 must-shoot spots

27 Jul

$ (document).ready(function() { SampleGalleryV2({“containerId”:”embeddedSampleGallery_9728177994″,”galleryId”:”9728177994″,”isEmbeddedWidget”:true,”standalone”:false,”selectedImageIndex”:0,”startInCommentsView”:false,”isMobile”:false}) });

It probably hasn’t made your landscape photography bucket list just yet, but there’s a good reason to visit Idaho. In fact, there are many good reasons, and photographer Michael Bonocore spent this spring traveling around his new home state, capturing the grandeur of the local landscapes.

Using the Visit Idaho website as his guide, Bonocore trekked all over the state and found nine ‘must-see’ destinations for all of the photographers out there. Especially in the spring, these spots offer “a perfect mix of still snow-capped mountain peaks, vibrant wildflowers and warming temperatures.”

From Sun Valley, to the town of Stanley (population 62), to Redfish Lake and beyond, he put his findings and some stunning photographs together into a photo essay, which you can read over on Resource Travel. And if you want a taste before you jet off, check out the slideshow above.

Articles: Digital Photography Review (dpreview.com)

 
Comments Off on Idaho in the spring: 9 must-shoot spots

Posted in Uncategorized


Big Sky Country: Local photographers share their favorite Montana photo spots

14 Apr

$ (document).ready(function() { SampleGalleryV2({“containerId”:”embeddedSampleGallery_0904372940″,”galleryId”:”0904372940″,”isEmbeddedWidget”:true,”standalone”:false,”selectedImageIndex”:0,”startInCommentsView”:false,”isMobile”:false}) });

Montanans celebrate an unofficial holiday on April 6th every year since ‘Big Sky Country’ as it’s known is covered by just one area code: 406. In honor of the day, Resource Travel recently rounded up a list of locals’ favorite photography spots across the state. Take a look at just a few examples of Montana’s gorgeous scenery and then head to Resource Travel for exact locations and more photos to whet your travel appetite.

Articles: Digital Photography Review (dpreview.com)

 
Comments Off on Big Sky Country: Local photographers share their favorite Montana photo spots

Posted in Uncategorized


Headed to Havana? Check out these photo spots

08 Apr

$ (document).ready(function() { SampleGalleryV2({“containerId”:”embeddedSampleGallery_6485310145″,”galleryId”:”6485310145″,”isEmbeddedWidget”:true,”standalone”:false,”selectedImageIndex”:0,”startInCommentsView”:false,”isMobile”:false}) });

Resource Travel has shared some helpful tips for photographers headed to Cuba, and now they’re offering a handy guide to Havana’s most photogenic spots. Photographer Edin Chavez shares his go-to spots for photographing the vibrant colors and culture that make up the fabric of Havana. Included are helpful tips, like the best time of day to go, and Google Map locations so you can save them for reference later.

Read the full post on Resource Travel

Have you been to Havana? Let us know what your favorite photo spots are in the comments.

Articles: Digital Photography Review (dpreview.com)

 
Comments Off on Headed to Havana? Check out these photo spots

Posted in Uncategorized


Photographer Edin Chavez shares his favorite Miami Beach photo spots

26 Feb

$ (document).ready(function() { SampleGalleryV2({“containerId”:”embeddedSampleGallery_6758783119″,”galleryId”:”6758783119″,”isEmbeddedWidget”:true,”standalone”:false,”selectedImageIndex”:0,”startInCommentsView”:false,”isMobile”:false}) });

When a nagging desire to unleash his creative juices wouldn’t leave him alone, Edin Chavez left a successful self-made painting business to pursue photography. He’s now a Miami-based commercial photographer with clients like Nikon, National Geographic and Corona on his resume. Photography has brought him all over the world, but it’s Miami where he honed his skills and found his first go-to photo spots.

He recently shared ten of his favorites with Resource Travel, where you’ll helpfully find embedded Google Map widgets so you can hone in on exactly the right spots. Head over to the full post – after all, it takes an insider to tell you that the Best Buy parking garage is one of the best places for a sunset view of the city.

Read ’10 Best Photography Spots in Miami Beach’ at Resource Travel

Articles: Digital Photography Review (dpreview.com)

 
Comments Off on Photographer Edin Chavez shares his favorite Miami Beach photo spots

Posted in Uncategorized


How to Quickly Remove Dirt Spots Using Median in Photoshop

07 Sep

You’ve rolled out your white background for your shoot; whether it’s vinyl or paper. It’s a bit dirty from shoes, but you’re under pressure to get the shoot done, so you carry on regardless. When the shoot is over and the photos are back on the computer, that’s when you see how bad it really was. The scuff marks, the footprints, the stray hairs, these are going take ages to clone out. You’re sorry now that you didn’t clean it up, or cut off some paper. Sigh. Better just getting going on the processing.

But wait! There’s a better way.

It doesn’t have to all be cloned out. There’s an easy way, using one of Photoshop’s lesser known tools called Median. Median is a form of blurring, where groups of pixels get changed to the middle value of the pixels. Higher values are reduced, lower values are increased, averaging out the values.

Steps for cleaning up your white background

So your floor has specs of dust, hair, and just general footprint dirt on it.

cleaning-a-white-background-1.jpg

Step one – duplicate layer

Duplicate your background layer by dragging it on to the New Layer icon at the bottom of the Layers panel.

Cleaning a white background 2

Alternatively, use the shortcut Command/Control + J. If you’ve got a set of layers, then use the shortcut Shift + Cmd/Cntrl + Option + E to stamp them into a new layer.

Step two – Median

Go to Filter>Noise>Median.

cleaning-a-white-background-3.jpg

Move the Radius slider until the dirt disappears. I’ve used 10 here.

Cleaning a white background 4

Step three – apply a layer mask

If you’re not familiar with Layer Masks, you can use the Erase brush to bring remove the areas you don’t want blurred, but I recommend using Layer Masks.Cleaning a white background 6

A white Layer Mask reveals everything on the layer, while a black mask conceals the contents of the layer. You want a black mask for this layer, so hold down the Option key on Mac (Alt for PC), and click the New Layer Mask icon at the bottom of the Layers Panel. A black mask appears on the layer and the Median filter is concealed.

Next, select the Brush Tool (or use the shortcut B), then hit D for Default colours. Then use the shortcut key X to swap foreground and background until the foreground (i.e. the top swatch in the tools panel) is white. With a soft brush, paint over the dirt to reveal the Median filter’s affect. Don’t go too close to the edges of your subject. If you make a mistake, press X to swap the brush to black, and paint it back to hide that area again. This is the beauty of Layer Masks, you can reveal or conceal over and over again without having to undo (this is called non-destructive editing).

cleaning-a-white-background-5.jpg

This trick isn’t limited to backgrounds. You can be use it on any areas of continuous tone, for a quick result. I’ve had to use it on skies, where I’d accidentally used a dirty sensor cleaning brush and left marks on the sensor. Here’s how you could fix such an issue using Median.

Fixing a dirty sky with Median

As with the background cleaning technique, start by duplicating the background layer. You can see the issue quite clearly in the sky (below), and in the smooth parts of the river.

cleaning-a-sky-1

Next, apply Filter>Noise>Median. The issue will need a far higher Radius than the background required.

cleaning-a-sky-2

Select only the sky area

Next, hide the Median layer by clicking on the eye on the layer, then select the layer underneath. From the tools panel, choose the Quick Selection tool or press W. From there, drag the cursor along the sky, close to the buildings. Because of the hard edges against the sky, the selection is made easily.

cleaning-a-sky-3

Next click “Select and Mask” (outlined in red above). You’ll see the sky clearly, and the rest of the image faded. Brush the cursor over the tips of the buildings, street lamps and other things that need to be protected from the blurring effects of the Median filter. Press return (enter) to create a selection with marching ants visible.

Turn the visibility back on for the Median layer. Press the Layer Mask icon in the Layers panel to create a mask.

cleaning-a-sky-4

You will see areas where the Median filter has blurred edges, so you’ll need to brush the mask with a black brush to hide these. You don’t need to be precise, using a large soft brush along the edge of the buildings will make it a quick job.

cleaning-a-sky-5

Remove the Median where it has blurred the edges of the city buildings.

The final part is to go along the water with a white brush, set to 50% Opacity, to hide the dirt in the water.

cleaning-a-sky-6

The final image looks far better than the original.

cleaning-a-sky-7

Much quicker than manually cloning the dirt out, right?

Have you tried this method, how did it go? Do you have another fast way of removing dirt? Please share your thoughts in the comments section below.

googletag.cmd.push(function() {
tablet_slots.push( googletag.defineSlot( “/1005424/_dPSv4_tab-all-article-bottom_(300×250)”, [300, 250], “pb-ad-78623” ).addService( googletag.pubads() ) ); } );

googletag.cmd.push(function() {
mobile_slots.push( googletag.defineSlot( “/1005424/_dPSv4_mob-all-article-bottom_(300×250)”, [300, 250], “pb-ad-78158” ).addService( googletag.pubads() ) ); } );

The post How to Quickly Remove Dirt Spots Using Median in Photoshop by Sean McCormack appeared first on Digital Photography School.


Digital Photography School

 
Comments Off on How to Quickly Remove Dirt Spots Using Median in Photoshop

Posted in Photography