RSS
 

Posts Tagged ‘Softbox’

Gear Review – Glow QuadraPro Portable Softbox

11 Dec

There is no greater teacher in life than time and experience. If I could go back in time and teach myself some photography lessons, high on my list would be OCF – off-camera flash. Back when I was starting out in photography, I used to dread using my flash. In fact, I think for the first two years of my photography career, I did not even own one. If a client would enquire about a family photoshoot, I would promptly reply back saying I am strictly a natural light photographer and the best times to schedule the session would be a little after sunrise or around sunset. I think I might have even turned down some indoor photo sessions because I hated the look and feel of a flash.

Fast forward a few years, as I ventured into the genre of wedding photography, I started to get over my fear of using a flash. As I educated myself on studio lights, flashes, and all the other lightning paraphernalia out there, I stopped hyperventilating as much at the thought of using artificial light for my photos. Although I am now fairly comfortable using an on-camera flash, I still consider myself a novice artificial light photographer. The next step to mastering artificial lights is to get comfortable with off-camera flash. To that end, I knew I needed, at the bare minimum, a light stand, a soft box, and my flash. So when I got the opportunity to review the GLOW QuadraPop Portable Softbox from Adorama I jumped at the chance.
Screen Shot 2015-12-03 at 1.37.49 PM

Let me preface this article by setting the record straight. I have never used an off-camera lighting system from the ground up. I have watched several online classes and tutorials on how a single light off-camera system works. In fact there are several wonderful articles on dPS that discuss off-camera flash like this one. But this is the first time I have handled such a setup ,and so, in essence, I am reviewing this product as a novice off-camera flash/softbox user.

Contents and what’s in the box

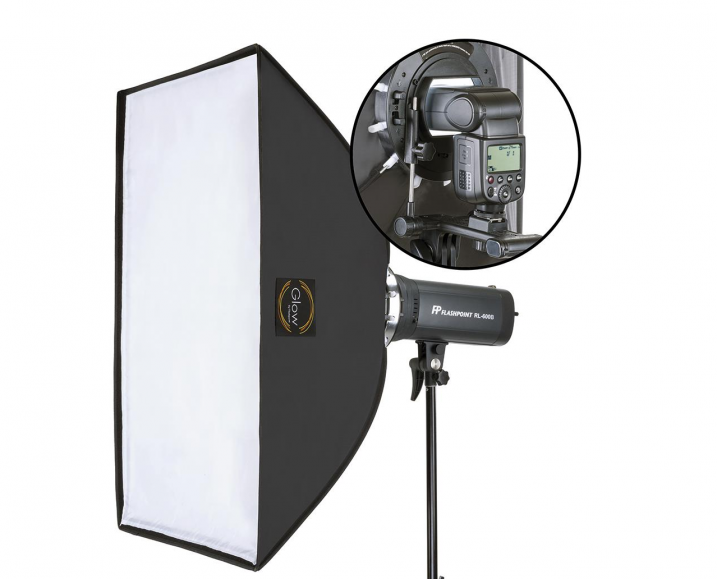
The QuadraPro comes fully equipped to use with a speedlight, as well as a studio strobe. Included in the box were the actual soft box, angle adjustment shoe bracket that can be adjusted for height and depth, removable inner and outer diffusers, removable cold shoe, and a protective bag to carry the QuadraPro on location. The only thing you will need to have is a light stand. I have a generic, lightweight stand that I had purchased from a local camera shop last year, and the GLOW QuadraPro worked perfectly with it.
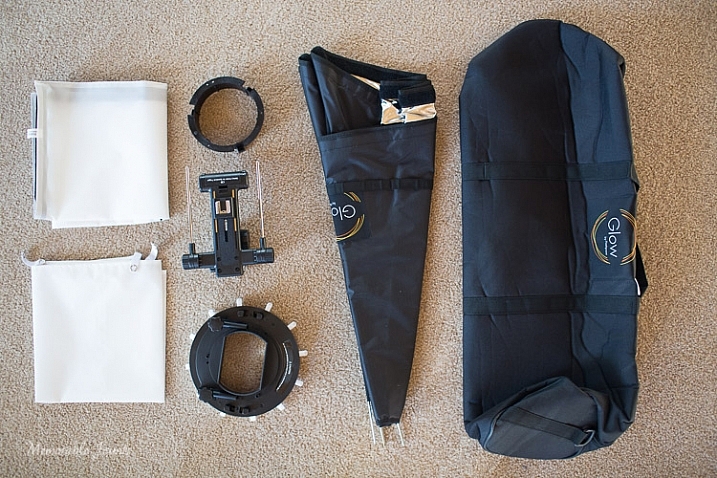
Memorable Jaunts Glow QuadraPro Softbox Article Image Whats in the bag-1

I have to admit that when I opened the box, I was a little nervous about how to set up the whole system. I am used to reading manuals and watching product videos prior to handling equipment, but for this softbox setup I decided to skip all the research and prep work, and start using the product right away. The setup did take me a few minutes to figure out, but once I read through the one page instruction sheet that comes with the GLOW QuadraPro, it was easy enough.

The flash cold shoe bracket was easy to use, but attaching the actual softbox to the QuadraPro ring did take me a couple of tries. Once I was able to secure the rods into the rings, it was easy to snap them in to place by adjusting the rings in a circular manner. The inner and outer diffuser panels are quite literally a snap to attach. The outer diffuser panel has a velcro attachment mechanism, while the inner panel snaps with push buttons.

Ease of use and comfort

The Glow QuadraPop line is perfect for mobile studios, on-location work, and also travel. The entire system is quite lightweight, and easy to set up and dismantle. This is ideal for individual portraits and product shots, as well as for use on location. The one I used is the QuadraPop Rectangular softbox that comes in two sizes – 28×38″ and 24×34″. I used the GLOW QuadraPop with both the internal, and external, diffuser panels. Additionally the flash shoe bracket has an angle adjustment knob for easy tilting, thereby adjusting the angle of light – perfect for photographing things from above.
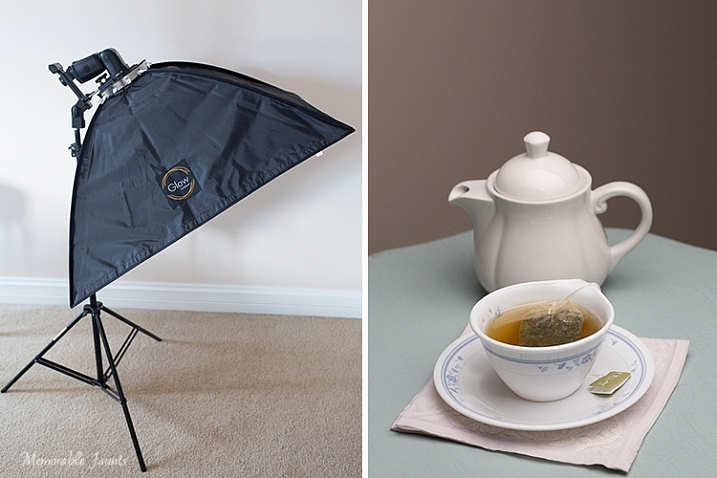
Memorable Jaunts Glow QuadraPro Softbox Article Image Angle Adjustment on the Flash Hotshoe-3

My afternoon tea was photographed with the softbox above and to the right of the tea cup, as seen in the reflection on the surface of the tea in the cup, and the light on the tea pot.

Basic setup and portability

I created a quick video on how easy it is to set up the softbox:
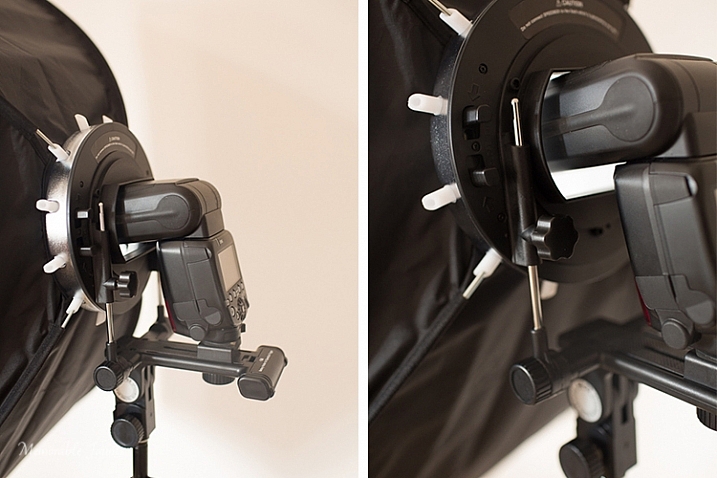
Memorable Jaunts Glow QuadraPro Softbox Article Image Softbox Setup-1

The softbox is mounted on the circular ring using the white clasps. The softbox is mounted on the light stand via the cold-shoe mount that also holds the flash.
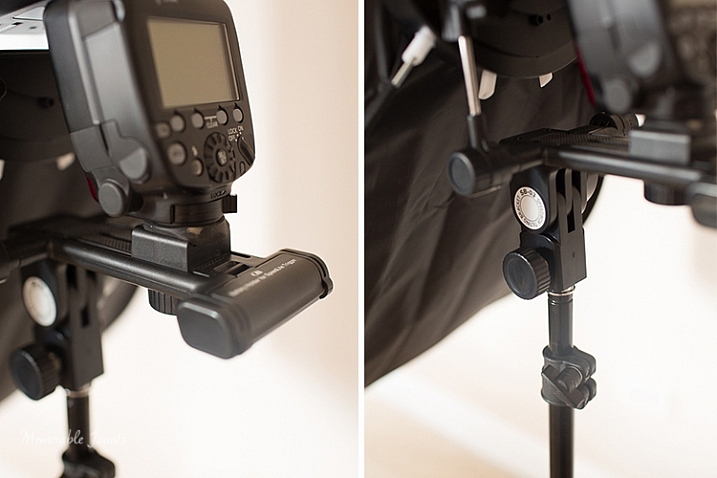
Memorable Jaunts Glow QuadraPro Softbox Article Image Softbox Setup-4

The cold-shoe mount has an adjustable screw that slides the flash forward or backward on the base.
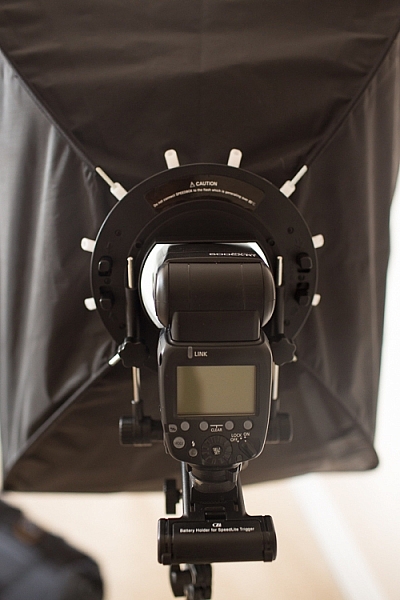
Memorable Jaunts Glow QuadraPro Softbox Article Image Softbox Setup-6

Back view of the fully assembled GLOW QuadraPro Softbox with the flash attached.
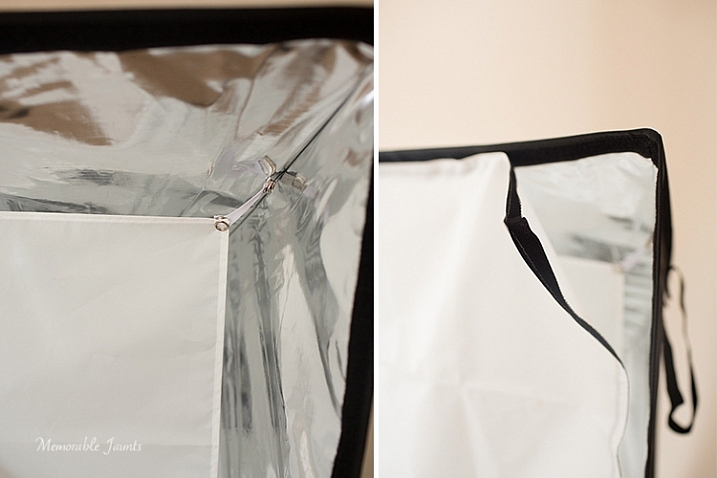
Memorable Jaunts Glow QuadraPro Softbox Article Image Softbox Setup-8

Inside diffuser panel that snaps into place, while the outside diffuser panel has velcro that attaches to the inside of the softbox close to the edge.

Indoor and outdoor use

I planned on putting the GLOW QuadraPop to the test with both indoor and outdoor use. But, just as I was writing this article, Chicago got the first major snow storm of the season. So, with subzero temps, I decided to forgo the outdoor test and just use it indoors with my obliging models, a.k.a my kids!

While indoors I moved the GLOW system from one room to the other, to see how easily I could manage carrying the system around. Before moving it, I removed the flash from the cold-shoe attachment, and also collapsed the softbox by squeezing the tabs on the sides of the ring. This did take some force, as the softbox rods were quite secure in their respective white sockets. I did not remove the diffuser panels as recommended, because I wanted the set up process to be easy at my next location (similar to what it would be like on a live on-location photoshoot). This made the set up, and take down process, much easier and faster.

Please note – I was experimenting with various softbox positions and had the flash on ETTL. My focus here was not on posing, but on the look and feel of a diffused lighting setup using a single softbox, i.e. the GLOW QuadraPro.
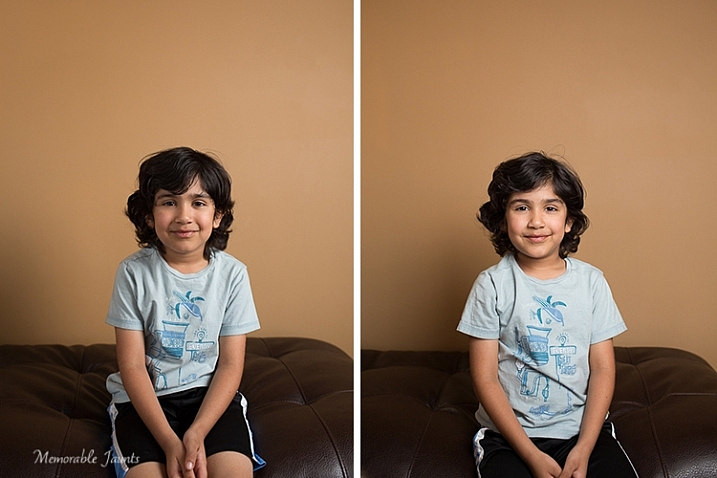
Memorable Jaunts Glow QuadraPro Softbox Article Image Indoor setup -4

The image on the left has the softbox to the right of the camera. There is a slight shadow on the left hand side, and a nice drop-off of light on the background. The image on the right has the softbox placed directly in front of the model for a more even tone, and even lighting on the face.
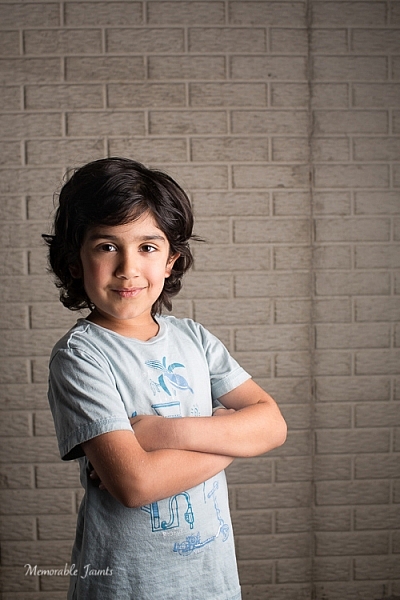
Memorable Jaunts Glow QuadraPro Softbox Article Image Indoor setup -3

For this image, I moved to the basement where it was much darker. I quite like the effect of the dramatic lighting on the left side of his face, with some shadows on the other side. His body is turned slightly towards the softbox, which is at approximately at a 45 degree angle from the subject’s position.

Next up, my other willing model who had to be constantly bribed with treats and food!
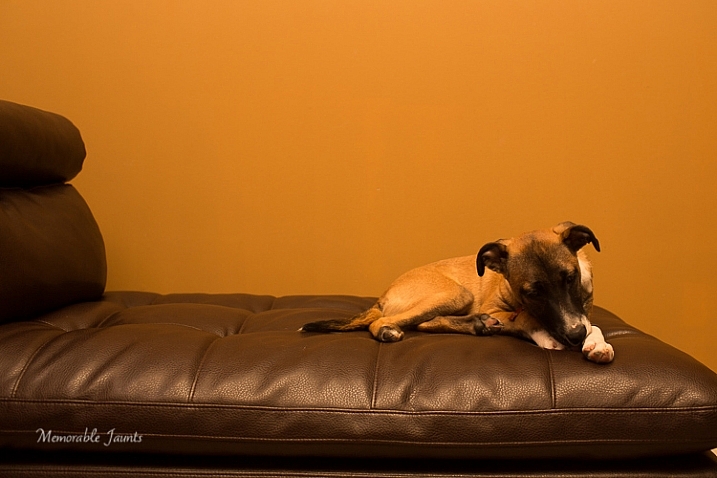
Memorable Jaunts Glow QuadraPro Softbox Article Image Indoor setup -5

This image was taking WITHOUT the softbox. The flash was just bounced straight up without any additional diffusion. The image is quite dark and the color of the wall is quite terrible in this image.
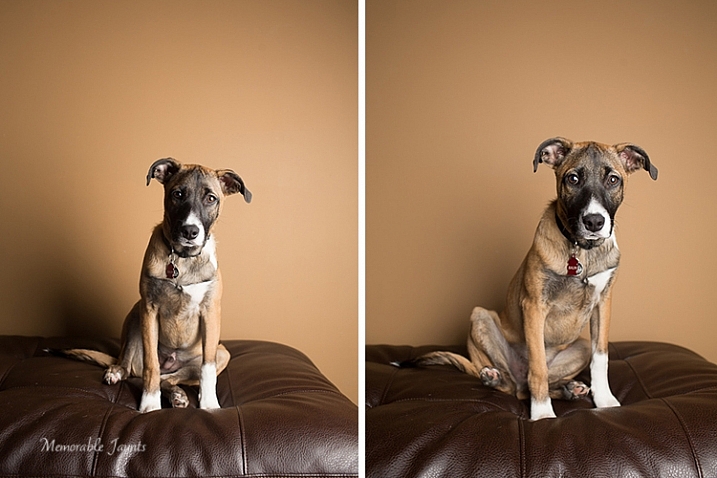
Memorable Jaunts Glow QuadraPro Softbox Article Image Indoor setup -8

The image on the left had the softbox placed at a 45 degree angle to the dog. The image on the right has the softbox pointed straight ahead, giving a more even lighting and beautiful catchlights in his eyes. Plus the color of the wall is more true to its actual color!

Final Thoughts

In conclusion, the GLOW QuadraPro softbox is a fairly easy to use, lightweight and portable, flash diffusion system. I quite liked the convenience of having the setup all ready to use as I was experimenting with a single off-camera flash. Initially the softbox was a bit difficult to put together, and that was purely because I have never used this type of lighting system from the ground up. But once I got used to the clamps, they were very easy to assemble and dismantle.

googletag.cmd.push(function() {
tablet_slots.push( googletag.defineSlot( “/1005424/_dPSv4_tab-all-article-bottom_(300×250)”, [300, 250], “pb-ad-78623” ).addService( googletag.pubads() ) ); } );

googletag.cmd.push(function() {
mobile_slots.push( googletag.defineSlot( “/1005424/_dPSv4_mob-all-article-bottom_(300×250)”, [300, 250], “pb-ad-78158” ).addService( googletag.pubads() ) ); } );

The post Gear Review – Glow QuadraPro Portable Softbox by Karthika Gupta appeared first on Digital Photography School.
Digital Photography School

 
Comments Off on Gear Review – Glow QuadraPro Portable Softbox

Posted in Photography


Manfrotto and Lastolite brands combine and launch new Speed-Lite softbox and Perspective Backgrounds

03 Nov

The accessory brands Lastolite and Manfrotto, both of which are owned by the Vitec Group, have combined to form the new brand ‘Lastolite By Manfrotto’. The new brand name will eventually encompass the entire Lastolite product range, but for now it includes a new version of the Ezybox Speed-Lite softbox for hotshoe flash units and three new scene-painted backgrounds. Read more

Articles: Digital Photography Review (dpreview.com)

 
Comments Off on Manfrotto and Lastolite brands combine and launch new Speed-Lite softbox and Perspective Backgrounds

Posted in Uncategorized


10 Reasons to Ditch Your Softbox for a Light Panel

11 Mar

So you want to create soft, beautiful light? One of the first light modifiers that comes to your mind is probably the tried and tested softbox. But, when it comes to versatility, are softboxes really worth the money? In this article, we are going to look at a viable contender to the age-old softbox – the light panel.

Now, the goal of this article is not to bash softboxes, I personally have nothing against them. I own several and use them whenever I feel that they are the right tool for the job. However, my go-to light modifier for the majority of my photography is the light panel. Why? I am glad you asked. Here are 10 reasons why you should consider using a light panel instead of a softbox for your next shoot.

Wide shot of two light panels

Wide shot of two self-standing PVC light panels fitted with diffusion and black fabric. The diffusion fabric is used like a large softbox, while the black fabric is used to flag or block light.

#1. They are inexpensive

For under $ 50 you can create a self-standing light panel that is larger than softboxes costing more than $ 300!

#2. They are easy to make

You can make a basic panel frame and legs with nothing more than a hacksaw. However, a pair of PVC shears is a great investment and will make your job a lot easier.

#3. Quickly change the size/quality of the light

Moving the light closer or further from a panel fitted with diffusion fabric can quickly create a different size softbox effect (closer to the panel = smaller light/harder quality versus further from the panel = larger light/softer quality). Since the panel and light are separated, the panel becomes the source of illumination and can remain in the same stationary position, in relation to the subject, throughout the entirety of the shoot.

#4. Easily change the shape of the light

By clamping pieces of black fabric over a panel fitted with diffusion material, you can create light sources of different shapes. This is a great technique if you want to create a tall, thin stripbox effect, or if you only need to use a portion of the panel.

#5. Different fabrics = different light modifiers

While softboxes can be sort of a one-trick pony, light panels can easily be turned into flags (to block light) or reflectors, just by changing out the fabric. I love to add black material to my panels and use them as flags to shape the light. I also like to use opaque white fabric to reflect and bounce light. It makes a beautiful fill for both indoors and out.

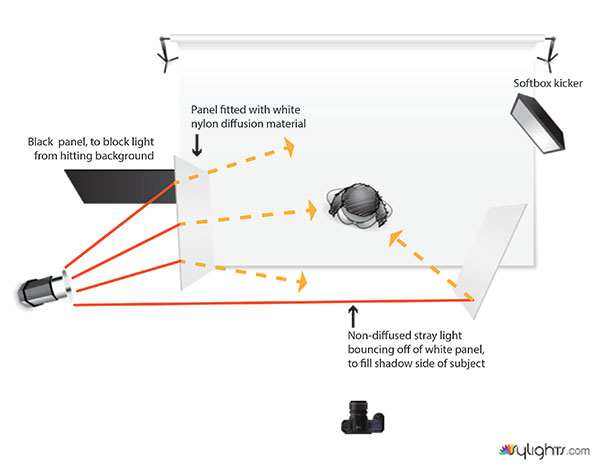
One of the coolest things you can do with light panels is harness the stray light from your strobe, to create multiple sources from one light. I oftentimes shoot through a diffused panel, then reflect some of the stray light back into the shadow side of the subject, using a second panel fitted with a white reflective material (as seen in the figures below).

portrait of bride lit with light panels

A bridal portrait primarily lit using two light panels

diagram showing how to bounce stray light with light panels

Using two panels to create a large soft key and fill from one light source. The white reflective panel was placed where stray, un-filtered, light was able to strike the front edge, which opened up the shadows more than if it were only allowed to bounce the light coming from the diffusion panel. A black panel was added to keep the light from spilling onto the background. It could have been removed, lighting the background and essentially filling the job of three lights (background, key and fill lights).

#6. No speed rings required

Speed rings can be such a hassle. After shelling out serious cash for a new softbox, the last thing you want to do is buy an adapter so you can actually use it. It can be a one-time cost, but if you ever change brands of lights you are most likely going to need a whole new set. Want to add a softbox to your speedlights? Well, you are going to need another type of speed ring adapter for that, too. With light panels, no matter the type of light source, all you have to do is place your light behind the panel and start shooting. Which brings me to #7 on our list.

#7. Home Depot light friendly

If you are just starting out and you want to try your hand at lighting with inexpensive Home Depot shop lights, then light panels are the best way to soften them. Stick multiple lights behind a panel fitted with diffusion fabric, or bounce them off a piece of white fabric to create a soft, bright, single source that can be used for photography or video. Now, all you will need is a good air conditioner to manage the heat!

#8. Gelling made easy

Have you ever tried to gel a softbox? It can be a tremendous waste of gel. Especially if your softbox is large. By shooting through a diffusion panel, you are able to attach a small square of gel to your strobes reflector, allowing you to purchase your gel in small sheets instead of giant rolls. For instance, at the time of this writing a 20×24” sheet of Rosco CTO gel cost roughly $ 7.50, as opposed to a 20”x25’ roll, which cost around $ 94.

#9. Better reflections for your product photography

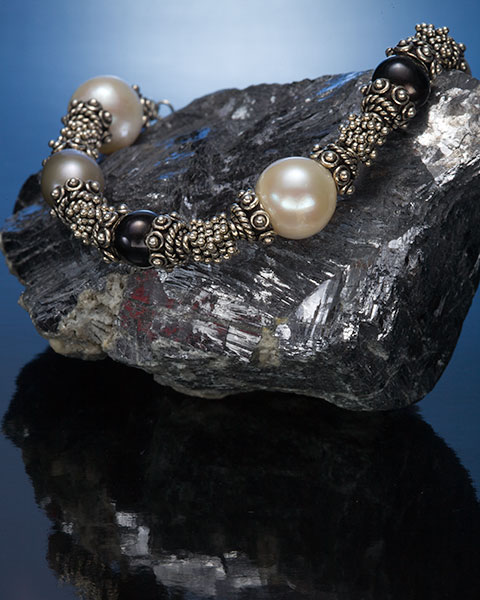
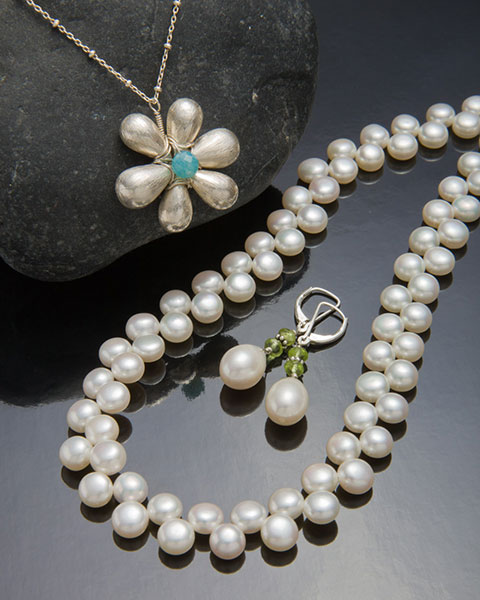
Softboxes are made to distribute the light evenly over the face of the outer diffusion panel. Even with the inner baffle removed, the reflective interior creates a fairly even spread of light. When lighting reflective objects, this evenness can sometimes be a bad thing. Notice the gradated reflections in the two images below. This is the kind of reflection you will typically get when placing a light behind a light panel. Take note on how it adds contrast, depth and interest to the scene.  If these same images were lit using a softbox, the reflection would be an even tone, with no gradation or falloff.

jewelry product shot using overhead light panel

Light placed behind light panel creates gradated reflection in black reflective paper.

jewelry product shot using a gelled strobe and light panel

Another example of the pleasing gradation light panels reveal in reflective surfaces. The same reflective black paper from the first example is used, but the light has been gelled blue.

#10. Portable walls

Have you ever been out on a remote location where you have needed a changing area for your model? You can easily create a makeshift changing room by attaching three or four panels together using connector clips, then covering them with black fabric. If it is windy, throw some sandbags on the bottom of each panel to weigh them down, for good measure.

I hope this article has given you a little more insight on how versatile and economic light panels can be.

Many companies make and sell light panels. They are usually made from light-weight aluminum and are relatively inexpensive, compared to softboxes. However, you can save a lot of money by making your own frames out of PVC.

In a future article I will:

  1. Show you how to create your own self-standing PVC light panel frames and accessories
  2. Offer helpful tips on making them stronger and easier to assemble
  3. Share some cheap fabric alternatives to use with your new frames

Until then, go out, have fun, experiment and create something awesome!

googletag.cmd.push(function() {
tablet_slots.push( googletag.defineSlot( “/1005424/_dPSv4_tab-all-article-bottom_(300×250)”, [300, 250], “pb-ad-78623” ).addService( googletag.pubads() ) ); } );

googletag.cmd.push(function() {
mobile_slots.push( googletag.defineSlot( “/1005424/_dPSv4_mob-all-article-bottom_(300×250)”, [300, 250], “pb-ad-78158” ).addService( googletag.pubads() ) ); } );

The post 10 Reasons to Ditch Your Softbox for a Light Panel by Joel Dryer appeared first on Digital Photography School.

Digital Photography School

 
Comments Off on 10 Reasons to Ditch Your Softbox for a Light Panel

Posted in Photography


Unboxing and setup of the Lencarta 60x90CM softbox

09 Jan

Unboxing and setup of the Lencarta 60 X 90CM Pro Fold softbox with Bowens S-fit ring. www.sounds-and-images.co.uk www.lencarta.com


Cowboy Studio Softbox

04 Jan

A video showing my new purchase of Cowboy Studio 16″ Softbox. At .99 defintely a nice little investment.

dombowerphoto.blogspot.com Video of the second day in japan, taking you from the silver ball in Osaka Ocat to amemura and doing a bit of print club which is a lot of fun. with my friends mari chan and Yuu chan, video is shot with the canon 550D and tamron 28-75mm f2.8 lens. Help Me keep making these videos by checking the link below . It takes you to the online store that can sell this stuff. www.bhphotovideo.com www.dombower.com facebook page http twitter twitter.com
Video Rating: 5 / 5


Flashpoint PZ Softbox & Octabox: Product Reviews: Adorama Photography TV

07 Nov

AdoramaTV presents The Flashpoint PZ Softbox & Octabox. This week Mark will show us the Flashpoint PZ series 24″ x 36″ Softbox and 60″ x 60″ Octabox. The patented easy set-up and tear down zipper which is easier to assemble & disassemble. All softboxes come with baffle, rescessed front and carry bag. Speed rings are sold separately and available for most strobes. For more information about the Flashpoint PZ Softbox and Octabox, as well as related articles and videos about studio lighting, go here: www.adorama.com Send your questions to: AskMark@Adorama.com
Video Rating: 5 / 5

Knowing and understanding basic lighting rules helps you to create better images. Improve your photography techniques with this free video presented by a professional photographer. Expert: Julia Dean Contact: www.juliadean.com Bio: Julia Dean is a photographer, educator, and the founder of the Julia Dean Photo Workshops. Filmmaker: Max Cusimano Series Description: The secret to getting professional looking photographs is understanding your camera and equipment well. Expand your photography techniques with help from a professional photographer in this free video series.
Video Rating: 5 / 5


Octagonal Softbox Review

20 Aug

First of all, I have no idea why there isn’t a standard name for octagonal softboxes, every company uses their own name – Elinchrom Octa, Photoflex Octodome, Hensel Octaform… it gets confusing!  That said the Octagon shaped soft-box is one of my favorite light modifiers.  Not only does it make for beautiful catchlights it also wraps around the face and body in a way other soft boxes just can’t seem to pull off.

I wanted to get a new one but I couldn’t really find any good reviews on the differences between brands, so I asked B&H to send me a couple to take for a test drive, thanks so much!  A few days later they arrived and the match was set!

Versus

I’m not a professional reviewer so I set out to simply experiment with both softboxes and report on which one I liked best.  I selected the Photoflex for the very simple reason that Photoflex soft-boxes have speed-rings that will adapt them to several different brands of strobes and  I chose Elinchrom because that is the brand of strobe I currently use in my studio.  For this particular test I used the Elinchrom Style 600RX.

In order to keep the results between the two soft-boxes as fair as possible I used the same settings on the strobe without moving the light stand at all between shots, I also kept all the camera settings exactly the same.  I had Bailey (the beautiful model) try to hold the same pose between shots.  We did this a few times with slightly different styles to get as broad of results as possible.

I didn’t have any expectations going into it, I have used Elinchrom and Photoflex soft boxes and have had great success with both brands.  What I found out surprised me.

What’s in the box

Rotalux by Elinchrom Midi Octa

Click for B&H Listing

  • Octa Softbox with textured silver lining
  • Removable Inner/Outer Baffle
  • Tent poles
  • Speed Ring
  • Case with shoulder strap

Photoflex Octadome

Click for B&H Listing

  • Octadome Softbox with white lining
  • Double sided lining, gold or silver
  • Octagon lining for back of softbox
  • Removable Inner/Outer Baffle
  • Speed Ring
  • Case with small handle

Thoughts after opening the boxes

Photoflex comes with a lot more stuff, but Elinchrom’s design eliminates the need for a lot of the extras.  For instance, the octagon shaped cover for the back of the softbox isn’t needed by Elinchrome simply because the design of the softbox fits perfectly snug with the Elinchrom strobe.  This may be because Photoflex is designing their light for maximum compatibility across multiple brands of strobes.

The double sided lining that comes with the Photoflex box is kind of a cool idea.  Why you would use a gold reflector? Well if you ever shoot in the shade on a bright sunny day you’ll notice that there is a blue-ish color cast.  The reason you get a blue color cast is because the ambient light is blue – mainly because it comes from the blue sky.  Since gold is a yellowish color (yellow is opposite Blue on the RGB color wheel) the gold reflector can help correct the blue cast in shadows. If you’re shooting the octa mostly inside a studio (like I am) then the gold reflector is pretty much useless… it is cool to have but it’s also a little bit of a pain to put on.

The texture of the two inner linings is significantly different, the Elinchrom has a raised, pebble like texture that you can see and feel. The Photoflex lining is completely flat (both gold and silver).  I’m interested to see if this has any affect on the final images.

Also, the baffles are made out of markedly different material.  The Elinchrom material feels more cloth-like whereas the Photoflex baffle feels more plasticky.  The cases don’t really affect how they’ll shoot but it’s worth mentioning that the Elinchrom case is much cooler and better quality.

Assembly

I hate putting together softboxes, especially big ones.  It’s a hassle.

As far as hassles go the Photoflex was much less stressful putting together, even though I had to put on all the linings the built in tent poles were much easier to manage during set-up.  It’s a trade-off though, once finished the Elinchrom had a smoother front to it, all the edges were crisp, it was much, much lighter, and the back of the softbox fit snuggly to the light which eliminated all the nasty spill light.  Also, the Elinchrom has zero velcro on it and the Photoflex feels like it was born in a velcro factory.

The Photflex does sell a mesh grid which fits the front of the softbox. An equivalent option is not available from Elinchrom. For this review I both soft boxes without a grid the entire time, I’ll do a separate review on the mesh grid in a later post.

All-in-all, if I were choosing soft-box that I was going to take apart and put back together often I’d probably go with the Photoflex, though if I had the option to leave it constructed most of the time (which I do) then the Elinchrom’s light weight and more solid construction make it a bit more convenient moving around the studio.

Shoot One: Beauty Portrait

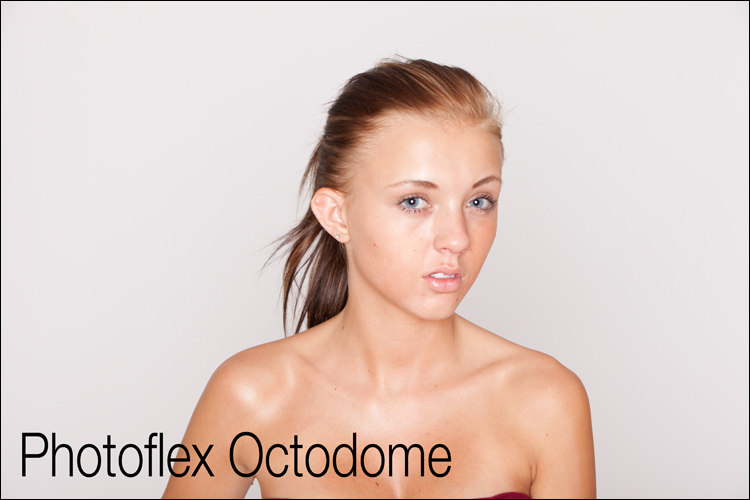
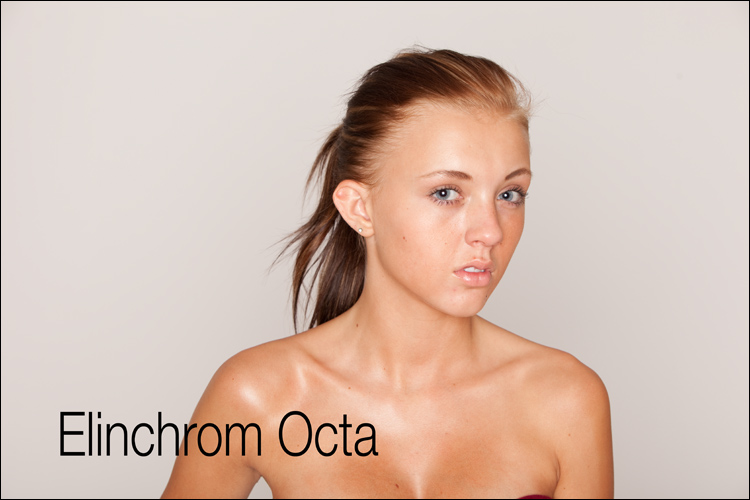
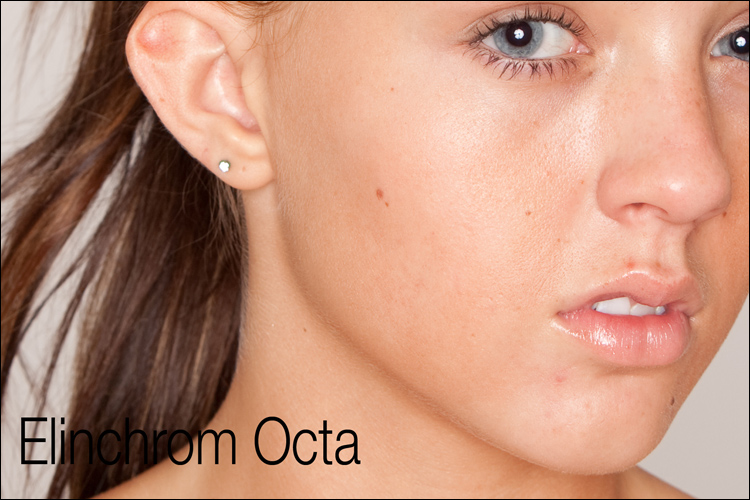
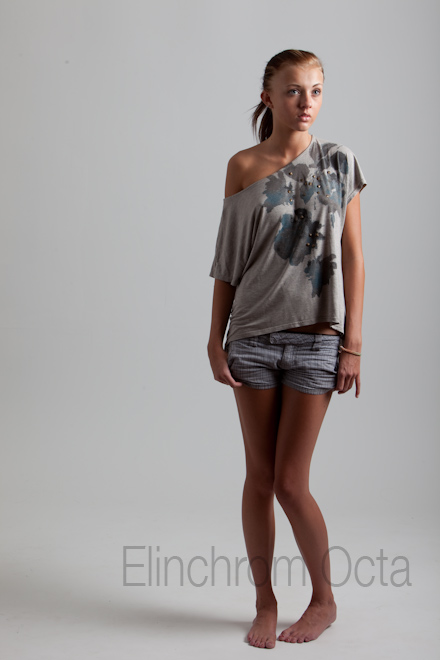
On first glance many of you will notice one difference between the two images, the Photoflex seems to be brighter – especially near the center of the image (right around the middle of her face).  I think the brightness has to do with the different fabric on each of the softboxes, the Elinchrom’s cloth baffle simply disperses or absorbs the light more than the Photflex.

Brightness aside the Photoflex seems to be a more specular light source than the Elinchrom.  Specular vs. diffuse is one of the main principles in the quality of light and generally speaking the smaller the light source the more specular it is, and the more specular a light source is the harder the shadows and highlights are.  That’s why an overcast sky (the biggest light source of all) creates nearly zero shadows.

What’s confusing to me is that since the Photoflex soft box is bigger it should be putting out a more diffuse light, but that’s not what is happening.

It’s a very, very subtle difference though, so we’ll take a closer look at what I’m talking about.

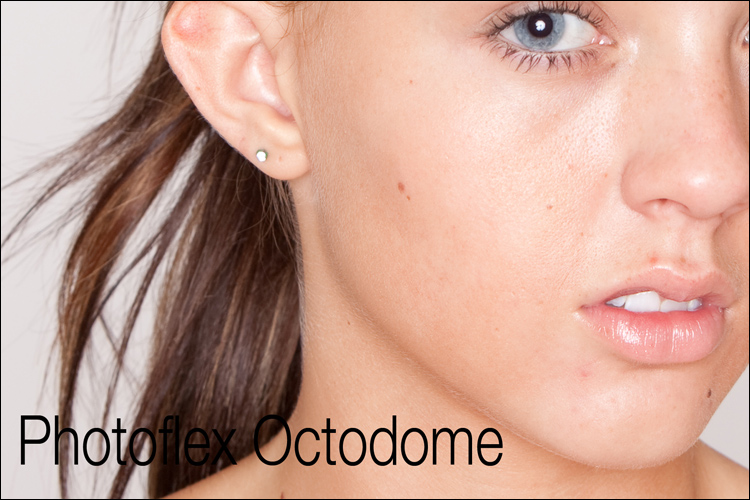
Look at the shadows just below her cheekbone on each of these completely un-retouched images.  Notice how the edge of the shadow on the Photoflex is just a tad bit more defined than the edge of the Elinchrom?  I’m not talking about darkness of shadow, I’m talking about the edge where it transitions from shadow to light.  You may need to squint to see it but you’ll notice that the bottom edge of the Elinchrom is very soft, whereas the Photoflex is a little more defined.

This is the exact opposite result of what I would have expected since Photoflex should be the more diffuse light source.  I’m not saying that a more diffuse shadow is better in any way. Many jobs call for more defined shadows, in which case a more specular light source is ideal, but a 5′ foot octagon softbox is designed to modify a light into a diffuse source.  Certainly this difference is not a major one at all, though it is noticeable to me.

Also, the Elinchrom seems to have slightly yellow color cast to it, again, easily corrected before or after I took the shot – but I wanted these to be with identical settings.

I think both would be an excellent choice for a beauty headshot.  I do prefer the Elinchrom mainly because of the subtle hot spot from Photoflex in the center of the image.

Shoot Two: Full Body Side Lighting

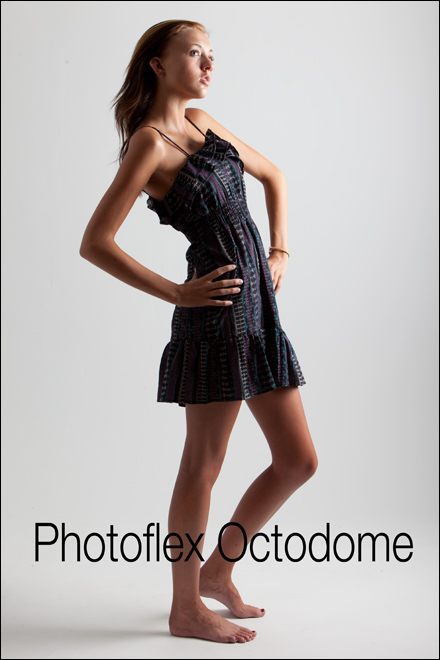
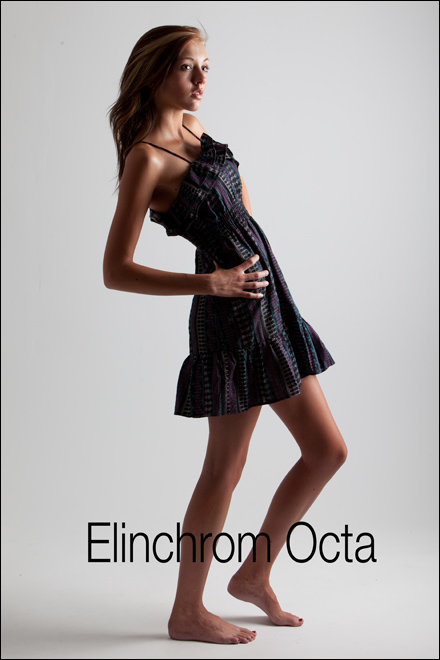
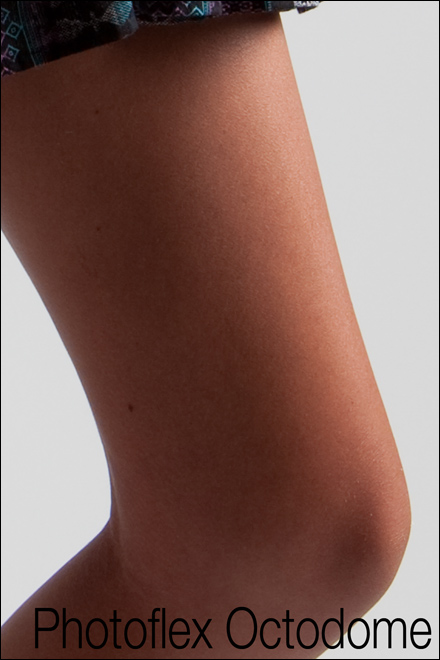
Again, the Photoflex appears brighter overall.  Both create very useable results.  It was only after very careful observation that I realized something really strange. It has to do with the light hitting the model’s left thigh.

On careful inspection (you have to look at how well the light reflects off the top of the thigh) you’ll notice that the light on the Elinchrom image is brighter than the Photoflex image.  Which is strange for a couple of reasons, first of all the Photoflex softbox is larger so her leg should be closer to the light source, and the closer the subject is to a fixed intensity light source the brighter that light will appear.  Of course spreading the same amount of light across more surface area would definitely decrease the intensity slightly but we already know the Photoflex is producing brighter images overall.  Maybe it was just because her leg is bent slightly more towards the light-source in the Elinchrom version – that would definitely cause a brighter light… but I don’t think the difference would be this much.  I could absolutely be wrong though, I decided to do another experiment to find out.

Like any 5th grade science teacher will tell you, in order to create a successful experiment you need to develop a hypothesis and then create an experiment to test your hypothesis.

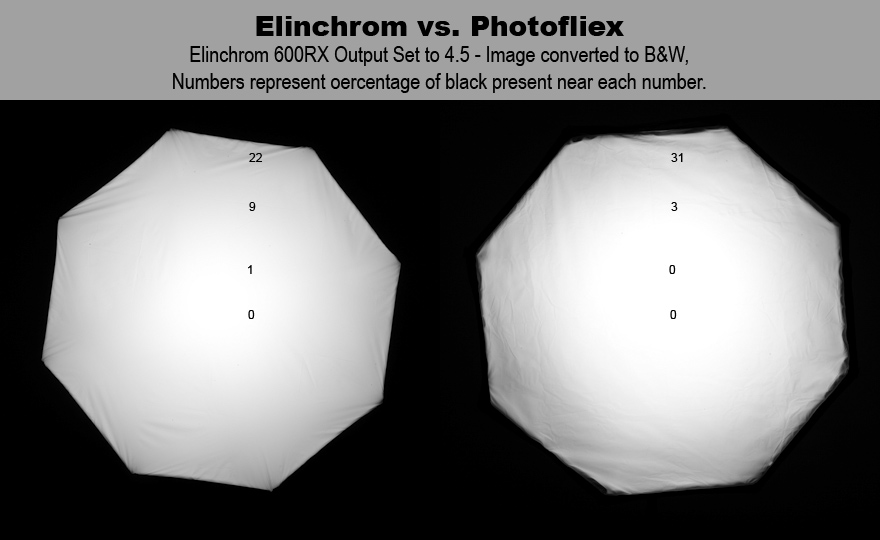
I developed a theory, even though the Photoflex was larger I figured the strobe was not actually spreading it’s light very equally across the front baffle.  To test the theory I came up with a plan.  I set my aperture to as high as it will go (f32) and shot the front of each softbox directly, at three different power settings.  1.5 | 3.0 | 4.5

The results are below (Elinchrom is on the left, Photoflex is on the right)

After converting these images to black and white I used the eyedropper tool along with the info tab in photoshop to measure the amount of black present at similar points in both lights. I labeled each of these as seen above.  This test verifies my theory and explains both issues I was having with the Photoflex soft box, there is a ring of more intense light (with a darker center) in the center of the Photoflex softbox and as the light goes out it stays brighter for longer but then drops off much faster than the Elinchrom.

Shoot 3: Front full Body

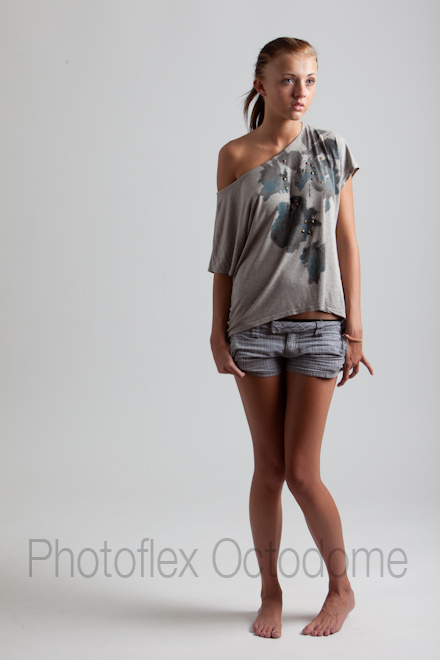
Even though the Photoflex appears brighter throughout the entire image you can see that the transition from the tones in her face to the tones in her legs is more drastic than in the Elinchrom version.  Not much, but when I look for it I can definitely tell.

Of course I could have shot still images of cubes and cylinders for this light test and we could have eliminated the tiny movements of the model in between tests but overall I think the best kind of test is a real life one.  That makes the beautiful Bailey a perfect choice for this experiment and I would like to thank her for her patience while I yelled at her to hold still while I swapped out lights.

The Conclusion?


All in all both, of the soft boxes performed well. If I’m being honest I prefer the Elinchrom.  Not only does the light transition more smoothly (with a less-pronounce center hot-spot) but the lighter weight and tighter construction makes it something that is just easier to move around in the studio.

One big complaint about Elinchrom though – I’d really love it if the Elinchrom softboxes weren’t nearly IMPOSSIBLE to remove from the Elinchrom 600RX!

However, it needs to be said that I am certain I could get very useable results from the Photoflex.

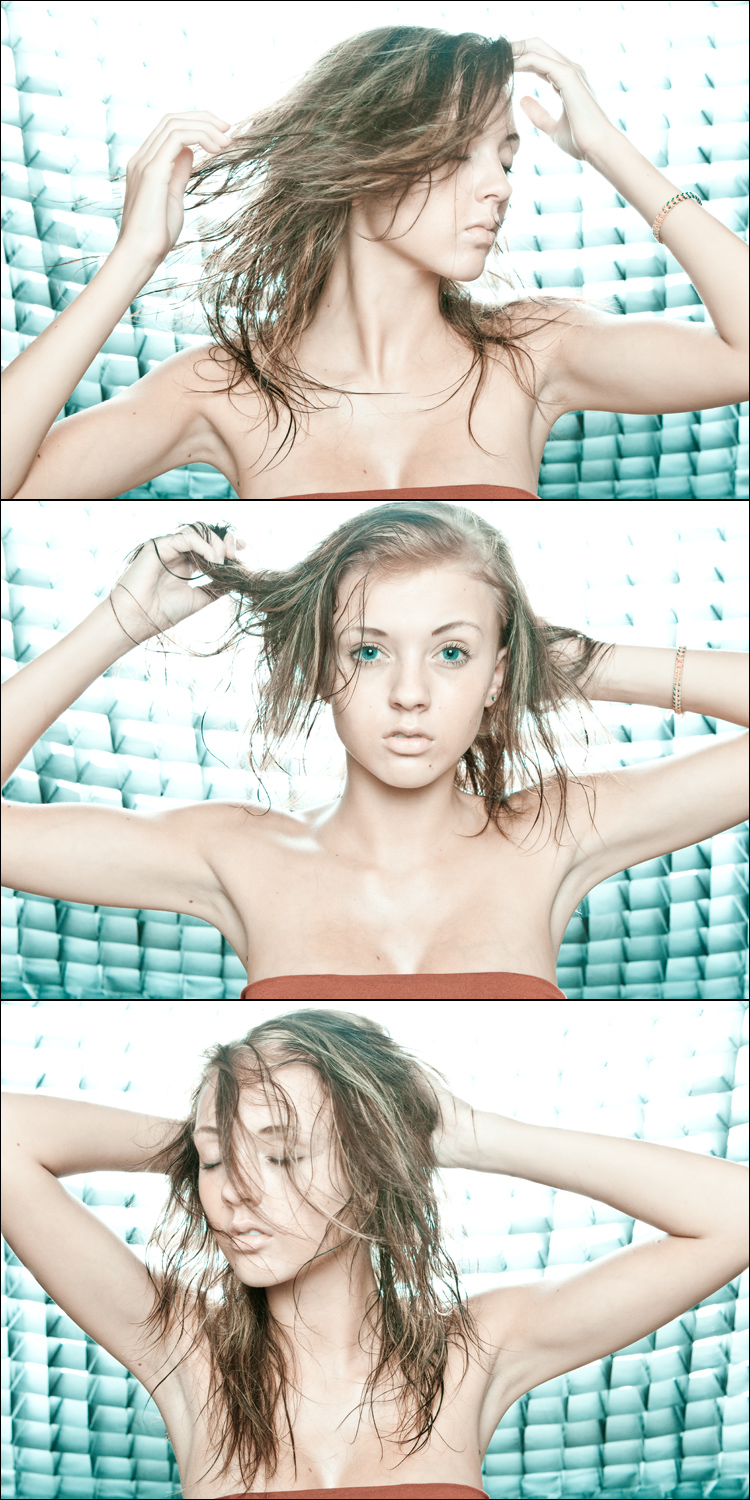
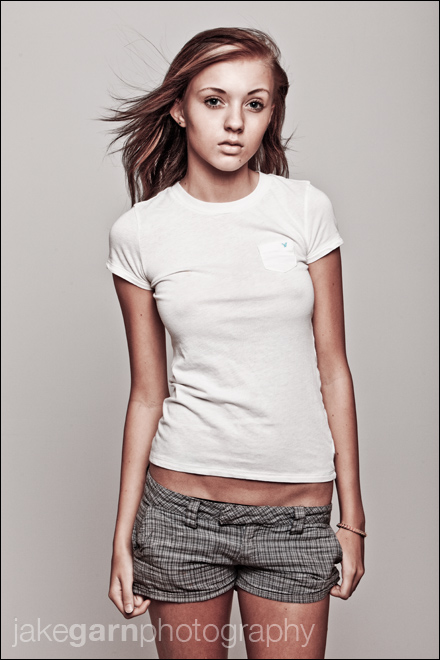
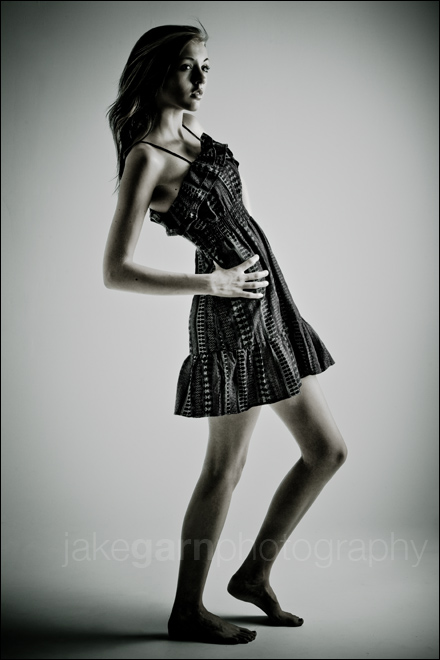
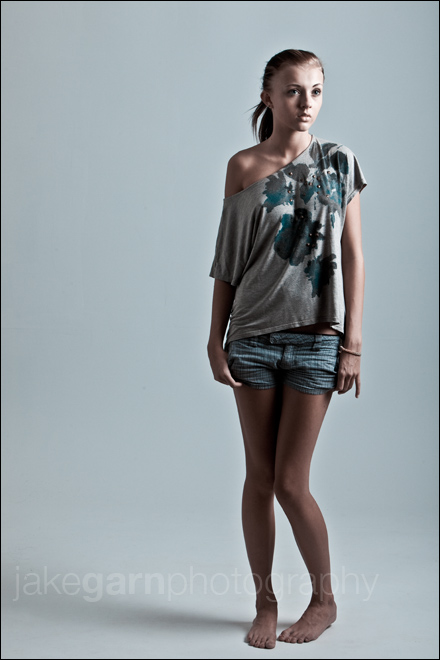
Final Retouched Images

Other Equipment used to achieve these images


Jake Garn Photography

 
Comments Off on Octagonal Softbox Review

Posted in Uncategorized