RSS
 

Posts Tagged ‘Sharper’

How To Find Your Lens’ Sweet Spot: A Beginner’s Guide to Sharper Images

06 Oct

The post How To Find Your Lens’ Sweet Spot: A Beginner’s Guide to Sharper Images appeared first on Digital Photography School. It was authored by Dena Haines.

How To Find Your Lens' Sweet Spot: A Beginner's Guide to Sharper Images

Are you tired of blurry images?

It’s time to learn how to capture sharper images by finding your lens’s sweet spot. This will give you more confidence, save time, and help you take better photos.

In this article, you’ll learn:

  • How to find your lens’s sweet spot (for sharper images)
  • Why you should shoot in Aperture Priority mode (and how to use it)
  • How to perform a test to get the sharpest image every time
  • How important your lens’s sweet spot really is

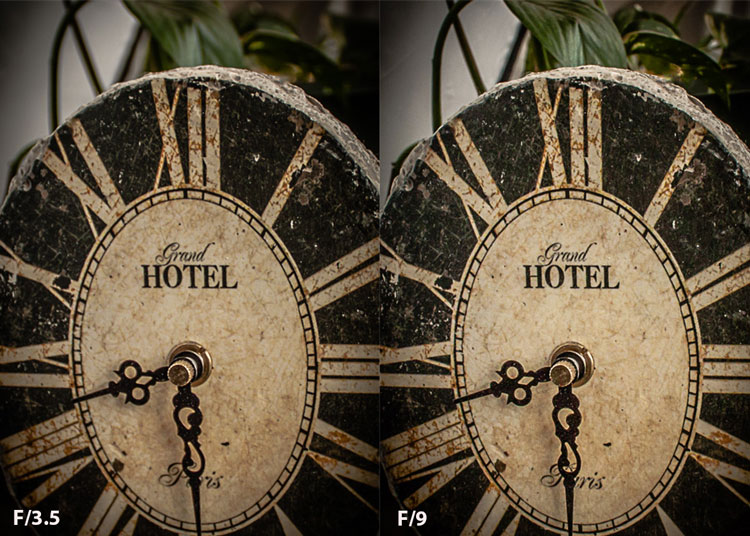
Mid range aperture sharper than wide open

In the above images of the clock, the one on the right is sharper. Look closely at the words. The f/9 image is sharper throughout because it was shot using my lens’s sweet spot. The f/3.5 one was not.

First, take a look at your lens

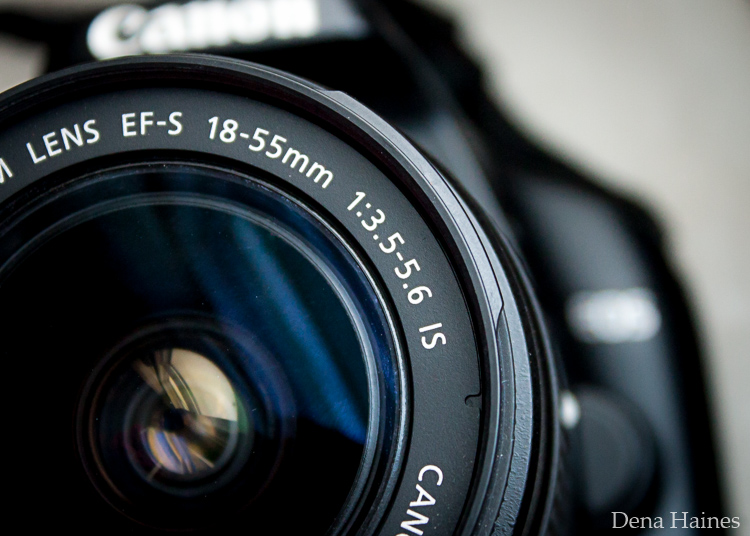
In this beginner’s guide, we’ll use an entry-level zoom lens as our example. Most kit lenses (the basic lens that comes with a DSLR) generally shoot their sharpest at a mid-range aperture setting. To determine the mid-range aperture of your lens, you’ll need to know its widest (or maximum) aperture setting. This is located on the side or end of the lens and will look something like 1:3.5-5.6.

For example, here it is on my Canon 18-55mm zoom lens:
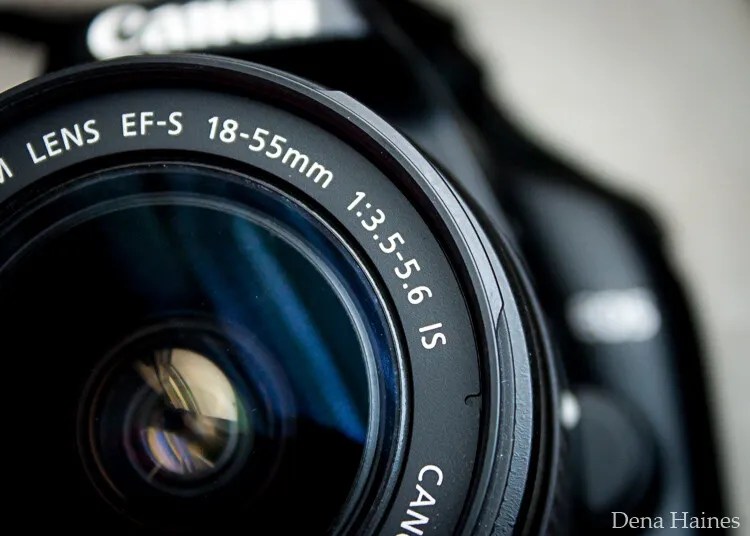
Lens aperture range

This means that when my lens is zoomed all the way out to 18mm, its widest aperture is f/3.5. When zoomed all the way in to 55mm, its widest aperture is f/5.6.

The rule for finding that mid-range sweet spot is to count up two full f-stops (aperture settings are called f-stops) from the widest aperture. On my lens, the widest aperture is f/3.5. Two full stops from there would bring me to a sweet spot of around f/7.1.

Use this chart to count your f-stops:

Robin Parmar

By Robin Parmar

There is some wiggle room in what counts as mid-range, so anything from f/7.1 to f/10 will capture a sharp image. Once you know the mid-range aperture of your lens, you can do an easy test to get your sharpest image. To perform the test you’ll need to shoot in Aperture Priority mode.

Take control with Aperture Priority mode

Shooting in Aperture Priority allows you to choose the aperture setting you want, which gives you more creative control than Auto mode.

By controlling the aperture setting, it’s much easier to get a sharp image. And because your camera still chooses the ISO (if it’s set to Auto ISO) and the shutter speed automatically, it’s very easy to use.

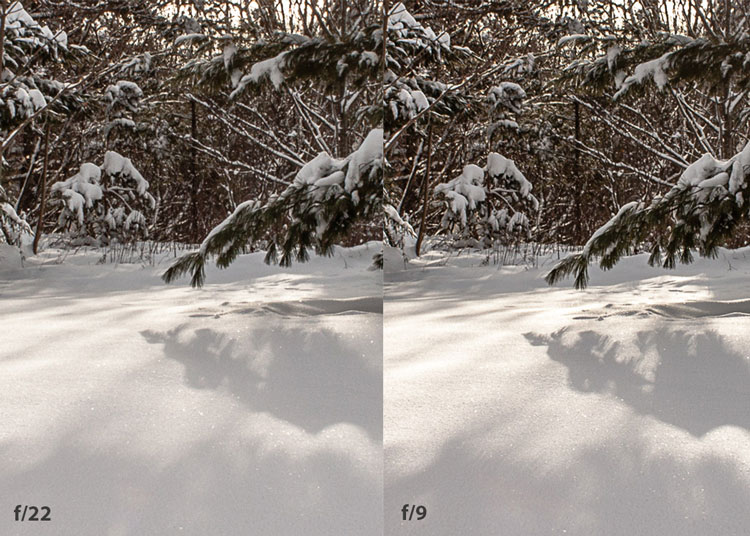
You’ve probably heard that apertures like f/16 and f/22 are best for keeping everything in focus. While that can be true, focus does not always equal overall sharpness. Choosing a mid-range aperture will give you sharper images throughout. You can improve your photos even further by reducing camera shake by way of a tripod and a remote shutter release (or your camera’s self-timer).

Here’s an example of how shooting in your lens’s sweet spot will give you sharper images:

Sharp images shot in lens sweet spot

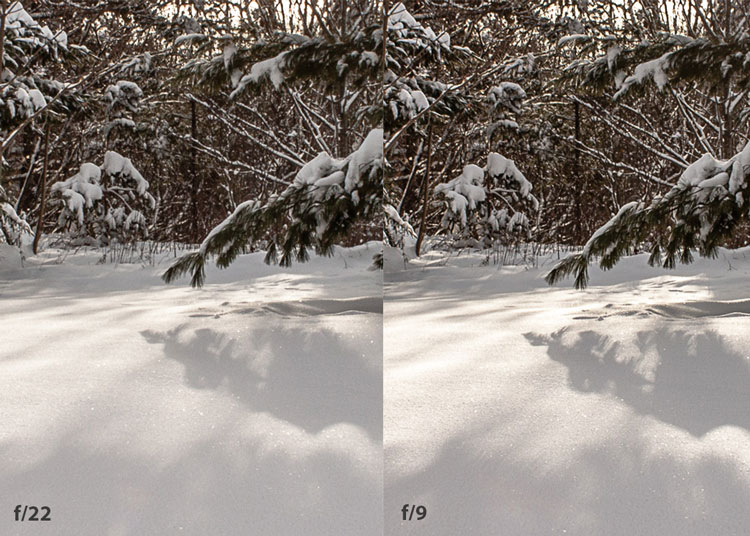
Mid range f stop sharper than small f stop

In the above image, the f/9 shot is sharper than the f/22 one. The needles and shadows are not as soft or blurry as in the f/22 shot (look at the crispness and sparkles in the snow, too).

Switching from Auto to Aperture Priority mode

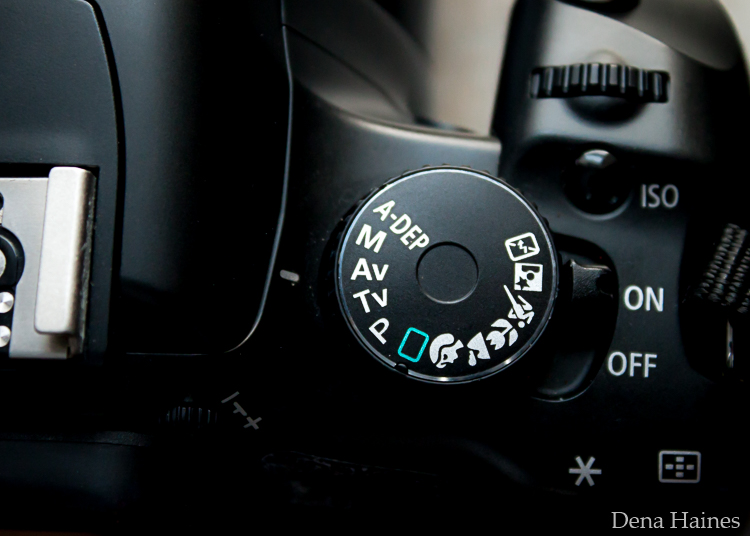
To take your camera off of Auto and put it in Aperture Priority, just turn the large mode dial to Aperture Priority. This is what that looks like on my Canon (on Nikon and other brands look for the “A”).

Aperture priority on canon mode dial

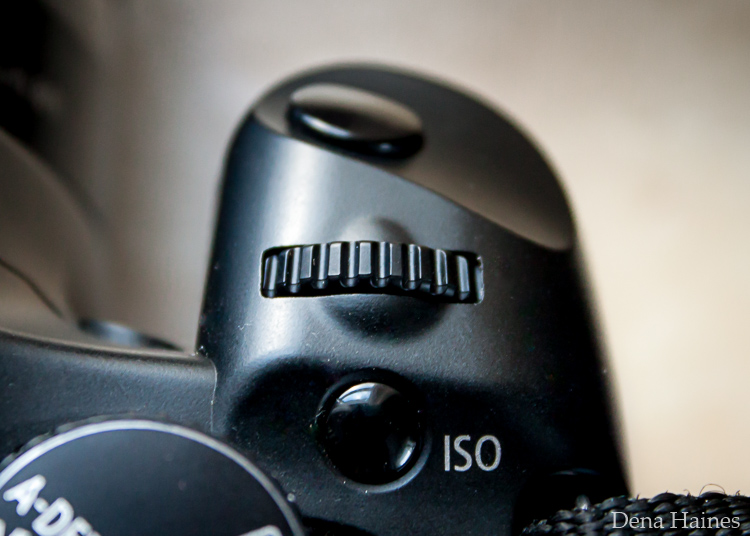
Auto mode is the green rectangle; Aperture Priority mode is the Av (or A on a Nikon). Once your camera is in Aperture Priority mode, turn the smaller main dial (shown here on the top of my Canon) to choose your f-stop.

Main dial canon

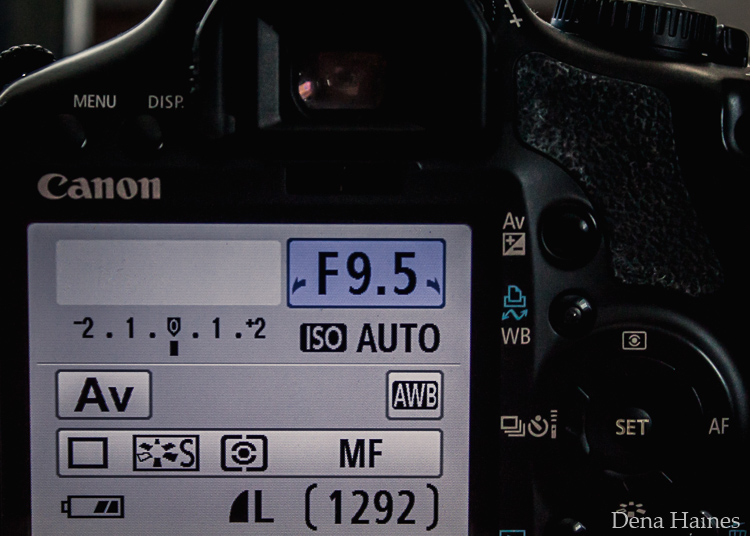
As you turn that dial, you’ll see the f-number changing on your screen. In the next picture, it’s set to f/9.5:

Aperture setting on canon LCD screen

Perform a lens sweet spot test

Once you have your camera set up on a tripod, performing a sweet spot test only takes a couple of minutes. To begin, put your camera in Aperture Priority mode, then compose your shot and take photos at varying apertures. Start with a shot at the widest aperture, then rotate that main dial a couple of times (to narrow the aperture) and take another shot. Keep doing that until you’ve taken seven or eight photos.

Upload your photos to your computer and zoom in. You’ll quickly see which aperture settings gave you the sharpest overall image.

This next photo of my daughter was shot using natural light. Shooting in my lens’s sweet spot gave me a pretty sharp image, even in this low light setting:

Mid range aperture sharp image low light

Find your lens sweet spot for sharper images

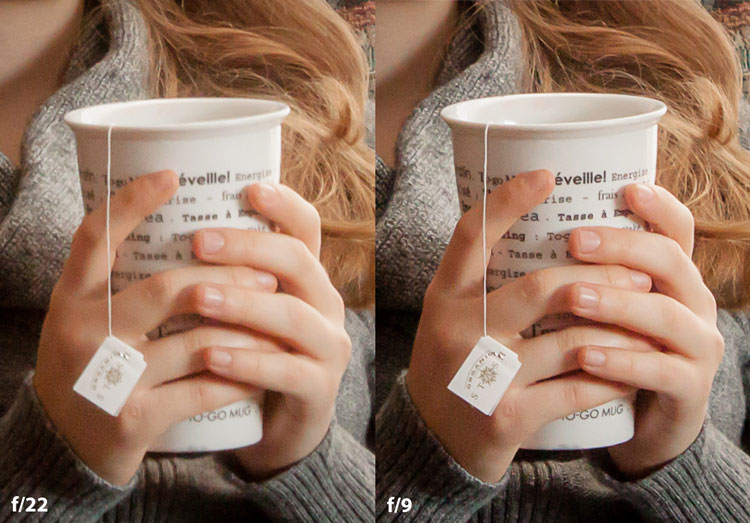
The close-up of the mug shows the advantage of shooting in the lens’s sweet spot. Whenever you want to make sure you get the sharpest capture possible, take a shot at each mid-range setting: f/7.1, f/8, f/9, and f/10.

Getting your sharpest images

Now that you know your lens’s sweet spot, it’s time to practice. I hope you’re as pleased with the results as I’ve been!

Mid range aperture for sharper images

I love shooting in natural light, and learning how to capture sharper images in low light has made me so much happier with my photos.

Tips for capturing the sharpest images

  • Shoot in Aperture Priority mode
  • Choose a mid-range aperture (usually f/7.1 to f/10)
  • Use a tripod and a remote shutter release (or your camera’s self-timer) to reduce camera shake
  • Take a series of shots at f/7.1 through f/10 when a sharp capture is especially important

But don’t stop there. Keep playing with settings in Aperture Priority mode. It’s awesome to get images that are sharp throughout, but there’s a lot more to aperture than that.

Learn more about aperture and depth of field here.

The post How To Find Your Lens’ Sweet Spot: A Beginner’s Guide to Sharper Images appeared first on Digital Photography School. It was authored by Dena Haines.


Digital Photography School

 
Comments Off on How To Find Your Lens’ Sweet Spot: A Beginner’s Guide to Sharper Images

Posted in Photography


Tips for Getting Sharper Real Estate Interior Photographs

23 Feb

Photography is a key part of advertising a property for real estate sales. But just as stunning images show the property looking its best, the opposite is also true. Poor photography, with blurred, sloping rooms, and out of focus images does little to inspire viewings.

Here are some basic, but important, steps to help you improve the quality of your interior photos. You’ll see what causes photographs to turn out blurry, and get some handy tips on equipment and techniques to avoid falling into these traps.

Preparing for the shoot

The best techniques for getting sharp photographs can be let down by poorly working equipment, or badly chosen or untidy scenes. So it’s important to start your session with good preparation and follow your check-list. Here are a few things that should be on your list.
1. Check your equipment

Make sure your equipment is okay, batteries are charged, extra lights working, tripod joints tight and in good condition, and that the lens is completely clean. Loose tripod joints, broken lights, and dirty lenses make problems for you later, so good preparation is worthwhile.

2. Make sure everything is clean and tidy

Dirty windows still look dirty in photographs, so take a household cleaning cloth and some glass cleaner. Cleaning everything is always easier than removing debris in post-production.

3. Set the scene

Tidy and set the scene, removing unwanted items from window sills, adjusting furniture positions and cleaning the windows. Don’t forget to look through the window too – a washing line of underwear probably isn’t what your client wants to see!

Think about the final image and what you want, then keep that in your mind throughout the photography session.

Using a tripod

Three common issues ruin a real estate photograph: blur, poor focus, and sloping rooms.

Blur and bad focus often come from camera movement during the long exposures you need when photographing interiors. Rooms appear sloping when the camera is not level.

You can resolve all three problems by securely mounting the camera on a sturdy tripod, which is why a tripod is highly recommended when photographing interiors.

Here are some pro tips for using a tripod:

  • Hang your camera bag from the center of the tripod (if it has a hook, as seen above) to increase stability.
  • Set the tripod exactly where you’ve decided to take the photographs, and extend the thicker sections of the legs first as they provide most stability. Avoid extending the center column as this is the least stable section and will reduce the stability of the tripod.
  • Give the tripod a gentle prod to make sure it won’t slip on the floor or wobble.
  • Mount the camera on the tripod, ensuring that the base plate and mounting are tight and cannot move around.
  • Adjust the tripod head until the camera is perfectly level and the image doesn’t slope to the left or the right. By getting the camera level, you ensure the room won’t look as if it slopes sideways.

For more on getting sharp images with a tripod, read: 5 Tips to Get Sharp Photos While Using a Tripod.

Eliminating sources of camera shake

There are also other sources of blurriness in photos. One of these is called mirror shake.

DSLR cameras have a mirror which sits in front of the camera sensor and helps you see the view through the lens by reflecting the image up to the eyepiece (through a prism). The mirror snaps up and out of the way when you take the photo, creating vibrations that can cause blurring.

You can eliminate this problem by setting it in the up position before taking any photographs. Look in your camera menu for the Mirror LockUp setting.

Left: The mirror is down in this image. Right: the mirror is up here exposing the camera’s sensor.

Conclusion

With good preparation and technique, and the right equipment, you can consistently get sharp, crisp interior photographs. When you set out to capture that image, remember:

  • Set the scene by making the room look neat and clean.
  • Make good use of a tripod.
  • Choose an appropriate lens.
  • Keep your camera stable and free from vibration.

The video tutorial expands on some of these tips, as well as showing other helpful hints for getting sharp photographs like choosing an appropriate lens and focusing correctly.

Watch the video to learn more about tripods, lenses, focusing, and keeping the camera steady.

Please share any other tips you have for taking sharper interior photographs of real estate in the comments area below.

Disclaimer: HDRsoft is a paid partner of dPS

The post Tips for Getting Sharper Real Estate Interior Photographs by David Robinson appeared first on Digital Photography School.


Digital Photography School

 
Comments Off on Tips for Getting Sharper Real Estate Interior Photographs

Posted in Photography


Now we know: Sony a9 is sharper than we thought

22 Jun

To make a long story short, we’ve re-shot our studio scene shots of the Sony a9 with the FE 85/1.8 lens, and they’re much sharper. We apologize for misleading any of our readers, but it’s a long story – see below. To jump to the images, just click the button, but we do encourage you to read the full text as well.

The Long Story

You may have noted on the studio scene page of our Sony a9 review that we admitted to having quite a bit of difficulty focusing the camera with the new Sony 85mm F1.8 lens in magnified live view. The maximum magnification (x9.4) on the camera LCD made it very difficult to fine tune the 85/1.8 precisely. Multiple AF-S attempts yielded shots varying in sharpness, and we were often able to attain better results manually focusing. But the only way to check each shot was to shoot tethered and check each shot magnified on a monitor. Of course, every time we thought we’d nailed focus, we’d try nudging the camera or focus ring just a bit to make sure we couldn’t do any better, and then realize we’d fallen off a bit.

And so the search began again and again, with the quest for perfect focus ending up a bit of a fool’s errand. We finally tuned focus to what we thought was reasonable (we look for maximum aliasing in the central Siemens stars, and color aliasing in the text), and shot our entire studio and dynamic range tests.

Subsequently, we got lots of complaints about the a9 being soft.

The Lens Factor

Was it the lens? This is the first Sony FE camera we’ve shot without the stellar Zeiss 55mm F1.8. We’ve had a long-standing policy of shooting with an on-brand 85mm equivalent lens per-system, to maintain equal distance from camera to target, something that allows for all images to be rendered with equal perspective. With Sony’s recent release of the razor sharp FE 85/1.8, we thought we’d stick to our policy and give it a try.

But we don’t blindly switch lenses for a system; we first verify:

  1. The new lens is at least as sharp as the previous one.
  2. The lens transmission (also accounting for the aperture at F5.6) is not so different as to affect noise comparisons.

Our initial testing showed equivalent sharpness between the 55 and 85mm F1.8 lenses on even a high-resolution a7R II (see below). Furthermore, DXO verified similar levels of sharpness between the 85 and 55 F1.8 lenses (which both perform better than Sony’s 85/1.4 GM, surprisingly). And while we don’t have a way of directly measuring lens transmission, we measured signal:noise ratio of a few grey patches in our scene with the two lenses on the same camera body, and found them to be within 1/6 to 1/10 EV of one another. That meant the new lens would not make the a9 look better, or worse, in Raw noise comparisons compared to if we were to use the Zeiss 55mm F1.8 at F5.6.

Sony 85mm F1.8 at F5.6 (left) vs. Sony 55mm F1.8 at F5.6 (right). Shot on a7R II

Some Friendly Help

While plowing ahead with other aspects of the review, a message from forum expert Jack Hogan turned up in my inbox showing this:

Long-time forum member and all-round expert Jack Hogan did a quick MTF analysis per color channel based off of the slanted edges in our scene. Uh-oh. Looks like the red channel is focused better than the green channel, yielding a calculated MTF50 of only 945 line pairs per picture height (equiv. to a 5.4MP image if weighting sharpness, or MTF50).

Importantly, the green channel should have the highest MTF.

It was now clear that focus was the underlying issue with our studio shots. Not a bad lens. Not a strong anti-aliasing filter. But simply the fact that the lens was not optimally focused: if it were, the green channel would have the highest MTF.

So we sat down one day and spent the entire day shooting many, many runs of our studio scene, slowly moving a macro rail (rather than coursely adjust focus on the lens) between each run. From these shots, we picked the (centrally) sharpest runs. While our copy of the 85/1.8 appears slightly decentered (the left is softer than the right), the results now are much more in line with where things should be:

Jack Hogan re-analyzed some of our new studio shots of the a9, and the green and blue channels now have the highest MTF, not the red channel. The calculated MTF50 of 1125 lp/ph (equiv. to a 7.6MP image if weighting sharpness, or MTF50), which is a 19% increase in linear resolution over our previous results.

A side benefit of analyzing properly focused shots is an ability to estimate the strength of the anti-aliasing filter, which appears to kick in around 0.744 cycles per pixel (the first minimum in the MTF curve). For comparison, the D5’s anti-aliasing filter kicks in around 0.748 cycles per pixel according to Jack’s analysis of our studio scene shots. Meaning the a9’s AA filter is fairly typical.

Have a look at our updated images, and our updated image quality analysis based off of our new results:


Editor’s note:

As camera sensor and lens resolutions are becoming astronomically high, tiny little differences become visible in pixel-peeping. And that’s precisely what our studio scene allows you to do.

Our studio scene isn’t perfect, but it can be helpful. It has its caveats though. For example, because we don’t control for lens transmission from brand-to-brand, or any shutter speed inaccuracies, we state that noise comparisons are only accurate to within 1/3 EV. Trying to extrapolate differences smaller than that from high ISO shots of our studio scene is meaningless: margins of error are real.

The same goes for sharpness. The reality of lenses and mounts is that there is copy variation – in both. Therefore, we urge you to make sharpness comparisons largely from the center of the scene, which removes the lens (as much as it can anyway) from the equation. The rest of the scene is useful for assessing color, detail retention and noise at high ISO in JPEG and Raw, respectively, and other subjective attributes. And keep in mind common sense things: the lock of hair is well above the plane of optimal focus, and different lenses can have field curvature which either helps or hurts the sharpness of this lock. It’s important to keep these sorts of things in mind when pixel-peeping our scene.

This time, with the a9, we take full responsibility for a non-optimally-focused set of shots. But the process has also been a learning experience for us: depending on a lens’ electromechanical coupling and the magnification of the live feed, it can be extremely difficult to take test shots that stand-up to the level of scrutiny our image comparison tool demands. And there are the practical issues mentioned above around taking one shot, checking it, and repeating the process – returning to the position of optimal focus is nearly impossible. The results of visually checking which shot is sharpest can even vary from tester to tester. I can assure you though: we are constantly working on methods to improve these processes.

That said, it’s important to keep things in perspective: in the real world it’s unlikely you’d have seen the sharpness ‘issues’ we had with our initial a9 run (that otherwise appeared so drastic in our studio scene). Why? Because (1) you don’t typically view images at 100%, (2) there will at least be a plane of maximum sharpness (which in our case, unfortunately wasn’t our studio scene on our first run), and (3) your lens and shooting aperture will have far more impact on subject sharpness than which 24 MP sensor was used to shoot it.

To our readers: we offer our sincere apologies, and wish you happy shooting!

Articles: Digital Photography Review (dpreview.com)

 
Comments Off on Now we know: Sony a9 is sharper than we thought

Posted in Uncategorized


6 Tips for Getting Sharper Wildlife Photos With a Super Telephoto Lens

29 May

In recent years, super telephoto lenses by third-party manufacturers such as Sigma and Tamron have been made available on the market for really reasonable prices. Earlier on, photographers had no choice but to spend a huge amount in order to buy a super telephoto lens, but now these third-party lenses make it more affordable. One such super telephoto lens is the Sigma 150-600mm f/5-6.3 DG OS HSM, which allows you to get much closer to a distant subject.

Using a super telephoto lens for wildlife photography is in itself a skill to master as you may not get sharp and clear results when you first pick up the lens. The tips below will help you get work better with a super telephoto lens so you can capture sharper wildlife photos going forward.

Wildlife photography telephoto lens 01

#1 – Choose the correct shutter speed

Selection of the best shutter speed is one of the most important tasks when doing wildlife photography. There is a standard rule which says that the shutter speed should be equal to or faster than the focal length of the lens you’re using. So, if you are shooting with a 500mm focal length, then you need a shutter speed of at least 1/500th or faster (1/1000th, 1/2000th, and so on).

Shooting at a shutter speed slower than 1/500th can introduce camera shake and thus will affect the sharpness of the image. However, if your lens features image stabilization technology, you can then shoot at a slower shutter than the focal length. How much slower will depend on the performance of the technology for that particular lens.

NOTE: This rule is applicable for full-frame digital cameras. If you are using an APS-C sensor camera, then you also have to multiply the focal length by the crop factor of your camera brand (1.5x for Nikon, 1.6x for Canon, etc). In this case, the focal length would become 750mm with a Nikon APS-C sensor camera and thus a shutter speed of 1/750th of a second or faster needs to be used to get sharp photos.

Wildlife photography telephoto lens 07

Usually super telephoto lenses such as the Sigma 150-600mm f/5-6.3 DG OS HSM perform the best from 150mm to 500mm, and as you go beyond 500mm the sharpness starts to lessen. So try and avoid using a focal length which is towards the maximum limit of a telephoto lens.

#2 Use the right aperture value

In wildlife photography, depth of field plays a great role in helping to make the subject stand out from the background. In case you are not aware, shooting with wider aperture (smaller aperture values like f/2.8) helps you to achieve shallow depth of field. This results in a photo where the subject is sharp and well segregated from the background, which itself will be out of focus.

But this does not mean that you blindly shoot using the smallest available aperture value. Instead, I recommend that you shoot at the aperture value which is the sweet spot of your lens. Usually the sweet spot of a lens is 2-3 stops higher than the smallest aperture value. So it would be around f/11 if you are using the Sigma 150-600mm f/5-6.3. Shooting at the sweet spot aperture value allows you to get maximum possible sharpness in the photo, along with decent depth of field. By the way, you would likely be shooting at a focal length such as 500mm or so, and in that case, you would get shallow depth of field even at f/8 or f/11.

Wildlife photography telephoto lens 03

#3 – Selecting ISO sensitivity

ISO sensitivity is one of the sides of the exposure triangle which needs to be adjusted as per the shutter speed and aperture value required for the shoot. In the case of wildlife photography, you will have to compromise on the ISO sensitivity over the other two elements of the exposure triangle. Why?

You will have to use a fast shutter speed in order to freeze the motion of the subject and an aperture value which is not that wide in order to capture sharper photo. This is the reason why you might have to increase the ISO sensitivity value in order to capture a well-exposed photo. So the ISO should be the last exposure setting that you adjust in order to correctly expose the frame.

Wildlife photography telephoto lens 04

#4 – Use a tripod or monopod for stability

Considering the fact that the super telephoto lenses are really heavy, it is important and advisable to mount them on a tripod or a monopod. Almost all telephoto lenses have a tripod collar for mounting the lens on a tripod or a monopod. This will enable you to concentrate more on the surroundings and the movement of the animals/birds instead of worrying about carrying the weight of the lens.

If you shoot handheld at telephoto focal lengths such as 300mm, 400mm and so on, you are bound to get shake in your photos. As a precautionary measure, it is better to carry a tripod or a monopod along every time you plan to shoot wildlife.

Wildlife photography telephoto lens 05

#5 – Image Stabilization mode in your lens

In a situation when you need to pan your camera along with the moving animal or bird, make sure that you have switched on the image stabilization on your lens. This is helpful in case you are shooting handheld, as it reduces the shake that is caused while panning or tilting the camera. Image stabilization mode can be found on lenses as IS on Canon lenses, VR on Nikon lenses, OS on Sigma lenses, VC on Tamron lenses and OSS on Sony lenses.

But in case you are using a tripod or a monopod as advised above, switch off the image stabilization mode on the lens. If you keep it switched on, the image stabilization feature introduces minor shake which in turn reaches the camera mounted on a tripod or a monopod. So in order to eliminate this minor shake you must switch off the image stabilization mode on your telephoto lens.

Wildlife photography telephoto lens 02

#6 – Explore Back Button Focus

If you are not already using the back button focus method to lock the focus on the subject, then you must be half-pressing the shutter release button to do the needful. When you use the shutter release button to lock focus, you are further contributing introduction of minor camera shake.

By using the back button focus technique, you can dedicate one of the buttons located on the back of your camera to focus. By doing so, you are then balancing the weight of the camera as you press the button on the back side. Not only does it reduce camera shake, it also helps you shoot at much faster rate as compared to the traditional approach.

Wildlife photography telephoto lens 08

Conclusion

Shooting with a super telephoto lens is a delight, but it is also really important that you understand the technical aspects of using it to get sharp results. Do not be disappointed if your initial shots are not as sharp as you expected them to be.

Make sure that you are using the right shutter speed and aperture values, these two elements of the exposure triangle contribute the most to the sharpness of your photos. If possible, use a tripod or monopod and mount your telephoto lens on it to avoid any possible camera shake. In case you are shooting handheld, switch-on the image stabilization feature on the lens to further reduce the shake caused during panning or tilting of the camera.

Wildlife photography telephoto lens 06

Do you have any additional tips for getting sharper wildlife photos using a super telephoto lens? If so please share them in the comments section below.

The post 6 Tips for Getting Sharper Wildlife Photos With a Super Telephoto Lens by Kunal Malhotra appeared first on Digital Photography School.


Digital Photography School

 
Comments Off on 6 Tips for Getting Sharper Wildlife Photos With a Super Telephoto Lens

Posted in Photography


4 Simple Ways to Get Sharper Photos

23 Feb

If I were to ask you what the best way to make sharper photographs is, your mind might instantly jump to something like, “Get a better lens.” While the quality of your lens glass certainly does play a huge role in overall image sharpness, it is not an absolute guarantee.

googletag.cmd.push(function() {
mobile_slots.push( googletag.defineSlot( “/1005424/_dPSv5topic-rhs(300×250)”, [300, 250], “pb-ad-124309” ).addService( googletag.pubads() ) ); } );

There are many other factors that come into play when discussing image sharpness or lack thereof. I’ve even said things myself like, “If I only had this lens or that lens, I could make better photos.” But have you considered the other reasons why your images seem to lack that wonderful sharpness we all chase?

4 Simple Ways to Get Sharper Photos

Let’s face it, not all of us can afford the top of the line lenses that we believe will deliver the utmost clarity in our photographs. But there are so many other things that can be done to make sure you don’t stand in the way of even your kit lenses of delivering the best images possible. Here a few easy tips you can use right now to make sure you get the most out of whatever glass you might have on hand…or rather, on camera – and get help you get sharper photos.

#1 – Ye’ Olde Tripod

Here it comes. That same old practice that I’ve always implored you to do – use a tripod. There’s simply no escaping the fact that the more steady your camera is the sharper your images will be. Read: 5 Tips to Get Sharp Photos While Using a Tripod for more on this.

4 Simple Ways to Get Sharper Photos

The truth is, excuses for not using a tripod are becoming slimmer and slimmer. Lightweight travel-style tripods (like the Vanguard tripod I wrote about here) are becoming more readily available. These are small and light options that fit in your camera bag without dragging you down. While not always practical, of course, a tripod (even a monopod) is the single best option you have for steadying your camera while making a photo. But when a tripod isn’t possible there are still ways to physically steady your camera for the capture. Like these…

#2 – How to Hold Your Camera Steady

There isn’t a set way to place your hands for each and every camera you may encounter. But there are some basic principles to follow that can help you to keep your camera physically stable when shooting handheld.

The most important thing to remember is that the further your camera moves away from your center of gravity, the more inherent possible camera shake will become. This means that whenever possible you should hold your arms close to your body and avoid putting distance between yourself and the camera.

4 Simple Ways to Get Sharper Photos

Arms out making the camera unsteady.

4 Simple Ways to Get Sharper Photos

Arms and elbows tucked in, this is much more stable.

Furthermore, the manner with which you hold the camera in your hands becomes important. Keep a comfortable yet firm grip with your shutter hand while your left hand remains beneath the lens close to the camera body, all the while still being capable of adjusting the lens focus or zoom ring. Your left hand should be pressing slightly backward in opposition to your shutter hand.

4 Simple Ways to Get Sharper Photos

Hold the camera and lens firmly but stay flexible. Notice the left hand is under the lens.

This will allow more steady control of the entire setup to reduce shake. Again, experiment with different configurations of the same grip so that you become the most comfortable. Just remember to keep those elbows tucked in close to your body, with your left hand cradling the lens firmly underneath close to the camera. Your right hand should be gripping the camera equally as firmly with opposing forward pressure to your left hand.

If you want to test yourself, take in a deep breath before each shot and exhale half way before you click the shutter. These little nuances may seem somewhat neurotic but can help you to get sharper photos when the odds are against you.

#3 – The Importance of Shutter Speed

Much like the idea of preventing camera shake, the faster the shutter speed you can use the better it is in terms of making your images sharper. Motion is always your enemy. Unless you purposefully want to impart motion to your photograph the more helpful arresting it in your frame will be. One of the most helpful methods you will find to reduce both camera shake and subject blur when shooting handheld is something called the Reciprocal Rule. Which really, is more of a guideline than a rule.

The Reciprocal Rule is simply a calculation based on whatever focal length lens you happen to be using. Just take the focal length in millimeters and make it a fraction. If you’re shooting a 50mm lens your maximum shutter speed should not be slower than 1/50th of a second. If you’re shooting a 24mm lens then the shutter speed should be at least 1/24th second; a 300mm lens would need 1/300th, and so forth. If the exact shutter speed isn’t available just round up to the nearest speed (or faster).

Here are a couple of examples of the improved sharpness based on an increase in shutter speed according to the Reciprocal Rule:

4 Simple Ways to Get Sharper Photos

Shot at 1/40th of a second with 85mm lens – notice how it’s not quite sharp. Usually when you see a sort of  double image like this – it’s due to the shutter speed being too slow. 

Now notice the reduction in motion blur once the shutter is increased to 1/100th second.

4 Simple Ways to Get Sharper Photos

Shot at 1/100th of a second with an 85mm lens

This is an easy and quick way to prevent your images from suffering sharpness robbing blur due to camera shake. While not perfect, the Reciprocal Rule will become your best friend in the field.

#4 – What’s a Sweet Spot Anyway?

Regardless of the lens you happen to be using, it has what is often referred to as a sweet spot. This is the aperture range of your lens that will produce the sharpest images. This range varies even between lenses of the same make and model, so personal experimentation is a must in order to determine where the sweet spot of your particular lens may be. Read: How to Identify Your Lens’s Sweet Spot

4 Simple Ways to Get Sharper Photos

Begin at the largest aperture (smallest f-number like f/4) and make photos at each aperture up to the minimum aperture (largest f-number like f/22 or f/32) of your lens. Adjust shutter speed and ISO as you go to normalize the exposure. Then examine each image throughout the frame, especially at the corners, to see which apertures give you the best sharpness. This is a somewhat tedious process, but I assure you it will pay off in more ways than you might imagine.

When in doubt, always place the subject of your photo towards the middle of the frame. The center of the lens glass will virtually always be the sharpest area. So, regardless of the aperture you happen to employ the more important aspect of your photo will benefit from the most physical sharpness possible.

Summing Up

  • When you can, use a tripod. A tripod really is your best friend.
  • Practice good camera holding techniques. Keep those elbows tucked in with your left hand firmly (yet still maneuverable) cradling the lens from underneath. Use your right hand to tightly grip the camera body in opposition to your left hand.
  • Use the fastest shutter speed allowable for your image effect. If you need to figure a maximum shutter speed quickly use the Reciprocal Rule (one over the focal length of your lens).
  • Learn the sweet spot of your lenses. Figure out the optimum sharpness aperture for each. If conditions don’t allow you to use that particular setting, then place your subject as close to the center of the frame as possible.

Have more tips that help you achieve sharper images? Please let us know in the comments please.

googletag.cmd.push(function() {
tablet_slots.push( googletag.defineSlot( “/1005424/_dPSv4_tab-all-article-bottom_(300×250)”, [300, 250], “pb-ad-78623” ).addService( googletag.pubads() ) ); } );

googletag.cmd.push(function() {
mobile_slots.push( googletag.defineSlot( “/1005424/_dPSv4_mob-all-article-bottom_(300×250)”, [300, 250], “pb-ad-78158” ).addService( googletag.pubads() ) ); } );

The post 4 Simple Ways to Get Sharper Photos by Adam Welch appeared first on Digital Photography School.


Digital Photography School

 
Comments Off on 4 Simple Ways to Get Sharper Photos

Posted in Photography


4 Tips for Using for Live View to Get Sharper and More Creative Images

02 Sep

Live View versus optical viewfinder on your DSLR, pros and cons?

Pascal

By Pascal

If you shoot with a DSLR you probably use the same method for taking pictures that most people do, holding the camera up to your eye and looking through the viewfinder before snapping the shutter button.

This tried-and-true method has several benefits, including letting you see precisely what you are going to take a picture of before you click the button. Also, allowing you to track fast-moving subjects without any lag time, and even stabilizing the camera due to the fact that it’s being held up against your face instead of away from your body.

Getting this shot using the optical viewfinder wouldn't have been impossible, but it would have been much more difficult.

Getting this shot using the optical viewfinder wouldn’t have been impossible, but it would have been much more difficult.

However, the Live View function that is built into most DSLR cameras has a few tricks up its sleeve that can greatly benefit you as well. While not useful in ever single photographic situation, Live View certainly is worth a second look if you are the type of person who normally casts it aside in favor of the traditional viewfinder.

#1 Make sure your subject is perfectly focused

When you look through the optical viewfinder on your camera, you will see an array of rectangles or dots which each represent points on which your camera can focus. This is a result of your camera’s phase detect focusing system which is present in nearly every DSLR. While it usually works just fine, there are situations in which it can present a bit of a problem.

For one, the subject on which you are focusing can sometimes be outside the boundary of your focusing points, which makes it quite difficult to get it tack sharp even with something like the focus-and-recompose technique. Also, even with using the built-in focusing points it’s not always a guarantee that your subject will be completely in focus, especially if it is very far away like when shooting landscapes or scenic vistas.

Live View helped me get this flower focused just how I wanted, and instead of laying in the mud I used the flip-out screen to help me compose the picture.

Live View helped me get this flower focused just how I wanted, and instead of laying in the mud I used the flip-out screen to help me compose the picture.

Zoom-in on Live View

Live View is the magic bullet in these situations, as you can use it not just to frame your shot, but to zoom in close on a specific area to make sure it is focused. Think of this as though you were holding a magnifying glass up to your camera’s viewfinder when focusing on your subject, and using that as the basis for judging whether it is tack sharp or just a bit fuzzy. This obviously works best if your camera is firmly attached to a tripod, but even if you just set it on a solid surface such as a shelf, rock, post, or other object, you should be fine.

Live View can be a good way to make sure your subjects are tack sharp and perfectly focused.

Live View can be a good way to make sure your subjects are tack sharp and perfectly focused.

Each camera handles the zoom-in function a bit differently, but for most DSLRs there will be an option in one of the menus to enable a button on your camera to zoom in during Live View, and even set the percentage of zoom which tells you how much it will magnify the image. If your subject is not moving, and neither is your camera, this technique is one of the best possible ways to make sure everything is tack sharp precisely how you want it to be (using manual focus in this instance can be helpful also).

#2 See previews of camera effects in realtime

One fun trick that many DSLR manufacturers have added to their cameras is the ability to do various types of effects like selective coloring, miniature, and black-and-white, among many others. Think of them as though you are adding Instagram filters, but in realtime, as you are taking your pictures instead of on your phone afterwards.

Using Live View as you activate various scene modes is a fun way to experiment with different types of creative image effects. It also has the added bonus of allowing you to play around and see how the options affect your photography before you even click the shutter.

A common camera effect is "miniature," which mimics a tilt-shift lens. It's fun to play around with these built-in effects using Live View which shows you a preview of what the final image will look like as you compose it.

A common camera effect is “miniature,” which mimics a tilt-shift lens. It’s fun to play around with these built-in effects using Live View, which shows you a preview of what the final image will look like as you compose it.

Some photographers frown on this type of creative expression, and prefer to leave these effects and scene modes to Photoshop, where things can be endlessly controlled, changed, and tweaked to perfection (often ad nauseam). But, my own personal stance is, if you’re making pictures you enjoy by using simple in-camera effects, then why not keep doing it?

Some of the built-in modes are a little cheesier than others, and you usually can’t shoot in RAW format. But using Live View to preview the different sorts of photography effects you can explore, is a great way to try something new and add a little spark back to your creative juices at the same time.

#3 Depth of Field preview

This one piggybacks pretty well off of the previous item, but I wanted to list it separately because it is so useful on its own. When you change the aperture and focal length of your lens, you are also changing the depth of field, or area that is in focus. It’s a difficult concept to understand since it involves several different variables, including how close you are to your subject and how far away is the background.

This confusion can be compounded by the fact that your optical viewfinder doesn’t really show you what to expect when you click the shutter button. Some DSLR cameras have a Depth of Field Preview button that allows you to close down the aperture and see what it will look like when you take a photo (it also gets dark if you use a small aperture), but another way to do this is by using Live View.

It really helped to see a preview of the depth of field by using Live View when composing this image.

It really helped to see a preview of the depth of field by using Live View when composing this image.

How it works

When you look through the viewfinder on a DSLR camera you are seeing through the lens while it is opened to its widest possible value. But, when you click over into Live View the aperture blades close down to the value you’ve specified, or that which the camera thinks is appropriate, depending on the shooting mode you are using.

This makes it possible to see precisely what the picture will look like when you press the shutter button. So, if you focus on an object while in Live View, you will see a more accurate representation of the depth of field than looking through the viewfinder. This is incredibly useful when shooting macro photos, because it’s difficult to understand just what is in focus and what is not unless you can see it yourself using Live View.

Depth of field can be extraordinarily thin when shooting macro pictures, and using Live View to see a preview of the final result is a good way to get the photo to show up just how you want.

Depth of field can be extraordinarily thin when shooting macro pictures, and using Live View to see a preview of the final result is a good way to get the photo to show up just how you want.

#4 Tap to focus

One final trick that Live View offers, is the ability to actually use it for the act of focusing itself. As more cameras start implementing touch screens, manufacturers like Canon have started allowing users to tap on the screen itself to actually focus the camera, much in the same way you do on your mobile phone.

While this feature is not available on all DSLR cameras, and though some with touch screens don’t have focusing enabled, if you do have a camera that allows you to tap-to-focus you might find it incredibly useful and well-worth your time. This won’t do you any good if you are shooting sports, action, or wedding photos, since the touch-based focusing isn’t as quick. But if you are out shooting casually it’s something you might really enjoy trying.

It even has some advantages over traditional viewfinder-based focusing if you are shooting at extreme angles, such as very low to the ground. More and more cameras are offering flip-out screens so you can swivel it, instead of crouching down, and then tap it to lock focus.

If you have a touchscreen, using Live View can be a great way to make sure your subject is focused exactly how you want by simply tapping the area you want to be in focus.

If you have a touchscreen, using Live View can be a great way to make sure your subject is focused exactly how you want by simply tapping the area you want to be in focus.

Summary

These are just a few of the options available to you if you use Live View on a DSLR. If you are more of a traditional shooter who prefers the optical viewfinder I hope you at least give Live View a chance. It’s not going to be the best option in every situation, but you may find it to be more compelling and useful than you realize.

If you do like shooting in Live View and have your own tips to share, please leave your thoughts in the comments below!

googletag.cmd.push(function() {
tablet_slots.push( googletag.defineSlot( “/1005424/_dPSv4_tab-all-article-bottom_(300×250)”, [300, 250], “pb-ad-78623” ).addService( googletag.pubads() ) ); } );

googletag.cmd.push(function() {
mobile_slots.push( googletag.defineSlot( “/1005424/_dPSv4_mob-all-article-bottom_(300×250)”, [300, 250], “pb-ad-78158” ).addService( googletag.pubads() ) ); } );

The post 4 Tips for Using for Live View to Get Sharper and More Creative Images by Simon Ringsmuth appeared first on Digital Photography School.


Digital Photography School

 
Comments Off on 4 Tips for Using for Live View to Get Sharper and More Creative Images

Posted in Photography


How To Find Your Lens’ Sweet Spot: A Beginner’s Guide to Sharper Images

03 Feb

Are you tired of blurry images?

It’s time to learn how to capture sharper images by finding your lens’ sweet spot. This will give you more confidence, save time, and help you take better photos.

In this article you’ll learn:

  • How to find your lens’ sweet spot (for sharper images)
  • Why you should shoot in Aperture Priority mode (and how to use it)
  • How to perform a test to get your sharpest image every time
  • How important is your lens’ sweet spot? Notice the difference

Mid range aperture sharper than wide open

In the above images of the clock, the one on the right is sharper. Look closely at the words and at the leaves behind the clock. The f/9 image is sharper throughout because it was shot in my lens’ sweet spot. The f/3.5 one was not.

First, take a look at your lens

In this beginner’s guide, we’ll use an entry level zoom lens as our example. Most kit lenses (the basic lens that comes with a DSLR) generally shoot their sharpest at the mid-range aperture settings. To determine the mid-range of your lens, you’ll need to know its widest (or maximum) aperture setting. It is located on the side, or end, of the lens and will look something like this 1:3.5-5.6.

For example, here it is on my Canon 18-55mm zoom lens.

Lens aperture range

This means that when my lens is zoomed all the way out, its widest aperture is f/3.5. When zoomed all the way in, its widest aperture is f/5.6.

The rule to finding that mid-range sweet spot, is to count up two full f-stops (aperture settings are called f-stops) from the widest aperture. On my lens, the widest aperture is f/3.5. Two full stops from there would bring me to a sweet spot of around f/7.

Use this chart to count your f-stops

Robin Parmar

By Robin Parmar

There is some wiggle room in the mid-range, so anything from f/7 to f/10 will capture a sharp image. Once you know the mid-range of your lens, you can do an easy test to get your sharpest image. To perform the test you’ll need to shoot in Aperture Priority mode.

Take control with Aperture Priority Mode

Shooting in Aperture Priority allows you to choose the aperture setting you want, which gives you more creative control than Automatic mode. By controlling the aperture setting, it’s much easier to get a sharp image, and because your camera still chooses the ISO (if you are set to Auto ISO) and shutter speed automatically, it’s very easy to use.

You’ve probably heard that apertures like f/16 and f/22 are best for keeping everything in focus. While that can be true, focus does not always equal overall sharpness. Choosing a mid-range aperture will give you sharper images throughout. You can improve them even further by reducing camera shake with a tripod and a remote shutter release (or your camera’s self-timer).

Here’s an example of how shooting in your lens’ sweet spot will give you sharper images.

Sharp images shot in lens sweet spot

Mid range f stop sharper than small f stop

In the above split-image, the f/9 image is sharper than the f/22 one. The needles and shadows are not as soft or blurry as in the f/22 shot (look at the crispness and sparkles in the snow too).

Switching from Automatic to Aperture Priority Mode

To take your camera out of Automatic and put it in Aperture Priority, just turn the large Mode Dial to Aperture Priority. This is what that looks like on my Canon (on Nikon and other brans look for the A).

Aperture priority on canon mode dial

Automatic mode is the green rectangle; Aperture Priority mode is the Av (or A on a Nikon). Once your camera is in Aperture Priority mode, turn the smaller Main Dial (shown here on the top of my Canon) to choose your f-stop.

Main dial canon

As you turn that dial, you’ll see the f-number changing on your screen. In the next picture, it’s set to f/9.5.

Aperture setting on canon LCD screen

Perform a Lens Sweet Spot Test

Once you have your camera set up on a tripod, performing a sweet spot test only takes a couple of minutes. To begin, put your camera in Aperture Priority mode, then compose your shot and take a photo at varying apertures. Start out with the widest, then click that main dial a couple of times (to the right) and take another. Keep doing that until you’ve taken seven or eight photos.

Upload your photos to your computer and zoom in on them. You’ll quickly see which aperture settings gave you the sharpest overall image.

This next photo of my daughter was shot using natural light. Shooting in my lens’ sweet spot gave me a pretty sharp image, even in this low light setting.

Mid range aperture sharp image low light

Find your lens sweet spot for sharper images

The close up of the mugs shows the advantage of shooting in the lens’ sweet spot. Whenever you want to make sure you get the sharpest capture possible, take a shot at each mid-range setting f/7, f/8, f/9, and f/10.

Getting Your Sharpest Images

Now that you know your lens’ sweet spot, it’s time to practice. I hope you’re as pleased with the results as I’ve been!

Mid range aperture for sharper images

I love shooting in natural light, and learning how to capture sharper images in low light has made me so much happier with my photos.

Tips for capturing your sharpest images:

  • Shoot in Aperture Priority mode
  • Choose a mid-range aperture (usually f/7 to f/10)
  • Use a tripod and a remote shutter release (or your camera’s self-timer) to reduce camera shake
  • Take a series of shots at f/7 through f/10 when a sharp capture is especially important

But don’t stop here. Keep playing with settings in Aperture priority mode. It’s awesome to get images that are sharp throughout, but there’s a lot more to aperture than that.

Learn more about aperture and depth of field here.

Do you have any lens sweet spot tips to share? Please do so by commenting below.

googletag.cmd.push(function() {
tablet_slots.push( googletag.defineSlot( “/1005424/_dPSv4_tab-all-article-bottom_(300×250)”, [300, 250], “pb-ad-78623” ).addService( googletag.pubads() ) ); } );

googletag.cmd.push(function() {
mobile_slots.push( googletag.defineSlot( “/1005424/_dPSv4_mob-all-article-bottom_(300×250)”, [300, 250], “pb-ad-78158” ).addService( googletag.pubads() ) ); } );

The post How To Find Your Lens’ Sweet Spot: A Beginner’s Guide to Sharper Images by Dena Haines appeared first on Digital Photography School.


Digital Photography School

 
Comments Off on How To Find Your Lens’ Sweet Spot: A Beginner’s Guide to Sharper Images

Posted in Photography


6 Ways to Use Live View to Get Sharper Images

27 Oct

The LED monitor on the back of a camera is most often used to review captured images. But here’s a tip: Live View can also be a useful tool, helping you to focus your camera before taking the shot. In fact, Live View may be the most accurate means of focusing a camera. Let’s take a look at six ways you might use Live View to focus.

1 – Focus Stacking

Use live view to focus on different depths of field to use for focus stacking

Use Live View to focus at different distances for focus stacking.

Focus Stacking is similar in principle to HDR. However, when doing Focus Stacking, images are captured with different parts of the image in focus, then combined in Photoshop to create an image with more depth of field than would be possible with a single exposure. This method is a useful tool when doing macro photography. Calm winds are a must to capture focus stacking images. Use Live View to accurately focus each image. Here is the step-by-step outline of the process:

  1. Set up your camera on a sturdy tripod (a must!)
  2. Frame or compose the image
  3. Turn on Live View
  4. Zoom the Live View in so you can adjust the focus of each image to different distances
  5. Use Photoshop to process and blend the stacked images

2 – Manual Trap Focus for Macro Photography

Use live view to manually trap focus a macro photography subject.

Use Live View to manually trap focus a macro photography subject.

Manual Trap Focus can also be useful in macro photography. Set your camera to manual focus, and using Live View move the camera until the subject is in focus. Used in conjunction with a focusing rail on a tripod, or hand held, move the camera to focus the image. Another benefit of this method is that it also gives you a Live View of the depth of field for the image you plan to capture. See steps below to give this method a try:

  1. Set camera to manual focus
  2. Turn the focus ring on your lens to the closest focus distance
  3. Turn on Live View
  4. Move your camera closer to your subject until it is in focus. (Using a focusing rail can help you master this method.)

To fine-tune the focus, use the zoom feature in Live View to get the most accurate focus point possible.

3 – Focus on any point in your scene

Live View is not restricted to the usual focusing points in your camera’s main focusing system. Most newer camera models will have 51 or more focusing points. However, these points are clustered around the center of the image. In Live View, you can move your focusing point all the way out to the edge of the image.

4 – More Accurate Focus

Use live focus to zoom in for a more accurate focus on waterfalls.

Use Live View focus to zoom-in for a more accurate focus on waterfalls.

Live View also provides a more accurate focus than a camera’s main auto focusing system. The Live View system is based on the contrast of the image actually captured by the camera’s sensor. It is slower-focusing than your camera’s regular phase detection autofocus system, but it is more accurate. This works great for focusing in on subjects within landscape, and portraiture where a slower-focusing method doesn’t affect the ability to capture the shot.

5 – Manual Focus in Low Light

When photographing in low light situations, such as astrophotography, auto focusing often fails to provide a desirable result. Using Live View, in conjunction with manual focusing, can help obtain a sharp image. While in Live View, use the zoom to enlarge the subject’s image and then use manual focus to tweak the photo’s sharpness.

Use live view to focus when capturing low light images.

Use live view to focus when capturing low light images.

6 – Focusing on the Eyes

For the most compelling portraiture and wildlife photography, the most important focus is on the eye(s) of the subject. Using Live View, it is possible to isolate the eye for either auto focus or a manual focus. This method is limited to images that are posed, or with little movement.

Use live view to focus on the eye to fine-tune the focus in select wildlife images.

Use Live View to focus on the eye to fine-tune the focus in select wildlife images.

Conclusion

These are just a few ways that you can use Live View mode to focus your camera. Remember that using these methods will be much harder on your battery life. Always keep a spare, fully charged, battery with you when you are shooting. If you have any other ideas for using Live View for focusing, please leave them in the comments below.

googletag.cmd.push(function() {
tablet_slots.push( googletag.defineSlot( “/1005424/_dPSv4_tab-all-article-bottom_(300×250)”, [300, 250], “pb-ad-78623” ).addService( googletag.pubads() ) ); } );

googletag.cmd.push(function() {
mobile_slots.push( googletag.defineSlot( “/1005424/_dPSv4_mob-all-article-bottom_(300×250)”, [300, 250], “pb-ad-78158” ).addService( googletag.pubads() ) ); } );

The post 6 Ways to Use Live View to Get Sharper Images by Bruce Wunderlich appeared first on Digital Photography School.


Digital Photography School

 
Comments Off on 6 Ways to Use Live View to Get Sharper Images

Posted in Photography


5 Tips for Geting Sharper Images When Doing Long Exposures

29 Apr

Long exposure photography makes it possible to show the passage of time in a still photograph. It does this by blurring moving elements and sharpening the static parts. But there is a downside to long exposures – any camera movement blurs the static elements. Here are four simple ways you can prevent unwanted blurring.

Salt Lake Sunset at Mandurah

1. Use a Good Tripod

For very short exposures there are ways to hold yourself and your camera steady, like: How to Reduce Camera Shake – 6 Techniques. However, when you’re taking an exposure of a few seconds, you need something steadier than your hands to hold your camera. You may set the camera on a table, or a rock but risk dropping the camera or accidental movement that can ruin your shoot.

The most common way is to put it on a sturdy tripod. You have to get at least a decent tripod as El Cheapo tripods are going to give you camera shake too.

Light Trail Central

2. Use a Remote Shutter Release

Even with a tripod the act of snapping the shutter can cause the camera to shake. There are a couple of ways to combat this problem.

One is to set the delay on the camera (2-sec timer) so any movement is done by the time the shutter snaps. The other is to get a remote shutter release.

Remotes can be connected to the camera by a cable or wireless – either one snaps the shutter without shaking the camera. They are also called remote cable releases. This is a small and cheap accessory which can help you get rid of camera shake.

Rockingham Sunset

3. Use Manual Focus

Autofocus is a wonderful thing. Most of the time it does exactly what you want, making it easier to take great photos. But there are times, especially when shooting long exposure, that it can have the opposite effect.

In low light situations autofocus has trouble finding something to focus on. Even when it seems focused it can readjust when the shutter is snapped. Using ND filters can cause the same problem.

Light Trail IFC

Fortunately, there is a simple solution. When shooting in low light you can use manual focus, or use a flashlight for focusing and once the focus is set, turn autofocus off so it won’t change once the light is off.

For ND filters set the focus manually (either before or after mounting the filter) or autofocus first, turn it off and mount the filter. The shot will stay focused, the picture sharp.

Moving Cloud Sunrise at Kings Park

4. Lock the Mirror Up

If you are using a DSLR camera – and you probably are since you are shooting long exposure – it has a mirror that reflects the image from the lens to the viewfinder. It is between the lens and the camera sensor, so it has to move before the shutter snaps.

That small movement causes vibration. When you turn on the mirror lockup it turns the shutter button into a two stage button. The first click lifts the mirror and the shutter doesn’t open until the second click. The time between the two clicks allows the vibration of the moving mirror to stop.

Light Trail Hong Hum

5. Use Your Aperture Sweet Spot

Closing down the aperture can make you shoot longer. However, when your aperture is too small, it will start to have a diffraction effect which lowers the sharpness.

In most lenses, the sweet spot of the lens aperture is between f/5.6 to f/8. In other words, you will get the sharpest images when using this range.

When you step down to f/16 or smaller, you will get images like that seem out of focus. You can learn the physics about diffraction in the below video by Steve Perry:

Conclusion

Taking long exposure photographs is a science and an art. Like any art, taking long exposure pictures with the right balance of sharpness and blur takes both skill and intuition. These five tools will help you use your skills to turn intuition into great photographs.

googletag.cmd.push(function() {
tablet_slots.push( googletag.defineSlot( “/1005424/_dPSv4_tab-all-article-bottom_(300×250)”, [300, 250], “pb-ad-78623” ).addService( googletag.pubads() ) ); } );

googletag.cmd.push(function() {
mobile_slots.push( googletag.defineSlot( “/1005424/_dPSv4_mob-all-article-bottom_(300×250)”, [300, 250], “pb-ad-78158” ).addService( googletag.pubads() ) ); } );

The post 5 Tips for Geting Sharper Images When Doing Long Exposures by Kevin Choi appeared first on Digital Photography School.


Digital Photography School

 
Comments Off on 5 Tips for Geting Sharper Images When Doing Long Exposures

Posted in Photography


Actionable Tips to Get Sharper Photos Every Time

11 Jul

There’s almost nothing (besides maybe losing a memory card) that hurts more than having a great shot that ends up poorly focused! And even though sometimes we can blame our equipment, there are other factors that come into play when focusing. Sharper and crisper photos are the goal of every photographer, so it’s time we cover  the basics to achieve Continue Reading

The post Actionable Tips to Get Sharper Photos Every Time appeared first on Photodoto.


Photodoto

 
Comments Off on Actionable Tips to Get Sharper Photos Every Time

Posted in Photography