RSS
 

Posts Tagged ‘Sharp’

Focus on Autofocus – Achieving Sharp Images Every Time

25 Oct

Focus on Autofocus 1

Focus on autofocus – this article goes out to all my fellow focus-obsessed shooters who strive for consistently tack-sharp images no matter what the scene, subject matter, or lighting situation.

Have you ever walked away from a shoot feeling confident that you nailed every last shot only to discover, upon closer review, that the majority of your captures are slightly or significantly front or rear focused? If so, this article is most definitely for you!

My eyes have been drawn to and compelled by explicitly sharp, detailed, and descriptive imagery since I was a young man pouring over the works of photojournalists such as Gordon Parks, Diane Arbus, Elliot Erwitt, and Eugene Richards to name a few.

These photographers not only captured substantive and spectacular content (moments) but did so with a technical acumen that titillated my visual senses and sent chills down my spine. I wanted to create images just as clean and captivating as those I idolized.

Focus on Autofocus 2

Autofocus in the age of modern digital technology offers quick, responsive subject acquisition and focus, but that technology sometimes yields inconsistent and unreliable results when creating images in chaotic environments or adverse situations—and, surprisingly, sometimes even in ideal situations.

My intention with this article is to discuss autofocus (AF): how it works and the various AF modes and points that are available to help ensure more consistent focus even under the most challenging circumstances.

Autofocus systems are incredibly complex and providing an in-depth explanation of precisely how they work, would take far too long and lead us astray. So here’s a concise breakdown of the two types of passive autofocus modes.

Phase Detection

Focus on Autofocus 3

Phase detection is most common in DSLRs and employs what is known as a beam-splitter. The beam-splitter directs the light (the image) onto two different microsensors, thus creating two separate and identical images. These are aligned (brought into focus) automatically using the camera’s internal software.

If you’ve ever used an older film camera with manual focus lenses, you may recall how the image or scene would appear split in the center of the viewfinder, and focus was achieved by aligning the two misaligned images. Phase detection works this way.

Contrast Detection

Focus on Autofocus 4

Contrast detection is arguably more accurate than phase detection, especially when shooting subjects (portraits) close-up with a wide aperture (i.e., f/1.4–f/2.8). The technology behind it is less cumbersome (lightweight) and less expensive. We see contrast detection AF systems most commonly in smaller and lighter mirrorless cameras.

Phase detection is more robust and more expensive, but it is also more responsive and reliable with subjects that are in motion or moving erratically. The mechanics of contrast detection are much leaner, lightweight and less expensive, but this system is notably slower and less responsive than phase detection.

For this article, I focus (no pun intended) on DSLR systems since they remain—for the time being—the mainstay for fast-action, low-light photography (i.e., photojournalism, sports, wildlife, and wedding photography).

Focus on Autofocus 5

I’ve worked extensively with both Canon and Nikon systems (each has their strengths and weaknesses), but based on my personal experience Nikon prevails when it comes to fast, accurate focus acquisition under adverse low-light situations with subjects in motion.

I shoot mostly using available light, fixed lenses, and wide apertures—typically between f/1.4 and f.2.8. There is no margin for missed shots when it comes to capturing key moments for wedding clients.

I need speed and accuracy and strive for consistency. I need to be able to capture those decisive moments as they unfold, but I also want tack-sharp images. Nothing frustrates me more than capturing great content that is slightly out of focus.

I need my focus to land precisely where I want the viewer’s eye to arrive first. Typically, that focal point is the main subject present in the scene or that subject’s eyes if the image is more portrait-like (rather than a scene with multiple subjects).

The issue of precise and accurate focus becomes even more pronounced and problematic when focusing on subjects close to the lens or when using fast lenses with wide-open apertures. A thorough and comprehensive understanding of your camera’s autofocus modes and AF points prove to be paramount in these cases.

Focus on Autofocus 6

When capturing stationary or slow-moving subjects, I achieve the best results with AF-S. I use the camera’s center focus point, which is considered the most accurate and reliable AF point. I acquire and lock focus with the center AF point then quickly recompose and capture.

Today’s cameras come equipped with many focal points. Depending on which make and model of camera you’re using, you could choose from up to 153 points. AF points typically light up in red or green when the shutter-release button is halfway depressed.

Focusing Modes (for Both Nikon & Canon)

Focus on Autofocus 7

Autofocus Automatic (AF-A) Nikon | AI Focus AF Canon

In Autofocus Automatic (AF-A), the camera analyzes the scene and determines which AF point/s to use. Based on whether or not the subject is moving or stationary, it automatically switches between AF-S and AF-C to achieve focus.

Single Servo AF (AF-S) Nikon | One-shot AF Canon

In Single-Servo AF (AF-S), the selected AF point locks focus on the subject as long as the shutter release button remains partially depressed. Focus lock is typically indicated in the viewfinder by the illumination of a solid circle.

Once focus is acquired and locked, the scene is recomposed without losing focus on the chosen subject/s. This AF mode is ideal for subjects that are stationary.

Continuous Servo AF (AF-C) Nikon | AI Servo AF Canon

In Continuous Servo AF (AF-C) focus, the camera continues to focus (and adjust focus) on the selected AF point up until the moment the shutter is activated. This AF mode is ideal for subjects that are moving.

The AF Area Mode (AF points)

In addition to these focusing modes, Nikon and Canon DSLRs come equipped with numerous AF points and AF area mode options.

Focus on Autofocus 8

Nikon AF Area Modes

Nikon allows you to choose the following AF area mode options:

Single Point – The photographer determines a single AF point manually, and the camera focuses on the subject in the selected AF point, working best with stationary subjects.

Dynamic Area – The photographer determines the AF point manually, as with Single Point AF (above). However, if the subject moves and leaves the selected AF point area, the camera adjusts accordingly based on surrounding AF points and refocuses accordingly. This setting works best with subjects that are moving unpredictably.

Auto – The camera determines which AF point contains the subject and focuses automatically.

3D – The photographer determines the AF point manually. Once the shutter release button is partially depressed, and the camera achieves focus, the photographer recomposes the scene, and the camera automatically shifts to a new AF point to maintain focus for the selected subject.

Canon AF Area Modes

Canon’s AF Area Mode options are very similar to Nikon’s but are predicated more so on groupings of AF points to achieve focus.

AF Point Expansion – This mode allows you to select a primary AF point accompanied by a surrounding 4 or 8 additional AF points for subjects that are moving or don’t offer much contrast for quick focus acquisition.

Zone AF – This provides a cluster of either 9 or 12 moveable AF point groupings to achieve focus on the nearest subject that falls within in the zone you’ve selected.

Auto AF Point Selection – In this mode, all AF points are active and track focus much like Nikon’s 3D AF mode.

If you’re anything like me, options can be exciting but also incredibly overwhelming. When reading camera manuals or highly technical tutorials, I want to ball up in the fetal position and go to my happy place.

So, I urge you to take a deep breath and read on as I speak more prosaically about how to synthesize and integrate this information for the practical application and use in the field.

I’m primarily a portrait and wedding photographer whose obsession with making sharp images has led to a great deal of experimentation throughout my 20-year career. I have worked with every pro DSLR body and lens combination imaginable and what I’m about to tell you isn’t a secret; it’s an affirmation.

Lens Calibration

First, I have achieved my best focus and image sharpness results by using fixed proprietary lenses. Proper lens calibration is also instrumental in achieving optimal results with DSLRs and proprietary lens combinations – both fixed and zooms. Lens calibration is the very first step you must take to achieve consistency and accuracy when it comes to focus.

Nikon offers AF fine-tuning with some of their newer or newly released DSLR pro bodies, and I can’t rave enough about what a valuable tool this is. Canon also allows its shooters to fine-tune and calibrate their pro lenses with their pro bodies, but for right now it remains a manual process.

If you’re interested in learning more about Nikon’s AF fine-tuning, please visit https://fstoppers.com/gear/how-get-most-nikons-auto-af-fine-tune-194063. This video provides a great tutorial that enables you to harness the power of this awesome feature!

Focus on Autofocus 9

Know that no camera body lens combination is ever a perfect match and that all body/lens combinations can benefit from calibrating your lenses. Whether you have a newer Nikon that allows you to calibrate automatically, or you own a Canon system and have to perform lens calibration manually, this is the genesis of consistently tack-sharp imagery.

My experimentation with AF points and AF modes is equally extensive. I have come to find that center point focus, and Single-Servo AF (AF-S) delivers more consistently for stationary or slow-moving objects than any other available combination of AF point and focusing mode.

I prefer to use the AF center point to achieve and lock focus, then recompose my scene for final image capture, rather than using AF points located nearer to the edge of the viewfinder. I haven’t always shot this way but discovered through comparison that this method was quicker and more reliable and that the focus was also far more accurate shot after shot.

Your camera’s AF points and focusing modes rely heavily upon contrasts present in the scene. The AF center point discerns contrast and thus achieves focus faster and more accurately than points closer to the edge of the viewfinder or image. Here contrast, clarity, and brightness get stifled by vignetting and optical aberrations that occur in all lenses—especially toward their edges and corners.

Additionally, the AF center points are cross-type focusing points, which are capable of focusing on lines in two directions, horizontally and vertically.

Focusing on Moving Subjects

Focus on Autofocus 10

When focusing for moving subjects, I have found that using Continuous-Servo AF (AF-C) in combination with Dynamic Area AF mode (Nikon) or Zone AF (Canon) delivers the best, most consistent results even in extreme low-lighting conditions.

Remember, Dynamic and Zone AF modes allow for the selection of AF point groupings ranging from 4-8 point groups to maintain constant focus tracking for subjects in motion.

When I’m a bit further away from subjects that are moving, I find that shooting in Continuous-Servo AF (AF-C) in combination with 3D area AF mode (Nikon) or Auto AF (Canon) produces the most consistent results.

For example, when I’m shooting the bride and groom’s first dance, 3D AF-C is my go-to, as it allows me to tell the camera which subject/s I want in focus and maintain that focus continuously as the subject/s move within the frame or I recompose the scene myself.

More on shooting moving subjects here.

Shooting Portraits

I think the most significant focus challenges come with shooting portraits or close-up details with longer lenses (50mm or greater) at apertures of f/1.2–f/2.8. This is where the pros separate from the amateurs.

Many photographers want to achieve the striking visual effect (bokeh) we see when shooting a subject wide open (f/1.2 – f/2.8) and nailing focus on the eyes. In these instances, there is no margin for error. Sometimes you see just a centimeter of sharpness—and if you miss it, the image is unusable (at least in my opinion). It’s a significant risk with huge rewards.

I’m often asked if there is a trick to nailing eye sharpness in portraits shot at such shallow depths of field. The ‘trick’ is to know how all of your equipment works. Know how each lens works with the body to which it’s paired, and which AF point or focusing mode produces best results when shooting shallow for that particular subject or scene.

Focus on Autofocus 11

For me, the reward is only worth the risk if I possess the technical acumen and confidence to achieve the desired result at least 8 out of 10 times (that’s my standard).

Consider the following: When shooting at 85mm set to f/1.8 with a subject to camera distance of 1 meter, you only have around a 1.3cm depth of field. If you use the center AF point in AF-S to set, lock focus, and recompose before capturing the image, it is highly unlikely your razor thin plane of focus will land where you initially locked focus.

It’s basic trigonometry.

The slight change in camera angle from recomposing (or even breathing), drastically affects (shifts) the plane of focus, resulting in the cheek, nose, ears, or chin (rather than the eyes) being in focus.

So unless you want the subject’s eyes positioned dead-center of the frame in all the portraits you shoot with a shallow aperture, you’ll need a more creative and effective strategy.

In my experience, using Continuous Servo AF (AF-C) and selecting a group of 4 to 6 Dynamic AF points near the eye is the best way to achieve eye sharpness in this precarious scenario.

However, I have found shooting in Continuous Frame or High-Speed mode, and manually making micro adjustments to the focus while the shutter is activated, is the only surefire way you’ll capture at least 1 or 2 frames where eyes are tack-sharp.

Conclusion

Autofocus is a powerful and convenient tool that has helped evolve and elevate photography to heights I would have never imagined 20 years ago.

However, with all things mechanical and humanmade, there exists weakness and limitations. That aside, there are no limitations when we speak of imagination or the creative wills that enable us—and compel us—to push those tools well beyond their limits to achieve optimal and desired results; something only possible when we possess the proper knowledge of how those tools work.

As I stated earlier in this article, Autofocus and AF systems are incredibly complex. It’s a topic of great interest and value to many photographers – from novices to seasoned pros alike.

It’s also a rapidly evolving technology, which means that what we know today may not apply tomorrow. Many variables and factors impact and affect AF accuracy and consistency – it’s a multifarious topic for sure. One article alone could never address all of these facets.

I hope that with this article I’ve been able to break the ice and provide useful information that inspires you to hone your skills further. We as photographers rely upon technology to articulate our vision and voices, so it’s not only crucial but also incumbent upon us to understand the technology – so that we may advance our artistry.

That said, I’m looking forward to writing more articles on this topic and carrying forward this conversation so that we may examine more closely and improve our collective focus.


The post Focus on Autofocus – Achieving Sharp Images Every Time appeared first on Digital Photography School.


Digital Photography School

 
Comments Off on Focus on Autofocus – Achieving Sharp Images Every Time

Posted in Photography


Five Ways to Take Stunningly Sharp Images

25 Sep

You can take sharp images. You can take them consistently, quickly, efficiently. However, you just may not realize it yet.

sharp images sanderling reflection

The Problem

The thing is, getting acceptably sharp images is a common problem among photographers. It’s something that I myself often struggled with getting consistently. I can’t tell you the number of times I used to come home, only to find my memory cards full of blurry or out of focus images.

I used to think the problem was my camera optics. In order to take pin-sharp images, I thought I needed a top of the line camera and lens. But it turns out that, when it comes to sharpness, the problem is generally the photographer (or the choices that the photographer makes).

And fortunately, that problem is very easy to fix.

sharp images purple flower

In this tutorial, you’ll learn five ways that you can get sharp images. And then, next time you go out shooting, you’ll consistently take pin-sharp images. Sound good? Read on to find out how.

sharp images tulip abstract

1. Use a fast enough shutter speed

When you press the shutter button on your camera, the internal sensor is briefly exposed to the light. This is how the camera actually captures an image.

The length of time that the sensor is exposed to the light is called the shutter speed.

sharp images yellow flower

Depending on your camera settings, the sensor might be exposed to the light for a long period of time (a slow shutter speed) or a short period of time (a fast shutter speed).

One of the main reasons your images are coming back blurry is that you’re not using a fast enough shutter speed. If you use a slow shutter speed, then your camera sensor remains open to the light for too long. It captures too much. That is, it captures motion.

But if you want to freeze the motion and capture only a sliver of a second so that everything is crystal clear, frozen. To do this, you need a fast shutter speed.

sharp images white ibis

Fortunately, it’s not difficult to do this. In your camera’s settings, you can generally increase the shutter speed. Or you can use the Action (Sports) setting, which many cameras have.

Even if your subject isn’t moving, your hands might not be rock-steady. This causes camera shake which in turn causes image blur.

A faster shutter speed will help fix this.

2. Tuck in your elbows

A shutter speed increase solves many issues with blurry photographs. But what if you can’t use a fast shutter speed?

photography without tripod golden retriever sunset

When the light is low, for instance, when you’re indoors or when you’re outside at night – a fast shutter speed lets in too little light, causing the image to be dark (we call this underexposure). Your camera will compensate for the low light by keeping the shutter open for longer, exposing the sensor to more light.

This is when it becomes important to eliminate camera shake completely. If the camera shakes, your image will come out blurred. So how do you stop your camera from shaking?

The first way that I’m going to talk about is simple: You tuck in your elbows. Don’t shoot with your arms out. Instead, firmly grip your camera while pulling your elbows in. This will serve to stabilize the camera and reduce camera shake.

sharp images woman in window

I tucked in my elbows in order to get a sharp shot of my model in low light.

3. Stabilize your body against a wall (or the ground!)

Sometimes, tucking in your elbows isn’t enough. If the light is really low, you may need to take more drastic measures to reduce camera shake.

One big tip is to stabilize your body against a feature of the landscape, something solid.

sharp images reddish egret

When photographing birds, I often stabilize my elbows against the ground, ensuring a sharper image. If you’re a street photographer, for instance, you can search for walls to lean against. If you’re a landscape photographer, you can hold onto a rock or tree.

It also helps to get down on the ground. You can kneel and stabilize your arms on your knee. Or you can get down on your stomach and use the grass, concrete or dirt as a stabilizer for your camera.

Trust me, it works!

4. Use a tripod

I’ve been talking a lot about stabilizing your camera, and the ways I’ve suggested will generally work well, especially if you’re in a pinch. But there is a more dedicated solution – use a tripod.

With a good tripod, you can completely eliminate camera shake. This will do wonders for keeping your images sharp.

sharp images ann arbor nickel's arcade

I used a tripod to capture this image of a musician at night.

There are a few downsides to using a tripod, however. The first is that you lose flexibility. It takes time to set up a new composition when you’re using a tripod, time that you might not want to spend. This is especially true if you’re photographing in a fast-paced atmosphere (e.g., portraiture or events).

The second downside is that good, solid tripods are expensive, especially if you want one that’s lightweight. Cheaper tripods may seem like a bargain, but they often don’t do the job well, or at all and replacing them costs more than buying one good one in the first place.

So be careful before choosing to invest in a good solid tripod.

5. Use a Shorter Lens

I have one more recommendation for eliminating blurry photographs, that is to use a shorter lens.

This is for a few reasons, but I’ll focus on the simplest one. A longer lens is harder to keep steady. It destabilizes the camera (and the image is magnified), and will, therefore, cause camera shake.

sharp images golden retriever

I used a wide-angle lens to photograph this golden retriever as the sun dipped below the horizon.

Hence, this tip is short and sweet. Especially when shooting in low light, put away your longer lenses and your telephoto zooms. Bring out your wide-angle and portrait lenses, ones that you can easily hold steady.

That’s how you’ll take sharp images.

Conclusion

Capturing consistently sharp images may have seemed daunting, but I hope that you now realize the truth. Getting sharp images is easy!

sharp images cosmos

I urge you to get out and try these tips now.

  1. Use a fast shutter speed.
  2. Tuck in your elbows.
  3. Stabilize your body.
  4. If you want, invest in a tripod.
  5. Use a wider lens.

And admire those crystal clear images!

Do you have any other tips for taking sharper images? Please share them in the comments below.

sharp images wilson's plover

The post Five Ways to Take Stunningly Sharp Images appeared first on Digital Photography School.


Digital Photography School

 
Comments Off on Five Ways to Take Stunningly Sharp Images

Posted in Photography


Tips for Ensuring You Get Sharp Photos Every Time

07 Sep

How many times have you captured an image that looks great as a thumbnail only to lose that sharpness when it is enlarged? If you’re like me, TOO MANY times. It happens to all of us all too often, but it doesn’t have to. You probably know the reasons why and how to avoid the problem, but let’s review them all in one setting to you can get sharp photos every time.

Tack Sharp photos - Leaves

There are several known contributors to soft photos and specific ways to prevent them.

First and foremost – clean the lens

Clean Lens - Tips for Ensuring You Get Sharp Photos Every Time

Fingerprints and dust on the lens are the most obvious hinderances to sharp pictures and are one of the most commonly overlooked causes. Carry a small clean microfiber cloth (or packets of lens cleaning wipes) in your camera bag at all times, and keep the lens cap on the lens when it’s not in use.

Become a clean freak with your lenses.

Aperture Settings

While shooting with the aperture wide open does allow you to use higher shutter speeds, it can also have an adverse effect on image sharpness because of an issue called a spherical aberration.

Simply put, light rays travel in straight lines. When they pass through a lens, the curve of the lens actually bends the light rays and diffuses their focus. The more the rays are curved, the softer the focus. When the entire rounded surface of the lens is utilized (as in when using a wide open aperture), the light-bending is increased and the sharpness on the outer edges of the picture is somewhat softened.

This aberration issue is most evident in less expensive lenses.

Tack Sharp photos - Aperture

It is widely known that an aperture 2-3 stops down from wide open produces the sharpest results. If your shot doesn’t require an extremely shallow depth of field to blur the background, close the lens down a stop or two and compensate the exposure with a slower shutter speed or higher ISO.

But be aware that extremely small aperture openings (f/22 and higher) present their own problem called diffraction. When light is forced through a very small opening, the outer rays bend to get past the small opening, which can soften the image and require a longer exposure time.

Lessons learned: Either aperture extreme will cause a slight softening of the image. Except for special applications, so stay in the middle of the road!

Lens Quality

It’s always good advice to buy the best glass you can afford. It is a known factor that THE most critical equipment in your camera bag is not your fancy camera body, but the quality of the glass in front of your camera.

Tack Sharp photos - Lens

Save your money and invest in quality lenses (f/2.8 or faster). Most of us carry at least one zoom lens, but these lenses, because of the complex grouping of internal glass, are seldom faster than f/2.8, and many are as slow as f/4.5 – f/5.6. The lower the number, the more light that passes through the lens. An f/1.4 prime (fixed length) lens always produces sharper images, though it costs more money.

Weather

Believe it or not, the cleanliness or dirtiness of the air can have a significant impact on your photography, especially long-range shots like landscapes. Both heatwaves rising from the hot ground and floating particles of dust and pollutants (what we lovingly call atmosphere) bend the lightwaves, dull the saturation, and blur the focus of your pictures.

Tack Sharp photos - Rust

Living on the “beach coast” of Florida, steady breezes come in off the ocean that are refreshing on a hot summer day but they contain serious amounts of salt. This air salt can be seen for miles in the distance while driving down the coastline. The saltwater mist hangs in the air and has an adverse effect on both metallic surfaces and photographic subjects.

The most ideal weather for shooting razor-sharp pictures is those delightful hours right after it rains. That happens in Florida like clockwork almost every afternoon and at least once every day, Florida gets a nature-shower that lasts for less than an hour and leaves the air sparkling clear for all kinds of outdoor activities. Thankfully, these daily showers scour the air and rinse the salt from both nature and automobiles.

Depth of Field

Choose an f-stop that will keep your entire subject in sharp focus. If you want to keep your subject in full focus while blurring the background, do the math to figure out the depth of field that will remain in full focus at a particular distance.

Each focal length lens has its own “pocket of precision” or focal zone for each subject-lens distance. Take the time to explore your lens’s capabilities so that you will be prepared.

Tack Sharp photos DOF

The depth of field is particularly critical in macro photography. The very nature of the process limits the actual focus on subjects to a very shallow distance. Sometimes this works out well and sometimes it just doesn’t.

Learn the limits of each macro lens’s “pocket” before you make your shot. If your camera allows you to preview the depth of field, use it religiously. Very small changes in the lens-to-subject distance have a very big effect on the focal distance.

Use the One-Third, Two-Thirds Rule

All photographers know that higher number f-stops mean greater depth of field, but maybe some don’t realize that there is an important ratio involved in the field of focus. This ratio must be considered when choosing the f-stop for a particular shot.

While the length of the lens affects how much of the subject will be in total focus, where you set your focus point is also critically important.

This is true whether you are using Automatic, Spot or Manual focusing. Learn to divide the desired focus area into thirds and set the focus one-third into that distance. When you focus on a particular spot, two-thirds of the focal range behind that spot will remain in focus while only one-third of the area in front of that spot will remain sharp.

This is why portrait photographers set their focus on the subject’s eyes. This way the distance from the nose to the ears remain in focus.

Autofocus Versus Manual Focus

Tack Sharp photos - Lumix Manual Focus

Unless your subject has a high level of contrasting edges and is located in the middle of your field of view, you might want to consider using manual focus. Autofocus is a life-saver most of the time, but any higher contrast item in the scene could very well steal the camera’s attention.

Camera autofocus is designed to zero-in on high contrast and those areas in the scene will always set the camera focus. If your subject is located in subdued lighting, try switching to manual focus instead.

Shutter Speed

Slow shutter speeds in hand-held conditions always present problems. No matter how still you hold, your body is always in motion.

The simple fact that your breathe and have a heartbeat means that slight motion will most likely become an issue with slow shutter speeds. Even the slight motion of pushing the shutter button is a contributing factor in this process. I personally make it a point to not go below 125/th of a second when shooting hand-held. Bracing yourself against a stable surface or using a tripod is always advisable.

Tack Sharp photos - Remote Trigger

Use a tripod and a remote trigger. The ultimate preparation for capturing detailed and sharp photos is to take human motion out of the equation altogether.

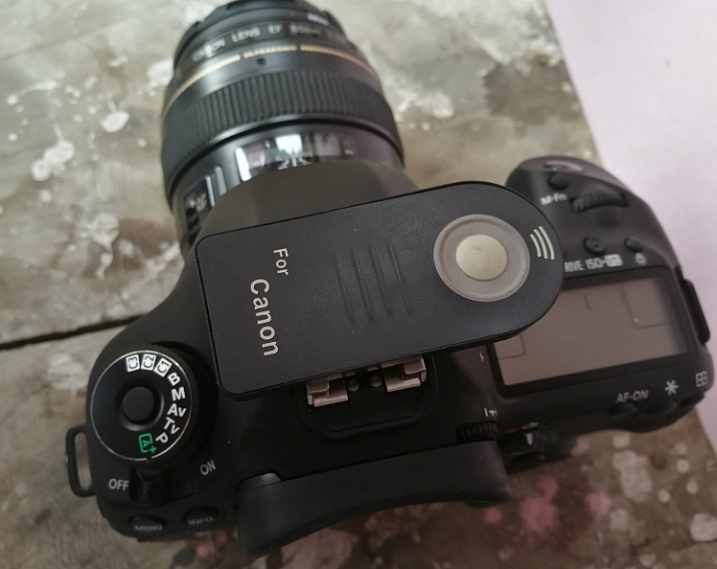
Once you mount your camera on a tripod, frame the scene, set the focus, set the appropriate f-stop for the depth of field, switch to the electronic shutter (if available on your camera). Set up a remote trigger using either a cable release or a smartphone app. Then sit back and be ready to pull the trigger when the scene is right.

Compensate ISO for Shutter Speed

If your shot requires a shallow depth of field or lower f-stops, try dialing up more light sensitivity (increased ISO). Most ideal lighting situations accommodate 200-400 ISO, but low lighting scenarios may require you to set the camera to significantly higher ISO.

But keep in mind that ISO determines how sensitive the image sensor is to light and darkness. Very high ISO will yield higher levels of electronic noise in your picture. Noise is the polar opposite of “signal.” Make your choice of ISO carefully if the image is to be enlarged at all.

About Image Sharpening

Tack Sharp photos - Smart Sharpen

Nominal sharpening takes place (usually) at the time the photo is taken. However, sometimes additional sharpening may be necessary. Beware, image sharpening should always be the last step in image preparation.

Most photos are intended to be sharp and detailed. But refrain from sharpening your images in the editing process in a ditch effort to bring out more detail. Image sharpening artificially simulates image sharpness and can actually degrade the digital image. Unless you use a sharpen brush, every time you sharpen an image in post-production you also enhance the non-subject elements in the scene.

So make sharpening for detail a last resort.

Conclusion

Make it a habit to capture the highest level of detail in the original shot. Take the time to learn each of these precautions and then consider them briefly before you take your shot. If you discipline yourself to go through this checklist the next half-dozen times you shoot, this will become a mental-muscle memory that you check subconsciously.

Exercise your good habits and you’ll come home with more sharp photos and become a sharpshooter.

The post Tips for Ensuring You Get Sharp Photos Every Time appeared first on Digital Photography School.


Digital Photography School

 
Comments Off on Tips for Ensuring You Get Sharp Photos Every Time

Posted in Photography


4 Reasons Why You Aren’t Getting Sharp Images

04 Sep

Capturing sharp images is something most photographers aim to do, regardless of what genre you do. While it sounds easy on paper, it’s not quite as easy to come home with sharp images; especially when you are photographing in challenging conditions.

There are several reasons why you’re images aren’t as sharp as you’d like them to be but the good news is that most of them are both quick and easy to fix. In this article, we’ll look at the most common reasons and what you can do to avoid making these mistakes again.

#1 The Shutter Speed is Too Slow

The shutter speed is to blame for a lack of sharp images in 99% of the cases. A shutter speed that is too slow results in the image becoming blurry.

moody mountain scene - 4 Reasons Why You Aren’t Getting Sharp Images

A shutter speed of 1/320th of a second captured with a 24mm lens was quick enough to get this image sharp.

This is a common mistake and it’s easy to forget to change the shutter speed when you’re in the field. There’s so much to remember, right? The ISO, the aperture, composition, light… and then the shutter speed. Don’t worry though; spending time using and learning the camera will make this much easier within no time at all.

The exact shutter speed you need depends on the situation. However, a rule of thumb is to never use a shutter speed slower than 1 over the focal length for handheld photography. That means that you shouldn’t use a shutter speed slower than 1/70th of a second with a 70mm lens, or slower than 1/16th of a second for a 16mm lens.

This isn’t an exact science though and while the tip above can serve as a guideline, you still should make it a habit to zoom in on the image preview to double check if the image is sharp.

natural scene at sunset - 4 Reasons Why You Aren’t Getting Sharp Images

I used a tripod to capture this 91-second exposure

If you need to use a slower shutter speed to achieve a certain look or due to the dim conditions, it’s essential that you use a tripod. This makes it possible to increase the exposure time without worrying about the image being blurry.

#2 Your Lens is Not Good Enough

Unfortunately, an unsharp image can’t always be blamed on human error. Sometimes the camera equipment is to blame. While I often preach that camera gear won’t make you a better photographer, it is true that it does make a difference to the image quality.

A budget lens isn’t as sharp as a professional lens and sometimes this becomes quite visible. For this reason, it’s advisable to do some research about the lens before purchasing it and make sure to read what people are saying about the image sharpness.

#3 The Camera is Vibrating

So what about the times when you’re using a slow shutter with the camera placed on a tripod, and you know for a fact that the lens is good enough? The cause might be camera vibration.

road with big trees arching over - 4 Reasons Why You Aren’t Getting Sharp Images

When capturing the image above I could not for the life of me figure out why almost every image was slightly blurry when I zoomed in on the LCD screen. I used a 70-200mm with a semi-slow shutter speed, the camera was mounted on a solid carbon fiber tripod and I used a remote shutter release.

After several attempts and trying to understand what was happening I realized it was due to me not standing still when taking the image. This caused small vibrations in the unstable ground I was standing on and resulted in the camera vibrating slightly.

Camera vibration becomes more visible and is easier to cause the longer the focal length you are using. Had I used a 14mm I would most likely not have noticed it at all.

There are many reasons why you might be having some camera vibration. The example above is perhaps not the most common. It could be caused by wind, waves, the tripod is placed in a river or on a bridge, or perhaps it is from you pressing the shutter button (so get a remote trigger).

#4 The Weather is to Blame

Other times you can’t blame either yourself or the camera gear. Sometimes the weather is to blame and it makes it impossible to capture a sharp image.

The most common reason is lots of particles in the air and high temperatures. Now, I’m not going to pretend I’m smart enough to explain how this works (I’m sure someone wants to take on this task in the comments) but it’s a common issue when photographing distant subjects.

mountains in the mist - 4 Reasons Why You Aren’t Getting Sharp Images

Make sure to zoom in 100% when using a telephoto zoom to see if you’re getting sharp images.

A good practice is to use Live View and zoom into 100% magnification to check for sharpness. This should give you a good idea of whether or whether not it’s possible to capture a sharp image.

Conclusion

So I hope these tips have you to get sharp images next time you’re out shooting. Use this as a checklist of things to look out for and go over them one by one to ensure you have everything sharp.

If you have any other tips of reasons why others might be experiencing unsharp images, please share them in the comment area below.


Be sure to read my eBook The Ultimate Guide to Long Exposure Photography if you’re curious about working with slower shutter speeds. 

The post 4 Reasons Why You Aren’t Getting Sharp Images appeared first on Digital Photography School.


Digital Photography School

 
Comments Off on 4 Reasons Why You Aren’t Getting Sharp Images

Posted in Photography


Gallery and impressions: The Tamron 100-400mm F4.5-6.3 is light, sharp and stabilized

28 Jan
Shot on the Canon EOS 80D.
ISO 800 | 154mm | 1/200 sec | F5.6

The Tamron 100-400mm F4.5-6.3 Di VC USD is a well-priced ($ 800) telephoto lens with a useful zoom range. Available in both Canon EF and Nikon F mount, this lens is useful on both full-frame and crop bodies, offering a 150-600mm equiv. field of view on the latter. We first saw it at PPE 2017 and were impressed by its reasonable size and weight given its reach – at 1.11 kg / 2.45 lb – it is the lightest lens in its class.

See our Tamron 100-400mm F4.5-6.3 sample gallery Optically, the 100-400mm is constructed of 17 elements arranged in 11 groups, including low-dispersion elements to correct for aberrations. It also features multiple coatings to reduce ghosting and flare, as well as a protective fluorine coating on the front element. Image stabilization is crucial when it comes to long zoom lenses and Tamron’s optical Vibration Correction system offers the equivalent of 4 stops of correction (CIPA rated).

Shown with the optional tripod collar attached, sold separately for $ 130.

Key Specifications:

  • 100-400mm zoom range
  • 150-600mm equiv. field of view on APS-C
  • F4.5-6.3 maximum aperture
  • VC Image stablization
  • Dust and moisture resistant
  • Silent AF
  • Florine coating on front element
  • Minimum focus distance: 1.5m
  • Maximum magnification ratio: 1:3.6
  • Filter thread: 67mm
  • Available in Canon EF and Nikon F mount

Wildlife and outdoor sports shooters can take solace in the fact that this lens is moisture resistant, with eight rubber gaskets, including one at the base of the lens mount. It’s compatible with Tamron’s TAP-in Console, allowing users to update firmware and/or fine-tune AF. It can also be used with the company’s 1.4X and 2X teleconverters. An A035TM accessory tripod collar is sold separately for $ 130.

Shot on the Canon EOS 5DS R.
ISO 200 | 100mm | 1/1600 sec | F4.5

Design and Handling

According to Tamron the lightweight design of this lens is mostly due to its magnesium alloy internal construction, though it is worth noting the outer shell of the lens is plastic (the lens mount is metal). The lens telescopes when zoomed, increasing in length about 50%. At its most compact it is about 20 cm / 7.8 in long.

Well-constructed, solid feeling and well-balanced, nothing rattles around inside the lens when shaken (my favorite test). Zooming from 100mm to 400mm requires a one quarter turn of the large rubberized zoom ring (located at the front of the lens).

Zooming from 100mm to 400mm requires a one quarter turn of the large rubberized zoom ring

‘Lens creep’ is an annoying fact of life when using telescoping lenses, fortunately it was not an issue during field testing. Just in case, there is a lock on the lens barrel (which can only be used when the zoom is retracted in to 100mm).

Toward the base of the lens barrel you’ll find an AF/MF switch as well as as a controller for selecting one’s VC (vibration compensation) mode: Mode 1 is for normal stabilization, Mode 2 is for use when panning. Users can also turn off VC completely, which useful if you’re on a tripod. Just below the focus ring is the focus distance scale window.

Performance

Hand-held at 400mm, shot using a 1/125 sec shutter because I live in Seattle and it is always dark outside. Shot on the Canon EOS 80D
ISO 800 | 400mm | 1/125 sec | F6.3

Tamron is pitching this lens as appropriate for sports and wildlife shooters, two groups that require reliable AF and effective stabilization. Fortunately, our real world usage shows the 100-400mm excelling in both areas.

The image stabilization system proved effective at helping to eliminate camera shake at shutter speeds I’d ordinarily not feel comfortable using, given the focal length used. The moment you engage AF the IS system kicks in – with one’s eye to the finder the effectiveness of the compensation is immediately apparent.

Autofocus is both silent (hello ultrasonic drive) and fast (powered by two processors). Acquisition is nearly instant in AF-S and it’s equally fast and impressive in AF-C. Users can expect it to maintain focus on the moving subjects they point it at, assuming their camera body is up to the challenge.

Image Quality

The lens is sharp through the zoom range, out of focus areas are also inoffensive. Shot on the Canon EOS 5DS R.
ISO 400 | 400mm | 1/500 sec | F6.3

Though this lens has a slow maximum aperture and is best used for daylight shooting, all signs point to it being optically very good. Our copy of the 100-400mm was well-centered and universally sharp across the frame at all focal lengths we shot. Ghosting and flare are rare.

[It is] universally sharp across the frame at all focal lengths we shot

Chromatic aberration is also really well controlled, though it does appears in some images. Lateral CA is easy to correct in Adobe Camera Raw and other Raw processing programs.However axial CA, which you can see in this shot, is much more difficult to correct for. We also noted some vignetting when used on full-frame, but that is also fairly easy to correct in post.

Bokeh is about what we would expect for a complex telephoto lens. It can look nice toward the longer end, when there’s good subject separation, but closer to 100mm, it can look a little busy, as is the case in this shot.

Conclusion

For travel photographers looking for a casual, lightweight telephoto lens to explore with, the Tamron 100-400 F4.5-6.3 is a solid choice. Shot on the EOS 5DS R.
ISO 400 | 143mm | 1/1250 sec | F5

The Tamron 100-400mm F4.5-6.3 is a great telephoto lens for daylight photography, whether your subjects are moving or not. It offers fast, silent autofocus, good stabilization and is optically impressive at all focal lengths. All that comes in a weather-resistant package that also happens to be the lightest in its class.

We feel comfortable giving it our recommendation

Priced the same as the Sigma 100-400mm F5-6.3 DG OS HSM, the most obvious difference between the two is the Tamron is faster on the wide end, F4.5 vs F5 (and it’s also a hair lighter). That aside, the two offer very similar features like image stabilization, multi layer coatings and special elements for dealing with CA. We’ll have to revisit the Sigma to see just how well the two compare. But having spent a good amount of time with the Tamron, we feel comfortable giving it our recommendation.

What we like:

  • Sharp, versatile zoom range on both APS-C and full-frame
  • Lightest lens in its class
  • Moisture and dust resistant
  • Impressive image stablization
  • Silent AF is fast and accurate

What we don’t:

  • Slow aperture range
  • Pricey tripod collar sold separately
  • Vignettes on full-frame (though easy to correct)

$ (document).ready(function() { SampleGalleryV2({“containerId”:”embeddedSampleGallery_6541892592″,”galleryId”:”6541892592″,”isEmbeddedWidget”:true,”selectedImageIndex”:0,”isMobile”:false}) });
Articles: Digital Photography Review (dpreview.com)

 
Comments Off on Gallery and impressions: The Tamron 100-400mm F4.5-6.3 is light, sharp and stabilized

Posted in Uncategorized


Sharp and wide: Sony FE 12-24mm F4 G gallery updated

07 Oct

The Sony FE 12-24mm F4 G was released earlier this year alongside the pricier FE 16-35mm F2.8 GM. While it may not be as fast as it’s GM ‘big brother,’ the 12-24mm F4 is smaller, lighter, and wider, offering a rectilinear 12mm field of view. It’s also impressively sharp.

We’ve had some more time, collectively as a staff, to shoot with this ultra wide zoom since initially publishing our sample gallery in the summer. Take a look through and see how it holds up in the hands of several photographers and in a variety of shooting scenarios.

See our updated Sony FE 12-24mm F4 G sample gallery

$ (document).ready(function() { SampleGalleryStripV2({“galleryId”:”9004820076″}) })

Sample photoSample photoSample photoSample photoSample photo

Articles: Digital Photography Review (dpreview.com)

 
Comments Off on Sharp and wide: Sony FE 12-24mm F4 G gallery updated

Posted in Uncategorized


A forgotten solution: Why this strange 1975 zoom lens is so sharp

15 Aug

For a few years now, I’ve had in my collection one very strange lens. I bought it primarily for it’s value as a collectible so, up until now, I haven’t really spent much time playing with it.

Made in 1975, this manual focus Minolta MC Rokkor-X 40-80mm F2.8 lens is one strange puppy. When it was first introduced, no other zoom lens could top its image quality and it really didn’t have much competition until more recent years. This is largely due to its very unique Gearbox design that sought to overcome the problem with zoom lenses that we still face today.

Way back in 1959, the first commercially-available 35mm still camera zoom lens, the Bessematic-mount Zoomar 36-82mm F2.8, was released by Voightlander. It’s mechanical design would not be unfamiliar to you since the focus and focal length were adjusted via a few round-turns of the lens barrel.

This simple helicoid design remains the only common method manufacturers use to make our lenses zoom in and out and focus. When you twist the zoom/focus ring(s) of a lens, the optics are carried forward or backward through a threaded barrel. This design results in a fixed movement ratio of the optical groups mounted inside that helicoid. The problem with this is every focal length requires a slightly different adjustment of the lens element/group spacing to properly correct aberrations and the fixed ratio of a helicoid cannot provide that kind of variance.

The helicoid is relatively simple, easy to make, and its shape tailors to a fitting physical design of a lens. If a lens were designed to have as few compromises as possible, it might look vastly different from what we see sitting on store shelves. For simplicity though, manufacturers have stuck with the helicoid and instead invested in overcoming its mechanical shortfalls with optical solutions.

Over the years, lens designers, aided by computers, have learned how to improve the optical designs of the zoom lens to work around most of the limitations of the locked-ratio helicoid. Modern zooms still aren’t quite as good as a prime lens but, with aspherical lens elements and fancy coatings to help out, they’re getting pretty darn close.

Back in the early 1970’s, Minolta’s engineers, armed with their slide rules and cigarettes, had a go at thinking outside the box to come up with a lens design that would allow for precise positioning of the optical groups in a zoom lens. What they came up with was so clever that it required they put it inside a box—a gearbox, to be precise.

Rather than work with the limitations of a helicoid design, this clever bunch decided to abandon that whole concept and create a new one where lens groups would be blessed with the freedom to move independent of each other. They came up with this unorthodox gearbox design that drives 12 optical elements in 12 separate groups along linear, gear-operated rails. With the chains of fixed-ratio movement cast from them, the entire lens design could be “geared” for precise positioning of the optics to best correct for aberrations throughout the range of focal lengths.

What they did was figure out how to make a hand held zoom lens that is as well corrected across its range of focal lengths as a fixed focal length lens would be at its one—that’s the theory anyway. In spite of the weird and wart-like appearance of their solution, Minolta’s engineers achieved with this lens something that is truly unique and special. There is no mistaking this lens for any other, that’s for sure.

Weighing in at 19.75 ounces (560 g), it isn’t particularly big or heavy. In fact, even with all the metal machinery inside this lens, it’s almost exactly half the weight of Nikon’s current 24-70mm f/2.8 VR.

Focus is adjusted by turning the big wheel while focal length is controlled by moving the lever arm. Both controls are very smooth and easy to move across their fairly short range of motion. The focus wheel features a precise distance scale with Infrared Index.

The lens has a 55mm diameter coated front element. Here you can see the profile of the gearbox which is fixed to the left-hand side of the lens body.

Did I mention it has a macro mode? The lens has a metal stem poking out of the gearbox which, when twisted anti-clockwise and pushed in, shifts everything inside the lens out toward the front, essentially putting more space between the film/sensor plane and the rear element (same thing an extension tube does). The result of this forward-shift is a reduction in the Minimum Focal Distance from 3.3 ft (1.01 m) to 1.2 ft (.37 m) @40mm.

Here, the stem is shown in the Macro position. When pushing in this stem, the focal length lever shifts forward with the internal glass. What a cool, whacky design!

Let’s see how well all of the engineering effort translates into actually making images with this lens.

My sister told me about this row of old silos that sit alongside a two-lane road not too far from where I live. Yesterday, I had to go by it while I was on errands. On the return trip I pulled over for this shot.

I had the lens set to 40mm and the aperture was wide-open at F2.8. This was the first shot I took and I kind of hurriedly grabbed it because of the unique lighting. That isn’t vignetting in the grass. Passing over head was a thick, dark cloud that cast the strangest light over this scene. No sooner I had shot this and the sun was back out in the open.

On the same errand run, I came across this old Chevrolet police car. Focal length was 80mm @ F8.

I was very interested to see how well the lens would control chromatic aberrations when shooting this brightly lit chrome.

I’ve not used a pre-1980’s zoom lens that didn’t produce some purple-fringing in a shot like this. Kudos to Minoltas engineers because there was none. Zoomed 400% in the 42 megapixel RAW file I could see nothing but bright chrome and colorful rust. 80mm @ F4

The Jelly Palm in our front yard is full of fruit this time of year. I shot this with the lens’ Macro mode enabled. 40mm @ F2.8

Just a bowl of bananas on the dinner table. Shot somewhere around 50mm @ F5.6

The Magnolia tree in the yard is sprouting new buds. Macro mode, 40mm @ F2.8. In the shade and backlit, color and contrast is good and the out-of-focus background is pleasantly smooth and non-distracting.

My second oldest daughter was kind enough to pause a moment for this final shot. 80mm @ F2.8

What can I say? The lens is awesome. All the effort put into designing this strange Gearbox-driven lens seems to have resulted in an excellent mid-range zoom lens. When I first started shooting with it, I did find it a little fiddly using a lever and wheel to make adjusts but after awhile I grew fond of it; it’s actually really fun to handle.

You don’t hold this lens like you would a traditional zoom, with your hands wrapped around the barrel. I keep it propped with the gearbox resting on the up-turned palm of my left hand and use my thumb to move the focal length lever and index finger to turn the focus wheel. The travel distance of both is just right so that you aren’t moving your fingers outside their natural range or having to make repetitious movements.

I can highly recommend this lens to anyone wanting to own a piece of history and/or turn some heads on their next photo walk. Comparing this to my favorite zoom lens, the incredible Minolta MD 35-70mm f/3.5, I would say it at least equals it. They’re both around the same size and weight and have a similar range of focal lengths. In fact, this Minolta 40-80mm f/2.8 lens is the antecedent to the 35-70mm f/3.5 (thus, for giggles, I used it to shoot the lens photos).

Minolta likely found that the unusual design and complexity of making this Gearbox lens was cost prohibitive and went back to the drawing board to come up with a balanced compromise. They only made two versions of it before canning the whole idea. The lens I have is the 1st Gen ‘MC’ version. An ‘MD’ version was made in 1977 and after that they called it quits.

Both versions can still be found for sale online, but I’ll warn you, this lens is priced for the committed collector.


Tom Leonard is an engineer, amateur photographer, and gear collector who travels around the world for work 30 days at a time. You can read more about Leonard’s travels and see his photography on his website.

This article was originally published on Tom’s blog, and is being republished on DPReview with express permission.

Articles: Digital Photography Review (dpreview.com)

 
Comments Off on A forgotten solution: Why this strange 1975 zoom lens is so sharp

Posted in Uncategorized


9 Ways to Ensure You Get Sharp Images When Photographing People

09 Mar

If you are struggling with soft or blurry images, you are not alone. Many photographers have difficulty with getting crisp, clear, in-focus images. This is especially true when taking pictures of people. It can be done, though, if you take the right steps. Try out these nine tips to make sure you get sharp images when you are photographing people. With a little practice, you should start seeing results right away.

9 Ways to Ensure You Get Sharp Images When Photographing People

1. Shutter Speed

If you set your shutter speed too slow, chances are that your images are not going to be as sharp as you want them to be. Make sure to set your shutter speed at least the same speed as the focal length of your lens. To be extra sure, you could even double it.

For example, if you are shooting with a 35mm lens, make sure your shutter speed is set to 1/35th (doubled – 1/70th) or faster. If you are shooting with an 85mm lens, set the shutter speed to 1/90th (double to 1/170th) or faster.

9 Ways to Ensure You Get Sharp Images When Photographing People

Shutter speed 1/1640th of a second.

2. Steady Hands

To hold your camera steady, firmly plant your hands on your camera and make sure that you are not shaking, even slightly. Ideally, a tripod could eliminate the possibility of this, but if you are shooting handheld, make sure to keep things as steady as you can. Even the slightest movement could cause your photo to become out of focus.

9 Ways to Ensure You Get Sharp Images When Photographing People - Shot hand held

Shot handheld.

3. Set Your Focal Point

There are a few ways to set your focus, but one great way is to set your focal point to the center focal point on your camera and focus in on the person you want to photograph. You can change the points around, but generally, the center one will give you the clearest focus.

9 Ways to Ensure You Get Sharp Images When Photographing People - Shot with center focal point

Shot with the camera set to the center focal point.

4. Look at the Eyes

If you are taking a photo of just one person, set your focus on their eyes. The eyes are generally what will stand out in a great portrait, so making sure that they are in focus is key. Remember those focal points? Make sure that center one is lined up right on their eye.

9 Ways to Ensure You Get Sharp Images When Photographing People - Focus on the eyes

Note: if the person is posed slightly sideways, always focus on the eye closest to the camera.

5. Pose Them

If you are taking a photo with more than one person or a family, the way you pose them can affect the sharpness and focus. An easy pose which helps to make sure the focus will stay sharp is lining them up. Keep everyone on the same plane (equidistant from the lens). This will be helpful especially if you are still learning manual shooting mode, and working with your aperture. When you pose a group of people for a picture and they are in multiple lines, or if you have some closer to the camera, while others are farther away, this could make it more difficult to get everyone in sharp focus.

9 Ways to Ensure You Get Sharp Images When Photographing People - Posed in a line

6. Setting Your Aperture

The wider you set your aperture, the greater the chance there may be some parts of the image that are out of focus. Remember how you’re going to pose them? When you pose the people in a line on the same plane, you can keep your aperture wider and lower the risk for a blurry photo. It is also easier to shoot with a wider aperture if you are just photographing one individual.

9 Ways to Ensure You Get Sharp Images When Photographing People - Aperture 2.2

Shot at aperture f/2.2

7. Focus on the Person Closest to You

If there are many people in your photo, set the focal point on the person closest to you. Ideally, this person will also be in the center of the group. This will help to make sure that they are in focus as well as any people in the photo that are behind them. Then, adjust your aperture to make sure all group members will be in focus.

8. Choose Your Lens

Not all lenses are created the same and some are better at capturing sharp images than others. It’s not necessarily always the most expensive lenses either. A good starter lens that has great focus and won’t break your bank account is the 50mm f/1.8. A few other great lenses that generally produce sharp photos and aren’t as pricey are the 85mm f/1.8 or the 50mm f/1.4.

9 Ways to Ensure You Get Sharp Images When Photographing People - Shot with 50mm f/1.4

Shot with a 50mm f/1.4 lens.

9. Clean Your Gear

If you’ve tried all these steps and you are still experiencing soft, blurry pictures, it may be time to clean your equipment. If it’s been awhile (or if you’ve never had it cleaned), take your camera and lenses into a local camera shop you trust and have them clean your gear for you. Hopefully, that will make a big different in the sharpness of your images.

Now you try it. Next time you go out to photo shoot, think about these steps and carefully plan to get sharp images. Don’t just assume it’s automatically going to happen. With practice you will get it, so keep trying.

The post 9 Ways to Ensure You Get Sharp Images When Photographing People by Emily Supiot appeared first on Digital Photography School.


Digital Photography School

 
Comments Off on 9 Ways to Ensure You Get Sharp Images When Photographing People

Posted in Photography


5 Tips to Get Sharp Photos While Using a Tripod

11 Feb

We all love to admire landscapes and cityscapes. The moment we witness the beauty of nature we instantly take out our camera and start clicking photos. If you are travelling with a tripod you would most probably be using it to take photos in low light conditions or to capture creative long exposure shots.

Shooting with your camera mounted on a tripod might seem easy and a quick fix, but it is equally important to know a few things in order to capture sharp photos. Simply follow these five tips and by end of this article you may be able to figure out why you were not able to capture sharp photos using a tripod before.

Tips sharp photos tripod 01

1. Extend the tripod legs only when needed

While buying a tripod we all research about the maximum height and how tall it can stand, which is completely fine. I have seen many budding photographers extending the legs of their tripod fully the moment they take it out to shoot. But, it does not mean that you always have to fully extend the legs just because your tripod allows to do so.

As you go on extending the length of the lens, the stability and sturdiness of your tripod starts reducing. This gets worse when you are shooting landscapes or stars at a windy location. Even if you wish to extend the legs, start opening up the top (larger/thicker) most section of the legs and then move to the lower (thinner) ones. The last thing to extend should be the neck of your tripod, as it is most prone to causing shake.

Tips sharp photos tripod 02

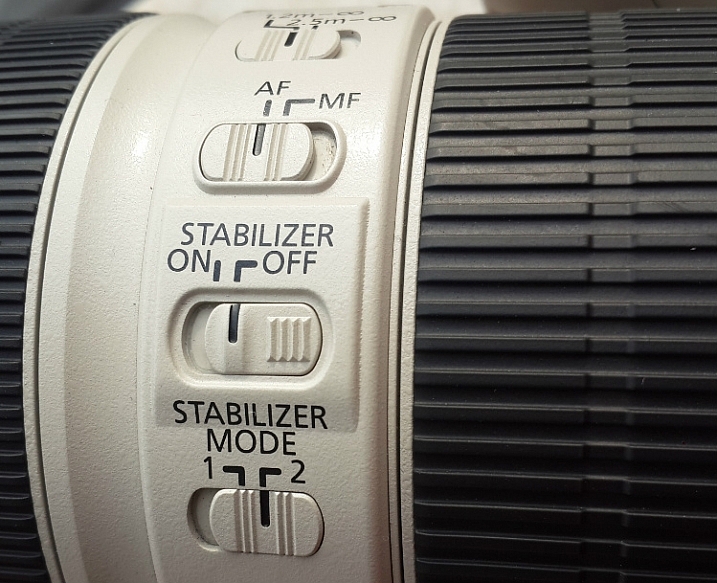
2. Switch-off image stabilization while using a tripod

It is fairly possible that you possess a lens which features image stabilization (IS or VR) and there are fair chances that you may be using your lens with IS/VR switched on. It is fine when you are shooting at a high shutter speed using a tripod, but as you slow things down, that’s when the real problem starts.

Check your lens for the IS or VR switch.

When you are shooting with IS/VR switched on, your lens generates a minor shake (meant to counter-act your hand movements) which ultimately reaches the camera. This minor vibration can introduce shake in your photos when shooting on a tripod, especially at slower shutter speeds.

While shooting landscapes in the evening, star trails, light trails, or any long exposure shot, you need to slow down your shutter speed. As you cannot shoot these types of photos handheld, you will need a tripod. I would advise you to switch off the IS/VR on your lens in order to eliminate the minor shake that would have been generated otherwise.

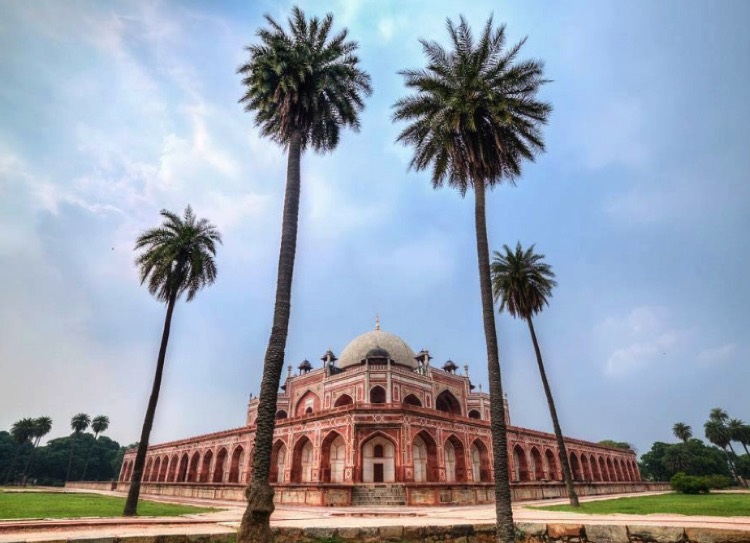
Tips sharp photos tripod 03

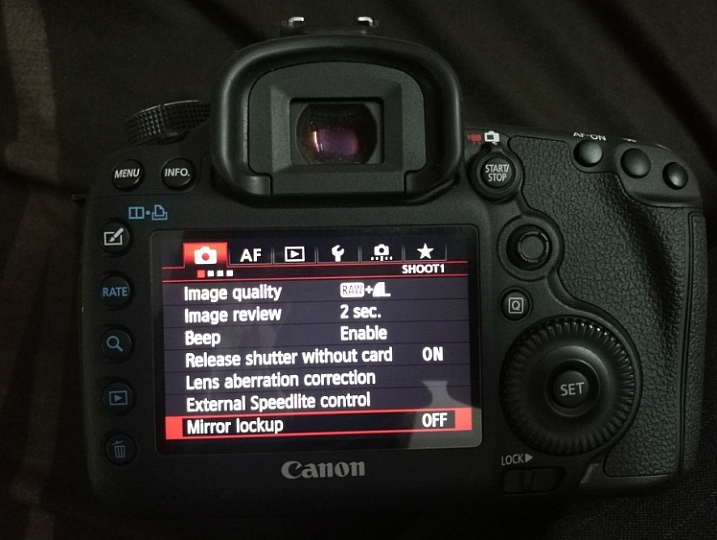
3. Use the mirror lock-up feature on your camera

You may be aware of the fact that there is a mirror inside your digital camera (except for mirrorless cameras) that moves to expose the image sensor when you press the shutter release button. This movement of the mirror can cause a minor shake while the camera is mounted on a tripod, thus affecting the sharpness of your photos.

This shake caused by the mirror may not affect your photos while you are shooting at a fast shutter speed, but as you slow down the shutter speed the shake would become visible in your photos. In order to eliminate this, you can manually lock the movement of the mirror. This can easily be done by activating the mirror lock-up feature (look through your camera’s menu settings or consult the user manual).

Tips sharp photos tripod 08

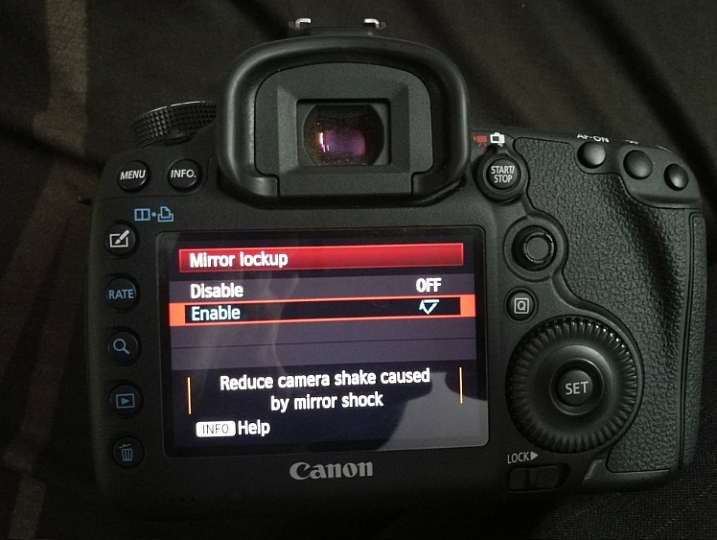
As you activate the mirror lock-up feature on your camera, the camera will raise the mirror up and keep it there until you disable the feature. So when you press the shutter release button the mirror will not move and the chances of minor shake being generated would be eliminated.

Mirror Lockup feature on Canon

Mirror Lockup enabled.

Note: This works differently on some camera models. Some the mirror stays up until you release it, on others you press the shutter button twice – first one lifts the mirror, second one takes the shot and lowers the mirror. The latter requires you to do it each time, but you can see your scene through your viewfinder between shots. In the former you cannot as the mirror blocks light coming to the eye piece.

Tips sharp photos tripod 04

4. Use the 2-second timer or a remote shutter release

Do you use the shutter release button to take a photo when the camera is resting on a tripod? If you said yes, then make sure that you switch on the 2-second timer in your camera. Do not assume that if the camera is on a tripod there will be no shake no matter what. When you press the shutter button you introduce a minor shake by applying some pressure to the camera. By using the 2-second timer feature you can do away with the camera shake as you are allowing 2 seconds for the camera to absorb that minor shake before exposing the photo.

Use a remote trigger or your 2-second timer to eliminate camera shake.

If you want to be extra cautious and not take any chances, you can use a remote shutter release or cable. The remote allows you to go wireless and click photos without even touching the camera, thus ensuring that your images will be crisp and sharp. A wired trigger is equally useful except for the fact that there is a cable attached to the camera, otherwise it functions exactly the same as a remote.

Tips sharp photos tripod 05

5. Shoot at the lowest ISO possible

The lower the ISO, the less sensitive the camera’s image sensor is to light and the chance of noise and grain is lessened. While you are shooting with your camera on a tripod, likely you may be working in low light conditions or doing long exposures. You would usually shoot at high ISO in order to compensate for slow shutter speed, but that is not necessary while using a tripod.

If you are shooting in low light conditions, using high ISO would obviously introduce noise or grain into your images. As you are already using a tripod, you do not have to worry about camera shake because of slow shutter speed. Without any second thoughts set the ISO sensitivity to the minimum value available on your camera, this will result in a sharp and grain free image.

Tips sharp photos tripod 06

Conclusion

So if you have had issues getting sharp images while shooting with a tripod, I hope these tips will help you solve them. Please share your comments and thoughts below.

googletag.cmd.push(function() {
tablet_slots.push( googletag.defineSlot( “/1005424/_dPSv4_tab-all-article-bottom_(300×250)”, [300, 250], “pb-ad-78623” ).addService( googletag.pubads() ) ); } );

googletag.cmd.push(function() {
mobile_slots.push( googletag.defineSlot( “/1005424/_dPSv4_mob-all-article-bottom_(300×250)”, [300, 250], “pb-ad-78158” ).addService( googletag.pubads() ) ); } );

The post 5 Tips to Get Sharp Photos While Using a Tripod by Kunal Malhotra appeared first on Digital Photography School.


Digital Photography School

 
Comments Off on 5 Tips to Get Sharp Photos While Using a Tripod

Posted in Photography


4 Secrets for How to Get Tack Sharp Photos

01 Nov

We’ve all been here before. You get home from an afternoon with your kids in the park, at the ball game, or even a formal photo session only to load your pictures on the computer and realize that many of them are fuzzy, blurry, or just plain out of focus. It’s a problem that has plagued photographers for years. While new cameras offer all sorts of features like 3D focus tracking and real-time face detection to help make sure to get the ultimate tack sharp photos, the fact remains that out-of-focus images are still an issue for just about everyone with a camera.

It’s an unfortunate reality of the way cameras work with incoming light, and until we are all shooting with Lytro-style light field cameras we are all going to have the occasional out-of-focus picture or two. Fortunately, there are a few relatively simple things you can do to make sure your pictures are indeed as sharp as possible.

tips for getting tack sharp photos

Use a fast shutter speed

The world around you is constantly in motion, and having a camera means you are equipped to freeze that motion into a single frame. Depending on what you are shooting the result can sometimes be a blurry mess, which is often the result of a shutter speed that is simply too slow. There’s an old bit of conventional wisdom that says the minimum shutter speed needed to get a sharp image of a still subject is 1/focal length. So if you are shooting with a 50mm lens you need a shutter speed of 1/50th of a second.

Note: Due to the cropped sensor on cameras like the Canon Rebel series or lower-end Nikons the formula becomes 1/(1.5x focal length), so you would need a minimum shutter speed of 1/75 second.

This might sound fast but it’s actually not, especially if you are shooting in low light conditions or with a small aperture on your lens. It gets even worse when your subject is moving, in which case you need a much faster shutter speed! This is why many mobile phone pictures end up looking blurry, in order to let in enough light to get a photo they often use slower shutter speeds.

This jittery squirrel was moving all over the place, so I shot with a speed of 1/180 second to get a sharp picture. tips for getting tack sharp photos

This jittery squirrel was moving all over the place, so I shot with a speed of 1/180 second to get a sharp picture.

Proper settings

The solution is to use a faster shutter speed, which might sound fairly obvious but it doesn’t always work unless you have your camera configured properly. If you shoot in Auto your camera might not know you want to use a fast shutter speed. So shooting in Program or Shutter Priority is a good way to control the shutter speed to make it as fast as you want.

You can also utilize higher ISO settings like 1600 or 3200, which look just fine from most modern cameras if you need a fast shutter and there isn’t much light. Most photographers would take a slightly grainy (noisy) photo that can often be fixed with software like Lightroom or Photoshop over a blurry photo that can usually not be fixed. If you find that you consistently get blurry pictures of your subjects, try increasing your shutter speed and you just may just be surprised with the outcome.

Use a smaller aperture

The lens on your camera is designed to gather incoming light and focus it so you can take a picture. The amount of light it lets in is largely dependent on the size of the physical lens opening. A bigger opening, or aperture, lets more light pass through than a smaller opening, much in the same way a bigger hole in the bottom of a bucket lets more water leak out than a smaller hole. Wider apertures let you use faster shutter speeds and also help you achieve the type of beautiful out-of-focus backgrounds, called bokeh, that are common in portrait, wildlife, or even sports photography.

tips for getting tack sharp photos - family photo

Even though my 85mm lens has a maximum aperture of f/1.8, I shot this at f/2.8 because I wanted a wider depth of field in order to make sure all three subjects were in focus.

Depth of field

One tradeoff that comes into play when using wide apertures, is that your depth of field is much shallower. That means you have a very narrow section of the image that will actually be in focus or tack sharp.  Under very carefully controlled conditions this can be fine and even quite desirable. But in many situations, a thin depth of field can result in more headaches and frustrations than it’s worth.

Shooting with a wide aperture can result in a depth of field that is so narrow a person’s nose could be in focus but her eye might not. One of the best solutions is to just use a smaller aperture. The tradeoff when using smaller apertures like f/2.8, f/4, etc., is that your background won’t be quite as blurry and you will need a longer shutter speed, but if your lighting is good the latter won’t matter. And as for the former, I like to err on the side of caution and go with a technique that will give me a higher chance of having my subject sharp and focused, even if it means a slightly less blurry background.

tips for getting tack sharp photos

Use cross-type focus points

Almost every interchangeable-lens camera has one or more cross-type focusing points. That means they look along the horizontal and vertical axes to make sure things are tack sharp before taking a picture. These points are the little dots or squares you see when you look through the viewfinder of your camera. The ones that are cross-type are usually a bit faster and give you better results than their single-axis counterparts. Of course, you will need to know which of the points on your particular camera are cross-type but a quick online search of your camera model and “cross type focus points” will usually get you the information you need.

tips for getting tack sharp photos cross-type focus points

The center focusing points on my D750 are all cross-type, so I like to use them whenever possible in order to make sure to get maximum sharpness.

Cross-type focusing points are usually limited to a certain portion of the viewfinder. This can present a bit of a problem since normal-type focusing points are what is commonly used to lock focus on objects along the outer edges. A solution I like to use for these situations is the focus-and-recompose technique. I use a cross-type focusing point, often the one right in the center, to lock focus and then recompose my shot to frame it how I want. This does not always work when shooting wide open since even the smallest amount of movement can affect your shot when the depth of field is razor thin. But as I mentioned earlier, if you want tack sharp pictures you should probably stop your aperture down a little bit anyway.

Sharpness is critical when shooting macro pictures, so I used a wide aperture (f/8) and cross-type focusing points to make sure the foreground tulip was tack sharp.

Sharpness is critical when shooting macro pictures, so I used a small aperture (f/8) and cross-type focusing points to make sure the tips of the petals on the foreground tulip were tack sharp.

Use a tripod and Live View and zoom in to 100%

If you’re like me, you spend 99% of your time looking through the viewfinder of your camera as opposed to using the Live View function (where you use the LCD screen on the back of your camera to compose your shot). DSLRs have traditionally been designed for photographers to use the optical viewfinder which is why this method is generally faster and easier to use. But Live View has some very good features as well depending on the type of photos you want to take. If you are doing a lot of action shots like sporting events the Live View function is quite frustrating. But if you shoot landscapes, products, or other types of pictures where your subject remains relatively still, Live View can be a major advantage in terms of getting the sharpest image possible.

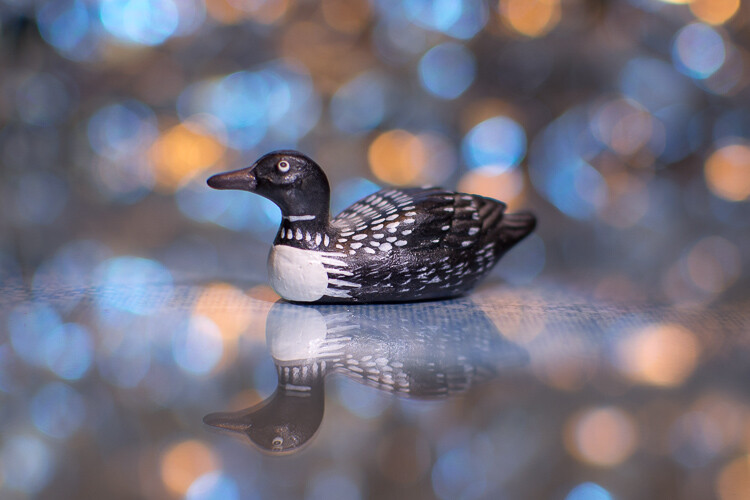
Using Live View helped me get this small wooden duck very sharp and focused.

Using Live View helped me get this small wooden duck tack sharp and focused.

Using Live View

The trick to using Live View for getting sharp images is to frame your shot with your camera on a steady surface such a tripod, then zoom in to 100%, using the controls on your camera. This gives you an ultra-close-up look at your image, and you can then use autofocus or manual focus to make sure everything is perfectly tack sharp.

While the autofocus points in the viewfinder do a good job, this type of 100% magnification shows you precisely how in-focus your image will be and helps you get pixel-perfect images. Landscape (and macro) photographers often use this technique, combined with small apertures for a wide depth of field, to get pictures that are much sharper than they could otherwise. It’s a tip that I highly recommend you try, especially if you don’t often shoot in Live View.

tips for getting tack sharp photos long exposure image

I wanted to get this 30-second exposure as sharp as possible. So I first used Live View and zoomed in to 100% to check that the foliage was focused.

Bonus tip: Use Focus-Peaking on mirrorless cameras

Most of the items in this article are geared towards traditional DSLR shooters, but if you use a mirrorless camera there is one handy tool you probably have that gives you a leg up on your traditional-style camera counterparts.

Focus-Peaking is a way for your camera to show you precisely what is tack sharp as you focus your lens. Many, but not all, mirrorless cameras have this capability and it is a fantastic way of making sure you get everything that should be tack sharp focused properly. With Focus-Peaking enabled, as you turn the focusing ring on your lens you will see a swath of dots (usually red or green) travel across the viewfinder. These dots indicate the spots that are perfectly focused, and when you see an outline of dots around the part of your image that you want focused, you can snap a picture and rest assured that it will show up exactly how you envisioned.

You can even use Focus-Peaking in conjunction with autofocus, so it’s another tool in your repertoire to help make sure you are taking the best possible pictures.

tips for getting tack sharp photos - focus-peaking

The edges of the leaves are all outlined in red by Focus-Peaking, which indicates that they will be in focus. Image by Bautsch (Own work) [CC0], via Wikimedia Commons

Over to you

Do you have any favorite tips or tricks for getting sharp photos? Are there things I left off this list that you’d like to share with others? Leave your thoughts in the comments below!

googletag.cmd.push(function() {
tablet_slots.push( googletag.defineSlot( “/1005424/_dPSv4_tab-all-article-bottom_(300×250)”, [300, 250], “pb-ad-78623” ).addService( googletag.pubads() ) ); } );

googletag.cmd.push(function() {
mobile_slots.push( googletag.defineSlot( “/1005424/_dPSv4_mob-all-article-bottom_(300×250)”, [300, 250], “pb-ad-78158” ).addService( googletag.pubads() ) ); } );

The post 4 Secrets for How to Get Tack Sharp Photos by Simon Ringsmuth appeared first on Digital Photography School.


Digital Photography School

 
Comments Off on 4 Secrets for How to Get Tack Sharp Photos

Posted in Photography