RSS
 

Posts Tagged ‘Sequences’

Review: Timelapse+ makes day-to-night time-lapse sequences easy

16 Feb

Even if you’re only a casual time-lapse photographer then you probably know how challenging it can be to shoot a time-lapse sequence that involves drastic changes in lighting conditions. For example, sequences shot during periods of time covering sunrises, sunsets, moonrises and moonsets are difficult because a single set of exposure parameters won’t work for the entire sequence. It’s also unlikely that your camera’s Auto Exposure mode will give you proper results, especially during low light conditions.

That’s where the Timelapse+ View intervalometer, a device designed to automate day-to-night time-lapse sequences, comes in. It retails for $ 399 and it includes Timelapse+ Studio, a Lightroom plugin for processing the timelapse sequences. Studio is also sold separately for $ 49.

I started photographing astronomical observatories 12 years ago. Whenever I needed to leave my camera unattended I would expose for the nighttime conditions (mainly considering the Moon’s brightness) and start my time-lapse sequence before sunset. The sequence would start completely overexposed but would become correctly exposed as it got darker. I would then try to salvage as many evening and morning twilight frames as possible by reducing the exposure value and recovering highlight information in post-processing. (More on how to do this in the Timelapse+ Studio for Non-Ramped Sequences section below.)

These time-lapse sequences illustrate the challenge that the Timelapse+ View aims to solve. I optimized the exposure to correctly capture the night sky, but as a result the afternoon and morning sequences were completely overexposed. Paranal Observatory, Chile. (Nikon D700 and Nikkor 14-24mm F2.8)

Timelapse+ View (the hardware)

All that hassle and limitation can be eliminated with the use of an exposure ramper, a device that progressively changes the exposure according to the lighting conditions. Some devices require that you know beforehand how the light is going to change as a function of time (that is, a light curve) and program the device accordingly. For changes involving the Sun and the Moon, this light curve will depend on the day of the year and your latitude on Earth. Consequently, a lot of trial and error might be required.

The View is an intervalometer and exposure ramper that uses algorithms to analyze the last several exposures and determine how the lighting conditions are changing. Then it predicts the correct exposure for the next frame and sets it accordingly on the camera.

With the Timelapse+ View you can correctly expose the first frame of a sequence and let its auto ramping mode do the rest of the work. The View is an intervalometer and exposure ramper that uses algorithms to analyze the last several exposures and determine how the lighting conditions are changing. Then it predicts the correct exposure for the next frame and sets it accordingly on the camera. At the same time, the View ignores transient sources of light such as headlights.

With the Timelapse+ View you can correctly expose the first frame of a sequence and let its auto ramping mode do the rest of the work.

The View has an internal battery which can be recharged via a Micro-B USB cable connected to a power device or AC outlet adapter. It sits on the camera hot shoe and is connected to the camera via a USB cable (simultaneous multi-camera control is supported via an optional USB port). The View works with many camera models from Nikon, Canon, Sony, Panasonic, Fuji and Olympus, and works with most motion control systems for shoot-move-shoot functionality and motion keyrame integration. It writes image files to either the camera memory card or to an SD card in the unit itself.

Exposure ramping a day-to-night sequence

To shoot a day-to-night sequence, one sets the camera to the lowest ISO and the appropriate shutter speed, making sure that no highlights are clipped. This initial setup will ensure that the sequence will not be overexposed. Since I always shoot in Raw I leave the white balance set to Auto (AWB) and edit the values in post-processing. (See below to learn how to edit a varying White Balance with Timelapse+ Studio.)

You can program the View with its intuitive menu but I prefer to use the free TL+View app (iOS and Android) to program, monitor, and even override my time-lapse sequences. The View can also be controlled from a web-based app on any device with a web browser.

In the first video example below, I captured a fisheye time-lapse sequence of night falling in Nashville for a planetarium show produced by Chicago’s Adler Planetarium. The most natural way of viewing circular fisheye photography is by projecting it on a dome. This results in an immersive experience putting the viewer at the center of the action.

Left: Out-of-camera sequence from a Nikon D810A controlled by the Timelapse+ View exposure ramper. The shutter speed changed from 1/250 sec to 5 sec. Right: The same sequence processed with the Timelapse+ Studio plugin to smooth out exposure changes and gradually change the white balance. Nashville, Tennessee.

For this sequence I set up a Nikon D810A with a Fisheye-Nikkor 8mm F2.8 AI-s lens by the Cumberland River in downtown Nashville. I chose an initial shutter speed of 1/250 sec and ISO 200 (with a fixed F8 aperture) and used the View’s Auto Day/Night interval mode. I set the (initial) ‘Day’ Interval to 5 sec, the ‘Night’ Interval to 10 sec, and chose Speed and ISO Auto Ramping (Aperture ramping mode is also available on the View).

In the Speed and ISO Auto Ramping mode, the View will gradually increase the exposure time and interval between exposures as night falls. ISO values will increase when the exposure time approaches the interval. In the Nashville sequence, the final shutter speed was 5 sec with an interval of 7 sec. It is interesting that during the sequence the ISO gradually decreased from 200 to 100. That’s because, whenever possible, the View will use the longest exposure (for a smoother motion) and lowest ISO (for a lower noise), even if this does not change the resulting exposure.

The View is an intervalometer and exposure ramper that uses algorithms to analyze the last several exposures and determine how the lighting conditions are changing.

I later learned that one can set a mimimum ISO. Setting this to 200 would have prevented the D810A from going into its extended (non-native) ISO range (below 200). According to the developer, only native ISO values should be used since going below the lowest native ISO could cause loss of highlights.

While a time-lapse sequence is in progress you can preview the sequence on the unit’s screen by using hand gestures. This nifty feature lets you control the sequence playback without ever touching the unit, and unintentionally moving the camera. Of course, you can also preview and monitor the sequence remotely using the TL+View mobile app or web-based interface (connected via Wi-Fi, either locally or over the internet). Furthermore, if you need to tweak the sequence settings, the app lets you make changes spread over a determined number of frames, resulting in a smooth change.

You can preview your time-lapse sequence on the built in screen using hand gestures, eliminating the need to physically touch the camera and risk moving it. The View can be programmed with its intuitive menu but I prefer to use the free TL+View app.

On the next page, I’ll explain how to process your images using the Timelapse+ Studio Lightroom plugin.

Articles: Digital Photography Review (dpreview.com)

 
Comments Off on Review: Timelapse+ makes day-to-night time-lapse sequences easy

Posted in Uncategorized


CamSwarm app may soon allow for easy capture of bullet time sequences

10 Jul

‘Bullet time’ effects, as seen in the 1999 movie ‘The Matrix,’ tend to be expensive and time-consuming to produce, requiring an array of synchronized cameras. Researchers at Columbia University are developing an iOS app that would make it easier for consumers to capture bullet time sequences. Read more

Articles: Digital Photography Review (dpreview.com)

 
Comments Off on CamSwarm app may soon allow for easy capture of bullet time sequences

Posted in Uncategorized


Triggertrap introduces pauses and delays for timelapse sequences with Timelapse Pro app

03 Apr

Triggertrap has released a new app that allows photographers to take more control of timelapse sessions by introducing the ability to add delays into a sequence. Timelapse Pro is available for iOS devices running iOS 8 and, with the appropriate dedicated cable, can control over 300 models of camera. Read more

Articles: Digital Photography Review (dpreview.com)
 
Comments Off on Triggertrap introduces pauses and delays for timelapse sequences with Timelapse Pro app

Posted in Uncategorized


Sending Panorama Sequences from Lightroom to Photoshop

09 Nov

Sending Panorama Sequences from Lightroom to Photoshop

In addition to being able to send single images from Lightroom to Photoshop for editing you can also send a series of images to Photoshop to assemble into a panorama. This is a useful because the Photoshop panorama merge feature is pretty good (certainly since the improvements in Photoshop CS3 & CS4) and other Photoshop tools such as Content Aware Fill and the Lens Correction Filter are handy for finishing your panoramas. When you are done, click Save and the completed panorama will be sent back to Lightroom for further processing.

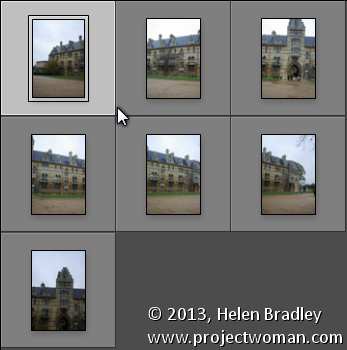
To see how this is done, begin inside Lightroom and select the images to assemble into a panorama. I like to put these into a collection so they are handy if I want to try multiple panorama options to select the best of them. I don’t typically process the images before sending them to Photoshop and, instead, I process the completed panorama when it returns to Lightroom. One exception to this is fixing the white balance if it were incorrectly set on the camera at capture time, for example.

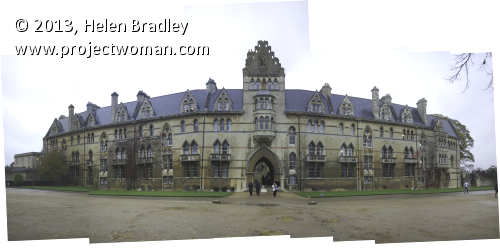
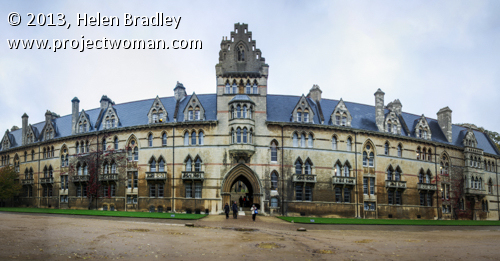
Photoshop can assemble panoramas both vertically and horizontally and it can also take a mix of images such as I used here. This sequence is six shots horizontally across the front of a building and one extra shot to handle the building’s tower which wasn’t captured in the original sequence. If I’d been thinking, I would have captured some extra sky to use but we can solve that in Photoshop.

Sending Panorama Sequences from Lightroom to Photoshop 1

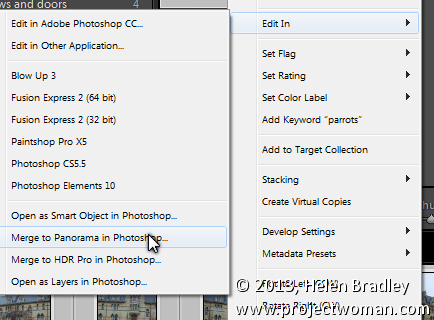
Select the images, right click and choose Edit In > Merge to Panorama in Photoshop.

Sending Panorama Sequences from Lightroom to Photoshop 2

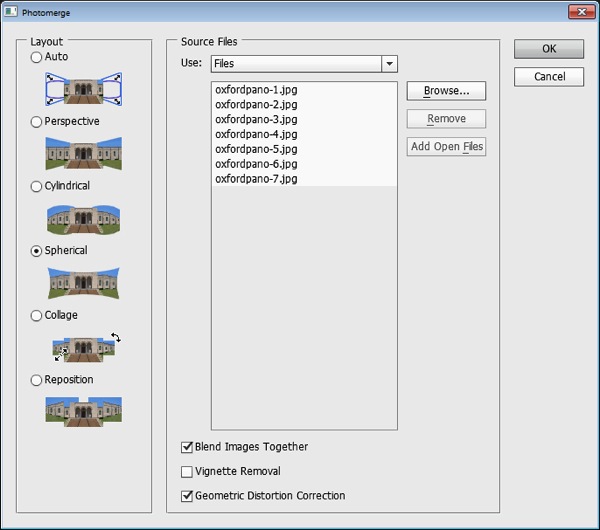
Photoshop will open with the images you sent to Photoshop listed in the Photomerge dialog. Now you need to determine the Layout to use. In most cases the Auto setting will be a good choice – when you select this, Photoshop will analyze the images and determine the best of the other layout alternatives: Perspective, Cylindrical and Spherical to use.

Sending Panorama Sequences from Lightroom to Photoshop  3

Check the Blend Images Together checkbox so that the images will be seamlessly blended together – then you won’t have to do it yourself. You can also click Geometric Distortion Correction to remove the effect of any barrel, pincushion or fisheye distortion in the original images. If the edges of your images have some edge vignetting click Vignette Removal. If you’re unsure what to choose, check all three checkboxes. Click Ok and wait as the images are aligned and blended.

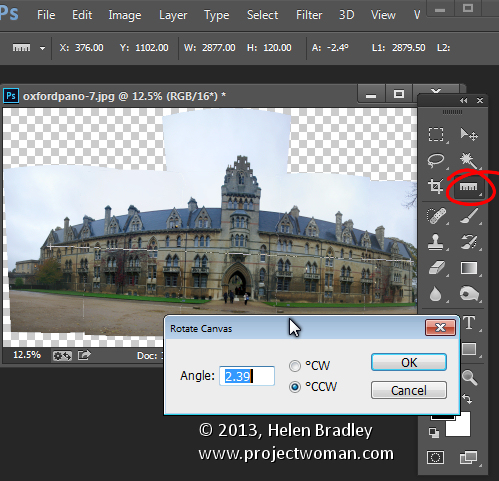
Once the panorama is assembled you can straighten the image if desired. To do this select all the layers and target the Ruler tool. Now drag along a line in the image which should be perfectly horizontal – you won’t be able to click the Straighten Layer button to rotate the image because you will have multiple layers selected. Instead, choose Image > Image Rotation > Arbitrary and click Ok to straighten the entire image to the angle of the Ruler line.

Sending Panorama Sequences from Lightroom to Photoshop  4

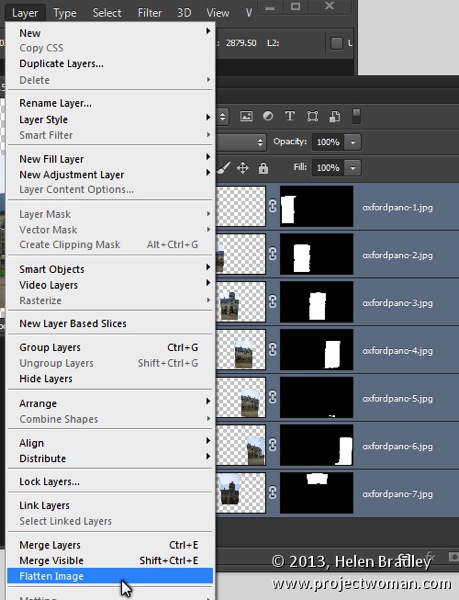
Most panoramas will then need to be cropped to a rectangle to eliminate uneven areas around the edge of the image. However, before you do this you may want to fill in some of the empty areas of the image using the Content Aware Fill tool so you can crop larger than you would otherwise be able to do. To do this you’ll either need to flatten the image to a single layer or you will need to create a new layer with the entire image on it to use. To flatten the image choose Layer > Flatten Image. To make a new layer with the image on it (but still retain the individual layers below) click the topmost layer and press Control + Alt + Shift + E (Command + Option + Shift + E on the Mac).

Sending Panorama Sequences from Lightroom to Photoshop  5

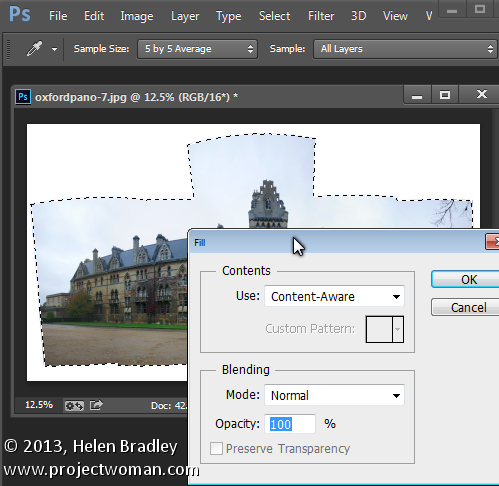
Select the area that you want to fill and then choose Edit > Fill, from the Use list choose Content Aware and click Ok. Photoshop will attempt to fill the missing area with details from the image around it. If the image contains sufficient detail you should be able to build up missing areas of sky and foreground, for example.

If you encounter problems with the Content Aware Fill feature this post will show you how to mask a layer to get better results when using it: http://digital-photography-school.com/smarter-content-aware-fill-in-photoshop. Crop the image when you have filled the edge area.

Sending Panorama Sequences from Lightroom to Photoshop 6

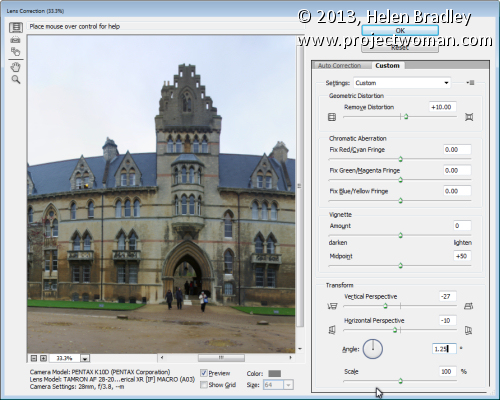
To fix unwanted distortion in an image you can use the Lens Correction tool. This tool works on a single layer and you run it by choosing Filter > Lens Correction > Manual. Adjust the Horizontal Perspective slider to fix problems with an image which has not been captured face onto the point of interest. Use the Vertical Perspective slider to adjust for keystoning – generally you will drag this slider to the left. Use the Geometric Distortion slider to remove barrel and pincushion distortion.

Sending Panorama Sequences from Lightroom to Photoshop 7

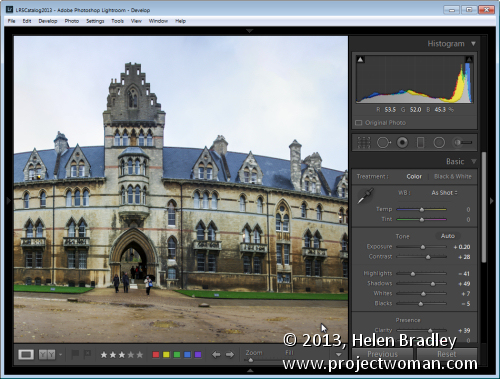
Once you have finished assembling the panorama choose File > Save to save the image and return to Lightroom where your panorama will be ready for further editing.

LR PS panoramaMerge 8

If you are not using Lightroom you can assemble a panorama from Bridge or from inside Photoshop. In Bridge select the panorama sequence and choose Tools > Photoshop > Photomerge in Bridge. In Photoshop, first open the images to use then choose File > Automate > Photomerge and click the Add Open Files button. In either case you will probably want to fix the image in Photoshop once the panorama is complete. If you are using Lightroom you may prefer to finish processing the panorama in Lightroom.

Layout Options

Each of the panorama Layout options in Photoshop results in a different looking panorama. Choosing Auto tells Photoshop to select the best of the options Perspective, Spherical and Cylindrical for your particular sequence of images.

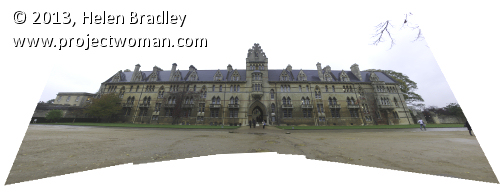
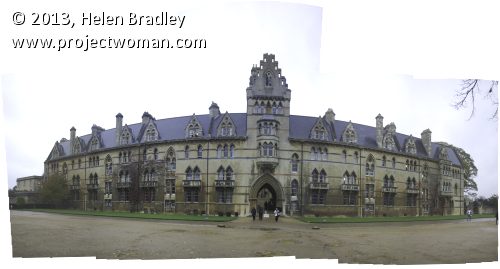
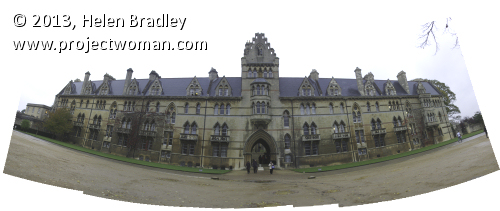
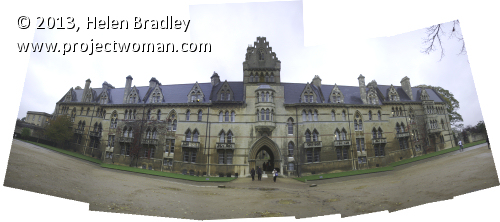
Here is the result of each of the other Layout options used with our image sequence, these results haven’t been edited except to straighten the image and brighten it a little. You may want to experiment with any given sequence of images to see which of these options gives you the most pleasing result:

Perspective Layout

The panorama is assembled in relation to the middle image of your sequence of images. The middle image is placed in position and the other images arranged either side of it and skewed and repositioned as needed. This often results in edges which are taller than the middle giving rise to the term ‘bow-tie” distortion.

LR PS panoramaMerge perspective

Cylindrical Layout

This layout avoids the bow-tie distortion by showing the images as they might look if placed on an unwrapped cylinder.

LR PS panoramaMerge cylindrical

Spherical Layout

This layout arranges the images as if to cover the inside of a sphere. It is a good choice for 360 degree panoramas and can also give good results with other shorter panorama sequences.

LR PS panoramaMerge spherical

Collage Layout

This layout aligns the images matching overlapping content. If necessary, image layers are transformed and rotated.

LR PS panoramaMerge collage

Reposition Layout

This layout aligns the images matching overlapping content but without transforming or rotated the images.

LR PS panoramaMerge reposition

Post originally from: Digital Photography Tips.

Check out our more Photography Tips at Photography Tips for Beginners, Portrait Photography Tips and Wedding Photography Tips.

Sending Panorama Sequences from Lightroom to Photoshop

The post Sending Panorama Sequences from Lightroom to Photoshop by Helen Bradley appeared first on Digital Photography School.


Digital Photography School

 
Comments Off on Sending Panorama Sequences from Lightroom to Photoshop

Posted in Photography