RSS
 

Posts Tagged ‘Secrets’

5 Secrets for Finding Great Indoor Photoshoot Locations

26 Jun

The post 5 Secrets for Finding Great Indoor Photoshoot Locations appeared first on Digital Photography School. It was authored by Melinda Smith.

secrets for finding indoor photoshoot locations

Not all photographers have a dedicated indoor studio, yet sometimes you need to shoot a session indoors. Maybe it’s freezing outside, and you don’t want to be out in that weather. Maybe you just want something fresh and a little quirky. Maybe a building has a special meaning to you or the person you are photographing.

Whatever your reasons, if you want to take indoor portraits, you’ll need to find that perfect indoor photoshoot location. And that’s what I’m going to share in this article: all my secrets for finding stunning locations (plus how to get permission to use them).

With any luck, they’ll help you find the perfect spot for your next session!

bride on a couch

1. Always be on the lookout

Wherever you go, keep your “photography eyes” open. You may be surprised by how many places transform into a great location once you really start looking.

Some unique and exciting indoor photoshoot locations might include:

  • family photos in the library
  • model portfolio shots in a city building
  • engagement session in the laundromat
  • dance group session in a hotel lobby
  • mom and toddler portraits in a grocery store
  • bridal session in a grand old house, a museum, a quaint bed and breakfast, a roller-skating rink, a university building, a furniture store, a toy store, or a candy store (the list is endless!)

Look for great lighting, open spaces, interesting backgrounds, and fun things to interact with. Consider whether there are lots of people you might end up disturbing, or whether it’s a relatively calm place where you can photograph in peace.

Use your imagination and creativity to turn the ordinary into something extraordinary.

kissing couple in a library photoshoot location

2. Always ask permission

Once you’ve found a place you’d like to use for a photoshoot, make sure you ask permission before you bring a client there.

I find that asking in person is usually best; the staff/owner can see who they’re talking to, and they’ll be much less resistant if they can see your smiling, friendly face. If you do need to ask over the phone, be professional and friendly. Remember, they need to feel comfortable with you coming in, camera setup and model/client in tow.

If you like a location but aren’t sure who owns it, check city or county records, or ask a neighboring building if they know the owner. It might take time and effort, but you should always find out who owns the property before shooting. It gives all photographers a bad name if you trespass.

In fact, I’ve had many photoshoots where I call to ask permission, and the owner thanks me profusely for bothering to ask. They usually express their frustration with other photographers who just start shooting without asking. (They allow me to photograph on their property, so obviously they don’t mind people being there, but they always appreciate being asked first.)

Also, note that some locations, like museums or theme parks, are fine with you taking photographs inside, but you’ll have to pay the entrance fee.

woman posing on stairs

Other places charge a fee for photography and some don’t allow photographers at all. If you whip your camera out in either of those types of places without asking permission first, you could be fined huge amounts. It’s not worth it. Ask, and if you get declined, just move on and find another place.

Remember: It never hurts to ask. Most of the time you’ll be granted permission – and owners are often pleased that you think their building is worthy of being an indoor photoshoot location.

child with valentine's day gift

3. Find an owner who will also benefit

I needed a place to have adorable kids come for Valentine’s Day photos, but I didn’t know who would want multiple kids and families traipsing in and out of their establishment. Then I came across an adorable little candy shop; it was was decorated perfectly, plus it was full of delicious sweets and treats.

In the end, my photography clients came in and out all day for their sessions, and they ended up buying lots of candy in the process. Many who came had never noticed the little hometown shop with homemade caramel apples and every kind of candy you can think of. They were happy to have discovered it. I ended up with a great place for my Valentine’s Day photos, and the owner got a lot of new business.

child looking in candy baskets

Look for places that might benefit from your photoshoot, and chances are the owner will be more than happy to let you use their location (free of charge).

Also, many small, locally-owned places need a couple of photos of their establishment for websites and advertising purposes, or maybe even a quick headshot, and would be thrilled to let you photograph there in exchange for a photo or two.

family looking at a dinosaur

4. Explore your connections

Do you have a friend who owns a quaint little bed and breakfast? Do they work at a museum? If you get hired to photograph that friend, you may be able to get your foot in the door and photograph at that location.

Then, if the photoshoot goes well, your friend/client may be okay with you bringing other people back to the property!

You can also think about your broader friend network. You might not be planning to photograph your best friend, but they may still have a connection to a property that you could use for your shoots.

That said, be careful not to ask for too much, and be careful not to put anyone in an uncomfortable position. If you sense that a friend is hesitant about letting you use a location, don’t push it. A little respect goes a long way, and you don’t want to be the photographer who people avoid at all costs. Relationships are more important than having a cool place to photograph, so be extra sensitive when following this advice.

family posing near a dinosaur

5. Be the best guest

Once you’ve gotten permission to use a place, never, never, ever let anything get destroyed or damaged. The whole location should be left exactly how you found it.

If you need to move something out of the way, ask if it’s okay first. Then, when you’re done, put it back.

Be mindful of what is going on around you, especially if you are photographing kids. You are responsible for what happens during your session, and you never want to pay a big repair bill or lose a friendship because you were careless.

Remember: When you use public or private property for photos, you are not only representing yourself but also all photographers. If you make it a horrible experience for the owners, you’ll destroy the opportunity for future sessions for yourself and for all other photographers who might think to ask permission.

Please don’t be a careless photographer who ruins it for everyone. Instead, leave such a great impression that all photographers are welcomed with open arms.

family sitting together indoor photoshoot locations

Secrets for finding indoor photoshoot locations: final words

Well, there you have it:

Five ways to find the perfect indoor photoshoot location. If you follow the tips I’ve given above, you’re bound to discover some gorgeous locations – and you’ll be able to use them for years to come.

Now over to you:

Do you have any other tips for finding great indoor portrait locations? Have you found any gems? Please share your comments and images of your favorite spots below!

bride posing indoors

The post 5 Secrets for Finding Great Indoor Photoshoot Locations appeared first on Digital Photography School. It was authored by Melinda Smith.


Digital Photography School

 
Comments Off on 5 Secrets for Finding Great Indoor Photoshoot Locations

Posted in Photography


5 Secrets for Creating Perfect Silhouette Portrait Photography

08 May

The post 5 Secrets for Creating Perfect Silhouette Portrait Photography appeared first on Digital Photography School. It was authored by Alana Orth.
5 secrets for creating perfect silhouette portrait photography

Silhouette portrait photography produces some of the most gorgeous images imaginable – which is why I recommend every portrait shooter try a silhouette shot or two.

In this article, I’m going to show you exactly what you need to do for perfect silhouette portraits. I’ll share plenty of tips and tricks I’ve learned from my own time as a portrait photographer. And by the time you’re done, you’ll be a portrait silhouette expert.

So let’s get started.

portrait silhouette photography kissing couple

1. Shoot low and head to toe

Powerful silhouettes start with clear, minimalistic compositions. Here’s what I recommend:

Place the subject’s entire body, from head to toe, against the sky. To pull this off, you’ll need to be lower than the subject, so try lying on your back or stomach.
If you are unable to get low enough, you may need to have your subject get higher; ask them to stand on a rock, small hill, or sand dune. In most circumstances, this will allow you to get an angle that places the subject’s entire outline against the sky. (You can see a variety of examples throughout this article.)
Why is this so important?

If you can’t place your subject’s body against the sky, they will merge with the background, and the recognizable silhouette will be lost. You’ll end up with a lot of confusing darkness, and your viewer won’t be able to immediately tell what’s going on.

Also, pro tip:

It’s so, so, so important that your subject’s feet are outlined against the sky! Legs in a silhouette portrait that are cut off above the feet look like weird, short stumps:

perfect silhouette photography woman by a tree

Even with all this composition advice in mind, there will be times when you just can’t find a suitable spot for a full-body-framed-against-the-sky type silhouette.

And when that happens, you don’t need to give up on silhouettes entirely. Just get closer to your subject and create tighter compositions, focusing on the areas of your subject that are framed by the sky.

couple kissing perfect silhouette

2. Shoot at the right time of day

Silhouettes work best around 20-30 minutes before sunset. The ideal time does vary with the angle you are able to achieve; the greater the height difference between you and the subject, the earlier you will need to take the shot.

Because if you wait too long, the sun will hide behind whatever your subjects are standing on, and the sky might not be bright enough to make a silhouette. 

Shooting too early is also a problem, however; the sky’s colors can be a bit boring and you will have other issues, such as sun flare.

kissing couple perfect silhouette portrait photography

Pro tip: Silhouettes can be taken earlier in the day (i.e., before sunset) if the sun is partially blocked or filtered through strong clouds.

3. Choose your portrait silhouette settings carefully

Perfect silhouettes require careful settings.

Set your camera to Aperture Priority mode and dial in an aperture of f/2.8 and an ISO of 400. Select Evaluative Metering; that way, the camera will consider the whole scene when determining the exposure.

If you fill the frame with your subject’s face or body, the camera will expose for their skin even with a bright background (see the photo below, left).

But if you fill the frame mostly with a very bright sky, then the camera will expose for the sky – bringing out the natural sunset colors and making everything else dark (see the photo below, right).

So place your subject directly against the bright sky and make sure their body takes up a small portion of the frame. The subject will be heavily underexposed, and the sky will retain detail.

The result? A perfect silhouette portrait!

DPS Silhouette 5 DPS Silhouette 6

Both the photographs above were taken with the settings I mentioned above (just seconds apart).

The difference? What was filling the frame – subject or sky.

4. Use perfect silhouette portrait posing

Silhouettes are very forgiving of poor facial expressions (because you cannot see them!). But silhouettes are very harsh when it comes to posing.

Here are a few things to keep in mind when posing subjects for a silhouette:

  1. Hugging poses do not work. A hug silhouette looks like a great big blob monster. Instead, all subjects need to be clearly defined, which means they need to be at least a couple of inches apart from each other. It’s nice for subjects to still be connected – but by holding hands or kissing, not by hugging.
  2. Have your clients look away from the camera. Face profiles look beautiful and natural.
  3. Watch the clothing. Very baggy clothing won’t work well for silhouettes; the shape can become unflattering. It is best to wear form-fitting clothes, as this helps clearly define your subject against the sky.
people holding hands silhouette

5. Take portrait silhouettes whenever you can (because they sell!)

Try to capture at least one silhouette at every photo shoot, whether it is a family portrait, maternity, engagement, or wedding.

Why? Because silhouettes sell!

Here are some reasons why silhouettes are great for client shoots:

  • Silhouettes add variety to the series. Silhouettes are so different in their colors and style – and the variety they give instantly makes any shoot more interesting. Plus, because silhouettes are unique compared to standard portraits, they’re easy to sell individually as a piece of artwork.
  • Silhouettes are perfect for shy clients. Some clients hate the idea of their faces hanging up on the wall. This makes silhouettes the perfect compromise! A silhouette can be marketed to a client as the perfect piece of personalized artwork – without making them feel uncomfortable or self-conscious.
  • Silhouettes look better when printed big! Wide-angle silhouettes and scenic, environmental compositions look great, especially when printed large. So if you do capture wider silhouettes, you can sell them as a large piece of artwork. The client will love it, and it’ll be a more profitable sale for you.
portrait silhouette photography people by a tree

Perfect silhouette portrait photography: final words

Well, there you have it:

Five simple secrets to capture stunning portrait silhouette photography.

Silhouette portraits are a lot of fun – so the next time you’re doing a portrait photoshoot, try a few shots! I’m confident you’ll love the results!

The post 5 Secrets for Creating Perfect Silhouette Portrait Photography appeared first on Digital Photography School. It was authored by Alana Orth.


Digital Photography School

 
Comments Off on 5 Secrets for Creating Perfect Silhouette Portrait Photography

Posted in Photography


Unlock the Secrets to Composition and Light

13 Dec

The post Unlock the Secrets to Composition and Light appeared first on Digital Photography School. It was authored by Darren Rowse.

Deal 2 dPS Holiday Deals

Day 2 of dPS Holiday Deals brings this amazing Composition and Light course combo deal from Photography Concentrate.

Save 75% now

Imagine having a special moment – with your loved ones, friends, or by yourself. A romantic spot, a fun trip, your kid’s first steps, or something else that made you want to pull out your camera, snap and share.  

Unfortunately, what happens next is pretty common … the photo you took is a dull, disappointing record of a great moment or a great place. You wanted to capture that excitement, warm fuzzy feeling or impressive view. But all you got is a lifeless shot. 

Enter composition and light!

Composition Courselight skills course

Understanding composition is the fastest and most lasting way to create amazing images.

People tend to view images in predictable ways.  And once you discover these patterns, you can use them to your advantage. Hacking the way people view photos enables you to create photos that communicate your message – an idea, a memory, a feeling – and look amazing too! 

With Photography Concentrate’s unique 8-step process you’ll be able to put everything you’ll learn about composition and light into action. You won’t be left wondering what’s next. You’ll have a simple step-by-step approach that will let you make great decisions, and create great photos.

This bundle of two practical courses and field guides will help you achieve stunning photos by making advanced composition and light concepts accessible & easy to use. 

Save 75% and get two course bundle now for only $ 48 (usually $ 194)

Check it out before the next deal arrives in less than 24 hours.

PS – You can still catch yesterday’s deal and sign up so you don’t miss a day of our 12 dPS Holiday Deals. Learn more here.

We receive an affiliate commission if you purchase from one of our trusted partners.

The post Unlock the Secrets to Composition and Light appeared first on Digital Photography School. It was authored by Darren Rowse.


Digital Photography School

 
Comments Off on Unlock the Secrets to Composition and Light

Posted in Photography


Secrets of a professional photographer’s workflow: Brian Ach

21 Apr
Brian Ach is an editorial and commercial photographer.

As photographers, most of our focus is on capturing images—finding good material and getting shots with all the gear we’ve spent so much time and money accumulating—but what happens next? For a lot of us, we download the images to a computer and edit a handful that catch our eye, and then… well, there are more photo shoots to pursue. Maybe we’ll apply some keywords, perhaps mark a few favorites, but too often the photos we worked so hard to create are just dumped onto a hard disk and forgotten. We know we should do better, but who has the time?

Professional photographers, that’s who.

To learn how a pro handles this process, I talked to Brian Ach, who frequently photographs celebrity portraits, high-profile events, and glamorous autos for numerous clients. You may remember his work from his stint as Prince’s official photographer during the musician’s 2011 international tour (the photos he returned to after Prince’s passing in “Purple Reign: Photographer Brian Ach shares his experiences of working with Prince”). He outlined his entire workflow, from preparing to leave for an event through handing off final images and making sure everything is backed up.

Brian’s outlined his entire workflow, from preparing to leave, through handing off final images and making sure everything is backed up

Although a professional’s workflow is different from that used by most photographers, there are aspects anyone can use in their own workflow to better manage their library.

A man of many skills, Brian shoots everything from rock and roll world tours to automotive ads. Shown here: Journey at Prudential Center in Newark, New Jersey.

Understanding Expectations

To get a sense of how Ach’s workflow may differ from most photographers’ approaches, I asked him to describe the types of high-pressure assignments that he encounters. In most cases, time is the number one factor at play.

“If I’m shooting an event for Getty or WireImage or AP Images, time is of the essence,” he said. “If you’re doing the red carpet and don’t have an onsite editor, you want to turn around your best pictures as quickly as possible and get them up on the wire so you can get placement and, basically, make money. From the end of the event, the goal is to have everything captioned and up on the site in two hours. That’s the worst case scenario—you’re really looking to do it quicker than that. Often it will be trying to get your top 10 or 15 pictures out in 45 minutes or less.”

‘Always import your card immediately after you’re done shooting.’

He noted that when shooting a big job like the Academy Awards or the Tony Awards, photographers are usually hard-wired via Ethernet cables to editing stations on site where editors send images out as soon as possible. Sometimes he shoots the red carpet as a solo photographer, where there may be on-site runners who collect memory cards every 15 or 20 minutes from each photographer to deliver to editors. And, of course, there are plenty of events where he’s responsible for everything.

“Usually when I’ve worked with Getty, it’s what they call a hired job,” he said. “I’m often the guy inside the party, which means I’ll have an editor on site. You have 1500 frames and you need to send them out as soon as possible because you want to beat everybody else and get the stuff out correctly.”

When shooting a high-profile event, it is essential to get your photos up on the wire before other photographers.

During the Shoot

Regardless of which type of event he’s shooting, Ach has developed a consistent workflow through years of hard-won experience.

“I do everything the exact same way every time, because once you have a workflow, you do it the way you do it,” he said. “If you change anything—you have to trust me on this—you will screw it up in a big way. Something will happen. It took me probably my first year-and-a-half to two years, no lie, just to get a workflow.”

Usually we think of photo workflow as the process that begins after you’re done shooting, but for Ach it’s earlier than you might expect: in his studio preparing to leave, formatting cards and making sure batteries are charged.

‘I always keep fresh cards in my right pocket. Cards that I’ve shot on, I keep in my left pocket.’

“It’s very hard for me to separate out the workflow from shooting,” he said. “When I get to the event, if I know I’m shooting multiple cards I always keep fresh cards in my right pocket. Cards that I’ve shot on, I keep in my left pocket. Always. I’ve learned not to put them back in the bag, or put them in my jacket or anything like that. Right pocket, fresh cards. Left pocket, used cards. So after I shoot the event, I come back to the studio. Whatever is still in my right pocket I just put back in the bag.”

Celebrity portrait shoots are another high pressure assignment that Brian specializes in – he often has only a few minutes with his subjects to nail the shot. Shown here: Director and screen writer Christopher McQuarrie.

We’ve all received the advice that it’s best to capture photos correctly in-camera, but in environments like these, it’s even more critical.

“White balance and exposure are two of my biggest things,” he said. “Put a gel on your flash, create a custom white balance, and then get it right [before the event begins]. I don’t want to have to waste the time afterward processing it. It sounds so obvious, but it’s not if your editor has to tweak your white balance for every shot and you’ve got 100 shots and your red carpet photos are coming out slightly yellow. The editor may not have time to do it—they may need to just send it out.”

To assist editors, or for his reference later if he’s doing the editing, Ach will mark images during the shoot that stand out, using a camera’s built-in tagging or image-protection features.

‘Go out and over-shoot everything and be brutal on yourself when evaluating’

“You can help your editor by tagging certain photos that are very good or very important,” he said. “You’re not trying to tell the editor how to do their job; you’re simply saying ‘here’s that photo.’ They can look at the previous 10 or 15 frames, or the 10 or 15 afterward, and pick whatever they think is best based on your recommendation.”

And how does one know which images rise above the others? “It’s training your eye,” he said. “Look at books, look at everything and try to figure out what makes them good. And then go out and over-shoot everything and be brutal on yourself [when evaluating them].”

Ach mentioned he once shot New York Fashion Week events and had a day where he shot 17,000 frames. “Thank God I had an editor who was very good, and he was able to quickly whittle that down,” he said. “It’s just pattern recognition, and knowing what the shot is and what’s good. And the only way you can get better at that is shooting a lot and looking at a lot.”

Not all of Brian’s assignments involve models and celebrities.

Articles: Digital Photography Review (dpreview.com)

 
Comments Off on Secrets of a professional photographer’s workflow: Brian Ach

Posted in Uncategorized


5 Secrets for Stunning Creative Bird Photography

16 Apr

The post 5 Secrets for Stunning Creative Bird Photography appeared first on Digital Photography School. It was authored by Jaymes Dempsey.

Do you want to capture stunning bird photography…

…that goes beyond the usual, standard bird photos?

You can!

In this article, I’ll give you 5 bird photography secrets that will ensure you consistently create incredible bird images.

Images that are creative, unique, and original.

Sound good?

Let’s dive right in!

1. Get Low for Gorgeous Bird Photography Backgrounds

Here’s the bread-and-butter of creative bird photography:

Get down low.

Really low.

It may seem tough. You might prefer to stay up high, away from the dirt and water and mud.

But if you want incredible bird photos, you’ve got to get out of your comfort zone. You’ve got to get down low.

Specifically, you need to get on a level with the bird. Your lens should be about even with the bird’s eye.

Why is this so important?

When you shoot from down low, the distance between the bird and the background is greatly increased. And that causes the background to be far more blurred.

Therefore, you’ll capture some beautiful bokeh.

And beautiful bokeh?

Makes for a stunning bird photo.

This is how professionals capture such dreamy backdrops in their bird photography.

They get down as low as they can go. That’s all.

It really does make a huge difference!

Try it. I can guarantee that you won’t regret the resulting shots.

2. Shoot in water for stunning reflections

Do you want to capture especially gorgeous bird photography?

One of my favorite ways to do this…

…is to shoot reflections.

Let me explain:

A photo of a bird is nice. It’s standard. It can be beautiful.

But if you add a reflection, the image immediately becomes far more captivating. Viewers are instantly sucked into the scene.

The reflection adds a sense of subtle beauty and delicateness – one that you can’t get any other way.

Now, here’s how you capture gorgeous bird reflections:

First, shoot by still water.

Mudflats (with puddles) work well. Same with sheltered lakes.

If you’re struggling to find water still enough to generate full reflections, try shooting during the early morning. That’s when the wind tends to be a lot less noticeable.

Second, make sure the sun is low in the sky. (The lower, the better.) This will ensure that the reflection includes some nice colors.

You also have to be careful not to get too low over the water.

Why?

If you’re too low, the full reflection won’t come through. And a broken reflection has far less power than a full reflection.

Bottom line?

Find some birds near the water, and start taking photos!

3. Capture action for compelling bird photos

One of the biggest problems with beginning bird photography…

…is that it’s static.

The bird just stands in the frame.

And while there are methods of making this type of photo work, it’s often just a boring photo.

That’s why you should spice up your bird photos using action.

Once you’ve found a subject, watch it through your camera. Keep your finger on the shutter button.

Then, as soon as it starts to move, take a burst of photos. The more photos, the better!

Of course, you’re going to have a lot of failed shots. But you’ll also capture some keepers. And these will (with a little luck) blow you away!

Some of my favorite shots involve birds flapping their wings, preening, or feeding. If you wait for this behavior, you’ll get some stellar action shots.

One thing I’d recommend:

When you’re watching a bird through the camera viewfinder, keep some space between the bird and the edge of the frame.

Because birds can rapidly change their size – just by opening their wings. And clipped body parts are one of the easiest ways to ruin a bird photo.

Just remember these tips, and you’ll be capturing some great action photos in no time!

4. Shoot through vegetation for unique images

Another way to capture original images…

…is to find a subject.

Get down low.

And shoot through some vegetation.

This creates a gorgeous foreground wash – one that frames the subject without dominating the photo.

To pull this off, you generally have to lie flat on the ground. I advise experimenting with a few different angles – move around your subject, testing different possible foregrounds.

Note: It’s important that the vegetation is very close to your lens (and very far from your subject). Because the farther the vegetation is from your lens, the more in focus (and distracting) it becomes.

It’s also important to limit the amount of vegetation in the photo. You don’t want to cover up the bird entirely. Instead, you want to frame the bird with the vegetation.

Make sense?

Then start taking some shots with a foreground wash. You’ll love the shots you get.

5. Capture silhouettes for dramatic bird shots

Here’s one more way to capture creative bird photos:

Shoot silhouettes!

Silhouettes are really easy to pull off – and they look incredible.

Here’s how you do it:

Go out as the sun is just about to set. Find a subject (birds with a clear outline are best).

Then change your position so that the bird is between you and the setting sun. Ideally, the bird blocks the sun from your camera. This will prevent the sky from being completely blown out.

Make sure that the bird is in front of as much of the sky as possible.

That is, you want to frame the bird with sky – and you don’t want any dark patches behind the bird (from trees or other objects).

If you’re struggling with this, try getting down as low as you can. Because the lower you get, the more sky you’ll include in the frame.

Finally, ensure that you drastically underexpose your subject. One trick is to set the exposure based on the sky next to the bird.

That way, you’ll get a beautiful sky – with a nicely silhouetted subject.

Creative bird photography: next steps

Now you know how to capture stunning, original bird photos.

You know how to produce amazing backgrounds.

You know how to generate interest.

And you know how to capture incredible foregrounds.

The next step…

…is to get out and shoot!

Have any tips for creative bird photography? Share them in the comments!

The post 5 Secrets for Stunning Creative Bird Photography appeared first on Digital Photography School. It was authored by Jaymes Dempsey.


Digital Photography School

 
Comments Off on 5 Secrets for Stunning Creative Bird Photography

Posted in Photography


6 Travel Photography Secrets That You May Not Have Tried

10 Apr

Great travel photography has the power to take the viewer to that destination and make them feel like they are there. It can evoke memories of faraway lands and local people and culture that the viewer might have never seen.

You may have heard the usual advice about travel photography like “getting up early” and photographing at the “golden hour”. But here are six travel photography secrets that you have probably never tried that will help you capture stunning photos.

6 Travel Photography Secrets That You May Not Have Tried

#1 Walk Around

Often the biggest advice for any prospective travel photographer is to simply walk around. It’s incredible how many different photo opportunities you will find simply walking around a city rather than getting in trains, buses, and taxis. Not only will you be able to get a better understanding of the geographical side of the city, but you will also notice moments that would often get missed if using transport.

Just get yourself a handy local map, set a route, and walk. Once you finish the route set another and walk again. Sometimes you might not see anything, and it will feel like a waste of time, but every now and again a photo opportunity will present itself that will make you glad you did walk.

6 Travel Photography Secrets That You May Not Have Tried

#2 Find High Vantage Spots

Getting up high for an aerial view of a place is a wonderful way to capture great photos. But it can also help get an understanding of the layout of the city and aid you in finding potential shot locations. Often most places have well-defined lookout or viewpoints and there’s nothing wrong with going to those locations and capturing photos even though they have been done before.

But in addition to that, when you are at the location try to figure out if there are any other places that can help you capture great elevated shots.

The great thing these days is that you can find a ton of information online about every location. So always try to build in time at a location to capture some photos from a high viewpoint.

6 Travel Photography Secrets That You May Not Have Tried

#3 Change Your Hotel

A great trick for photographing cities and being able to capture a good variety of photos is to change your hotel. So rather than staying in the same place for a week, aim to stay at two different hotels around the city.

By choosing your hotels carefully you may be able to capture photos from a rooftop bar or even from your room of different views of the city. Often these photos can work better than those from lookout points as only those people who have stayed at the hotel will be able to capture it.

But the other advantage of staying at a hotel in a different part of the city is that you will get to learn that area and naturally spend more time around there. This will mean rather than focusing most of your time in one location if you were staying in one hotel, you can now spend time in two.

Clearly, if the city is small you won’t need to do this, but in a big city such as Moscow or London this could be useful and help you capture more photos.

6 Travel Photography Secrets That You May Not Have Tried

On a recent trip to Bangkok, I was able to my hotel room balcony to capture a cityscape shot.

#4 Speak to a Local Photographer

Let’s be honest, no matter how good of a photographer you are and how well you plan your trip, a local photographer will always have an edge purely because it is their home city. So why not use that to your advantage.

Contact a local and ask them some questions or get some tips about places you are looking to photograph. Obviously, the key here is not to try to copy their photos but get advice about anything you want to capture. The great thing about doing this rather than contacting a tour guide is that as a photographer they will understand your needs and can help you capture the shots you want.

You never know they may even tell you or show you around a few places that you never knew about. Just think of it as paying it forward, so if one day someone contacts you for information, do the same thing.

Note from the editor: Please do your due diligence and use normal safety precautions when meeting someone you do not know over the internet or in person. Always put your safety first over getting a shot.

6 Travel Photography Secrets That You May Not Have Tried

#5 Hire a Translator

Whilst not absolutely essential, sometimes having a translator can come in handy. This is especially true if you are photographing anywhere that might be sensitive such as religious buildings or even women in some cultures.

Having a translator can mean that they can ask permission for you, speak to locals to put them at ease, and even help you get model release clauses. You could look to hire a translator just for a day or for the duration of your stay, but they can be a big help in capturing photos in a place where you don’t speak the language.

6 Travel Photography Secrets That You May Not Have Tried

#6 Ask Tourists

More and more these days picture editors want photos of experiences rather than just another standard snap of the Eiffel tower. Sometimes you can capture those photos naturally with things that happen before your eyes. At other times you may need to set something up to help get that story across.

One of the best ways to do this is by using other tourists. Firstly, if they are from your country you will be able to communicate without any problems. Second, and most importantly, they would probably love to have some great photos of themselves from their trip for their personal use.

Just explain what you are doing and ask if they are willing to participate. Then take their email address and email them a copy of the photo when you get home. The bonus here is that you also have their email address and if one day you require a model release form, you can contact them.

Just be aware of time. No one wants to spend half of their day on holiday posing for photos. Work quickly, take a few photos, and let them get on with their day.

6 Travel Photography Secrets That You May Not Have Tried

Conclusion

Travel photography often requires a lot of “out of the box” thinking as you’ll rarely encounter exact situations over and over again. Over time you’ll build up your own arsenal of solutions to potential creative challenges. In the meantime use the tips above to help you capture great travel photos.

Have you got any travel photography tips and tricks? Please share them below.

The post 6 Travel Photography Secrets That You May Not Have Tried appeared first on Digital Photography School.


Digital Photography School

 
Comments Off on 6 Travel Photography Secrets That You May Not Have Tried

Posted in Photography


Secrets in the Shadows: Urban Objects Transformed with Sidewalk Paint

29 Aug

[ By SA Rogers in Art & Street Art & Graffiti. ]

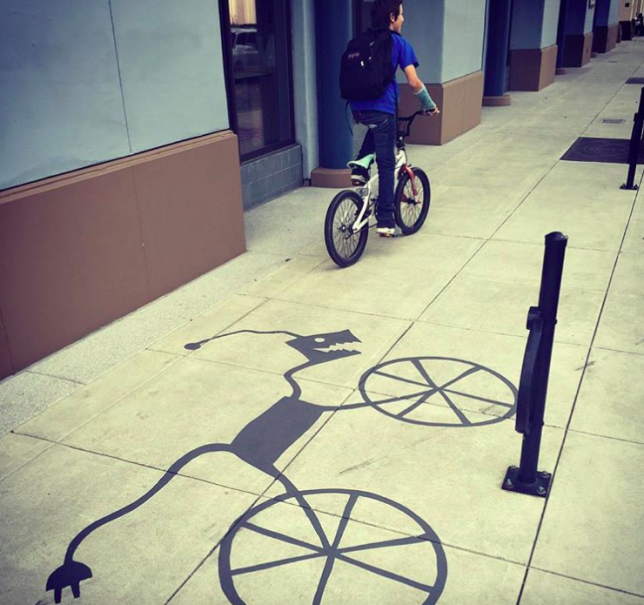
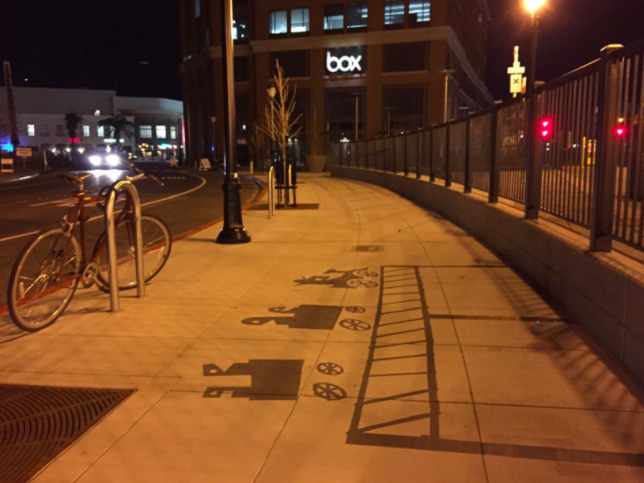
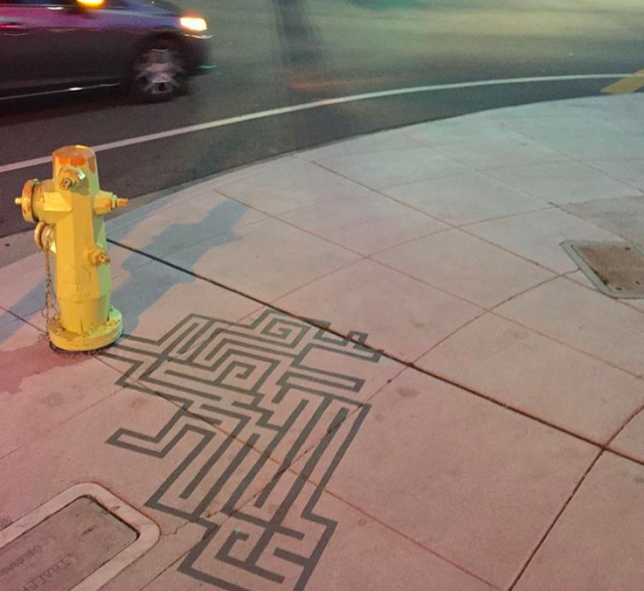
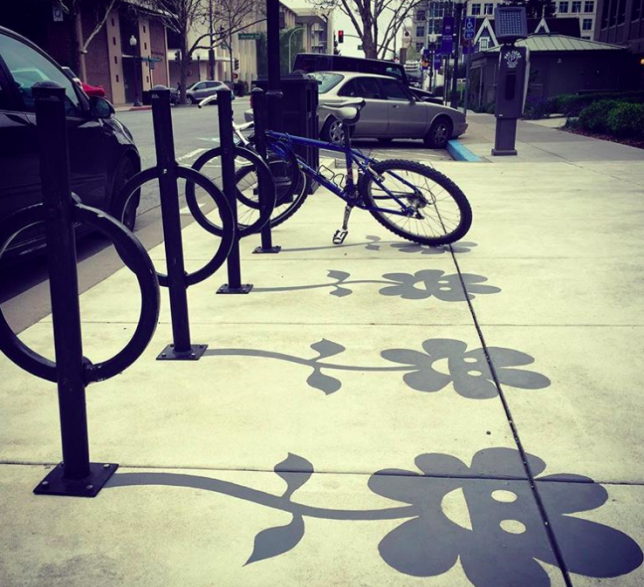
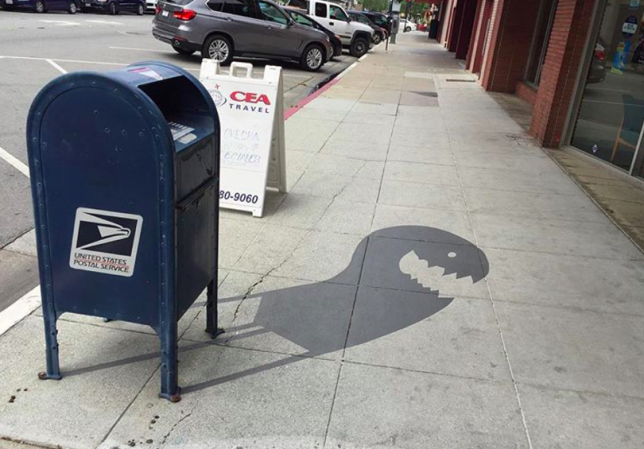
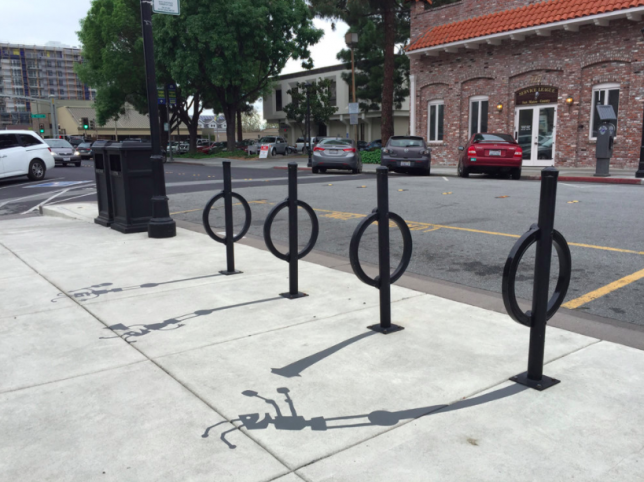
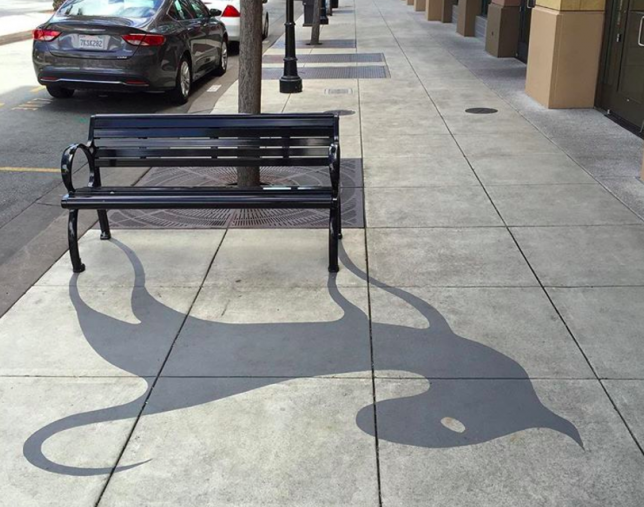
You might not even notice there’s anything unusual about these shadows until you’re right up on them, wondering why in the world a mailbox looks like a grinning monster, fearing that somebody slipped you a psychedelic drug. There’s nothing wrong with your perception of the world. You’re just lucky enough to spot one of Damon Belanger’s shadow art creations in the wild, painted on urban surfaces all over Redwood City, California. Depending on the time of day, the shadows can be surprisingly convincing, catching passersby off guard.

A public bench becomes a cat, a bicycle has a mind of its own and a cartoon train scoots along the top of a fence. A fire hydrant sprouts a maze, and smiling flowers grow from the bases of bike racks. The work was created in partnership with the Redwood City Improvement Association, and though it may be simple, it’s sweet, and a fun way to liven up public spaces. You can see more on Belanger’s Instagram.

“The shadow art has allowed me to bring out a more whimsical side of my art and allows me to play with shadows,” Belanger told the Daily Journal. “The shadows give regular mundane objects a lively spirit so people can have a little fun in their everyday lives.”

Share on Facebook


[ By SA Rogers in Art & Street Art & Graffiti. ]

[ WebUrbanist | Archives | Galleries | Privacy | TOS ]


WebUrbanist

 
Comments Off on Secrets in the Shadows: Urban Objects Transformed with Sidewalk Paint

Posted in Creativity


Video: Seven ‘hidden secrets’ in Adobe Lightroom

16 Jul

It’ll be a little while before Adobe can deliver on its recent promise to make Lightroom faster, but that doesn’t mean you can’t still figure out ways to make the program work faster for you. Case in point: photoshopCAFE founder Colin Smith has put together this really useful video outlining 7 ‘hidden secrets’ in Adobe Lightroom that will definitely help you get more out of the Raw editor.

Some of these tips are genuinely useful, and we’re going to guess that at least one or two of them will be new to you even if you’ve been using Lightroom for years.

Smith covers the tips in detail (and shows you how to use them) in the video above, but here’s the TL;DW version:

  1. Right click in the panels of the Develop module and enable ‘Solo Mode.’ This only allows one panel to stay open at a time, collapsing the rest.
  2. Click and drag your panel sidebar out to the left to make your sliders longer.
  3. Hold down Command (CTRL on Windows) and double click the center of a shape like a radial filter, and it will automatically snap to the edges of the photo you’re editing.
  4. Right click and uncheck to hide both modules and panels you don’t use.
  5. The Develop module doesn’t work on videos, but you can sync edits made to a single frame of that video onto the full thing. Just pull a frame, edit it, and then select the frame and video both and click Sync.
  6. You can turn any collection into a ‘Quick Collection’ by right clicking it and selecting ‘Set as Target Collection.’ Now you can curate photos into that collection with a single click.
  7. If you have multiple photos selected, you can still see the metadata for an individual photo without deselecting the bunch. Just click Metadata > Show Metadata for Target Photo Only.

And that’s it! Obviously these tips are easier to take in by actually watching the video, so click play, learn a little something and let us know which (if any) of these ‘hidden secrets’ were actually new to you.

Articles: Digital Photography Review (dpreview.com)

 
Comments Off on Video: Seven ‘hidden secrets’ in Adobe Lightroom

Posted in Uncategorized


7 Secrets of Black and White Photography

20 Apr

We’ve all heard it … “to master black and white photography you must learning to see in black and white” – but just how do you do that?

It can sometimes seem like actually learning to see in black and white is a skill for only the chosen few. But trust us, it’s for you too!

Here are seven (not-so-secret-anymore) secrets that will help you train your brain and expand your eye for the art of black and white photography.

(…)
Read the rest of 7 Secrets of Black and White Photography (844 words)


© Meg for Photojojo, 2017. |
Permalink |
No comment |
Add to
del.icio.us

Post tags:


Photojojo

 
Comments Off on 7 Secrets of Black and White Photography

Posted in Equipment


Japanese Joinery: Captivating Gifs Reveal Ancient Secrets of Wood Assembly

25 Jan

[ By WebUrbanist in Design & Furniture & Decor. ]

giffed

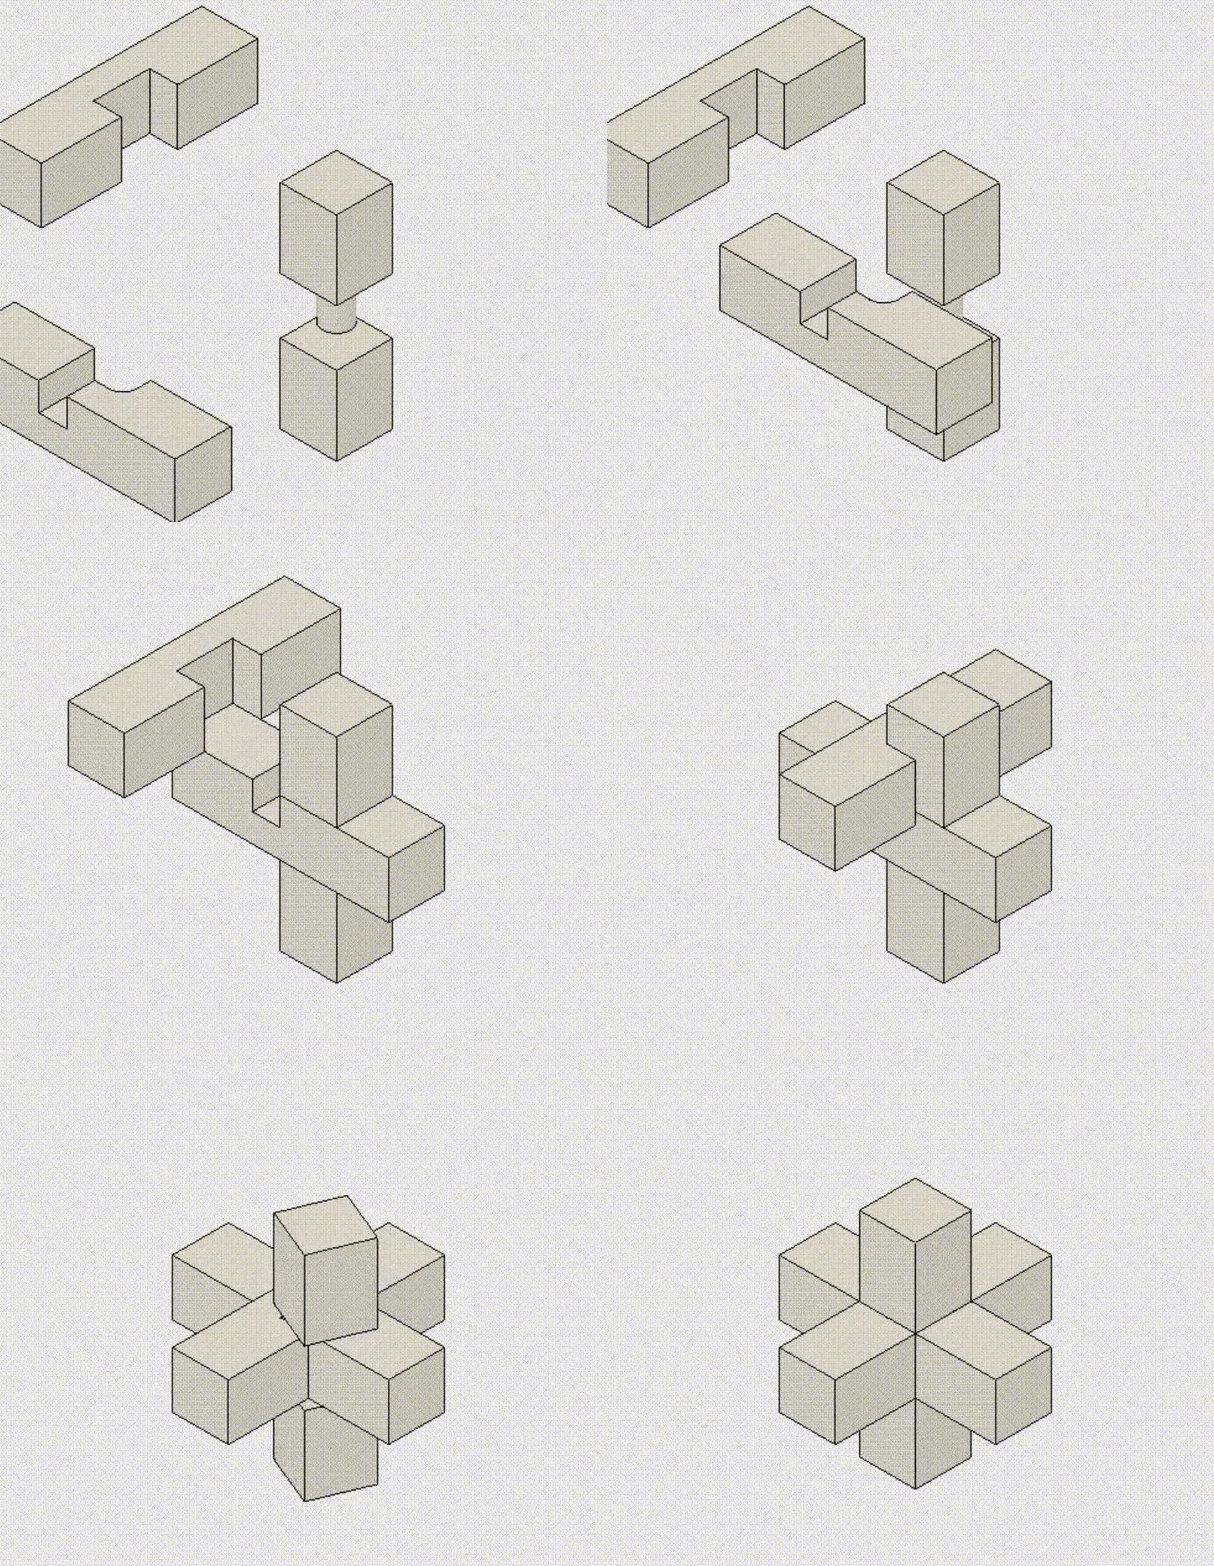
Before screws, nails, glue and other fasteners, joinery was a matter of complex interlocking forms that shaped not only the structure but also the aesthetic of what was built.

joinerygifs

For generations, Japanese wood craftsmen and their carpentry guilds were known to carefully protect trade secrets of their construction techniques. Even as the approaches found visual representation in print publications, it was often hard to visualize how they worked.

These animated 3D representations communicate the inner workings of these traditional techniques in a way that no static rendering or model could hope to do, depicting them in motion through the assembly process.

Created by a Japanese fan of woodworking, they were made using Fusion360 and derived from historical documents and precedents. He has so far posted dozens of these joinery techniques, many of them highly complex (featuring multiple interlocking parts, twists and turns).

While modern-day technologies have replaced historical joints in most everyday applications, they could also be positioned to bring them back into play — with 3D-printing devices readily available, the sophisticated cutting that used to be done by hand can be done by machine.

Share on Facebook


[ By WebUrbanist in Design & Furniture & Decor. ]

[ WebUrbanist | Archives | Galleries | Privacy | TOS ]


WebUrbanist

 
Comments Off on Japanese Joinery: Captivating Gifs Reveal Ancient Secrets of Wood Assembly

Posted in Creativity